Merlon
- Not to be confused with Mervin.
| Merlon | |
|---|---|
Sprite from Paper Mario: The Thousand-Year Door (Nintendo Switch) | |
| Species | Shaman |
| First appearance | Paper Mario (2000) |
| Latest appearance | Paper Mario: The Thousand-Year Door (Nintendo Switch) (2024) |
- “Where to begin...? My name...is Merlon. I am a wizard. When I was reading the stars the other day, an oracle came to me. What I discovered is very important, and it concerns you.”
- —Merlon, Paper Mario
Merlon is a wizard from the Paper Mario series. Although he is often depicted as stubborn and comical, Merlon's integral wisdom inherently shines through, especially in Super Paper Mario. He is named after the wizard of Arthurian legend, Merlin, as are most of his relatives. In the first three games in the Paper Mario series, Merlon's mustache is longer than in the previous one, but while his overall appearance changes, the clasp of his cloak always resembled a Star Point.
According to Wonky in Paper Mario: The Thousand-Year Door, Merlon's tribe would name people based on their job, and if multiple people had the same job, then they would be given the same name, implying that the Merlons that appear in the Paper Mario series are possibly separate individuals.
History[edit]
Paper Mario[edit]
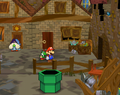
Merlon first appears as a supporting character in Paper Mario. Most of the time, he can be found in his house, which has a spinning roof and is located in front of the gates to Peach's Castle in Toad Town.
Merlon's help is required when several black Toads block the way to the Koopa Bros. Fortress. When Mario first tries to enter his house, Merlon knocks him unconscious for a brief moment when he slams open the door. Inside, Merlon attempts to relay a story to Mario, though puts him to sleep with his rambling. After this, Mario can guide him to the Toads, prompting Merlon to use his magic to blow away their disguises, revealing their true identities as the Koopa Bros., at which point they retreat to their fortress.

During Chapter 3, Merlon can be found standing outside of his house. If Mario speaks to him, he tells Mario of an oracle that spoke to him in his sleep, telling him to walk around a red palm tree. This serves as a hint toward obtaining the Quick Change badge, as doing this in Dry Dry Outpost prompts a nearby Dryite to inform Mario of a dream they had, indicating the badge's existence in Merlon's own house. Once the badge is revealed, Merlon tells Mario he was unaware of the badge being in his attic, and recommends he put it on.
When Mario returns to Merlon's house after Chapter 6, he and a Ninji request that he visit Merlon's son Merle in Starborn Valley. Merlon instructs Mario to travel to Shiver City first via the Toad Town Tunnels.
Throughout the game, Merlon can predict Mario's next path for five coins using his crystal ball.
There is a letter addressed to Merlon from his granddaughter Merlee on Mt. Rugged; delivering this letter with Parakarry rewards Mario with a Star Piece.
Merlon often states that he is not at home. At the beginning of Chapter 1, he is actually lying (because he is later seen in). But at the end of the game, this is truth, as he is seen in Peach's Castle attending the party with Merle, Merlee, his grandson Merlow, and his other granddaughter Merluvlee.
- Merlon's predictions
- For story predictions, see List of story predictions in Paper Mario.
Paper Mario: The Thousand-Year Door[edit]


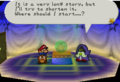
In Paper Mario: The Thousand-Year Door, Merlon is the neighbor of Professor Frankly in Rogueport. Mario can visit Merlon to have him upgrade one of Mario's partners for three Shine Sprites. Initially, Mario's partner can be upgraded to Super Rank. After Mario collects the Sapphire Star in Keelhaul Key and returns to Rogueport, he finds Merlon just outside his house. Merlon informs Mario about a portentous sign he saw for him upon consulting his star charts, but has no idea what it meant. The sign goes as follows:
"In the house of the dragon that flew through the air... Beyond the reversible stair... Near the empty black chest that cursed you...lies a clue to help your allies learn..."
Seeing its importance to Mario and his partners, Merlon asks Mario to figure out the mystery before going back into his house. To help Merlon, Mario must travel to Hooktail Castle in Petal Meadows and make his way to a room where he earlier uncovered a Black Key to find a crack in the rightmost wall. Using Admiral Bobbery's ability to blast a hole in the wall, Mario discovers a secret room, where he must hit a blue ! Block to reveal a chest containing an Up Arrow. Afterward, Mario must return to Rogueport and give the Up Arrow to Merlon, who then floats up until he crashes into the ceiling, releasing an Ultra Stone that falls to the floor. Merlon then realizes that the star sign was referring to the Ultra Stone, which he earlier picked up from a flea market but had forgotten that it was in the attic. With the Ultra Stone, Merlon can upgrade Mario's partners from Super Rank to Ultra Rank.
Super Paper Mario[edit]
- “Farewells are bittersweet... but as long as you live, you can never escape them. To feel sadness is to live, but as long as you are alive, the future is a blank page.”
- —Merlon, Super Paper Mario

Merlon appears again in Super Paper Mario, living in the town of Flipside; like most residents of this town, Merlon has a rather angular, disjointed appearance. In this game, Merlon has a larger role than in the previous installments. He tells Mario the prophecy of the Light Prognosticus and provides the first Pure Heart of the game. He has a distant cousin living in Flopside called Nolrem. He also gets a quick mention when Tippi is tattling Bestovius.
According to Garson, Merlon once fell in love with Saffron, the owner of Sweet Smiles. He went to her restaurant each day and wooed her constantly. Saffron agreed she would date him if he was able to finish her Saffron Special Galactic Meal, one of the most filling dishes ever made; it was said that Merlon finished all but a bit of parsley left on the plate when he received word that a poor, injured girl had mysteriously appeared in Flipside. Saffron suspended the challenge for Merlon to go help her, and he became engrossed in his studies ever since, never having the chance to return to complete it. As well as wooing Saffron, Merlon spent some of his free time at the Flipside Arcade, where he has a high score of 400000 in Forget Me Not.
Merlon was responsible for saving Tippi's life when she apparently wandered into Flipside by turning her into a Pixl. He is able to revive her after she falls unconscious following Chapter 4 and makes it clear that he cares a great deal for her and her well-being, as he requests that Mario and his friends be sure to take care of her and reminds Tippi to return to him in one piece prior to her trip to Castle Bleck. Following the defeat of the final boss and the restoration of all worlds, Merlon questions Peach as to whether Tippi is happy where she is now, and Peach responds by assuring him she is.
In Chapter 8-2, Mimi, one of Count Bleck's minions, disguises as Merlon and tells the heroes that the Light Prognosticus says to hit a "totally unsuspicious block". Upon doing so, a trapdoor opens from underneath the heroes and they fall into a trap.
If the player visits Merlon's house after purchasing Tiptron, he will initially mistake her for Tippi before dishearteningly realizing she is only one of Francis's creations. After recounting the love many felt for Tippi, he will request that Mario and Co. take good care of her replica. Merlon's Catch Card can be found on the first floor of the Flipside Outskirts, at the bottom of a hidden hole.
If Mario refuses the first Pure Heart three times when Merlon offers it to him at the beginning of the game, he will receive a Game Over before the player is even given control of Mario.
Profiles[edit]
Paper Mario[edit]
- Tattle: "He's a stubborn and mysterious old man. His name is Merlon. He uses magical powers to look into the future. I've listened to his stories before and they're really long. I try to pay attention but... sometimes I fall asleep. Still, his fortune-telling is supposedly right on. I don't know personally, but Goompa told me."
Paper Mario: The Thousand-Year Door[edit]
- Tattle: "That's Merlon. He's this odd old man who says really bizarre things sometimes. He helps power up your allies here. For three Shine Sprites, he raises a partner one rank."
Super Paper Mario[edit]
- Tattle: "That's Merlon... He's a descendant of the Ancients who led us here... He toils to protect the world from destruction, the Light Prognosticus as his guide... He's the source of knowledge in Flipside. Most people here put their trust in him..."
| Catch Card | |
|---|---|
 |
|
Gallery[edit]

Merlon in Paper Mario
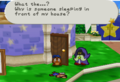
Merlon finds Mario outside of his house in Paper Mario
Merlon begins to tell Mario his story in Paper Mario
Merlon outside his house in Paper Mario: The Thousand-Year Door

Artwork from Super Paper Mario

Sprite from Super Paper Mario

Catch Card from Super Paper Mario
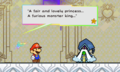
Mario meeting Merlon in Super Paper Mario

Artwork from Paper Mario: The Thousand-Year Door (Nintendo Switch)
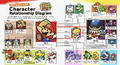
Merlon on the Nintendo Magazine for summer 2024, showing a relationship chart featuring many characters from Paper Mario: The Thousand-Year Door


Names in other languages[edit]
| Language | Name | Meaning | Note(s) | Ref. |
|---|---|---|---|---|
| Japanese | デアール Deāru |
From「である」(de aru), a more formal variation of「だ」(da, "to be"), which is most commonly seen in formal writing such as literature and encyclopedias; following the format of「スペール」(Supēru, "Shaman") | [?] | |
| Chinese (Simplified) | 莫隆 Mòlóng |
From the English name | Paper Mario | [1] |
| 德亚儿 Déyàer |
From the Japanese name | The Thousand-Year Door remake | [?] | |
| Chinese (Traditional) | 德亞兒 Déyàer |
From the Japanese name | [?] | |
| Dutch | Merlon | - | [?] | |
| French | Merlon | - | [?] | |
| German | Merlon | - | [?] | |
| Italian | Merlocchio | Portmanteau of Merlino ("Merlin") and occhio ("eye") | [?] | |
| Korean | 라네르 Ranereu |
From "라네" (-rane), a polite ending to a sentence commonly used by elderly people or in literature, and his Japanese name | [?] | |
| Spanish | Merlón | Merlon | [?] |
Notes[edit]
- In Super Paper Mario, Merlon plays a similar role to Professor Frankly from Paper Mario: The Thousand-Year Door, as they are both wise old men who aid Mario in his adventure and bear some relation to his Tattle partner.
- In some localizations of Super Paper Mario and its advergame, Merlon is stated to be the mayor of Flipside.
- In his artwork for the Nintendo Switch remake of Paper Mario: The Thousand-Year Door, Merlon has three feet as a result of being rendered in the equivalent of a T-pose as opposed to his idle state. This error has yet to be corrected.
References[edit]
- ^ From iQue's localization of Paper Mario: November 9, 2019. 神游纸片马力欧速通. Bilibili (Chinese). Retrieved April 27, 2024.
| Shamans |
|---|
| Bestovius • Chet Rippo • Merle • Merlee • Merlon • Merlow • Merluvlee • Nolrem • Old Man Watchitt • Tribe of Ancients (Merlight • Merlimbis • Merloo • Merlumina) |