Mario Kart DS: Difference between revisions
(That message was primarily about making it look good on smaller screens, which I took into account. As these are, they are listed vertically, which is outright confusing, and being able to tell which map goes where on the fly without having to change pages is also useful. The media files also help to add character and ease of telling-where-things-go. I know it's a big change, but I'd direct you to Nintendo101's various improvements on 3D game pages, particularly SMG. If issue, talk page please) Tag: Manual revert |
|||
| (313 intermediate revisions by 81 users not shown) | |||
| Line 1: | Line 1: | ||
{{italic title}} | {{italic title}} | ||
{{ | {{game infobox | ||
|image=[[File:MKDS NA Box Art.png|270px]] | |||
|image=[[File: | |||
|developer=[[Nintendo Entertainment Analysis and Development|Nintendo EAD]] | |developer=[[Nintendo Entertainment Analysis and Development|Nintendo EAD]] | ||
|publisher=[[Nintendo]] | |publisher=[[Nintendo]] | ||
| | |release='''Nintendo DS''':<br>{{release|USA|November 14, 2005|Australia|November 17, 2005|Europe|November 25, 2005|Japan|December 8, 2005|HK|December 8, 2005<ref>{{cite|author=Akfamilyhome|date=April 1, 2020|url=https://www.youtube.com/watch?v=IToY_73pRHU|publisher=YouTube|title=A History of Nintendo's Hong Kong Releases|language=Chinese (English subtitles available)|archive=https://web.archive.org/web/20240525112253/https://www.youtube.com/watch?v=IToY_73pRHU|accessdate=June 5, 2024}}</ref>|ROC|December 8, 2005|South Korea|April 5, 2007}} '''Virtual Console (Wii U)''':<br>{{release|Europe|April 1, 2015|Australia|April 2, 2015|USA|April 23, 2015|Japan|May 25, 2016}} | ||
|languages={{languages|en_us=y|es_es=y|fr_fr=y|de=y|it=y|jp=y|kr=y}} | |||
|genre=[[Mario Kart (series)|Racing]] | |genre=[[Mario Kart (series)|Racing]] | ||
|modes=Single player<br> | |modes=Single player<br>Local Wireless Play: 2–8 players<br>Wi-Fi Connection: 2-4 players | ||
|ratings={{ratings|esrb=E|pegi=3|acb=G|cero=A}} | |ratings={{ratings|esrb=E|pegi=3|acb=G|cero=A|usk=0}} | ||
|platforms=[[Nintendo DS]], [[Virtual Console]] ([[Wii U]]) | |platforms=[[Nintendo DS]], [[Virtual Console]] ([[Wii U]]) | ||
| | |format={{format|ds=1|wiiudl=1}} | ||
|input={{input| | |input={{input|ds=1|stylus=1|dsmicrophone=1|wiiu=1}} | ||
|ids=NTR-AMCE-USA (North America) | |||
}} | }} | ||
'''''Mario Kart DS''''' is a [[Nintendo DS]] | '''''Mario Kart DS''''' is a racing game in the ''[[Mario Kart (series)|Mario Kart]]'' series for the [[Nintendo DS]], developed and published by [[Nintendo]]. ''Mario Kart DS'' was released first in North America, on November 14, 2005, and is the only mainline ''Mario Kart'' game to be released first in North America. Unlike its predecessor, ''[[Mario Kart: Double Dash!!]]'', it retains the traditional single-driver kart racing elements in the ''Mario Kart'' series, where players race against seven competitors in obstacle tracks, using item-based weaponry to gain further advantages over their opponents. It is the first handheld ''Mario Kart'' title to use live-rendered 3D graphics for most of the objects in the game, including characters, vehicles, and racetracks. | ||
''Mario Kart DS'' expands and introduces mechanics that would later become the standard in future titles, | ''Mario Kart DS'' expands and introduces mechanics that would later become the standard in future titles, most notably the Retro Grand Prix, and the advent of retro courses in general, that revamps tracks from all previous titles from the ''Mario Kart'' series. ''Mario Kart DS'' supports both single pak and multi-pak gameplay via DS Download Play, and is the first ''Super Mario'' title to support [[Nintendo Wi-Fi Connection]], allowing players to race against opponents by using online services across the world. On May 20, 2014, the Nintendo Wi-Fi Connection has been discontinued, making online play no longer possible. | ||
''Mario Kart DS'' has its own mechanics that are not available in other ''Mario Kart'' games, such as customizing [[emblem]]s for the vehicles, and the [[#Missions|Missions mode]], in which racers are tasked to complete objectives in a short series of events. The game also makes use of the Nintendo DS's features, using the bottom screen to display other HUD elements such as two types of maps, character order, and what items their opponents have. | |||
== | On April 23, 2015, ''Mario Kart DS'' became available for purchase for the [[Wii U]]'s [[Virtual Console]] service via the [[Nintendo eShop]] until March 27, 2023 after the service's discontinuation. Players who purchased the title before this date can still play it as long as it is on their Wii U device. The Virtual Console version is only playable in single-player mode. | ||
=== | |||
A | ==Controls== | ||
===Menu controls=== | |||
*{{button|ds|Pad}} - Scroll | |||
*{{button|ds|A}} - Select | |||
*{{button|ds|B}} - Back | |||
*{{button|ds|Stylus}} - Tap selection | |||
===Race controls=== | |||
*{{button|ds|A}} - Accelerate/[[Rocket Start]] (hold at 2 during the countdown before the race starts) | |||
*{{button|ds|B}} - Brake/reverse | |||
*{{button|ds|L}}/{{button|ds|X}} - Use current Item/Stop Item Roulette/Equip Item | |||
*{{Button|Padleftright}} - Steer | |||
*{{button|ds|L}}/{{button|ds|X}} + {{Button|Padupdown}} - Throw items backward or forward. | |||
*{{button|ds|R}} - Hop/Powerslide/[[Drift]] (Hold)/[[Mini-Turbo]] (Release) | |||
*{{button|ds|Stylus}}/{{button|ds|Y}} - Change map view (does not work in Mission Mode) | |||
*{{button|ds|start}} - Pause/resume game | |||
*{{button|ds|select}} - Blow [[Balloon]] ([[Mario Kart (series)#Balloon Battle|Balloon Battle]]), Toggle arrows/Mushrooms on/off ([[Mario Kart (series)#Modes of play|Time Trial]]) | |||
*{{button|ds|mic}} - Blow Balloon (Balloon Battle) | |||
===Wii U Menu controls=== | |||
*{{button|wiiu|Pad}} - Scroll | |||
*{{button|wiiu|A}} - Select | |||
*{{button|wiiu|B}} - Back | |||
*{{button|wiiu|Stylus}} - Tap selection | |||
===Wii U Race controls=== | |||
*{{button|wiiu|A}} - Accelerate/Rocket Start (hold at 2 during the countdown before the race starts) | |||
*{{button|wiiu|B}} - Brake/reverse | |||
*{{button|wiiu|L}}/{{button|wiiu|X}} - Use current Item/Stop Item Roulette/Equip Item | |||
*{{button|Padleftright}} - Steer | |||
*{{button|Padupdown}} - Throw items backward or forward. | |||
*{{button|wiiu|R}} - Hop/Powerslide/Drift (Hold)/Mini-Turbo (Release) | |||
*{{button|wiiu|Stylus}}/{{button|wiiu|Y}} - Change map view (does not work in Mission Mode) | |||
*{{button|wiiu|Plus}} - Pause/resume game | |||
*{{button|wiiu|Minus}} - Blow Balloon (Balloon Battle), Toggle arrows/Mushrooms on/off (Time Trial) | |||
*{{button|wiiu|mic}} - Blow Balloon (Balloon Battle) | |||
==Game modes== | |||
[[File:MKDS Full Roster Title Screen.png|thumb|The title screen after the game's completion.]] | |||
As in ''[[Mario Kart 64]]'' and ''[[Mario Kart: Double Dash!!]]'', the game introduced sixteen courses for the four main cups: [[Mushroom Cup]], [[Flower Cup]], [[Star Cup]], and [[Special Cup]], which are collectively known as the nitro cups. The game also includes sixteen courses that appeared in earlier ''Mario Kart'' games and are part of the retro cups: [[Shell Cup]], [[Banana Cup]], [[Leaf Cup]], and the [[Lightning Cup]]. These cups are sorted by difficulty in the same way as the nitro cups. | |||
In every retro cup, each of the four courses originate from a different ''[[Mario Kart (series)|Mario Kart]]'' game. Every retro cup has their courses ordered in the same way as the release order of the four previous ''Mario Kart'' games. Furthermore, every retro course's name starts with an abbreviation of the game console that their originating game was released for: | |||
*[[Super Nintendo Entertainment System|SNES]], which represents ''[[Super Mario Kart]]'' | |||
*[[Nintendo 64|N64]], which represents ''Mario Kart 64'' | |||
*[[Game Boy Advance|GBA]], which represents ''[[Mario Kart: Super Circuit]]'' | |||
*[[Nintendo GameCube|GCN]], which represents ''Mario Kart: Double Dash!!'' | |||
Starting with the following ''Mario Kart'' game, ''[[Mario Kart Wii]]'', stages originating from ''Mario Kart DS'' were included as retro courses and were represented by the abbreviation "[[Nintendo DS|DS]]". | |||
===Grand Prix=== | |||
Grand Prix is a single player-exclusive mode. In it, a player competes in each cup in 50cc, 100cc, 150cc, and Mirror 150cc engine classes, with ascending speed and difficulty. The game reuses the point system of ''Mario Kart: Double Dash!!'' by awarding 10/8/6/4/3/2/1/0 points for first to eighth place respectively. Similarly to ''Mario Kart: Super Circuit'', a rating of how well a player performed is shown after the trophy presentation, from highest to lowest: ★★★, ★★, ★, A, B, C, D and E. An overall "game ranking" of ★, ★★, or ★★★ is shown in the Records area if the player has earned the designated rating in every cup and class. | |||
=== | ===Time Trial=== | ||
Time Trial is a single player-exclusive mode. In it, the player's character races to complete a course in the fastest time. The item rating of a [[#Karts|kart]] determines how many [[Dash Mushroom|Mushroom]]s the racer can have once they start the race; vehicles with low item rate can only use one Mushroom; the ones with average item rate use two and the ones with high item rate use three. Players can choose to race against their best time as a [[Ghost (Mario Kart series)|Ghost]], the Staff Ghost (raced by a Japanese Nintendo staff player with a * game ranking), or no Ghost. The game can download records from other players, allowing the player's character to race their Ghosts. | |||
=== | ===VS=== | ||
In VS mode (single or multiplayer), player(s) choose their [[Kart]]s and head out on the race track. They can earn points based of their finish position in each race. The player can also choose what course they race on (provided they've unlocked it). Up to eight players can play locally via wireless - simple mode only uses one game card but is limited. The essential requirement is that everyone has a DS or 3DS system. In VS mode, the player can choose the engine class, the [[MarioWiki:Glossary#C|CPU]]'s difficulty level, the way the courses will be chosen - by the player, in order or random; the rules to win races (either free - infinite races; number of wins from 1 to 10 - where only the first racer earns points, or the number of races from 1 up to 32 (functions similarly to the [[All-Cup Tour]] from ''Mario Kart: Double Dash!''), and team race mode. | |||
It is possible to have up to eight players play using just one ''Mario Kart DS'' game card - using the DS Download Play locally. Here, only the Mushroom Cup and Shell Cup tracks are playable, and everyone except the host must play as a random color of Shy Guy, in which he becomes playable then. If everyone has a game card, all tracks are available and there are no limitations. | |||
When playing in VS races where players place for a set number of races rather than for a set number of wins, players score points based off their finish position. If the game is being played in teams, the amount of points each player earns for each race is multiplied by about 1.5. The point system is the same as the one used in Wi-Fi when playing with 2-4 players and the one used in Grand Prix when playing with 8 players or with CPU opponents. However, when playing with 5-7 players, the distribution is as follows: | |||
{|class="wikitable" | |||
!colspan=9|'''Point spread''' | |||
| | |||
! | |||
|- | |- | ||
!Number of players!!1st!!2nd!!3rd!!4th!!5th!!6th!!7th!!8th | |||
|- | |- | ||
| | |'''2 players'''||<span style="color:#0000FF">10</span>||5||-||-||-||-||-||- | ||
--- | |||
| | |||
| | |||
|- | |- | ||
| | |'''3 players'''||<span style="color:#0000FF">10</span>||7||4||-||-||-||-||- | ||
--- | |||
| | |||
| | |||
|- | |- | ||
| | |'''4 players'''||<span style="color:#0000FF">10</span>||<span style="color:green">7</span>||4||1||-||-||-||- | ||
| | |||
| | |||
|- | |- | ||
| | |'''5 players'''<ref>[https://youtu.be/z6A0ZIWyouc?t=118 Point System for 5 Players.]</ref>||<span style="color:#0000FF">10</span>||<span style="color:green">8</span>||5||2||0||-||-||- | ||
| | |||
|- | |- | ||
| | |'''6 players'''<ref>[https://youtu.be/5ULBDigX0MU?t=134 Point System for 6 Players.]</ref>||<span style="color:#0000FF">10</span>||<span style="color:green">8</span>||<span style="color:green">6</span>||3||1||0||-||- | ||
| | |||
| | |||
|- | |- | ||
| | |'''7 players'''<ref>[https://youtu.be/4-GyAdxLfKw?t=245 Point System for 7 Players.]</ref>||<span style="color:#0000FF">10</span>||<span style="color:green">8</span>||<span style="color:green">6</span>||4||2||1||0||- | ||
- | |||
| | |||
| | |||
|- | |- | ||
| | |'''8 players'''||<span style="color:#0000FF">10</span>||<span style="color:green">8</span>||<span style="color:green">6</span>||4||3||2||1||0 | ||
-- | |} | ||
[[File: | *'''<span style="color:#0000FF">Blue</span>''' text indicates winning results. | ||
| | *'''<span style="color:green">Green</span>''' text indicates moderate results. | ||
*'''Black''' text indicates losing results. | |||
|- | |||
===Battle=== | |||
--- | In Battle mode, there are six battle stages, four of which are original and two of which are from earlier ''Mario Kart'' games: | ||
[[ | <gallery heights=80> | ||
| | MKDS Nintendo DS Course Icon.png|[[Nintendo DS (battle course)|Nintendo DS]] | ||
MKDS Twilight Shore Course Icon.png|[[DS Twilight House|Twilight House]]{{footnote|main|*}} | |||
MKDS Palm Shore Course Icon.png|[[DS Palm Shore|Palm Shore]]{{footnote|main|*}} | |||
MKDS Tart Top Course Icon.png|[[Tart Top]] | |||
MKDS N64 Block Fort Course Icon.png|[[Block Fort]]{{footnote|main|*}} | |||
MKDS GCN Pipe Plaza Course Icon.png|[[Pipe Plaza]] | |||
</gallery> | |||
{{footnote|note|*|Not playable in the simple version of multiplayer mode.}} | |||
In single player mode, the user faces CPU controlled racers, whose difficulty can be set in the battle's setup menu. All racers drive their respective standard Kart only within this mode (note that all the standard karts have the same stats in battle mode and only the weight will differ, depending on the weight of the character chosen). Additionally, other players can join a battle locally. However, Battle Mode is unavailable on [[#Nintendo Wi-Fi Connection mode|the Wi-Fi mode]]. Like in versus, battles can also be played in teams, and rounds in team battles end when all of one team's players have been eliminated. | |||
''Mario Kart DS'' is the only ''Mario Kart'' game to exclude console abbreviations from the names of its retro battle courses; in other words, the game does not name Block Fort and Pipe Plaza as <small>N64</small> Block Fort and <small>GCN</small> Pipe Plaza respectively. Additionally, the retro battle courses do not retain their music from their original appearances, instead using the same music as the nitro battle courses. | |||
====Balloon Battle==== | |||
[[File:MKDSPalmShore.png|thumb|Mario in a Balloon Battle at [[DS Palm Shore|Palm Shore]].]] | |||
The classic battle mode seen in all ''Mario Kart'' mainstream, gets a new twist in ''Mario Kart DS''. From previous games, racers begin a match with three balloons. In this game, however, all players begin with a single balloon, though they can get more by blowing up their balloons using the [[Nintendo DS#Microphone|microphone]] feature on the DS, or just holding the {{button|gba|select}} button. Each player has four balloons in stock (five in total) and racers can hold up to three balloons in battle. On the other hand, the less balloons a player has, the more powerful items they will obtain from the Item Boxes. Racers may also take possession of a balloon from their opponents if the thief has used a [[Dash Mushroom|Mushroom]] and made contact to the opponent's kart. If the player loses all their balloons they are eliminated. | |||
The following is what the game describes this mode as: | |||
<blockquote>''Burst your opponents' balloons with items! If all your inflated balloons burst, you lose! Blow into the mic to inflate your balloons!''</blockquote> | |||
====Shine Runners==== | |||
Adopted from the ''[[Mario Kart: Double Dash!!]]'' [[Battle Mode#Shine Thief|version]], nine [[Shine Sprite]]s are scattered onto the course at the beginning. Players need to capture the Shine Sprites, and to avoid being hit, as it causes a player to lose one sprite. The sprite then moves to a random spot for someone else to grab. In the meantime, a clock ticks down to zero. Anyone with or tied with the lowest Shine total when the clock hits zero is eliminated. The clock resets itself to a lower time and the battle continues until at least one is left (there are nine sprites to avoid a tie, but it is possible to have two players with four sprites each or four players with two sprites each or all eight players with one sprite each trying to get that last one on the course when time expires, or have three players with three sprites each; in either case, no one is eliminated and the clock resets as usual). The less sprites a player has, the better an item is obtained (Spiny Shells and Bullet Bills remain out). Shine Runners is almost the same as Coin Runners in ''[[Mario Kart Wii]]'', ''[[Mario Kart 7]]'' and ''[[Mario Kart 8 Deluxe]]'', but instead of [[Shine Sprite]]s, they use [[coin]]s. | |||
<blockquote>''Collect more Shines than anyone else! Steal opponents' Shines to add to your total. Those with less Shines get booted over time.''</blockquote> | |||
===Missions=== | |||
[[File:Mario Kart DS Big Bully.png|thumb|[[Yoshi]] battling [[Big Bully]] in Mission Mode.]] | |||
Missions mode is a new single-player mode for ''Mario Kart DS'' in which the player must complete some tasks and earn a ranking similarly to that in Grand Prix mode. It involves seven levels, each containing eight "missions" and a boss battle, most of which are taken from ''[[Super Mario 64 DS]]''. The ranks almost always depend on how much time is left or taken. There are varying mission types: | |||
*Driving through gates - driving in between giant half wheels in the ground. Very often the player has to pass these gates in numerical order. | |||
*Collecting coins - Players must pick up all the coins set in the track. Players may lose these coins by some obstacle of such course. | |||
*Destroying item boxes - Players must run over [[Item Box]]es. Usually the racer will obtain Mushrooms after taking a box. In some cases, Item Boxes will move, and the player will have to catch up with it. Other missions the player must take care not to pick up the [[Fake Item Box]]es alongside real ones. | |||
*Using Stars, Bob-ombs, or shells to destroy enemies. | |||
*Driving backwards - players must use the {{button|ds|B}} button to move, and directions on the {{button|ds|pad}} are reversed. It is sometimes combined with other mission types. | |||
*Performing power boosts within a certain lap - as said. More power boosts are often required to finish faster, meaning a higher ranking. | |||
*Racing a CPU player for one lap - item boxes contain Mushrooms and Stars that the CPU cannot use - the key to win. CPU players will always perform a [[Rocket Start]]. This mission type also includes a race against a Red Car and a [[Chain Chomp]]. | |||
*Boss Battle - Unlocked after completion of the first eight missions in a level. The racer is usually required to use items in boss battles. Every boss is from ''[[Super Mario 64 DS]]'', and each of them have their own battlefield stage and require a different strategy to defeat. | |||
There are some one-time isolated missions that are self-explanatory. Each mission takes place on a course, often blocked off in some areas (sometimes even a battle course) and players are given a character in their own standard kart (CPU players are also in standard karts). None of the unlockable characters are playable, and [[Bowser]] and [[Donkey Kong]] do not fight a boss. Sometimes Mushrooms are laid across the track to help the player to complete the mission. When at least a ★ ranking is achieved on all missions and bosses in the first six levels, Level 7 is unlocked. When the boss battles of Level 6 and 7 are completed, the first version of the staff credits is shown. | |||
====Missions table==== | |||
The following table includes the mission number, in-game mission description, time limit for the mission (0:00 signifies it is a race, and the mission finishes at 2:00 if the race is not completed), course, character the player plays as, and item distribution used. For a list of the item sets used, see [[Mario Kart DS item probability distributions#Special cases|here]]. CPU opponents always use set 1. | |||
{|class="wikitable"style="width:100%;max-width:100em" | |||
|- | |||
|-class=expandable | |||
!colspan="6"|Level 1 | |||
|- | |||
!Mission!!Description!!Time limit!!Track!!Character!!Item set | |||
|- | |||
|style=width:3%|1-1||style="text-align:left;"|''Drive through all '''5 numbered gates''' in order!''||0:35||style="width:20%"|Figure-8 Circuit||style="width:8%"|Mario||N/A | |||
|- | |||
|style=width:3%|1-2||style="text-align:left;"|''Collect all '''15 coins'''!''||style="width:5%"|0:30||<small>GBA</small> Peach Circuit||Peach||N/A | |||
|- | |||
|style=width:3%|1-3||style="text-align:left;"|''Destroy all '''10 item boxes'''!''||0:45||Yoshi Falls||Yoshi||2 | |||
|- | |- | ||
| | |style=width:3%|1-4||style="text-align:left;"|''Get the Star and use it to hit '''5 Cheep Cheeps'''!''||0:40||Cheep Cheep Beach||Wario||4 | ||
- | |||
| | |||
| | |||
|- | |- | ||
| | |style=width:3%|1-5||style="text-align:left;"|''Drive through all '''6 numbered gates''' in order!''||0:30||Nintendo DS||Toad||N/A | ||
- | |||
| | |||
| | |||
|- | |- | ||
| | |style=width:3%|1-6||style="text-align:left;"|''Drive out of the [[DS Luigi's Mansion|mansion]]...'''backward'''!''||0:45||Luigi's Mansion||Luigi||N/A | ||
- | |||
| | |||
|- | |- | ||
| | |style=width:3%|1-7||style="text-align:left;"|''Collect all '''20 coins'''!''||0:35||<small>N64</small> Moo Moo Farm||DK||3 | ||
- | |||
| | |||
| | |||
|- | |- | ||
| | |style=width:3%|1-8||style="text-align:left;"|''Perform '''4 power-slide turbo boosts''' in '''1 lap'''!''||0:45||<small>SNES</small> Mario Circuit 1||Mario||N/A | ||
- | |||
| | |||
| | |||
|- | |- | ||
| | |style=width:3%|Boss||style="text-align:left;"|''Use Mushrooms to crash into the [[Big Bully]] and '''knock him off the stage'''!''||3:00||[[List_of_boss_arenas_in_Mario_Kart_DS#Water Arena|Water Arena]]*||Yoshi||3 | ||
|-class=expandable | |||
[[ | !colspan="6"|Level 2 | ||
| | |||
|- | |- | ||
|align=" | |style=width:3%|2-1||style="text-align:left;"|''Crash into all '''10 wooden crates''' and destroy every one!''||style="width:5%"|0:55||style="width:20%"|Delfino Square||style="width:8%"|Wario||N/A | ||
| | |||
| | |||
|- | |- | ||
| | |style=width:3%|2-2||style="text-align:left;"|''Collect all '''10 coins'''!''||0:30||Figure-8 Circuit||Yoshi||N/A | ||
- | |||
| | |||
| | |||
|- | |- | ||
| | |style=width:3%|2-3||style="text-align:left;"|''Drive through all '''5 numbered gates''' in order!''||0:45||<small>SNES</small> Donut Plains 1||DK||N/A | ||
- | |||
| | |||
| | |||
|- | |- | ||
| | |style=width:3%|2-4||style="text-align:left;"|''Destroy all '''5 item boxes'''!''||0:35||Luigi's Mansion||Luigi||2 | ||
- | |||
| | |||
| | |||
|- | |- | ||
| | |style=width:3%|2-5||style="text-align:left;"|''Collect all '''20 coins'''!''||0:30||Cheep Cheep Beach||Peach||N/A | ||
- | |||
| | |||
| | |||
|- | |- | ||
| | |style=width:3%|2-6||style="text-align:left;"|''Use Bob-ombs to destroy all '''5 Pokeys'''!''||0:55||Desert Hills||Wario||9 | ||
- | |||
| | |||
| | |||
|- | |- | ||
| | |style=width:3%|2-7||style="text-align:left;"|''Drive through all '''10 numbered gates''' in order!''||0:55||<small>GCN</small> Luigi Circuit||Toad||2 | ||
- | |||
| | |||
| | |||
|- | |- | ||
| | |style=width:3%|2-8||style="text-align:left;"|''Perform '''6 power-slide turbo boosts''' in '''3 laps'''!''||0:55||<small>GCN</small> Baby Park||Peach||4 | ||
- | |- | ||
|style=width:3%|Boss||style="text-align:left;"|''Hit the [[Eyerok]]'s eyeball '''3 times''' with shells!''||5:00||[[List_of_boss_arenas_in_Mario_Kart_DS#Sand Arena|Sand Arena]]*||Mario||11 | |||
| | |-class=expandable | ||
!colspan="6" | Level 3 | |||
| | |- | ||
|style=width:3%|3-1||style="text-align:left;"|''Destroy all '''5 item boxes'''!''||style="width:5%"|0:50||style="width:20%"|Waluigi Pinball||style="width:8%"|Wario||4 | |||
|- | |||
|style=width:3%|3-2||style="text-align:left;"|''Drive through all '''5 numbered gates''' in order...'''backward'''!''||0:50||Delfino Square||Bowser||N/A | |||
|- | |||
|style=width:3%|3-3||style="text-align:left;"|''Collect all '''15 coins''' while avoiding the Chain Chomp!''||0:25||<small>GCN</small> Luigi Circuit||Luigi||N/A | |||
|- | |||
|style=width:3%|3-4||style="text-align:left;"|''Reach the finish before '''Yoshi'''!''||0:00||Yoshi Falls||Peach||8 | |||
|- | |||
|style=width:3%|3-5||style="text-align:left;"|''Drive through all '''8 numbered gates''' in order!''||0:45||<small>GCN</small> Pipe Plaza||Yoshi||N/A | |||
* | |||
= | |||
== | |||
= | |||
|- | |- | ||
! | |style=width:3%|3-6||style="text-align:left;"|''Hit Monty Moles with shells '''5 times'''!''||1:05||<small>N64</small> Moo Moo Farm||Luigi||11 | ||
|- | |- | ||
| | |style=width:3%|3-7||style="text-align:left;"|''Perform '''10 power-slide turbo boosts''' in '''1 lap'''!''||1:10||Shroom Ridge||DK||N/A | ||
|- | |- | ||
| | |style=width:3%|3-8||style="text-align:left;"|''Collect all '''20 coins'''!''||1:05||Twilight House||Mario||N/A | ||
|- | |- | ||
| ''' | |style=width:3%|Boss||style="text-align:left;"|''Reach the finish before '''[[Goomboss]]'''!''||0:00||<small>GCN</small> Baby Park||Toad||N/A | ||
|-class=expandable | |||
!colspan="6"|Level 4 | |||
|- | |- | ||
| | |style=width:3%|4-1||style="text-align:left;"|''Reach the finish before '''Donkey Kong'''!''||0:00||DK Pass**||Wario||8 | ||
|- | |- | ||
| | |style=width:3%|4-2||style="text-align:left;"|''Blast '''20 crabs'''!''<sub>1</sub>||2:00||Palm Shore||Yoshi||10 | ||
|- | |- | ||
| | |style=width:3%|4-3||style="text-align:left;"|''Reach the finish before the '''red car'''!''||0:00||Shroom Ridge||Mario||3 | ||
|- | |- | ||
|style=width:3%|4-4||style="text-align:left;"|''Drive through all '''7 numbered gates''' in order!''||0:45||Desert Hills||Wario||3 | |||
|style=width:3%| | |||
| | |||
| | |||
|- | |- | ||
|style=width:3%| | |style=width:3%|4-5||style="text-align:left;"|''Collect all '''15 coins'''. If you get squished by a Thwomp, you fail!''||0:30||<small>GBA</small> Bowser Castle 2||Bowser||N/A | ||
|- | |- | ||
|style=width:3%| | |style=width:3%|4-6||style="text-align:left;"|''Break all '''10 item boxes''' while avoiding the Fake Items!''||1:10||<small>N64</small> Choco Mountain||DK||2 | ||
|- | |- | ||
|style=width:3%| | |style=width:3%|4-7||style="text-align:left;"|''Drive through all '''10 gates'''!''<sub>2</sub>||0:45||Waluigi Pinball||Toad||N/A | ||
|- | |- | ||
|style=width:3%| | |style=width:3%|4-8||style="text-align:left;"|''Perform '''9 power-slide turbo boosts''' in '''1 lap'''!''||1:00||<small>GBA</small> Luigi Circuit||Luigi||N/A | ||
|- | |- | ||
|style=width:3%|Boss||style="text-align:left;"| | |style=width:3%|Boss||style="text-align:left;"|''Collect '''50 coins''' while avoiding [[King Boo]]!''||5:00||[[List_of_boss_arenas_in_Mario_Kart_DS#Lava Arena|Lava Arena]]*||Peach||N/A | ||
|-class=expandable | |-class=expandable | ||
!colspan=" | !colspan="6" | Level 5 | ||
|- | |- | ||
|style=width:3%| | |style=width:3%|5-1||style="text-align:left;"|''Reach the finish before the '''stray Chain Chomp'''!''||0:00||Peach Gardens||Peach||3 | ||
|- | |- | ||
|style=width:3%| | |style=width:3%|5-2||style="text-align:left;"|''Drive '''backward''' and collect '''15 coins'''! If you hit a snowman, you fail!''||0:30||<small>N64</small> Frappe Snowland||DK||N/A | ||
|- | |- | ||
|style=width:3%| | |style=width:3%|5-3||style="text-align:left;"|''Destroy all '''5 item boxes'''!''||0:35||<small>SNES</small> Koopa Beach 2||Toad||2 | ||
|- | |- | ||
|style=width:3%| | |style=width:3%|5-4||style="text-align:left;"|''Drive through all '''10 numbered gates''' in order!''||1:05||<small>GBA</small> Bowser Castle 2||Bowser||N/A | ||
|- | |- | ||
|style=width:3%| | |style=width:3%|5-5||style="text-align:left;"|''Complete '''1 lap''' in the opposite direction within the time limit!''||0:55||<small>GCN</small> Mushroom Bridge||Mario||2 | ||
|- | |- | ||
|style=width:3%| | |style=width:3%|5-6||style="text-align:left;"|''Collect all '''18 coins'''!''||0:45||Tart Top||Yoshi||N/A | ||
|- | |- | ||
|style=width:3%| | |style=width:3%|5-7||style="text-align:left;"|''Drive through all '''8 numbered gates''' in order!''||0:45||DK Pass**||Toad||N/A | ||
|- | |- | ||
|style=width:3%| | |style=width:3%|5-8||style="text-align:left;"|''Reach the finish before '''Mario'''!''||0:00||Mario Circuit||Luigi||8 | ||
|- | |- | ||
|style=width:3%|Boss||style="text-align:left;"|Hit | |style=width:3%|Boss||style="text-align:left;"|''Hit the [[King Bob-omb|Big Bob-omb]] with '''3 Bob-ombs'''!''||5:00||Sand Arena*||Wario||9 | ||
|-class=expandable | |-class=expandable | ||
!colspan=" | !colspan="6"|Level 6 | ||
|- | |- | ||
|style=width:3%| | |style=width:3%|6-1||style="text-align:left;"|''Drive '''backward''' across the spinning bridge! If you fall, you're out!''||0:30||Bowser Castle||Bowser||N/A | ||
|- | |- | ||
|style=width:3%| | |style=width:3%|6-2||style="text-align:left;"|''Get Stars and run over '''15 Rocky Wrenches'''!''||0:55||Airship Fortress||Wario||4 | ||
|- | |- | ||
|style=width:3%| | |style=width:3%|6-3||style="text-align:left;"|''Collect all '''30 coins'''!''||0:45||<small>SNES</small> Choco Island 2||Yoshi||N/A | ||
|- | |- | ||
|style=width:3%| | |style=width:3%|6-4||style="text-align:left;"|''Destroy all '''10 item boxes'''!''||2:00||<small>N64</small> Block Fort||Mario||2 | ||
|- | |- | ||
|style=width:3%| | |style=width:3%|6-5||style="text-align:left;"|''Drive through all '''8 numbered gates''' in order!''||0:50||<small>GBA</small> Sky Garden||Peach||3 | ||
|- | |- | ||
|style=width:3%| | |style=width:3%|6-6||style="text-align:left;"|''Perform '''14 power-slide turbo boosts''' in '''1 lap'''!''||1:00||<small>GCN</small> Yoshi Circuit||Yoshi||N/A | ||
|- | |- | ||
|style=width:3%| | |style=width:3%|6-7||style="text-align:left;"|''Collect all '''40 coins'''!''||1:30||Tick-Tock Clock||Toad||N/A | ||
|- | |- | ||
|style=width:3%| | |style=width:3%|6-8||style="text-align:left;"|''Reach the finish before '''Peach'''!''||0:00||Peach Gardens**||Bowser||8 | ||
|- | |- | ||
|style=width:3%|Boss||style="text-align:left;"| | |style=width:3%|Boss||style="text-align:left;"|''Use Mushroom boosts to hit [[Chief Chilly]] and '''knock him off the stage 3 times'''!''||5:00||Water Arena*||Luigi||3 | ||
|-class=expandable | |-class=expandable | ||
!colspan=" | !colspan="6" | Level 7 | ||
|- | |- | ||
|style=width:3%| | |style=width:3%|7-1||style="text-align:left;"|''Perform '''6 power-slide turbo boosts''' in '''1 lap'''!''||1:00||Rainbow Road||Peach||N/A | ||
|- | |- | ||
|style=width:3%| | |style=width:3%|7-2||style="text-align:left;"|''Reach the finish before '''Bowser!''||0:00||Bowser Castle||Mario||8 | ||
|- | |- | ||
|style=width:3%| | |style=width:3%|7-3||style="text-align:left;"|''Complete '''2 laps''' within the time limit!''<sub>3</sub>||1:30||Tick-Tock Clock||DK||3 | ||
|- | |- | ||
|style=width:3%| | |style=width:3%|7-4||style="text-align:left;"|''Use shells to defeat all '''30 Goombas''' within the time limit!''||2:00||Mario Circuit||Toad||<abbr title="Collecting an item box while triple green shells are active will result in a forced single green shell, because the player cannot get triple green shells while triple green shells are active.>5</abbr> | ||
|- | |- | ||
|style=width:3%| | |style=width:3%|7-5||style="text-align:left;"|''Collect all '''20 coins'''!''||0:55||Wario Stadium||Wario||N/A | ||
|- | |- | ||
|style=width:3%| | |style=width:3%|7-6||style="text-align:left;"|''Drive through all '''8 numbered gates''' in order!''||0:11||Nintendo DS||Mario||N/A | ||
|- | |- | ||
|style=width:3%| | |style=width:3%|7-7||style="text-align:left;"|''Drive '''backward''' and collect all '''12 coins'''! If you hit a burner, you fail!''||0:50||Airship Fortress||Bowser||N/A | ||
|- | |- | ||
|style=width:3%| | |style=width:3%|7-8||style="text-align:left;"|''Break all '''10 item boxes''' while avoiding the Fake Items!''||1:05||<small>N64</small> Banshee Boardwalk||Luigi||2 | ||
|- | |- | ||
|style=width:3%|Boss||style="text-align:left;"| | |style=width:3%|Boss||style="text-align:left;"|''Reach the finish before '''[[Wiggler#Mario Kart DS|Wiggler]]'''!''||0:00||<small>GCN</small> Mushroom Bridge||Mario||<abbr title="Boxes on the track use set 4, while boxes hidden under vehicles use set 2.>2 & 4</abbr> | ||
|} | |||
:<nowiki>*</nowiki>Conjectural title based on surroundings. | |||
:<nowiki>**</nowiki>Denotes that the player drives through the course in the opposite direction. | |||
| | |||
| | |||
|} | |||
:<nowiki>*</nowiki>Conjectural title based on surroundings. | |||
:<nowiki>**</nowiki>Denotes that the player drives through the course in the opposite direction. | |||
:<sub>1</sub>Using Green Shells (solo or triple) and Bob-ombs | :<sub>1</sub>Using Green Shells (solo or triple) and Bob-ombs | ||
:<sub>2</sub>The gates don't necessarily have to be driven through in order. | :<sub>2</sub>The gates don't necessarily have to be driven through in order. | ||
| Line 489: | Line 299: | ||
===Nintendo Wi-Fi Connection mode=== | ===Nintendo Wi-Fi Connection mode=== | ||
''Mario Kart DS'' | ''Mario Kart DS'' was the first Nintendo game to support online play (which has since been discontinued) though it's worth noting that it's the second ''Mario Kart'' game to support online connectivity, with the Japanese version of ''[[Mario Kart: Super Circuit]]'' being the first (the use of online connectivity for this game was made primarily to exchange ghost data with other players).<ref>[[tcrf:Mario Kart Super Circuit#Misc.|Mario Kart Super Circuit § Misc.]]</ref> Being one of the first Nintendo DS games to feature wireless connection, the game mode required some technical changes in order to avoid connection malfunctions and long time loads during online play. | ||
The following changes and restrictions | The following changes and restrictions were applied to prevent excessive lag: | ||
*Only up to four players | *Only up to four players | ||
*Only 100cc engine | *Only the 100cc engine class was available | ||
*12 of 32 courses | *12 of 32 courses were omitted | ||
*No | *No multi-items | ||
*No spilled [[List of items|Items]] onto course to be used; items | *No spilled [[List of items|Items]] onto course to be used; items were just lost | ||
* | *Items could not be dragged behind the kart | ||
*Item roulette | *Item roulette could not be stopped earlier | ||
*Course obstacles | *Course obstacles could not be destroyed (e.g. boxes in Delfino Square or snowballs in DK Pass) | ||
{|class="wikitable" style="margin:1em auto;text-align:center;max-width:60em" | |||
{| | |||
|- | |- | ||
! colspan=9 style="background:# | !colspan="9" style="background:#e0e0e0"|Point Spread Comparisons | ||
|- | |- | ||
! style=" | !style="max-width:20em"| !!style="width:2.5em"|1st!!style="width:2.5em"|2nd!!style="width:2.5em"|3rd!!style="width:2.5em"|4th!!style="width:2.5em"|5th!!style="width:2.5em"|6th!!style="width:2.5em"|7th!!style="width:2.5em"|8th | ||
|- | |- | ||
| | |'''''Super Mario Kart'' <br> ''Mario Kart 64'' <br>''Mario Kart: Super Circuit'''''||style="background:#096;color:white;font-weight:bold"|9||style="background:#CF0"|6||style="background:#CF0"|3||style="background:#CF0"|1||0||0||0||0 | ||
|- | |- | ||
|'''''Mario Kart: Double Dash!!''<br>''Mario Kart DS'' Grand Prix'''||style="background:#096;color:white;font-weight:bold"|10||style="background:#CF0"|8||style="background:#CF0"|6||4||3||2||1||0 | |||
|- | |- | ||
| | |'''''Mario Kart DS'' Teams'''<ref>https://youtu.be/rHS3RQfqxSg?t=835</ref>||style="background:#096;color:white;font-weight:bold"|15||style="background:#CF0"|12||style="background:#CF0"|9||6||4||2||1||0 | ||
|- | |- | ||
|WFC 4 Players ||style="background:#096"| 10 ||style="background:#CF0"| 7 || 4 || 1 || | |'''''Mario Kart DS'' WFC 4 Players'''||style="background:#096;color:white;font-weight:bold"|10||style="background:#CF0"|7||4||1||—||—||—||- | ||
|- | |- | ||
|WFC 3 Players ||style="background:#096"| 10 || 7 || 4 || | |'''''Mario Kart DS'' WFC 3 Players'''||style="background:#096;color:white;font-weight:bold"|10||7||4||—||—||—||—||- | ||
|- | |- | ||
|WFC 2 Players ||style="background:#096"| 10 || 5 || | |'''''Mario Kart DS'' WFC 2 Players'''||style="background:#096;color:white;font-weight:bold"|10||5||—||—||—||—||—||- | ||
|- | |- | ||
| colspan=9 style="text-align:justify;font-size:smaller;" | <span style="background:#096">Grove-green bg signifies victory results (great clapping, character(s) cheering), best after-race music</span><br><span style="background:#CF0">Lime-green bg signifies moderate results (mild clapping, moderate character reaction), same music in Wi-Fi as winner but different in Grand Prix</span><br>Normal bg signifies losing results, losing music (kart engine stops if not in Grand Prix mode if the player placed last). In ''[[Super Mario Kart]]'', ''[[Mario Kart 64]]'' and ''[[Mario Kart: Super Circuit]]'', the race will be restarted (0 pts) if the racer comes in 5th-8th. If this happens more than three times (except in ''Mario Kart 64''), the [[Grand Prix]] must be started over.<br> | |colspan=9 style="text-align:justify;font-size:smaller;"|<span style="background:#096;color:white">Grove-green bg signifies victory results (great clapping, character(s) cheering), best after-race music</span><br><span style="background:#CF0">Lime-green bg signifies moderate results (mild clapping, moderate character reaction), same music in Wi-Fi as winner but different in Grand Prix</span><br>Normal bg signifies losing results, losing music (kart engine stops if not in Grand Prix mode if the player placed last). In ''[[Super Mario Kart]]'', ''[[Mario Kart 64]]'' and ''[[Mario Kart: Super Circuit]]'', the race will be restarted (0 pts) if the racer comes in 5th-8th. If this happens more than three times (except in ''Mario Kart 64''), the [[Grand Prix]] must be started over.<br>— means not available | ||
|} | |} | ||
====Connection==== | ====Connection==== | ||
Players connect using a wireless connection or a [[Nintendo Wi-Fi Connection#Logging in|Nintendo Wi-Fi USB Connector]] (preferably high-speed.) Racers choose to search for other players in "Friends" (more info below), "Rivals" (players with a similar record), "Regional" or "Continental" in Non-American versions of the game (players in same country or continent), and "Worldwide", the latter possible to cause long lags. Other racers searching in the same category | Players could connect using a wireless connection or a [[Nintendo Wi-Fi Connection#Logging in|Nintendo Wi-Fi USB Connector]] (preferably high-speed.) Racers would choose to search for other players in "Friends" (more info below), "Rivals" (players with a similar record), "Regional" or "Continental" in Non-American versions of the game (players in same country or continent), and "Worldwide", the latter possible to cause long lags. Other racers searching in the same category were randomly grouped. The game tried to find four players, but eventually settled for three or two if necessary. Players chose their characters, karts, and the course they wanted for the first of four races. | ||
In addition to the 20 courses listed in order of when it is encountered, there | In addition to the 20 courses listed in order of when it is encountered, there was also a random button. After everyone's selection was placed, a course was chosen based on the responses. If all players each picked a different course, the system randomly picked one. If four players chose two courses, two each, the game randomly selected from those two. On the other hand, the most voted course by a group of users was selected to race. It proceeded like so for four races, then the points were tallied up, and after the match, a player's wins and losses were totaled. | ||
Each player | Each player received one "win" for finishing ahead of a player and one "loss" for finishing behind of a player. If a player tied with another player, it did not count as a "win" or "loss". For example: | ||
*A player winning a 3-player match, or ties for 1st with one other player in a 4-player match receives 2 wins and 0 losses. | *A player winning a 3-player match, or ties for 1st with one other player in a 4-player match receives 2 wins and 0 losses. | ||
*A player coming 2nd in a 4-player match receives 2 wins and 1 loss. | *A player coming 2nd in a 4-player match receives 2 wins and 1 loss. | ||
*A player tied for third in a 4-player match gets only 2 losses, as compared to 3. | *A player tied for third in a 4-player match gets only 2 losses, as compared to 3. | ||
*A player tied with all other players, no matter how many players are participating, | *A player tied with all other players, no matter how many players are participating, was simply called a tie and did not affect either player's record. | ||
Players | Players could continue after the match to play the same racers again or quit to restart the process to find other players. | ||
====Issues==== | ====Issues==== | ||
'''Problem:''' Trouble with friend codes | '''Problem:''' Trouble with friend codes | ||
:A) '''Friend Code System'''. Each copy of the game comes with a 12-digit code known as a "friend code". Players | :A) '''Friend Code System'''. Each copy of the game comes with a 12-digit code known as a "friend code". Players could enter codes into each other's "friend roster" to create a friend list, where [[Wi-Fi]] records between the players were stored. When a friend was online at the same time, a symbol would appear above the Wi-Fi strength symbol, whether trying to find racers or during racing. Yet, both (or more) players must have had each (or all) of their friend codes registered and be looking in the friends section at the same time to hook up. If the player were to find a racer to compete against elsewhere online, there was no communication for a friend code swap; the only way to race again is to do it right away by selecting ''continue'' after a match. | ||
'''Problem:''' Disconnecting racers change the outcome of the match; it is later reflected in the match records. | '''Problem:''' Disconnecting racers change the outcome of the match; it is later reflected in the match records. | ||
:B) '''Disconnecting'''. Take this scenario into consideration: | :B) '''Disconnecting'''. Take this scenario into consideration: | ||
::''Bob started in a four-player match, but two people have disconnected since, and he is now in a two-player match against a three-star player, and has come second and third in the first two races. It is 20-11. | ::''Bob started in a four-player match, but two people have disconnected since, and he is now in a two-player match against a three-star player, and has come second and third in the first two races. It is 20-11. Josh wins the next match, bringing the totals to 25-21. But, in the fourth race, the three-star player is a full half-lap ahead with one lap to go. Josh realizes that he might not win this race; however, Josh has researched about Wi-Fi connections and has learned a trick. He leaves his DS untouched, bringing his kart to a stop, then finds his wireless router, and disconnects it. According to the record-book, Bob has won the match from which he has disconnected.'' | ||
'''Causes:''' | '''Causes:''' | ||
*The two players who disconnected earlier are experiencing certain effects. When a player is disconnected from Wi-Fi via turning off his or her DS, the player is charged with the same number of losses as there are other players. Players can disconnect at any time, but if they cancel before the first course is chosen, there is no effect on the win-loss record. Other players finishing the whole match gain one win per disconnected player. | *The two players who disconnected earlier are experiencing certain effects. When a player is disconnected from Wi-Fi via turning off his or her DS, the player is charged with the same number of losses as there are other players. Players can disconnect at any time, but if they cancel before the first course is chosen, there is no effect on the win-loss record. Other players finishing the whole match gain one win per disconnected player. | ||
*Refer to the point spread chart for WFC. Mid-match, due to disconnected players, the point spread can change. For example, when it goes down from four to three players, the point conversion is not affected for the top three. Yet, from three to two, it is. In the first two races, | *Refer to the point spread chart for WFC. Mid-match, due to disconnected players, the point spread can change. For example, when it goes down from four to three players, the point conversion is not affected for the top three. Yet, from three to two, it is. In the first two races, Josh lost three and six points to the three-star player, under the 10-7-4(-1) point spread. But, if he had won the last two races, under the 10-5 point spread, he would have recovered ten points - and would have won, 31-30, even though he came in third once and only won two out of four races. | ||
*Players occasionally disconnect when losing. A glitch in the game affects the final results, and this is exactly what | *Players occasionally disconnect when losing. A glitch in the game affects the final results, and this is exactly what Josh does in the scenario. Instead of turning off the DS, he disconnects his actual connection. The three-star player would have gained three wins, but when everyone disconnects, it takes no effect on the winning player's records. | ||
**To restate and make clear: if | **To restate and make clear: if Josh would have played it out and lost the fourth race, the result would have been 35-26, in favor of the three-star player. | ||
== | ==Characters== | ||
===Drivers=== | |||
The main game has 12 playable characters, 4 of which are unlockable. The eight starting characters, [[Mario]], [[Luigi]], [[Princess Peach|Peach]], [[Yoshi]], [[Toad]], [[Donkey Kong]], [[Wario]], and [[Bowser]], are the same eight characters available in ''[[Mario Kart 64]]'' and ''[[Mario Kart: Super Circuit]]''. The other four drivers can be unlocked by winning a gold trophy of certain cups in [[Mario Kart (series)#Modes of play|Grand Prix]] mode. Two of the unlockable characters, [[Princess Daisy|Daisy]] and [[Waluigi]], return from ''[[Mario Kart: Double Dash!!]]'', and the other two, [[Dry Bones]] and [[R.O.B.]], make their first ''Mario Kart'' playable appearances. A 13th racer, [[Shy Guy]], debuts as a playable character sharing [[Yoshi]]'s statistics, but is only available to players using DS Download Play. Discounting the multiplayer-exclusive Shy Guy, this is the first game since ''[[Super Mario Kart]]'' where the player classes are divided evenly, with four characters in each. | |||
{|border=1 style="text-align:center; border:1px solid black; border-collapse:collapse; max-width:1300px" | |||
|- | |||
!style="background:red;color:white"|Drivers | |||
|-style="background:#EAECF0" | |||
== | |style="display:inline-block; background:white" width=320px| | ||
{| | {|border=1 cellspacing=0 cellpadding=4 margin=0 padding=0 style="border:1px solid black; border-collapse:collapse; height:100%" width=100% | ||
|- | |||
!style="background:# | !style="background:#EAECF0; height:56px" align="center" colspan=4|[[File:Mario MKDS icon.png]]<br><big>'''{{text outline|{{color-link|red|Mario}}}}'''</big> | ||
|- | |||
!style="background: | !style="background:white; height:250px" align="center" colspan=4|[[File:MKDS Mario Standard Kart Artwork.png|300x250px]] | ||
|- | |- | ||
!colspan=4 style="background:#EAECF0"|Description: | |||
| | |||
|- | |- | ||
| | |colspan=4 height=64px|''Mario is familiar to racers one and all. With a balance of abilities, he is a racer suited to all situations.'' | ||
| | |||
|- | |- | ||
!colspan=2 style="background:#EAECF0" width=50%|Emblem: | |||
| | |colspan=2 width=50%|[[File:MKDSEmblemMario.png]] | ||
| | |||
|[[File: | |||
|- | |- | ||
| | !colspan=2 style="background:#EAECF0"|Weight: | ||
| | |colspan=2 align="center"|'''32''' | ||
| | {|style="background:white; border:1px solid #1e276b; border-collapse:collapse" | ||
| | !style="background:#white; width:104px !important" | | ||
{|style="background:#d8f800; border:1px solid #1e276b; border-collapse:collapse" | |||
!style="background:#d8f800; border:1px solid #1e276b; width:64px !important" | | |||
!style="background:#EAECF0; width:36px !important" | | |||
|} | |||
|} | |} | ||
|- | |- | ||
| | !colspan=2 style="background:#EAECF0"|Class: | ||
|[[ | |colspan=2|'''{{color|green|Medium}}''' | ||
| | |- | ||
| | !colspan=2 style="background:#EAECF0"|Signature kart: | ||
|width=8%|1: | |||
|'''[[B Dasher]]''' | |||
|- | |||
!colspan=2 style="background:#EAECF0"|Standard kart: | |||
|2: | |||
|'''[[Standard MR]]''' | |||
|- | |||
!colspan=2 style="background:#EAECF0"|Unlockable kart: | |||
|3: | |||
|'''[[Shooting Star (kart)|Shooting Star]]''' | |||
|- | |- | ||
!colspan=4 style="background:#EAECF0"|Borrowed karts: | |||
|- | |- | ||
| | |width=8%|4: | ||
|[[ | |'''[[4-Wheel Cradle]]''' | ||
| | |5: | ||
|[[ | |'''[[Light Dancer]]''' | ||
|- | |- | ||
| | |6: | ||
|[[ | |'''[[Banisher]]''' | ||
| | |7: | ||
|[[ | |'''[[Gold Mantis]]''' | ||
|} | |} | ||
|style="display:inline-block; background:white" width=320px| | |||
{|border=1 cellspacing=0 cellpadding=4 margin=0 padding=0 style="border:1px solid black; border-collapse:collapse; height:100%" width=100% | |||
{| | |||
|- | |- | ||
|''' | !style="background:#EAECF0; height:56px" align="center" colspan=4|[[File:Luigi MKDS icon.png]]<br><big>'''{{text outline|{{color-link|green|Luigi}}|white}}'''</big> | ||
|- | |- | ||
!style="background:white; height:250px" align="center" colspan=4|[[File:Luigi in Standard LG MKDS artwork.png|300x250px]] | |||
| | |||
| | |||
|- | |- | ||
| | !colspan=4 style="background:#EAECF0"|Description: | ||
|- | |- | ||
|'''Luigi' | |colspan=4 height=64px|''Mario's younger brother Luigi is ready to race. His superb traction makes it hard for him to spin out.'' | ||
|- | |- | ||
| | !colspan=2 style="background:#EAECF0" width=50%|Emblem: | ||
|colspan=2 width=50%|[[File:MKDSEmblemLuigi.png]] | |||
| | |||
| | |||
|- | |- | ||
|''' | !colspan=2 style="background:#EAECF0"|Weight: | ||
| | |colspan=2 align="center"|'''32''' | ||
| | {|style="background:white; border:1px solid #1e276b; border-collapse:collapse" | ||
| | !style="background:#white; width:104px !important" | | ||
{|style="background:#d8f800; border:1px solid #1e276b; border-collapse:collapse" | |||
!style="background:#d8f800; border:1px solid #1e276b; width:64px !important" | | |||
!style="background:#EAECF0; width:36px !important" | | |||
|} | |||
|} | |||
|- | |- | ||
|''' | !colspan=2 style="background:#EAECF0"|Class: | ||
|colspan=2|'''{{color|green|Medium}}''' | |||
|- | |- | ||
|''' | !colspan=2 style="background:#EAECF0"|Signature kart: | ||
|width=8%|1: | |||
|'''[[Poltergust 4000]]''' | |||
|- | |- | ||
|''' | !colspan=2 style="background:#EAECF0"|Standard kart: | ||
|2: | |||
|'''[[Standard LG]]''' | |||
|- | |- | ||
|''' | !colspan=2 style="background:#EAECF0"|Unlockable kart: | ||
|3: | |||
|'''[[Streamliner]]''' | |||
|- | |- | ||
| | !colspan=4 style="background:#EAECF0"|Borrowed karts: | ||
|- | |- | ||
|''' | |width=8%|4: | ||
| | |'''[[Cucumber]]''' | ||
| | |5: | ||
|'''[[Wildlife]]''' | |||
|- | |- | ||
|''' | |6: | ||
| | |'''[[Dragonfly]]''' | ||
| | |7: | ||
| | |'''[[ROB-BLS]]''' | ||
|} | |||
|style="display:inline-block; background:white" width=320px| | |||
{|border=1 cellspacing=0 cellpadding=4 margin=0 padding=0 style="border:1px solid black; border-collapse:collapse; height:100%" width=100% | |||
|- | |- | ||
| | !style="background:#EAECF0; height:56px" align="center" colspan=4|[[File:Peach MKDS icon.png]]<br><big>'''{{text outline|{{color-link|hotpink|Princess Peach|Peach}}}}'''</big> | ||
| | |||
| | |||
|Peach/ | |||
|- | |- | ||
!style="background:white; height:250px" align="center" colspan=4|[[File:MKDS Peach Artwork.png|300x250px]] | |||
| | |||
| | |||
|- | |- | ||
| | !colspan=4 style="background:#EAECF0"|Description: | ||
|- | |- | ||
|'' | |colspan=4 height=64px|''A generally genteel princess, the heart of a competitor burns deep within her. She is adapt at drifting.'' | ||
|- | |- | ||
| | !colspan=2 style="background:#EAECF0" width=50%|Emblem: | ||
|colspan=2 width=50%|[[File:MKDSEmblemPeach.png]] | |||
| | |||
| | |||
|- | |- | ||
|''' | !colspan=2 style="background:#EAECF0"|Weight: | ||
| | |colspan=2 align="center"|'''23''' | ||
| | {|style="background:white; border:1px solid #1e276b; border-collapse:collapse" | ||
| | !style="background:#white; width:104px !important" | | ||
{|style="background:#d8f800; border:1px solid #1e276b; border-collapse:collapse" | |||
!style="background:#d8f800; border:1px solid #1e276b; width:46px !important" | | |||
!style="background:#EAECF0; width:54px !important" | | |||
|} | |||
|} | |||
|- | |- | ||
|''' | !colspan=2 style="background:#EAECF0"|Class: | ||
|colspan=2|'''{{color|dodgerblue|Light}}''' | |||
|- | |- | ||
|''' | !colspan=2 style="background:#EAECF0"|Signature kart: | ||
|width=8%|1: | |||
|'''[[Royale]]''' | |||
|- | |- | ||
|''' | !colspan=2 style="background:#EAECF0"|Standard kart: | ||
|2: | |||
|'''[[Standard PC]]''' | |||
|- | |- | ||
|''' | !colspan=2 style="background:#EAECF0"|Unlockable kart: | ||
|3: | |||
|'''[[Light Tripper]]''' | |||
|- | |- | ||
| | !colspan=4 style="background:#EAECF0"|Borrowed karts: | ||
|- | |- | ||
|''' | |width=8%|4: | ||
| | |'''[[4-Wheel Cradle]]''' | ||
| | |5: | ||
|'''[[Wildlife]]''' | |||
|- | |- | ||
|''' | |6: | ||
| | |'''[[Power Flower (kart)|Power Flower]]''' | ||
| | |7: | ||
| | |'''[[Dry Bomber]]''' | ||
|} | |||
|style="display:inline-block; background:white" width=320px| | |||
{|border=1 cellspacing=0 cellpadding=4 margin=0 padding=0 style="border:1px solid black; border-collapse:collapse; height:100%" width=100% | |||
|- | |- | ||
| | !style="background:#EAECF0; height:56px" align="center" colspan=4|[[File:Yoshi MKDS icon.png]]<br><big>'''{{text outline|{{color-link|limegreen|Yoshi}}}}'''</big> | ||
| | |||
| | |||
| | |||
|- | |- | ||
!style="background:white; height:250px" align="center" colspan=4|[[File:MKDS Yoshi Artwork.png|300x250px]] | |||
| | |||
| | |||
|- | |- | ||
| | !colspan=4 style="background:#EAECF0"|Description: | ||
|- | |- | ||
|''' | |colspan=4 height=64px|''While Yoshi is usually ridden by Mario, this time he's ready to race. Yoshi's traction is excellent.'' | ||
|- | |- | ||
| | !colspan=2 style="background:#EAECF0" width=50%|Emblem: | ||
|colspan=2 width=50%|[[File:MKDSEmblemYoshi.png]] | |||
| | |||
| | |||
|- | |- | ||
|''' | !colspan=2 style="background:#EAECF0"|Weight: | ||
|1: | |colspan=2 align="center"|'''20''' | ||
| | {|style="background:white; border:1px solid #1e276b; border-collapse:collapse" | ||
| | !style="background:#white; width:104px !important" | | ||
{|style="background:#d8f800; border:1px solid #1e276b; border-collapse:collapse" | |||
!style="background:#d8f800; border:1px solid #1e276b; width:40px !important" | | |||
!style="background:#EAECF0; width:60px !important" | | |||
|} | |||
|} | |||
|- | |||
!colspan=2 style="background:#EAECF0"|Class: | |||
|colspan=2|'''{{color|dodgerblue|Light}}''' | |||
|- | |||
!colspan=2 style="background:#EAECF0"|Signature kart: | |||
|width=8%|1: | |||
|'''[[Egg 1]]''' | |||
|- | |||
!colspan=2 style="background:#EAECF0"|Standard kart: | |||
|2: | |||
|'''[[Standard YS]]''' | |||
|- | |||
!colspan=2 style="background:#EAECF0"|Unlockable kart: | |||
|3: | |||
|'''[[Cucumber]]''' | |||
|- | |||
!colspan=4 style="background:#EAECF0"|Borrowed karts: | |||
|- | |||
|width=8%|4: | |||
|'''[[Mushmellow]]''' | |||
|5: | |||
|'''[[Banisher]]''' | |||
|- | |||
|6: | |||
|'''[[Poltergust 4000]]''' | |||
|7: | |||
|'''[[Royale]]''' | |||
|} | |} | ||
= | |style="display:inline-block; background:white" width=320px| | ||
: | {|border=1 cellspacing=0 cellpadding=4 margin=0 padding=0 style="border:1px solid black; border-collapse:collapse; height:100%" width=100% | ||
{| | |||
|- | |- | ||
! | !style="background:#EAECF0; height:56px" align="center" colspan=4|[[File:Toad MKDS icon.png]]<br><big>'''{{text outline|{{color-link|blue|Toad}}|white}}'''</big> | ||
|- | |- | ||
|[[File: | !style="background:white; height:250px" align="center" colspan=4|[[File:MKDS Toad Artwork.png|300x250px]] | ||
|- | |- | ||
| | !colspan=4 style="background:#EAECF0"|Description: | ||
|- | |- | ||
| | |colspan=4 height=64px|''Toad uses his tiny stature to his advantage as he skillfully weaves in and out of traffic on the track.'' | ||
|'' | |||
|- | |- | ||
|[[File: | !colspan=2 style="background:#EAECF0" width=50%|Emblem: | ||
|colspan=2 width=50%|[[File:MKDSEmblemToad.png]] | |||
|- | |- | ||
| | !colspan=2 style="background:#EAECF0"|Weight: | ||
| | |colspan=2 align="center"|'''17''' | ||
|'' | {|style="background:white; border:1px solid #1e276b; border-collapse:collapse" | ||
!style="background:#white; width:104px !important" | | |||
{|style="background:#d8f800; border:1px solid #1e276b; border-collapse:collapse" | |||
!style="background:#d8f800; border:1px solid #1e276b; width:34px !important" | | |||
!style="background:#EAECF0; width:66px !important" | | |||
|} | |||
|} | |||
|- | |- | ||
| | !colspan=2 style="background:#EAECF0"|Class: | ||
| | |colspan=2|'''{{color|dodgerblue|Light}}''' | ||
|'' | |||
|- | |- | ||
| | !colspan=2 style="background:#EAECF0"|Signature kart: | ||
|[[ | |width=8%|1: | ||
|'''[[Mushmellow]]''' | |||
|- | |- | ||
| | !colspan=2 style="background:#EAECF0"|Standard kart: | ||
|[[ | |2: | ||
|'''[[Standard TD]]''' | |||
|- | |- | ||
| | !colspan=2 style="background:#EAECF0"|Unlockable kart: | ||
|[[ | |3: | ||
|'''[[4-Wheel Cradle]]''' | |||
|- | |- | ||
| | !colspan=4 style="background:#EAECF0"|Borrowed karts: | ||
|- | |- | ||
|[[ | |width=8%|4: | ||
|[[ | |'''[[Dry Bomber]]''' | ||
|5: | |||
|'''[[Zipper (kart)|Zipper]]''' | |||
|- | |- | ||
|[[File: | |6: | ||
|[[ | |'''[[Shooting Star (kart)|Shooting Star]]''' | ||
|'' | |7: | ||
|'''[[Royale]]''' | |||
|} | |||
|style="display:inline-block; background:white" width=320px| | |||
{|border=1 cellspacing=0 cellpadding=4 margin=0 padding=0 style="border:1px solid black; border-collapse:collapse; height:100%" width=100% | |||
|- | |||
!style="background:#EAECF0; height:56px" align="center" colspan=4|[[File:DK MKDS icon.png]]<br><big>'''{{text outline|{{color-link|yellow|Donkey Kong}}}}'''</big> | |||
|- | |||
!style="background:white; height:250px" align="center" colspan=4|[[File:MKDS Donkey Kong Standard Kart Artwork.png|300x250px]] | |||
|- | |||
!colspan=4 style="background:#EAECF0"|Description: | |||
|- | |||
|colspan=4 height=64px|''DK overwhelms his opponents with his jungle instincts. He drifts through comers like a mad-man...or a mad-ape!'' | |||
|- | |||
!colspan=2 style="background:#EAECF0" width=50%|Emblem: | |||
|colspan=2 width=50%|[[File:MKDSEmblemDK.png]] | |||
|- | |||
!colspan=2 style="background:#EAECF0"|Weight: | |||
|colspan=2 align="center"|'''41''' | |||
{|style="background:white; border:1px solid #1e276b; border-collapse:collapse" | |||
!style="background:#white; width:104px !important" | | |||
{|style="background:#d8f800; border:1px solid #1e276b; border-collapse:collapse" | |||
!style="background:#d8f800; border:1px solid #1e276b; width:82px !important" | | |||
!style="background:#EAECF0; width:18px !important" | | |||
|} | |||
|} | |||
|- | |||
!colspan=2 style="background:#EAECF0"|Class: | |||
|colspan=2|'''{{color|red|Heavy}}''' | |||
|- | |- | ||
| | !colspan=2 style="background:#EAECF0"|Signature kart: | ||
|[[ | |width=8%|1: | ||
|'''[[Rambi Rider]]''' | |||
|- | |- | ||
| | !colspan=2 style="background:#EAECF0"|Standard kart: | ||
|[[ | |2: | ||
|'''[[Standard DK]]''' | |||
|- | |- | ||
| | !colspan=2 style="background:#EAECF0"|Unlockable kart: | ||
|[[ | |3: | ||
|'''[[Wildlife]]''' | |||
|- | |- | ||
!colspan=4 style="background:#EAECF0"|Borrowed karts: | |||
| | |||
|- | |- | ||
| | |width=8%|4: | ||
|[[ | |'''[[Hurricane (kart)|Hurricane]]''' | ||
|'' | |5: | ||
|'''[[Power Flower (kart)|Power Flower]]''' | |||
|- | |- | ||
| | |6: | ||
|[[ | |'''[[Gold Mantis]]''' | ||
|'' | |7: | ||
|'''[[ROB-LGS]]''' | |||
|} | |} | ||
|style="display:inline-block; background:white" width=320px| | |||
{|border=1 cellspacing=0 cellpadding=4 margin=0 padding=0 style="border:1px solid black; border-collapse:collapse; height:100%" width=100% | |||
|- | |||
=== | !style="background:#EAECF0; height:56px" align="center" colspan=4|[[File:Wario MKDS icon.png]]<br><big>'''{{text outline|{{color-link|mediumorchid|Wario}}}}'''</big> | ||
|- | |||
!style="background:white; height:250px" align="center" colspan=4|[[File:MKDS Wario Artwork.png|300x250px]] | |||
=== | |- | ||
[[File: | !colspan=4 style="background:#EAECF0"|Description: | ||
== | |||
[[File: | |||
|- | |- | ||
|colspan=4 height=64px|''As his name implies, he's the anti-hero to Mario's heroism. Other than acceleration, he has no foil.'' | |||
|- | |- | ||
! | !colspan=2 style="background:#EAECF0" width=50%|Emblem: | ||
| | |colspan=2 width=50%|[[File:MKDSEmblemWario.png]] | ||
|- | |- | ||
! | !colspan=2 style="background:#EAECF0"|Weight: | ||
| | |colspan=2 align="center"|'''44''' | ||
| | {|style="background:white; border:1px solid #1e276b; border-collapse:collapse" | ||
| | !style="background:#white; width:104px !important" | | ||
| | {|style="background:#d8f800; border:1px solid #1e276b; border-collapse:collapse" | ||
| | !style="background:#d8f800; border:1px solid #1e276b; width:88px !important" | | ||
| | !style="background:#EAECF0; width:12px !important" | | ||
|} | |||
|} | |||
|- | |- | ||
! | !colspan=2 style="background:#EAECF0"|Class: | ||
| | |colspan=2|'''{{color|red|Heavy}}''' | ||
| | |||
| | |||
| | |||
|- | |- | ||
! | !colspan=2 style="background:#EAECF0"|Signature kart: | ||
| | |width=8%|1: | ||
|'''[[Brute]]''' | |||
|- | |- | ||
![[Standard | !colspan=2 style="background:#EAECF0"|Standard kart: | ||
|2: | |||
|'''[[Standard WR]]''' | |||
|- | |- | ||
! | !colspan=2 style="background:#EAECF0"|Unlockable kart: | ||
| | |3: | ||
| | |'''[[Dragonfly]]''' | ||
|- | |||
!colspan=4 style="background:#EAECF0"|Borrowed karts: | |||
|- | |- | ||
|width=8%|4: | |||
| | |'''[[Tyrant]]''' | ||
|5: | |||
| | |'''[[Zipper (kart)|Zipper]]''' | ||
| | |||
| | |||
|- | |- | ||
|6: | |||
| | |'''[[ROB-BLS]]''' | ||
| | |7: | ||
| | |'''[[Shooting Star (kart)|Shooting Star]]''' | ||
| | |} | ||
| | |||
| | |style="display:inline-block; background:white" width=320px| | ||
{|border=1 cellspacing=0 cellpadding=4 margin=0 padding=0 style="border:1px solid black; border-collapse:collapse; height:100%" width=100% | |||
|- | |- | ||
![[File: | !style="background:#EAECF0; height:56px" align="center" colspan=4|[[File:Bowser MKDS icon.png]]<br><big>'''{{text outline|{{color-link|coral|Bowser}}}}'''</big> | ||
| | |||
| | |||
| | |||
|- | |- | ||
! | !style="background:white; height:250px" align="center" colspan=4|[[File:MKDS Bowser Artwork.png|300x250px]] | ||
|- | |- | ||
! | !colspan=4 style="background:#EAECF0"|Description: | ||
| | |||
|- | |- | ||
|colspan=4 height=64px|''Mario's arch-enemy is superb at using his driving skills to race through curves.'' | |||
| | |||
|- | |- | ||
! | !colspan=2 style="background:#EAECF0" width=50%|Emblem: | ||
| | |colspan=2 width=50%|[[File:MKDSEmblemBowser.png]] | ||
|- | |- | ||
! | !colspan=2 style="background:#EAECF0"|Weight: | ||
| | |colspan=2 align="center"|'''50''' | ||
| | {|style="background:white; border:1px solid #1e276b; border-collapse:collapse" | ||
| | !style="background:#white; width:104px !important" | | ||
| | {|style="background:#d8f800; border:1px solid #1e276b; border-collapse:collapse" | ||
| | !style="background:#d8f800; border:1px solid #1e276b; width:100px !important" | | ||
| | |} | ||
|} | |||
|- | |- | ||
! | !colspan=2 style="background:#EAECF0"|Class: | ||
|colspan=2|'''{{color|red|Heavy}}''' | |||
| | |||
| | |||
| | |||
| | |||
|- | |- | ||
! | !colspan=2 style="background:#EAECF0"|Signature kart: | ||
| | |width=8%|1: | ||
|'''[[Tyrant]]''' | |||
|- | |- | ||
![[Standard | !colspan=2 style="background:#EAECF0"|Standard kart: | ||
|2: | |||
|'''[[Standard BW]]''' | |||
|- | |- | ||
! | !colspan=2 style="background:#EAECF0"|Unlockable kart: | ||
| | |3: | ||
| | |'''[[Hurricane (kart)|Hurricane]]''' | ||
| | |||
|- | |- | ||
! | !colspan=4 style="background:#EAECF0"|Borrowed karts: | ||
|- | |- | ||
|width=8%|4: | |||
| | |'''[[Light Dancer]]''' | ||
| | |5: | ||
|'''[[ROB-LGS]]''' | |||
|- | |- | ||
|6: | |||
| | |'''[[Rambi Rider]]''' | ||
| | |7: | ||
| | |'''[[Brute]]''' | ||
| | |} | ||
| | |||
|100 | |- | ||
!style="background:red;color:white"|Unlockable drivers | |||
|-style="background:#EAECF0" | |||
|style="display:inline-block; background:white" width=320px| | |||
{|border=1 cellspacing=0 cellpadding=4 margin=0 padding=0 style="border:1px solid black; border-collapse:collapse; height:100%" width=100% | |||
|- | |- | ||
! | !style="background:#EAECF0; height:56px" align="center" colspan=4|[[File:Daisy MKDS icon.png]]<br><big>'''{{text outline|{{color-link|orange|Princess Daisy|Daisy}}}}'''</big> | ||
| | |||
| | |||
| | |||
| | |||
|- | |- | ||
![[ | !style="background:white; height:250px" align="center" colspan=4|[[File:PrincessDaisyMKDS.png|300x250px]] | ||
|- | |- | ||
![[File: | !colspan=2 style="background:#EAECF0" width=50%|Emblem: | ||
|colspan=2 width=50%|[[File:MKDSEmblemDaisy.png]] | |||
|- | |- | ||
! | !colspan=2 style="background:#EAECF0"|Weight: | ||
| | |colspan=2 align="center"|'''26''' | ||
! | {|style="background:white; border:1px solid #1e276b; border-collapse:collapse" | ||
| | !style="background:#white; width:104px !important" | | ||
| | {|style="background:#d8f800; border:1px solid #1e276b; border-collapse:collapse" | ||
!style="background:#d8f800; border:1px solid #1e276b; width:52px !important" | | |||
| | !style="background:#EAECF0; width:48px !important" | | ||
| | |} | ||
| | |} | ||
|- | |- | ||
! | !colspan=2 style="background:#EAECF0"|Class: | ||
|colspan=2|'''{{color|green|Medium}}''' | |||
| | |||
| | |||
| | |||
| | |||
| | |||
|- | |- | ||
! | !colspan=2 style="background:#EAECF0"|Signature kart: | ||
|width=8%|1: | |||
| | |'''[[Power Flower (kart)|Power Flower]]''' | ||
| | |||
| | |||
| | |||
|- | |- | ||
! | !colspan=2 style="background:#EAECF0"|Standard kart: | ||
| | |2: | ||
|'''[[Standard DS]]''' | |||
|- | |- | ||
! | !colspan=2 style="background:#EAECF0"|Unlockable kart: | ||
| | |3: | ||
| | |'''[[Light Dancer]]''' | ||
| | |||
|- | |- | ||
! | !colspan=4 style="background:#EAECF0"|Borrowed karts: | ||
|- | |- | ||
|width=8%|4: | |||
| | |'''[[B Dasher]]''' | ||
|5: | |||
| | |'''[[Light Tripper]]''' | ||
| | |||
|- | |- | ||
|6: | |||
| | |'''[[Egg 1]]''' | ||
| | |7: | ||
|'''[[Rambi Rider]]''' | |||
|- | |- | ||
! | !colspan=4 style="background:#EAECF0"|To unlock: | ||
|- | |- | ||
|colspan=4 height=64px|Obtain a gold trophy for every 50cc Retro Grand Prix cup | |||
| | |} | ||
|style="display:inline-block; background:white" width=320px| | |||
{|border=1 cellspacing=0 cellpadding=4 margin=0 padding=0 style="border:1px solid black; border-collapse:collapse; height:100%" width=100% | |||
|- | |- | ||
![[ | !style="background:#EAECF0; height:56px" align="center" colspan=4|[[File:Dry Bones MKDS icon.png]]<br><big>'''{{text outline|{{color-link|palegoldenrod|Dry Bones}}}}'''</big><sup><small>(new)</small></sup> | ||
| | |||
| | |||
| | |||
|- | |- | ||
![[File: | !style="background:white; height:250px" align="center" colspan=4|[[File:MKDS Dry Bones Artwork.png|300x250px]] | ||
|- | |- | ||
! | !colspan=2 style="background:#EAECF0" width=50%|Emblem: | ||
| | |colspan=2 width=50%|[[File:MKDSEmblemDryBones.png]] | ||
|- | |- | ||
! | !colspan=2 style="background:#EAECF0"|Weight: | ||
| | |colspan=2 align="center"|'''14''' | ||
| | {|style="background:white; border:1px solid #1e276b; border-collapse:collapse" | ||
| | !style="background:#white; width:104px !important" | | ||
| | {|style="background:#d8f800; border:1px solid #1e276b; border-collapse:collapse" | ||
| | !style="background:#d8f800; border:1px solid #1e276b; width:28px !important" | | ||
| | !style="background:#EAECF0; width:72px !important" | | ||
|} | |||
|} | |||
|- | |- | ||
| | !colspan=2 style="background:#EAECF0"|Class: | ||
| | |colspan=2|'''{{color|dodgerblue|Light}}''' | ||
| | |||
| | |||
| | |||
|- | |- | ||
| | !colspan=2 style="background:#EAECF0"|Signature kart: | ||
| | |width=8%|1: | ||
|'''[[Banisher]]''' | |||
| | |||
| | |||
|- | |- | ||
| | !colspan=2 style="background:#EAECF0"|Standard kart: | ||
| | |2: | ||
| | |'''[[Standard DB]]''' | ||
|- | |- | ||
| | !colspan=2 style="background:#EAECF0"|Unlockable kart: | ||
| | |3: | ||
| | |'''[[Dry Bomber]]''' | ||
|- | |- | ||
| | !colspan=4 style="background:#EAECF0"|Borrowed karts: | ||
|- | |- | ||
| | |width=8%|4: | ||
|'''[[Streamliner]]''' | |||
| | |5: | ||
| | |'''[[Light Tripper]]''' | ||
| | |||
| | |||
|- | |- | ||
| | |6: | ||
| | |'''[[Cucumber]]''' | ||
| | |7: | ||
| | |'''[[Mushmellow]]''' | ||
|- | |- | ||
| | !colspan=4 style="background:#EAECF0"|To unlock: | ||
|- | |- | ||
| | |colspan=4 height=64px|Obtain a gold trophy for every 50cc Nitro Grand Prix cup | ||
| | |} | ||
| | |style="display:inline-block; background:white" width=320px| | ||
| | {|border=1 cellspacing=0 cellpadding=4 margin=0 padding=0 style="border:1px solid black; border-collapse:collapse; height:100%" width=100% | ||
| | |||
|- | |- | ||
| | !style="background:#EAECF0; height:56px" align="center" colspan=4|[[File:Waluigi MKDS icon.png]]<br><big>'''{{text outline|{{color-link|indigo|Waluigi}}|white}}'''</big> | ||
| | |||
| | |||
| | |||
| | |||
|- | |- | ||
| | !style="background:white; height:250px" align="center" colspan=4|[[File:MKDS Waluigi Artwork.png|300x250px]] | ||
| | |||
|- | |- | ||
| | !colspan=2 style="background:#EAECF0" width=50%|Emblem: | ||
| | |colspan=2 width=50%|[[File:MKDSEmblemWaluigi.png]] | ||
| | |||
|- | |- | ||
!colspan=" | !colspan=2 style="background:#EAECF0"|Weight: | ||
|colspan=2 align="center"|'''35''' | |||
{|style="background:white; border:1px solid #1e276b; border-collapse:collapse" | |||
!style="background:#white; width:104px !important" | | |||
{|style="background:#d8f800; border:1px solid #1e276b; border-collapse:collapse" | |||
!style="background:#d8f800; border:1px solid #1e276b; width:70px !important" | | |||
!style="background:#EAECF0; width:30px !important" | | |||
|} | |||
|} | |} | ||
|- | |- | ||
! | !colspan=2 style="background:#EAECF0"|Class: | ||
|colspan=2|'''{{color|green|Medium}}''' | |||
! | |- | ||
!colspan=2 style="background:#EAECF0"|Signature kart: | |||
|width=8%|1: | |||
! | |'''[[Gold Mantis]]''' | ||
!colspan=" | |- | ||
!colspan=2 style="background:#EAECF0"|Standard kart: | |||
! | |2: | ||
|'''[[Standard WL]]''' | |||
|- | |||
!colspan=2 style="background:#EAECF0"|Unlockable kart: | |||
|3: | |||
|'''[[Zipper (kart)|Zipper]]''' | |||
|- | |||
!colspan=4 style="background:#EAECF0"|Borrowed karts: | |||
|- | |||
|width=8%|4: | |||
|'''[[B Dasher]]''' | |||
|5: | |||
|'''[[Poltergust 4000]]''' | |||
|- | |- | ||
|6: | |||
|'''[[Brute]]''' | |||
|7: | |||
|'''[[Tyrant]]''' | |||
|- | |- | ||
! | !colspan=4 style="background:#EAECF0"|To unlock: | ||
|- | |||
|colspan=4 height=64px|Obtain a gold trophy for every 100cc Retro Grand Prix cup | |||
|} | |||
|style="display:inline-block; background:white" width=320px| | |||
{|border=1 cellspacing=0 cellpadding=4 margin=0 padding=0 style="border:1px solid black; border-collapse:collapse; height:100%" width=100% | |||
|- | |||
!style="background:#EAECF0; height:56px" align="center" colspan=4|[[File:ROB MKDS icon.png]]<br><big>'''{{text outline|{{color-link|darkslategray|R.O.B.}}|white}}'''</big><sup><small>(new)</small></sup> | |||
! | |||
|- | |- | ||
! | !style="background:white; height:250px" align="center" colspan=4|[[File:MKDS ROB Artwork.png|300x250px]] | ||
| | |||
|- | |- | ||
! | !colspan=2 style="background:#EAECF0" width=50%|Emblem: | ||
|'' | |colspan=2 width=50%|[[File:MKDSEmblemROB.png]] | ||
| | |- | ||
| | !colspan=2 style="background:#EAECF0"|Weight: | ||
| | |colspan=2 align="center"|'''50''' | ||
| | {|style="background:white; border:1px solid #1e276b; border-collapse:collapse" | ||
| | !style="background:#white; width:104px !important" | | ||
| | {|style="background:#d8f800; border:1px solid #1e276b; border-collapse:collapse" | ||
| | !style="background:#d8f800; border:1px solid #1e276b; width:100px !important" | | ||
| | |} | ||
| | |} | ||
| | |- | ||
| | !colspan=2 style="background:#EAECF0"|Class: | ||
| | |colspan=2|'''{{color|red|Heavy}}''' | ||
| | |- | ||
| | !colspan=2 style="background:#EAECF0"|Signature kart: | ||
| | |width=8%|1: | ||
| | |'''[[ROB-BLS]]''' | ||
|- | |||
!colspan=2 style="background:#EAECF0"|Standard kart: | |||
|2: | |||
|'''[[Standard RB]]''' | |||
|- | |||
!colspan=2 style="background:#EAECF0"|Unlockable kart: | |||
|3: | |||
|'''[[ROB-LGS]]''' | |||
|- | |||
!colspan=4 style="background:#EAECF0"|Borrowed karts: | |||
|- | |- | ||
|width=8%|4: | |||
|'' | |'''[[Streamliner]]''' | ||
| | |5: | ||
| | |'''[[Egg 1]]''' | ||
| | |- | ||
| | |6: | ||
| | |'''[[Dragonfly]]''' | ||
| | |7: | ||
| | |'''[[Hurricane (kart)|Hurricane]]''' | ||
| | |||
|- | |- | ||
! | !colspan=4 style="background:#EAECF0"|To unlock: | ||
|- | |- | ||
|colspan=4 height=64px|Obtain a gold trophy for either every 150cc Mirror Nitro Grand Prix cup or Retro Grand Prix cup | |||
| | |} | ||
| | |||
| | |- | ||
| | !style="background:red;color:white"|DS Download Play only | ||
| | |-style="background:#EAECF0" | ||
|0 | |||
| | |style="display:inline-block; background:white" width=320px| | ||
| | {|border=1 cellspacing=0 cellpadding=4 margin=0 padding=0 style="border:1px solid black; border-collapse:collapse; height:100%" width=100% | ||
| | |- | ||
| | !style="background:#EAECF0; height:56px" align="center" colspan=2|[[File:MKDS Red Shy Guy Mugshot.png]]<br><big>'''{{text outline|{{color-link|whitesmoke|Shy Guy}}}}'''</big><sup><small>(new)</small></sup> | ||
| | |- | ||
| | !style="background:white; height:250px" align="center" colspan=2|[[File:MKDS Shy Guy Artwork.png|300x250px]] | ||
| | |- | ||
| | !colspan=2 style="background:#EAECF0"|Description: | ||
| | |- | ||
| | |colspan=2 height=64px|''Shy Guy stares out from behind his mask, his gaze revealing the hidden weaknesses of his opponents. Shy Guy only appears in DS Download Play matches.'' | ||
| | |- | ||
!style="background:#EAECF0" width=50%|Emblem: | |||
|width=50%|[[File:MKDSEmblemShyGuy.png]] | |||
|- | |- | ||
! | !style="background:#EAECF0"|Weight: | ||
|'' | |align="center"|'''20''' | ||
| | {|style="background:white; border:1px solid #1e276b; border-collapse:collapse" | ||
!style="background:#white; width:104px !important" | | |||
{|style="background:#d8f800; border:1px solid #1e276b; border-collapse:collapse" | |||
!style="background:#d8f800; border:1px solid #1e276b; width:40px !important" | | |||
!style="background:#EAECF0; width:60px !important" | | |||
|} | |||
|} | |||
| | |||
| | |||
| | |||
| | |||
| | |||
| | |||
|- | |- | ||
! | !style="background:#EAECF0"|Class: | ||
|'''{{color|dodgerblue|Light}}''' | |||
|'' | |||
| | |||
| | |||
|- | |- | ||
! | !style="background:#EAECF0"|Standard kart: | ||
|'' | |'''{{conjectural|[[Standard SG]]}}''' | ||
| | |} | ||
| | |||
| | |} | ||
| | |||
| | ===Other characters=== | ||
| | These characters are non-playable. They appear as either spectators, hazards, or obstacles of certain courses. | ||
| | {|class="wikitable" | ||
| | !style="background-color:red;color:white"|Image | ||
| | !style="background-color:red;color:white"|Name | ||
| | !style="background-color:red;color:white"|Course appearance(s) | ||
| | !style="background-color:red;color:white"|Description | ||
| | |- | ||
| | |style="text-align:center"|[[File:MKDSAngrySun.png|60px]] | ||
| | |style="text-align:center"|[[Angry Sun]] | ||
| | |style="text-align:center"|[[DS Desert Hills|Desert Hills]] | ||
| | |The Angry Sun shoots out [[Fire Snake]]s onto certain areas of the track when the second lap begins. | ||
|- | |||
|style="text-align:center"|[[File:MKDS Boo Sprite.png]] | |||
|style="text-align:center"|[[Boo]] | |||
|style="text-align:center;white-space:nowrap"|[[DS Luigi's Mansion|Luigi's Mansion]]<br>{{classic-link|N64|Banshee Boardwalk}} | |||
|In addition to being items in the game, Boos appear at certain parts of the race and make their trademark noises. These Boos are merely there for decoration, and are not hazards nor obstacles. | |||
|- | |||
|style="text-align:center"|[[File:BubbaMKDS.png|60px]] | |||
|style="text-align:center"|[[Cheep Chomp|Bubba]] | |||
|style="text-align:center"|<small>N64</small> Banshee Boardwalk | |||
|Bubba jumps out of the water over the track. It does not hit any of the racers. | |||
|- | |||
|style="text-align:center"|[[File:MKDS Airship Fortress Bullet Bill Screenshot.png]] | |||
|style="text-align:center"|[[Bullet Bill]] | |||
|style="text-align:center"|[[DS Airship Fortress|Airship Fortress]] | |||
|Also in addition to being an item in the game, Bullet Bills are shot out of the [[Airship]] towards the starting line, knocking out any racers in their path. | |||
|- | |||
|style="text-align:center"|[[File:MKDSBurner.png]] | |||
|style="text-align:center"|[[Burner]] | |||
|style="text-align:center"|Airship Fortress<br>[[Bowser Castle (Mario Kart DS)|Bowser Castle]] | |||
|Burners drop out of the ceiling onto the ground for a brief moment, setting the racer on fire if contact is made. | |||
|- | |- | ||
|style="text-align:center"|[[File:MKDSChainChomp.png]] | |||
| | |style="text-align:center"|[[Chain Chomp]] | ||
|style="text-align:center"|[[DS Peach Gardens|Peach Gardens]]<br>{{classic-link|GCN|Luigi Circuit}} | |||
| | |In Peach Gardens, chain-less Chain Chomps are all around the path. Some have a tail of [[Item Box]]es. In Luigi Circuit, a Chain Chomp chained to a stake lunges at nearby players. | ||
| | |||
| | |||
| | |||
| | |||
| | |||
| | |||
| | |||
|- | |- | ||
|style="text-align:center"|[[File:MKDS Cheep Cheep Sprite.png]] | |||
|style="text-align:center"|[[Cheep Cheep]] | |||
|style="text-align:center"|[[DS Cheep Cheep Beach|Cheep Cheep Beach]]<br>{{classic-link|SNES|Koopa Troopa Beach 2|Koopa Beach 2}} | |||
|In both courses, Cheep Cheeps bounce on the shoreline and spin racers out of control if driven into them. | |||
| | |||
| | |||
| | |||
| | |||
| | |||
| | |||
| | |||
| | |||
| | |||
|- | |- | ||
|style="text-align:center"|[[File:MKDSFireBar.png]] | |||
| | |style="text-align:center"|[[Fire Bar]] | ||
| | |style="text-align:center"|[[DS Wario Stadium|Wario Stadium]] | ||
| | |Different variations of Fire Bars are abundant on the track. Some spin in circles after a [[Dash Panel]] ramp. Others are in a triangle-like formation. Both set the racers on fire. | ||
| | |- | ||
| | |style="text-align:center"|[[File:MKDSFireSnake.png]] | ||
| | |style="text-align:center"|[[Fire Snake|Firesnake]] | ||
| | |style="text-align:center"|Desert Hills | ||
| | |Fire Snakes are projected from the Angry Sun and bounce around at certain points on the track. | ||
| | |- | ||
| | |style="text-align:center"|[[File:MKDSGoomba.png]] | ||
| | |style="text-align:center"|[[Goomba]] | ||
| | |style="text-align:center"|Mario Circuit | ||
| | |Goombas are situated on the track and spin players out of control. If [[Lightning]] strikes or if they're hit by shells, they get squashed and drop [[Dash Mushroom|Mushroom]]s, though they continue walking even while flattened. | ||
| | |- | ||
| | |style="text-align:center"|[[File:MKDSLavaBubble.png]] | ||
| | |style="text-align:center"|[[Lava Bubble]] | ||
| | |style="text-align:center"|{{classic-link|GBA|Bowser's Castle 2|Bowser Castle 2}} | ||
|Lava Bubbles jump out of lava pits at several places around the course. If a racer drives into a Lava Bubble, their kart is briefly set on fire, and they also usually fall into the lava. | |||
|- | |||
|style="text-align:center"|[[File:MontyMoleMKDS.png]] | |||
|style="text-align:center"|[[Monty Mole]] | |||
|style="text-align:center"|Peach Gardens<br>{{classic-link|N64|Moo Moo Farm}} | |||
|Monty Moles peak out of holes and then jump, posing as obstacles for the drivers. | |||
|- | |||
|style="text-align:center"|[[File:MKDSMooMoo.png]] | |||
|style="text-align:center"|[[Moo Moo]] | |||
|style="text-align:center"|<small>N64</small> Moo Moo Farm | |||
|There are several Moo Moos in the background of the track, only posing as onlookers. | |||
|- | |||
|style="text-align:center"|[[File:Pianta MKDS blue.png]][[File:Pianta MKDS pink.png]][[File:Pianta MKDS yellow.png]] | |||
|style="text-align:center"|[[Pianta]] | |||
|style="text-align:center"|[[DS Delfino Square|Delfino Square]] | |||
|Piantas appear as spectators of the race. Additionally, a Pianta statue is found in the beginning of the track. | |||
|- | |||
|style="text-align:center"|[[File:Piranha Plant MKDS sprite.png]] | |||
|style="text-align:center"|[[Piranha Plant]] | |||
|style="text-align:center"|Mario Circuit<br>{{classic-link|SNES|Choco Island 2}}<br>{{classic-link|GCN|Yoshi Circuit}} | |||
|Piranha Plants pose as obstacles on the race tracks, spinning drivers out of control for a brief moment. | |||
|- | |- | ||
|style="text-align:center"|[[File:PokeyMKDS.png|32x110px]] | |||
| | |style="text-align:center"|[[Pokey]] | ||
| | |style="text-align:center"|Desert Hills | ||
| | |Many Pokeys appear on the track, creating obstacles for the drivers. | ||
| | |- | ||
| | |style="text-align:center"|[[File:MKDS Rocky Wrench Render.png]] | ||
| | |style="text-align:center"|[[Rocky Wrench]] | ||
| | |style="text-align:center"|Airship Fortress | ||
| | |Rocky Wrenches are a stage obstacle. They hide under lids on the track. Their pattern is to briefly peak out before exposing themselves. If a racer drives over a lid which a Rocky Wrench peeks from, their kart jumps slightly into the air. If racers drive into a Rocky Wrench, their kart will be knocked over. | ||
| | |||
| | |||
| | |||
| | |||
| | |||
|- | |- | ||
|style="text-align:center"|[[File:SidestepperMKDS.png]] | |||
|style="text-align:center"|[[Sidestepper]] | |||
|style="text-align:center"|Cheep Cheep Beach | |||
|Sidesteppers are stationed on the sand, spinning players out of control if driven into them. | |||
| | |||
| | |||
| | |||
| | |||
| | |||
|- | |- | ||
|style="text-align:center"|[[File:MKDSSnowman.png]] | |||
| | |style="text-align:center"|[[Snowman]] | ||
| | |style="text-align:center"|[[DS DK Pass|DK Pass]]<br>{{classic-link|N64|Frappe Snowland}} | ||
| | |Snowmen are situated on the track, causing the player to be thrown backwards if driven into them. | ||
| | |- | ||
| | |style="text-align:center"|[[File:MKDS Swoop.png]] | ||
| | |style="text-align:center"|[[Swoop]] | ||
| | |style="text-align:center"|<small>N64</small> Banshee Boardwalk | ||
| | |A colony of Swoops fly towards the racers, slowing them down if they drive directly into the swarm. | ||
| | |- | ||
| | |style="text-align:center"|[[File:MKDSThwomp.png]] | ||
| | |style="text-align:center"|[[Thwomp]] | ||
| | |style="text-align:center"|Bowser Castle<br><small>GBA</small> Bowser Castle 2 | ||
| | |Thwomps appear as enemies, performing their trademark slam attempt at the drivers below. Additionally, some Thwomps move side to side on the ground. | ||
| | |- | ||
| | |style="text-align:center"|[[File:MKDSFirePiranhaPlant.png]] | ||
| | |style="white-space:nowrap;text-align:center"|[[Fire Piranha Plant|Venus Fire Trap]] | ||
| | |style="text-align:center"|[[DS Mario Circuit|Mario Circuit]] | ||
|Venus Fire Traps are stationed in [[Warp Pipe|pipe]]s and spit fire at oncoming racers. | |||
|- | |- | ||
|style="text-align:center"|[[File:MKDSTree.png]] | |||
|'' | |style="text-align:center"|[[Walking Tree]] | ||
| | |style="text-align:center"|Luigi's Mansion | ||
| | |Walking Trees walk in patterns and pose as obstacles for the drivers. | ||
| | |} | ||
==Karts== | |||
[[File:Mario in Standard MR MKDS.png|thumb|The kart selection screen in ''Mario Kart DS'' with Mario only.]] | |||
| | In ''Mario Kart DS'', there are 36 different karts (37 if including the [[Standard SG]]) in total. | ||
| | |||
| | Every kart shows six ratings: | ||
| | *'''Speed:''' How high the top speed of the kart is; how fast the kart can go. [[Bowser]] and [[R.O.B.]] have the fastest karts. | ||
| | *'''Acceleration:''' The time the kart's top speed is achieved when accelerating (the higher the acceleration, the shorter players wait until they reach their kart's top speed, and the lower it is, the longer they wait). [[Dry Bones|Dry Bones's]] karts can reach their top speed very quickly. | ||
|0 | *'''Weight:''' When a vehicle is heavy, the driver can knock a lighter kart. Unlike other stats, the character contributes to this stat, with [[Bowser]] and [[R.O.B.]] being very heavy, and the former of which having the heaviest karts. Characters with a higher weight stat, however, will also apply a penalty to the vehicle's '''Off-Road''' stat (which is hidden to the player). | ||
| | *'''Handling:''' How tight the kart can normally turn without drifting. [[Dry Bones]] has the best turning curve. | ||
| | *'''Drift:''' How tight the kart turns while drifting or powersliding. [[Princess Peach|Peach]] has the best drifting curve. | ||
| | *'''Items:''' The variety of items to use when touching an [[Item Box]] (a high Items rating signifies a higher chance of getting Triple Bananas in first place, Triple Mushrooms in third, fourth, etc). | ||
| | For all stats, one or more karts will have a rating of one hundred for that stat; for example, the [[Hurricane (kart)|Hurricane]] and [[ROB-BLS]] have speed ratings of one hundred, the [[Dry Bomber]] has both acceleration and handling rates of one hundred, the [[Tyrant]] has a weight rating of one hundred if normally paired with Bowser or R.O.B., the [[Light Tripper]] has a drift rating of one hundred, and each character has an items rating of one hundred for their heavier signature kart, an items rating of sixty-six for their standard kart, and an items rating of thirty-three for their lighter signature kart. | ||
Originally, only two karts are available for each character; a signature kart and a standard kart. As the player wins gold trophies in the 100cc Nitro Grand Prix, the player will unlock a second signature kart for each character. When the player wins a gold trophy in either 150cc [[Special Cup]] or [[Lightning Cup]], four signature karts from different characters will become available, bringing the total to seven karts for each character. After winning gold trophies in all eight cups in Mirror Mode, each character can be paired in any of the 36 karts, making 432 combinations (excluding Shy Guy). CPU drivers will only use their characters' respective karts in races and battles. | |||
The following ratings are from zero to one hundred, directly obtained from the values used by the game to fill the bar in the kart selection screen.<ref>[https://docs.google.com/spreadsheets/d/15fb4tuhafxs3L0u9dKcKkwcB8oNPSgbXVFr9Dwl_gfM/pubhtml A transcription of the in-game statistics of ''Mario Kart DS'']. The values used to fill the bars in the kart selection screen are found in the ''kartmenuparam'' and ''charmenuparam'' sections.</ref> The exception is weight, which due to needing to be combined with character weight for the full value, is instead from zero to fifty. On a side note, it is worth noting that a kart with a high items rating will usually have lower overall stats than the standard karts. Likewise, karts with a low items rating will usually have higher overall stats than the standard karts. Karts with a high items rating tend to be heavier than the karts with a low items rating. Karts with high items rating also receive more Mushroom boosts in Time Trial mode. The player will get one Mushroom boost if the items rating is low, two if the items rating is average, and three if the items rating is high. The weight class of the character does not play an important role in ''Mario Kart DS'', as the weight does not create kart use restrictions. | |||
===Displayed statistics=== | |||
====Signature karts==== | |||
The first type of karts are the signature karts. They are all unique and unlocked by default, with one per each character. By collecting all golden trophies in Nitro or Retro 150cc, signature karts are opened to certain other drivers. By collecting all golden trophies in 150cc Mirror Mode, any driver may use any other's signature karts. | |||
{|border=1 style="text-align:center; border:1px solid black; border-collapse:collapse; max-width:1300px" | |||
|- | |||
!style="background:red;color:white"|Signature karts | |||
|-style="background:#EAECF0" | |||
|style="display:inline-block; background:white" width=320px| | |||
{|border=1 cellspacing=0 cellpadding=4 margin=0 padding=0 style="border:1px solid black; border-collapse:collapse; height:100%" width=100% | |||
|- | |||
!style="background:#EAECF0; height:56px" align="center" colspan=2|<big>'''{{text outline|{{color-link|red|B Dasher}}}}'''</big> | |||
|- | |||
!style="background:white; height:250px" align="center" colspan=2|[[File:MKDS B Dasher Model.png|300x250px]] | |||
|- | |- | ||
! | !style="background:#EAECF0"|Speed: | ||
! | |align="center" width=50%|'''58''' | ||
|'' | {|style="background:white; border:1px solid #1e276b; border-collapse:collapse" | ||
| | !style="background:#white; width:104px !important" | | ||
| | {|style="background:#d8f800; border:1px solid #1e276b; border-collapse:collapse" | ||
| | !style="background:#d8f800; border:1px solid #1e276b; width:58px !important" | | ||
| | !style="background:#EAECF0; width:42px !important" | | ||
| | |} | ||
| | |} | ||
| | |- | ||
| | !style="background:#EAECF0"|Acceleration: | ||
| | |align="center"|'''69''' | ||
| | {|style="background:white; border:1px solid #1e276b; border-collapse:collapse" | ||
| | !style="background:#white; width:104px !important" | | ||
| | {|style="background:#d8f800; border:1px solid #1e276b; border-collapse:collapse" | ||
| | !style="background:#d8f800; border:1px solid #1e276b; width:69px !important" | | ||
| | !style="background:#EAECF0; width:31px !important" | | ||
| | |} | ||
| | |} | ||
|- | |||
!style="background:#EAECF0"|Weight: | |||
|align="center"|'''41''' | |||
{|style="background:white; border:1px solid #1e276b; border-collapse:collapse" | |||
!style="background:#white; width:104px !important" | | |||
{|style="background:#d8f800; border:1px solid #1e276b; border-collapse:collapse" | |||
!style="background:#d8f800; border:1px solid #1e276b; width:82px !important" | | |||
!style="background:#EAECF0; width:18px !important" | | |||
|} | |||
|} | |||
|- | |||
!style="background:#EAECF0"|Handling: | |||
|align="center"|'''52''' | |||
{|style="background:white; border:1px solid #1e276b; border-collapse:collapse" | |||
!style="background:#white; width:104px !important" | | |||
{|style="background:#d8f800; border:1px solid #1e276b; border-collapse:collapse" | |||
!style="background:#d8f800; border:1px solid #1e276b; width:52px !important" | | |||
!style="background:#EAECF0; width:48px !important" | | |||
|} | |||
|} | |||
|- | |- | ||
! | !style="background:#EAECF0"|Drift: | ||
|'' | |align="center"|'''55''' | ||
| | {|style="background:white; border:1px solid #1e276b; border-collapse:collapse" | ||
| | !style="background:#white; width:104px !important" | | ||
| | {|style="background:#d8f800; border:1px solid #1e276b; border-collapse:collapse" | ||
| | !style="background:#d8f800; border:1px solid #1e276b; width:55px !important" | | ||
| | !style="background:#EAECF0; width:45px !important" | | ||
| | |} | ||
| | |} | ||
| | |- | ||
| | !style="background:#EAECF0"|Items: | ||
| | |align="center"|'''100''' | ||
| | {|style="background:white; border:1px solid #1e276b; border-collapse:collapse" | ||
| | !style="background:#white; width:104px !important" | | ||
| | {|style="background:#d8f800; border:1px solid #1e276b; border-collapse:collapse" | ||
| | !style="background:#d8f800; border:1px solid #1e276b; width:100px !important" | | ||
| | |} | ||
| | |} | ||
|- | |- | ||
! | !style="background:#EAECF0"|Owner: | ||
|'' | |[[File:Mario MKDS icon.png]]<br>'''[[Mario]]''' | ||
|- | |- | ||
! | !colspan=2 style="background:#EAECF0"|Secondary drivers: | ||
|- | |||
|'' | |[[File:Daisy MKDS icon.png]]<br>'''[[Princess Daisy|Daisy]]''' | ||
| | |[[File:Waluigi MKDS icon.png]]<br>'''[[Waluigi]]''' | ||
| | |} | ||
| | |||
| | |style="display:inline-block; background:white" width=320px| | ||
|0 | {|border=1 cellspacing=0 cellpadding=4 margin=0 padding=0 style="border:1px solid black; border-collapse:collapse; height:100%" width=100% | ||
|- | |||
!style="background:#EAECF0; height:56px" align="center" colspan=3|<big>'''{{text outline|{{color-link|green|Poltergust 4000}}|white}}'''</big> | |||
| | |- | ||
| | !style="background:white; height:250px" align="center" colspan=2|[[File:MKDS Poltergust 4000 Model.png|300x250px]] | ||
| | |||
| | |||
| | |||
| | |||
| | |||
| | |||
| | |||
|- | |- | ||
! | !style="background:#EAECF0"|Speed: | ||
|'' | |align="center" width=50%|'''75''' | ||
| | {|style="background:white; border:1px solid #1e276b; border-collapse:collapse" | ||
!style="background:#white; width:104px !important" | | |||
{|style="background:#d8f800; border:1px solid #1e276b; border-collapse:collapse" | |||
!style="background:#d8f800; border:1px solid #1e276b; width:75px !important" | | |||
!style="background:#EAECF0; width:25px !important" | | |||
|} | |||
|} | |||
| | |||
| | |||
| | |||
| | |||
| | |||
| | |||
|- | |- | ||
! | !style="background:#EAECF0"|Acceleration: | ||
|'' | |align="center"|'''76''' | ||
| | {|style="background:white; border:1px solid #1e276b; border-collapse:collapse" | ||
!style="background:#white; width:104px !important" | | |||
{|style="background:#d8f800; border:1px solid #1e276b; border-collapse:collapse" | |||
!style="background:#d8f800; border:1px solid #1e276b; width:76px !important" | | |||
!style="background:#EAECF0; width:24px !important" | | |||
|} | |||
|} | |||
| | |||
| | |||
| | |||
| | |||
| | |||
| | |||
|- | |- | ||
! | !style="background:#EAECF0"|Weight: | ||
! | |align="center"|'''17''' | ||
|'' | {|style="background:white; border:1px solid #1e276b; border-collapse:collapse" | ||
| | !style="background:#white; width:104px !important" | | ||
| | {|style="background:#d8f800; border:1px solid #1e276b; border-collapse:collapse" | ||
| | !style="background:#d8f800; border:1px solid #1e276b; width:34px !important" | | ||
| | !style="background:#EAECF0; width:66px !important" | | ||
| | |} | ||
| | |} | ||
| | |- | ||
| | !style="background:#EAECF0"|Handling: | ||
| | |align="center"|'''77''' | ||
| | {|style="background:white; border:1px solid #1e276b; border-collapse:collapse" | ||
| | !style="background:#white; width:104px !important" | | ||
| | {|style="background:#d8f800; border:1px solid #1e276b; border-collapse:collapse" | ||
| | !style="background:#d8f800; border:1px solid #1e276b; width:77px !important" | | ||
| | !style="background:#EAECF0; width:23px !important" | | ||
| | |} | ||
| | |} | ||
|- | |||
!style="background:#EAECF0"|Drift: | |||
|align="center"|'''33''' | |||
{|style="background:white; border:1px solid #1e276b; border-collapse:collapse" | |||
!style="background:#white; width:104px !important" | | |||
{|style="background:#d8f800; border:1px solid #1e276b; border-collapse:collapse" | |||
!style="background:#d8f800; border:1px solid #1e276b; width:33px !important" | | |||
!style="background:#EAECF0; width:67px !important" | | |||
|} | |||
|} | |||
|- | |- | ||
! | !style="background:#EAECF0"|Items: | ||
|'' | |align="center"|'''33''' | ||
| | {|style="background:white; border:1px solid #1e276b; border-collapse:collapse" | ||
!style="background:#white; width:104px !important" | | |||
{|style="background:#d8f800; border:1px solid #1e276b; border-collapse:collapse" | |||
!style="background:#d8f800; border:1px solid #1e276b; width:33px !important" | | |||
!style="background:#EAECF0; width:67px !important" | | |||
|} | |||
|} | |||
| | |||
| | |||
| | |||
| | |||
| | |||
| | |||
|- | |- | ||
! | !style="background:#EAECF0"|Owner: | ||
|'' | |[[File:Luigi MKDS icon.png]]<br>'''[[Luigi]]''' | ||
|- | |- | ||
! | !colspan=2 style="background:#EAECF0"|Secondary drivers: | ||
|- | |||
|'' | |[[File:Yoshi MKDS icon.png]]<br>'''[[Yoshi]]''' | ||
| | |[[File:Waluigi MKDS icon.png]]<br>'''[[Waluigi]]''' | ||
| | |} | ||
| | |style="display:inline-block; background:white" width=320px| | ||
| | {|border=1 cellspacing=0 cellpadding=4 margin=0 padding=0 style="border:1px solid black; border-collapse:collapse; height:100%" width=100% | ||
|0 | |- | ||
!style="background:#EAECF0; height:56px" align="center" colspan=3|<big>'''{{text outline|{{color-link|hotpink|Royale}}}}'''</big> | |||
|- | |||
| | !style="background:white; height:250px" align="center" colspan=2|[[File:MKDS Royale Model.png|300x250px]] | ||
| | |||
| | |||
| | |||
| | |||
| | |||
| | |||
| | |||
|- | |- | ||
! | !style="background:#EAECF0"|Speed: | ||
|'' | |align="center" width=50%|'''41''' | ||
| | {|style="background:white; border:1px solid #1e276b; border-collapse:collapse" | ||
!style="background:#white; width:104px !important" | | |||
{|style="background:#d8f800; border:1px solid #1e276b; border-collapse:collapse" | |||
!style="background:#d8f800; border:1px solid #1e276b; width:41px !important" | | |||
!style="background:#EAECF0; width:59px !important" | | |||
|} | |||
|} | |||
| | |||
| | |||
| | |||
| | |||
| | |||
| | |||
|- | |- | ||
! | !style="background:#EAECF0"|Acceleration: | ||
|'' | |align="center"|'''69''' | ||
| | {|style="background:white; border:1px solid #1e276b; border-collapse:collapse" | ||
!style="background:#white; width:104px !important" | | |||
{|style="background:#d8f800; border:1px solid #1e276b; border-collapse:collapse" | |||
!style="background:#d8f800; border:1px solid #1e276b; width:69px !important" | | |||
!style="background:#EAECF0; width:31px !important" | | |||
|} | |||
|} | |||
| | |||
| | |||
| | |||
| | |||
| | |||
| | |||
|- | |- | ||
! | !style="background:#EAECF0"|Weight: | ||
! | |align="center"|'''44''' | ||
|'' | {|style="background:white; border:1px solid #1e276b; border-collapse:collapse" | ||
| | !style="background:#white; width:104px !important" | | ||
| | {|style="background:#d8f800; border:1px solid #1e276b; border-collapse:collapse" | ||
| | !style="background:#d8f800; border:1px solid #1e276b; width:88px !important" | | ||
| | !style="background:#EAECF0; width:12px !important" | | ||
| | |} | ||
| | |} | ||
| | |- | ||
| | !style="background:#EAECF0"|Handling: | ||
| | |align="center"|'''45''' | ||
| | {|style="background:white; border:1px solid #1e276b; border-collapse:collapse" | ||
| | !style="background:#white; width:104px !important" | | ||
| | {|style="background:#d8f800; border:1px solid #1e276b; border-collapse:collapse" | ||
| | !style="background:#d8f800; border:1px solid #1e276b; width:45px !important" | | ||
| | !style="background:#EAECF0; width:55px !important" | | ||
| | |} | ||
| | |} | ||
|- | |||
!style="background:#EAECF0"|Drift: | |||
|align="center"|'''94''' | |||
{|style="background:white; border:1px solid #1e276b; border-collapse:collapse" | |||
!style="background:#white; width:104px !important" | | |||
{|style="background:#d8f800; border:1px solid #1e276b; border-collapse:collapse" | |||
!style="background:#d8f800; border:1px solid #1e276b; width:94px !important" | | |||
!style="background:#EAECF0; width:6px !important" | | |||
|} | |||
|} | |||
|- | |- | ||
! | !style="background:#EAECF0"|Items: | ||
|'' | |align="center"|'''100''' | ||
| | {|style="background:white; border:1px solid #1e276b; border-collapse:collapse" | ||
| | !style="background:#white; width:104px !important" | | ||
| | {|style="background:#d8f800; border:1px solid #1e276b; border-collapse:collapse" | ||
| | !style="background:#d8f800; border:1px solid #1e276b; width:100px !important" | | ||
| | |} | ||
| | |} | ||
| | |- | ||
| | !style="background:#EAECF0"|Owner: | ||
| | |[[File:Peach MKDS icon.png]]<br>'''[[Princess Peach|Peach]]''' | ||
| | |- | ||
| | !colspan=2 style="background:#EAECF0"|Secondary drivers: | ||
|0 | |- | ||
| | |[[File:Yoshi MKDS icon.png]]<br>'''[[Yoshi]]''' | ||
| | |[[File:Toad MKDS icon.png]]<br>'''[[Toad]]''' | ||
| | |} | ||
| | |||
|style="display:inline-block; background:white" width=320px| | |||
{|border=1 cellspacing=0 cellpadding=4 margin=0 padding=0 style="border:1px solid black; border-collapse:collapse; height:100%" width=100% | |||
|- | |||
!style="background:#EAECF0; height:56px" align="center" colspan=3|<big>'''{{text outline|{{color-link|limegreen|Egg 1}}}}'''</big> | |||
|- | |||
!style="background:white; height:250px" align="center" colspan=2|[[File:MKDS Egg 1 Model.png|300x250px]] | |||
|- | |- | ||
! | !style="background:#EAECF0"|Speed: | ||
|'' | |align="center" width=50%|'''59''' | ||
| | {|style="background:white; border:1px solid #1e276b; border-collapse:collapse" | ||
!style="background:#white; width:104px !important" | | |||
{|style="background:#d8f800; border:1px solid #1e276b; border-collapse:collapse" | |||
!style="background:#d8f800; border:1px solid #1e276b; width:59px !important" | | |||
!style="background:#EAECF0; width:41px !important" | | |||
|} | |||
|} | |||
| | |||
| | |||
| | |||
| | |||
| | |||
| | |||
|- | |- | ||
! | !style="background:#EAECF0"|Acceleration: | ||
|align="center"|'''91''' | |||
|'' | {|style="background:white; border:1px solid #1e276b; border-collapse:collapse" | ||
| | !style="background:#white; width:104px !important" | | ||
| | {|style="background:#d8f800; border:1px solid #1e276b; border-collapse:collapse" | ||
| | !style="background:#d8f800; border:1px solid #1e276b; width:91px !important" | | ||
| | !style="background:#EAECF0; width:9px !important" | | ||
|} | |||
|} | |||
| | |||
| | |||
| | |||
|- | |- | ||
! | !style="background:#EAECF0"|Weight: | ||
|'' | |align="center"|'''14''' | ||
| | {|style="background:white; border:1px solid #1e276b; border-collapse:collapse" | ||
| | !style="background:#white; width:104px !important" | | ||
| | {|style="background:#d8f800; border:1px solid #1e276b; border-collapse:collapse" | ||
| | !style="background:#d8f800; border:1px solid #1e276b; width:28px !important" | | ||
| | !style="background:#EAECF0; width:72px !important" | | ||
| | |} | ||
| | |} | ||
| | |- | ||
| | !style="background:#EAECF0"|Handling: | ||
| | |align="center"|'''89''' | ||
| | {|style="background:white; border:1px solid #1e276b; border-collapse:collapse" | ||
| | !style="background:#white; width:104px !important" | | ||
| | {|style="background:#d8f800; border:1px solid #1e276b; border-collapse:collapse" | ||
| | !style="background:#d8f800; border:1px solid #1e276b; width:89px !important" | | ||
| | !style="background:#EAECF0; width:11px !important" | | ||
| | |} | ||
|} | |||
|- | |||
!style="background:#EAECF0"|Drift: | |||
|align="center"|'''41''' | |||
{|style="background:white; border:1px solid #1e276b; border-collapse:collapse" | |||
!style="background:#white; width:104px !important" | | |||
{|style="background:#d8f800; border:1px solid #1e276b; border-collapse:collapse" | |||
!style="background:#d8f800; border:1px solid #1e276b; width:41px !important" | | |||
!style="background:#EAECF0; width:59px !important" | | |||
|} | |||
|} | |||
|- | |- | ||
! | !style="background:#EAECF0"|Items: | ||
|'' | |align="center"|'''33''' | ||
| | {|style="background:white; border:1px solid #1e276b; border-collapse:collapse" | ||
!style="background:#white; width:104px !important" | | |||
{|style="background:#d8f800; border:1px solid #1e276b; border-collapse:collapse" | |||
!style="background:#d8f800; border:1px solid #1e276b; width:33px !important" | | |||
!style="background:#EAECF0; width:67px !important" | | |||
|} | |||
|} | |||
| | |||
| | |||
| | |||
| | |||
| | |||
| | |||
|- | |- | ||
! | !style="background:#EAECF0"|Owner: | ||
|[[File:Yoshi MKDS icon.png]]<br>'''[[Yoshi]]''' | |||
|'' | |||
|- | |- | ||
! | !colspan=2 style="background:#EAECF0"|Secondary drivers: | ||
|'' | |- | ||
| | |[[File:Daisy MKDS icon.png]]<br>'''[[Princess Daisy|Daisy]]''' | ||
| | |[[File:ROB MKDS icon.png]]<br>'''[[R.O.B.]]''' | ||
| | |} | ||
| | |||
|0 | |style="display:inline-block; background:white" width=320px| | ||
{|border=1 cellspacing=0 cellpadding=4 margin=0 padding=0 style="border:1px solid black; border-collapse:collapse; height:100%" width=100% | |||
|- | |||
| | !style="background:#EAECF0; height:56px" align="center" colspan=3|<big>'''{{text outline|{{color-link|blue|Mushmellow}}|white}}'''</big> | ||
| | |- | ||
| | !style="background:white; height:250px" align="center" colspan=2|[[File:MKDS Mushmellow Model.png|300x250px]] | ||
| | |||
| | |||
| | |||
| | |||
| | |||
| | |||
|- | |- | ||
! | !style="background:#EAECF0"|Speed: | ||
|'' | |align="center" width=50%|'''43''' | ||
| | {|style="background:white; border:1px solid #1e276b; border-collapse:collapse" | ||
| | !style="background:#white; width:104px !important" | | ||
| | {|style="background:#d8f800; border:1px solid #1e276b; border-collapse:collapse" | ||
!style="background:#d8f800; border:1px solid #1e276b; width:43px !important" | | |||
!style="background:#EAECF0; width:57px !important" | | |||
|} | |||
|} | |||
| | |||
| | |||
| | |||
| | |||
|- | |- | ||
! | !style="background:#EAECF0"|Acceleration: | ||
|align="center"|'''87''' | |||
|'' | {|style="background:white; border:1px solid #1e276b; border-collapse:collapse" | ||
| | !style="background:#white; width:104px !important" | | ||
| | {|style="background:#d8f800; border:1px solid #1e276b; border-collapse:collapse" | ||
| | !style="background:#d8f800; border:1px solid #1e276b; width:87px !important" | | ||
| | !style="background:#EAECF0; width:13px !important" | | ||
|} | |||
|} | |||
| | |||
| | |||
| | |||
|- | |- | ||
! | !style="background:#EAECF0"|Weight: | ||
| | |align="center"|'''17''' | ||
| | {|style="background:white; border:1px solid #1e276b; border-collapse:collapse" | ||
| | !style="background:#white; width:104px !important" | | ||
| | {|style="background:#d8f800; border:1px solid #1e276b; border-collapse:collapse" | ||
| | !style="background:#d8f800; border:1px solid #1e276b; width:34px !important" | | ||
| | !style="background:#EAECF0; width:66px !important" | | ||
| | |} | ||
| | |} | ||
| | |- | ||
| | !style="background:#EAECF0"|Handling: | ||
| | |align="center"|'''69''' | ||
| | {|style="background:white; border:1px solid #1e276b; border-collapse:collapse" | ||
| | !style="background:#white; width:104px !important" | | ||
| | {|style="background:#d8f800; border:1px solid #1e276b; border-collapse:collapse" | ||
| | !style="background:#d8f800; border:1px solid #1e276b; width:69px !important" | | ||
| | !style="background:#EAECF0; width:31px !important" | | ||
| | |} | ||
|} | |||
|- | |||
!style="background:#EAECF0"|Drift: | |||
|align="center"|'''69''' | |||
{|style="background:white; border:1px solid #1e276b; border-collapse:collapse" | |||
!style="background:#white; width:104px !important" | | |||
{|style="background:#d8f800; border:1px solid #1e276b; border-collapse:collapse" | |||
!style="background:#d8f800; border:1px solid #1e276b; width:69px !important" | | |||
!style="background:#EAECF0; width:31px !important" | | |||
|} | |||
|} | |||
|- | |- | ||
| | !style="background:#EAECF0"|Items: | ||
| | |align="center"|'''33''' | ||
| | {|style="background:white; border:1px solid #1e276b; border-collapse:collapse" | ||
| | !style="background:#white; width:104px !important" | | ||
| | {|style="background:#d8f800; border:1px solid #1e276b; border-collapse:collapse" | ||
| | !style="background:#d8f800; border:1px solid #1e276b; width:33px !important" | | ||
| | !style="background:#EAECF0; width:67px !important" | | ||
| | |} | ||
| | |} | ||
| | |- | ||
| | !style="background:#EAECF0"|Owner: | ||
| | |[[File:Toad MKDS icon.png]]<br>'''[[Toad]]''' | ||
| | |||
|- | |- | ||
| | !colspan=2 style="background:#EAECF0"|Secondary drivers: | ||
|- | |- | ||
| | |[[File:Dry Bones MKDS icon.png]]<br>'''[[Dry Bones]]''' | ||
| | |[[File:Yoshi MKDS icon.png]]<br>'''[[Yoshi]]''' | ||
| | |} | ||
| | |||
|0. | |style="display:inline-block; background:white" width=320px| | ||
| | {|border=1 cellspacing=0 cellpadding=4 margin=0 padding=0 style="border:1px solid black; border-collapse:collapse; height:100%" width=100% | ||
| | |- | ||
| | !style="background:#EAECF0; height:56px" align="center" colspan=3|<big>'''{{text outline|{{color-link|yellow|Rambi Rider}}}}'''</big> | ||
| | |- | ||
| | !style="background:white; height:250px" align="center" colspan=2|[[File:MKDS Rambi Rider Model.png|300x250px]] | ||
| | |- | ||
| | !style="background:#EAECF0"|Speed: | ||
| | |align="center" width=50%|'''74''' | ||
| | {|style="background:white; border:1px solid #1e276b; border-collapse:collapse" | ||
| | !style="background:#white; width:104px !important" | | ||
| | {|style="background:#d8f800; border:1px solid #1e276b; border-collapse:collapse" | ||
| | !style="background:#d8f800; border:1px solid #1e276b; width:74px !important" | | ||
!style="background:#EAECF0; width:26px !important" | | |||
|} | |||
|} | |||
|- | |||
!style="background:#EAECF0"|Acceleration: | |||
|align="center"|'''44''' | |||
{|style="background:white; border:1px solid #1e276b; border-collapse:collapse" | |||
!style="background:#white; width:104px !important" | | |||
{|style="background:#d8f800; border:1px solid #1e276b; border-collapse:collapse" | |||
!style="background:#d8f800; border:1px solid #1e276b; width:44px !important" | | |||
!style="background:#EAECF0; width:56px !important" | | |||
|} | |||
|} | |||
|- | |- | ||
| | !style="background:#EAECF0"|Weight: | ||
| | |align="center"|'''47''' | ||
{|style="background:white; border:1px solid #1e276b; border-collapse:collapse" | |||
!style="background:#white; width:104px !important" | | |||
{|style="background:#d8f800; border:1px solid #1e276b; border-collapse:collapse" | |||
!style="background:#d8f800; border:1px solid #1e276b; width:94px !important" | | |||
!style="background:#EAECF0; width:6px !important" | | |||
|} | |||
|} | |||
| | |||
| | |||
| | |||
| | |||
| | |||
| | |||
| | |||
| | |||
|- | |- | ||
| | !style="background:#EAECF0"|Handling: | ||
| | |align="center"|'''31''' | ||
{|style="background:white; border:1px solid #1e276b; border-collapse:collapse" | |||
!style="background:#white; width:104px !important" | | |||
{|style="background:#d8f800; border:1px solid #1e276b; border-collapse:collapse" | |||
!style="background:#d8f800; border:1px solid #1e276b; width:31px !important" | | |||
!style="background:#EAECF0; width:69px !important" | | |||
|} | |||
|} | |||
| | |||
| | |||
| | |||
| | |||
| | |||
| | |||
| | |||
| | |||
|- | |- | ||
| | !style="background:#EAECF0"|Drift: | ||
| | |align="center"|'''74''' | ||
| | {|style="background:white; border:1px solid #1e276b; border-collapse:collapse" | ||
| | !style="background:#white; width:104px !important" | | ||
| | {|style="background:#d8f800; border:1px solid #1e276b; border-collapse:collapse" | ||
| | !style="background:#d8f800; border:1px solid #1e276b; width:74px !important" | | ||
| | !style="background:#EAECF0; width:26px !important" | | ||
| | |} | ||
| | |} | ||
| | |- | ||
| | !style="background:#EAECF0"|Items: | ||
| | |align="center"|'''100''' | ||
| | {|style="background:white; border:1px solid #1e276b; border-collapse:collapse" | ||
| | !style="background:#white; width:104px !important" | | ||
| | {|style="background:#d8f800; border:1px solid #1e276b; border-collapse:collapse" | ||
| | !style="background:#d8f800; border:1px solid #1e276b; width:100px !important" | | ||
| | |} | ||
|} | |||
|- | |||
!style="background:#EAECF0"|Owner: | |||
|[[File:DK MKDS icon.png]]<br>'''[[Donkey Kong]]''' | |||
|- | |||
!colspan=2 style="background:#EAECF0"|Secondary drivers: | |||
|- | |- | ||
| | |[[File:Bowser MKDS icon.png]]<br>'''[[Bowser]]''' | ||
|[[File:Daisy MKDS icon.png]]<br>'''[[Princess Daisy|Daisy]]''' | |||
|} | |||
| | |||
| | |style="display:inline-block; background:white" width=320px| | ||
| | {|border=1 cellspacing=0 cellpadding=4 margin=0 padding=0 style="border:1px solid black; border-collapse:collapse; height:100%" width=100% | ||
|- | |||
| | !style="background:#EAECF0; height:56px" align="center" colspan=3|<big>'''{{text outline|{{color-link|mediumorchid|Brute}}}}'''</big> | ||
| | |||
|0 | |||
| | |||
| | |||
| | |||
| | |||
| | |||
|- | |- | ||
| | !style="background:white; height:250px" align="center" colspan=2|[[File:MKDS Brute Model.png|300x250px]] | ||
| | |||
|- | |- | ||
| | !style="background:#EAECF0"|Speed: | ||
| | |align="center" width=50%|'''92''' | ||
| | {|style="background:white; border:1px solid #1e276b; border-collapse:collapse" | ||
| | !style="background:#white; width:104px !important" | | ||
| | {|style="background:#d8f800; border:1px solid #1e276b; border-collapse:collapse" | ||
| | !style="background:#d8f800; border:1px solid #1e276b; width:92px !important" | | ||
| | !style="background:#EAECF0; width:8px !important" | | ||
| | |} | ||
| | |} | ||
| | |- | ||
| | !style="background:#EAECF0"|Acceleration: | ||
| | |align="center"|'''53''' | ||
| | {|style="background:white; border:1px solid #1e276b; border-collapse:collapse" | ||
| | !style="background:#white; width:104px !important" | | ||
| | {|style="background:#d8f800; border:1px solid #1e276b; border-collapse:collapse" | ||
| | !style="background:#d8f800; border:1px solid #1e276b; width:53px !important" | | ||
| | !style="background:#EAECF0; width:47px !important" | | ||
|} | |||
|} | |||
|- | |||
!style="background:#EAECF0"|Weight: | |||
|align="center"|'''23''' | |||
{|style="background:white; border:1px solid #1e276b; border-collapse:collapse" | |||
!style="background:#white; width:104px !important" | | |||
{|style="background:#d8f800; border:1px solid #1e276b; border-collapse:collapse" | |||
!style="background:#d8f800; border:1px solid #1e276b; width:46px !important" | | |||
!style="background:#EAECF0; width:54px !important" | | |||
|} | |||
|} | |||
|- | |||
!style="background:#EAECF0"|Handling: | |||
|align="center"|'''51''' | |||
{|style="background:white; border:1px solid #1e276b; border-collapse:collapse" | |||
!style="background:#white; width:104px !important" | | |||
{|style="background:#d8f800; border:1px solid #1e276b; border-collapse:collapse" | |||
!style="background:#d8f800; border:1px solid #1e276b; width:51px !important" | | |||
!style="background:#EAECF0; width:49px !important" | | |||
|} | |||
|} | |||
|- | |- | ||
| | !style="background:#EAECF0"|Drift: | ||
| | |align="center"|'''49''' | ||
| | {|style="background:white; border:1px solid #1e276b; border-collapse:collapse" | ||
| | !style="background:#white; width:104px !important" | | ||
| | {|style="background:#d8f800; border:1px solid #1e276b; border-collapse:collapse" | ||
| | !style="background:#d8f800; border:1px solid #1e276b; width:49px !important" | | ||
| | !style="background:#EAECF0; width:51px !important" | | ||
| | |} | ||
| | |} | ||
| | |- | ||
| | !style="background:#EAECF0"|Items: | ||
| | |align="center"|'''33''' | ||
| | {|style="background:white; border:1px solid #1e276b; border-collapse:collapse" | ||
| | !style="background:#white; width:104px !important" | | ||
| | {|style="background:#d8f800; border:1px solid #1e276b; border-collapse:collapse" | ||
| | !style="background:#d8f800; border:1px solid #1e276b; width:33px !important" | | ||
| | !style="background:#EAECF0; width:67px !important" | | ||
|} | |||
|} | |||
|- | |- | ||
| | !style="background:#EAECF0"|Owner: | ||
| | |[[File:Wario MKDS icon.png]]<br>'''[[Wario]]''' | ||
|- | |- | ||
| | !colspan=2 style="background:#EAECF0"|Secondary drivers: | ||
|- | |- | ||
|[[File:Bowser MKDS icon.png]]<br>'''[[Bowser]]''' | |||
|[[File:Waluigi MKDS icon.png]]<br>'''[[Waluigi]]''' | |||
|} | |} | ||
== | |style="display:inline-block; background:white" width=320px| | ||
{ | {|border=1 cellspacing=0 cellpadding=4 margin=0 padding=0 style="border:1px solid black; border-collapse:collapse; height:100%" width=100% | ||
|- | |||
{{ | !style="background:#EAECF0; height:56px" align="center" colspan=3|<big>'''{{text outline|{{color-link|coral|Tyrant}}}}'''</big> | ||
|- | |||
!style="background:white; height:250px" align="center" colspan=2|[[File:MKDS Tyrant Model.png|300x250px]] | |||
{{ | |- | ||
< | !style="background:#EAECF0"|Speed: | ||
|align="center" width=50%|'''90''' | |||
File: | {|style="background:white; border:1px solid #1e276b; border-collapse:collapse" | ||
!style="background:#white; width:104px !important" | | |||
{|style="background:#d8f800; border:1px solid #1e276b; border-collapse:collapse" | |||
!style="background:#d8f800; border:1px solid #1e276b; width:90px !important" | | |||
!style="background:#EAECF0; width:10px !important" | | |||
|} | |||
|} | |||
== | |- | ||
{ | !style="background:#EAECF0"|Acceleration: | ||
{{ | |align="center"|'''25''' | ||
| | {|style="background:white; border:1px solid #1e276b; border-collapse:collapse" | ||
| | !style="background:#white; width:104px !important" | | ||
| | {|style="background:#d8f800; border:1px solid #1e276b; border-collapse:collapse" | ||
| | !style="background:#d8f800; border:1px solid #1e276b; width:25px !important" | | ||
| | !style="background:#EAECF0; width:75px !important" | | ||
| | |} | ||
| | |} | ||
| | |- | ||
| | !style="background:#EAECF0"|Weight: | ||
| | |align="center"|'''50''' | ||
| | {|style="background:white; border:1px solid #1e276b; border-collapse:collapse" | ||
| | !style="background:#white; width:104px !important" | | ||
| | {|style="background:#d8f800; border:1px solid #1e276b; border-collapse:collapse" | ||
| | !style="background:#d8f800; border:1px solid #1e276b; width:100px !important" | | ||
| | |} | ||
|} | |||
|- | |||
!style="background:#EAECF0"|Handling: | |||
|align="center"|'''25''' | |||
{|style="background:white; border:1px solid #1e276b; border-collapse:collapse" | |||
!style="background:#white; width:104px !important" | | |||
{|style="background:#d8f800; border:1px solid #1e276b; border-collapse:collapse" | |||
!style="background:#d8f800; border:1px solid #1e276b; width:25px !important" | | |||
!style="background:#EAECF0; width:75px !important" | | |||
|} | |||
|} | |||
|- | |||
!style="background:#EAECF0"|Drift: | |||
|align="center"|'''64''' | |||
{|style="background:white; border:1px solid #1e276b; border-collapse:collapse" | |||
!style="background:#white; width:104px !important" | | |||
{|style="background:#d8f800; border:1px solid #1e276b; border-collapse:collapse" | |||
!style="background:#d8f800; border:1px solid #1e276b; width:64px !important" | | |||
!style="background:#EAECF0; width:36px !important" | | |||
|} | |||
|} | |||
|- | |||
!style="background:#EAECF0"|Items: | |||
|align="center"|'''100''' | |||
{|style="background:white; border:1px solid #1e276b; border-collapse:collapse" | |||
!style="background:#white; width:104px !important" | | |||
{|style="background:#d8f800; border:1px solid #1e276b; border-collapse:collapse" | |||
!style="background:#d8f800; border:1px solid #1e276b; width:100px !important" | | |||
|} | |||
|} | |||
|- | |||
!style="background:#EAECF0"|Owner: | |||
|[[File:Bowser MKDS icon.png]]<br>'''[[Bowser]]''' | |||
|- | |||
!colspan=2 style="background:#EAECF0"|Secondary drivers: | |||
|- | |||
|[[File:Waluigi MKDS icon.png]]<br>'''[[Waluigi]]''' | |||
|[[File:Wario MKDS icon.png]]<br>'''[[Wario]]''' | |||
|} | |||
== | |style="display:inline-block; background:white" width=320px| | ||
{{ | {|border=1 cellspacing=0 cellpadding=4 margin=0 padding=0 style="border:1px solid black; border-collapse:collapse; height:100%" width=100% | ||
|- | |||
!style="background:#EAECF0; height:56px" align="center" colspan=3|<big>'''{{text outline|{{color-link|orange|Power Flower (kart)|Power Flower}}}}'''</big> | |||
|- | |||
== | !style="background:white; height:250px" align="center" colspan=2|[[File:MKDS Power Flower Model.png|300x250px]] | ||
{{ | |- | ||
=== | !style="background:#EAECF0"|Speed: | ||
|align="center" width=50%|'''58''' | |||
{|style="background:white; border:1px solid #1e276b; border-collapse:collapse" | |||
!style="background:#white; width:104px !important" | | |||
{|style="background:#d8f800; border:1px solid #1e276b; border-collapse:collapse" | |||
!style="background:#d8f800; border:1px solid #1e276b; width:58px !important" | | |||
!style="background:#EAECF0; width:42px !important" | | |||
|} | |||
|} | |||
|- | |||
!style="background:#EAECF0"|Acceleration: | |||
|align="center"|'''61''' | |||
{|style="background:white; border:1px solid #1e276b; border-collapse:collapse" | |||
!style="background:#white; width:104px !important" | | |||
{|style="background:#d8f800; border:1px solid #1e276b; border-collapse:collapse" | |||
!style="background:#d8f800; border:1px solid #1e276b; width:61px !important" | | |||
!style="background:#EAECF0; width:39px !important" | | |||
|} | |||
|} | |||
|- | |||
!style="background:#EAECF0"|Weight: | |||
|align="center"|'''35''' | |||
{|style="background:white; border:1px solid #1e276b; border-collapse:collapse" | |||
!style="background:#white; width:104px !important" | | |||
{|style="background:#d8f800; border:1px solid #1e276b; border-collapse:collapse" | |||
!style="background:#d8f800; border:1px solid #1e276b; width:70px !important" | | |||
!style="background:#EAECF0; width:30px !important" | | |||
|} | |||
|} | |||
|- | |||
!style="background:#EAECF0"|Handling: | |||
|align="center"|'''36''' | |||
{|style="background:white; border:1px solid #1e276b; border-collapse:collapse" | |||
!style="background:#white; width:104px !important" | | |||
{|style="background:#d8f800; border:1px solid #1e276b; border-collapse:collapse" | |||
!style="background:#d8f800; border:1px solid #1e276b; width:36px !important" | | |||
!style="background:#EAECF0; width:64px !important" | | |||
|} | |||
|} | |||
|- | |||
!style="background:#EAECF0"|Drift: | |||
|align="center"|'''84''' | |||
{|style="background:white; border:1px solid #1e276b; border-collapse:collapse" | |||
!style="background:#white; width:104px !important" | | |||
{|style="background:#d8f800; border:1px solid #1e276b; border-collapse:collapse" | |||
!style="background:#d8f800; border:1px solid #1e276b; width:84px !important" | | |||
!style="background:#EAECF0; width:16px !important" | | |||
|} | |||
|} | |||
|- | |||
!style="background:#EAECF0"|Items: | |||
|align="center"|'''100''' | |||
{|style="background:white; border:1px solid #1e276b; border-collapse:collapse" | |||
!style="background:#white; width:104px !important" | | |||
{|style="background:#d8f800; border:1px solid #1e276b; border-collapse:collapse" | |||
!style="background:#d8f800; border:1px solid #1e276b; width:100px !important" | | |||
|} | |||
|} | |||
|- | |||
!style="background:#EAECF0"|Owner: | |||
|[[File:Daisy MKDS icon.png]]<br>'''[[Princess Daisy|Daisy]]''' | |||
|- | |||
!colspan=2 style="background:#EAECF0"|Secondary drivers: | |||
|- | |||
|[[File:Peach MKDS icon.png]]<br>'''[[Princess Peach|Peach]]''' | |||
|[[File:DK MKDS icon.png]]<br>'''[[Donkey Kong]]''' | |||
|} | |||
=== | |style="display:inline-block; background:white" width=320px| | ||
{|border=1 cellspacing=0 cellpadding=4 margin=0 padding=0 style="border:1px solid black; border-collapse:collapse; height:100%" width=100% | |||
|- | |||
=== | !style="background:#EAECF0; height:56px" align="center" colspan=3|<big>'''{{text outline|{{color-link|palegoldenrod|Banisher}}}}'''</big> | ||
|- | |||
!style="background:white; height:250px" align="center" colspan=2|[[File:MKDS Banisher Model.png|300x250px]] | |||
=== | |- | ||
!style="background:#EAECF0"|Speed: | |||
|align="center" width=50%|'''25''' | |||
=== | {|style="background:white; border:1px solid #1e276b; border-collapse:collapse" | ||
!style="background:#white; width:104px !important" | | |||
{|style="background:#d8f800; border:1px solid #1e276b; border-collapse:collapse" | |||
!style="background:#d8f800; border:1px solid #1e276b; width:25px !important" | | |||
!style="background:#EAECF0; width:75px !important" | | |||
|} | |||
|} | |||
|- | |||
!style="background:#EAECF0"|Acceleration: | |||
|align="center"|'''97''' | |||
{|style="background:white; border:1px solid #1e276b; border-collapse:collapse" | |||
!style="background:#white; width:104px !important" | | |||
{|style="background:#d8f800; border:1px solid #1e276b; border-collapse:collapse" | |||
!style="background:#d8f800; border:1px solid #1e276b; width:97px !important" | | |||
!style="background:#EAECF0; width:3px !important" | | |||
|} | |||
|} | |||
|- | |||
!style="background:#EAECF0"|Weight: | |||
|align="center"|'''35''' | |||
{|style="background:white; border:1px solid #1e276b; border-collapse:collapse" | |||
!style="background:#white; width:104px !important" | | |||
{|style="background:#d8f800; border:1px solid #1e276b; border-collapse:collapse" | |||
!style="background:#d8f800; border:1px solid #1e276b; width:70px !important" | | |||
!style="background:#EAECF0; width:30px !important" | | |||
|} | |||
|} | |||
|- | |||
!style="background:#EAECF0"|Handling: | |||
|align="center"|'''91''' | |||
{|style="background:white; border:1px solid #1e276b; border-collapse:collapse" | |||
!style="background:#white; width:104px !important" | | |||
{|style="background:#d8f800; border:1px solid #1e276b; border-collapse:collapse" | |||
!style="background:#d8f800; border:1px solid #1e276b; width:91px !important" | | |||
!style="background:#EAECF0; width:9px !important" | | |||
|} | |||
|} | |||
|- | |||
!style="background:#EAECF0"|Drift: | |||
|align="center"|'''45''' | |||
{|style="background:white; border:1px solid #1e276b; border-collapse:collapse" | |||
!style="background:#white; width:104px !important" | | |||
{|style="background:#d8f800; border:1px solid #1e276b; border-collapse:collapse" | |||
!style="background:#d8f800; border:1px solid #1e276b; width:45px !important" | | |||
!style="background:#EAECF0; width:55px !important" | | |||
|} | |||
|} | |||
|- | |||
!style="background:#EAECF0"|Items: | |||
|align="center"|'''100''' | |||
{|style="background:white; border:1px solid #1e276b; border-collapse:collapse" | |||
!style="background:#white; width:104px !important" | | |||
{|style="background:#d8f800; border:1px solid #1e276b; border-collapse:collapse" | |||
!style="background:#d8f800; border:1px solid #1e276b; width:100px !important" | | |||
|} | |||
|} | |||
|- | |||
!style="background:#EAECF0"|Owner: | |||
|[[File:Dry Bones MKDS icon.png]]<br>'''[[Dry Bones]]''' | |||
|- | |||
!colspan=2 style="background:#EAECF0"|Secondary drivers: | |||
|- | |||
|[[File:Mario MKDS icon.png]]<br>'''[[Mario]]''' | |||
|[[File:Yoshi MKDS icon.png]]<br>'''[[Yoshi]]''' | |||
|} | |||
== | |style="display:inline-block; background:white" width=320px| | ||
{{ | {|border=1 cellspacing=0 cellpadding=4 margin=0 padding=0 style="border:1px solid black; border-collapse:collapse; height:100%" width=100% | ||
=== | |- | ||
!style="background:#EAECF0; height:56px" align="center" colspan=3|<big>'''{{text outline|{{color-link|indigo|Gold Mantis}}|white}}'''</big> | |||
|- | |||
=== | !style="background:white; height:250px" align="center" colspan=2|[[File:MKDS Gold Mantis Model.png|300x250px]] | ||
|- | |||
!style="background:#EAECF0"|Speed: | |||
=== | |align="center" width=50%|'''75''' | ||
{|style="background:white; border:1px solid #1e276b; border-collapse:collapse" | |||
!style="background:#white; width:104px !important" | | |||
{|style="background:#d8f800; border:1px solid #1e276b; border-collapse:collapse" | |||
=== | !style="background:#d8f800; border:1px solid #1e276b; width:75px !important" | | ||
!style="background:#EAECF0; width:25px !important" | | |||
|} | |||
=== | |} | ||
|- | |||
!style="background:#EAECF0"|Acceleration: | |||
|align="center"|'''65''' | |||
{|style="background:white; border:1px solid #1e276b; border-collapse:collapse" | |||
!style="background:#white; width:104px !important" | | |||
{|style="background:#d8f800; border:1px solid #1e276b; border-collapse:collapse" | |||
!style="background:#d8f800; border:1px solid #1e276b; width:65px !important" | | |||
!style="background:#EAECF0; width:35px !important" | | |||
|} | |||
|} | |||
|- | |||
!style="background:#EAECF0"|Weight: | |||
|align="center"|'''29''' | |||
{|style="background:white; border:1px solid #1e276b; border-collapse:collapse" | |||
!style="background:#white; width:104px !important" | | |||
{|style="background:#d8f800; border:1px solid #1e276b; border-collapse:collapse" | |||
!style="background:#d8f800; border:1px solid #1e276b; width:58px !important" | | |||
!style="background:#EAECF0; width:42px !important" | | |||
|} | |||
|} | |||
|- | |||
!style="background:#EAECF0"|Handling: | |||
|align="center"|'''60''' | |||
{|style="background:white; border:1px solid #1e276b; border-collapse:collapse" | |||
!style="background:#white; width:104px !important" | | |||
{|style="background:#d8f800; border:1px solid #1e276b; border-collapse:collapse" | |||
!style="background:#d8f800; border:1px solid #1e276b; width:60px !important" | | |||
!style="background:#EAECF0; width:40px !important" | | |||
|} | |||
|} | |||
|- | |||
!style="background:#EAECF0"|Drift: | |||
|align="center"|'''59''' | |||
{|style="background:white; border:1px solid #1e276b; border-collapse:collapse" | |||
!style="background:#white; width:104px !important" | | |||
{|style="background:#d8f800; border:1px solid #1e276b; border-collapse:collapse" | |||
!style="background:#d8f800; border:1px solid #1e276b; width:59px !important" | | |||
!style="background:#EAECF0; width:41px !important" | | |||
|} | |||
|} | |||
|- | |||
!style="background:#EAECF0"|Items: | |||
|align="center"|'''33''' | |||
{|style="background:white; border:1px solid #1e276b; border-collapse:collapse" | |||
!style="background:#white; width:104px !important" | | |||
{|style="background:#d8f800; border:1px solid #1e276b; border-collapse:collapse" | |||
!style="background:#d8f800; border:1px solid #1e276b; width:33px !important" | | |||
!style="background:#EAECF0; width:67px !important" | | |||
|} | |||
|} | |||
|- | |||
!style="background:#EAECF0"|Owner: | |||
|[[File:Waluigi MKDS icon.png]]<br>'''[[Waluigi]]''' | |||
|- | |||
!colspan=2 style="background:#EAECF0"|Secondary drivers: | |||
|- | |||
|[[File:Mario MKDS icon.png]]<br>'''[[Mario]]''' | |||
|[[File:DK MKDS icon.png]]<br>'''[[Donkey Kong]]''' | |||
|} | |||
=== | |style="display:inline-block; background:white" width=320px| | ||
{|border=1 cellspacing=0 cellpadding=4 margin=0 padding=0 style="border:1px solid black; border-collapse:collapse; height:100%" width=100% | |||
|- | |||
!style="background:#EAECF0; height:56px" align="center" colspan=3|<big>'''{{text outline|{{color-link|darkslategray|ROB-BLS}}|white}}'''</big> | |||
=== | |- | ||
!style="background:white; height:250px" align="center" colspan=2|[[File:MKDS ROB-BLS Model.png|300x250px]] | |||
|- | |||
=== | !style="background:#EAECF0"|Speed: | ||
|align="center" width=50%|'''100''' | |||
{|style="background:white; border:1px solid #1e276b; border-collapse:collapse" | |||
== | !style="background:#white; width:104px !important" | | ||
'' | {|style="background:#d8f800; border:1px solid #1e276b; border-collapse:collapse" | ||
!style="background:#d8f800; border:1px solid #1e276b; width:100px !important" | | |||
|} | |||
|} | |||
|- | |||
!style="background:#EAECF0"|Acceleration: | |||
|align="center"|'''55''' | |||
{|style="background:white; border:1px solid #1e276b; border-collapse:collapse" | |||
!style="background:#white; width:104px !important" | | |||
{|style="background:#d8f800; border:1px solid #1e276b; border-collapse:collapse" | |||
!style="background:#d8f800; border:1px solid #1e276b; width:55px !important" | | |||
!style="background:#EAECF0; width:45px !important" | | |||
|} | |||
|} | |||
|- | |||
!style="background:#EAECF0"|Weight: | |||
|align="center"|'''25''' | |||
{|style="background:white; border:1px solid #1e276b; border-collapse:collapse" | |||
!style="background:#white; width:104px !important" | | |||
{|style="background:#d8f800; border:1px solid #1e276b; border-collapse:collapse" | |||
!style="background:#d8f800; border:1px solid #1e276b; width:50px !important" | | |||
!style="background:#EAECF0; width:50px !important" | | |||
|} | |||
|} | |||
|- | |||
!style="background:#EAECF0"|Handling: | |||
|align="center"|'''69''' | |||
{|style="background:white; border:1px solid #1e276b; border-collapse:collapse" | |||
!style="background:#white; width:104px !important" | | |||
{|style="background:#d8f800; border:1px solid #1e276b; border-collapse:collapse" | |||
!style="background:#d8f800; border:1px solid #1e276b; width:69px !important" | | |||
!style="background:#EAECF0; width:31px !important" | | |||
|} | |||
|} | |||
|- | |||
!style="background:#EAECF0"|Drift: | |||
|align="center"|'''28''' | |||
{|style="background:white; border:1px solid #1e276b; border-collapse:collapse" | |||
!style="background:#white; width:104px !important" | | |||
{|style="background:#d8f800; border:1px solid #1e276b; border-collapse:collapse" | |||
!style="background:#d8f800; border:1px solid #1e276b; width:28px !important" | | |||
!style="background:#EAECF0; width:72px !important" | | |||
|} | |||
|} | |||
|- | |||
!style="background:#EAECF0"|Items: | |||
|align="center"|'''33''' | |||
{|style="background:white; border:1px solid #1e276b; border-collapse:collapse" | |||
!style="background:#white; width:104px !important" | | |||
{|style="background:#d8f800; border:1px solid #1e276b; border-collapse:collapse" | |||
!style="background:#d8f800; border:1px solid #1e276b; width:33px !important" | | |||
!style="background:#EAECF0; width:67px !important" | | |||
|} | |||
|} | |||
|- | |||
!style="background:#EAECF0"|Owner: | |||
|[[File:ROB MKDS icon.png]]<br>'''[[R.O.B.]]''' | |||
|- | |||
!colspan=2 style="background:#EAECF0"|Secondary drivers: | |||
|- | |||
|[[File:Luigi MKDS icon.png]]<br>'''[[Luigi]]''' | |||
|[[File:Wario MKDS icon.png]]<br>'''[[Wario]]''' | |||
|} | |||
|} | |||
[ | ====Standard karts==== | ||
The second type of karts are the [[Standard Kart|standard kart]]s, which are also available by default. They all follow a similar design to each other, with only the color differing, and tend to have more rounded statistics. They are automatically used for missions and battle modes, and are given mildly different statistics in the latter than in normal races, aside from the weight and item stats which are identical for all standard karts. They are not unlocked for alternate characters after collecting all golden trophies in Nitro or Retro 150cc, unlike the signature karts. However, they are still unlocked for other characters along with every other kart after collecting all golden trophies in 150cc Mirror Mode. The one exception is the [[Shy Guy]]s' standard kart, which uses the same statistics as Yoshi's and is only available for Shy Guys as their sole kart. | |||
{|border=1 style="text-align:center; border:1px solid black; border-collapse:collapse; max-width:1300px" | |||
|- | |||
!style="background:red;color:white"|Standard karts | |||
|-style="background:#EAECF0" | |||
''Mario Kart DS'' is the 3rd best | |style="display:inline-block; background:white" width=320px| | ||
{|border=1 cellspacing=0 cellpadding=4 margin=0 padding=0 style="border:1px solid black; border-collapse:collapse; height:100%" width=100% | |||
|- | |||
!style="background:#EAECF0; height:56px" align="center" colspan=3|<big>'''{{text outline|{{color-link|red|Standard MR}}}}'''</big> | |||
|- | |||
!style="background:white; height:250px" align="center" colspan=3|[[File:MKDS Standard Kart MR Model.png|300x250px]] | |||
|- | |||
!rowspan=2 style="background:#EAECF0"|Speed: | |||
!style="background:#EAECF0"|Race: | |||
|align="center" width=50%|'''64''' | |||
{|style="background:white; border:1px solid #1e276b; border-collapse:collapse" | |||
!style="background:#white; width:104px !important" | | |||
{|style="background:#d8f800; border:1px solid #1e276b; border-collapse:collapse" | |||
!style="background:#d8f800; border:1px solid #1e276b; width:64px !important" | | |||
!style="background:#EAECF0; width:36px !important" | | |||
|} | |||
|} | |||
|- | |||
!style="background:#EAECF0"|Battle: | |||
|align="center"|'''50''' | |||
{|style="background:white; border:1px solid #1e276b; border-collapse:collapse" | |||
!style="background:#white; width:104px !important" | | |||
{|style="background:#d8f800; border:1px solid #1e276b; border-collapse:collapse" | |||
!style="background:#d8f800; border:1px solid #1e276b; width:50px !important" | | |||
!style="background:#EAECF0; width:50px !important" | | |||
|} | |||
|} | |||
|- | |||
!rowspan=2 style="background:#EAECF0"|Acceleration: | |||
!style="background:#EAECF0"|Race: | |||
|align="center"|'''72''' | |||
{|style="background:white; border:1px solid #1e276b; border-collapse:collapse" | |||
!style="background:#white; width:104px !important" | | |||
{|style="background:#d8f800; border:1px solid #1e276b; border-collapse:collapse" | |||
!style="background:#d8f800; border:1px solid #1e276b; width:72px !important" | | |||
!style="background:#EAECF0; width:28px !important" | | |||
|} | |||
|} | |||
|- | |||
!style="background:#EAECF0"|Battle: | |||
|align="center"|'''54''' | |||
{|style="background:white; border:1px solid #1e276b; border-collapse:collapse" | |||
!style="background:#white; width:104px !important" | | |||
{|style="background:#d8f800; border:1px solid #1e276b; border-collapse:collapse" | |||
!style="background:#d8f800; border:1px solid #1e276b; width:54px !important" | | |||
!style="background:#EAECF0; width:46px !important" | | |||
|} | |||
|} | |||
|- | |||
!colspan=2 style="background:#EAECF0"|Weight: | |||
|align="center"|'''32''' | |||
{|style="background:white; border:1px solid #1e276b; border-collapse:collapse" | |||
!style="background:#white; width:104px !important" | | |||
{|style="background:#d8f800; border:1px solid #1e276b; border-collapse:collapse" | |||
!style="background:#d8f800; border:1px solid #1e276b; width:64px !important" | | |||
!style="background:#EAECF0; width:36px !important" | | |||
|} | |||
|} | |||
|- | |||
!rowspan=2 style="background:#EAECF0"|Handling: | |||
!style="background:#EAECF0"|Race: | |||
|align="center"|'''56''' | |||
{|style="background:white; border:1px solid #1e276b; border-collapse:collapse" | |||
!style="background:#white; width:104px !important" | | |||
{|style="background:#d8f800; border:1px solid #1e276b; border-collapse:collapse" | |||
!style="background:#d8f800; border:1px solid #1e276b; width:56px !important" | | |||
!style="background:#EAECF0; width:44px !important" | | |||
|} | |||
|} | |||
|- | |||
!style="background:#EAECF0"|Battle: | |||
|align="center"|'''50''' | |||
{|style="background:white; border:1px solid #1e276b; border-collapse:collapse" | |||
!style="background:#white; width:104px !important" | | |||
{|style="background:#d8f800; border:1px solid #1e276b; border-collapse:collapse" | |||
!style="background:#d8f800; border:1px solid #1e276b; width:50px !important" | | |||
!style="background:#EAECF0; width:50px !important" | | |||
|} | |||
|} | |||
|- | |||
!rowspan=2 style="background:#EAECF0"|Drift: | |||
!style="background:#EAECF0"|Race: | |||
|align="center"|'''57''' | |||
{|style="background:white; border:1px solid #1e276b; border-collapse:collapse" | |||
!style="background:#white; width:104px !important" | | |||
{|style="background:#d8f800; border:1px solid #1e276b; border-collapse:collapse" | |||
!style="background:#d8f800; border:1px solid #1e276b; width:57px !important" | | |||
!style="background:#EAECF0; width:43px !important" | | |||
|} | |||
|} | |||
|- | |||
!style="background:#EAECF0"|Battle: | |||
|align="center"|'''50''' | |||
{|style="background:white; border:1px solid #1e276b; border-collapse:collapse" | |||
!style="background:#white; width:104px !important" | | |||
{|style="background:#d8f800; border:1px solid #1e276b; border-collapse:collapse" | |||
!style="background:#d8f800; border:1px solid #1e276b; width:50px !important" | | |||
!style="background:#EAECF0; width:50px !important" | | |||
|} | |||
|} | |||
|- | |||
!colspan=2 style="background:#EAECF0"|Items: | |||
|align="center"|'''66''' | |||
{|style="background:white; border:1px solid #1e276b; border-collapse:collapse" | |||
!style="background:#white; width:104px !important" | | |||
{|style="background:#d8f800; border:1px solid #1e276b; border-collapse:collapse" | |||
!style="background:#d8f800; border:1px solid #1e276b; width:66px !important" | | |||
!style="background:#EAECF0; width:34px !important" | | |||
|} | |||
|} | |||
|- | |||
!colspan=2 style="background:#EAECF0"|Owner: | |||
|[[File:Mario MKDS icon.png]]<br>'''[[Mario]]''' | |||
|} | |||
|style="display:inline-block; background:white" width=320px| | |||
{|border=1 cellspacing=0 cellpadding=4 margin=0 padding=0 style="border:1px solid black; border-collapse:collapse; height:100%" width=100% | |||
|- | |||
!style="background:#EAECF0; height:56px" align="center" colspan=3|<big>'''{{text outline|{{color-link|green|Standard LG}}|white}}'''</big> | |||
|- | |||
!style="background:white; height:250px" align="center" colspan=3|[[File:MKDS Standard Kart LG Model.png|300x250px]] | |||
|- | |||
!rowspan=2 style="background:#EAECF0"|Speed: | |||
!style="background:#EAECF0"|Race: | |||
|align="center" width=50%|'''72''' | |||
{|style="background:white; border:1px solid #1e276b; border-collapse:collapse" | |||
!style="background:#white; width:104px !important" | | |||
{|style="background:#d8f800; border:1px solid #1e276b; border-collapse:collapse" | |||
!style="background:#d8f800; border:1px solid #1e276b; width:72px !important" | | |||
!style="background:#EAECF0; width:28px !important" | | |||
|} | |||
|} | |||
|- | |||
!style="background:#EAECF0"|Battle: | |||
|align="center"|'''56''' | |||
{|style="background:white; border:1px solid #1e276b; border-collapse:collapse" | |||
!style="background:#white; width:104px !important" | | |||
{|style="background:#d8f800; border:1px solid #1e276b; border-collapse:collapse" | |||
!style="background:#d8f800; border:1px solid #1e276b; width:56px !important" | | |||
!style="background:#EAECF0; width:44px !important" | | |||
|} | |||
|} | |||
|- | |||
!rowspan=2 style="background:#EAECF0"|Acceleration: | |||
!style="background:#EAECF0"|Race: | |||
|align="center"|'''74''' | |||
{|style="background:white; border:1px solid #1e276b; border-collapse:collapse" | |||
!style="background:#white; width:104px !important" | | |||
{|style="background:#d8f800; border:1px solid #1e276b; border-collapse:collapse" | |||
!style="background:#d8f800; border:1px solid #1e276b; width:74px !important" | | |||
!style="background:#EAECF0; width:26px !important" | | |||
|} | |||
|} | |||
|- | |||
!style="background:#EAECF0"|Battle: | |||
|align="center"|'''58''' | |||
{|style="background:white; border:1px solid #1e276b; border-collapse:collapse" | |||
!style="background:#white; width:104px !important" | | |||
{|style="background:#d8f800; border:1px solid #1e276b; border-collapse:collapse" | |||
!style="background:#d8f800; border:1px solid #1e276b; width:58px !important" | | |||
!style="background:#EAECF0; width:42px !important" | | |||
|} | |||
|} | |||
|- | |||
!colspan=2 style="background:#EAECF0"|Weight: | |||
|align="center"|'''32''' | |||
{|style="background:white; border:1px solid #1e276b; border-collapse:collapse" | |||
!style="background:#white; width:104px !important" | | |||
{|style="background:#d8f800; border:1px solid #1e276b; border-collapse:collapse" | |||
!style="background:#d8f800; border:1px solid #1e276b; width:64px !important" | | |||
!style="background:#EAECF0; width:36px !important" | | |||
|} | |||
|} | |||
|- | |||
!rowspan=2 style="background:#EAECF0"|Handling: | |||
!style="background:#EAECF0"|Race: | |||
|align="center"|'''73''' | |||
{|style="background:white; border:1px solid #1e276b; border-collapse:collapse" | |||
!style="background:#white; width:104px !important" | | |||
{|style="background:#d8f800; border:1px solid #1e276b; border-collapse:collapse" | |||
!style="background:#d8f800; border:1px solid #1e276b; width:73px !important" | | |||
!style="background:#EAECF0; width:27px !important" | | |||
|} | |||
|} | |||
|- | |||
!style="background:#EAECF0"|Battle: | |||
|align="center"|'''63''' | |||
{|style="background:white; border:1px solid #1e276b; border-collapse:collapse" | |||
!style="background:#white; width:104px !important" | | |||
{|style="background:#d8f800; border:1px solid #1e276b; border-collapse:collapse" | |||
!style="background:#d8f800; border:1px solid #1e276b; width:63px !important" | | |||
!style="background:#EAECF0; width:37px !important" | | |||
|} | |||
|} | |||
|- | |||
!rowspan=2 style="background:#EAECF0"|Drift: | |||
!style="background:#EAECF0"|Race: | |||
|align="center"|'''32''' | |||
{|style="background:white; border:1px solid #1e276b; border-collapse:collapse" | |||
!style="background:#white; width:104px !important" | | |||
{|style="background:#d8f800; border:1px solid #1e276b; border-collapse:collapse" | |||
!style="background:#d8f800; border:1px solid #1e276b; width:32px !important" | | |||
!style="background:#EAECF0; width:68px !important" | | |||
|} | |||
|} | |||
|- | |||
!style="background:#EAECF0"|Battle: | |||
|align="center"|'''31''' | |||
{|style="background:white; border:1px solid #1e276b; border-collapse:collapse" | |||
!style="background:#white; width:104px !important" | | |||
{|style="background:#d8f800; border:1px solid #1e276b; border-collapse:collapse" | |||
!style="background:#d8f800; border:1px solid #1e276b; width:31px !important" | | |||
!style="background:#EAECF0; width:69px !important" | | |||
|} | |||
|} | |||
|- | |||
!colspan=2 style="background:#EAECF0"|Items: | |||
|align="center"|'''66''' | |||
{|style="background:white; border:1px solid #1e276b; border-collapse:collapse" | |||
!style="background:#white; width:104px !important" | | |||
{|style="background:#d8f800; border:1px solid #1e276b; border-collapse:collapse" | |||
!style="background:#d8f800; border:1px solid #1e276b; width:66px !important" | | |||
!style="background:#EAECF0; width:34px !important" | | |||
|} | |||
|} | |||
|- | |||
!colspan=2 style="background:#EAECF0"|Owner: | |||
|[[File:Luigi MKDS icon.png]]<br>'''[[Luigi]]''' | |||
|} | |||
|style="display:inline-block; background:white" width=320px| | |||
{|border=1 cellspacing=0 cellpadding=4 margin=0 padding=0 style="border:1px solid black; border-collapse:collapse; height:100%" width=100% | |||
|- | |||
!style="background:#EAECF0; height:56px" align="center" colspan=3|<big>'''{{text outline|{{color-link|hotpink|Standard PC}}}}'''</big> | |||
|- | |||
!style="background:white; height:250px" align="center" colspan=3|[[File:MKDS Standard Kart PC Model.png|300x250px]] | |||
|- | |||
!rowspan=2 style="background:#EAECF0"|Speed: | |||
!style="background:#EAECF0"|Race: | |||
|align="center" width=50%|'''47''' | |||
{|style="background:white; border:1px solid #1e276b; border-collapse:collapse" | |||
!style="background:#white; width:104px !important" | | |||
{|style="background:#d8f800; border:1px solid #1e276b; border-collapse:collapse" | |||
!style="background:#d8f800; border:1px solid #1e276b; width:47px !important" | | |||
!style="background:#EAECF0; width:53px !important" | | |||
|} | |||
|} | |||
|- | |||
!style="background:#EAECF0"|Battle: | |||
|align="center"|'''38''' | |||
{|style="background:white; border:1px solid #1e276b; border-collapse:collapse" | |||
!style="background:#white; width:104px !important" | | |||
{|style="background:#d8f800; border:1px solid #1e276b; border-collapse:collapse" | |||
!style="background:#d8f800; border:1px solid #1e276b; width:38px !important" | | |||
!style="background:#EAECF0; width:62px !important" | | |||
|} | |||
|} | |||
|- | |||
!rowspan=2 style="background:#EAECF0"|Acceleration: | |||
!style="background:#EAECF0"|Race: | |||
|align="center"|'''73''' | |||
{|style="background:white; border:1px solid #1e276b; border-collapse:collapse" | |||
!style="background:#white; width:104px !important" | | |||
{|style="background:#d8f800; border:1px solid #1e276b; border-collapse:collapse" | |||
!style="background:#d8f800; border:1px solid #1e276b; width:73px !important" | | |||
!style="background:#EAECF0; width:27px !important" | | |||
|} | |||
|} | |||
|- | |||
!style="background:#EAECF0"|Battle: | |||
|align="center"|'''55''' | |||
{|style="background:white; border:1px solid #1e276b; border-collapse:collapse" | |||
!style="background:#white; width:104px !important" | | |||
{|style="background:#d8f800; border:1px solid #1e276b; border-collapse:collapse" | |||
!style="background:#d8f800; border:1px solid #1e276b; width:55px !important" | | |||
!style="background:#EAECF0; width:45px !important" | | |||
|} | |||
|} | |||
|- | |||
!colspan=2 style="background:#EAECF0"|Weight: | |||
|align="center"|'''32''' | |||
{|style="background:white; border:1px solid #1e276b; border-collapse:collapse" | |||
!style="background:#white; width:104px !important" | | |||
{|style="background:#d8f800; border:1px solid #1e276b; border-collapse:collapse" | |||
!style="background:#d8f800; border:1px solid #1e276b; width:64px !important" | | |||
!style="background:#EAECF0; width:36px !important" | | |||
|} | |||
|} | |||
|- | |||
!rowspan=2 style="background:#EAECF0"|Handling: | |||
!style="background:#EAECF0"|Race: | |||
|align="center"|'''48''' | |||
{|style="background:white; border:1px solid #1e276b; border-collapse:collapse" | |||
!style="background:#white; width:104px !important" | | |||
{|style="background:#d8f800; border:1px solid #1e276b; border-collapse:collapse" | |||
!style="background:#d8f800; border:1px solid #1e276b; width:48px !important" | | |||
!style="background:#EAECF0; width:52px !important" | | |||
|} | |||
|} | |||
|- | |||
!style="background:#EAECF0"|Battle: | |||
|align="center"|'''44''' | |||
{|style="background:white; border:1px solid #1e276b; border-collapse:collapse" | |||
!style="background:#white; width:104px !important" | | |||
{|style="background:#d8f800; border:1px solid #1e276b; border-collapse:collapse" | |||
!style="background:#d8f800; border:1px solid #1e276b; width:44px !important" | | |||
!style="background:#EAECF0; width:56px !important" | | |||
|} | |||
|} | |||
|- | |||
!rowspan=2 style="background:#EAECF0"|Drift: | |||
!style="background:#EAECF0"|Race: | |||
|align="center"|'''97''' | |||
{|style="background:white; border:1px solid #1e276b; border-collapse:collapse" | |||
!style="background:#white; width:104px !important" | | |||
{|style="background:#d8f800; border:1px solid #1e276b; border-collapse:collapse" | |||
!style="background:#d8f800; border:1px solid #1e276b; width:97px !important" | | |||
!style="background:#EAECF0; width:3px !important" | | |||
|} | |||
|} | |||
|- | |||
!style="background:#EAECF0"|Battle: | |||
|align="center"|'''75''' | |||
{|style="background:white; border:1px solid #1e276b; border-collapse:collapse" | |||
!style="background:#white; width:104px !important" | | |||
{|style="background:#d8f800; border:1px solid #1e276b; border-collapse:collapse" | |||
!style="background:#d8f800; border:1px solid #1e276b; width:75px !important" | | |||
!style="background:#EAECF0; width:25px !important" | | |||
|} | |||
|} | |||
|- | |||
!colspan=2 style="background:#EAECF0"|Items: | |||
|align="center"|'''66''' | |||
{|style="background:white; border:1px solid #1e276b; border-collapse:collapse" | |||
!style="background:#white; width:104px !important" | | |||
{|style="background:#d8f800; border:1px solid #1e276b; border-collapse:collapse" | |||
!style="background:#d8f800; border:1px solid #1e276b; width:66px !important" | | |||
!style="background:#EAECF0; width:34px !important" | | |||
|} | |||
|} | |||
|- | |||
!colspan=2 style="background:#EAECF0"|Owner: | |||
|[[File:Peach MKDS icon.png]]<br>'''[[Princess Peach|Peach]]''' | |||
|} | |||
|style="display:inline-block; background:white" width=320px| | |||
{|border=1 cellspacing=0 cellpadding=4 margin=0 padding=0 style="border:1px solid black; border-collapse:collapse; height:100%" width=100% | |||
|- | |||
!style="background:#EAECF0; height:56px" align="center" colspan=3|<big>'''{{text outline|{{color-link|limegreen|Standard YS}}}}'''</big> | |||
|- | |||
!style="background:white; height:250px" align="center" colspan=3|[[File:MKDS Standard Kart YS Model.png|300x250px]] | |||
|- | |||
!rowspan=2 style="background:#EAECF0"|Speed: | |||
!style="background:#EAECF0"|Race: | |||
|align="center" width=50%|'''55''' | |||
{|style="background:white; border:1px solid #1e276b; border-collapse:collapse" | |||
!style="background:#white; width:104px !important" | | |||
{|style="background:#d8f800; border:1px solid #1e276b; border-collapse:collapse" | |||
!style="background:#d8f800; border:1px solid #1e276b; width:55px !important" | | |||
!style="background:#EAECF0; width:45px !important" | | |||
|} | |||
|} | |||
|- | |||
!style="background:#EAECF0"|Battle: | |||
|align="center"|'''44''' | |||
{|style="background:white; border:1px solid #1e276b; border-collapse:collapse" | |||
!style="background:#white; width:104px !important" | | |||
{|style="background:#d8f800; border:1px solid #1e276b; border-collapse:collapse" | |||
!style="background:#d8f800; border:1px solid #1e276b; width:44px !important" | | |||
!style="background:#EAECF0; width:56px !important" | | |||
|} | |||
|} | |||
|- | |||
!rowspan=2 style="background:#EAECF0"|Acceleration: | |||
!style="background:#EAECF0"|Race: | |||
|align="center"|'''90''' | |||
{|style="background:white; border:1px solid #1e276b; border-collapse:collapse" | |||
!style="background:#white; width:104px !important" | | |||
{|style="background:#d8f800; border:1px solid #1e276b; border-collapse:collapse" | |||
!style="background:#d8f800; border:1px solid #1e276b; width:90px !important" | | |||
!style="background:#EAECF0; width:10px !important" | | |||
|} | |||
|} | |||
|- | |||
!style="background:#EAECF0"|Battle: | |||
|align="center"|'''71''' | |||
{|style="background:white; border:1px solid #1e276b; border-collapse:collapse" | |||
!style="background:#white; width:104px !important" | | |||
{|style="background:#d8f800; border:1px solid #1e276b; border-collapse:collapse" | |||
!style="background:#d8f800; border:1px solid #1e276b; width:71px !important" | | |||
!style="background:#EAECF0; width:29px !important" | | |||
|} | |||
|} | |||
|- | |||
!colspan=2 style="background:#EAECF0"|Weight: | |||
|align="center"|'''32''' | |||
{|style="background:white; border:1px solid #1e276b; border-collapse:collapse" | |||
!style="background:#white; width:104px !important" | | |||
{|style="background:#d8f800; border:1px solid #1e276b; border-collapse:collapse" | |||
!style="background:#d8f800; border:1px solid #1e276b; width:64px !important" | | |||
!style="background:#EAECF0; width:36px !important" | | |||
|} | |||
|} | |||
|- | |||
!rowspan=2 style="background:#EAECF0"|Handling: | |||
!style="background:#EAECF0"|Race: | |||
|align="center"|'''84''' | |||
{|style="background:white; border:1px solid #1e276b; border-collapse:collapse" | |||
!style="background:#white; width:104px !important" | | |||
{|style="background:#d8f800; border:1px solid #1e276b; border-collapse:collapse" | |||
!style="background:#d8f800; border:1px solid #1e276b; width:84px !important" | | |||
!style="background:#EAECF0; width:16px !important" | | |||
|} | |||
|} | |||
|- | |||
!style="background:#EAECF0"|Battle: | |||
|align="center"|'''69''' | |||
{|style="background:white; border:1px solid #1e276b; border-collapse:collapse" | |||
!style="background:#white; width:104px !important" | | |||
{|style="background:#d8f800; border:1px solid #1e276b; border-collapse:collapse" | |||
!style="background:#d8f800; border:1px solid #1e276b; width:69px !important" | | |||
!style="background:#EAECF0; width:31px !important" | | |||
|} | |||
|} | |||
|- | |||
!rowspan=2 style="background:#EAECF0"|Drift: | |||
!style="background:#EAECF0"|Race: | |||
|align="center"|'''39''' | |||
{|style="background:white; border:1px solid #1e276b; border-collapse:collapse" | |||
!style="background:#white; width:104px !important" | | |||
{|style="background:#d8f800; border:1px solid #1e276b; border-collapse:collapse" | |||
!style="background:#d8f800; border:1px solid #1e276b; width:39px !important" | | |||
!style="background:#EAECF0; width:61px !important" | | |||
|} | |||
|} | |||
|- | |||
!style="background:#EAECF0"|Battle: | |||
|align="center"|'''38''' | |||
{|style="background:white; border:1px solid #1e276b; border-collapse:collapse" | |||
!style="background:#white; width:104px !important" | | |||
{|style="background:#d8f800; border:1px solid #1e276b; border-collapse:collapse" | |||
!style="background:#d8f800; border:1px solid #1e276b; width:38px !important" | | |||
!style="background:#EAECF0; width:62px !important" | | |||
|} | |||
|} | |||
|- | |||
!colspan=2 style="background:#EAECF0"|Items: | |||
|align="center"|'''66''' | |||
{|style="background:white; border:1px solid #1e276b; border-collapse:collapse" | |||
!style="background:#white; width:104px !important" | | |||
{|style="background:#d8f800; border:1px solid #1e276b; border-collapse:collapse" | |||
!style="background:#d8f800; border:1px solid #1e276b; width:66px !important" | | |||
!style="background:#EAECF0; width:34px !important" | | |||
|} | |||
|} | |||
|- | |||
!colspan=2 style="background:#EAECF0"|Owner: | |||
|[[File:Yoshi MKDS icon.png]]<br>'''[[Yoshi]]''' | |||
|} | |||
|style="display:inline-block; background:white" width=320px| | |||
{|border=1 cellspacing=0 cellpadding=4 margin=0 padding=0 style="border:1px solid black; border-collapse:collapse; height:100%" width=100% | |||
|- | |||
!style="background:#EAECF0; height:56px" align="center" colspan=3|<big>'''{{text outline|{{color-link|blue|Standard TD}}|white}}'''</big> | |||
|- | |||
!style="background:white; height:250px" align="center" colspan=3|[[File:MKDS Standard Kart TD Model.png|300x250px]] | |||
|- | |||
!rowspan=2 style="background:#EAECF0"|Speed: | |||
!style="background:#EAECF0"|Race: | |||
|align="center" width=50%|'''39''' | |||
{|style="background:white; border:1px solid #1e276b; border-collapse:collapse" | |||
!style="background:#white; width:104px !important" | | |||
{|style="background:#d8f800; border:1px solid #1e276b; border-collapse:collapse" | |||
!style="background:#d8f800; border:1px solid #1e276b; width:39px !important" | | |||
!style="background:#EAECF0; width:61px !important" | | |||
|} | |||
|} | |||
|- | |||
!style="background:#EAECF0"|Battle: | |||
|align="center"|'''31''' | |||
{|style="background:white; border:1px solid #1e276b; border-collapse:collapse" | |||
!style="background:#white; width:104px !important" | | |||
{|style="background:#d8f800; border:1px solid #1e276b; border-collapse:collapse" | |||
!style="background:#d8f800; border:1px solid #1e276b; width:31px !important" | | |||
!style="background:#EAECF0; width:69px !important" | | |||
|} | |||
|} | |||
|- | |||
!rowspan=2 style="background:#EAECF0"|Acceleration: | |||
!style="background:#EAECF0"|Race: | |||
|align="center"|'''85''' | |||
{|style="background:white; border:1px solid #1e276b; border-collapse:collapse" | |||
!style="background:#white; width:104px !important" | | |||
{|style="background:#d8f800; border:1px solid #1e276b; border-collapse:collapse" | |||
!style="background:#d8f800; border:1px solid #1e276b; width:85px !important" | | |||
!style="background:#EAECF0; width:15px !important" | | |||
|} | |||
|} | |||
|- | |||
!style="background:#EAECF0"|Battle: | |||
|align="center"|'''69''' | |||
{|style="background:white; border:1px solid #1e276b; border-collapse:collapse" | |||
!style="background:#white; width:104px !important" | | |||
{|style="background:#d8f800; border:1px solid #1e276b; border-collapse:collapse" | |||
!style="background:#d8f800; border:1px solid #1e276b; width:69px !important" | | |||
!style="background:#EAECF0; width:31px !important" | | |||
|} | |||
|} | |||
|- | |||
!colspan=2 style="background:#EAECF0"|Weight: | |||
|align="center"|'''32''' | |||
{|style="background:white; border:1px solid #1e276b; border-collapse:collapse" | |||
!style="background:#white; width:104px !important" | | |||
{|style="background:#d8f800; border:1px solid #1e276b; border-collapse:collapse" | |||
!style="background:#d8f800; border:1px solid #1e276b; width:64px !important" | | |||
!style="background:#EAECF0; width:36px !important" | | |||
|} | |||
|} | |||
|- | |||
!rowspan=2 style="background:#EAECF0"|Handling: | |||
!style="background:#EAECF0"|Race: | |||
|align="center"|'''65''' | |||
{|style="background:white; border:1px solid #1e276b; border-collapse:collapse" | |||
!style="background:#white; width:104px !important" | | |||
{|style="background:#d8f800; border:1px solid #1e276b; border-collapse:collapse" | |||
!style="background:#d8f800; border:1px solid #1e276b; width:65px !important" | | |||
!style="background:#EAECF0; width:35px !important" | | |||
|} | |||
|} | |||
|- | |||
!style="background:#EAECF0"|Battle: | |||
|align="center"|'''56''' | |||
{|style="background:white; border:1px solid #1e276b; border-collapse:collapse" | |||
!style="background:#white; width:104px !important" | | |||
{|style="background:#d8f800; border:1px solid #1e276b; border-collapse:collapse" | |||
!style="background:#d8f800; border:1px solid #1e276b; width:56px !important" | | |||
!style="background:#EAECF0; width:44px !important" | | |||
|} | |||
|} | |||
|- | |||
!rowspan=2 style="background:#EAECF0"|Drift: | |||
!style="background:#EAECF0"|Race: | |||
|align="center"|'''67''' | |||
{|style="background:white; border:1px solid #1e276b; border-collapse:collapse" | |||
!style="background:#white; width:104px !important" | | |||
{|style="background:#d8f800; border:1px solid #1e276b; border-collapse:collapse" | |||
!style="background:#d8f800; border:1px solid #1e276b; width:67px !important" | | |||
!style="background:#EAECF0; width:33px !important" | | |||
|} | |||
|} | |||
|- | |||
!style="background:#EAECF0"|Battle: | |||
|align="center"|'''56''' | |||
{|style="background:white; border:1px solid #1e276b; border-collapse:collapse" | |||
!style="background:#white; width:104px !important" | | |||
{|style="background:#d8f800; border:1px solid #1e276b; border-collapse:collapse" | |||
!style="background:#d8f800; border:1px solid #1e276b; width:56px !important" | | |||
!style="background:#EAECF0; width:44px !important" | | |||
|} | |||
|} | |||
|- | |||
!colspan=2 style="background:#EAECF0"|Items: | |||
|align="center"|'''66''' | |||
{|style="background:white; border:1px solid #1e276b; border-collapse:collapse" | |||
!style="background:#white; width:104px !important" | | |||
{|style="background:#d8f800; border:1px solid #1e276b; border-collapse:collapse" | |||
!style="background:#d8f800; border:1px solid #1e276b; width:66px !important" | | |||
!style="background:#EAECF0; width:34px !important" | | |||
|} | |||
|} | |||
|- | |||
!colspan=2 style="background:#EAECF0"|Owner: | |||
|[[File:Toad MKDS icon.png]]<br>'''[[Toad]]''' | |||
|} | |||
|style="display:inline-block; background:white" width=320px| | |||
{|border=1 cellspacing=0 cellpadding=4 margin=0 padding=0 style="border:1px solid black; border-collapse:collapse; height:100%" width=100% | |||
|- | |||
!style="background:#EAECF0; height:56px" align="center" colspan=3|<big>'''{{text outline|{{color-link|yellow|Standard DK}}}}'''</big> | |||
|- | |||
!style="background:white; height:250px" align="center" colspan=3|[[File:MKDS Standard Kart DK Model.png|300x250px]] | |||
|- | |||
!rowspan=2 style="background:#EAECF0"|Speed: | |||
!style="background:#EAECF0"|Race: | |||
|align="center" width=50%|'''80''' | |||
{|style="background:white; border:1px solid #1e276b; border-collapse:collapse" | |||
!style="background:#white; width:104px !important" | | |||
{|style="background:#d8f800; border:1px solid #1e276b; border-collapse:collapse" | |||
!style="background:#d8f800; border:1px solid #1e276b; width:80px !important" | | |||
!style="background:#EAECF0; width:20px !important" | | |||
|} | |||
|} | |||
|- | |||
!style="background:#EAECF0"|Battle: | |||
|align="center"|'''63''' | |||
{|style="background:white; border:1px solid #1e276b; border-collapse:collapse" | |||
!style="background:#white; width:104px !important" | | |||
{|style="background:#d8f800; border:1px solid #1e276b; border-collapse:collapse" | |||
!style="background:#d8f800; border:1px solid #1e276b; width:63px !important" | | |||
!style="background:#EAECF0; width:37px !important" | | |||
|} | |||
|} | |||
|- | |||
!rowspan=2 style="background:#EAECF0"|Acceleration: | |||
!style="background:#EAECF0"|Race: | |||
|align="center"|'''47''' | |||
{|style="background:white; border:1px solid #1e276b; border-collapse:collapse" | |||
!style="background:#white; width:104px !important" | | |||
{|style="background:#d8f800; border:1px solid #1e276b; border-collapse:collapse" | |||
!style="background:#d8f800; border:1px solid #1e276b; width:47px !important" | | |||
!style="background:#EAECF0; width:53px !important" | | |||
|} | |||
|} | |||
|- | |||
!style="background:#EAECF0"|Battle: | |||
|align="center"|'''32''' | |||
{|style="background:white; border:1px solid #1e276b; border-collapse:collapse" | |||
!style="background:#white; width:104px !important" | | |||
{|style="background:#d8f800; border:1px solid #1e276b; border-collapse:collapse" | |||
!style="background:#d8f800; border:1px solid #1e276b; width:32px !important" | | |||
!style="background:#EAECF0; width:68px !important" | | |||
|} | |||
|} | |||
|- | |||
!colspan=2 style="background:#EAECF0"|Weight: | |||
|align="center"|'''32''' | |||
{|style="background:white; border:1px solid #1e276b; border-collapse:collapse" | |||
!style="background:#white; width:104px !important" | | |||
{|style="background:#d8f800; border:1px solid #1e276b; border-collapse:collapse" | |||
!style="background:#d8f800; border:1px solid #1e276b; width:64px !important" | | |||
!style="background:#EAECF0; width:36px !important" | | |||
|} | |||
|} | |||
|- | |||
!rowspan=2 style="background:#EAECF0"|Handling: | |||
!style="background:#EAECF0"|Race: | |||
|align="center"|'''34''' | |||
{|style="background:white; border:1px solid #1e276b; border-collapse:collapse" | |||
!style="background:#white; width:104px !important" | | |||
{|style="background:#d8f800; border:1px solid #1e276b; border-collapse:collapse" | |||
!style="background:#d8f800; border:1px solid #1e276b; width:34px !important" | | |||
!style="background:#EAECF0; width:66px !important" | | |||
|} | |||
|} | |||
|- | |||
!style="background:#EAECF0"|Battle: | |||
|align="center"|'''31''' | |||
{|style="background:white; border:1px solid #1e276b; border-collapse:collapse" | |||
!style="background:#white; width:104px !important" | | |||
{|style="background:#d8f800; border:1px solid #1e276b; border-collapse:collapse" | |||
!style="background:#d8f800; border:1px solid #1e276b; width:31px !important" | | |||
!style="background:#EAECF0; width:69px !important" | | |||
|} | |||
|} | |||
|- | |||
!rowspan=2 style="background:#EAECF0"|Drift: | |||
!style="background:#EAECF0"|Race: | |||
|align="center"|'''77''' | |||
{|style="background:white; border:1px solid #1e276b; border-collapse:collapse" | |||
!style="background:#white; width:104px !important" | | |||
{|style="background:#d8f800; border:1px solid #1e276b; border-collapse:collapse" | |||
!style="background:#d8f800; border:1px solid #1e276b; width:77px !important" | | |||
!style="background:#EAECF0; width:23px !important" | | |||
|} | |||
|} | |||
|- | |||
!style="background:#EAECF0"|Battle: | |||
|align="center"|'''63''' | |||
{|style="background:white; border:1px solid #1e276b; border-collapse:collapse" | |||
!style="background:#white; width:104px !important" | | |||
{|style="background:#d8f800; border:1px solid #1e276b; border-collapse:collapse" | |||
!style="background:#d8f800; border:1px solid #1e276b; width:63px !important" | | |||
!style="background:#EAECF0; width:37px !important" | | |||
|} | |||
|} | |||
|- | |||
!colspan=2 style="background:#EAECF0"|Items: | |||
|align="center"|'''66''' | |||
{|style="background:white; border:1px solid #1e276b; border-collapse:collapse" | |||
!style="background:#white; width:104px !important" | | |||
{|style="background:#d8f800; border:1px solid #1e276b; border-collapse:collapse" | |||
!style="background:#d8f800; border:1px solid #1e276b; width:66px !important" | | |||
!style="background:#EAECF0; width:34px !important" | | |||
|} | |||
|} | |||
|- | |||
!colspan=2 style="background:#EAECF0"|Owner: | |||
|[[File:DK MKDS icon.png]]<br>'''[[Donkey Kong]]''' | |||
|} | |||
|style="display:inline-block; background:white" width=320px| | |||
{|border=1 cellspacing=0 cellpadding=4 margin=0 padding=0 style="border:1px solid black; border-collapse:collapse; height:100%" width=100% | |||
|- | |||
!style="background:#EAECF0; height:56px" align="center" colspan=3|<big>'''{{text outline|{{color-link|mediumorchid|Standard WR}}}}'''</big> | |||
|- | |||
!style="background:white; height:250px" align="center" colspan=3|[[File:MKDS Standard Kart WR Model.png|300x250px]] | |||
|- | |||
!rowspan=2 style="background:#EAECF0"|Speed: | |||
!style="background:#EAECF0"|Race: | |||
|align="center" width=50%|'''88''' | |||
{|style="background:white; border:1px solid #1e276b; border-collapse:collapse" | |||
!style="background:#white; width:104px !important" | | |||
{|style="background:#d8f800; border:1px solid #1e276b; border-collapse:collapse" | |||
!style="background:#d8f800; border:1px solid #1e276b; width:88px !important" | | |||
!style="background:#EAECF0; width:12px !important" | | |||
|} | |||
|} | |||
|- | |||
!style="background:#EAECF0"|Battle: | |||
|align="center"|'''69''' | |||
{|style="background:white; border:1px solid #1e276b; border-collapse:collapse" | |||
!style="background:#white; width:104px !important" | | |||
{|style="background:#d8f800; border:1px solid #1e276b; border-collapse:collapse" | |||
!style="background:#d8f800; border:1px solid #1e276b; width:69px !important" | | |||
!style="background:#EAECF0; width:31px !important" | | |||
|} | |||
|} | |||
|- | |||
!rowspan=2 style="background:#EAECF0"|Acceleration: | |||
!style="background:#EAECF0"|Race: | |||
|align="center"|'''50''' | |||
{|style="background:white; border:1px solid #1e276b; border-collapse:collapse" | |||
!style="background:#white; width:104px !important" | | |||
{|style="background:#d8f800; border:1px solid #1e276b; border-collapse:collapse" | |||
!style="background:#d8f800; border:1px solid #1e276b; width:50px !important" | | |||
!style="background:#EAECF0; width:50px !important" | | |||
|} | |||
|} | |||
|- | |||
!style="background:#EAECF0"|Battle: | |||
|align="center"|'''38''' | |||
{|style="background:white; border:1px solid #1e276b; border-collapse:collapse" | |||
!style="background:#white; width:104px !important" | | |||
{|style="background:#d8f800; border:1px solid #1e276b; border-collapse:collapse" | |||
!style="background:#d8f800; border:1px solid #1e276b; width:38px !important" | | |||
!style="background:#EAECF0; width:62px !important" | | |||
|} | |||
|} | |||
|- | |||
!colspan=2 style="background:#EAECF0"|Weight: | |||
|align="center"|'''32''' | |||
{|style="background:white; border:1px solid #1e276b; border-collapse:collapse" | |||
!style="background:#white; width:104px !important" | | |||
{|style="background:#d8f800; border:1px solid #1e276b; border-collapse:collapse" | |||
!style="background:#d8f800; border:1px solid #1e276b; width:64px !important" | | |||
!style="background:#EAECF0; width:36px !important" | | |||
|} | |||
|} | |||
|- | |||
!rowspan=2 style="background:#EAECF0"|Handling: | |||
!style="background:#EAECF0"|Race: | |||
|align="center"|'''48''' | |||
{|style="background:white; border:1px solid #1e276b; border-collapse:collapse" | |||
!style="background:#white; width:104px !important" | | |||
{|style="background:#d8f800; border:1px solid #1e276b; border-collapse:collapse" | |||
!style="background:#d8f800; border:1px solid #1e276b; width:48px !important" | | |||
!style="background:#EAECF0; width:52px !important" | | |||
|} | |||
|} | |||
|- | |||
!style="background:#EAECF0"|Battle: | |||
|align="center"|'''44''' | |||
{|style="background:white; border:1px solid #1e276b; border-collapse:collapse" | |||
!style="background:#white; width:104px !important" | | |||
{|style="background:#d8f800; border:1px solid #1e276b; border-collapse:collapse" | |||
!style="background:#d8f800; border:1px solid #1e276b; width:44px !important" | | |||
!style="background:#EAECF0; width:56px !important" | | |||
|} | |||
|} | |||
|- | |||
!rowspan=2 style="background:#EAECF0"|Drift: | |||
!style="background:#EAECF0"|Race: | |||
|align="center"|'''47''' | |||
{|style="background:white; border:1px solid #1e276b; border-collapse:collapse" | |||
!style="background:#white; width:104px !important" | | |||
{|style="background:#d8f800; border:1px solid #1e276b; border-collapse:collapse" | |||
!style="background:#d8f800; border:1px solid #1e276b; width:47px !important" | | |||
!style="background:#EAECF0; width:53px !important" | | |||
|} | |||
|} | |||
|- | |||
!style="background:#EAECF0"|Battle: | |||
|align="center"|'''44''' | |||
{|style="background:white; border:1px solid #1e276b; border-collapse:collapse" | |||
!style="background:#white; width:104px !important" | | |||
{|style="background:#d8f800; border:1px solid #1e276b; border-collapse:collapse" | |||
!style="background:#d8f800; border:1px solid #1e276b; width:44px !important" | | |||
!style="background:#EAECF0; width:56px !important" | | |||
|} | |||
|} | |||
|- | |||
!colspan=2 style="background:#EAECF0"|Items: | |||
|align="center"|'''66''' | |||
{|style="background:white; border:1px solid #1e276b; border-collapse:collapse" | |||
!style="background:#white; width:104px !important" | | |||
{|style="background:#d8f800; border:1px solid #1e276b; border-collapse:collapse" | |||
!style="background:#d8f800; border:1px solid #1e276b; width:66px !important" | | |||
!style="background:#EAECF0; width:34px !important" | | |||
|} | |||
|} | |||
|- | |||
!colspan=2 style="background:#EAECF0"|Owner: | |||
|[[File:Wario MKDS icon.png]]<br>'''[[Wario]]''' | |||
|} | |||
|style="display:inline-block; background:white" width=320px| | |||
{|border=1 cellspacing=0 cellpadding=4 margin=0 padding=0 style="border:1px solid black; border-collapse:collapse; height:100%" width=100% | |||
|- | |||
!style="background:#EAECF0; height:56px" align="center" colspan=3|<big>'''{{text outline|{{color-link|coral|Standard BW}}}}'''</big> | |||
|- | |||
!style="background:white; height:250px" align="center" colspan=3|[[File:MKDS Standard Kart BW Model.png|300x250px]] | |||
|- | |||
!rowspan=2 style="background:#EAECF0"|Speed: | |||
!style="background:#EAECF0"|Race: | |||
|align="center" width=50%|'''96''' | |||
{|style="background:white; border:1px solid #1e276b; border-collapse:collapse" | |||
!style="background:#white; width:104px !important" | | |||
{|style="background:#d8f800; border:1px solid #1e276b; border-collapse:collapse" | |||
!style="background:#d8f800; border:1px solid #1e276b; width:96px !important" | | |||
!style="background:#EAECF0; width:4px !important" | | |||
|} | |||
|} | |||
|- | |||
!style="background:#EAECF0"|Battle: | |||
|align="center"|'''75''' | |||
{|style="background:white; border:1px solid #1e276b; border-collapse:collapse" | |||
!style="background:#white; width:104px !important" | | |||
{|style="background:#d8f800; border:1px solid #1e276b; border-collapse:collapse" | |||
!style="background:#d8f800; border:1px solid #1e276b; width:75px !important" | | |||
!style="background:#EAECF0; width:25px !important" | | |||
|} | |||
|} | |||
|- | |||
!rowspan=2 style="background:#EAECF0"|Acceleration: | |||
!style="background:#EAECF0"|Race: | |||
|align="center"|'''30''' | |||
{|style="background:white; border:1px solid #1e276b; border-collapse:collapse" | |||
!style="background:#white; width:104px !important" | | |||
{|style="background:#d8f800; border:1px solid #1e276b; border-collapse:collapse" | |||
!style="background:#d8f800; border:1px solid #1e276b; width:30px !important" | | |||
!style="background:#EAECF0; width:70px !important" | | |||
|} | |||
|} | |||
|- | |||
!style="background:#EAECF0"|Battle: | |||
|align="center"|'''25''' | |||
{|style="background:white; border:1px solid #1e276b; border-collapse:collapse" | |||
!style="background:#white; width:104px !important" | | |||
{|style="background:#d8f800; border:1px solid #1e276b; border-collapse:collapse" | |||
!style="background:#d8f800; border:1px solid #1e276b; width:25px !important" | | |||
!style="background:#EAECF0; width:75px !important" | | |||
|} | |||
|} | |||
|- | |||
!colspan=2 style="background:#EAECF0"|Weight: | |||
|align="center"|'''32''' | |||
{|style="background:white; border:1px solid #1e276b; border-collapse:collapse" | |||
!style="background:#white; width:104px !important" | | |||
{|style="background:#d8f800; border:1px solid #1e276b; border-collapse:collapse" | |||
!style="background:#d8f800; border:1px solid #1e276b; width:64px !important" | | |||
!style="background:#EAECF0; width:36px !important" | | |||
|} | |||
|} | |||
|- | |||
!rowspan=2 style="background:#EAECF0"|Handling: | |||
!style="background:#EAECF0"|Race: | |||
|align="center"|'''28''' | |||
{|style="background:white; border:1px solid #1e276b; border-collapse:collapse" | |||
!style="background:#white; width:104px !important" | | |||
{|style="background:#d8f800; border:1px solid #1e276b; border-collapse:collapse" | |||
!style="background:#d8f800; border:1px solid #1e276b; width:28px !important" | | |||
!style="background:#EAECF0; width:72px !important" | | |||
|} | |||
|} | |||
|- | |||
!style="background:#EAECF0"|Battle: | |||
|align="center"|'''25''' | |||
{|style="background:white; border:1px solid #1e276b; border-collapse:collapse" | |||
!style="background:#white; width:104px !important" | | |||
{|style="background:#d8f800; border:1px solid #1e276b; border-collapse:collapse" | |||
!style="background:#d8f800; border:1px solid #1e276b; width:25px !important" | | |||
!style="background:#EAECF0; width:75px !important" | | |||
|} | |||
|} | |||
|- | |||
!rowspan=2 style="background:#EAECF0"|Drift: | |||
!style="background:#EAECF0"|Race: | |||
|align="center"|'''67''' | |||
{|style="background:white; border:1px solid #1e276b; border-collapse:collapse" | |||
!style="background:#white; width:104px !important" | | |||
{|style="background:#d8f800; border:1px solid #1e276b; border-collapse:collapse" | |||
!style="background:#d8f800; border:1px solid #1e276b; width:67px !important" | | |||
!style="background:#EAECF0; width:33px !important" | | |||
|} | |||
|} | |||
|- | |||
!style="background:#EAECF0"|Battle: | |||
|align="center"|'''56''' | |||
{|style="background:white; border:1px solid #1e276b; border-collapse:collapse" | |||
!style="background:#white; width:104px !important" | | |||
{|style="background:#d8f800; border:1px solid #1e276b; border-collapse:collapse" | |||
!style="background:#d8f800; border:1px solid #1e276b; width:56px !important" | | |||
!style="background:#EAECF0; width:44px !important" | | |||
|} | |||
|} | |||
|- | |||
!colspan=2 style="background:#EAECF0"|Items: | |||
|align="center"|'''66''' | |||
{|style="background:white; border:1px solid #1e276b; border-collapse:collapse" | |||
!style="background:#white; width:104px !important" | | |||
{|style="background:#d8f800; border:1px solid #1e276b; border-collapse:collapse" | |||
!style="background:#d8f800; border:1px solid #1e276b; width:66px !important" | | |||
!style="background:#EAECF0; width:34px !important" | | |||
|} | |||
|} | |||
|- | |||
!colspan=2 style="background:#EAECF0"|Owner: | |||
|[[File:Bowser MKDS icon.png]]<br>'''[[Bowser]]''' | |||
|} | |||
|style="display:inline-block; background:white" width=320px| | |||
{|border=1 cellspacing=0 cellpadding=4 margin=0 padding=0 style="border:1px solid black; border-collapse:collapse; height:100%" width=100% | |||
|- | |||
!style="background:#EAECF0; height:56px" align="center" colspan=3|<big>'''{{text outline|{{color-link|orange|Standard DS}}}}'''</big> | |||
|- | |||
!style="background:white; height:250px" align="center" colspan=3|[[File:MKDS Standard Kart DS Model.png|300x250px]] | |||
|- | |||
!rowspan=2 style="background:#EAECF0"|Speed: | |||
!style="background:#EAECF0"|Race: | |||
|align="center" width=50%|'''64''' | |||
{|style="background:white; border:1px solid #1e276b; border-collapse:collapse" | |||
!style="background:#white; width:104px !important" | | |||
{|style="background:#d8f800; border:1px solid #1e276b; border-collapse:collapse" | |||
!style="background:#d8f800; border:1px solid #1e276b; width:64px !important" | | |||
!style="background:#EAECF0; width:36px !important" | | |||
|} | |||
|} | |||
|- | |||
!style="background:#EAECF0"|Battle: | |||
|align="center"|'''50''' | |||
{|style="background:white; border:1px solid #1e276b; border-collapse:collapse" | |||
!style="background:#white; width:104px !important" | | |||
{|style="background:#d8f800; border:1px solid #1e276b; border-collapse:collapse" | |||
!style="background:#d8f800; border:1px solid #1e276b; width:50px !important" | | |||
!style="background:#EAECF0; width:50px !important" | | |||
|} | |||
|} | |||
|- | |||
!rowspan=2 style="background:#EAECF0"|Acceleration: | |||
!style="background:#EAECF0"|Race: | |||
|align="center"|'''64''' | |||
{|style="background:white; border:1px solid #1e276b; border-collapse:collapse" | |||
!style="background:#white; width:104px !important" | | |||
{|style="background:#d8f800; border:1px solid #1e276b; border-collapse:collapse" | |||
!style="background:#d8f800; border:1px solid #1e276b; width:64px !important" | | |||
!style="background:#EAECF0; width:36px !important" | | |||
|} | |||
|} | |||
|- | |||
!style="background:#EAECF0"|Battle: | |||
|align="center"|'''50''' | |||
{|style="background:white; border:1px solid #1e276b; border-collapse:collapse" | |||
!style="background:#white; width:104px !important" | | |||
{|style="background:#d8f800; border:1px solid #1e276b; border-collapse:collapse" | |||
!style="background:#d8f800; border:1px solid #1e276b; width:50px !important" | | |||
!style="background:#EAECF0; width:50px !important" | | |||
|} | |||
|} | |||
|- | |||
!colspan=2 style="background:#EAECF0"|Weight: | |||
|align="center"|'''32''' | |||
{|style="background:white; border:1px solid #1e276b; border-collapse:collapse" | |||
!style="background:#white; width:104px !important" | | |||
{|style="background:#d8f800; border:1px solid #1e276b; border-collapse:collapse" | |||
!style="background:#d8f800; border:1px solid #1e276b; width:64px !important" | | |||
!style="background:#EAECF0; width:36px !important" | | |||
|} | |||
|} | |||
|- | |||
!rowspan=2 style="background:#EAECF0"|Handling: | |||
!style="background:#EAECF0"|Race: | |||
|align="center"|'''40''' | |||
{|style="background:white; border:1px solid #1e276b; border-collapse:collapse" | |||
!style="background:#white; width:104px !important" | | |||
{|style="background:#d8f800; border:1px solid #1e276b; border-collapse:collapse" | |||
!style="background:#d8f800; border:1px solid #1e276b; width:40px !important" | | |||
!style="background:#EAECF0; width:60px !important" | | |||
|} | |||
|} | |||
|- | |||
!style="background:#EAECF0"|Battle: | |||
|align="center"|'''38''' | |||
{|style="background:white; border:1px solid #1e276b; border-collapse:collapse" | |||
!style="background:#white; width:104px !important" | | |||
{|style="background:#d8f800; border:1px solid #1e276b; border-collapse:collapse" | |||
!style="background:#d8f800; border:1px solid #1e276b; width:38px !important" | | |||
!style="background:#EAECF0; width:62px !important" | | |||
|} | |||
|} | |||
|- | |||
!rowspan=2 style="background:#EAECF0"|Drift: | |||
!style="background:#EAECF0"|Race: | |||
|align="center"|'''87''' | |||
{|style="background:white; border:1px solid #1e276b; border-collapse:collapse" | |||
!style="background:#white; width:104px !important" | | |||
{|style="background:#d8f800; border:1px solid #1e276b; border-collapse:collapse" | |||
!style="background:#d8f800; border:1px solid #1e276b; width:87px !important" | | |||
!style="background:#EAECF0; width:13px !important" | | |||
|} | |||
|} | |||
|- | |||
!style="background:#EAECF0"|Battle: | |||
|align="center"|'''69''' | |||
{|style="background:white; border:1px solid #1e276b; border-collapse:collapse" | |||
!style="background:#white; width:104px !important" | | |||
{|style="background:#d8f800; border:1px solid #1e276b; border-collapse:collapse" | |||
!style="background:#d8f800; border:1px solid #1e276b; width:69px !important" | | |||
!style="background:#EAECF0; width:31px !important" | | |||
|} | |||
|} | |||
|- | |||
!colspan=2 style="background:#EAECF0"|Items: | |||
|align="center"|'''66''' | |||
{|style="background:white; border:1px solid #1e276b; border-collapse:collapse" | |||
!style="background:#white; width:104px !important" | | |||
{|style="background:#d8f800; border:1px solid #1e276b; border-collapse:collapse" | |||
!style="background:#d8f800; border:1px solid #1e276b; width:66px !important" | | |||
!style="background:#EAECF0; width:34px !important" | | |||
|} | |||
|} | |||
|- | |||
!colspan=2 style="background:#EAECF0"|Owner: | |||
|[[File:Daisy MKDS icon.png]]<br>'''[[Princess Daisy|Daisy]]''' | |||
|} | |||
|style="display:inline-block; background:white" width=320px| | |||
{|border=1 cellspacing=0 cellpadding=4 margin=0 padding=0 style="border:1px solid black; border-collapse:collapse; height:100%" width=100% | |||
|- | |||
!style="background:#EAECF0; height:56px" align="center" colspan=3|<big>'''{{text outline|{{color-link|palegoldenrod|Standard DB}}}}'''</big> | |||
|- | |||
!style="background:white; height:250px" align="center" colspan=3|[[File:MKDS Standard Kart DB Model.png|300x250px]] | |||
|- | |||
!rowspan=2 style="background:#EAECF0"|Speed: | |||
!style="background:#EAECF0"|Race: | |||
|align="center" width=50%|'''31''' | |||
{|style="background:white; border:1px solid #1e276b; border-collapse:collapse" | |||
!style="background:#white; width:104px !important" | | |||
{|style="background:#d8f800; border:1px solid #1e276b; border-collapse:collapse" | |||
!style="background:#d8f800; border:1px solid #1e276b; width:31px !important" | | |||
!style="background:#EAECF0; width:69px !important" | | |||
|} | |||
|} | |||
|- | |||
!style="background:#EAECF0"|Battle: | |||
|align="center"|'''25''' | |||
{|style="background:white; border:1px solid #1e276b; border-collapse:collapse" | |||
!style="background:#white; width:104px !important" | | |||
{|style="background:#d8f800; border:1px solid #1e276b; border-collapse:collapse" | |||
!style="background:#d8f800; border:1px solid #1e276b; width:25px !important" | | |||
!style="background:#EAECF0; width:75px !important" | | |||
|} | |||
|} | |||
|- | |||
!rowspan=2 style="background:#EAECF0"|Acceleration: | |||
!style="background:#EAECF0"|Race: | |||
|align="center"|'''99''' | |||
{|style="background:white; border:1px solid #1e276b; border-collapse:collapse" | |||
!style="background:#white; width:104px !important" | | |||
{|style="background:#d8f800; border:1px solid #1e276b; border-collapse:collapse" | |||
!style="background:#d8f800; border:1px solid #1e276b; width:99px !important" | | |||
!style="background:#EAECF0; width:1px !important" | | |||
|} | |||
|} | |||
|- | |||
!style="background:#EAECF0"|Battle: | |||
|align="center"|'''75''' | |||
{|style="background:white; border:1px solid #1e276b; border-collapse:collapse" | |||
!style="background:#white; width:104px !important" | | |||
{|style="background:#d8f800; border:1px solid #1e276b; border-collapse:collapse" | |||
!style="background:#d8f800; border:1px solid #1e276b; width:75px !important" | | |||
!style="background:#EAECF0; width:25px !important" | | |||
|} | |||
|} | |||
|- | |||
!colspan=2 style="background:#EAECF0"|Weight: | |||
|align="center"|'''32''' | |||
{|style="background:white; border:1px solid #1e276b; border-collapse:collapse" | |||
!style="background:#white; width:104px !important" | | |||
{|style="background:#d8f800; border:1px solid #1e276b; border-collapse:collapse" | |||
!style="background:#d8f800; border:1px solid #1e276b; width:64px !important" | | |||
!style="background:#EAECF0; width:36px !important" | | |||
|} | |||
|} | |||
|- | |||
!rowspan=2 style="background:#EAECF0"|Handling: | |||
!style="background:#EAECF0"|Race: | |||
|align="center"|'''96''' | |||
{|style="background:white; border:1px solid #1e276b; border-collapse:collapse" | |||
!style="background:#white; width:104px !important" | | |||
{|style="background:#d8f800; border:1px solid #1e276b; border-collapse:collapse" | |||
!style="background:#d8f800; border:1px solid #1e276b; width:96px !important" | | |||
!style="background:#EAECF0; width:4px !important" | | |||
|} | |||
|} | |||
|- | |||
!style="background:#EAECF0"|Battle: | |||
|align="center"|'''75''' | |||
{|style="background:white; border:1px solid #1e276b; border-collapse:collapse" | |||
!style="background:#white; width:104px !important" | | |||
{|style="background:#d8f800; border:1px solid #1e276b; border-collapse:collapse" | |||
!style="background:#d8f800; border:1px solid #1e276b; width:75px !important" | | |||
!style="background:#EAECF0; width:25px !important" | | |||
|} | |||
|} | |||
|- | |||
!rowspan=2 style="background:#EAECF0"|Drift: | |||
!style="background:#EAECF0"|Race: | |||
|align="center"|'''47''' | |||
{|style="background:white; border:1px solid #1e276b; border-collapse:collapse" | |||
!style="background:#white; width:104px !important" | | |||
{|style="background:#d8f800; border:1px solid #1e276b; border-collapse:collapse" | |||
!style="background:#d8f800; border:1px solid #1e276b; width:47px !important" | | |||
!style="background:#EAECF0; width:53px !important" | | |||
|} | |||
|} | |||
|- | |||
!style="background:#EAECF0"|Battle: | |||
|align="center"|'''44''' | |||
{|style="background:white; border:1px solid #1e276b; border-collapse:collapse" | |||
!style="background:#white; width:104px !important" | | |||
{|style="background:#d8f800; border:1px solid #1e276b; border-collapse:collapse" | |||
!style="background:#d8f800; border:1px solid #1e276b; width:44px !important" | | |||
!style="background:#EAECF0; width:56px !important" | | |||
|} | |||
|} | |||
|- | |||
!colspan=2 style="background:#EAECF0"|Items: | |||
|align="center"|'''66''' | |||
{|style="background:white; border:1px solid #1e276b; border-collapse:collapse" | |||
!style="background:#white; width:104px !important" | | |||
{|style="background:#d8f800; border:1px solid #1e276b; border-collapse:collapse" | |||
!style="background:#d8f800; border:1px solid #1e276b; width:66px !important" | | |||
!style="background:#EAECF0; width:34px !important" | | |||
|} | |||
|} | |||
|- | |||
!colspan=2 style="background:#EAECF0"|Owner: | |||
|[[File:Dry Bones MKDS icon.png]]<br>'''[[Dry Bones]]''' | |||
|} | |||
|style="display:inline-block; background:white" width=320px| | |||
{|border=1 cellspacing=0 cellpadding=4 margin=0 padding=0 style="border:1px solid black; border-collapse:collapse; height:100%" width=100% | |||
|- | |||
!style="background:#EAECF0; height:56px" align="center" colspan=3|<big>'''{{text outline|{{color-link|indigo|Standard WL}}|white}}'''</big> | |||
|- | |||
!style="background:white; height:250px" align="center" colspan=3|[[File:MKDS Standard Kart WL Model.png|300x250px]] | |||
|- | |||
!rowspan=2 style="background:#EAECF0"|Speed: | |||
!style="background:#EAECF0"|Race: | |||
|align="center" width=50%|'''72''' | |||
{|style="background:white; border:1px solid #1e276b; border-collapse:collapse" | |||
!style="background:#white; width:104px !important" | | |||
{|style="background:#d8f800; border:1px solid #1e276b; border-collapse:collapse" | |||
!style="background:#d8f800; border:1px solid #1e276b; width:72px !important" | | |||
!style="background:#EAECF0; width:28px !important" | | |||
|} | |||
|} | |||
|- | |||
!style="background:#EAECF0"|Battle: | |||
|align="center"|'''56''' | |||
{|style="background:white; border:1px solid #1e276b; border-collapse:collapse" | |||
!style="background:#white; width:104px !important" | | |||
{|style="background:#d8f800; border:1px solid #1e276b; border-collapse:collapse" | |||
!style="background:#d8f800; border:1px solid #1e276b; width:56px !important" | | |||
!style="background:#EAECF0; width:44px !important" | | |||
|} | |||
|} | |||
|- | |||
!rowspan=2 style="background:#EAECF0"|Acceleration: | |||
!style="background:#EAECF0"|Race: | |||
|align="center"|'''63''' | |||
{|style="background:white; border:1px solid #1e276b; border-collapse:collapse" | |||
!style="background:#white; width:104px !important" | | |||
{|style="background:#d8f800; border:1px solid #1e276b; border-collapse:collapse" | |||
!style="background:#d8f800; border:1px solid #1e276b; width:63px !important" | | |||
!style="background:#EAECF0; width:37px !important" | | |||
|} | |||
|} | |||
|- | |||
!style="background:#EAECF0"|Battle: | |||
|align="center"|'''50''' | |||
{|style="background:white; border:1px solid #1e276b; border-collapse:collapse" | |||
!style="background:#white; width:104px !important" | | |||
{|style="background:#d8f800; border:1px solid #1e276b; border-collapse:collapse" | |||
!style="background:#d8f800; border:1px solid #1e276b; width:50px !important" | | |||
!style="background:#EAECF0; width:50px !important" | | |||
|} | |||
|} | |||
|- | |||
!colspan=2 style="background:#EAECF0"|Weight: | |||
|align="center"|'''32''' | |||
{|style="background:white; border:1px solid #1e276b; border-collapse:collapse" | |||
!style="background:#white; width:104px !important" | | |||
{|style="background:#d8f800; border:1px solid #1e276b; border-collapse:collapse" | |||
!style="background:#d8f800; border:1px solid #1e276b; width:64px !important" | | |||
!style="background:#EAECF0; width:36px !important" | | |||
|} | |||
|} | |||
|- | |||
!rowspan=2 style="background:#EAECF0"|Handling: | |||
!style="background:#EAECF0"|Race: | |||
|align="center"|'''56''' | |||
{|style="background:white; border:1px solid #1e276b; border-collapse:collapse" | |||
!style="background:#white; width:104px !important" | | |||
{|style="background:#d8f800; border:1px solid #1e276b; border-collapse:collapse" | |||
!style="background:#d8f800; border:1px solid #1e276b; width:56px !important" | | |||
!style="background:#EAECF0; width:44px !important" | | |||
|} | |||
|} | |||
|- | |||
!style="background:#EAECF0"|Battle: | |||
|align="center"|'''50''' | |||
{|style="background:white; border:1px solid #1e276b; border-collapse:collapse" | |||
!style="background:#white; width:104px !important" | | |||
{|style="background:#d8f800; border:1px solid #1e276b; border-collapse:collapse" | |||
!style="background:#d8f800; border:1px solid #1e276b; width:50px !important" | | |||
!style="background:#EAECF0; width:50px !important" | | |||
|} | |||
|} | |||
|- | |||
!rowspan=2 style="background:#EAECF0"|Drift: | |||
!style="background:#EAECF0"|Race: | |||
|align="center"|'''57''' | |||
{|style="background:white; border:1px solid #1e276b; border-collapse:collapse" | |||
!style="background:#white; width:104px !important" | | |||
{|style="background:#d8f800; border:1px solid #1e276b; border-collapse:collapse" | |||
!style="background:#d8f800; border:1px solid #1e276b; width:57px !important" | | |||
!style="background:#EAECF0; width:43px !important" | | |||
|} | |||
|} | |||
|- | |||
!style="background:#EAECF0"|Battle: | |||
|align="center"|'''50''' | |||
{|style="background:white; border:1px solid #1e276b; border-collapse:collapse" | |||
!style="background:#white; width:104px !important" | | |||
{|style="background:#d8f800; border:1px solid #1e276b; border-collapse:collapse" | |||
!style="background:#d8f800; border:1px solid #1e276b; width:50px !important" | | |||
!style="background:#EAECF0; width:50px !important" | | |||
|} | |||
|} | |||
|- | |||
!colspan=2 style="background:#EAECF0"|Items: | |||
|align="center"|'''66''' | |||
{|style="background:white; border:1px solid #1e276b; border-collapse:collapse" | |||
!style="background:#white; width:104px !important" | | |||
{|style="background:#d8f800; border:1px solid #1e276b; border-collapse:collapse" | |||
!style="background:#d8f800; border:1px solid #1e276b; width:66px !important" | | |||
!style="background:#EAECF0; width:34px !important" | | |||
|} | |||
|} | |||
|- | |||
!colspan=2 style="background:#EAECF0"|Owner: | |||
|[[File:Waluigi MKDS icon.png]]<br>'''[[Waluigi]]''' | |||
|} | |||
|style="display:inline-block; background:white" width=320px| | |||
{|border=1 cellspacing=0 cellpadding=4 margin=0 padding=0 style="border:1px solid black; border-collapse:collapse; height:100%" width=100% | |||
|- | |||
!style="background:#EAECF0; height:56px" align="center" colspan=3|<big>'''{{text outline|{{color-link|darkslategray|Standard RB}}|white}}'''</big> | |||
|- | |||
!style="background:white; height:250px" align="center" colspan=3|[[File:MKDS Standard Kart RB Model.png|300x250px]] | |||
|- | |||
!rowspan=2 style="background:#EAECF0"|Speed: | |||
!style="background:#EAECF0"|Race: | |||
|align="center" width=50%|'''96''' | |||
{|style="background:white; border:1px solid #1e276b; border-collapse:collapse" | |||
!style="background:#white; width:104px !important" | | |||
{|style="background:#d8f800; border:1px solid #1e276b; border-collapse:collapse" | |||
!style="background:#d8f800; border:1px solid #1e276b; width:96px !important" | | |||
!style="background:#EAECF0; width:4px !important" | | |||
|} | |||
|} | |||
|- | |||
!style="background:#EAECF0"|Battle: | |||
|align="center"|'''75''' | |||
{|style="background:white; border:1px solid #1e276b; border-collapse:collapse" | |||
!style="background:#white; width:104px !important" | | |||
{|style="background:#d8f800; border:1px solid #1e276b; border-collapse:collapse" | |||
!style="background:#d8f800; border:1px solid #1e276b; width:75px !important" | | |||
!style="background:#EAECF0; width:25px !important" | | |||
|} | |||
|} | |||
|- | |||
!rowspan=2 style="background:#EAECF0"|Acceleration: | |||
!style="background:#EAECF0"|Race: | |||
|align="center"|'''53''' | |||
{|style="background:white; border:1px solid #1e276b; border-collapse:collapse" | |||
!style="background:#white; width:104px !important" | | |||
{|style="background:#d8f800; border:1px solid #1e276b; border-collapse:collapse" | |||
!style="background:#d8f800; border:1px solid #1e276b; width:53px !important" | | |||
!style="background:#EAECF0; width:47px !important" | | |||
|} | |||
|} | |||
|- | |||
!style="background:#EAECF0"|Battle: | |||
|align="center"|'''49''' | |||
{|style="background:white; border:1px solid #1e276b; border-collapse:collapse" | |||
!style="background:#white; width:104px !important" | | |||
{|style="background:#d8f800; border:1px solid #1e276b; border-collapse:collapse" | |||
!style="background:#d8f800; border:1px solid #1e276b; width:49px !important" | | |||
!style="background:#EAECF0; width:51px !important" | | |||
|} | |||
|} | |||
|- | |||
!colspan=2 style="background:#EAECF0"|Weight: | |||
|align="center"|'''32''' | |||
{|style="background:white; border:1px solid #1e276b; border-collapse:collapse" | |||
!style="background:#white; width:104px !important" | | |||
{|style="background:#d8f800; border:1px solid #1e276b; border-collapse:collapse" | |||
!style="background:#d8f800; border:1px solid #1e276b; width:64px !important" | | |||
!style="background:#EAECF0; width:36px !important" | | |||
|} | |||
|} | |||
|- | |||
!rowspan=2 style="background:#EAECF0"|Handling: | |||
!style="background:#EAECF0"|Race: | |||
|align="center"|'''65''' | |||
{|style="background:white; border:1px solid #1e276b; border-collapse:collapse" | |||
!style="background:#white; width:104px !important" | | |||
{|style="background:#d8f800; border:1px solid #1e276b; border-collapse:collapse" | |||
!style="background:#d8f800; border:1px solid #1e276b; width:65px !important" | | |||
!style="background:#EAECF0; width:35px !important" | | |||
|} | |||
|} | |||
|- | |||
!style="background:#EAECF0"|Battle: | |||
|align="center"|'''56''' | |||
{|style="background:white; border:1px solid #1e276b; border-collapse:collapse" | |||
!style="background:#white; width:104px !important" | | |||
{|style="background:#d8f800; border:1px solid #1e276b; border-collapse:collapse" | |||
!style="background:#d8f800; border:1px solid #1e276b; width:56px !important" | | |||
!style="background:#EAECF0; width:44px !important" | | |||
|} | |||
|} | |||
|- | |||
!rowspan=2 style="background:#EAECF0"|Drift: | |||
!style="background:#EAECF0"|Race: | |||
|align="center"|'''27''' | |||
{|style="background:white; border:1px solid #1e276b; border-collapse:collapse" | |||
!style="background:#white; width:104px !important" | | |||
{|style="background:#d8f800; border:1px solid #1e276b; border-collapse:collapse" | |||
!style="background:#d8f800; border:1px solid #1e276b; width:27px !important" | | |||
!style="background:#EAECF0; width:73px !important" | | |||
|} | |||
|} | |||
|- | |||
!style="background:#EAECF0"|Battle: | |||
|align="center"|'''25''' | |||
{|style="background:white; border:1px solid #1e276b; border-collapse:collapse" | |||
!style="background:#white; width:104px !important" | | |||
{|style="background:#d8f800; border:1px solid #1e276b; border-collapse:collapse" | |||
!style="background:#d8f800; border:1px solid #1e276b; width:25px !important" | | |||
!style="background:#EAECF0; width:75px !important" | | |||
|} | |||
|} | |||
|- | |||
!colspan=2 style="background:#EAECF0"|Items: | |||
|align="center"|'''66''' | |||
{|style="background:white; border:1px solid #1e276b; border-collapse:collapse" | |||
!style="background:#white; width:104px !important" | | |||
{|style="background:#d8f800; border:1px solid #1e276b; border-collapse:collapse" | |||
!style="background:#d8f800; border:1px solid #1e276b; width:66px !important" | | |||
!style="background:#EAECF0; width:34px !important" | | |||
|} | |||
|} | |||
|- | |||
!colspan=2 style="background:#EAECF0"|Owner: | |||
|[[File:ROB MKDS icon.png]]<br>'''[[R.O.B.]]''' | |||
|} | |||
|style="display:inline-block; background:white" width=320px| | |||
{|border=1 cellspacing=0 cellpadding=4 margin=0 padding=0 style="border:1px solid black; border-collapse:collapse; height:100%" width=100% | |||
|- | |||
!style="background:#EAECF0; height:56px" align="center" colspan=3|<big>'''{{conjectural|{{text outline|{{color-link|whitesmoke|Standard SG}}}}}}'''</big> | |||
|- | |||
!style="background:white; height:250px" align="center" colspan=3|[[File:MKDS Standard Kart SG Model.png|300x250px]] | |||
|- | |||
!rowspan=2 style="background:#EAECF0"|Speed: | |||
!style="background:#EAECF0"|Race: | |||
|align="center" width=50%|'''55''' | |||
{|style="background:white; border:1px solid #1e276b; border-collapse:collapse" | |||
!style="background:#white; width:104px !important" | | |||
{|style="background:#d8f800; border:1px solid #1e276b; border-collapse:collapse" | |||
!style="background:#d8f800; border:1px solid #1e276b; width:55px !important" | | |||
!style="background:#EAECF0; width:45px !important" | | |||
|} | |||
|} | |||
|- | |||
!style="background:#EAECF0"|Battle: | |||
|align="center"|'''44''' | |||
{|style="background:white; border:1px solid #1e276b; border-collapse:collapse" | |||
!style="background:#white; width:104px !important" | | |||
{|style="background:#d8f800; border:1px solid #1e276b; border-collapse:collapse" | |||
!style="background:#d8f800; border:1px solid #1e276b; width:44px !important" | | |||
!style="background:#EAECF0; width:56px !important" | | |||
|} | |||
|} | |||
|- | |||
!rowspan=2 style="background:#EAECF0"|Acceleration: | |||
!style="background:#EAECF0"|Race: | |||
|align="center"|'''90''' | |||
{|style="background:white; border:1px solid #1e276b; border-collapse:collapse" | |||
!style="background:#white; width:104px !important" | | |||
{|style="background:#d8f800; border:1px solid #1e276b; border-collapse:collapse" | |||
!style="background:#d8f800; border:1px solid #1e276b; width:90px !important" | | |||
!style="background:#EAECF0; width:10px !important" | | |||
|} | |||
|} | |||
|- | |||
!style="background:#EAECF0"|Battle: | |||
|align="center"|'''71''' | |||
{|style="background:white; border:1px solid #1e276b; border-collapse:collapse" | |||
!style="background:#white; width:104px !important" | | |||
{|style="background:#d8f800; border:1px solid #1e276b; border-collapse:collapse" | |||
!style="background:#d8f800; border:1px solid #1e276b; width:71px !important" | | |||
!style="background:#EAECF0; width:29px !important" | | |||
|} | |||
|} | |||
|- | |||
!colspan=2 style="background:#EAECF0"|Weight: | |||
|align="center"|'''32''' | |||
{|style="background:white; border:1px solid #1e276b; border-collapse:collapse" | |||
!style="background:#white; width:104px !important" | | |||
{|style="background:#d8f800; border:1px solid #1e276b; border-collapse:collapse" | |||
!style="background:#d8f800; border:1px solid #1e276b; width:64px !important" | | |||
!style="background:#EAECF0; width:36px !important" | | |||
|} | |||
|} | |||
|- | |||
!rowspan=2 style="background:#EAECF0"|Handling: | |||
!style="background:#EAECF0"|Race: | |||
|align="center"|'''84''' | |||
{|style="background:white; border:1px solid #1e276b; border-collapse:collapse" | |||
!style="background:#white; width:104px !important" | | |||
{|style="background:#d8f800; border:1px solid #1e276b; border-collapse:collapse" | |||
!style="background:#d8f800; border:1px solid #1e276b; width:84px !important" | | |||
!style="background:#EAECF0; width:16px !important" | | |||
|} | |||
|} | |||
|- | |||
!style="background:#EAECF0"|Battle: | |||
|align="center"|'''69''' | |||
{|style="background:white; border:1px solid #1e276b; border-collapse:collapse" | |||
!style="background:#white; width:104px !important" | | |||
{|style="background:#d8f800; border:1px solid #1e276b; border-collapse:collapse" | |||
!style="background:#d8f800; border:1px solid #1e276b; width:69px !important" | | |||
!style="background:#EAECF0; width:31px !important" | | |||
|} | |||
|} | |||
|- | |||
!rowspan=2 style="background:#EAECF0"|Drift: | |||
!style="background:#EAECF0"|Race: | |||
|align="center"|'''39''' | |||
{|style="background:white; border:1px solid #1e276b; border-collapse:collapse" | |||
!style="background:#white; width:104px !important" | | |||
{|style="background:#d8f800; border:1px solid #1e276b; border-collapse:collapse" | |||
!style="background:#d8f800; border:1px solid #1e276b; width:39px !important" | | |||
!style="background:#EAECF0; width:61px !important" | | |||
|} | |||
|} | |||
|- | |||
!style="background:#EAECF0"|Battle: | |||
|align="center"|'''38''' | |||
{|style="background:white; border:1px solid #1e276b; border-collapse:collapse" | |||
!style="background:#white; width:104px !important" | | |||
{|style="background:#d8f800; border:1px solid #1e276b; border-collapse:collapse" | |||
!style="background:#d8f800; border:1px solid #1e276b; width:38px !important" | | |||
!style="background:#EAECF0; width:62px !important" | | |||
|} | |||
|} | |||
|- | |||
!colspan=2 style="background:#EAECF0"|Items: | |||
|align="center"|'''66''' | |||
{|style="background:white; border:1px solid #1e276b; border-collapse:collapse" | |||
!style="background:#white; width:104px !important" | | |||
{|style="background:#d8f800; border:1px solid #1e276b; border-collapse:collapse" | |||
!style="background:#d8f800; border:1px solid #1e276b; width:66px !important" | | |||
!style="background:#EAECF0; width:34px !important" | | |||
|} | |||
|} | |||
|- | |||
!colspan=2 style="background:#EAECF0"|Owner: | |||
|[[File:MKDS Red Shy Guy Mugshot.png]]<br>'''[[Shy Guy]]''' | |||
|} | |||
|} | |||
====Unlockable karts==== | |||
The third group of karts are unlocked all at once after getting gold trophies on all Nitro cups on 100cc difficulty. They function the same as the default signature karts in that they are based around one character each, are unlocked for select other characters after collecting all golden trophies in Nitro or Retro 150cc, and are then unlocked for everyone after collecting all golden trophies in 150cc Mirror Mode. | |||
{|border=1 style="text-align:center; border:1px solid black; border-collapse:collapse; max-width:1300px" | |||
|- | |||
!style="background:red;color:white"|Unlockable karts | |||
|-style="background:#EAECF0" | |||
|style="display:inline-block; background:white" width=320px| | |||
{|border=1 cellspacing=0 cellpadding=4 margin=0 padding=0 style="border:1px solid black; border-collapse:collapse; height:100%" width=100% | |||
|- | |||
!style="background:#EAECF0; height:56px" align="center" colspan=2|<big>'''{{text outline|{{color-link|red|Shooting Star (kart)|Shooting Star}}}}'''</big> | |||
|- | |||
!style="background:white; height:250px" align="center" colspan=2|[[File:MKDS Shooting Star Model.png|300x250px]] | |||
|- | |||
!style="background:#EAECF0"|Speed: | |||
|align="center" width=50%|'''67''' | |||
{|style="background:white; border:1px solid #1e276b; border-collapse:collapse" | |||
!style="background:#white; width:104px !important" | | |||
{|style="background:#d8f800; border:1px solid #1e276b; border-collapse:collapse" | |||
!style="background:#d8f800; border:1px solid #1e276b; width:67px !important" | | |||
!style="background:#EAECF0; width:33px !important" | | |||
|} | |||
|} | |||
|- | |||
!style="background:#EAECF0"|Acceleration: | |||
|align="center"|'''74''' | |||
{|style="background:white; border:1px solid #1e276b; border-collapse:collapse" | |||
!style="background:#white; width:104px !important" | | |||
{|style="background:#d8f800; border:1px solid #1e276b; border-collapse:collapse" | |||
!style="background:#d8f800; border:1px solid #1e276b; width:74px !important" | | |||
!style="background:#EAECF0; width:26px !important" | | |||
|} | |||
|} | |||
|- | |||
!style="background:#EAECF0"|Weight: | |||
|align="center"|'''14''' | |||
{|style="background:white; border:1px solid #1e276b; border-collapse:collapse" | |||
!style="background:#white; width:104px !important" | | |||
{|style="background:#d8f800; border:1px solid #1e276b; border-collapse:collapse" | |||
!style="background:#d8f800; border:1px solid #1e276b; width:28px !important" | | |||
!style="background:#EAECF0; width:72px !important" | | |||
|} | |||
|} | |||
|- | |||
!style="background:#EAECF0"|Handling: | |||
|align="center"|'''60''' | |||
{|style="background:white; border:1px solid #1e276b; border-collapse:collapse" | |||
!style="background:#white; width:104px !important" | | |||
{|style="background:#d8f800; border:1px solid #1e276b; border-collapse:collapse" | |||
!style="background:#d8f800; border:1px solid #1e276b; width:60px !important" | | |||
!style="background:#EAECF0; width:40px !important" | | |||
|} | |||
|} | |||
|- | |||
!style="background:#EAECF0"|Drift: | |||
|align="center"|'''59''' | |||
{|style="background:white; border:1px solid #1e276b; border-collapse:collapse" | |||
!style="background:#white; width:104px !important" | | |||
{|style="background:#d8f800; border:1px solid #1e276b; border-collapse:collapse" | |||
!style="background:#d8f800; border:1px solid #1e276b; width:59px !important" | | |||
!style="background:#EAECF0; width:41px !important" | | |||
|} | |||
|} | |||
|- | |||
!style="background:#EAECF0"|Items: | |||
|align="center"|'''33''' | |||
{|style="background:white; border:1px solid #1e276b; border-collapse:collapse" | |||
!style="background:#white; width:104px !important" | | |||
{|style="background:#d8f800; border:1px solid #1e276b; border-collapse:collapse" | |||
!style="background:#d8f800; border:1px solid #1e276b; width:33px !important" | | |||
!style="background:#EAECF0; width:67px !important" | | |||
|} | |||
|} | |||
|- | |||
!style="background:#EAECF0"|Owner: | |||
|[[File:Mario MKDS icon.png]]<br>'''[[Mario]]''' | |||
|- | |||
!colspan=2 style="background:#EAECF0"|Secondary drivers: | |||
|- | |||
|[[File:Toad MKDS icon.png]]<br>'''[[Toad]]''' | |||
|[[File:Wario MKDS icon.png]]<br>'''[[Wario]]''' | |||
|} | |||
|style="display:inline-block; background:white" width=320px| | |||
{|border=1 cellspacing=0 cellpadding=4 margin=0 padding=0 style="border:1px solid black; border-collapse:collapse; height:100%" width=100% | |||
|- | |||
!style="background:#EAECF0; height:56px" align="center" colspan=3|<big>'''{{text outline|{{color-link|green|Streamliner}}|white}}'''</big> | |||
|- | |||
!style="background:white; height:250px" align="center" colspan=2|[[File:MKDS Streamliner Model.png|300x250px]] | |||
|- | |||
!style="background:#EAECF0"|Speed: | |||
|align="center" width=50%|'''66''' | |||
{|style="background:white; border:1px solid #1e276b; border-collapse:collapse" | |||
!style="background:#white; width:104px !important" | | |||
{|style="background:#d8f800; border:1px solid #1e276b; border-collapse:collapse" | |||
!style="background:#d8f800; border:1px solid #1e276b; width:66px !important" | | |||
!style="background:#EAECF0; width:34px !important" | | |||
|} | |||
|} | |||
|- | |||
!style="background:#EAECF0"|Acceleration: | |||
|align="center"|'''71''' | |||
{|style="background:white; border:1px solid #1e276b; border-collapse:collapse" | |||
!style="background:#white; width:104px !important" | | |||
{|style="background:#d8f800; border:1px solid #1e276b; border-collapse:collapse" | |||
!style="background:#d8f800; border:1px solid #1e276b; width:71px !important" | | |||
!style="background:#EAECF0; width:29px !important" | | |||
|} | |||
|} | |||
|- | |||
!style="background:#EAECF0"|Weight: | |||
|align="center"|'''41''' | |||
{|style="background:white; border:1px solid #1e276b; border-collapse:collapse" | |||
!style="background:#white; width:104px !important" | | |||
{|style="background:#d8f800; border:1px solid #1e276b; border-collapse:collapse" | |||
!style="background:#d8f800; border:1px solid #1e276b; width:82px !important" | | |||
!style="background:#EAECF0; width:18px !important" | | |||
|} | |||
|} | |||
|- | |||
!style="background:#EAECF0"|Handling: | |||
|align="center"|'''69''' | |||
{|style="background:white; border:1px solid #1e276b; border-collapse:collapse" | |||
!style="background:#white; width:104px !important" | | |||
{|style="background:#d8f800; border:1px solid #1e276b; border-collapse:collapse" | |||
!style="background:#d8f800; border:1px solid #1e276b; width:69px !important" | | |||
!style="background:#EAECF0; width:31px !important" | | |||
|} | |||
|} | |||
|- | |||
!style="background:#EAECF0"|Drift: | |||
|align="center"|'''30''' | |||
{|style="background:white; border:1px solid #1e276b; border-collapse:collapse" | |||
!style="background:#white; width:104px !important" | | |||
{|style="background:#d8f800; border:1px solid #1e276b; border-collapse:collapse" | |||
!style="background:#d8f800; border:1px solid #1e276b; width:30px !important" | | |||
!style="background:#EAECF0; width:70px !important" | | |||
|} | |||
|} | |||
|- | |||
!style="background:#EAECF0"|Items: | |||
|align="center"|'''100''' | |||
{|style="background:white; border:1px solid #1e276b; border-collapse:collapse" | |||
!style="background:#white; width:104px !important" | | |||
{|style="background:#d8f800; border:1px solid #1e276b; border-collapse:collapse" | |||
!style="background:#d8f800; border:1px solid #1e276b; width:100px !important" | | |||
|} | |||
|} | |||
|- | |||
!style="background:#EAECF0"|Owner: | |||
|[[File:Luigi MKDS icon.png]]<br>'''[[Luigi]]''' | |||
|- | |||
!colspan=2 style="background:#EAECF0"|Secondary drivers: | |||
|- | |||
|[[File:Dry Bones MKDS icon.png]]<br>'''[[Dry Bones]]''' | |||
|[[File:ROB MKDS icon.png]]<br>'''[[R.O.B.]]''' | |||
|} | |||
|style="display:inline-block; background:white" width=320px| | |||
{|border=1 cellspacing=0 cellpadding=4 margin=0 padding=0 style="border:1px solid black; border-collapse:collapse; height:100%" width=100% | |||
|- | |||
!style="background:#EAECF0; height:56px" align="center" colspan=3|<big>'''{{text outline|{{color-link|hotpink|Light Tripper}}}}'''</big> | |||
|- | |||
!style="background:white; height:250px" align="center" colspan=2|[[File:MKDS Light Tripper Model.png|300x250px]] | |||
|- | |||
!style="background:#EAECF0"|Speed: | |||
|align="center" width=50%|'''51''' | |||
{|style="background:white; border:1px solid #1e276b; border-collapse:collapse" | |||
!style="background:#white; width:104px !important" | | |||
{|style="background:#d8f800; border:1px solid #1e276b; border-collapse:collapse" | |||
!style="background:#d8f800; border:1px solid #1e276b; width:51px !important" | | |||
!style="background:#EAECF0; width:49px !important" | | |||
|} | |||
|} | |||
|- | |||
!style="background:#EAECF0"|Acceleration: | |||
|align="center"|'''75''' | |||
{|style="background:white; border:1px solid #1e276b; border-collapse:collapse" | |||
!style="background:#white; width:104px !important" | | |||
{|style="background:#d8f800; border:1px solid #1e276b; border-collapse:collapse" | |||
!style="background:#d8f800; border:1px solid #1e276b; width:75px !important" | | |||
!style="background:#EAECF0; width:25px !important" | | |||
|} | |||
|} | |||
|- | |||
!style="background:#EAECF0"|Weight: | |||
|align="center"|'''20''' | |||
{|style="background:white; border:1px solid #1e276b; border-collapse:collapse" | |||
!style="background:#white; width:104px !important" | | |||
{|style="background:#d8f800; border:1px solid #1e276b; border-collapse:collapse" | |||
!style="background:#d8f800; border:1px solid #1e276b; width:40px !important" | | |||
!style="background:#EAECF0; width:60px !important" | | |||
|} | |||
|} | |||
|- | |||
!style="background:#EAECF0"|Handling: | |||
|align="center"|'''51''' | |||
{|style="background:white; border:1px solid #1e276b; border-collapse:collapse" | |||
!style="background:#white; width:104px !important" | | |||
{|style="background:#d8f800; border:1px solid #1e276b; border-collapse:collapse" | |||
!style="background:#d8f800; border:1px solid #1e276b; width:51px !important" | | |||
!style="background:#EAECF0; width:49px !important" | | |||
|} | |||
|} | |||
|- | |||
!style="background:#EAECF0"|Drift: | |||
|align="center"|'''100''' | |||
{|style="background:white; border:1px solid #1e276b; border-collapse:collapse" | |||
!style="background:#white; width:104px !important" | | |||
{|style="background:#d8f800; border:1px solid #1e276b; border-collapse:collapse" | |||
!style="background:#d8f800; border:1px solid #1e276b; width:100px !important" | | |||
|} | |||
|} | |||
|- | |||
!style="background:#EAECF0"|Items: | |||
|align="center"|'''33''' | |||
{|style="background:white; border:1px solid #1e276b; border-collapse:collapse" | |||
!style="background:#white; width:104px !important" | | |||
{|style="background:#d8f800; border:1px solid #1e276b; border-collapse:collapse" | |||
!style="background:#d8f800; border:1px solid #1e276b; width:33px !important" | | |||
!style="background:#EAECF0; width:67px !important" | | |||
|} | |||
|} | |||
|- | |||
!style="background:#EAECF0"|Owner: | |||
|[[File:Peach MKDS icon.png]]<br>'''[[Princess Peach|Peach]]''' | |||
|- | |||
!colspan=2 style="background:#EAECF0"|Secondary drivers: | |||
|- | |||
|[[File:Daisy MKDS icon.png]]<br>'''[[Princess Daisy|Daisy]]''' | |||
|[[File:Dry Bones MKDS icon.png]]<br>'''[[Dry Bones]]''' | |||
|} | |||
|style="display:inline-block; background:white" width=320px| | |||
{|border=1 cellspacing=0 cellpadding=4 margin=0 padding=0 style="border:1px solid black; border-collapse:collapse; height:100%" width=100% | |||
|- | |||
!style="background:#EAECF0; height:56px" align="center" colspan=3|<big>'''{{text outline|{{color-link|limegreen|Cucumber}}}}'''</big> | |||
|- | |||
!style="background:white; height:250px" align="center" colspan=2|[[File:MKDS Cucumber Model.png|300x250px]] | |||
|- | |||
!style="background:#EAECF0"|Speed: | |||
|align="center" width=50%|'''49''' | |||
{|style="background:white; border:1px solid #1e276b; border-collapse:collapse" | |||
!style="background:#white; width:104px !important" | | |||
{|style="background:#d8f800; border:1px solid #1e276b; border-collapse:collapse" | |||
!style="background:#d8f800; border:1px solid #1e276b; width:49px !important" | | |||
!style="background:#EAECF0; width:51px !important" | | |||
|} | |||
|} | |||
|- | |||
!style="background:#EAECF0"|Acceleration: | |||
|align="center"|'''88''' | |||
{|style="background:white; border:1px solid #1e276b; border-collapse:collapse" | |||
!style="background:#white; width:104px !important" | | |||
{|style="background:#d8f800; border:1px solid #1e276b; border-collapse:collapse" | |||
!style="background:#d8f800; border:1px solid #1e276b; width:88px !important" | | |||
!style="background:#EAECF0; width:12px !important" | | |||
|} | |||
|} | |||
|- | |||
!style="background:#EAECF0"|Weight: | |||
|align="center"|'''38''' | |||
{|style="background:white; border:1px solid #1e276b; border-collapse:collapse" | |||
!style="background:#white; width:104px !important" | | |||
{|style="background:#d8f800; border:1px solid #1e276b; border-collapse:collapse" | |||
!style="background:#d8f800; border:1px solid #1e276b; width:76px !important" | | |||
!style="background:#EAECF0; width:24px !important" | | |||
|} | |||
|} | |||
|- | |||
!style="background:#EAECF0"|Handling: | |||
|align="center"|'''80''' | |||
{|style="background:white; border:1px solid #1e276b; border-collapse:collapse" | |||
!style="background:#white; width:104px !important" | | |||
{|style="background:#d8f800; border:1px solid #1e276b; border-collapse:collapse" | |||
!style="background:#d8f800; border:1px solid #1e276b; width:80px !important" | | |||
!style="background:#EAECF0; width:20px !important" | | |||
|} | |||
|} | |||
|- | |||
!style="background:#EAECF0"|Drift: | |||
|align="center"|'''37''' | |||
{|style="background:white; border:1px solid #1e276b; border-collapse:collapse" | |||
!style="background:#white; width:104px !important" | | |||
{|style="background:#d8f800; border:1px solid #1e276b; border-collapse:collapse" | |||
!style="background:#d8f800; border:1px solid #1e276b; width:37px !important" | | |||
!style="background:#EAECF0; width:63px !important" | | |||
|} | |||
|} | |||
|- | |||
!style="background:#EAECF0"|Items: | |||
|align="center"|'''100''' | |||
{|style="background:white; border:1px solid #1e276b; border-collapse:collapse" | |||
!style="background:#white; width:104px !important" | | |||
{|style="background:#d8f800; border:1px solid #1e276b; border-collapse:collapse" | |||
!style="background:#d8f800; border:1px solid #1e276b; width:100px !important" | | |||
|} | |||
|} | |||
|- | |||
!style="background:#EAECF0"|Owner: | |||
|[[File:Yoshi MKDS icon.png]]<br>'''[[Yoshi]]''' | |||
|- | |||
!colspan=2 style="background:#EAECF0"|Secondary drivers: | |||
|- | |||
|[[File:Dry Bones MKDS icon.png]]<br>'''[[Dry Bones]]''' | |||
|[[File:Luigi MKDS icon.png]]<br>'''[[Luigi]]''' | |||
|} | |||
|style="display:inline-block; background:white" width=320px| | |||
{|border=1 cellspacing=0 cellpadding=4 margin=0 padding=0 style="border:1px solid black; border-collapse:collapse; height:100%" width=100% | |||
|- | |||
!style="background:#EAECF0; height:56px" align="center" colspan=3|<big>'''{{text outline|{{color-link|blue|4-Wheel Cradle}}|white}}'''</big> | |||
|- | |||
!style="background:white; height:250px" align="center" colspan=2|[[File:MKDS 4-Wheel Cradle Model.png|300x250px]] | |||
|- | |||
!style="background:#EAECF0"|Speed: | |||
|align="center" width=50%|'''33''' | |||
{|style="background:white; border:1px solid #1e276b; border-collapse:collapse" | |||
!style="background:#white; width:104px !important" | | |||
{|style="background:#d8f800; border:1px solid #1e276b; border-collapse:collapse" | |||
!style="background:#d8f800; border:1px solid #1e276b; width:33px !important" | | |||
!style="background:#EAECF0; width:67px !important" | | |||
|} | |||
|} | |||
|- | |||
!style="background:#EAECF0"|Acceleration: | |||
|align="center"|'''83''' | |||
{|style="background:white; border:1px solid #1e276b; border-collapse:collapse" | |||
!style="background:#white; width:104px !important" | | |||
{|style="background:#d8f800; border:1px solid #1e276b; border-collapse:collapse" | |||
!style="background:#d8f800; border:1px solid #1e276b; width:83px !important" | | |||
!style="background:#EAECF0; width:17px !important" | | |||
|} | |||
|} | |||
|- | |||
!style="background:#EAECF0"|Weight: | |||
|align="center"|'''44''' | |||
{|style="background:white; border:1px solid #1e276b; border-collapse:collapse" | |||
!style="background:#white; width:104px !important" | | |||
{|style="background:#d8f800; border:1px solid #1e276b; border-collapse:collapse" | |||
!style="background:#d8f800; border:1px solid #1e276b; width:88px !important" | | |||
!style="background:#EAECF0; width:12px !important" | | |||
|} | |||
|} | |||
|- | |||
!style="background:#EAECF0"|Handling: | |||
|align="center"|'''61''' | |||
{|style="background:white; border:1px solid #1e276b; border-collapse:collapse" | |||
!style="background:#white; width:104px !important" | | |||
{|style="background:#d8f800; border:1px solid #1e276b; border-collapse:collapse" | |||
!style="background:#d8f800; border:1px solid #1e276b; width:61px !important" | | |||
!style="background:#EAECF0; width:39px !important" | | |||
|} | |||
|} | |||
|- | |||
!style="background:#EAECF0"|Drift: | |||
|align="center"|'''64''' | |||
{|style="background:white; border:1px solid #1e276b; border-collapse:collapse" | |||
!style="background:#white; width:104px !important" | | |||
{|style="background:#d8f800; border:1px solid #1e276b; border-collapse:collapse" | |||
!style="background:#d8f800; border:1px solid #1e276b; width:64px !important" | | |||
!style="background:#EAECF0; width:36px !important" | | |||
|} | |||
|} | |||
|- | |||
!style="background:#EAECF0"|Items: | |||
|align="center"|'''100''' | |||
{|style="background:white; border:1px solid #1e276b; border-collapse:collapse" | |||
!style="background:#white; width:104px !important" | | |||
{|style="background:#d8f800; border:1px solid #1e276b; border-collapse:collapse" | |||
!style="background:#d8f800; border:1px solid #1e276b; width:100px !important" | | |||
|} | |||
|} | |||
|- | |||
!style="background:#EAECF0"|Owner: | |||
|[[File:Toad MKDS icon.png]]<br>'''[[Toad]]''' | |||
|- | |||
!colspan=2 style="background:#EAECF0"|Secondary drivers: | |||
|- | |||
|[[File:Mario MKDS icon.png]]<br>'''[[Mario]]''' | |||
|[[File:Peach MKDS icon.png]]<br>'''[[Princess Peach|Peach]]''' | |||
|} | |||
|style="display:inline-block; background:white" width=320px| | |||
{|border=1 cellspacing=0 cellpadding=4 margin=0 padding=0 style="border:1px solid black; border-collapse:collapse; height:100%" width=100% | |||
|- | |||
!style="background:#EAECF0; height:56px" align="center" colspan=3|<big>'''{{text outline|{{color-link|yellow|Wildlife}}}}'''</big> | |||
|- | |||
!style="background:white; height:250px" align="center" colspan=2|[[File:MKDS Wildlife Model.png|300x250px]] | |||
|- | |||
!style="background:#EAECF0"|Speed: | |||
|align="center" width=50%|'''84''' | |||
{|style="background:white; border:1px solid #1e276b; border-collapse:collapse" | |||
!style="background:#white; width:104px !important" | | |||
{|style="background:#d8f800; border:1px solid #1e276b; border-collapse:collapse" | |||
!style="background:#d8f800; border:1px solid #1e276b; width:84px !important" | | |||
!style="background:#EAECF0; width:16px !important" | | |||
|} | |||
|} | |||
|- | |||
!style="background:#EAECF0"|Acceleration: | |||
|align="center"|'''50''' | |||
{|style="background:white; border:1px solid #1e276b; border-collapse:collapse" | |||
!style="background:#white; width:104px !important" | | |||
{|style="background:#d8f800; border:1px solid #1e276b; border-collapse:collapse" | |||
!style="background:#d8f800; border:1px solid #1e276b; width:50px !important" | | |||
!style="background:#EAECF0; width:50px !important" | | |||
|} | |||
|} | |||
|- | |||
!style="background:#EAECF0"|Weight: | |||
|align="center"|'''23''' | |||
{|style="background:white; border:1px solid #1e276b; border-collapse:collapse" | |||
!style="background:#white; width:104px !important" | | |||
{|style="background:#d8f800; border:1px solid #1e276b; border-collapse:collapse" | |||
!style="background:#d8f800; border:1px solid #1e276b; width:46px !important" | | |||
!style="background:#EAECF0; width:54px !important" | | |||
|} | |||
|} | |||
|- | |||
!style="background:#EAECF0"|Handling: | |||
|align="center"|'''37''' | |||
{|style="background:white; border:1px solid #1e276b; border-collapse:collapse" | |||
!style="background:#white; width:104px !important" | | |||
{|style="background:#d8f800; border:1px solid #1e276b; border-collapse:collapse" | |||
!style="background:#d8f800; border:1px solid #1e276b; width:37px !important" | | |||
!style="background:#EAECF0; width:63px !important" | | |||
|} | |||
|} | |||
|- | |||
!style="background:#EAECF0"|Drift: | |||
|align="center"|'''79''' | |||
{|style="background:white; border:1px solid #1e276b; border-collapse:collapse" | |||
!style="background:#white; width:104px !important" | | |||
{|style="background:#d8f800; border:1px solid #1e276b; border-collapse:collapse" | |||
!style="background:#d8f800; border:1px solid #1e276b; width:79px !important" | | |||
!style="background:#EAECF0; width:21px !important" | | |||
|} | |||
|} | |||
|- | |||
!style="background:#EAECF0"|Items: | |||
|align="center"|'''33''' | |||
{|style="background:white; border:1px solid #1e276b; border-collapse:collapse" | |||
!style="background:#white; width:104px !important" | | |||
{|style="background:#d8f800; border:1px solid #1e276b; border-collapse:collapse" | |||
!style="background:#d8f800; border:1px solid #1e276b; width:33px !important" | | |||
!style="background:#EAECF0; width:67px !important" | | |||
|} | |||
|} | |||
|- | |||
!style="background:#EAECF0"|Owner: | |||
|[[File:DK MKDS icon.png]]<br>'''[[Donkey Kong]]''' | |||
|- | |||
!colspan=2 style="background:#EAECF0"|Secondary drivers: | |||
|- | |||
|[[File:Luigi MKDS icon.png]]<br>'''[[Luigi]]''' | |||
|[[File:Peach MKDS icon.png]]<br>'''[[Princess Peach|Peach]]''' | |||
|} | |||
|style="display:inline-block; background:white" width=320px| | |||
{|border=1 cellspacing=0 cellpadding=4 margin=0 padding=0 style="border:1px solid black; border-collapse:collapse; height:100%" width=100% | |||
|- | |||
!style="background:#EAECF0; height:56px" align="center" colspan=3|<big>'''{{text outline|{{color-link|mediumorchid|Dragonfly}}}}'''</big> | |||
|- | |||
!style="background:white; height:250px" align="center" colspan=2|[[File:MKDS Dragonfly Model.png|300x250px]] | |||
|- | |||
!style="background:#EAECF0"|Speed: | |||
|align="center" width=50%|'''82''' | |||
{|style="background:white; border:1px solid #1e276b; border-collapse:collapse" | |||
!style="background:#white; width:104px !important" | | |||
{|style="background:#d8f800; border:1px solid #1e276b; border-collapse:collapse" | |||
!style="background:#d8f800; border:1px solid #1e276b; width:82px !important" | | |||
!style="background:#EAECF0; width:18px !important" | | |||
|} | |||
|} | |||
|- | |||
!style="background:#EAECF0"|Acceleration: | |||
|align="center"|'''46''' | |||
{|style="background:white; border:1px solid #1e276b; border-collapse:collapse" | |||
!style="background:#white; width:104px !important" | | |||
{|style="background:#d8f800; border:1px solid #1e276b; border-collapse:collapse" | |||
!style="background:#d8f800; border:1px solid #1e276b; width:46px !important" | | |||
!style="background:#EAECF0; width:54px !important" | | |||
|} | |||
|} | |||
|- | |||
!style="background:#EAECF0"|Weight: | |||
|align="center"|'''47''' | |||
{|style="background:white; border:1px solid #1e276b; border-collapse:collapse" | |||
!style="background:#white; width:104px !important" | | |||
{|style="background:#d8f800; border:1px solid #1e276b; border-collapse:collapse" | |||
!style="background:#d8f800; border:1px solid #1e276b; width:94px !important" | | |||
!style="background:#EAECF0; width:6px !important" | | |||
|} | |||
|} | |||
|- | |||
!style="background:#EAECF0"|Handling: | |||
|align="center"|'''45''' | |||
{|style="background:white; border:1px solid #1e276b; border-collapse:collapse" | |||
!style="background:#white; width:104px !important" | | |||
{|style="background:#d8f800; border:1px solid #1e276b; border-collapse:collapse" | |||
!style="background:#d8f800; border:1px solid #1e276b; width:45px !important" | | |||
!style="background:#EAECF0; width:55px !important" | | |||
|} | |||
|} | |||
|- | |||
!style="background:#EAECF0"|Drift: | |||
|align="center"|'''45''' | |||
{|style="background:white; border:1px solid #1e276b; border-collapse:collapse" | |||
!style="background:#white; width:104px !important" | | |||
{|style="background:#d8f800; border:1px solid #1e276b; border-collapse:collapse" | |||
!style="background:#d8f800; border:1px solid #1e276b; width:45px !important" | | |||
!style="background:#EAECF0; width:55px !important" | | |||
|} | |||
|} | |||
|- | |||
!style="background:#EAECF0"|Items: | |||
|align="center"|'''100''' | |||
{|style="background:white; border:1px solid #1e276b; border-collapse:collapse" | |||
!style="background:#white; width:104px !important" | | |||
{|style="background:#d8f800; border:1px solid #1e276b; border-collapse:collapse" | |||
!style="background:#d8f800; border:1px solid #1e276b; width:100px !important" | | |||
|} | |||
|} | |||
|- | |||
!style="background:#EAECF0"|Owner: | |||
|[[File:Wario MKDS icon.png]]<br>'''[[Wario]]''' | |||
|- | |||
!colspan=2 style="background:#EAECF0"|Secondary drivers: | |||
|- | |||
|[[File:ROB MKDS icon.png]]<br>'''[[R.O.B.]]''' | |||
|[[File:Luigi MKDS icon.png]]<br>'''[[Luigi]]''' | |||
|} | |||
|style="display:inline-block; background:white" width=320px| | |||
{|border=1 cellspacing=0 cellpadding=4 margin=0 padding=0 style="border:1px solid black; border-collapse:collapse; height:100%" width=100% | |||
|- | |||
!style="background:#EAECF0; height:56px" align="center" colspan=3|<big>'''{{text outline|{{color-link|coral|Hurricane (kart)|Hurricane}}}}'''</big> | |||
|- | |||
!style="background:white; height:250px" align="center" colspan=2|[[File:MKDS Hurricane Model.png|300x250px]] | |||
|- | |||
!style="background:#EAECF0"|Speed: | |||
|align="center" width=50%|'''100''' | |||
{|style="background:white; border:1px solid #1e276b; border-collapse:collapse" | |||
!style="background:#white; width:104px !important" | | |||
{|style="background:#d8f800; border:1px solid #1e276b; border-collapse:collapse" | |||
!style="background:#d8f800; border:1px solid #1e276b; width:100px !important" | | |||
|} | |||
|} | |||
|- | |||
!style="background:#EAECF0"|Acceleration: | |||
|align="center"|'''34''' | |||
{|style="background:white; border:1px solid #1e276b; border-collapse:collapse" | |||
!style="background:#white; width:104px !important" | | |||
{|style="background:#d8f800; border:1px solid #1e276b; border-collapse:collapse" | |||
!style="background:#d8f800; border:1px solid #1e276b; width:34px !important" | | |||
!style="background:#EAECF0; width:66px !important" | | |||
|} | |||
|} | |||
|- | |||
!style="background:#EAECF0"|Weight: | |||
|align="center"|'''29''' | |||
{|style="background:white; border:1px solid #1e276b; border-collapse:collapse" | |||
!style="background:#white; width:104px !important" | | |||
{|style="background:#d8f800; border:1px solid #1e276b; border-collapse:collapse" | |||
!style="background:#d8f800; border:1px solid #1e276b; width:58px !important" | | |||
!style="background:#EAECF0; width:42px !important" | | |||
|} | |||
|} | |||
|- | |||
!style="background:#EAECF0"|Handling: | |||
|align="center"|'''32''' | |||
{|style="background:white; border:1px solid #1e276b; border-collapse:collapse" | |||
!style="background:#white; width:104px !important" | | |||
{|style="background:#d8f800; border:1px solid #1e276b; border-collapse:collapse" | |||
!style="background:#d8f800; border:1px solid #1e276b; width:32px !important" | | |||
!style="background:#EAECF0; width:68px !important" | | |||
|} | |||
|} | |||
|- | |||
!style="background:#EAECF0"|Drift: | |||
|align="center"|'''69''' | |||
{|style="background:white; border:1px solid #1e276b; border-collapse:collapse" | |||
!style="background:#white; width:104px !important" | | |||
{|style="background:#d8f800; border:1px solid #1e276b; border-collapse:collapse" | |||
!style="background:#d8f800; border:1px solid #1e276b; width:69px !important" | | |||
!style="background:#EAECF0; width:31px !important" | | |||
|} | |||
|} | |||
|- | |||
!style="background:#EAECF0"|Items: | |||
|align="center"|'''33''' | |||
{|style="background:white; border:1px solid #1e276b; border-collapse:collapse" | |||
!style="background:#white; width:104px !important" | | |||
{|style="background:#d8f800; border:1px solid #1e276b; border-collapse:collapse" | |||
!style="background:#d8f800; border:1px solid #1e276b; width:33px !important" | | |||
!style="background:#EAECF0; width:67px !important" | | |||
|} | |||
|} | |||
|- | |||
!style="background:#EAECF0"|Owner: | |||
|[[File:Bowser MKDS icon.png]]<br>'''[[Bowser]]''' | |||
|- | |||
!colspan=2 style="background:#EAECF0"|Secondary drivers: | |||
|- | |||
|[[File:ROB MKDS icon.png]]<br>'''[[R.O.B.]]''' | |||
|[[File:DK MKDS icon.png]]<br>'''[[Donkey Kong]]''' | |||
|} | |||
|style="display:inline-block; background:white" width=320px| | |||
{|border=1 cellspacing=0 cellpadding=4 margin=0 padding=0 style="border:1px solid black; border-collapse:collapse; height:100%" width=100% | |||
|- | |||
!style="background:#EAECF0; height:56px" align="center" colspan=3|<big>'''{{text outline|{{color-link|orange|Light Dancer}}}}'''</big> | |||
|- | |||
!style="background:white; height:250px" align="center" colspan=2|[[File:MKDS Light Dancer Model.png|300x250px]] | |||
|- | |||
!style="background:#EAECF0"|Speed: | |||
|align="center" width=50%|'''67''' | |||
{|style="background:white; border:1px solid #1e276b; border-collapse:collapse" | |||
!style="background:#white; width:104px !important" | | |||
{|style="background:#d8f800; border:1px solid #1e276b; border-collapse:collapse" | |||
!style="background:#d8f800; border:1px solid #1e276b; width:67px !important" | | |||
!style="background:#EAECF0; width:33px !important" | | |||
|} | |||
|} | |||
|- | |||
!style="background:#EAECF0"|Acceleration: | |||
|align="center"|'''66''' | |||
{|style="background:white; border:1px solid #1e276b; border-collapse:collapse" | |||
!style="background:#white; width:104px !important" | | |||
{|style="background:#d8f800; border:1px solid #1e276b; border-collapse:collapse" | |||
!style="background:#d8f800; border:1px solid #1e276b; width:66px !important" | | |||
!style="background:#EAECF0; width:34px !important" | | |||
|} | |||
|} | |||
|- | |||
!style="background:#EAECF0"|Weight: | |||
|align="center"|'''20''' | |||
{|style="background:white; border:1px solid #1e276b; border-collapse:collapse" | |||
!style="background:#white; width:104px !important" | | |||
{|style="background:#d8f800; border:1px solid #1e276b; border-collapse:collapse" | |||
!style="background:#d8f800; border:1px solid #1e276b; width:40px !important" | | |||
!style="background:#EAECF0; width:60px !important" | | |||
|} | |||
|} | |||
|- | |||
!style="background:#EAECF0"|Handling: | |||
|align="center"|'''43''' | |||
{|style="background:white; border:1px solid #1e276b; border-collapse:collapse" | |||
!style="background:#white; width:104px !important" | | |||
{|style="background:#d8f800; border:1px solid #1e276b; border-collapse:collapse" | |||
!style="background:#d8f800; border:1px solid #1e276b; width:43px !important" | | |||
!style="background:#EAECF0; width:57px !important" | | |||
|} | |||
|} | |||
|- | |||
!style="background:#EAECF0"|Drift: | |||
|align="center"|'''90''' | |||
{|style="background:white; border:1px solid #1e276b; border-collapse:collapse" | |||
!style="background:#white; width:104px !important" | | |||
{|style="background:#d8f800; border:1px solid #1e276b; border-collapse:collapse" | |||
!style="background:#d8f800; border:1px solid #1e276b; width:90px !important" | | |||
!style="background:#EAECF0; width:10px !important" | | |||
|} | |||
|} | |||
|- | |||
!style="background:#EAECF0"|Items: | |||
|align="center"|'''33''' | |||
{|style="background:white; border:1px solid #1e276b; border-collapse:collapse" | |||
!style="background:#white; width:104px !important" | | |||
{|style="background:#d8f800; border:1px solid #1e276b; border-collapse:collapse" | |||
!style="background:#d8f800; border:1px solid #1e276b; width:33px !important" | | |||
!style="background:#EAECF0; width:67px !important" | | |||
|} | |||
|} | |||
|- | |||
!style="background:#EAECF0"|Owner: | |||
|[[File:Daisy MKDS icon.png]]<br>'''[[Princess Daisy|Daisy]]''' | |||
|- | |||
!colspan=2 style="background:#EAECF0"|Secondary drivers: | |||
|- | |||
|[[File:Mario MKDS icon.png]]<br>'''[[Mario]]''' | |||
|[[File:Bowser MKDS icon.png]]<br>'''[[Bowser]]''' | |||
|} | |||
|style="display:inline-block; background:white" width=320px| | |||
{|border=1 cellspacing=0 cellpadding=4 margin=0 padding=0 style="border:1px solid black; border-collapse:collapse; height:100%" width=100% | |||
|- | |||
!style="background:#EAECF0; height:56px" align="center" colspan=3|<big>'''{{text outline|{{color-link|palegoldenrod|Dry Bomber}}}}'''</big> | |||
|- | |||
!style="background:white; height:250px" align="center" colspan=2|[[File:MKDS Dry Bomber Model.png|300x250px]] | |||
|- | |||
!style="background:#EAECF0"|Speed: | |||
|align="center" width=50%|'''34''' | |||
{|style="background:white; border:1px solid #1e276b; border-collapse:collapse" | |||
!style="background:#white; width:104px !important" | | |||
{|style="background:#d8f800; border:1px solid #1e276b; border-collapse:collapse" | |||
!style="background:#d8f800; border:1px solid #1e276b; width:34px !important" | | |||
!style="background:#EAECF0; width:66px !important" | | |||
|} | |||
|} | |||
|- | |||
!style="background:#EAECF0"|Acceleration: | |||
|align="center"|'''100''' | |||
{|style="background:white; border:1px solid #1e276b; border-collapse:collapse" | |||
!style="background:#white; width:104px !important" | | |||
{|style="background:#d8f800; border:1px solid #1e276b; border-collapse:collapse" | |||
!style="background:#d8f800; border:1px solid #1e276b; width:100px !important" | | |||
|} | |||
|} | |||
|- | |||
!style="background:#EAECF0"|Weight: | |||
|align="center"|'''26''' | |||
{|style="background:white; border:1px solid #1e276b; border-collapse:collapse" | |||
!style="background:#white; width:104px !important" | | |||
{|style="background:#d8f800; border:1px solid #1e276b; border-collapse:collapse" | |||
!style="background:#d8f800; border:1px solid #1e276b; width:52px !important" | | |||
!style="background:#EAECF0; width:48px !important" | | |||
|} | |||
|} | |||
|- | |||
!style="background:#EAECF0"|Handling: | |||
|align="center"|'''100''' | |||
{|style="background:white; border:1px solid #1e276b; border-collapse:collapse" | |||
!style="background:#white; width:104px !important" | | |||
{|style="background:#d8f800; border:1px solid #1e276b; border-collapse:collapse" | |||
!style="background:#d8f800; border:1px solid #1e276b; width:100px !important" | | |||
|} | |||
|} | |||
|- | |||
!style="background:#EAECF0"|Drift: | |||
|align="center"|'''49''' | |||
{|style="background:white; border:1px solid #1e276b; border-collapse:collapse" | |||
!style="background:#white; width:104px !important" | | |||
{|style="background:#d8f800; border:1px solid #1e276b; border-collapse:collapse" | |||
!style="background:#d8f800; border:1px solid #1e276b; width:49px !important" | | |||
!style="background:#EAECF0; width:51px !important" | | |||
|} | |||
|} | |||
|- | |||
!style="background:#EAECF0"|Items: | |||
|align="center"|'''33''' | |||
{|style="background:white; border:1px solid #1e276b; border-collapse:collapse" | |||
!style="background:#white; width:104px !important" | | |||
{|style="background:#d8f800; border:1px solid #1e276b; border-collapse:collapse" | |||
!style="background:#d8f800; border:1px solid #1e276b; width:33px !important" | | |||
!style="background:#EAECF0; width:67px !important" | | |||
|} | |||
|} | |||
|- | |||
!style="background:#EAECF0"|Owner: | |||
|[[File:Dry Bones MKDS icon.png]]<br>'''[[Dry Bones]]''' | |||
|- | |||
!colspan=2 style="background:#EAECF0"|Secondary drivers: | |||
|- | |||
|[[File:Peach MKDS icon.png]]<br>'''[[Princess Peach|Peach]]''' | |||
|[[File:Toad MKDS icon.png]]<br>'''[[Toad]]''' | |||
|} | |||
|style="display:inline-block; background:white" width=320px| | |||
{|border=1 cellspacing=0 cellpadding=4 margin=0 padding=0 style="border:1px solid black; border-collapse:collapse; height:100%" width=100% | |||
|- | |||
!style="background:#EAECF0; height:56px" align="center" colspan=3|<big>'''{{text outline|{{color-link|indigo|Zipper (kart)|Zipper}}|white}}'''</big> | |||
|- | |||
!style="background:white; height:250px" align="center" colspan=2|[[File:MKDS Zipper Model.png|300x250px]] | |||
|- | |||
!style="background:#EAECF0"|Speed: | |||
|align="center" width=50%|'''66''' | |||
{|style="background:white; border:1px solid #1e276b; border-collapse:collapse" | |||
!style="background:#white; width:104px !important" | | |||
{|style="background:#d8f800; border:1px solid #1e276b; border-collapse:collapse" | |||
!style="background:#d8f800; border:1px solid #1e276b; width:66px !important" | | |||
!style="background:#EAECF0; width:34px !important" | | |||
|} | |||
|} | |||
|- | |||
!style="background:#EAECF0"|Acceleration: | |||
|align="center"|'''59''' | |||
{|style="background:white; border:1px solid #1e276b; border-collapse:collapse" | |||
!style="background:#white; width:104px !important" | | |||
{|style="background:#d8f800; border:1px solid #1e276b; border-collapse:collapse" | |||
!style="background:#d8f800; border:1px solid #1e276b; width:59px !important" | | |||
!style="background:#EAECF0; width:41px !important" | | |||
|} | |||
|} | |||
|- | |||
!style="background:#EAECF0"|Weight: | |||
|align="center"|'''35''' | |||
{|style="background:white; border:1px solid #1e276b; border-collapse:collapse" | |||
!style="background:#white; width:104px !important" | | |||
{|style="background:#d8f800; border:1px solid #1e276b; border-collapse:collapse" | |||
!style="background:#d8f800; border:1px solid #1e276b; width:70px !important" | | |||
!style="background:#EAECF0; width:30px !important" | | |||
|} | |||
|} | |||
|- | |||
!style="background:#EAECF0"|Handling: | |||
|align="center"|'''52''' | |||
{|style="background:white; border:1px solid #1e276b; border-collapse:collapse" | |||
!style="background:#white; width:104px !important" | | |||
{|style="background:#d8f800; border:1px solid #1e276b; border-collapse:collapse" | |||
!style="background:#d8f800; border:1px solid #1e276b; width:52px !important" | | |||
!style="background:#EAECF0; width:48px !important" | | |||
|} | |||
|} | |||
|- | |||
!style="background:#EAECF0"|Drift: | |||
|align="center"|'''55''' | |||
{|style="background:white; border:1px solid #1e276b; border-collapse:collapse" | |||
!style="background:#white; width:104px !important" | | |||
{|style="background:#d8f800; border:1px solid #1e276b; border-collapse:collapse" | |||
!style="background:#d8f800; border:1px solid #1e276b; width:55px !important" | | |||
!style="background:#EAECF0; width:45px !important" | | |||
|} | |||
|} | |||
|- | |||
!style="background:#EAECF0"|Items: | |||
|align="center"|'''100''' | |||
{|style="background:white; border:1px solid #1e276b; border-collapse:collapse" | |||
!style="background:#white; width:104px !important" | | |||
{|style="background:#d8f800; border:1px solid #1e276b; border-collapse:collapse" | |||
!style="background:#d8f800; border:1px solid #1e276b; width:100px !important" | | |||
|} | |||
|} | |||
|- | |||
!style="background:#EAECF0"|Owner: | |||
|[[File:Waluigi MKDS icon.png]]<br>'''[[Waluigi]]''' | |||
|- | |||
!colspan=2 style="background:#EAECF0"|Secondary drivers: | |||
|- | |||
|[[File:Toad MKDS icon.png]]<br>'''[[Toad]]''' | |||
|[[File:Wario MKDS icon.png]]<br>'''[[Wario]]''' | |||
|} | |||
|style="display:inline-block; background:white" width=320px| | |||
{|border=1 cellspacing=0 cellpadding=4 margin=0 padding=0 style="border:1px solid black; border-collapse:collapse; height:100%" width=100% | |||
|- | |||
!style="background:#EAECF0; height:56px" align="center" colspan=3|<big>'''{{text outline|{{color-link|darkslategray|ROB-LGS}}|white}}'''</big> | |||
|- | |||
!style="background:white; height:250px" align="center" colspan=2|[[File:MKDS ROB-LGS Model.png|300x250px]] | |||
|- | |||
!style="background:#EAECF0"|Speed: | |||
|align="center" width=50%|'''90''' | |||
{|style="background:white; border:1px solid #1e276b; border-collapse:collapse" | |||
!style="background:#white; width:104px !important" | | |||
{|style="background:#d8f800; border:1px solid #1e276b; border-collapse:collapse" | |||
!style="background:#d8f800; border:1px solid #1e276b; width:90px !important" | | |||
!style="background:#EAECF0; width:10px !important" | | |||
|} | |||
|} | |||
|- | |||
!style="background:#EAECF0"|Acceleration: | |||
|align="center"|'''48''' | |||
{|style="background:white; border:1px solid #1e276b; border-collapse:collapse" | |||
!style="background:#white; width:104px !important" | | |||
{|style="background:#d8f800; border:1px solid #1e276b; border-collapse:collapse" | |||
!style="background:#d8f800; border:1px solid #1e276b; width:48px !important" | | |||
!style="background:#EAECF0; width:52px !important" | | |||
|} | |||
|} | |||
|- | |||
!style="background:#EAECF0"|Weight: | |||
|align="center"|'''38''' | |||
{|style="background:white; border:1px solid #1e276b; border-collapse:collapse" | |||
!style="background:#white; width:104px !important" | | |||
{|style="background:#d8f800; border:1px solid #1e276b; border-collapse:collapse" | |||
!style="background:#d8f800; border:1px solid #1e276b; width:76px !important" | | |||
!style="background:#EAECF0; width:24px !important" | | |||
|} | |||
|} | |||
|- | |||
!style="background:#EAECF0"|Handling: | |||
|align="center"|'''61''' | |||
{|style="background:white; border:1px solid #1e276b; border-collapse:collapse" | |||
!style="background:#white; width:104px !important" | | |||
{|style="background:#d8f800; border:1px solid #1e276b; border-collapse:collapse" | |||
!style="background:#d8f800; border:1px solid #1e276b; width:61px !important" | | |||
!style="background:#EAECF0; width:39px !important" | | |||
|} | |||
|} | |||
|- | |||
!style="background:#EAECF0"|Drift: | |||
|align="center"|'''25''' | |||
{|style="background:white; border:1px solid #1e276b; border-collapse:collapse" | |||
!style="background:#white; width:104px !important" | | |||
{|style="background:#d8f800; border:1px solid #1e276b; border-collapse:collapse" | |||
!style="background:#d8f800; border:1px solid #1e276b; width:25px !important" | | |||
!style="background:#EAECF0; width:75px !important" | | |||
|} | |||
|} | |||
|- | |||
!style="background:#EAECF0"|Items: | |||
|align="center"|'''100''' | |||
{|style="background:white; border:1px solid #1e276b; border-collapse:collapse" | |||
!style="background:#white; width:104px !important" | | |||
{|style="background:#d8f800; border:1px solid #1e276b; border-collapse:collapse" | |||
!style="background:#d8f800; border:1px solid #1e276b; width:100px !important" | | |||
|} | |||
|} | |||
|- | |||
!style="background:#EAECF0"|Owner: | |||
|[[File:ROB MKDS icon.png]]<br>'''[[R.O.B.]]''' | |||
|- | |||
!colspan=2 style="background:#EAECF0"|Secondary drivers: | |||
|- | |||
|[[File:DK MKDS icon.png]]<br>'''[[Donkey Kong]]''' | |||
|[[File:Bowser MKDS icon.png]]<br>'''[[Bowser]]''' | |||
|} | |||
|} | |||
===Actual statistics=== | |||
''Mario Kart DS'' features several in-game statistics, some of which are not shown in the kart selection menu.<ref>[https://docs.google.com/spreadsheets/d/15fb4tuhafxs3L0u9dKcKkwcB8oNPSgbXVFr9Dwl_gfM/pubhtml A transcription of the in-game statistics of ''Mario Kart DS'']. Please note that due to the 16-bit Fixed Point format used by the game, rational numbers are shown as integers that must be divided by 4096.</ref> There are three types of '''Tires''', either Small (''S''), Medium (''M'') or Large (''L''). Just like in ''[[Mario Kart: Double Dash!!]]'', there is a '''Mini-Turbo''' statistics that corresponds to the length of the Mini-Turbo boost in frames. '''Acceleration''' is determined by three triplets of values, that are presumably related to the acceleration while drifting and the acceleration in all other conditions; there is also a '''deceleration''' value that determines the speed of the next frame as fraction of the current speed when not accelerating (such as when the kart is spinning or the acceleration button is not being held). There are four different types of off-road terrains, and accordingly the karts have four '''off-road''' statistics that are the relative top speed in each type of terrain. | |||
{|class="wikitable center" | |||
!colspan="19"|<big>Actual statistics of ''Mario Kart DS''</big> | |||
|- | |||
!rowspan="3"|Driver | |||
!rowspan="3"|Kart | |||
!rowspan="3"|Tires | |||
!rowspan="3"|Weight | |||
!rowspan="3"|Mini-Turbo | |||
!rowspan="3"|Top Speed | |||
!colspan="6"|Acceleration | |||
!rowspan="3"|Deceleration | |||
!rowspan="3"|Handling | |||
!rowspan="3"|Drift | |||
!rowspan="2" colspan="4"|Off-Road | |||
|- | |||
!colspan="3"|Normal | |||
!colspan="3"|While Drifting | |||
|- | |||
!1st value | |||
!2nd value | |||
!3rd value | |||
!1st value | |||
!2nd value | |||
!3rd value | |||
!Very Light | |||
!Light | |||
!Normal | |||
!Heavy | |||
|- | |||
!rowspan="3"|Mario | |||
!Standard MR | |||
|''kart_tire_M'' | |||
|0.5 | |||
|45 | |||
|7.5 | |||
|0.0579 | |||
|0.0239 | |||
|0.7 | |||
|0.0649 | |||
|0.0239 | |||
|0.75 | |||
|0.984 | |||
|0.0806 | |||
|0.0537 | |||
|0.9 | |||
|0.7 | |||
|0.5 | |||
|0.3 | |||
|- | |||
!Shooting Star | |||
|''kart_tire_S'' | |||
|0.2 | |||
|51 | |||
|7.523 | |||
|0.0598 | |||
|0.0249 | |||
|0.7 | |||
|0.0669 | |||
|0.0249 | |||
|0.75 | |||
|0.984 | |||
|0.0823 | |||
|0.0547 | |||
|0.9 | |||
|0.7 | |||
|0.5 | |||
|0.3 | |||
|- | |||
!B Dasher | |||
|''kart_tire_L'' | |||
|0.65 | |||
|35 | |||
|7.463 | |||
|0.0549 | |||
|0.0229 | |||
|0.7 | |||
|0.0608 | |||
|0.0229 | |||
|0.75 | |||
|0.984 | |||
|0.0789 | |||
|0.0527 | |||
|0.9 | |||
|0.7 | |||
|0.5 | |||
|0.3 | |||
|- | |||
!rowspan="3"|Donkey Kong | |||
!Standard DK | |||
|''kart_tire_M'' | |||
|0.5 | |||
|30 | |||
|7.6 | |||
|0.0449 | |||
|0.0229 | |||
|0.45 | |||
|0.0669 | |||
|0.0188 | |||
|0.9 | |||
|0.978 | |||
|0.0708 | |||
|0.0635 | |||
|0.85 | |||
|0.62 | |||
|0.4 | |||
|0.22 | |||
|- | |||
!Wildlife | |||
|''kart_tire_S'' | |||
|0.35 | |||
|34 | |||
|7.623 | |||
|0.0469 | |||
|0.0239 | |||
|0.45 | |||
|0.0688 | |||
|0.0198 | |||
|0.9 | |||
|0.978 | |||
|0.0723 | |||
|0.0647 | |||
|0.85 | |||
|0.62 | |||
|0.4 | |||
|0.22 | |||
|- | |||
!Rambi Rider | |||
|''kart_tire_L'' | |||
|0.75 | |||
|23 | |||
|7.562 | |||
|0.043 | |||
|0.022 | |||
|0.45 | |||
|0.063 | |||
|0.0178 | |||
|0.9 | |||
|0.978 | |||
|0.0693 | |||
|0.0623 | |||
|0.85 | |||
|0.62 | |||
|0.4 | |||
|0.22 | |||
|- | |||
!rowspan="3"|Toad | |||
!Standard TD | |||
|''kart_tire_M'' | |||
|0.5 | |||
|50 | |||
|7.35 | |||
|0.085 | |||
|0.0269 | |||
|0.7 | |||
|0.085 | |||
|0.0278 | |||
|0.75 | |||
|0.988 | |||
|0.0842 | |||
|0.0586 | |||
|0.92 | |||
|0.74 | |||
|0.55 | |||
|0.34 | |||
|- | |||
!Mushmellow | |||
|''kart_tire_S'' | |||
|0.25 | |||
|56 | |||
|7.372 | |||
|0.0879 | |||
|0.0278 | |||
|0.7 | |||
|0.0879 | |||
|0.0288 | |||
|0.75 | |||
|0.988 | |||
|0.0859 | |||
|0.0598 | |||
|0.92 | |||
|0.74 | |||
|0.55 | |||
|0.34 | |||
|- | |||
!4-Wheel Cradle | |||
|''kart_tire_L'' | |||
|0.7 | |||
|39 | |||
|7.313 | |||
|0.0798 | |||
|0.0259 | |||
|0.7 | |||
|0.0798 | |||
|0.0259 | |||
|0.75 | |||
|0.988 | |||
|0.0825 | |||
|0.0574 | |||
|0.92 | |||
|0.74 | |||
|0.55 | |||
|0.34 | |||
|- | |||
!rowspan="3"|Bowser | |||
!Standard BW | |||
|''kart_tire_M'' | |||
|0.5 | |||
|25 | |||
|7.7 | |||
|0.0398 | |||
|0.0188 | |||
|0.45 | |||
|0.0588 | |||
|0.0168 | |||
|0.9 | |||
|0.976 | |||
|0.0684 | |||
|0.0586 | |||
|0.84 | |||
|0.6 | |||
|0.38 | |||
|0.2 | |||
|- | |||
!Hurricane | |||
|''kart_tire_S'' | |||
|0.45 | |||
|28 | |||
|7.723 | |||
|0.0408 | |||
|0.0198 | |||
|0.45 | |||
|0.0608 | |||
|0.0178 | |||
|0.9 | |||
|0.976 | |||
|0.0698 | |||
|0.0598 | |||
|0.84 | |||
|0.6 | |||
|0.38 | |||
|0.2 | |||
|- | |||
!Tyrant | |||
|''kart_tire_L'' | |||
|0.8 | |||
|19 | |||
|7.662 | |||
|0.0378 | |||
|0.0178 | |||
|0.45 | |||
|0.0559 | |||
|0.0159 | |||
|0.9 | |||
|0.976 | |||
|0.0669 | |||
|0.0574 | |||
|0.84 | |||
|0.6 | |||
|0.38 | |||
|0.2 | |||
|- | |||
!rowspan="3"|Peach | |||
!Standard PC | |||
|''kart_tire_M'' | |||
|0.5 | |||
|40 | |||
|7.4 | |||
|0.075 | |||
|0.0298 | |||
|0.45 | |||
|0.1099 | |||
|0.0249 | |||
|0.9 | |||
|0.982 | |||
|0.0769 | |||
|0.0732 | |||
|0.88 | |||
|0.67 | |||
|0.46 | |||
|0.27 | |||
|- | |||
!Light Tripper | |||
|''kart_tire_S'' | |||
|0.3 | |||
|45 | |||
|7.422 | |||
|0.0779 | |||
|0.0308 | |||
|0.45 | |||
|0.1138 | |||
|0.0259 | |||
|0.9 | |||
|0.982 | |||
|0.0784 | |||
|0.0747 | |||
|0.88 | |||
|0.67 | |||
|0.46 | |||
|0.27 | |||
|- | |||
!Royale | |||
|''kart_tire_L'' | |||
|0.7 | |||
|31 | |||
|7.363 | |||
|0.0708 | |||
|0.0278 | |||
|0.45 | |||
|0.1038 | |||
|0.0239 | |||
|0.9 | |||
|0.982 | |||
|0.0754 | |||
|0.0718 | |||
|0.88 | |||
|0.67 | |||
|0.46 | |||
|0.27 | |||
|- | |||
!rowspan="3"|Wario | |||
!Standard WR | |||
|''kart_tire_M'' | |||
|0.5 | |||
|35 | |||
|7.65 | |||
|0.042 | |||
|0.0188 | |||
|0.7 | |||
|0.0479 | |||
|0.0168 | |||
|0.75 | |||
|0.98 | |||
|0.0769 | |||
|0.0488 | |||
|0.86 | |||
|0.64 | |||
|0.43 | |||
|0.24 | |||
|- | |||
!Brute | |||
|''kart_tire_S'' | |||
|0.35 | |||
|39 | |||
|7.673 | |||
|0.043 | |||
|0.0198 | |||
|0.7 | |||
|0.0498 | |||
|0.0178 | |||
|0.75 | |||
|0.98 | |||
|0.0784 | |||
|0.0498 | |||
|0.86 | |||
|0.64 | |||
|0.43 | |||
|0.24 | |||
|- | |||
!Dragonfly | |||
|''kart_tire_L'' | |||
|0.75 | |||
|27 | |||
|7.612 | |||
|0.0398 | |||
|0.0178 | |||
|0.7 | |||
|0.0449 | |||
|0.0159 | |||
|0.75 | |||
|0.98 | |||
|0.0754 | |||
|0.0479 | |||
|0.86 | |||
|0.64 | |||
|0.43 | |||
|0.24 | |||
|- | |||
!rowspan="3"|Yoshi | |||
!Standard YS | |||
|''kart_tire_M'' | |||
|0.5 | |||
|60 | |||
|7.45 | |||
|0.095 | |||
|0.0178 | |||
|0.85 | |||
|0.0618 | |||
|0.0269 | |||
|0.6 | |||
|0.99 | |||
|0.0928 | |||
|0.0452 | |||
|0.95 | |||
|0.84 | |||
|0.68 | |||
|0.43 | |||
|- | |||
!Egg 1 | |||
|''kart_tire_S'' | |||
|0.2 | |||
|68 | |||
|7.472 | |||
|0.0979 | |||
|0.0188 | |||
|0.85 | |||
|0.064 | |||
|0.0278 | |||
|0.6 | |||
|0.99 | |||
|0.0947 | |||
|0.0461 | |||
|0.95 | |||
|0.84 | |||
|0.68 | |||
|0.43 | |||
|- | |||
!Cucumber | |||
|''kart_tire_L'' | |||
|0.6 | |||
|47 | |||
|7.413 | |||
|0.0898 | |||
|0.0168 | |||
|0.85 | |||
|0.0588 | |||
|0.0259 | |||
|0.6 | |||
|0.99 | |||
|0.0908 | |||
|0.0442 | |||
|0.95 | |||
|0.84 | |||
|0.68 | |||
|0.43 | |||
|- | |||
!rowspan="3"|Luigi | |||
!Standard LG | |||
|''kart_tire_M'' | |||
|0.5 | |||
|55 | |||
|7.55 | |||
|0.063 | |||
|0.0149 | |||
|0.85 | |||
|0.0488 | |||
|0.0229 | |||
|0.6 | |||
|0.988 | |||
|0.0879 | |||
|0.0415 | |||
|0.94 | |||
|0.79 | |||
|0.61 | |||
|0.38 | |||
|- | |||
!Poltergust 4000 | |||
|''kart_tire_S'' | |||
|0.25 | |||
|62 | |||
|7.573 | |||
|0.0649 | |||
|0.0159 | |||
|0.85 | |||
|0.0508 | |||
|0.0239 | |||
|0.6 | |||
|0.988 | |||
|0.0896 | |||
|0.0422 | |||
|0.94 | |||
|0.79 | |||
|0.61 | |||
|0.38 | |||
|- | |||
!Streamliner | |||
|''kart_tire_L'' | |||
|0.65 | |||
|43 | |||
|7.512 | |||
|0.0598 | |||
|0.0139 | |||
|0.85 | |||
|0.0459 | |||
|0.022 | |||
|0.6 | |||
|0.988 | |||
|0.0862 | |||
|0.0408 | |||
|0.94 | |||
|0.79 | |||
|0.61 | |||
|0.38 | |||
|- | |||
!rowspan="3"|Dry Bones | |||
!Standard DB | |||
|''kart_tire_M'' | |||
|0.5 | |||
|65 | |||
|7.3 | |||
|0.1199 | |||
|0.022 | |||
|0.85 | |||
|0.073 | |||
|0.0308 | |||
|0.6 | |||
|0.992 | |||
|0.0977 | |||
|0.0488 | |||
|0.96 | |||
|0.9 | |||
|0.75 | |||
|0.48 | |||
|- | |||
!Dry Bomber | |||
|''kart_tire_S'' | |||
|0.4 | |||
|73 | |||
|7.322 | |||
|0.1238 | |||
|0.0229 | |||
|0.85 | |||
|0.0759 | |||
|0.032 | |||
|0.6 | |||
|0.992 | |||
|0.0996 | |||
|0.0498 | |||
|0.96 | |||
|0.9 | |||
|0.75 | |||
|0.48 | |||
|- | |||
!Banisher | |||
|''kart_tire_L'' | |||
|0.55 | |||
|50 | |||
|7.264 | |||
|0.1128 | |||
|0.021 | |||
|0.85 | |||
|0.0688 | |||
|0.0288 | |||
|0.6 | |||
|0.992 | |||
|0.0957 | |||
|0.0479 | |||
|0.96 | |||
|0.9 | |||
|0.75 | |||
|0.48 | |||
|- | |||
!rowspan="3"|Daisy | |||
!Standard DS | |||
|''kart_tire_M'' | |||
|0.5 | |||
|35 | |||
|7.5 | |||
|0.0618 | |||
|0.0269 | |||
|0.45 | |||
|0.0898 | |||
|0.022 | |||
|0.9 | |||
|0.98 | |||
|0.0732 | |||
|0.0684 | |||
|0.86 | |||
|0.64 | |||
|0.43 | |||
|0.24 | |||
|- | |||
!Light Dancer | |||
|''kart_tire_S'' | |||
|0.3 | |||
|39 | |||
|7.523 | |||
|0.064 | |||
|0.0278 | |||
|0.45 | |||
|0.0928 | |||
|0.0229 | |||
|0.9 | |||
|0.98 | |||
|0.0747 | |||
|0.0698 | |||
|0.86 | |||
|0.64 | |||
|0.43 | |||
|0.24 | |||
|- | |||
!Power Flower | |||
|''kart_tire_L'' | |||
|0.55 | |||
|27 | |||
|7.463 | |||
|0.0588 | |||
|0.0259 | |||
|0.45 | |||
|0.085 | |||
|0.021 | |||
|0.9 | |||
|0.98 | |||
|0.0718 | |||
|0.0669 | |||
|0.86 | |||
|0.64 | |||
|0.43 | |||
|0.24 | |||
|- | |||
!rowspan="3"|Waluigi | |||
!Standard WL | |||
|''kart_tire_M'' | |||
|0.5 | |||
|40 | |||
|7.55 | |||
|0.0488 | |||
|0.022 | |||
|0.7 | |||
|0.0559 | |||
|0.0198 | |||
|0.75 | |||
|0.982 | |||
|0.0806 | |||
|0.0537 | |||
|0.88 | |||
|0.67 | |||
|0.46 | |||
|0.27 | |||
|- | |||
!Gold Mantis | |||
|''kart_tire_S'' | |||
|0.45 | |||
|45 | |||
|7.573 | |||
|0.0508 | |||
|0.0229 | |||
|0.7 | |||
|0.0579 | |||
|0.021 | |||
|0.75 | |||
|0.982 | |||
|0.0823 | |||
|0.0547 | |||
|0.88 | |||
|0.67 | |||
|0.46 | |||
|0.27 | |||
|- | |||
!Zipper | |||
|''kart_tire_L'' | |||
|0.55 | |||
|31 | |||
|7.512 | |||
|0.0459 | |||
|0.021 | |||
|0.7 | |||
|0.053 | |||
|0.0188 | |||
|0.75 | |||
|0.982 | |||
|0.0789 | |||
|0.0527 | |||
|0.88 | |||
|0.67 | |||
|0.46 | |||
|0.27 | |||
|- | |||
!rowspan="3"|ROB | |||
!Standard RB | |||
|''kart_tire_M'' | |||
|0.5 | |||
|50 | |||
|7.7 | |||
|0.0459 | |||
|0.012 | |||
|0.85 | |||
|0.043 | |||
|0.0198 | |||
|0.6 | |||
|0.986 | |||
|0.0842 | |||
|0.0391 | |||
|0.92 | |||
|0.74 | |||
|0.55 | |||
|0.34 | |||
|- | |||
!ROB-BLS | |||
|''kart_tire_S'' | |||
|0.38 | |||
|56 | |||
|7.723 | |||
|0.0479 | |||
|0.012 | |||
|0.85 | |||
|0.0449 | |||
|0.021 | |||
|0.6 | |||
|0.986 | |||
|0.0859 | |||
|0.0398 | |||
|0.92 | |||
|0.74 | |||
|0.55 | |||
|0.34 | |||
|- | |||
!ROB-LGS | |||
|''kart_tire_L'' | |||
|0.6 | |||
|39 | |||
|7.662 | |||
|0.043 | |||
|0.011 | |||
|0.85 | |||
|0.0408 | |||
|0.0188 | |||
|0.6 | |||
|0.986 | |||
|0.0825 | |||
|0.0383 | |||
|0.92 | |||
|0.74 | |||
|0.55 | |||
|0.34 | |||
|- | |||
!Shy Guy | |||
!Standard SG | |||
|''kart_tire_M'' | |||
|0.5 | |||
|60 | |||
|7.45 | |||
|0.095 | |||
|0.0178 | |||
|0.85 | |||
|0.0618 | |||
|0.0269 | |||
|0.6 | |||
|0.99 | |||
|0.0928 | |||
|0.0452 | |||
|0.95 | |||
|0.84 | |||
|0.68 | |||
|0.43 | |||
|- | |||
!colspan="19"|Battle Mode karts | |||
|- | |||
!rowspan="3"|Driver | |||
!rowspan="3"|Kart | |||
!rowspan="3"|Tires | |||
!rowspan="3"|Weight | |||
!rowspan="3"|Mini-Turbo | |||
!rowspan="3"|Top Speed | |||
!colspan="6"|Acceleration | |||
!rowspan="3"|Deceleration | |||
!rowspan="3"|Handling | |||
!rowspan="3"|Drift | |||
!rowspan="2" colspan="4"|Off-Road | |||
|- | |||
!colspan="3"|Normal | |||
!colspan="3"|While Drifting | |||
|- | |||
!1st value | |||
!2nd value | |||
!3rd value | |||
!1st value | |||
!2nd value | |||
!3rd value | |||
!Very Light | |||
!Light | |||
!Normal | |||
!Heavy | |||
|- | |||
!Mario | |||
!Standard MR | |||
| | |||
|0.5 | |||
|35 | |||
|7.35 | |||
|0.0598 | |||
|0.0149 | |||
|0.8 | |||
|0.0598 | |||
|0.0198 | |||
|0.85 | |||
|0.98 | |||
|0.0879 | |||
|0.0635 | |||
|0.9 | |||
|0.7 | |||
|0.5 | |||
|0.3 | |||
|- | |||
!Donkey Kong | |||
!Standard DK | |||
| | |||
|0.5 | |||
|35 | |||
|7.37 | |||
|0.0508 | |||
|0.0139 | |||
|0.8 | |||
|0.063 | |||
|0.0198 | |||
|0.85 | |||
|0.98 | |||
|0.0842 | |||
|0.0659 | |||
|0.85 | |||
|0.62 | |||
|0.4 | |||
|0.22 | |||
|- | |||
!Toad | |||
!Standard TD | |||
| | |||
|0.5 | |||
|35 | |||
|7.32 | |||
|0.0659 | |||
|0.0159 | |||
|0.8 | |||
|0.0659 | |||
|0.021 | |||
|0.85 | |||
|0.98 | |||
|0.0891 | |||
|0.0647 | |||
|0.92 | |||
|0.74 | |||
|0.55 | |||
|0.34 | |||
|- | |||
!Bowser | |||
!Standard BW | |||
| | |||
|0.5 | |||
|35 | |||
|7.39 | |||
|0.0479 | |||
|0.0139 | |||
|0.8 | |||
|0.054 | |||
|0.0188 | |||
|0.85 | |||
|0.98 | |||
|0.083 | |||
|0.0647 | |||
|0.84 | |||
|0.6 | |||
|0.38 | |||
|0.2 | |||
|- | |||
!Peach | |||
!Standard PC | |||
| | |||
|0.5 | |||
|35 | |||
|7.33 | |||
|0.0598 | |||
|0.0149 | |||
|0.8 | |||
|0.0718 | |||
|0.021 | |||
|0.85 | |||
|0.98 | |||
|0.0867 | |||
|0.0684 | |||
|0.88 | |||
|0.67 | |||
|0.46 | |||
|0.27 | |||
|- | |||
!Wario | |||
!Standard WR | |||
| | |||
|0.5 | |||
|35 | |||
|7.38 | |||
|0.054 | |||
|0.0139 | |||
|0.8 | |||
|0.054 | |||
|0.0188 | |||
|0.85 | |||
|0.98 | |||
|0.0867 | |||
|0.0623 | |||
|0.86 | |||
|0.64 | |||
|0.43 | |||
|0.24 | |||
|- | |||
!Yoshi | |||
!Standard YS | |||
| | |||
|0.5 | |||
|35 | |||
|7.34 | |||
|0.0688 | |||
|0.0159 | |||
|0.8 | |||
|0.0569 | |||
|0.0198 | |||
|0.85 | |||
|0.98 | |||
|0.0916 | |||
|0.061 | |||
|0.95 | |||
|0.84 | |||
|0.68 | |||
|0.43 | |||
|- | |||
!Luigi | |||
!Standard LG | |||
| | |||
|0.5 | |||
|35 | |||
|7.36 | |||
|0.063 | |||
|0.0149 | |||
|0.8 | |||
|0.0508 | |||
|0.0188 | |||
|0.85 | |||
|0.98 | |||
|0.0903 | |||
|0.0598 | |||
|0.94 | |||
|0.79 | |||
|0.61 | |||
|0.38 | |||
|- | |||
!Dry Bones | |||
!Standard DB | |||
| | |||
|0.5 | |||
|35 | |||
|7.31 | |||
|0.0718 | |||
|0.0159 | |||
|0.8 | |||
|0.0598 | |||
|0.0198 | |||
|0.85 | |||
|0.98 | |||
|0.0928 | |||
|0.0623 | |||
|0.96 | |||
|0.9 | |||
|0.75 | |||
|0.48 | |||
|- | |||
!Daisy | |||
!Standard DS | |||
| | |||
|0.5 | |||
|35 | |||
|7.35 | |||
|0.0569 | |||
|0.0149 | |||
|0.8 | |||
|0.0688 | |||
|0.021 | |||
|0.85 | |||
|0.98 | |||
|0.0854 | |||
|0.0671 | |||
|0.86 | |||
|0.64 | |||
|0.43 | |||
|0.24 | |||
|- | |||
!Waluigi | |||
!Standard WL | |||
| | |||
|0.5 | |||
|35 | |||
|7.36 | |||
|0.0569 | |||
|0.0149 | |||
|0.8 | |||
|0.0569 | |||
|0.0198 | |||
|0.85 | |||
|0.98 | |||
|0.0879 | |||
|0.0635 | |||
|0.88 | |||
|0.67 | |||
|0.46 | |||
|0.27 | |||
|- | |||
!ROB | |||
!Standard RB | |||
| | |||
|0.5 | |||
|35 | |||
|7.39 | |||
|0.0569 | |||
|0.0149 | |||
|0.8 | |||
|0.0479 | |||
|0.0188 | |||
|0.85 | |||
|0.98 | |||
|0.0891 | |||
|0.0586 | |||
|0.92 | |||
|0.74 | |||
|0.55 | |||
|0.34 | |||
|- | |||
!Shy Guy | |||
!Standard SG | |||
| | |||
|0.5 | |||
|35 | |||
|7.34 | |||
|0.0688 | |||
|0.0159 | |||
|0.8 | |||
|0.0569 | |||
|0.0198 | |||
|0.85 | |||
|0.98 | |||
|0.0916 | |||
|0.061 | |||
|0.95 | |||
|0.84 | |||
|0.68 | |||
|0.43 | |||
|} | |||
==Courses== | |||
In addition to the sixteen standard courses, ''Mario Kart DS'' is the first game in the series to include the Retro Grand Prix, which has been carried over into every future installment in the series to date. The Retro Grand Prix consists of sixteen courses from past ''Mario Kart'' games updated and compiled into four additional cups. This makes a total of 8 cups and 32 courses. ''Mario Kart DS'' is the only ''Mario Kart'' game where there is no Mario Circuit in the Flower Cup, unlike other ''Mario Kart'' games. | |||
This is the only ''Mario Kart'' game to have three Grand Prix introduction fanfares; one for Figure-8 Circuit, Waluigi Pinball, Mario Circuit, and <small>GCN</small> Luigi Circuit, one for Wario Stadium, and one for the other courses. | |||
Some courses were playable on the [[Nintendo Wi-Fi Connection]]. They are marked with the service's logo below. | |||
Additionally, each course has a [[Ghost (Mario Kart series)|Staff Ghost]]. Staff Ghosts are Time Trial races that were previously done by a [[Nintendo]] staff member. Every course has its unlockable Staff Ghost that the player can race against if their completion time is close to the Staff Ghost's. The player's record must be no more than 108% of the Staff Ghost's completion time to unlock.<ref>https://docs.google.com/spreadsheets/d/1ekw2H8dZvsBGEOS-MJWkR2hDFflBpWnX3VhxcWhff_8/edit#gid=1195895108{{better source}}</ref> | |||
===Nitro Grand Prix=== | |||
{|border=1 style="text-align:center; border:1px solid black; border-collapse:collapse; max-width:998px" | |||
|- | |||
!style="background:#DEDEE0"|[[File:MKDS Mushroom Cup Emblem.png]]<br><big>'''[[Mushroom Cup]]'''</big> | |||
|-style="background:#EAECF0" | |||
|style="display:inline-block; background:white; maxwidth:494px" width=494px| | |||
{|border=1 cellspacing=0 cellpadding=2 margin=0 padding=0 style="border:1px solid black; border-collapse:collapse; height:100%" width=100% | |||
!colspan=7 style="background:#DEDEE0"|<big>'''[[Figure-8 Circuit]]'''</big><br><tt>cross_course</tt> | |||
|- | |||
!colspan=2 style="background:#EAECF0" width=74px height=92px|[[File:MKDS Figure 8 Circuit Course Icon.png]] | |||
!rowspan=2 colspan=3 style="background:white" width=256px height=192px|[[File:MKDS Figure-8 Circuit Intro.png]] | |||
|rowspan=2 colspan=2 style="background:slategray" width=144px height=192px|[[File:MKDS Figure-8 Circuit layout.png]] | |||
|- | |||
!colspan=2 style="background:#EAECF0" width=74px height=92px|[[File:WFC Logo.svg|74x74px]] | |||
|- | |||
|rowspan=3 style="background:#DEDEE0; border-right:#DEDEE0" width=48px| | |||
!colspan=5 style="background:#DEDEE0; border-right:#DEDEE0; border-left:#DEDEE0"|Staff ghost | |||
|rowspan=3 style="background:#DEDEE0; border-left:#DEDEE0" width=48px| | |||
|- | |||
!colspan=3 style="background:#EAECF0" height=32px|Details | |||
!width=96px style="background:#EAECF0"|Time | |||
|width=96px|1:36:481 | |||
|- | |||
|width=32px height=32px|[[File:Mario MKDS record icon.png]] | |||
|width=32px height=32px|[[File:Standard MR icon.png]] | |||
|width=96px|Ninten★たなか | |||
!width=96px style="background:#EAECF0"|Unlock time | |||
|width=96px|1:44:199 | |||
|- | |||
|colspan=7 style="background:black"|[[File:MKDS-Music-CircuitTheme.oga|486px]] | |||
|} | |||
|style="display:inline-block; background:white; maxwidth:494px" width=494px| | |||
{|border=1 cellspacing=0 cellpadding=2 margin=0 padding=0 style="border:1px solid black; border-collapse:collapse; height:100%" width=100% | |||
!colspan=7 style="background:#DEDEE0"|<big>'''[[DS Yoshi Falls|Yoshi Falls]]'''</big><br><tt>bank_course</tt> | |||
|- | |||
!colspan=2 style="background:#EAECF0" width=74px height=92px|[[File:MKDS Yoshi Falls Course Icon.png]] | |||
!rowspan=2 colspan=3 style="background:white" width=256px height=192px|[[File:Yoshi Falls.png]] | |||
|rowspan=2 colspan=2 style="background:slategray" width=144px height=192px|[[File:MKDS Yoshi Falls layout.png]] | |||
|- | |||
!colspan=2 style="background:#EAECF0" width=74px height=92px|[[File:WFC Logo.svg|74x74px]] | |||
|- | |||
|rowspan=3 style="background:#DEDEE0; border-right:#DEDEE0" width=48px| | |||
!colspan=5 style="background:#DEDEE0; border-right:#DEDEE0; border-left:#DEDEE0"|Staff ghost | |||
|rowspan=3 style="background:#DEDEE0; border-left:#DEDEE0" width=48px| | |||
|- | |||
!colspan=3 style="background:#EAECF0" height=32px|Details | |||
!width=96px style="background:#EAECF0"|Time | |||
|width=96px|0:57:677 | |||
|- | |||
|width=32px height=32px|[[File:Yoshi MKDS record icon.png]] | |||
|width=32px height=32px|[[File:Egg 1 icon.png]] | |||
|width=96px|Ninten★まっは | |||
!width=96px style="background:#EAECF0"|Unlock time | |||
|width=96px|1:02:291 | |||
|- | |||
|colspan=7 style="background:black"|[[File:MKDS-Music-YoshiFalls.oga|486px]] | |||
|} | |||
|style="display:inline-block; background:white; maxwidth:494px" width=494px| | |||
{|border=1 cellspacing=0 cellpadding=2 margin=0 padding=0 style="border:1px solid black; border-collapse:collapse; height:100%" width=100% | |||
!colspan=7 style="background:#DEDEE0"|<big>'''[[DS Cheep Cheep Beach|Cheep Cheep Beach]]'''</big><br><tt>beach_course</tt> | |||
|- | |||
!colspan=2 style="background:#EAECF0" width=74px height=92px|[[File:MKDS Cheep Cheep Beach Course Icon.png]] | |||
!rowspan=2 colspan=3 style="background:white" width=256px height=192px|[[File:MKDS Cheep Cheep Beach Intro.png]] | |||
|rowspan=2 colspan=2 style="background:slategray" width=144px height=192px|[[File:MKDS Cheep Cheep Beach layout.png]] | |||
|- | |||
!colspan=2 style="background:#EAECF0" width=74px height=92px|[[File:WFC Logo.svg|74x74px]] | |||
|- | |||
|rowspan=3 style="background:#DEDEE0; border-right:#DEDEE0" width=48px| | |||
!colspan=5 style="background:#DEDEE0; border-right:#DEDEE0; border-left:#DEDEE0"|Staff ghost | |||
|rowspan=3 style="background:#DEDEE0; border-left:#DEDEE0" width=48px| | |||
|- | |||
!colspan=3 style="background:#EAECF0" height=32px|Details | |||
!width=96px style="background:#EAECF0"|Time | |||
|width=96px|1:43:654 | |||
|- | |||
|width=32px height=32px|[[File:DK MKDS record icon.png]] | |||
|width=32px height=32px|[[File:Standard DK icon.png]] | |||
|width=96px|Ninten★しんご | |||
!width=96px style="background:#EAECF0"|Unlock time | |||
|width=96px|1:51:946 | |||
|- | |||
|colspan=7 style="background:black"|[[File:MKDS-Music-CheepCheepBeach.oga|486px]] | |||
|} | |||
|style="display:inline-block; background:white; maxwidth:494px" width=494px| | |||
{|border=1 cellspacing=0 cellpadding=2 margin=0 padding=0 style="border:1px solid black; border-collapse:collapse; height:100%" width=100% | |||
!colspan=7 style="background:#DEDEE0"|<big>'''[[DS Luigi's Mansion|Luigi's Mansion]]'''</big><br><tt>mansion_course</tt> | |||
|- | |||
!colspan=2 style="background:#EAECF0" width=74px height=92px|[[File:MKDS Luigi's Mansion Course Icon.png]] | |||
!rowspan=2 colspan=3 style="background:white" width=256px height=192px|[[File:MKDS Luigi's Mansion Intro.png]] | |||
|rowspan=2 colspan=2 style="background:slategray" width=144px height=192px|[[File:MKDS Luigi's Mansion layout.png]] | |||
|- | |||
!colspan=2 style="background:#EAECF0" width=74px height=92px|[[File:WFC Logo.svg|74x74px]] | |||
|- | |||
|rowspan=3 style="background:#DEDEE0; border-right:#DEDEE0" width=48px| | |||
!colspan=5 style="background:#DEDEE0; border-right:#DEDEE0; border-left:#DEDEE0"|Staff ghost | |||
|rowspan=3 style="background:#DEDEE0; border-left:#DEDEE0" width=48px| | |||
|- | |||
!colspan=3 style="background:#EAECF0" height=32px|Details | |||
!width=96px style="background:#EAECF0"|Time | |||
|width=96px|1:59:357 | |||
|- | |||
|width=32px height=32px|[[File:Luigi MKDS record icon.png]] | |||
|width=32px height=32px|[[File:Streamliner icon.png]] | |||
|width=96px|Ninten★しんご | |||
!width=96px style="background:#EAECF0"|Unlock time | |||
|width=96px|2:08:905 | |||
|- | |||
|colspan=7 style="background:black"|[[File:MKDS-Music-Luigi'sMansion.oga|486px]] | |||
|} | |||
|- | |||
!style="background:#DEDEE0"|[[File:MKDS Flower Cup Icon.png]]<br><big>'''[[Flower Cup]]'''</big> | |||
|-style="background:#EAECF0" | |||
|style="display:inline-block; background:white; maxwidth:494px" width=494px| | |||
{|border=1 cellspacing=0 cellpadding=2 margin=0 padding=0 style="border:1px solid black; border-collapse:collapse; height:100%" width=100% | |||
!colspan=7 style="background:#DEDEE0"|<big>'''[[DS Desert Hills|Desert Hills]]'''</big><br><tt>desert_course</tt> | |||
|- | |||
!colspan=2 style="background:#EAECF0" width=74px height=92px|[[File:MKDS Desert Hills Course Icon.png]] | |||
!rowspan=2 colspan=3 style="background:white" width=256px height=192px|[[File:DesertHillds.png]] | |||
|rowspan=2 colspan=2 style="background:slategray" width=144px height=192px|[[File:MKDS Desert Hills layout.png]] | |||
|- | |||
!colspan=2 style="background:#EAECF0" width=74px height=92px|[[File:WFC Logo.svg|74x74px]] | |||
|- | |||
|rowspan=3 style="background:#DEDEE0; border-right:#DEDEE0" width=48px| | |||
!colspan=5 style="background:#DEDEE0; border-right:#DEDEE0; border-left:#DEDEE0"|Staff ghost | |||
|rowspan=3 style="background:#DEDEE0; border-left:#DEDEE0" width=48px| | |||
|- | |||
!colspan=3 style="background:#EAECF0" height=32px|Details | |||
!width=96px style="background:#EAECF0"|Time | |||
|width=96px|1:31:262 | |||
|- | |||
|width=32px height=32px|[[File:ROB MKDS record icon.png]] | |||
|width=32px height=32px|[[File:ROB-LGS icon.png]] | |||
|width=96px|Ninten★かつ | |||
!width=96px style="background:#EAECF0"|Unlock time | |||
|width=96px|1:38:562 | |||
|- | |||
|colspan=7 style="background:black"|[[File:MKDS-Music-DesertHills.oga|486px]] | |||
|} | |||
|style="display:inline-block; background:white; maxwidth:494px" width=494px| | |||
{|border=1 cellspacing=0 cellpadding=2 margin=0 padding=0 style="border:1px solid black; border-collapse:collapse; height:100%" width=100% | |||
!colspan=7 style="background:#DEDEE0"|<big>'''[[DS Delfino Square|Delfino Square]]'''</big><br><tt>town_course</tt> | |||
|- | |||
!colspan=2 style="background:#EAECF0" width=74px height=92px|[[File:MKDS Delfino Square Course Icon.png]] | |||
!rowspan=2 colspan=3 style="background:white" width=256px height=192px|[[File:DelfinosquareDS.png]] | |||
|rowspan=2 colspan=2 style="background:slategray" width=144px height=192px|[[File:MKDS Delfino Square layout.png]] | |||
|- | |||
!colspan=2 style="background:#EAECF0" width=74px height=92px|[[File:WFC Logo.svg|74x74px]] | |||
|- | |||
|rowspan=3 style="background:#DEDEE0; border-right:#DEDEE0" width=48px| | |||
!colspan=5 style="background:#DEDEE0; border-right:#DEDEE0; border-left:#DEDEE0"|Staff ghost | |||
|rowspan=3 style="background:#DEDEE0; border-left:#DEDEE0" width=48px| | |||
|- | |||
!colspan=3 style="background:#EAECF0" height=32px|Details | |||
!width=96px style="background:#EAECF0"|Time | |||
|width=96px|1:54:601 | |||
|- | |||
|width=32px height=32px|[[File:Peach MKDS record icon.png]] | |||
|width=32px height=32px|[[File:Royale icon.png]] | |||
|width=96px|Ninten★いわ | |||
!width=96px style="background:#EAECF0"|Unlock time | |||
|width=96px|2:03:769 | |||
|- | |||
|colspan=7 style="background:black"|[[File:MKDS-Music-DelfinoSquare.oga|486px]] | |||
|} | |||
|style="display:inline-block; background:white; maxwidth:494px" width=494px| | |||
{|border=1 cellspacing=0 cellpadding=2 margin=0 padding=0 style="border:1px solid black; border-collapse:collapse; height:100%" width=100% | |||
!colspan=7 style="background:#DEDEE0"|<big>'''[[DS Waluigi Pinball|Waluigi Pinball]]'''</big><br><tt>pinball_course</tt> | |||
|- | |||
!colspan=2 style="background:#EAECF0" width=74px height=92px|[[File:MKDS Waluigi Pinball Course Icon.png]] | |||
!rowspan=2 colspan=3 style="background:white" width=256px height=192px|[[File:Waluigi Pinball.png]] | |||
|rowspan=2 colspan=2 style="background:slategray" width=144px height=192px|[[File:MKDS Waluigi Pinball layout.png]] | |||
|- | |||
!colspan=2 style="background:#EAECF0" width=74px height=92px|[[File:X mark.svg|74x74px]] | |||
|- | |||
|rowspan=3 style="background:#DEDEE0; border-right:#DEDEE0" width=48px| | |||
!colspan=5 style="background:#DEDEE0; border-right:#DEDEE0; border-left:#DEDEE0"|Staff ghost | |||
|rowspan=3 style="background:#DEDEE0; border-left:#DEDEE0" width=48px| | |||
|- | |||
!colspan=3 style="background:#EAECF0" height=32px|Details | |||
!width=96px style="background:#EAECF0"|Time | |||
|width=96px|2:23:288 | |||
|- | |||
|width=32px height=32px|[[File:Waluigi MKDS record icon.png]] | |||
|width=32px height=32px|[[File:Gold Mantis icon.png]] | |||
|width=96px|Ninten★しんや | |||
!width=96px style="background:#EAECF0"|Unlock time | |||
|width=96px|2:34:751 | |||
|- | |||
|colspan=7 style="background:black"|[[File:MKDS-Music-WaluigiPinball.oga|486px]] | |||
|} | |||
|style="display:inline-block; background:white; maxwidth:494px" width=494px| | |||
{|border=1 cellspacing=0 cellpadding=2 margin=0 padding=0 style="border:1px solid black; border-collapse:collapse; height:100%" width=100% | |||
!colspan=7 style="background:#DEDEE0"|<big>'''[[DS Shroom Ridge|Shroom Ridge]]'''</big><br><tt>ridge_course</tt> | |||
|- | |||
!colspan=2 style="background:#EAECF0" width=74px height=92px|[[File:MKDS Shroom Ridge Course Icon.png]] | |||
!rowspan=2 colspan=3 style="background:white" width=256px height=192px|[[File:Shroom Ridge.png]] | |||
|rowspan=2 colspan=2 style="background:slategray" width=144px height=192px|[[File:MKDS Shroom Ridge layout.png]] | |||
|- | |||
!colspan=2 style="background:#EAECF0" width=74px height=92px|[[File:X mark.svg|74x74px]] | |||
|- | |||
|rowspan=3 style="background:#DEDEE0; border-right:#DEDEE0" width=48px| | |||
!colspan=5 style="background:#DEDEE0; border-right:#DEDEE0; border-left:#DEDEE0"|Staff ghost | |||
|rowspan=3 style="background:#DEDEE0; border-left:#DEDEE0" width=48px| | |||
|- | |||
!colspan=3 style="background:#EAECF0" height=32px|Details | |||
!width=96px style="background:#EAECF0"|Time | |||
|width=96px|2:05:123 | |||
|- | |||
|width=32px height=32px|[[File:Toad MKDS record icon.png]] | |||
|width=32px height=32px|[[File:Mushmellow icon.png]] | |||
|width=96px|Ninten★ジョー | |||
!width=96px style="background:#EAECF0"|Unlock time | |||
|width=96px|2:15:132 | |||
|- | |||
|colspan=7 style="background:black"|[[File:MKDS-Music-ShroomRidge.oga|486px]] | |||
|} | |||
|- | |||
!style="background:#DEDEE0"|[[File:MKDS Star Cup Emblem.png]]<br><big>'''[[Star Cup]]'''</big> | |||
|-style="background:#EAECF0" | |||
|style="display:inline-block; background:white; maxwidth:494px" width=494px| | |||
{|border=1 cellspacing=0 cellpadding=2 margin=0 padding=0 style="border:1px solid black; border-collapse:collapse; height:100%" width=100% | |||
!colspan=7 style="background:#DEDEE0"|<big>'''[[DS DK Pass|DK Pass]]'''</big><br><tt>snow_course</tt> | |||
|- | |||
!colspan=2 style="background:#EAECF0" width=74px height=92px|[[File:MKDS DK Pass Course Icon.png]] | |||
!rowspan=2 colspan=3 style="background:white" width=256px height=192px|[[File:DK Pass.png]] | |||
|rowspan=2 colspan=2 style="background:slategray" width=144px height=192px|[[File:MKDS DK Pass layout.png]] | |||
|- | |||
!colspan=2 style="background:#EAECF0" width=74px height=92px|[[File:WFC Logo.svg|74x74px]] | |||
|- | |||
|rowspan=3 style="background:#DEDEE0; border-right:#DEDEE0" width=48px| | |||
!colspan=5 style="background:#DEDEE0; border-right:#DEDEE0; border-left:#DEDEE0"|Staff ghost | |||
|rowspan=3 style="background:#DEDEE0; border-left:#DEDEE0" width=48px| | |||
|- | |||
!colspan=3 style="background:#EAECF0" height=32px|Details | |||
!width=96px style="background:#EAECF0"|Time | |||
|width=96px|2:14:607 | |||
|- | |||
|width=32px height=32px|[[File:DK MKDS record icon.png]] | |||
|width=32px height=32px|[[File:Wildlife icon.png]] | |||
|width=96px|Ninten★™NN | |||
!width=96px style="background:#EAECF0"|Unlock time | |||
|width=96px|2:25:375 | |||
|- | |||
|colspan=7 style="background:black"|[[File:MKDS-Music-DKPass.oga|486px]] | |||
|} | |||
|style="display:inline-block; background:white; maxwidth:494px" width=494px| | |||
{|border=1 cellspacing=0 cellpadding=2 margin=0 padding=0 style="border:1px solid black; border-collapse:collapse; height:100%" width=100% | |||
!colspan=7 style="background:#DEDEE0"|<big>'''[[DS Tick-Tock Clock|Tick-Tock Clock]]'''</big><br><tt>clock_course</tt> | |||
|- | |||
!colspan=2 style="background:#EAECF0" width=74px height=92px|[[File:MKDS Tick-Tock Clock Course Icon.png]] | |||
!rowspan=2 colspan=3 style="background:white" width=256px height=192px|[[File:MKDS Tick Tock Clock.png]] | |||
|rowspan=2 colspan=2 style="background:slategray" width=144px height=192px|[[File:MKDS Tick-Tock Clock layout.png]] | |||
|- | |||
!colspan=2 style="background:#EAECF0" width=74px height=92px|[[File:X mark.svg|74x74px]] | |||
|- | |||
|rowspan=3 style="background:#DEDEE0; border-right:#DEDEE0" width=48px| | |||
!colspan=5 style="background:#DEDEE0; border-right:#DEDEE0; border-left:#DEDEE0"|Staff ghost | |||
|rowspan=3 style="background:#DEDEE0; border-left:#DEDEE0" width=48px| | |||
|- | |||
!colspan=3 style="background:#EAECF0" height=32px|Details | |||
!width=96px style="background:#EAECF0"|Time | |||
|width=96px|1:54:903 | |||
|- | |||
|width=32px height=32px|[[File:Daisy MKDS record icon.png]] | |||
|width=32px height=32px|[[File:Light Dancer icon.png]] | |||
|width=96px|Ninten★だい8 | |||
!width=96px style="background:#EAECF0"|Unlock time | |||
|width=96px|2:04:085 | |||
|- | |||
|colspan=7 style="background:black"|[[File:MKDS-Music-TickTockClock.oga|486px]] | |||
|} | |||
|style="display:inline-block; background:white; maxwidth:494px" width=494px| | |||
{|border=1 cellspacing=0 cellpadding=2 margin=0 padding=0 style="border:1px solid black; border-collapse:collapse; height:100%" width=100% | |||
!colspan=7 style="background:#DEDEE0"|<big>'''[[DS Mario Circuit|Mario Circuit]]'''</big><br><tt>mario_course</tt> | |||
|- | |||
!colspan=2 style="background:#EAECF0" width=74px height=92px|[[File:MKDS Mario Circuit Course Icon.png]] | |||
!rowspan=2 colspan=3 style="background:white" width=256px height=192px|[[File:MKDS Mario Circuit DS Intro.png]] | |||
|rowspan=2 colspan=2 style="background:slategray" width=144px height=192px|[[File:MKDS Mario Circuit DS layout.png]] | |||
|- | |||
!colspan=2 style="background:#EAECF0" width=74px height=92px|[[File:WFC Logo.svg|74x74px]] | |||
|- | |||
|rowspan=3 style="background:#DEDEE0; border-right:#DEDEE0" width=48px| | |||
!colspan=5 style="background:#DEDEE0; border-right:#DEDEE0; border-left:#DEDEE0"|Staff ghost | |||
|rowspan=3 style="background:#DEDEE0; border-left:#DEDEE0" width=48px| | |||
|- | |||
!colspan=3 style="background:#EAECF0" height=32px|Details | |||
!width=96px style="background:#EAECF0"|Time | |||
|width=96px|1:56:533 | |||
|- | |||
|width=32px height=32px|[[File:Mario MKDS record icon.png]] | |||
|width=32px height=32px|[[File:Shooting Star MKDS icon.png]] | |||
|width=96px|Ninten★モリオ | |||
!width=96px style="background:#EAECF0"|Unlock time | |||
|width=96px|2:05:855 | |||
|- | |||
|colspan=7 style="background:black"|[[File:MKDS-Music-CircuitTheme.oga|486px]] | |||
|} | |||
|style="display:inline-block; background:white; maxwidth:494px" width=494px| | |||
{|border=1 cellspacing=0 cellpadding=2 margin=0 padding=0 style="border:1px solid black; border-collapse:collapse; height:100%" width=100% | |||
!colspan=7 style="background:#DEDEE0"|<big>'''[[DS Airship Fortress|Airship Fortress]]'''</big><br><tt>airship_course</tt> | |||
|- | |||
!colspan=2 style="background:#EAECF0" width=74px height=92px|[[File:MKDS Airship Fortress Course Icon.png]] | |||
!rowspan=2 colspan=3 style="background:white" width=256px height=192px|[[File:Airship Fortress MKDS preview.png]] | |||
|rowspan=2 colspan=2 style="background:slategray" width=144px height=192px|[[File:MKDS Airship Fortress layout.png]] | |||
|- | |||
!colspan=2 style="background:#EAECF0" width=74px height=92px|[[File:X mark.svg|74x74px]] | |||
|- | |||
|rowspan=3 style="background:#DEDEE0; border-right:#DEDEE0" width=48px| | |||
!colspan=5 style="background:#DEDEE0; border-right:#DEDEE0; border-left:#DEDEE0"|Staff ghost | |||
|rowspan=3 style="background:#DEDEE0; border-left:#DEDEE0" width=48px| | |||
|- | |||
!colspan=3 style="background:#EAECF0" height=32px|Details | |||
!width=96px style="background:#EAECF0"|Time | |||
|width=96px|2:07:748 | |||
|- | |||
|width=32px height=32px|[[File:Bowser MKDS record icon.png]] | |||
|width=32px height=32px|[[File:Hurricane icon.png]] | |||
|width=96px|Ninten★シュン | |||
!width=96px style="background:#EAECF0"|Unlock time | |||
|width=96px|2:17:967 | |||
|- | |||
|colspan=7 style="background:black"|[[File:MKDS-Music-AirshipFortress.oga|486px]] | |||
|} | |||
|- | |||
!style="background:#DEDEE0"|[[File:MKDS Special Cup Emblem.png]]<br><big>'''[[Special Cup]]'''</big> | |||
|-style="background:#EAECF0" | |||
|style="display:inline-block; background:white; maxwidth:494px" width=494px| | |||
{|border=1 cellspacing=0 cellpadding=2 margin=0 padding=0 style="border:1px solid black; border-collapse:collapse; height:100%" width=100% | |||
!colspan=7 style="background:#DEDEE0"|<big>'''[[DS Wario Stadium|Wario Stadium]]'''</big><br><tt>stadium_course</tt> | |||
|- | |||
!colspan=2 style="background:#EAECF0" width=74px height=92px|[[File:MKDS Wario Stadium Course Icon.png]] | |||
!rowspan=2 colspan=3 style="background:white" width=256px height=192px|[[File:Wario Stadium MKDS preview.png]] | |||
|rowspan=2 colspan=2 style="background:slategray" width=144px height=192px|[[File:MKDS Wario Stadium DS layout.png]] | |||
|- | |||
!colspan=2 style="background:#EAECF0" width=74px height=92px|[[File:WFC Logo.svg|74x74px]] | |||
|- | |||
|rowspan=3 style="background:#DEDEE0; border-right:#DEDEE0" width=48px| | |||
!colspan=5 style="background:#DEDEE0; border-right:#DEDEE0; border-left:#DEDEE0"|Staff ghost | |||
|rowspan=3 style="background:#DEDEE0; border-left:#DEDEE0" width=48px| | |||
|- | |||
!colspan=3 style="background:#EAECF0" height=32px|Details | |||
!width=96px style="background:#EAECF0"|Time | |||
|width=96px|2:14:868 | |||
|- | |||
|width=32px height=32px|[[File:Wario MKDS record icon.png]] | |||
|width=32px height=32px|[[File:Brute icon.png]] | |||
|width=96px|Ninten★マトゥ | |||
!width=96px style="background:#EAECF0"|Unlock time | |||
|width=96px|2:25:657 | |||
|- | |||
|colspan=7 style="background:black"|[[File:MKDS-Music-WaluigiPinball.oga|486px]] | |||
|} | |||
|style="display:inline-block; background:white; maxwidth:494px" width=494px| | |||
{|border=1 cellspacing=0 cellpadding=2 margin=0 padding=0 style="border:1px solid black; border-collapse:collapse; height:100%" width=100% | |||
!colspan=7 style="background:#DEDEE0"|<big>'''[[DS Peach Gardens|Peach Gardens]]'''</big><br><tt>garden_course</tt> | |||
|- | |||
!colspan=2 style="background:#EAECF0" width=74px height=92px|[[File:MKDS Peach Gardens Course Icon.png]] | |||
!rowspan=2 colspan=3 style="background:white" width=256px height=192px|[[File:Peach GardensDS.png]] | |||
|rowspan=2 colspan=2 style="background:slategray" width=144px height=192px|[[File:MKDS Peach Gardens layout.png]] | |||
|- | |||
!colspan=2 style="background:#EAECF0" width=74px height=92px|[[File:X mark.svg|74x74px]] | |||
|- | |||
|rowspan=3 style="background:#DEDEE0; border-right:#DEDEE0" width=48px| | |||
!colspan=5 style="background:#DEDEE0; border-right:#DEDEE0; border-left:#DEDEE0"|Staff ghost | |||
|rowspan=3 style="background:#DEDEE0; border-left:#DEDEE0" width=48px| | |||
|- | |||
!colspan=3 style="background:#EAECF0" height=32px|Details | |||
!width=96px style="background:#EAECF0"|Time | |||
|width=96px|1:52:989 | |||
|- | |||
|width=32px height=32px|[[File:Peach MKDS record icon.png]] | |||
|width=32px height=32px|[[File:Royale icon.png]] | |||
|width=96px|Ninten★ゆきつ | |||
!width=96px style="background:#EAECF0"|Unlock time | |||
|width=96px|2:02:028 | |||
|- | |||
|colspan=7 style="background:black"|[[File:MKDS-Music-PeachGardens.oga|486px]] | |||
|} | |||
|style="display:inline-block; background:white; maxwidth:494px" width=494px| | |||
{|border=1 cellspacing=0 cellpadding=2 margin=0 padding=0 style="border:1px solid black; border-collapse:collapse; height:100%" width=100% | |||
!colspan=7 style="background:#DEDEE0"|<big>'''[[Bowser Castle (Mario Kart DS)|Bowser Castle]]'''</big><br><tt>koopa_course</tt> | |||
|- | |||
!colspan=2 style="background:#EAECF0" width=74px height=92px|[[File:MKDS Bowser Castle Course Icon.png]] | |||
!rowspan=2 colspan=3 style="background:white" width=256px height=192px|[[File:Bowser Castle MKDS preview.png]] | |||
|rowspan=2 colspan=2 style="background:slategray" width=144px height=192px|[[File:MKDS Bowser Castle DS layout.png]] | |||
|- | |||
!colspan=2 style="background:#EAECF0" width=74px height=92px|[[File:X mark.svg|74x74px]] | |||
|- | |||
|rowspan=3 style="background:#DEDEE0; border-right:#DEDEE0" width=48px| | |||
!colspan=5 style="background:#DEDEE0; border-right:#DEDEE0; border-left:#DEDEE0"|Staff ghost | |||
|rowspan=3 style="background:#DEDEE0; border-left:#DEDEE0" width=48px| | |||
|- | |||
!colspan=3 style="background:#EAECF0" height=32px|Details | |||
!width=96px style="background:#EAECF0"|Time | |||
|width=96px|2:19:661 | |||
|- | |||
|width=32px height=32px|[[File:Bowser MKDS record icon.png]] | |||
|width=32px height=32px|[[File:Hurricane icon.png]] | |||
|width=96px|Ninten★ひろむ | |||
!width=96px style="background:#EAECF0"|Unlock time | |||
|width=96px|2:30:833 | |||
|- | |||
|colspan=7 style="background:black"|[[File:MKDS-Music-BowserCastle.oga|486px]] | |||
|} | |||
|style="display:inline-block; background:white; maxwidth:494px" width=494px| | |||
{|border=1 cellspacing=0 cellpadding=2 margin=0 padding=0 style="border:1px solid black; border-collapse:collapse; height:100%" width=100% | |||
!colspan=7 style="background:#DEDEE0"|<big>'''[[Rainbow Road (Mario Kart DS)|Rainbow Road]]'''</big><br><tt>rainbow_course</tt> | |||
|- | |||
!colspan=2 style="background:#EAECF0" width=74px height=92px|[[File:MKDS Rainbow Road Course Icon.png]] | |||
!rowspan=2 colspan=3 style="background:white" width=256px height=192px|[[File:MKDS Rainbow Road Intro.png]] | |||
|rowspan=2 colspan=2 style="background:slategray" width=144px height=192px|[[File:MKDS Rainbow Road DS layout.png]] | |||
|- | |||
!colspan=2 style="background:#EAECF0" width=74px height=92px|[[File:WFC Logo.svg|74x74px]] | |||
|- | |||
|rowspan=3 style="background:#DEDEE0; border-right:#DEDEE0" width=48px| | |||
!colspan=5 style="background:#DEDEE0; border-right:#DEDEE0; border-left:#DEDEE0"|Staff ghost | |||
|rowspan=3 style="background:#DEDEE0; border-left:#DEDEE0" width=48px| | |||
|- | |||
!colspan=3 style="background:#EAECF0" height=32px|Details | |||
!width=96px style="background:#EAECF0"|Time | |||
|width=96px|2:16:246 | |||
|- | |||
|width=32px height=32px|[[File:ROB MKDS record icon.png]] | |||
|width=32px height=32px|[[File:ROB-BLS icon.png]] | |||
|width=96px|Ninten★たえこ | |||
!width=96px style="background:#EAECF0"|Unlock time | |||
|width=96px|2:27:145 | |||
|- | |||
|colspan=7 style="background:black"|[[File:MKDS-Music-RainbowRoad.oga|486px]] | |||
|} | |||
|} | |||
===Retro Grand Prix=== | |||
{|border=1 style="text-align:center; border:1px solid black; border-collapse:collapse; max-width:998px" | |||
|- | |||
!style="background:#DEDEE0"|[[File:MKDS Shell Cup Emblem.png]]<br><big>'''[[Shell Cup]]'''</big> | |||
|-style="background:#EAECF0" | |||
|style="display:inline-block; background:white; maxwidth:494px" width=494px| | |||
{|border=1 cellspacing=0 cellpadding=2 margin=0 padding=0 style="border:1px solid black; border-collapse:collapse; height:100%" width=100% | |||
!colspan=7 style="background:#DEDEE0"|<big>'''{{classic-link|SNES|Mario Circuit 1}}'''</big><br><tt>old_mario_sfc</tt> | |||
|- | |||
!colspan=2 style="background:#EAECF0" width=74px height=92px|[[File:MKDS SNES Mario Circuit 1 Course Icon.png]] | |||
!rowspan=2 colspan=3 style="background:white" width=256px height=192px|[[File:MKDS Mario Circuit 1.png]] | |||
|rowspan=2 colspan=2 style="background:slategray" width=144px height=192px|[[File:MKDS Mario Circuit 1 SNES layout.png]] | |||
|- | |||
!colspan=2 style="background:#EAECF0" width=74px height=92px|[[File:WFC Logo.svg|74x74px]] | |||
|- | |||
|rowspan=3 style="background:#DEDEE0; border-right:#DEDEE0" width=48px| | |||
!colspan=5 style="background:#DEDEE0; border-right:#DEDEE0; border-left:#DEDEE0"|Staff ghost | |||
|rowspan=3 style="background:#DEDEE0; border-left:#DEDEE0" width=48px| | |||
|- | |||
!colspan=3 style="background:#EAECF0" height=32px|Details | |||
!width=96px style="background:#EAECF0"|Time | |||
|width=96px|0:50:688 | |||
|- | |||
|width=32px height=32px|[[File:Mario MKDS record icon.png]] | |||
|width=32px height=32px|[[File:Standard MR icon.png]] | |||
|width=96px|Ninten★いわ | |||
!width=96px style="background:#EAECF0"|Unlock time | |||
|width=96px|0:54:743 | |||
|- | |||
|colspan=7 style="background:black"|[[File:MKDS-Music-SNES-MarioCircuit1.oga|486px]] | |||
|} | |||
|style="display:inline-block; background:white; maxwidth:494px" width=494px| | |||
{|border=1 cellspacing=0 cellpadding=2 margin=0 padding=0 style="border:1px solid black; border-collapse:collapse; height:100%" width=100% | |||
!colspan=7 style="background:#DEDEE0"|<big>'''{{classic-link|N64|Moo Moo Farm}}'''</big><br><tt>old_momo_64</tt> | |||
|- | |||
!colspan=2 style="background:#EAECF0" width=74px height=92px|[[File:MKDS N64 Moo Moo Farm Course Icon.png]] | |||
!rowspan=2 colspan=3 style="background:white" width=256px height=192px|[[File:MKDS Moo Moo Farm Intro.png]] | |||
|rowspan=2 colspan=2 style="background:slategray" width=144px height=192px|[[File:MKDS Moo Moo Farm N64 layout.png]] | |||
|- | |||
!colspan=2 style="background:#EAECF0" width=74px height=92px|[[File:WFC Logo.svg|74x74px]] | |||
|- | |||
|rowspan=3 style="background:#DEDEE0; border-right:#DEDEE0" width=48px| | |||
!colspan=5 style="background:#DEDEE0; border-right:#DEDEE0; border-left:#DEDEE0"|Staff ghost | |||
|rowspan=3 style="background:#DEDEE0; border-left:#DEDEE0" width=48px| | |||
|- | |||
!colspan=3 style="background:#EAECF0" height=32px|Details | |||
!width=96px style="background:#EAECF0"|Time | |||
|width=96px|1:17:751 | |||
|- | |||
|width=32px height=32px|[[File:DK MKDS record icon.png]] | |||
|width=32px height=32px|[[File:Wildlife icon.png]] | |||
|width=96px|Ninten★だる® | |||
!width=96px style="background:#EAECF0"|Unlock time | |||
|width=96px|1:23:971 | |||
|- | |||
|colspan=7 style="background:black"|[[File:MKDS-Music-N64-MooMooFarm.oga|486px]] | |||
|} | |||
|style="display:inline-block; background:white; maxwidth:494px" width=494px| | |||
{|border=1 cellspacing=0 cellpadding=2 margin=0 padding=0 style="border:1px solid black; border-collapse:collapse; height:100%" width=100% | |||
!colspan=7 style="background:#DEDEE0"|<big>'''{{classic-link|GBA|Peach Circuit}}'''</big><br><tt>old_peach_agb</tt> | |||
|- | |||
!colspan=2 style="background:#EAECF0" width=74px height=92px|[[File:MKDS GBA Peach Circuit Course Icon.png]] | |||
!rowspan=2 colspan=3 style="background:white" width=256px height=192px|[[File:MKDS Peach Circuit Intro.png]] | |||
|rowspan=2 colspan=2 style="background:slategray" width=144px height=192px|[[File:MKDS Peach Circuit GBA layout.png]] | |||
|- | |||
!colspan=2 style="background:#EAECF0" width=74px height=92px|[[File:WFC Logo.svg|74x74px]] | |||
|- | |||
|rowspan=3 style="background:#DEDEE0; border-right:#DEDEE0" width=48px| | |||
!colspan=5 style="background:#DEDEE0; border-right:#DEDEE0; border-left:#DEDEE0"|Staff ghost | |||
|rowspan=3 style="background:#DEDEE0; border-left:#DEDEE0" width=48px| | |||
|- | |||
!colspan=3 style="background:#EAECF0" height=32px|Details | |||
!width=96px style="background:#EAECF0"|Time | |||
|width=96px|1:12:011 | |||
|- | |||
|width=32px height=32px|[[File:Peach MKDS record icon.png]] | |||
|width=32px height=32px|[[File:Royale icon.png]] | |||
|width=96px|Ninten★だい8 | |||
!width=96px style="background:#EAECF0"|Unlock time | |||
|width=96px|1:17:771 | |||
|- | |||
|colspan=7 style="background:black"|[[File:MKDS-Music-GBA-Circuit.oga|486px]] | |||
|} | |||
|style="display:inline-block; background:white; maxwidth:494px" width=494px| | |||
{|border=1 cellspacing=0 cellpadding=2 margin=0 padding=0 style="border:1px solid black; border-collapse:collapse; height:100%" width=100% | |||
!colspan=7 style="background:#DEDEE0"|<big>'''{{classic-link|GCN|Luigi Circuit}}'''</big><br><tt>old_luigi_gc</tt> | |||
|- | |||
!colspan=2 style="background:#EAECF0" width=74px height=92px|[[File:MKDS GCN Luigi Circuit Course Icon.png]] | |||
!rowspan=2 colspan=3 style="background:white" width=256px height=192px|[[File:MKDS Luigi Circuit GCN Intro.png]] | |||
|rowspan=2 colspan=2 style="background:slategray" width=144px height=192px|[[File:MKDS Luigi Circuit GCN layout.png]] | |||
|- | |||
!colspan=2 style="background:#EAECF0" width=74px height=92px|[[File:WFC Logo.svg|74x74px]] | |||
|- | |||
|rowspan=3 style="background:#DEDEE0; border-right:#DEDEE0" width=48px| | |||
!colspan=5 style="background:#DEDEE0; border-right:#DEDEE0; border-left:#DEDEE0"|Staff ghost | |||
|rowspan=3 style="background:#DEDEE0; border-left:#DEDEE0" width=48px| | |||
|- | |||
!colspan=3 style="background:#EAECF0" height=32px|Details | |||
!width=96px style="background:#EAECF0"|Time | |||
|width=96px|1:29:759 | |||
|- | |||
|width=32px height=32px|[[File:Luigi MKDS record icon.png]] | |||
|width=32px height=32px|[[File:Poltergust 4000 icon.png]] | |||
|width=96px|Ninten★おつぼ | |||
!width=96px style="background:#EAECF0"|Unlock time | |||
|width=96px|1:36:939 | |||
|- | |||
|colspan=7 style="background:black"|[[File:MKDS-Music-GCN-Circuit.oga|486px]] | |||
|} | |||
|- | |||
!style="background:#DEDEE0"|[[File:MKDS Banana Cup Emblem.png]]<br><big>'''[[Banana Cup]]'''</big> | |||
|-style="background:#EAECF0" | |||
|style="display:inline-block; background:white; maxwidth:494px" width=494px| | |||
{|border=1 cellspacing=0 cellpadding=2 margin=0 padding=0 style="border:1px solid black; border-collapse:collapse; height:100%" width=100% | |||
!colspan=7 style="background:#DEDEE0"|<big>'''{{classic-link|SNES|Donut Plains 1}}'''</big><br><tt>old_donut_sfc</tt> | |||
|- | |||
!colspan=2 style="background:#EAECF0" width=74px height=92px|[[File:MKDS SNES Donut Plains 1 Course Icon.png]] | |||
!rowspan=2 colspan=3 style="background:white" width=256px height=192px|[[File:MKDS Donut Plains 1.png]] | |||
|rowspan=2 colspan=2 style="background:slategray" width=144px height=192px|[[File:MKDS Donut Plains 1 SNES layout.png]] | |||
|- | |||
!colspan=2 style="background:#EAECF0" width=74px height=92px|[[File:X mark.svg|74x74px]] | |||
|- | |||
|rowspan=3 style="background:#DEDEE0; border-right:#DEDEE0" width=48px| | |||
!colspan=5 style="background:#DEDEE0; border-right:#DEDEE0; border-left:#DEDEE0"|Staff ghost | |||
|rowspan=3 style="background:#DEDEE0; border-left:#DEDEE0" width=48px| | |||
|- | |||
!colspan=3 style="background:#EAECF0" height=32px|Details | |||
!width=96px style="background:#EAECF0"|Time | |||
|width=96px|1:08:027 | |||
|- | |||
|width=32px height=32px|[[File:Dry Bones MKDS record icon.png]] | |||
|width=32px height=32px|[[File:Dry Bomber icon.png]] | |||
|width=96px|Ninten★しばた | |||
!width=96px style="background:#EAECF0"|Unlock time | |||
|width=96px|1:13:469 | |||
|- | |||
|colspan=7 style="background:black"|[[File:MKDS-Music-SNES-DonutPlains1.oga|486px]] | |||
|} | |||
|style="display:inline-block; background:white; maxwidth:494px" width=494px| | |||
{|border=1 cellspacing=0 cellpadding=2 margin=0 padding=0 style="border:1px solid black; border-collapse:collapse; height:100%" width=100% | |||
!colspan=7 style="background:#DEDEE0"|<big>'''{{classic-link|N64|Frappe Snowland}}'''</big><br><tt>old_frappe_64</tt> | |||
|- | |||
!colspan=2 style="background:#EAECF0" width=74px height=92px|[[File:MKDS N64 Frappe Snowland Course Icon.png]] | |||
!rowspan=2 colspan=3 style="background:white" width=256px height=192px|[[File:MKDS Frappe Snowland N64 Intro.png]] | |||
|rowspan=2 colspan=2 style="background:slategray" width=144px height=192px|[[File:MKDS Frappe Snowland layout.png]] | |||
|- | |||
!colspan=2 style="background:#EAECF0" width=74px height=92px|[[File:WFC Logo.svg|74x74px]] | |||
|- | |||
|rowspan=3 style="background:#DEDEE0; border-right:#DEDEE0" width=48px| | |||
!colspan=5 style="background:#DEDEE0; border-right:#DEDEE0; border-left:#DEDEE0"|Staff ghost | |||
|rowspan=3 style="background:#DEDEE0; border-left:#DEDEE0" width=48px| | |||
|- | |||
!colspan=3 style="background:#EAECF0" height=32px|Details | |||
!width=96px style="background:#EAECF0"|Time | |||
|width=96px|2:08:781 | |||
|- | |||
|width=32px height=32px|[[File:Wario MKDS record icon.png]] | |||
|width=32px height=32px|[[File:Brute icon.png]] | |||
|width=96px|Ninten★ジョー | |||
!width=96px style="background:#EAECF0"|Unlock time | |||
|width=96px|2:19:083 | |||
|- | |||
|colspan=7 style="background:black"|[[File:MKDS-Music-N64-FrappeSnowland.oga|486px]] | |||
|} | |||
|style="display:inline-block; background:white; maxwidth:494px" width=494px| | |||
{|border=1 cellspacing=0 cellpadding=2 margin=0 padding=0 style="border:1px solid black; border-collapse:collapse; height:100%" width=100% | |||
!colspan=7 style="background:#DEDEE0"|<big>'''{{classic-link|GBA|Bowser's Castle 2|Bowser Castle 2}}'''</big><br><tt>old_koopa_agb</tt> | |||
|- | |||
!colspan=2 style="background:#EAECF0" width=74px height=92px|[[File:MKDS GBA Bowser Castle 2 Course Icon.png]] | |||
!rowspan=2 colspan=3 style="background:white" width=256px height=192px|[[File:MKDS Bowser Castle 2 GBA Intro.png]] | |||
|rowspan=2 colspan=2 style="background:slategray" width=144px height=192px|[[File:MKDS Bowser Castle 2 GBA layout.png]] | |||
|- | |||
!colspan=2 style="background:#EAECF0" width=74px height=92px|[[File:X mark.svg|74x74px]] | |||
|- | |||
|rowspan=3 style="background:#DEDEE0; border-right:#DEDEE0" width=48px| | |||
!colspan=5 style="background:#DEDEE0; border-right:#DEDEE0; border-left:#DEDEE0"|Staff ghost | |||
|rowspan=3 style="background:#DEDEE0; border-left:#DEDEE0" width=48px| | |||
|- | |||
!colspan=3 style="background:#EAECF0" height=32px|Details | |||
!width=96px style="background:#EAECF0"|Time | |||
|width=96px|1:52:258 | |||
|- | |||
|width=32px height=32px|[[File:Bowser MKDS record icon.png]] | |||
|width=32px height=32px|[[File:Standard BW icon.png]] | |||
|width=96px|Ninten★ジョー | |||
!width=96px style="background:#EAECF0"|Unlock time | |||
|width=96px|2:01:238 | |||
|- | |||
|colspan=7 style="background:black"|[[File:MKDS-Music-GBA-BowserCastle2.oga|486px]] | |||
|} | |||
|style="display:inline-block; background:white; maxwidth:494px" width=494px| | |||
{|border=1 cellspacing=0 cellpadding=2 margin=0 padding=0 style="border:1px solid black; border-collapse:collapse; height:100%" width=100% | |||
!colspan=7 style="background:#DEDEE0"|<big>'''{{classic-link|GCN|Baby Park}}'''</big><br><tt>old_baby_gc</tt> | |||
|- | |||
!colspan=2 style="background:#EAECF0" width=74px height=92px|[[File:MKDS GCN Baby Park Course Icon.png]] | |||
!rowspan=2 colspan=3 style="background:white" width=256px height=192px|[[File:MKDS Baby Park Intro.png]] | |||
|rowspan=2 colspan=2 style="background:slategray" width=144px height=192px|[[File:MKDS Baby Park GCN layout.png]] | |||
|- | |||
!colspan=2 style="background:#EAECF0" width=74px height=92px|[[File:WFC Logo.svg|74x74px]] | |||
|- | |||
|rowspan=3 style="background:#DEDEE0; border-right:#DEDEE0" width=48px| | |||
!colspan=5 style="background:#DEDEE0; border-right:#DEDEE0; border-left:#DEDEE0"|Staff ghost | |||
|rowspan=3 style="background:#DEDEE0; border-left:#DEDEE0" width=48px| | |||
|- | |||
!colspan=3 style="background:#EAECF0" height=32px|Details | |||
!width=96px style="background:#EAECF0"|Time | |||
|width=96px|0:50:920 | |||
|- | |||
|width=32px height=32px|[[File:Toad MKDS record icon.png]] | |||
|width=32px height=32px|[[File:Mushmellow icon.png]] | |||
|width=96px|Ninten★ひょう | |||
!width=96px style="background:#EAECF0"|Unlock time | |||
|width=96px|0:54:993 | |||
|- | |||
|colspan=7 style="background:black"|[[File:MKDS-Music-GCN-BabyPark.oga|486px]] | |||
|} | |||
|- | |||
!style="background:#DEDEE0"|[[File:MKDS Leaf Cup Emblem.png]]<br><big>'''[[Leaf Cup]]'''</big> | |||
|-style="background:#EAECF0" | |||
|style="display:inline-block; background:white; maxwidth:494px" width=494px| | |||
{|border=1 cellspacing=0 cellpadding=2 margin=0 padding=0 style="border:1px solid black; border-collapse:collapse; height:100%" width=100% | |||
!colspan=7 style="background:#DEDEE0"|<big>'''{{classic-link|SNES|Koopa Troopa Beach 2|Koopa Beach 2}}'''</big><br><tt>old_noko_sfc</tt> | |||
|- | |||
!colspan=2 style="background:#EAECF0" width=74px height=92px|[[File:MKDS SNES Koopa Beach 2 Course Icon.png]] | |||
!rowspan=2 colspan=3 style="background:white" width=256px height=192px|[[File:MKDS Koopa Beach 2 SNES Intro.png]] | |||
|rowspan=2 colspan=2 style="background:slategray" width=144px height=192px|[[File:MKDS Koopa Beach 2 SNES layout.png]] | |||
|- | |||
!colspan=2 style="background:#EAECF0" width=74px height=92px|[[File:X mark.svg|74x74px]] | |||
|- | |||
|rowspan=3 style="background:#DEDEE0; border-right:#DEDEE0" width=48px| | |||
!colspan=5 style="background:#DEDEE0; border-right:#DEDEE0; border-left:#DEDEE0"|Staff ghost | |||
|rowspan=3 style="background:#DEDEE0; border-left:#DEDEE0" width=48px| | |||
|- | |||
!colspan=3 style="background:#EAECF0" height=32px|Details | |||
!width=96px style="background:#EAECF0"|Time | |||
|width=96px|0:54:847 | |||
|- | |||
|width=32px height=32px|[[File:Yoshi MKDS record icon.png]] | |||
|width=32px height=32px|[[File:Egg 1 icon.png]] | |||
|width=96px|Ninten★しんや | |||
!width=96px style="background:#EAECF0"|Unlock time | |||
|width=96px|0:59:34 | |||
|- | |||
|colspan=7 style="background:black"|[[File:MKDS-Music-SNES-KoopaBeach2.oga|486px]] | |||
|} | |||
|style="display:inline-block; background:white; maxwidth:494px" width=494px| | |||
{|border=1 cellspacing=0 cellpadding=2 margin=0 padding=0 style="border:1px solid black; border-collapse:collapse; height:100%" width=100% | |||
!colspan=7 style="background:#DEDEE0"|<big>'''{{classic-link|N64|Choco Mountain}}'''</big><br><tt>old_choco_64</tt> | |||
|- | |||
!colspan=2 style="background:#EAECF0" width=74px height=92px|[[File:MKDS N64 Choco Mountain Course Icon.png]] | |||
!rowspan=2 colspan=3 style="background:white" width=256px height=192px|[[File:MKDS Choco Mountain N64 Intro.png]] | |||
|rowspan=2 colspan=2 style="background:slategray" width=144px height=192px|[[File:MKDS Choco Mountain N64 layout.png]] | |||
|- | |||
!colspan=2 style="background:#EAECF0" width=74px height=92px|[[File:WFC Logo.svg|74x74px]] | |||
|- | |||
|rowspan=3 style="background:#DEDEE0; border-right:#DEDEE0" width=48px| | |||
!colspan=5 style="background:#DEDEE0; border-right:#DEDEE0; border-left:#DEDEE0"|Staff ghost | |||
|rowspan=3 style="background:#DEDEE0; border-left:#DEDEE0" width=48px| | |||
|- | |||
!colspan=3 style="background:#EAECF0" height=32px|Details | |||
!width=96px style="background:#EAECF0"|Time | |||
|width=96px|2:15:571 | |||
|- | |||
|width=32px height=32px|[[File:Wario MKDS record icon.png]] | |||
|width=32px height=32px|[[File:Dragonfly icon.png]] | |||
|width=96px|Ninten★イシビ | |||
!width=96px style="background:#EAECF0"|Unlock time | |||
|width=96px|2:26:416 | |||
|- | |||
|colspan=7 style="background:black"|[[File:MKDS-Music-N64-ChocoMountain.oga|486px]] | |||
|} | |||
|style="display:inline-block; background:white; maxwidth:494px" width=494px| | |||
{|border=1 cellspacing=0 cellpadding=2 margin=0 padding=0 style="border:1px solid black; border-collapse:collapse; height:100%" width=100% | |||
!colspan=7 style="background:#DEDEE0"|<big>'''{{classic-link|GBA|Luigi Circuit}}'''</big><br><tt>old_luigi_agb</tt> | |||
|- | |||
!colspan=2 style="background:#EAECF0" width=74px height=92px|[[File:MKDS GBA Luigi Circuit Course Icon.png]] | |||
!rowspan=2 colspan=3 style="background:white" width=256px height=192px|[[File:MKDS Luigi Circuit GBA Intro.png]] | |||
|rowspan=2 colspan=2 style="background:slategray" width=144px height=192px|[[File:MKDS Luigi Circuit GBA layout.png]] | |||
|- | |||
!colspan=2 style="background:#EAECF0" width=74px height=92px|[[File:X mark.svg|74x74px]] | |||
|- | |||
|rowspan=3 style="background:#DEDEE0; border-right:#DEDEE0" width=48px| | |||
!colspan=5 style="background:#DEDEE0; border-right:#DEDEE0; border-left:#DEDEE0"|Staff ghost | |||
|rowspan=3 style="background:#DEDEE0; border-left:#DEDEE0" width=48px| | |||
|- | |||
!colspan=3 style="background:#EAECF0" height=32px|Details | |||
!width=96px style="background:#EAECF0"|Time | |||
|width=96px|1:46:581 | |||
|- | |||
|width=32px height=32px|[[File:Luigi MKDS record icon.png]] | |||
|width=32px height=32px|[[File:Poltergust 4000 icon.png]] | |||
|width=96px|Ninten★モリオ | |||
!width=96px style="background:#EAECF0"|Unlock time | |||
|width=96px|1:55:107 | |||
|- | |||
|colspan=7 style="background:black"|[[File:MKDS-Music-GBA-Circuit.oga|486px]] | |||
|} | |||
|style="display:inline-block; background:white; maxwidth:494px" width=494px| | |||
{|border=1 cellspacing=0 cellpadding=2 margin=0 padding=0 style="border:1px solid black; border-collapse:collapse; height:100%" width=100% | |||
!colspan=7 style="background:#DEDEE0"|<big>'''{{classic-link|GCN|Mushroom Bridge}}'''</big><br><tt>old_kinoko_gc</tt> | |||
|- | |||
!colspan=2 style="background:#EAECF0" width=74px height=92px|[[File:MKDS GCN Mushroom Bridge Course Icon.png]] | |||
!rowspan=2 colspan=3 style="background:white" width=256px height=192px|[[File:MKDS Mushroom Bridge GCN Intro.png]] | |||
|rowspan=2 colspan=2 style="background:slategray" width=144px height=192px|[[File:MKDS Mushroom Bridge GCN layout.png]] | |||
|- | |||
!colspan=2 style="background:#EAECF0" width=74px height=92px|[[File:X mark.svg|74x74px]] | |||
|- | |||
|rowspan=3 style="background:#DEDEE0; border-right:#DEDEE0" width=48px| | |||
!colspan=5 style="background:#DEDEE0; border-right:#DEDEE0; border-left:#DEDEE0"|Staff ghost | |||
|rowspan=3 style="background:#DEDEE0; border-left:#DEDEE0" width=48px| | |||
|- | |||
!colspan=3 style="background:#EAECF0" height=32px|Details | |||
!width=96px style="background:#EAECF0"|Time | |||
|width=96px|1:30:600 | |||
|- | |||
|width=32px height=32px|[[File:Toad MKDS record icon.png]] | |||
|width=32px height=32px|[[File:Mushmellow icon.png]] | |||
|width=96px|Ninten★ひょう | |||
!width=96px style="background:#EAECF0"|Unlock time | |||
|width=96px|1:37:847 | |||
|- | |||
|colspan=7 style="background:black"|[[File:MKDS-Music-GCN-MushroomBridge.oga|486px]] | |||
|} | |||
|- | |||
!style="background:#DEDEE0"|[[File:MKDS Lightning Cup Emblem.png]]<br><big>'''[[Lightning Cup]]'''</big> | |||
|-style="background:#EAECF0" | |||
|style="display:inline-block; background:white; maxwidth:494px" width=494px| | |||
{|border=1 cellspacing=0 cellpadding=2 margin=0 padding=0 style="border:1px solid black; border-collapse:collapse; height:100%" width=100% | |||
!colspan=7 style="background:#DEDEE0"|<big>'''{{classic-link|SNES|Choco Island 2}}'''</big><br><tt>old_choco_sfc</tt> | |||
|- | |||
!colspan=2 style="background:#EAECF0" width=74px height=92px|[[File:MKDS SNES Choco Island 2 Course Icon.png]] | |||
!rowspan=2 colspan=3 style="background:white" width=256px height=192px|[[File:MKDS Choco Island 2 Intro.png]] | |||
|rowspan=2 colspan=2 style="background:slategray" width=144px height=192px|[[File:MKDS Choco Island 2 SNES layout.png]] | |||
|- | |||
!colspan=2 style="background:#EAECF0" width=74px height=92px|[[File:WFC Logo.svg|74x74px]] | |||
|- | |||
|rowspan=3 style="background:#DEDEE0; border-right:#DEDEE0" width=48px| | |||
!colspan=5 style="background:#DEDEE0; border-right:#DEDEE0; border-left:#DEDEE0"|Staff ghost | |||
|rowspan=3 style="background:#DEDEE0; border-left:#DEDEE0" width=48px| | |||
|- | |||
!colspan=3 style="background:#EAECF0" height=32px|Details | |||
!width=96px style="background:#EAECF0"|Time | |||
|width=96px|1:01:620 | |||
|- | |||
|width=32px height=32px|[[File:Waluigi MKDS record icon.png]] | |||
|width=32px height=32px|[[File:Zipper icon.png]] | |||
|width=96px|Ninten★おつぼ | |||
!width=96px style="background:#EAECF0"|Unlock time | |||
|width=96px|1:06:549 | |||
|- | |||
|colspan=7 style="background:black"|[[File:MKDS-Music-SNES-ChocoIsland2.oga|486px]] | |||
|} | |||
|style="display:inline-block; background:white; maxwidth:494px" width=494px| | |||
{|border=1 cellspacing=0 cellpadding=2 margin=0 padding=0 style="border:1px solid black; border-collapse:collapse; height:100%" width=100% | |||
!colspan=7 style="background:#DEDEE0"|<big>'''{{classic-link|N64|Banshee Boardwalk}}'''</big><br><tt>old_hyudoro_64</tt> | |||
|- | |||
!colspan=2 style="background:#EAECF0" width=74px height=92px|[[File:MKDS N64 Banshee Boardwalk Course Icon.png]] | |||
!rowspan=2 colspan=3 style="background:white" width=256px height=192px|[[File:MKDS Banshee Boardwalk N64 Intro.png]] | |||
|rowspan=2 colspan=2 style="background:slategray" width=144px height=192px|[[File:MKDS Banshee Boardwalk N64 layout.png]] | |||
|- | |||
!colspan=2 style="background:#EAECF0" width=74px height=92px|[[File:X mark.svg|74x74px]] | |||
|- | |||
|rowspan=3 style="background:#DEDEE0; border-right:#DEDEE0" width=48px| | |||
!colspan=5 style="background:#DEDEE0; border-right:#DEDEE0; border-left:#DEDEE0"|Staff ghost | |||
|rowspan=3 style="background:#DEDEE0; border-left:#DEDEE0" width=48px| | |||
|- | |||
!colspan=3 style="background:#EAECF0" height=32px|Details | |||
!width=96px style="background:#EAECF0"|Time | |||
|width=96px|2:14:403 | |||
|- | |||
|width=32px height=32px|[[File:Dry Bones MKDS record icon.png]] | |||
|width=32px height=32px|[[File:Dry Bomber icon.png]] | |||
|width=96px|Ninten★まさ | |||
!width=96px style="background:#EAECF0"|Unlock time | |||
|width=96px|2:25:155 | |||
|- | |||
|colspan=7 style="background:black"|[[File:MKDS-Music-N64-BansheeBoardwalk.oga|486px]] | |||
|} | |||
|style="display:inline-block; background:white; maxwidth:494px" width=494px| | |||
{|border=1 cellspacing=0 cellpadding=2 margin=0 padding=0 style="border:1px solid black; border-collapse:collapse; height:100%" width=100% | |||
!colspan=7 style="background:#DEDEE0"|<big>'''{{classic-link|GBA|Sky Garden}}'''</big><br><tt>old_sky_agb</tt> | |||
|- | |||
!colspan=2 style="background:#EAECF0" width=74px height=92px|[[File:MKDS GBA Sky Garden Course Icon.png]] | |||
!rowspan=2 colspan=3 style="background:white" width=256px height=192px|[[File:MKDS Sky Gardens Intro.png]] | |||
|rowspan=2 colspan=2 style="background:slategray" width=144px height=192px|[[File:MKDS Sky Garden GBA layout.png]] | |||
|- | |||
!colspan=2 style="background:#EAECF0" width=74px height=92px|[[File:WFC Logo.svg|74x74px]] | |||
|- | |||
|rowspan=3 style="background:#DEDEE0; border-right:#DEDEE0" width=48px| | |||
!colspan=5 style="background:#DEDEE0; border-right:#DEDEE0; border-left:#DEDEE0"|Staff ghost | |||
|rowspan=3 style="background:#DEDEE0; border-left:#DEDEE0" width=48px| | |||
|- | |||
!colspan=3 style="background:#EAECF0" height=32px|Details | |||
!width=96px style="background:#EAECF0"|Time | |||
|width=96px|1:44:400 | |||
|- | |||
|width=32px height=32px|[[File:Daisy MKDS record icon.png]] | |||
|width=32px height=32px|[[File:Power Flower icon.png]] | |||
|width=96px|Ninten★ドリー | |||
!width=96px style="background:#EAECF0"|Unlock time | |||
|width=96px|1:52:752 | |||
|- | |||
|colspan=7 style="background:black"|[[File:MKDS-Music-GBA-SkyGarden.oga|486px]] | |||
|} | |||
|style="display:inline-block; background:white; maxwidth:494px" width=494px| | |||
{|border=1 cellspacing=0 cellpadding=2 margin=0 padding=0 style="border:1px solid black; border-collapse:collapse; height:100%" width=100% | |||
!colspan=7 style="background:#DEDEE0"|<big>'''{{classic-link|GCN|Yoshi Circuit}}'''</big><br><tt>old_yoshi_gc</tt> | |||
|- | |||
!colspan=2 style="background:#EAECF0" width=74px height=92px|[[File:MKDS GCN Yoshi Circuit Course Icon.png]] | |||
!rowspan=2 colspan=3 style="background:white" width=256px height=192px|[[File:MKDS Yoshi Circuit GCN Intro.png]] | |||
|rowspan=2 colspan=2 style="background:slategray" width=144px height=192px|[[File:MKDS Yoshi Circuit GCN layout.png]] | |||
|- | |||
!colspan=2 style="background:#EAECF0" width=74px height=92px|[[File:WFC Logo.svg|74x74px]] | |||
|- | |||
|rowspan=3 style="background:#DEDEE0; border-right:#DEDEE0" width=48px| | |||
!colspan=5 style="background:#DEDEE0; border-right:#DEDEE0; border-left:#DEDEE0"|Staff ghost | |||
|rowspan=3 style="background:#DEDEE0; border-left:#DEDEE0" width=48px| | |||
|- | |||
!colspan=3 style="background:#EAECF0" height=32px|Details | |||
!width=96px style="background:#EAECF0"|Time | |||
|width=96px|1:48:793 | |||
|- | |||
|width=32px height=32px|[[File:Yoshi MKDS record icon.png]] | |||
|width=32px height=32px|[[File:Standard YS icon.png]] | |||
|width=96px|Ninten★たろう | |||
!width=96px style="background:#EAECF0"|Unlock time | |||
|width=96px|1:57:496 | |||
|- | |||
|colspan=7 style="background:black"|[[File:MKDS-Music-GCN-Circuit.oga|486px]] | |||
|} | |||
|} | |||
===Battle courses=== | |||
{|border=1 style="text-align:center; border:1px solid black; border-collapse:collapse; max-width:798px" | |||
|- | |||
!style="background:#DEDEE0"|<big>'''Nitro courses'''</big> | |||
|-style="background:#EAECF0" | |||
|style="display:inline-block; background:white; maxwidth:394px" width=394px| | |||
{|border=1 cellspacing=0 cellpadding=2 margin=0 padding=0 style="border:1px solid black; border-collapse:collapse; height:100%" width=100% | |||
!colspan=2 style="background:#DEDEE0"|<big>'''[[Nintendo DS (battle course)|Nintendo DS]]'''</big><br><tt>mini_stage1</tt> | |||
|- | |||
!style="background:#EAECF0" width=107px height=80px|[[File:MKDS Nintendo DS Course Icon.png]] | |||
!rowspan=2 style="background:white" width=256px height=192px|[[File:Nintendo DS MKDS battle stage.png]] | |||
|- | |||
|style="background:slategray" width=128px height=128px|[[File:MKDS Nintendo DS layout.png]] | |||
|} | |||
|style="display:inline-block; background:white; maxwidth:394px" width=394px| | |||
{|border=1 cellspacing=0 cellpadding=2 margin=0 padding=0 style="border:1px solid black; border-collapse:collapse; height:100%" width=100% | |||
!colspan=2 style="background:#DEDEE0"|<big>'''[[DS Twilight House|Twilight House]]'''</big><br><tt>mini_stage2</tt> | |||
|- | |||
!style="background:#EAECF0" width=107px height=80px|[[File:MKDS Twilight Shore Course Icon.png]] | |||
!rowspan=2 style="background:white" width=256px height=192px|[[File:Twilight House MKDS preview.png]] | |||
|- | |||
|style="background:slategray" width=128px height=128px|[[File:MKDS Twilight House layout.png]] | |||
|} | |||
|style="display:inline-block; background:white; maxwidth:394px" width=394px| | |||
{|border=1 cellspacing=0 cellpadding=2 margin=0 padding=0 style="border:1px solid black; border-collapse:collapse; height:100%" width=100% | |||
!colspan=2 style="background:#DEDEE0"|<big>'''[[DS Palm Shore|Palm Shore]]'''</big><br><tt>mini_stage3</tt> | |||
|- | |||
!style="background:#EAECF0" width=107px height=80px|[[File:MKDS Palm Shore Course Icon.png]] | |||
!rowspan=2 style="background:white" width=256px height=192px|[[File:MKDS Palm Shore.png]] | |||
|- | |||
|style="background:slategray" width=128px height=128px|[[File:MKDS Palm Shore layout.png]] | |||
|} | |||
|style="display:inline-block; background:white; maxwidth:394px" width=394px| | |||
{|border=1 cellspacing=0 cellpadding=2 margin=0 padding=0 style="border:1px solid black; border-collapse:collapse; height:100%" width=100% | |||
!colspan=2 style="background:#DEDEE0"|<big>'''[[Tart Top]]'''</big><br><tt>mini_stage4</tt> | |||
|- | |||
!style="background:#EAECF0" width=107px height=80px|[[File:MKDS Tart Top Course Icon.png]] | |||
!rowspan=2 style="background:white" width=256px height=192px|[[File:Tart Top MKDS preview.png]] | |||
|- | |||
|style="background:slategray" width=128px height=128px|[[File:MKDS Tart Top layout.png]] | |||
|} | |||
|- | |||
!style="background:#DEDEE0"|<big>'''Retro courses'''</big> | |||
|-style="background:#EAECF0" | |||
|style="display:inline-block; background:white; maxwidth:394px" width=394px| | |||
{|border=1 cellspacing=0 cellpadding=2 margin=0 padding=0 style="border:1px solid black; border-collapse:collapse; height:100%" width=100% | |||
!colspan=2 style="background:#DEDEE0"|<big>'''[[Block Fort]]'''</big><br><tt>mini_block_64</tt> | |||
|- | |||
!style="background:#EAECF0" width=107px height=80px|[[File:MKDS N64 Block Fort Course Icon.png]] | |||
!rowspan=2 style="background:white" width=256px height=192px|[[File:MKDS Block Fort Intro.png]] | |||
|- | |||
|style="background:slategray" width=128px height=128px|[[File:MKDS Block Fort layout.png]] | |||
|} | |||
|style="display:inline-block; background:white; maxwidth:394px" width=394px| | |||
{|border=1 cellspacing=0 cellpadding=2 margin=0 padding=0 style="border:1px solid black; border-collapse:collapse; height:100%" width=100% | |||
!colspan=2 style="background:#DEDEE0"|<big>'''[[Pipe Plaza]]'''</big><br><tt>mini_dokan_gc</tt> | |||
|- | |||
!style="background:#EAECF0" width=107px height=80px|[[File:MKDS GCN Pipe Plaza Course Icon.png]] | |||
!rowspan=2 style="background:white" width=256px height=192px|[[File:Pipe Plaza.png]] | |||
|- | |||
|style="background:slategray" width=128px height=128px|[[File:MKDS Pipe Plaza layout.png]] | |||
|} | |||
|- | |||
!style="background:black"|[[File:MKDS-Music-BattleMode.oga|486px]] | |||
|} | |||
==Items== | |||
:''For information on the probability of obtaining each item from an Item Box, see [[Mario Kart DS item probability distributions]].'' | |||
As with other ''Mario Kart'' games, a main element of ''Mario Kart DS'' are the pick-up items that allow the racer to take certain advantage over their opponents. An item can be obtained by driving into an [[Item Box]]. This causes the item roulette at the top-left corner of the screen. Racers in higher positions receive less powerful items than racers in lower positions. Some items are unavailable in [[Battle Mode]], and in the mode, similar to normal races, leaders with the most [[Balloon]]s or [[Shine Sprite]]s receive less powerful items. | |||
Each kart has an Items stats ratio, which determines the variety of items that a racer can receive; karts with a higher items ratio are more likely to receive rare items. In subsequent games, this stat was removed, making position the only factor that influences items. When the Item Roulette has chosen a normal item, it makes a simple ''plong'' sound, but if the racer receives a more powerful item, it makes a stronger ''plong'' sound. | |||
The game introduces two items, [[Bullet Bill]] and [[Blooper]], both of which have since appeared in every subsequent ''Mario Kart'' game. Most of ''Mario Kart DS''{{'}}s item artworks are from ''[[Mario Kart: Double Dash!!]]'' except for the Fake Item Box, Triple Bananas, Boo, Bullet Bill and Blooper. | |||
{|class="wikitable" | |||
!style="background-color:red;color:white"|Image | |||
!style="background-color:red;color:white"|Name | |||
!style="background-color:red;color:white;text-align:center"|Instruction booklet description | |||
|- | |||
|[[File:MKDDMushroom.png|100px]] | |||
|[[Dash Mushroom|Mushroom]] | |||
|''Provides a short speed boost.'' | |||
|- | |||
|[[File:MKDD Triple Mushrooms.png|100px]] | |||
|[[Triple Mushrooms]] | |||
|''Each press of {{button|ds|l}} or {{button|ds|x}} uses up one Mushroom.'' | |||
|- | |||
|[[File:Golden Mushroom.png|100px]] | |||
|[[Golden Dash Mushroom|Golden Mushroom]] | |||
|''Allows you to use Mushroom boosts as many times as you want for a short period of time.'' | |||
|- | |||
|[[File:MKDD ItemBox.png|100px]] | |||
|[[Item Box]] | |||
|''Drive through the item boxes on the tracks to get the items contained within. The item inside is determined randomly. {{footnote|main|1}} In Balloon Battle, if the player is eliminated from the game and gets an Item Box, the player only receives an Item Box, as an actual item. This can be placed on the floor, and someone not eliminated can use it, but it only lasts for a short time before disappearing.'' | |||
|- | |||
|[[File:MKDS Fake Item Box Artwork.png|100px]] | |||
|[[Fake Item Box]] | |||
|''Looks just like an item box, but when you run into it, it knocks you over.'' | |||
|- | |||
|[[File:MKDD BananaPeel.png|100px]] | |||
|[[Banana]] | |||
|''Makes karts spin out when run over.'' | |||
|- | |||
|[[File:TripleBananasMKDS.png|100px]] | |||
|[[Triple Bananas]] | |||
|''Press {{button|ds|l}} or {{button|ds|x}} to deploy behind the kart. Tap the button again to drop one.'' | |||
|- | |||
|[[File:MKDD GreenShell.png|100px]] | |||
|[[Green Shell]] | |||
|''When thrown, this shell travels in a straight line and knocks over the first kart it hits.'' | |||
|- | |||
|[[File:MKDD Triple Green Shells.png|100px]] | |||
|style="white-space:nowrap"|[[Triple Green Shells]] | |||
|''Press {{button|ds|l}} or {{button|ds|x}} to deploy, then press the button again to launch a shell. Each one has the same effect as a single Green or Red Shell.'' | |||
|- | |||
|[[File:MKDD RedShell.png|100px]] | |||
|[[Red Shell]] | |||
|''These automatically lock onto and chase after the next kart in front of you. When hit, the kart rolls over.'' | |||
|- | |||
|[[File:MKDD Triple Red Shells.png|100px]] | |||
|[[Triple Red Shells]] | |||
|''Press {{button|ds|l}} or {{button|ds|x}} to deploy, then press the button again to launch a shell. Each one has the same effect as a single Red Shell.'' | |||
|- | |||
|[[File:MKDD SpinyShell.png|100px]] | |||
|[[Spiny Shell (blue)|Spiny Shell]] | |||
|''This shell travels and chases after the lead kart and blows up when it reaches its target. Any kart in the blast radius will be knocked over or spun around.'' | |||
|- | |||
|[[File:MKDD Star.png|100px]] | |||
|[[Super Star|Star]] | |||
|''Makes you invincible for a brief period of time. While invincible, you will knock over any kart you hit.'' | |||
|- | |||
|[[File:MKDD Thunderbolt Artwork.png|100px]] | |||
|[[Lightning]] | |||
|''Makes all opponents spin out, drop their items, and shrink for a brief period of time.'' | |||
|- | |||
|[[File:MKDD Bob-omb.png|100px]] | |||
|[[Bob-omb]] | |||
|''Explodes after a brief pause or when another kart comes near it. Any kart in the blast radius will be knocked over or spun around.'' | |||
|- | |||
|[[File:BlooperMKDS.png|100px]] | |||
|[[Blooper]] | |||
|''Sprays ink on all of the karts in front of you, obscuring those drivers' view of the track.'' | |||
|- | |||
|[[File:BulletBill-MKDS.png|100px]] | |||
|[[Bullet Bill]] | |||
|''Briefly transforms the user into a Bullet Bill that soars through the air along the track, knocking over karts along the way.'' | |||
|- | |||
|[[File:Boo-MKDS.png|100px]] | |||
|[[Boo]] | |||
|''Unleashes Boo, who turns you invisible for a brief time, making you impervious to enemy attacks, and steals an opponent's item.'' | |||
|} | |||
{{footnote|note|1|The instruction booklet provides this description in page 10}} | |||
==Racing techniques== | |||
===Rocket Start=== | |||
Throughout the entire series, the [[Rocket Start]] allow drivers to give them an extra speed boost and get a head start when a race begins. To use the technique for this installment, players should stay at the starting line and wait for the countdown to hit two. When it does reach that number and when it starts to fade, players should hold the {{button|ds|A}} button to rev up the kart's engine. When ''START'' appears on the race screen, the kart receives a small boost of speed out from the starting line, which is a very helpful move to get first place early on in a race. But, there is a risk to this move. If players hold the button before the two fades, it may make the player's kart falter, and takes a few seconds to get back up to normal speed. If the player holds the {{button|ds|A}} after the second "ding" sound is heard and end, the player can get a boost that is a little faster than the normal small boost. | |||
===Drifting and powersliding=== | |||
[[File:Powersliding1.png|thumb|[[Yoshi]] powersliding at Figure-8 Circuit.]] | |||
In the entire ''Mario Kart'' series, players [[drift]] by holding the {{button|ds|R}} button on a turn. Gray wisps come out of their kart as they turn around corners, possibly tighter or better than normal turning. | |||
The next step up is powersliding. While drifting, players can move the {{button|ds|pad}} Control Pad right and left repeatedly to produce sparks behind the kart. If done correctly, the sparks change their colors and intensity from blue to orange on each alternated move. After the sparks turn orange, the player releases the {{button|ds|R}} button to stop drifting and release a brief [[Mini-Turbo]] after powersliding. This can be used to dodge [[Spiny Shell (blue)|Spiny Shell]] if combined with a [[Hop (move)|hop]] only during 100cc and 150cc races. | |||
A player can perform a useful technique known as [[Mini-Turbo#Snaking|snaking]] by performing consecutive mini-turbos in a zigzagged direction, which offers a player the boost they need to get further ahead. This technique is much easier to perform with karts with higher handling, especially with [[Dry Bones]]. | |||
===Slipstreaming=== | |||
Back from ''Mario Kart 64'', [[Slipstream]]ing is simply moving just behind another player. If racers can stay behind their opponent's vehicle for about four seconds, players get a momentary speed boost that is strong enough to pass the other player. | |||
==Multiplayer== | |||
The multiplayer mode allows up to eight players to play either by multi-card (Normal) or by Download Play (Simple) mode. | |||
In Normal mode, players can select any character and kart combination they have unlocked. They can also pick any track that any Game Card has unlocked. | |||
In Simple mode, players can only select courses from the Mushroom Cup and the Shell Cup. Only three of the battle courses are available—[[Nintendo DS (battle course)|Nintendo DS]], [[Tart Top]] and [[Pipe Plaza]]—which are always selected by the game at random. Download Play participants are forced to play as Shy Guy, whose color is selected by the game randomly. This applies even if everyone in the room has the game. | |||
==Options== | |||
{{multiple image|align=right|direction=horizontal|footer_align=center|footer=The emblem maker can be used to make a variety of designs, for example this picture of Mario.|image1=MKDS Mario Emblem Maker.png|alt1=Emblem maker|width1=100|image2=MKDS Mario Custom Emblem.png|alt2=Emblem with Mario|width2=32|caption2=Result}} | |||
In the options menu, the player can select "Settings", "Edit", or "Erase Data". Under "Settings", the sound output can be changed between stereo, headphones, and surround and the "Locate Friend" feature can be togged on or off. "Locate Friend" notifies the player about friends who are seeking opponents while connected to the internet. Under "Edit", the player can change their nickname and make their own emblem for racing throughout the game. They also have an option to make the emblem show up on the kart they are driving. Additionally, this emblem shows up next to a player's name while driving in a multiplayer or Nintendo WFC race. "Erase Data" clears all save data. | |||
{{br}} | |||
==Gallery== | |||
{{main-gallery}} | |||
<gallery> | |||
MKDS Mario and B Dasher Cover Artwork.png|[[Mario]] in his [[B Dasher]] | |||
MKDS Luigi Poltergust 4000 Artwork.png|[[Luigi]] driving his [[Poltergust 4000]] | |||
Princess Peach Spiny Shell Artwork - Mario Kart DS.png|[[Princess Peach|Peach]] driving her [[Royale]] holding a [[Spiny Shell]] | |||
MKDS Donkey Kong Rambi Rider Artwork.png|[[Donkey Kong]] driving his [[Rambi Rider]] with [[Triple Red Shells]] | |||
MKDS Brute Artwork.jpg|[[Wario]] driving his [[Brute]] | |||
LakituMKDD.jpg|[[Lakitu (Mario Kart referee)|Lakitu]], holding up the Final Lap sign. | |||
</gallery> | |||
==Media== | |||
{{main-media}} | |||
{{media table | |||
|file1=MKDS-Music-CircuitTheme.oga | |||
|title1=Figure 8 Circuit/Mario Circuit | |||
|description1=The main circuit theme | |||
|length1=0:30 | |||
|file2=MKDS-Music-WaluigiPinball.oga | |||
|title2=Waluigi Pinball/Wario Stadium | |||
|description2=Waluigi Pinball/Wario Stadium theme | |||
|length2=0:29 | |||
|file3=MKDS-Music-RainbowRoad.oga | |||
|title3=Rainbow Road | |||
|description3=Rainbow Road theme | |||
|length3=0:30 | |||
}} | |||
==Pre-release and unused content== | |||
{{Main|List of Mario Kart DS pre-release and unused content}} | |||
There were three unused items: the [[Chain Chomp]], [[Bowser's Shell]], and a purple [[Shell|Koopa Shell]], although the Chain Chomp was the only one found in the item roulette. The Chain Chomp would have likely functioned the same as in ''[[Mario Kart: Double Dash!!]]''. | |||
[[Professor Elvin Gadd]] was planned to be playable and would have had the [[Poltergust 4000]] as his kart. Birdo may have also be planned as a playable character as there is a pink version of the [[Egg 1]] found in the data. | |||
==Glitches== | |||
{{Main|List of Mario Kart DS glitches}} | |||
===Choco Mountain boulder glitch=== | |||
In Choco Mountain, if the player goes to the lake and the water splashes before they fall, the boulder should hit them. If done correctly, they should start flying. The screen will then turn black as if they fell into the water. Lakitu will then pick them up. This glitch rarely works after the first time it is performed. | |||
===Mini-Spin turn item glitch=== | |||
To perform this glitch, the player must drive towards an item box in any mode (battle mode is preferred) and sit themselves right in the center where it appears so that they continuously break it open when it appears again. Then, the player should hold either left or right on {{button|ds|Pad}}. When the item box appears again, it will break as usual, and the player will turn a very small amount in the direction pressed. Given time, so long as the player doesn't move, the player can turn all the way round in the direction pressed. | |||
===Pipe Plaza Bob-omb glitch=== | |||
In Pipe Plaza, if the player has a [[Bob-omb]] and drops it near one of the pipe holes, another player or a CPU should hit the Bob-omb. If done correctly, the player should go through the pipe hole and they will fall. Lakitu will pick the player up as usual. This can also be done with a [[Super Star|Star]], but is harder to pull off. | |||
==Staff== | |||
{{main|List of Mario Kart DS staff}} | |||
A few staff members from ''Mario Kart: Double Dash!!'' returned to work on this game, including Hirotake Ohtsubo and Yoshihisa Morimoto as course designers and Yasuyuki Oyagi as one of the directors. Hiromu Takemura, who also worked as a course designer for ''Double Dash!!'' and a map designer for ''[[Super Mario Sunshine]]'', led as the course director. [[Hideki Konno]] returns as a producer after being absent from ''Double Dash!!''{{'}}s development. [[Shigeru Miyamoto]] served as the general producer and [[Satoru Iwata]] served as the executive producer. | |||
==Reception== | |||
''Mario Kart DS'' received critical acclaim. It currently maintains a 9.2 average at [http://www.gamestats.com/objects/682/682877/index.html Gamestats], the highest score for a Nintendo DS game on the site (as of December 2006). | |||
[http://ds.gamespy.com/nintendo-ds/mario-kart-ds/667164p1.html Gamespy] reviewer Bryn Williams said that online, Nintendo "trimmed it back a little too much for my liking", but was certain that "Even with a few online flaws, this is the best ''Mario Kart'' ever." With a rank of 5 out of 5 and describing the multiplayer experience as "great". | |||
[http://www.gamespot.com/ds/driving/mariokartds/review.html GameSpot] reviewer Justin Calvert had similar quips with the online feature: "Whether these opponents were leaving voluntarily or because of network problems is anybody's guess, but it's equally irritating either way." He finished up similarly by saying "''Mario Kart DS'' is without a doubt one of the best games to hit the Nintendo DS to date." ''Mario Kart DS'' received a score of 9.2 out of 10 and was regarded as GameSpot's Editor's Choice and DS game of the year. | |||
[http://ds.ign.com/articles/666/666125p1.html IGN] gave an overall score of 9.5 out of 10, granting the game the IGN Editor's Choice Award and DS game of the year. Reviewer Craig Harris commented that "it's just hard to ignore just how limited the online presentation is.", but ended the review with this: "The only way to finish this review is just to say it: this is the greatest Mario Kart game ever developed, and is without a doubt the best DS game of 2005." | |||
{| class="wikitable reviews" | |||
!colspan="4"style="font-size:120%; text-align:center; background-color:silver;"|Reviews | |||
|-style="background-color:#E6E6E6" | |||
|Release | |||
|Reviewer, Publication | |||
|Score | |||
|Verdict | |||
|- | |||
|[[Nintendo DS]] | |||
|Bryn Williams, [http://ds.gamespy.com/nintendo-ds/mario-kart-ds/667164p1.html Gamespy] | |||
|5/5 | |||
|"''In the end, it really boils down to this. If you're a fan of Nintendo, racing games, and want some of the best digital excitement 2005 has to offer, you need to get Mario Kart DS. The online shortcomings are annoying, yes, but very minor, and they are more than made up for by the amazing single-player content and local WiFi gameplay. If you absolutely hate, hate, hate karting games, then fair enough. Just be sure to book that next appointment with your shrink to figure out why that is.''" | |||
|- | |||
|[[Nintendo DS]] | |||
|Justin Calvert, [https://www.gamespot.com/reviews/mario-kart-ds-review/1900-6139765/ GameSpot] | |||
|9.2/10 | |||
|"''Mario Kart DS is without a doubt one of the best games to hit the Nintendo DS to date. The game plays every bit as well as any of its predecessors, and adds just enough new features to the mix to make it worthy of your attention, even if you're still playing any of those games on a regular basis. The online play is undoubtedly the icing on an especially yummy cake, and even if you're not in a position to sample said icing, a yummy cake without icing is still a yummy cake.''" | |||
|- | |||
|[[Nintendo DS]] | |||
|Craig Harris, [http://ds.ign.com/articles/666/666125p1.html IGN] | |||
|9.5/10 | |||
|"''After experiencing Mario Kart DS, it's hard to imagine how Nintendo's going to improve on what they've done for this stunning portable rendition. There's so much gameplay and depth in this design, moreso than the series has ever had in the past. It's an amazingly addictive racer both in single and multiplayer modes, and even with the limitations of the online functions, it's impossible to avoid becoming addicted to the long distance Mario Kart match-ups. The only way to finish this review is just to say it: this is the greatest Mario Kart game ever developed, and is without a doubt the best DS game of 2005.''" | |||
|- | |||
|[[Nintendo DS]] | |||
|Jeremy Parish, [https://web.archive.org/web/20060216140611/http://www.1up.com/do/reviewPage?cId=3145630&did=1 1UP] | |||
|8.7/10 | |||
|"''Everything about MKDS comes together into a surprisingly compelling package, a portable racing game on par with anything ever to appear on a console. Even for a skeptic like me. Like the victor of a tough kart race, MKDS has come from behind against steep odds to snatch the gold from the clutches of cynicism.''" | |||
|- | |||
!colspan="4"style="font-size:120%; text-align:center; background-color:silver;"|Aggregators | |||
|-style="background-color:#E6E6E6" | |||
|colspan=2|Compiler | |||
|colspan=2|{{nw|Platform / Score}} | |||
|- | |||
|colspan=2|Metacritic | |||
|colspan=2 style="background-color:LimeGreen"|[https://www.metacritic.com/game/ds/mario-kart-ds 91] | |||
|- | |||
|colspan=2|GameRankings | |||
|colspan=2|[https://www.gamerankings.com/ds/920788-mario-kart-ds/index.html 91.43%] | |||
|} | |||
== | ===Sales=== | ||
''Mario Kart DS'' is the 3rd best selling game for the [[Nintendo DS]], selling 23.60 million copies worldwide. | |||
==References to other games== | ==References to other games== | ||
*''[[Super Mario Bros. 3]]'': The | *''[[Super Mario Bros. 3]]'': The course [[DS Airship Fortress|Airship Fortress]] is based of the many airship based levels in this game. [[DS Desert Hills|Desert Hills]] is based on World 2 of this game, even featuring the [[Angry Sun]], [[Lava Bubble|Podoboo]]s, [[Fire Snake|Firesnake]]s, the pyramid, and two pipe formations taken from a level in this world. [[List_of_boss_arenas_in_Mario_Kart_DS#Water Arena|Water Arena]] and [[List_of_boss_arenas_in_Mario_Kart_DS#Sand Arena|Sand Arena]] use various objects from this game. A sprite of Mario and Luigi's heads appear on the Single Player and VS. mode bars. | ||
*''[[Super Mario | *''[[Super Mario Kart]]'': [[SNES Mario Circuit 1|Mario Circuit 1]], [[SNES Donut Plains 1|Donut Plains 1]], [[SNES Koopa Troopa Beach 2|Koopa Beach 2]], and [[SNES Choco Island 2|Choco Island 2]] return as retro courses. | ||
*''[[Donkey Kong Country]]'': The Rambi Rider is based off [[Rambi]] from this game. | |||
*''[[Donkey Kong Country]]'': The Rambi Rider is based off [[ | *''[[Super Mario 64]]'': The course [[DS Tick-Tock Clock|Tick-Tock Clock]] is based off of the [[Tick Tock Clock|level]] of the same name in this game. | ||
*''[[Super Mario 64]]'': The | *''[[Mario Kart 64]]'': [[N64 Moo Moo Farm|Moo Moo Farm]], [[N64 Frappe Snowland|Frappe Snowland]], [[N64 Choco Mountain|Choco Mountain]], and [[N64 Banshee Boardwalk|Banshee Boardwalk]] return as retro courses, and [[Block Fort]] returns as a playable battle course. Also, the name "[[Wario Stadium]]" is reused. Lastly, part of the credits theme from this game is used in the second part of the credits when Mirror Special Cup or Lightning Cup is beat in first place and the eight playable characters that are available from the start are taken from the eight playable characters in this game, including the same eight colored karts. | ||
*''[[Mario Kart 64]]'': [[Moo Moo Farm]], [[Frappe Snowland]], [[Choco Mountain]], and [[Banshee Boardwalk]] return as retro courses, and [[Block Fort]] returns as a playable battle course. Also, the name "[[ | *''[[Donkey Kong 64]]'': Donkey Kong's voice clips are reused in the Beta Kiosk Demo of this game, but not in the final version. | ||
*''[[Mobile Golf]]'': The | *''[[Mobile Golf]]'': The Gold Mantis is based off [[Foreman Spike]]'s excavator from his artwork for this game. | ||
*''[[Mario Kart: Super Circuit]]'': [[Peach Circuit]], [[Bowser Castle 2 | *''[[Mario Kart: Super Circuit]]'': [[GBA Peach Circuit|Peach Circuit]], [[GBA Bowser's Castle 2|Bowser Castle 2]], [[GBA Luigi Circuit|Luigi Circuit]], and [[GBA Sky Garden|Sky Garden]] return as retro courses. Also, the eight playable characters in this game were reused as the starting characters. The [[Lightning Cup]] returns as the highest-tier retro cup. The multiplayer-only Shy Guys and their kart share their statistics with Yoshi, similar to the multiplayer-only colored Yoshis from this game. | ||
*''[[Wario Land 4]]'': The | *''[[Wario Land 4]]'': The Brute is based off the Wario Car in this game. | ||
*''[[Luigi's Mansion]]'': The Poltergust 4000 is based off the Poltergust 3000 from this game. Also a | *''[[Luigi's Mansion]]'': The Poltergust 4000 is based off the Poltergust 3000 from this game. Also a [[DS Luigi's Mansion|course]] of the same name is based on this game. | ||
*''[[Super Mario Sunshine]]'': The | *''[[Super Mario Sunshine]]'': The course [[DS Delfino Square|Delfino Square]] is based off the main area of this game, [[Delfino Plaza]]. Piantas also appear as spectators in this course. | ||
*''[[Mario Kart: Double Dash!!]]'': [[Luigi Circuit | *''[[Mario Kart: Double Dash!!]]'': [[GCN Luigi Circuit|Luigi Circuit]], [[GCN Baby Park|Baby Park]], [[GCN Mushroom Bridge|Mushroom Bridge]], and [[GCN Yoshi Circuit|Yoshi Circuit]] return as retro courses, and [[Pipe Plaza]] returns as a playable battle course. Also, Wario Stadium seems to use elements from [[GCN Waluigi Stadium|Waluigi Stadium]]. Some sound effects and some of the playable characters' voice clips are also taken from this game, and the character icons from the character select menu are used at the end of a Grand Prix race and a VS. match. The 3-2-1 starting countdown is also taken from this game, and it has appeared in every recurring game since then. | ||
*''[[Super Mario 64 DS]]'': | *''[[Super Mario 64 DS]]'': All of the bosses, with the exception of King Whomp, return from this game. Mario, Luigi, Wario, and Yoshi also have voice clips recycled from this game. | ||
*''[[Donkey Kong Jungle Beat]]'': Many of Donkey Kong's voice clips are recycled from this game. | |||
==References in later games== | ==References in later games== | ||
*''[[New Super Mario Bros.]]'': The [[Blooper]]'s design and the [[Dash Mushroom|Dash]]/[[Super Mushroom]]'s menu design return for the first time in this game and become their standard designs in subsequent games. | |||
*[[Nintendo Monopoly]]: The kart design on the space Mario Kart, the [[? Block]] card "Take a spin in the Kart", and on the [[Brick Block]] card "Renew kart license" is the same from this game. | *[[Nintendo Monopoly]]: The kart design on the space Mario Kart, the [[? Block]] card "Take a spin in the Kart", and on the [[Brick Block]] card "Renew kart license" is the same from this game. | ||
*''[[Mario Kart Wii]]'': [[Yoshi Falls]], [[Delfino Square]], [[Desert Hills]], and [[Peach Gardens]] appear as | *''[[Super Smash Bros. Brawl]]'': Waluigi Pinball's theme is used as a song arrangement. | ||
*''[[Mario Kart Wii]]'': [[DS Yoshi Falls|Yoshi Falls]], [[DS Delfino Square|Delfino Square]], [[DS Desert Hills|Desert Hills]], and [[DS Peach Gardens|Peach Gardens]] appear as classic race courses. [[DS Twilight House|Twilight House]] is a classic battle course. The item roulette and countdown chimes were reused in this game. | |||
*''[[Mario Sports Mix]]'': Waluigi owns a pinball-themed course in this game, [[Waluigi Pinball (court)|Waluigi Pinball]]. | *''[[Mario Sports Mix]]'': Waluigi owns a pinball-themed course in this game, [[Waluigi Pinball (court)|Waluigi Pinball]]. | ||
*''[[Mario Kart 7]]'': [[Luigi's Mansion | *''[[Mario Kart 7]]'': [[DS Luigi's Mansion|Luigi's Mansion]], [[DS Waluigi Pinball|Waluigi Pinball]], [[DS DK Pass|DK Pass]], and [[DS Airship Fortress|Airship Fortress]] appear as classic race courses. [[DS Palm Shore|Palm Shore]] is a classic battle course. Also the design of the standard kart is similar but has a rounder appearance. Also, part of the credits theme is similar to that in ''Mario Kart DS'', the karts B Dasher and Egg 1 re-appear too. The item roulette and countdown chimes were reused in this game once again. | ||
*''[[Mario Kart Arcade GP DX]]'': | *''[[Mario Kart Arcade GP 2]]'': Several character-exclusive karts greatly resemble ones present in this game. | ||
*''[[Mario Kart 8]]'': [[Cheep Cheep Beach]], [[Wario Stadium | *''[[Mario Kart Arcade GP DX]]'': Some of the character-exclusive karts present in ''Mario Kart Arcade GP 2'' return in this game. | ||
**''[[Mario Kart 8 Deluxe]]'': An arrangement of the | *''[[Mario Kart 8]]'': [[DS Cheep Cheep Beach|Cheep Cheep Beach]], [[DS Wario Stadium|Wario Stadium]], and [[DS Tick-Tock Clock|Tick-Tock Clock]] return as classic race courses. The [[B Dasher]] returns as one of the four karts included in the [[The Legend of Zelda x Mario Kart 8|first DLC pack]]. | ||
*''[[Super Smash Bros. for Nintendo 3DS / Wii U]]'': Rainbow Road's theme is used in the "Rainbow Road Medley" arrangement. | |||
*''[[Mario Kart 8 Deluxe]]'': An arrangement of the music for Luigi's Mansion is used in {{classic-link|GCN|Luigi's Mansion}}. [[DS Shroom Ridge|Shroom Ridge]], [[DS Waluigi Pinball|Waluigi Pinball]], [[DS Peach Gardens|Peach Gardens]], and [[DS Mario Circuit|Mario Circuit]] reappear as classic courses in the ''[[Mario Kart 8 Deluxe – Booster Course Pass|Booster Course Pass]]''. | |||
*''[[Super Smash Bros. Ultimate]]'': The [[B Dasher]] appears as a spirit. | |||
*''[[Mario Kart Tour]]'': [[DS Luigi's Mansion|Luigi's Mansion]], [[DS Waluigi Pinball|Waluigi Pinball]], [[DS Shroom Ridge|Shroom Ridge]], [[DS DK Pass|DK Pass]], [[DS Mario Circuit|Mario Circuit]], [[DS Airship Fortress|Airship Fortress]] and [[DS Peach Gardens|Peach Gardens]] return as classic race courses. All of this game's [[classic course]]s also return except for {{classic-link|N64|Moo Moo Farm}}, {{classic-link|GCN|Luigi Circuit}} and {{classic-link|N64|Banshee Boardwalk}}. [[DS Twilight House|Twilight House]] returns as a classic battle course. The [[B Dasher]], [[Poltergust 4000]], [[Streamliner]], [[Royale]], [[Egg 1]], [[Mushmellow]], [[Rambi Rider]] and [[Dragonfly]] return as karts. Challenges with unique objectives return as the fourth and final race in every cup. | |||
==Names in other languages== | ==Names in other languages== | ||
| Line 2,479: | Line 6,826: | ||
==Trivia== | ==Trivia== | ||
*This | *This and ''[[Mario Kart Tour]]'' are the only ''Mario Kart'' games in which [[Lakitu (Mario Kart referee)|Lakitu]] does not start the races. | ||
*If the game is played on the original DS, Mario says | *If the game is played on the original Nintendo DS, Mario says "Yahoo!" on the Nintendo logo screen, but if it is played on the DS Lite, DSi, 3DS, or Wii U, he instead says "Here we go!"<ref>[https://www.youtube.com/watch?v=bQGiv60MopE Mario Kart DS (Wii U) - 150cc - Grand Prix: All Cups & End Credits (1080p60fps)] ''YouTube''. Retrieved October 11, 2015</ref><ref>For comparison, [https://www.youtube.com/watch?v=RB1QP8Zun7g here] is the game on a normal DS.</ref> | ||
*''Mario Kart DS'' is one of the few games | *''Mario Kart DS'' is one of the few Nintendo DS games with a "Language Block", meaning that the in-game language (except Japanese) is the same as that of the Nintendo DS system. Japanese is the only language available for ''Mario Kart DS'' releases in Japan. | ||
*On page 12 of the ''Mario Kart DS'' instruction booklet, the text for the [[Blooper]] reads, "Sprays ink on the all of the karts in front of you", where there is an erroneous "the" between "on" and "all". Earlier versions of the instruction booklet also featured a misspelling of "perform" as "perfprm" on page 9, but this was fixed in later releases of the booklet. | |||
==References== | ==References== | ||
| Line 2,487: | Line 6,835: | ||
==External links== | ==External links== | ||
*[http://www.mariokart.com/mkds/launch/index.html Official ''Mario Kart DS'' website (North America)] | {{NIWA|StrategyWiki=1}} | ||
*[ | *[https://web.archive.org/web/20051125012938/http://www.mariokart.com/mkds/launch/index.html Official ''Mario Kart DS'' website (North America)] | ||
*[https://www.nintendo.co.jp/ds/amcj/ Official ''Mario Kart DS'' website (Japan)] | |||
{{MKDS}} | {{MKDS}} | ||
{{ | {{Super Mario games}} | ||
{{DS}} | {{DS}} | ||
{{ | {{Virtual Console}} | ||
[[de:Mario Kart DS]] | [[de:Mario Kart DS]] | ||
[[it:Mario Kart DS]] | [[it:Mario Kart DS]] | ||
[[Category:Mario Kart DS|*]] | [[Category:Mario Kart DS|*]] | ||
[[Category:Games]] | [[Category:Games]] | ||
[[Category:Nintendo DS | [[Category:Nintendo DS games]] | ||
[[Category:Racing | [[Category:Racing games]] | ||
[[Category:2005 games]] | [[Category:2005 games]] | ||
[[Category:2007 games]] | [[Category:2007 games]] | ||
[[Category:Games with Wi-Fi Connection]] | [[Category:Games with Nintendo Wi-Fi Connection]] | ||
Latest revision as of 11:29, June 12, 2024
| Mario Kart DS | |||||||||||
|---|---|---|---|---|---|---|---|---|---|---|---|
 For alternate box art, see the game's gallery. | |||||||||||
| Developer | Nintendo EAD | ||||||||||
| Publisher | Nintendo | ||||||||||
| Platform(s) | Nintendo DS, Virtual Console (Wii U) | ||||||||||
| Release date | Nintendo DS: Virtual Console (Wii U): | ||||||||||
| Language(s) | Deutsch English (United States) Español (España) Français (France) Italiano 한국어 日本語 | ||||||||||
| Genre | Racing | ||||||||||
| Rating(s) |
| ||||||||||
| Mode(s) | Single player Local Wireless Play: 2–8 players Wi-Fi Connection: 2-4 players | ||||||||||
| Format | Wii U: Nintendo DS:
Game Card
| ||||||||||
| Input | Wii U: Nintendo DS:
| ||||||||||
Mario Kart DS is a racing game in the Mario Kart series for the Nintendo DS, developed and published by Nintendo. Mario Kart DS was released first in North America, on November 14, 2005, and is the only mainline Mario Kart game to be released first in North America. Unlike its predecessor, Mario Kart: Double Dash!!, it retains the traditional single-driver kart racing elements in the Mario Kart series, where players race against seven competitors in obstacle tracks, using item-based weaponry to gain further advantages over their opponents. It is the first handheld Mario Kart title to use live-rendered 3D graphics for most of the objects in the game, including characters, vehicles, and racetracks.
Mario Kart DS expands and introduces mechanics that would later become the standard in future titles, most notably the Retro Grand Prix, and the advent of retro courses in general, that revamps tracks from all previous titles from the Mario Kart series. Mario Kart DS supports both single pak and multi-pak gameplay via DS Download Play, and is the first Super Mario title to support Nintendo Wi-Fi Connection, allowing players to race against opponents by using online services across the world. On May 20, 2014, the Nintendo Wi-Fi Connection has been discontinued, making online play no longer possible.
Mario Kart DS has its own mechanics that are not available in other Mario Kart games, such as customizing emblems for the vehicles, and the Missions mode, in which racers are tasked to complete objectives in a short series of events. The game also makes use of the Nintendo DS's features, using the bottom screen to display other HUD elements such as two types of maps, character order, and what items their opponents have.
On April 23, 2015, Mario Kart DS became available for purchase for the Wii U's Virtual Console service via the Nintendo eShop until March 27, 2023 after the service's discontinuation. Players who purchased the title before this date can still play it as long as it is on their Wii U device. The Virtual Console version is only playable in single-player mode.
Controls
Menu controls
 - Scroll
 - Select
 - Back
 - Tap selection
Race controls
- - Accelerate/Rocket Start (hold at 2 during the countdown before the race starts)
- - Brake/reverse
 /
/ - Use current Item/Stop Item Roulette/Equip Item
 - Steer
- / +
 - Throw items backward or forward.
  - Hop/Powerslide/Drift (Hold)/Mini-Turbo (Release)
- /
 - Change map view (does not work in Mission Mode)
  - Pause/resume game
 - Blow Balloon (Balloon Battle), Toggle arrows/Mushrooms on/off (Time Trial)
 - Blow Balloon (Balloon Battle)
Wii U Menu controls
 - Scroll
 - Select
 - Back
 - Tap selection
Wii U Race controls
- - Accelerate/Rocket Start (hold at 2 during the countdown before the race starts)
- - Brake/reverse
 /
/ - Use current Item/Stop Item Roulette/Equip Item
- - Steer
- - Throw items backward or forward.
 - Hop/Powerslide/Drift (Hold)/Mini-Turbo (Release)
- /
 - Change map view (does not work in Mission Mode)
  - Pause/resume game
 - Blow Balloon (Balloon Battle), Toggle arrows/Mushrooms on/off (Time Trial)
 - Blow Balloon (Balloon Battle)
Game modes

As in Mario Kart 64 and Mario Kart: Double Dash!!, the game introduced sixteen courses for the four main cups: Mushroom Cup, Flower Cup, Star Cup, and Special Cup, which are collectively known as the nitro cups. The game also includes sixteen courses that appeared in earlier Mario Kart games and are part of the retro cups: Shell Cup, Banana Cup, Leaf Cup, and the Lightning Cup. These cups are sorted by difficulty in the same way as the nitro cups.
In every retro cup, each of the four courses originate from a different Mario Kart game. Every retro cup has their courses ordered in the same way as the release order of the four previous Mario Kart games. Furthermore, every retro course's name starts with an abbreviation of the game console that their originating game was released for:
- SNES, which represents Super Mario Kart
- N64, which represents Mario Kart 64
- GBA, which represents Mario Kart: Super Circuit
- GCN, which represents Mario Kart: Double Dash!!
Starting with the following Mario Kart game, Mario Kart Wii, stages originating from Mario Kart DS were included as retro courses and were represented by the abbreviation "DS".
Grand Prix
Grand Prix is a single player-exclusive mode. In it, a player competes in each cup in 50cc, 100cc, 150cc, and Mirror 150cc engine classes, with ascending speed and difficulty. The game reuses the point system of Mario Kart: Double Dash!! by awarding 10/8/6/4/3/2/1/0 points for first to eighth place respectively. Similarly to Mario Kart: Super Circuit, a rating of how well a player performed is shown after the trophy presentation, from highest to lowest: ★★★, ★★, ★, A, B, C, D and E. An overall "game ranking" of ★, ★★, or ★★★ is shown in the Records area if the player has earned the designated rating in every cup and class.
Time Trial
Time Trial is a single player-exclusive mode. In it, the player's character races to complete a course in the fastest time. The item rating of a kart determines how many Mushrooms the racer can have once they start the race; vehicles with low item rate can only use one Mushroom; the ones with average item rate use two and the ones with high item rate use three. Players can choose to race against their best time as a Ghost, the Staff Ghost (raced by a Japanese Nintendo staff player with a * game ranking), or no Ghost. The game can download records from other players, allowing the player's character to race their Ghosts.
VS
In VS mode (single or multiplayer), player(s) choose their Karts and head out on the race track. They can earn points based of their finish position in each race. The player can also choose what course they race on (provided they've unlocked it). Up to eight players can play locally via wireless - simple mode only uses one game card but is limited. The essential requirement is that everyone has a DS or 3DS system. In VS mode, the player can choose the engine class, the CPU's difficulty level, the way the courses will be chosen - by the player, in order or random; the rules to win races (either free - infinite races; number of wins from 1 to 10 - where only the first racer earns points, or the number of races from 1 up to 32 (functions similarly to the All-Cup Tour from Mario Kart: Double Dash!), and team race mode.
It is possible to have up to eight players play using just one Mario Kart DS game card - using the DS Download Play locally. Here, only the Mushroom Cup and Shell Cup tracks are playable, and everyone except the host must play as a random color of Shy Guy, in which he becomes playable then. If everyone has a game card, all tracks are available and there are no limitations.
When playing in VS races where players place for a set number of races rather than for a set number of wins, players score points based off their finish position. If the game is being played in teams, the amount of points each player earns for each race is multiplied by about 1.5. The point system is the same as the one used in Wi-Fi when playing with 2-4 players and the one used in Grand Prix when playing with 8 players or with CPU opponents. However, when playing with 5-7 players, the distribution is as follows:
| Point spread | ||||||||
|---|---|---|---|---|---|---|---|---|
| Number of players | 1st | 2nd | 3rd | 4th | 5th | 6th | 7th | 8th |
| 2 players | 10 | 5 | - | - | - | - | - | - |
| 3 players | 10 | 7 | 4 | - | - | - | - | - |
| 4 players | 10 | 7 | 4 | 1 | - | - | - | - |
| 5 players[2] | 10 | 8 | 5 | 2 | 0 | - | - | - |
| 6 players[3] | 10 | 8 | 6 | 3 | 1 | 0 | - | - |
| 7 players[4] | 10 | 8 | 6 | 4 | 2 | 1 | 0 | - |
| 8 players | 10 | 8 | 6 | 4 | 3 | 2 | 1 | 0 |
- Blue text indicates winning results.
- Green text indicates moderate results.
- Black text indicates losing results.
Battle
In Battle mode, there are six battle stages, four of which are original and two of which are from earlier Mario Kart games:
* - Not playable in the simple version of multiplayer mode.
In single player mode, the user faces CPU controlled racers, whose difficulty can be set in the battle's setup menu. All racers drive their respective standard Kart only within this mode (note that all the standard karts have the same stats in battle mode and only the weight will differ, depending on the weight of the character chosen). Additionally, other players can join a battle locally. However, Battle Mode is unavailable on the Wi-Fi mode. Like in versus, battles can also be played in teams, and rounds in team battles end when all of one team's players have been eliminated.
Mario Kart DS is the only Mario Kart game to exclude console abbreviations from the names of its retro battle courses; in other words, the game does not name Block Fort and Pipe Plaza as N64 Block Fort and GCN Pipe Plaza respectively. Additionally, the retro battle courses do not retain their music from their original appearances, instead using the same music as the nitro battle courses.
Balloon Battle

The classic battle mode seen in all Mario Kart mainstream, gets a new twist in Mario Kart DS. From previous games, racers begin a match with three balloons. In this game, however, all players begin with a single balloon, though they can get more by blowing up their balloons using the microphone feature on the DS, or just holding the ![]() button. Each player has four balloons in stock (five in total) and racers can hold up to three balloons in battle. On the other hand, the less balloons a player has, the more powerful items they will obtain from the Item Boxes. Racers may also take possession of a balloon from their opponents if the thief has used a Mushroom and made contact to the opponent's kart. If the player loses all their balloons they are eliminated.
button. Each player has four balloons in stock (five in total) and racers can hold up to three balloons in battle. On the other hand, the less balloons a player has, the more powerful items they will obtain from the Item Boxes. Racers may also take possession of a balloon from their opponents if the thief has used a Mushroom and made contact to the opponent's kart. If the player loses all their balloons they are eliminated.
The following is what the game describes this mode as:
Burst your opponents' balloons with items! If all your inflated balloons burst, you lose! Blow into the mic to inflate your balloons!
Shine Runners
Adopted from the Mario Kart: Double Dash!! version, nine Shine Sprites are scattered onto the course at the beginning. Players need to capture the Shine Sprites, and to avoid being hit, as it causes a player to lose one sprite. The sprite then moves to a random spot for someone else to grab. In the meantime, a clock ticks down to zero. Anyone with or tied with the lowest Shine total when the clock hits zero is eliminated. The clock resets itself to a lower time and the battle continues until at least one is left (there are nine sprites to avoid a tie, but it is possible to have two players with four sprites each or four players with two sprites each or all eight players with one sprite each trying to get that last one on the course when time expires, or have three players with three sprites each; in either case, no one is eliminated and the clock resets as usual). The less sprites a player has, the better an item is obtained (Spiny Shells and Bullet Bills remain out). Shine Runners is almost the same as Coin Runners in Mario Kart Wii, Mario Kart 7 and Mario Kart 8 Deluxe, but instead of Shine Sprites, they use coins.
Collect more Shines than anyone else! Steal opponents' Shines to add to your total. Those with less Shines get booted over time.
Missions

Missions mode is a new single-player mode for Mario Kart DS in which the player must complete some tasks and earn a ranking similarly to that in Grand Prix mode. It involves seven levels, each containing eight "missions" and a boss battle, most of which are taken from Super Mario 64 DS. The ranks almost always depend on how much time is left or taken. There are varying mission types:
- Driving through gates - driving in between giant half wheels in the ground. Very often the player has to pass these gates in numerical order.
- Collecting coins - Players must pick up all the coins set in the track. Players may lose these coins by some obstacle of such course.
- Destroying item boxes - Players must run over Item Boxes. Usually the racer will obtain Mushrooms after taking a box. In some cases, Item Boxes will move, and the player will have to catch up with it. Other missions the player must take care not to pick up the Fake Item Boxes alongside real ones.
- Using Stars, Bob-ombs, or shells to destroy enemies.
- Driving backwards - players must use the button to move, and directions on the are reversed. It is sometimes combined with other mission types.
- Performing power boosts within a certain lap - as said. More power boosts are often required to finish faster, meaning a higher ranking.
- Racing a CPU player for one lap - item boxes contain Mushrooms and Stars that the CPU cannot use - the key to win. CPU players will always perform a Rocket Start. This mission type also includes a race against a Red Car and a Chain Chomp.
- Boss Battle - Unlocked after completion of the first eight missions in a level. The racer is usually required to use items in boss battles. Every boss is from Super Mario 64 DS, and each of them have their own battlefield stage and require a different strategy to defeat.
There are some one-time isolated missions that are self-explanatory. Each mission takes place on a course, often blocked off in some areas (sometimes even a battle course) and players are given a character in their own standard kart (CPU players are also in standard karts). None of the unlockable characters are playable, and Bowser and Donkey Kong do not fight a boss. Sometimes Mushrooms are laid across the track to help the player to complete the mission. When at least a ★ ranking is achieved on all missions and bosses in the first six levels, Level 7 is unlocked. When the boss battles of Level 6 and 7 are completed, the first version of the staff credits is shown.
Missions table
The following table includes the mission number, in-game mission description, time limit for the mission (0:00 signifies it is a race, and the mission finishes at 2:00 if the race is not completed), course, character the player plays as, and item distribution used. For a list of the item sets used, see here. CPU opponents always use set 1.
| Level 1 | |||||
|---|---|---|---|---|---|
| Mission | Description | Time limit | Track | Character | Item set |
| 1-1 | Drive through all 5 numbered gates in order! | 0:35 | Figure-8 Circuit | Mario | N/A |
| 1-2 | Collect all 15 coins! | 0:30 | GBA Peach Circuit | Peach | N/A |
| 1-3 | Destroy all 10 item boxes! | 0:45 | Yoshi Falls | Yoshi | 2 |
| 1-4 | Get the Star and use it to hit 5 Cheep Cheeps! | 0:40 | Cheep Cheep Beach | Wario | 4 |
| 1-5 | Drive through all 6 numbered gates in order! | 0:30 | Nintendo DS | Toad | N/A |
| 1-6 | Drive out of the mansion...backward! | 0:45 | Luigi's Mansion | Luigi | N/A |
| 1-7 | Collect all 20 coins! | 0:35 | N64 Moo Moo Farm | DK | 3 |
| 1-8 | Perform 4 power-slide turbo boosts in 1 lap! | 0:45 | SNES Mario Circuit 1 | Mario | N/A |
| Boss | Use Mushrooms to crash into the Big Bully and knock him off the stage! | 3:00 | Water Arena* | Yoshi | 3 |
| Level 2 | |||||
| 2-1 | Crash into all 10 wooden crates and destroy every one! | 0:55 | Delfino Square | Wario | N/A |
| 2-2 | Collect all 10 coins! | 0:30 | Figure-8 Circuit | Yoshi | N/A |
| 2-3 | Drive through all 5 numbered gates in order! | 0:45 | SNES Donut Plains 1 | DK | N/A |
| 2-4 | Destroy all 5 item boxes! | 0:35 | Luigi's Mansion | Luigi | 2 |
| 2-5 | Collect all 20 coins! | 0:30 | Cheep Cheep Beach | Peach | N/A |
| 2-6 | Use Bob-ombs to destroy all 5 Pokeys! | 0:55 | Desert Hills | Wario | 9 |
| 2-7 | Drive through all 10 numbered gates in order! | 0:55 | GCN Luigi Circuit | Toad | 2 |
| 2-8 | Perform 6 power-slide turbo boosts in 3 laps! | 0:55 | GCN Baby Park | Peach | 4 |
| Boss | Hit the Eyerok's eyeball 3 times with shells! | 5:00 | Sand Arena* | Mario | 11 |
| Level 3 | |||||
| 3-1 | Destroy all 5 item boxes! | 0:50 | Waluigi Pinball | Wario | 4 |
| 3-2 | Drive through all 5 numbered gates in order...backward! | 0:50 | Delfino Square | Bowser | N/A |
| 3-3 | Collect all 15 coins while avoiding the Chain Chomp! | 0:25 | GCN Luigi Circuit | Luigi | N/A |
| 3-4 | Reach the finish before Yoshi! | 0:00 | Yoshi Falls | Peach | 8 |
| 3-5 | Drive through all 8 numbered gates in order! | 0:45 | GCN Pipe Plaza | Yoshi | N/A |
| 3-6 | Hit Monty Moles with shells 5 times! | 1:05 | N64 Moo Moo Farm | Luigi | 11 |
| 3-7 | Perform 10 power-slide turbo boosts in 1 lap! | 1:10 | Shroom Ridge | DK | N/A |
| 3-8 | Collect all 20 coins! | 1:05 | Twilight House | Mario | N/A |
| Boss | Reach the finish before Goomboss! | 0:00 | GCN Baby Park | Toad | N/A |
| Level 4 | |||||
| 4-1 | Reach the finish before Donkey Kong! | 0:00 | DK Pass** | Wario | 8 |
| 4-2 | Blast 20 crabs!1 | 2:00 | Palm Shore | Yoshi | 10 |
| 4-3 | Reach the finish before the red car! | 0:00 | Shroom Ridge | Mario | 3 |
| 4-4 | Drive through all 7 numbered gates in order! | 0:45 | Desert Hills | Wario | 3 |
| 4-5 | Collect all 15 coins. If you get squished by a Thwomp, you fail! | 0:30 | GBA Bowser Castle 2 | Bowser | N/A |
| 4-6 | Break all 10 item boxes while avoiding the Fake Items! | 1:10 | N64 Choco Mountain | DK | 2 |
| 4-7 | Drive through all 10 gates!2 | 0:45 | Waluigi Pinball | Toad | N/A |
| 4-8 | Perform 9 power-slide turbo boosts in 1 lap! | 1:00 | GBA Luigi Circuit | Luigi | N/A |
| Boss | Collect 50 coins while avoiding King Boo! | 5:00 | Lava Arena* | Peach | N/A |
| Level 5 | |||||
| 5-1 | Reach the finish before the stray Chain Chomp! | 0:00 | Peach Gardens | Peach | 3 |
| 5-2 | Drive backward and collect 15 coins! If you hit a snowman, you fail! | 0:30 | N64 Frappe Snowland | DK | N/A |
| 5-3 | Destroy all 5 item boxes! | 0:35 | SNES Koopa Beach 2 | Toad | 2 |
| 5-4 | Drive through all 10 numbered gates in order! | 1:05 | GBA Bowser Castle 2 | Bowser | N/A |
| 5-5 | Complete 1 lap in the opposite direction within the time limit! | 0:55 | GCN Mushroom Bridge | Mario | 2 |
| 5-6 | Collect all 18 coins! | 0:45 | Tart Top | Yoshi | N/A |
| 5-7 | Drive through all 8 numbered gates in order! | 0:45 | DK Pass** | Toad | N/A |
| 5-8 | Reach the finish before Mario! | 0:00 | Mario Circuit | Luigi | 8 |
| Boss | Hit the Big Bob-omb with 3 Bob-ombs! | 5:00 | Sand Arena* | Wario | 9 |
| Level 6 | |||||
| 6-1 | Drive backward across the spinning bridge! If you fall, you're out! | 0:30 | Bowser Castle | Bowser | N/A |
| 6-2 | Get Stars and run over 15 Rocky Wrenches! | 0:55 | Airship Fortress | Wario | 4 |
| 6-3 | Collect all 30 coins! | 0:45 | SNES Choco Island 2 | Yoshi | N/A |
| 6-4 | Destroy all 10 item boxes! | 2:00 | N64 Block Fort | Mario | 2 |
| 6-5 | Drive through all 8 numbered gates in order! | 0:50 | GBA Sky Garden | Peach | 3 |
| 6-6 | Perform 14 power-slide turbo boosts in 1 lap! | 1:00 | GCN Yoshi Circuit | Yoshi | N/A |
| 6-7 | Collect all 40 coins! | 1:30 | Tick-Tock Clock | Toad | N/A |
| 6-8 | Reach the finish before Peach! | 0:00 | Peach Gardens** | Bowser | 8 |
| Boss | Use Mushroom boosts to hit Chief Chilly and knock him off the stage 3 times! | 5:00 | Water Arena* | Luigi | 3 |
| Level 7 | |||||
| 7-1 | Perform 6 power-slide turbo boosts in 1 lap! | 1:00 | Rainbow Road | Peach | N/A |
| 7-2 | Reach the finish before Bowser! | 0:00 | Bowser Castle | Mario | 8 |
| 7-3 | Complete 2 laps within the time limit!3 | 1:30 | Tick-Tock Clock | DK | 3 |
| 7-4 | Use shells to defeat all 30 Goombas within the time limit! | 2:00 | Mario Circuit | Toad | 5 |
| 7-5 | Collect all 20 coins! | 0:55 | Wario Stadium | Wario | N/A |
| 7-6 | Drive through all 8 numbered gates in order! | 0:11 | Nintendo DS | Mario | N/A |
| 7-7 | Drive backward and collect all 12 coins! If you hit a burner, you fail! | 0:50 | Airship Fortress | Bowser | N/A |
| 7-8 | Break all 10 item boxes while avoiding the Fake Items! | 1:05 | N64 Banshee Boardwalk | Luigi | 2 |
| Boss | Reach the finish before Wiggler! | 0:00 | GCN Mushroom Bridge | Mario | 2 & 4 |
- *Conjectural title based on surroundings.
- **Denotes that the player drives through the course in the opposite direction.
- 1Using Green Shells (solo or triple) and Bob-ombs
- 2The gates don't necessarily have to be driven through in order.
- 3Players can use any means - normal or powersliding - to finish.
Nintendo Wi-Fi Connection mode
Mario Kart DS was the first Nintendo game to support online play (which has since been discontinued) though it's worth noting that it's the second Mario Kart game to support online connectivity, with the Japanese version of Mario Kart: Super Circuit being the first (the use of online connectivity for this game was made primarily to exchange ghost data with other players).[5] Being one of the first Nintendo DS games to feature wireless connection, the game mode required some technical changes in order to avoid connection malfunctions and long time loads during online play.
The following changes and restrictions were applied to prevent excessive lag:
- Only up to four players
- Only the 100cc engine class was available
- 12 of 32 courses were omitted
- No multi-items
- No spilled Items onto course to be used; items were just lost
- Items could not be dragged behind the kart
- Item roulette could not be stopped earlier
- Course obstacles could not be destroyed (e.g. boxes in Delfino Square or snowballs in DK Pass)
| Point Spread Comparisons | ||||||||
|---|---|---|---|---|---|---|---|---|
| 1st | 2nd | 3rd | 4th | 5th | 6th | 7th | 8th | |
| Super Mario Kart Mario Kart 64 Mario Kart: Super Circuit |
9 | 6 | 3 | 1 | 0 | 0 | 0 | 0 |
| Mario Kart: Double Dash!! Mario Kart DS Grand Prix |
10 | 8 | 6 | 4 | 3 | 2 | 1 | 0 |
| Mario Kart DS Teams[6] | 15 | 12 | 9 | 6 | 4 | 2 | 1 | 0 |
| Mario Kart DS WFC 4 Players | 10 | 7 | 4 | 1 | — | — | — | - |
| Mario Kart DS WFC 3 Players | 10 | 7 | 4 | — | — | — | — | - |
| Mario Kart DS WFC 2 Players | 10 | 5 | — | — | — | — | — | - |
| Grove-green bg signifies victory results (great clapping, character(s) cheering), best after-race music Lime-green bg signifies moderate results (mild clapping, moderate character reaction), same music in Wi-Fi as winner but different in Grand Prix Normal bg signifies losing results, losing music (kart engine stops if not in Grand Prix mode if the player placed last). In Super Mario Kart, Mario Kart 64 and Mario Kart: Super Circuit, the race will be restarted (0 pts) if the racer comes in 5th-8th. If this happens more than three times (except in Mario Kart 64), the Grand Prix must be started over. — means not available | ||||||||
Connection
Players could connect using a wireless connection or a Nintendo Wi-Fi USB Connector (preferably high-speed.) Racers would choose to search for other players in "Friends" (more info below), "Rivals" (players with a similar record), "Regional" or "Continental" in Non-American versions of the game (players in same country or continent), and "Worldwide", the latter possible to cause long lags. Other racers searching in the same category were randomly grouped. The game tried to find four players, but eventually settled for three or two if necessary. Players chose their characters, karts, and the course they wanted for the first of four races.
In addition to the 20 courses listed in order of when it is encountered, there was also a random button. After everyone's selection was placed, a course was chosen based on the responses. If all players each picked a different course, the system randomly picked one. If four players chose two courses, two each, the game randomly selected from those two. On the other hand, the most voted course by a group of users was selected to race. It proceeded like so for four races, then the points were tallied up, and after the match, a player's wins and losses were totaled.
Each player received one "win" for finishing ahead of a player and one "loss" for finishing behind of a player. If a player tied with another player, it did not count as a "win" or "loss". For example:
- A player winning a 3-player match, or ties for 1st with one other player in a 4-player match receives 2 wins and 0 losses.
- A player coming 2nd in a 4-player match receives 2 wins and 1 loss.
- A player tied for third in a 4-player match gets only 2 losses, as compared to 3.
- A player tied with all other players, no matter how many players are participating, was simply called a tie and did not affect either player's record.
Players could continue after the match to play the same racers again or quit to restart the process to find other players.
Issues
Problem: Trouble with friend codes
- A) Friend Code System. Each copy of the game comes with a 12-digit code known as a "friend code". Players could enter codes into each other's "friend roster" to create a friend list, where Wi-Fi records between the players were stored. When a friend was online at the same time, a symbol would appear above the Wi-Fi strength symbol, whether trying to find racers or during racing. Yet, both (or more) players must have had each (or all) of their friend codes registered and be looking in the friends section at the same time to hook up. If the player were to find a racer to compete against elsewhere online, there was no communication for a friend code swap; the only way to race again is to do it right away by selecting continue after a match.
Problem: Disconnecting racers change the outcome of the match; it is later reflected in the match records.
- B) Disconnecting. Take this scenario into consideration:
- Bob started in a four-player match, but two people have disconnected since, and he is now in a two-player match against a three-star player, and has come second and third in the first two races. It is 20-11. Josh wins the next match, bringing the totals to 25-21. But, in the fourth race, the three-star player is a full half-lap ahead with one lap to go. Josh realizes that he might not win this race; however, Josh has researched about Wi-Fi connections and has learned a trick. He leaves his DS untouched, bringing his kart to a stop, then finds his wireless router, and disconnects it. According to the record-book, Bob has won the match from which he has disconnected.
Causes:
- The two players who disconnected earlier are experiencing certain effects. When a player is disconnected from Wi-Fi via turning off his or her DS, the player is charged with the same number of losses as there are other players. Players can disconnect at any time, but if they cancel before the first course is chosen, there is no effect on the win-loss record. Other players finishing the whole match gain one win per disconnected player.
- Refer to the point spread chart for WFC. Mid-match, due to disconnected players, the point spread can change. For example, when it goes down from four to three players, the point conversion is not affected for the top three. Yet, from three to two, it is. In the first two races, Josh lost three and six points to the three-star player, under the 10-7-4(-1) point spread. But, if he had won the last two races, under the 10-5 point spread, he would have recovered ten points - and would have won, 31-30, even though he came in third once and only won two out of four races.
- Players occasionally disconnect when losing. A glitch in the game affects the final results, and this is exactly what Josh does in the scenario. Instead of turning off the DS, he disconnects his actual connection. The three-star player would have gained three wins, but when everyone disconnects, it takes no effect on the winning player's records.
- To restate and make clear: if Josh would have played it out and lost the fourth race, the result would have been 35-26, in favor of the three-star player.
Characters
Drivers
The main game has 12 playable characters, 4 of which are unlockable. The eight starting characters, Mario, Luigi, Peach, Yoshi, Toad, Donkey Kong, Wario, and Bowser, are the same eight characters available in Mario Kart 64 and Mario Kart: Super Circuit. The other four drivers can be unlocked by winning a gold trophy of certain cups in Grand Prix mode. Two of the unlockable characters, Daisy and Waluigi, return from Mario Kart: Double Dash!!, and the other two, Dry Bones and R.O.B., make their first Mario Kart playable appearances. A 13th racer, Shy Guy, debuts as a playable character sharing Yoshi's statistics, but is only available to players using DS Download Play. Discounting the multiplayer-exclusive Shy Guy, this is the first game since Super Mario Kart where the player classes are divided evenly, with four characters in each.
| Drivers | ||||||||||||||||||||||||||||||||||||||||||||||||||||||||||||||||||||||||||||||||||||||||||||||||||||||||||||||||||||||||||||||||||||||||||||||||||||||||||||||||||||||||||||||||||||||||||||||||||||||||||||||||||||||||||||||||||||||||||||||||||||||||||||||||||||||||||||||||||||||||||||||||||||||||||||||||||||||||||||||||||||||||||||||||||||||||||||||||||||||||||||||||||||||||||||||||||||||||||||||||||||||||||||||||||||||||||||||||||||||||||||||
|---|---|---|---|---|---|---|---|---|---|---|---|---|---|---|---|---|---|---|---|---|---|---|---|---|---|---|---|---|---|---|---|---|---|---|---|---|---|---|---|---|---|---|---|---|---|---|---|---|---|---|---|---|---|---|---|---|---|---|---|---|---|---|---|---|---|---|---|---|---|---|---|---|---|---|---|---|---|---|---|---|---|---|---|---|---|---|---|---|---|---|---|---|---|---|---|---|---|---|---|---|---|---|---|---|---|---|---|---|---|---|---|---|---|---|---|---|---|---|---|---|---|---|---|---|---|---|---|---|---|---|---|---|---|---|---|---|---|---|---|---|---|---|---|---|---|---|---|---|---|---|---|---|---|---|---|---|---|---|---|---|---|---|---|---|---|---|---|---|---|---|---|---|---|---|---|---|---|---|---|---|---|---|---|---|---|---|---|---|---|---|---|---|---|---|---|---|---|---|---|---|---|---|---|---|---|---|---|---|---|---|---|---|---|---|---|---|---|---|---|---|---|---|---|---|---|---|---|---|---|---|---|---|---|---|---|---|---|---|---|---|---|---|---|---|---|---|---|---|---|---|---|---|---|---|---|---|---|---|---|---|---|---|---|---|---|---|---|---|---|---|---|---|---|---|---|---|---|---|---|---|---|---|---|---|---|---|---|---|---|---|---|---|---|---|---|---|---|---|---|---|---|---|---|---|---|---|---|---|---|---|---|---|---|---|---|---|---|---|---|---|---|---|---|---|---|---|---|---|---|---|---|---|---|---|---|---|---|---|---|---|---|---|---|---|---|---|---|---|---|---|---|---|---|---|---|---|---|---|---|---|---|---|---|---|---|---|---|---|---|---|---|---|---|---|---|---|---|---|---|---|---|---|---|---|---|---|---|---|---|---|---|---|---|---|---|---|---|---|---|---|---|---|---|---|---|---|---|---|---|---|---|---|---|---|---|---|---|---|---|---|---|---|---|---|---|---|---|---|---|---|---|---|---|---|---|---|---|---|---|---|---|---|---|---|---|---|
|
|
|
|
|
|
|
| |||||||||||||||||||||||||||||||||||||||||||||||||||||||||||||||||||||||||||||||||||||||||||||||||||||||||||||||||||||||||||||||||||||||||||||||||||||||||||||||||||||||||||||||||||||||||||||||||||||||||||||||||||||||||||||||||||||||||||||||||||||||||||||||||||||||||||||||||||||||||||||||||||||||||||||||||||||||||||||||||||||||||||||||||||||||||||||||||||||||||||||||||||||||||||||||||||||||||||||||||||||||||||||||||||||||||||||||||||||||
| Unlockable drivers | ||||||||||||||||||||||||||||||||||||||||||||||||||||||||||||||||||||||||||||||||||||||||||||||||||||||||||||||||||||||||||||||||||||||||||||||||||||||||||||||||||||||||||||||||||||||||||||||||||||||||||||||||||||||||||||||||||||||||||||||||||||||||||||||||||||||||||||||||||||||||||||||||||||||||||||||||||||||||||||||||||||||||||||||||||||||||||||||||||||||||||||||||||||||||||||||||||||||||||||||||||||||||||||||||||||||||||||||||||||||||||||||
|
|
|
| |||||||||||||||||||||||||||||||||||||||||||||||||||||||||||||||||||||||||||||||||||||||||||||||||||||||||||||||||||||||||||||||||||||||||||||||||||||||||||||||||||||||||||||||||||||||||||||||||||||||||||||||||||||||||||||||||||||||||||||||||||||||||||||||||||||||||||||||||||||||||||||||||||||||||||||||||||||||||||||||||||||||||||||||||||||||||||||||||||||||||||||||||||||||||||||||||||||||||||||||||||||||||||||||||||||||||||||||||||||||||||
| DS Download Play only | ||||||||||||||||||||||||||||||||||||||||||||||||||||||||||||||||||||||||||||||||||||||||||||||||||||||||||||||||||||||||||||||||||||||||||||||||||||||||||||||||||||||||||||||||||||||||||||||||||||||||||||||||||||||||||||||||||||||||||||||||||||||||||||||||||||||||||||||||||||||||||||||||||||||||||||||||||||||||||||||||||||||||||||||||||||||||||||||||||||||||||||||||||||||||||||||||||||||||||||||||||||||||||||||||||||||||||||||||||||||||||||||
| ||||||||||||||||||||||||||||||||||||||||||||||||||||||||||||||||||||||||||||||||||||||||||||||||||||||||||||||||||||||||||||||||||||||||||||||||||||||||||||||||||||||||||||||||||||||||||||||||||||||||||||||||||||||||||||||||||||||||||||||||||||||||||||||||||||||||||||||||||||||||||||||||||||||||||||||||||||||||||||||||||||||||||||||||||||||||||||||||||||||||||||||||||||||||||||||||||||||||||||||||||||||||||||||||||||||||||||||||||||||||||||||


Other characters
These characters are non-playable. They appear as either spectators, hazards, or obstacles of certain courses.
| Image | Name | Course appearance(s) | Description |
|---|---|---|---|

|
Angry Sun | Desert Hills | The Angry Sun shoots out Fire Snakes onto certain areas of the track when the second lap begins. |
| Boo | Luigi's Mansion N64 Banshee Boardwalk |
In addition to being items in the game, Boos appear at certain parts of the race and make their trademark noises. These Boos are merely there for decoration, and are not hazards nor obstacles. | |

|
Bubba | N64 Banshee Boardwalk | Bubba jumps out of the water over the track. It does not hit any of the racers. |

|
Bullet Bill | Airship Fortress | Also in addition to being an item in the game, Bullet Bills are shot out of the Airship towards the starting line, knocking out any racers in their path. |
| Burner | Airship Fortress Bowser Castle |
Burners drop out of the ceiling onto the ground for a brief moment, setting the racer on fire if contact is made. | |

|
Chain Chomp | Peach Gardens GCN Luigi Circuit |
In Peach Gardens, chain-less Chain Chomps are all around the path. Some have a tail of Item Boxes. In Luigi Circuit, a Chain Chomp chained to a stake lunges at nearby players. |
| Cheep Cheep | Cheep Cheep Beach SNES Koopa Beach 2 |
In both courses, Cheep Cheeps bounce on the shoreline and spin racers out of control if driven into them. | |

|
Fire Bar | Wario Stadium | Different variations of Fire Bars are abundant on the track. Some spin in circles after a Dash Panel ramp. Others are in a triangle-like formation. Both set the racers on fire. |
| Firesnake | Desert Hills | Fire Snakes are projected from the Angry Sun and bounce around at certain points on the track. | |

|
Goomba | Mario Circuit | Goombas are situated on the track and spin players out of control. If Lightning strikes or if they're hit by shells, they get squashed and drop Mushrooms, though they continue walking even while flattened. |
| Lava Bubble | GBA Bowser Castle 2 | Lava Bubbles jump out of lava pits at several places around the course. If a racer drives into a Lava Bubble, their kart is briefly set on fire, and they also usually fall into the lava. | |

|
Monty Mole | Peach Gardens N64 Moo Moo Farm |
Monty Moles peak out of holes and then jump, posing as obstacles for the drivers. |

|
Moo Moo | N64 Moo Moo Farm | There are several Moo Moos in the background of the track, only posing as onlookers. |
  
|
Pianta | Delfino Square | Piantas appear as spectators of the race. Additionally, a Pianta statue is found in the beginning of the track. |
| Piranha Plant | Mario Circuit SNES Choco Island 2 GCN Yoshi Circuit |
Piranha Plants pose as obstacles on the race tracks, spinning drivers out of control for a brief moment. | |
| Pokey | Desert Hills | Many Pokeys appear on the track, creating obstacles for the drivers. | |
| Rocky Wrench | Airship Fortress | Rocky Wrenches are a stage obstacle. They hide under lids on the track. Their pattern is to briefly peak out before exposing themselves. If a racer drives over a lid which a Rocky Wrench peeks from, their kart jumps slightly into the air. If racers drive into a Rocky Wrench, their kart will be knocked over. | |
| Sidestepper | Cheep Cheep Beach | Sidesteppers are stationed on the sand, spinning players out of control if driven into them. | |
| Snowman | DK Pass N64 Frappe Snowland |
Snowmen are situated on the track, causing the player to be thrown backwards if driven into them. | |
| Swoop | N64 Banshee Boardwalk | A colony of Swoops fly towards the racers, slowing them down if they drive directly into the swarm. | |

|
Thwomp | Bowser Castle GBA Bowser Castle 2 |
Thwomps appear as enemies, performing their trademark slam attempt at the drivers below. Additionally, some Thwomps move side to side on the ground. |

|
Venus Fire Trap | Mario Circuit | Venus Fire Traps are stationed in pipes and spit fire at oncoming racers. |

|
Walking Tree | Luigi's Mansion | Walking Trees walk in patterns and pose as obstacles for the drivers. |
Karts

In Mario Kart DS, there are 36 different karts (37 if including the Standard SG) in total.
Every kart shows six ratings:
- Speed: How high the top speed of the kart is; how fast the kart can go. Bowser and R.O.B. have the fastest karts.
- Acceleration: The time the kart's top speed is achieved when accelerating (the higher the acceleration, the shorter players wait until they reach their kart's top speed, and the lower it is, the longer they wait). Dry Bones's karts can reach their top speed very quickly.
- Weight: When a vehicle is heavy, the driver can knock a lighter kart. Unlike other stats, the character contributes to this stat, with Bowser and R.O.B. being very heavy, and the former of which having the heaviest karts. Characters with a higher weight stat, however, will also apply a penalty to the vehicle's Off-Road stat (which is hidden to the player).
- Handling: How tight the kart can normally turn without drifting. Dry Bones has the best turning curve.
- Drift: How tight the kart turns while drifting or powersliding. Peach has the best drifting curve.
- Items: The variety of items to use when touching an Item Box (a high Items rating signifies a higher chance of getting Triple Bananas in first place, Triple Mushrooms in third, fourth, etc).
For all stats, one or more karts will have a rating of one hundred for that stat; for example, the Hurricane and ROB-BLS have speed ratings of one hundred, the Dry Bomber has both acceleration and handling rates of one hundred, the Tyrant has a weight rating of one hundred if normally paired with Bowser or R.O.B., the Light Tripper has a drift rating of one hundred, and each character has an items rating of one hundred for their heavier signature kart, an items rating of sixty-six for their standard kart, and an items rating of thirty-three for their lighter signature kart.
Originally, only two karts are available for each character; a signature kart and a standard kart. As the player wins gold trophies in the 100cc Nitro Grand Prix, the player will unlock a second signature kart for each character. When the player wins a gold trophy in either 150cc Special Cup or Lightning Cup, four signature karts from different characters will become available, bringing the total to seven karts for each character. After winning gold trophies in all eight cups in Mirror Mode, each character can be paired in any of the 36 karts, making 432 combinations (excluding Shy Guy). CPU drivers will only use their characters' respective karts in races and battles.
The following ratings are from zero to one hundred, directly obtained from the values used by the game to fill the bar in the kart selection screen.[7] The exception is weight, which due to needing to be combined with character weight for the full value, is instead from zero to fifty. On a side note, it is worth noting that a kart with a high items rating will usually have lower overall stats than the standard karts. Likewise, karts with a low items rating will usually have higher overall stats than the standard karts. Karts with a high items rating tend to be heavier than the karts with a low items rating. Karts with high items rating also receive more Mushroom boosts in Time Trial mode. The player will get one Mushroom boost if the items rating is low, two if the items rating is average, and three if the items rating is high. The weight class of the character does not play an important role in Mario Kart DS, as the weight does not create kart use restrictions.
Displayed statistics
Signature karts
The first type of karts are the signature karts. They are all unique and unlocked by default, with one per each character. By collecting all golden trophies in Nitro or Retro 150cc, signature karts are opened to certain other drivers. By collecting all golden trophies in 150cc Mirror Mode, any driver may use any other's signature karts.
| Signature karts | ||||||||||||||||||||||||||||||||||||||||||||||||||||||||||||||||||||||||||||||||||||||||||||||||||||||||||||||||||||||||||||||||||||||||||||||||||||||||||||||||||||||||||||||||||||||||||||||||||||||||||||||||||||||||||||||||||||||||||||||||||||||||||||||||||||||||||||||||||||||||||||||||||||||||||||||||||||||||||||||||||||||||||||||||||||||||||||||||||||||||||||||||||||||||||||||||||||||||||||||||||||||||||||||||||||||||||||||||||||||||||||||||||||||||||||||||||||||||||||||||||||||||||||||
|---|---|---|---|---|---|---|---|---|---|---|---|---|---|---|---|---|---|---|---|---|---|---|---|---|---|---|---|---|---|---|---|---|---|---|---|---|---|---|---|---|---|---|---|---|---|---|---|---|---|---|---|---|---|---|---|---|---|---|---|---|---|---|---|---|---|---|---|---|---|---|---|---|---|---|---|---|---|---|---|---|---|---|---|---|---|---|---|---|---|---|---|---|---|---|---|---|---|---|---|---|---|---|---|---|---|---|---|---|---|---|---|---|---|---|---|---|---|---|---|---|---|---|---|---|---|---|---|---|---|---|---|---|---|---|---|---|---|---|---|---|---|---|---|---|---|---|---|---|---|---|---|---|---|---|---|---|---|---|---|---|---|---|---|---|---|---|---|---|---|---|---|---|---|---|---|---|---|---|---|---|---|---|---|---|---|---|---|---|---|---|---|---|---|---|---|---|---|---|---|---|---|---|---|---|---|---|---|---|---|---|---|---|---|---|---|---|---|---|---|---|---|---|---|---|---|---|---|---|---|---|---|---|---|---|---|---|---|---|---|---|---|---|---|---|---|---|---|---|---|---|---|---|---|---|---|---|---|---|---|---|---|---|---|---|---|---|---|---|---|---|---|---|---|---|---|---|---|---|---|---|---|---|---|---|---|---|---|---|---|---|---|---|---|---|---|---|---|---|---|---|---|---|---|---|---|---|---|---|---|---|---|---|---|---|---|---|---|---|---|---|---|---|---|---|---|---|---|---|---|---|---|---|---|---|---|---|---|---|---|---|---|---|---|---|---|---|---|---|---|---|---|---|---|---|---|---|---|---|---|---|---|---|---|---|---|---|---|---|---|---|---|---|---|---|---|---|---|---|---|---|---|---|---|---|---|---|---|---|---|---|---|---|---|---|---|---|---|---|---|---|---|---|---|---|---|---|---|---|---|---|---|---|---|---|---|---|---|---|---|---|---|---|---|---|---|---|---|---|---|---|---|---|---|---|---|---|---|---|---|---|---|---|---|---|---|---|---|---|---|---|---|---|---|---|---|---|---|---|---|---|---|---|---|---|---|---|---|---|---|---|---|---|---|---|---|---|---|---|---|---|---|---|---|---|---|---|---|---|---|---|---|---|---|---|
|
|
|
|
|
|
|
|
|
|
|
| |||||||||||||||||||||||||||||||||||||||||||||||||||||||||||||||||||||||||||||||||||||||||||||||||||||||||||||||||||||||||||||||||||||||||||||||||||||||||||||||||||||||||||||||||||||||||||||||||||||||||||||||||||||||||||||||||||||||||||||||||||||||||||||||||||||||||||||||||||||||||||||||||||||||||||||||||||||||||||||||||||||||||||||||||||||||||||||||||||||||||||||||||||||||||||||||||||||||||||||||||||||||||||||||||||||||||||||||||||||||||||||||||||||||||||||||||||||||||||||||||||


Standard karts
The second type of karts are the standard karts, which are also available by default. They all follow a similar design to each other, with only the color differing, and tend to have more rounded statistics. They are automatically used for missions and battle modes, and are given mildly different statistics in the latter than in normal races, aside from the weight and item stats which are identical for all standard karts. They are not unlocked for alternate characters after collecting all golden trophies in Nitro or Retro 150cc, unlike the signature karts. However, they are still unlocked for other characters along with every other kart after collecting all golden trophies in 150cc Mirror Mode. The one exception is the Shy Guys' standard kart, which uses the same statistics as Yoshi's and is only available for Shy Guys as their sole kart.
| Standard karts | |||||||||||||||||||||||||||||||||||||||||||||||||||||||||||||||||||||||||||||||||||||||||||||||||||||||||||||||||||||||||||||||||||||||||||||||||||||||||||||||||||||||||||||||||||||||||||||||||||||||||||||||||||||||||||||||||||||||||||||||||||||||||||||||||||||||||||||||||||||||||||||||||||||||||||||||||||||||||||||||||||||||||||||||||||||||||||||||||||||||||||||||||||||||||||||||||||||||||||||||||||||||||||||||||||||||||||||||||||||||||||||||||||||||||||||||||||||||||||||||||||||||||||||||||||||||||||||||||||||||||||||||||||||||||||||||||||||||||||||||||||||||||||||||||||||||||||||||||||||||||||||||||||||||||||||||||||||||||||||||||||||||||||||||||||||||||||||||||||||||||||||||||||||||||||||||||||||||||||||||||||||||||||||||||||||||||||||||||||||||||||||||||||||||||||||||||||||||||||||||||||||||||||||||||||||||||||||||||||||||||||||||||||||||||
|---|---|---|---|---|---|---|---|---|---|---|---|---|---|---|---|---|---|---|---|---|---|---|---|---|---|---|---|---|---|---|---|---|---|---|---|---|---|---|---|---|---|---|---|---|---|---|---|---|---|---|---|---|---|---|---|---|---|---|---|---|---|---|---|---|---|---|---|---|---|---|---|---|---|---|---|---|---|---|---|---|---|---|---|---|---|---|---|---|---|---|---|---|---|---|---|---|---|---|---|---|---|---|---|---|---|---|---|---|---|---|---|---|---|---|---|---|---|---|---|---|---|---|---|---|---|---|---|---|---|---|---|---|---|---|---|---|---|---|---|---|---|---|---|---|---|---|---|---|---|---|---|---|---|---|---|---|---|---|---|---|---|---|---|---|---|---|---|---|---|---|---|---|---|---|---|---|---|---|---|---|---|---|---|---|---|---|---|---|---|---|---|---|---|---|---|---|---|---|---|---|---|---|---|---|---|---|---|---|---|---|---|---|---|---|---|---|---|---|---|---|---|---|---|---|---|---|---|---|---|---|---|---|---|---|---|---|---|---|---|---|---|---|---|---|---|---|---|---|---|---|---|---|---|---|---|---|---|---|---|---|---|---|---|---|---|---|---|---|---|---|---|---|---|---|---|---|---|---|---|---|---|---|---|---|---|---|---|---|---|---|---|---|---|---|---|---|---|---|---|---|---|---|---|---|---|---|---|---|---|---|---|---|---|---|---|---|---|---|---|---|---|---|---|---|---|---|---|---|---|---|---|---|---|---|---|---|---|---|---|---|---|---|---|---|---|---|---|---|---|---|---|---|---|---|---|---|---|---|---|---|---|---|---|---|---|---|---|---|---|---|---|---|---|---|---|---|---|---|---|---|---|---|---|---|---|---|---|---|---|---|---|---|---|---|---|---|---|---|---|---|---|---|---|---|---|---|---|---|---|---|---|---|---|---|---|---|---|---|---|---|---|---|---|---|---|---|---|---|---|---|---|---|---|---|---|---|---|---|---|---|---|---|---|---|---|---|---|---|---|---|---|---|---|---|---|---|---|---|---|---|---|---|---|---|---|---|---|---|---|---|---|---|---|---|---|---|---|---|---|---|---|---|---|---|---|---|---|---|---|---|---|---|---|---|---|---|---|---|---|---|---|---|---|---|---|---|---|---|---|---|---|---|---|---|---|---|---|---|---|---|---|---|---|---|---|---|---|---|---|---|---|---|---|---|---|---|---|---|---|---|---|---|---|---|---|---|---|---|---|---|---|---|---|---|---|---|---|---|---|---|---|---|---|---|---|---|---|---|---|---|---|---|---|---|---|---|---|---|---|---|---|---|---|---|---|---|---|---|---|---|---|---|---|---|---|---|---|---|---|---|---|---|---|---|---|---|---|---|---|---|---|---|---|---|---|---|---|---|---|---|---|---|---|---|---|---|---|---|---|---|---|---|---|---|---|---|---|---|---|---|---|---|---|---|---|---|---|---|---|---|---|---|---|---|---|---|---|---|---|---|---|---|---|---|---|---|---|---|---|---|---|---|---|---|---|---|---|---|---|---|---|---|---|---|---|---|---|---|---|---|---|---|---|---|---|---|---|---|---|---|---|---|---|---|---|---|---|---|---|---|---|---|---|---|---|---|---|---|---|---|---|---|---|---|---|---|---|---|---|---|---|---|---|---|---|---|---|---|---|---|---|---|---|---|---|---|---|---|---|---|---|---|---|---|---|---|---|---|---|---|---|---|---|---|---|---|---|---|---|---|---|---|---|---|---|---|---|---|---|---|---|---|---|---|---|---|---|---|---|---|---|---|---|---|---|---|---|---|---|---|---|---|---|---|---|---|---|---|---|---|---|---|---|---|---|---|---|---|---|---|---|---|---|---|---|---|---|---|---|---|---|---|---|---|---|---|---|---|---|---|---|---|---|---|---|---|---|---|---|---|---|---|---|---|---|---|---|
|
|
|
|
|
|
|
|
|
|
|
|
| |||||||||||||||||||||||||||||||||||||||||||||||||||||||||||||||||||||||||||||||||||||||||||||||||||||||||||||||||||||||||||||||||||||||||||||||||||||||||||||||||||||||||||||||||||||||||||||||||||||||||||||||||||||||||||||||||||||||||||||||||||||||||||||||||||||||||||||||||||||||||||||||||||||||||||||||||||||||||||||||||||||||||||||||||||||||||||||||||||||||||||||||||||||||||||||||||||||||||||||||||||||||||||||||||||||||||||||||||||||||||||||||||||||||||||||||||||||||||||||||||||||||||||||||||||||||||||||||||||||||||||||||||||||||||||||||||||||||||||||||||||||||||||||||||||||||||||||||||||||||||||||||||||||||||||||||||||||||||||||||||||||||||||||||||||||||||||||||||||||||||||||||||||||||||||||||||||||||||||||||||||||||||||||||||||||||||||||||||||||||||||||||||||||||||||||||||||||||||||||||||||||||||||||||||||||||||||||||||||||||||||||


Unlockable karts
The third group of karts are unlocked all at once after getting gold trophies on all Nitro cups on 100cc difficulty. They function the same as the default signature karts in that they are based around one character each, are unlocked for select other characters after collecting all golden trophies in Nitro or Retro 150cc, and are then unlocked for everyone after collecting all golden trophies in 150cc Mirror Mode.
| Unlockable karts | ||||||||||||||||||||||||||||||||||||||||||||||||||||||||||||||||||||||||||||||||||||||||||||||||||||||||||||||||||||||||||||||||||||||||||||||||||||||||||||||||||||||||||||||||||||||||||||||||||||||||||||||||||||||||||||||||||||||||||||||||||||||||||||||||||||||||||||||||||||||||||||||||||||||||||||||||||||||||||||||||||||||||||||||||||||||||||||||||||||||||||||||||||||||||||||||||||||||||||||||||||||||||||||||||||||||||||||||||||||||||||||||||||||||||||||||||||||||||||||||||||||||||||||
|---|---|---|---|---|---|---|---|---|---|---|---|---|---|---|---|---|---|---|---|---|---|---|---|---|---|---|---|---|---|---|---|---|---|---|---|---|---|---|---|---|---|---|---|---|---|---|---|---|---|---|---|---|---|---|---|---|---|---|---|---|---|---|---|---|---|---|---|---|---|---|---|---|---|---|---|---|---|---|---|---|---|---|---|---|---|---|---|---|---|---|---|---|---|---|---|---|---|---|---|---|---|---|---|---|---|---|---|---|---|---|---|---|---|---|---|---|---|---|---|---|---|---|---|---|---|---|---|---|---|---|---|---|---|---|---|---|---|---|---|---|---|---|---|---|---|---|---|---|---|---|---|---|---|---|---|---|---|---|---|---|---|---|---|---|---|---|---|---|---|---|---|---|---|---|---|---|---|---|---|---|---|---|---|---|---|---|---|---|---|---|---|---|---|---|---|---|---|---|---|---|---|---|---|---|---|---|---|---|---|---|---|---|---|---|---|---|---|---|---|---|---|---|---|---|---|---|---|---|---|---|---|---|---|---|---|---|---|---|---|---|---|---|---|---|---|---|---|---|---|---|---|---|---|---|---|---|---|---|---|---|---|---|---|---|---|---|---|---|---|---|---|---|---|---|---|---|---|---|---|---|---|---|---|---|---|---|---|---|---|---|---|---|---|---|---|---|---|---|---|---|---|---|---|---|---|---|---|---|---|---|---|---|---|---|---|---|---|---|---|---|---|---|---|---|---|---|---|---|---|---|---|---|---|---|---|---|---|---|---|---|---|---|---|---|---|---|---|---|---|---|---|---|---|---|---|---|---|---|---|---|---|---|---|---|---|---|---|---|---|---|---|---|---|---|---|---|---|---|---|---|---|---|---|---|---|---|---|---|---|---|---|---|---|---|---|---|---|---|---|---|---|---|---|---|---|---|---|---|---|---|---|---|---|---|---|---|---|---|---|---|---|---|---|---|---|---|---|---|---|---|---|---|---|---|---|---|---|---|---|---|---|---|---|---|---|---|---|---|---|---|---|---|---|---|---|---|---|---|---|---|---|---|---|---|---|---|---|---|---|---|---|---|---|---|---|---|---|---|---|---|---|---|---|---|---|---|---|---|---|---|---|---|
|
|
|
|
|
|
|
|
|
|
|
| |||||||||||||||||||||||||||||||||||||||||||||||||||||||||||||||||||||||||||||||||||||||||||||||||||||||||||||||||||||||||||||||||||||||||||||||||||||||||||||||||||||||||||||||||||||||||||||||||||||||||||||||||||||||||||||||||||||||||||||||||||||||||||||||||||||||||||||||||||||||||||||||||||||||||||||||||||||||||||||||||||||||||||||||||||||||||||||||||||||||||||||||||||||||||||||||||||||||||||||||||||||||||||||||||||||||||||||||||||||||||||||||||||||||||||||||||||||||||||||||||


Actual statistics
Mario Kart DS features several in-game statistics, some of which are not shown in the kart selection menu.[8] There are three types of Tires, either Small (S), Medium (M) or Large (L). Just like in Mario Kart: Double Dash!!, there is a Mini-Turbo statistics that corresponds to the length of the Mini-Turbo boost in frames. Acceleration is determined by three triplets of values, that are presumably related to the acceleration while drifting and the acceleration in all other conditions; there is also a deceleration value that determines the speed of the next frame as fraction of the current speed when not accelerating (such as when the kart is spinning or the acceleration button is not being held). There are four different types of off-road terrains, and accordingly the karts have four off-road statistics that are the relative top speed in each type of terrain.
| Actual statistics of Mario Kart DS | ||||||||||||||||||
|---|---|---|---|---|---|---|---|---|---|---|---|---|---|---|---|---|---|---|
| Driver | Kart | Tires | Weight | Mini-Turbo | Top Speed | Acceleration | Deceleration | Handling | Drift | Off-Road | ||||||||
| Normal | While Drifting | |||||||||||||||||
| 1st value | 2nd value | 3rd value | 1st value | 2nd value | 3rd value | Very Light | Light | Normal | Heavy | |||||||||
| Mario | Standard MR | kart_tire_M | 0.5 | 45 | 7.5 | 0.0579 | 0.0239 | 0.7 | 0.0649 | 0.0239 | 0.75 | 0.984 | 0.0806 | 0.0537 | 0.9 | 0.7 | 0.5 | 0.3 |
| Shooting Star | kart_tire_S | 0.2 | 51 | 7.523 | 0.0598 | 0.0249 | 0.7 | 0.0669 | 0.0249 | 0.75 | 0.984 | 0.0823 | 0.0547 | 0.9 | 0.7 | 0.5 | 0.3 | |
| B Dasher | kart_tire_L | 0.65 | 35 | 7.463 | 0.0549 | 0.0229 | 0.7 | 0.0608 | 0.0229 | 0.75 | 0.984 | 0.0789 | 0.0527 | 0.9 | 0.7 | 0.5 | 0.3 | |
| Donkey Kong | Standard DK | kart_tire_M | 0.5 | 30 | 7.6 | 0.0449 | 0.0229 | 0.45 | 0.0669 | 0.0188 | 0.9 | 0.978 | 0.0708 | 0.0635 | 0.85 | 0.62 | 0.4 | 0.22 |
| Wildlife | kart_tire_S | 0.35 | 34 | 7.623 | 0.0469 | 0.0239 | 0.45 | 0.0688 | 0.0198 | 0.9 | 0.978 | 0.0723 | 0.0647 | 0.85 | 0.62 | 0.4 | 0.22 | |
| Rambi Rider | kart_tire_L | 0.75 | 23 | 7.562 | 0.043 | 0.022 | 0.45 | 0.063 | 0.0178 | 0.9 | 0.978 | 0.0693 | 0.0623 | 0.85 | 0.62 | 0.4 | 0.22 | |
| Toad | Standard TD | kart_tire_M | 0.5 | 50 | 7.35 | 0.085 | 0.0269 | 0.7 | 0.085 | 0.0278 | 0.75 | 0.988 | 0.0842 | 0.0586 | 0.92 | 0.74 | 0.55 | 0.34 |
| Mushmellow | kart_tire_S | 0.25 | 56 | 7.372 | 0.0879 | 0.0278 | 0.7 | 0.0879 | 0.0288 | 0.75 | 0.988 | 0.0859 | 0.0598 | 0.92 | 0.74 | 0.55 | 0.34 | |
| 4-Wheel Cradle | kart_tire_L | 0.7 | 39 | 7.313 | 0.0798 | 0.0259 | 0.7 | 0.0798 | 0.0259 | 0.75 | 0.988 | 0.0825 | 0.0574 | 0.92 | 0.74 | 0.55 | 0.34 | |
| Bowser | Standard BW | kart_tire_M | 0.5 | 25 | 7.7 | 0.0398 | 0.0188 | 0.45 | 0.0588 | 0.0168 | 0.9 | 0.976 | 0.0684 | 0.0586 | 0.84 | 0.6 | 0.38 | 0.2 |
| Hurricane | kart_tire_S | 0.45 | 28 | 7.723 | 0.0408 | 0.0198 | 0.45 | 0.0608 | 0.0178 | 0.9 | 0.976 | 0.0698 | 0.0598 | 0.84 | 0.6 | 0.38 | 0.2 | |
| Tyrant | kart_tire_L | 0.8 | 19 | 7.662 | 0.0378 | 0.0178 | 0.45 | 0.0559 | 0.0159 | 0.9 | 0.976 | 0.0669 | 0.0574 | 0.84 | 0.6 | 0.38 | 0.2 | |
| Peach | Standard PC | kart_tire_M | 0.5 | 40 | 7.4 | 0.075 | 0.0298 | 0.45 | 0.1099 | 0.0249 | 0.9 | 0.982 | 0.0769 | 0.0732 | 0.88 | 0.67 | 0.46 | 0.27 |
| Light Tripper | kart_tire_S | 0.3 | 45 | 7.422 | 0.0779 | 0.0308 | 0.45 | 0.1138 | 0.0259 | 0.9 | 0.982 | 0.0784 | 0.0747 | 0.88 | 0.67 | 0.46 | 0.27 | |
| Royale | kart_tire_L | 0.7 | 31 | 7.363 | 0.0708 | 0.0278 | 0.45 | 0.1038 | 0.0239 | 0.9 | 0.982 | 0.0754 | 0.0718 | 0.88 | 0.67 | 0.46 | 0.27 | |
| Wario | Standard WR | kart_tire_M | 0.5 | 35 | 7.65 | 0.042 | 0.0188 | 0.7 | 0.0479 | 0.0168 | 0.75 | 0.98 | 0.0769 | 0.0488 | 0.86 | 0.64 | 0.43 | 0.24 |
| Brute | kart_tire_S | 0.35 | 39 | 7.673 | 0.043 | 0.0198 | 0.7 | 0.0498 | 0.0178 | 0.75 | 0.98 | 0.0784 | 0.0498 | 0.86 | 0.64 | 0.43 | 0.24 | |
| Dragonfly | kart_tire_L | 0.75 | 27 | 7.612 | 0.0398 | 0.0178 | 0.7 | 0.0449 | 0.0159 | 0.75 | 0.98 | 0.0754 | 0.0479 | 0.86 | 0.64 | 0.43 | 0.24 | |
| Yoshi | Standard YS | kart_tire_M | 0.5 | 60 | 7.45 | 0.095 | 0.0178 | 0.85 | 0.0618 | 0.0269 | 0.6 | 0.99 | 0.0928 | 0.0452 | 0.95 | 0.84 | 0.68 | 0.43 |
| Egg 1 | kart_tire_S | 0.2 | 68 | 7.472 | 0.0979 | 0.0188 | 0.85 | 0.064 | 0.0278 | 0.6 | 0.99 | 0.0947 | 0.0461 | 0.95 | 0.84 | 0.68 | 0.43 | |
| Cucumber | kart_tire_L | 0.6 | 47 | 7.413 | 0.0898 | 0.0168 | 0.85 | 0.0588 | 0.0259 | 0.6 | 0.99 | 0.0908 | 0.0442 | 0.95 | 0.84 | 0.68 | 0.43 | |
| Luigi | Standard LG | kart_tire_M | 0.5 | 55 | 7.55 | 0.063 | 0.0149 | 0.85 | 0.0488 | 0.0229 | 0.6 | 0.988 | 0.0879 | 0.0415 | 0.94 | 0.79 | 0.61 | 0.38 |
| Poltergust 4000 | kart_tire_S | 0.25 | 62 | 7.573 | 0.0649 | 0.0159 | 0.85 | 0.0508 | 0.0239 | 0.6 | 0.988 | 0.0896 | 0.0422 | 0.94 | 0.79 | 0.61 | 0.38 | |
| Streamliner | kart_tire_L | 0.65 | 43 | 7.512 | 0.0598 | 0.0139 | 0.85 | 0.0459 | 0.022 | 0.6 | 0.988 | 0.0862 | 0.0408 | 0.94 | 0.79 | 0.61 | 0.38 | |
| Dry Bones | Standard DB | kart_tire_M | 0.5 | 65 | 7.3 | 0.1199 | 0.022 | 0.85 | 0.073 | 0.0308 | 0.6 | 0.992 | 0.0977 | 0.0488 | 0.96 | 0.9 | 0.75 | 0.48 |
| Dry Bomber | kart_tire_S | 0.4 | 73 | 7.322 | 0.1238 | 0.0229 | 0.85 | 0.0759 | 0.032 | 0.6 | 0.992 | 0.0996 | 0.0498 | 0.96 | 0.9 | 0.75 | 0.48 | |
| Banisher | kart_tire_L | 0.55 | 50 | 7.264 | 0.1128 | 0.021 | 0.85 | 0.0688 | 0.0288 | 0.6 | 0.992 | 0.0957 | 0.0479 | 0.96 | 0.9 | 0.75 | 0.48 | |
| Daisy | Standard DS | kart_tire_M | 0.5 | 35 | 7.5 | 0.0618 | 0.0269 | 0.45 | 0.0898 | 0.022 | 0.9 | 0.98 | 0.0732 | 0.0684 | 0.86 | 0.64 | 0.43 | 0.24 |
| Light Dancer | kart_tire_S | 0.3 | 39 | 7.523 | 0.064 | 0.0278 | 0.45 | 0.0928 | 0.0229 | 0.9 | 0.98 | 0.0747 | 0.0698 | 0.86 | 0.64 | 0.43 | 0.24 | |
| Power Flower | kart_tire_L | 0.55 | 27 | 7.463 | 0.0588 | 0.0259 | 0.45 | 0.085 | 0.021 | 0.9 | 0.98 | 0.0718 | 0.0669 | 0.86 | 0.64 | 0.43 | 0.24 | |
| Waluigi | Standard WL | kart_tire_M | 0.5 | 40 | 7.55 | 0.0488 | 0.022 | 0.7 | 0.0559 | 0.0198 | 0.75 | 0.982 | 0.0806 | 0.0537 | 0.88 | 0.67 | 0.46 | 0.27 |
| Gold Mantis | kart_tire_S | 0.45 | 45 | 7.573 | 0.0508 | 0.0229 | 0.7 | 0.0579 | 0.021 | 0.75 | 0.982 | 0.0823 | 0.0547 | 0.88 | 0.67 | 0.46 | 0.27 | |
| Zipper | kart_tire_L | 0.55 | 31 | 7.512 | 0.0459 | 0.021 | 0.7 | 0.053 | 0.0188 | 0.75 | 0.982 | 0.0789 | 0.0527 | 0.88 | 0.67 | 0.46 | 0.27 | |
| ROB | Standard RB | kart_tire_M | 0.5 | 50 | 7.7 | 0.0459 | 0.012 | 0.85 | 0.043 | 0.0198 | 0.6 | 0.986 | 0.0842 | 0.0391 | 0.92 | 0.74 | 0.55 | 0.34 |
| ROB-BLS | kart_tire_S | 0.38 | 56 | 7.723 | 0.0479 | 0.012 | 0.85 | 0.0449 | 0.021 | 0.6 | 0.986 | 0.0859 | 0.0398 | 0.92 | 0.74 | 0.55 | 0.34 | |
| ROB-LGS | kart_tire_L | 0.6 | 39 | 7.662 | 0.043 | 0.011 | 0.85 | 0.0408 | 0.0188 | 0.6 | 0.986 | 0.0825 | 0.0383 | 0.92 | 0.74 | 0.55 | 0.34 | |
| Shy Guy | Standard SG | kart_tire_M | 0.5 | 60 | 7.45 | 0.095 | 0.0178 | 0.85 | 0.0618 | 0.0269 | 0.6 | 0.99 | 0.0928 | 0.0452 | 0.95 | 0.84 | 0.68 | 0.43 |
| Battle Mode karts | ||||||||||||||||||
| Driver | Kart | Tires | Weight | Mini-Turbo | Top Speed | Acceleration | Deceleration | Handling | Drift | Off-Road | ||||||||
| Normal | While Drifting | |||||||||||||||||
| 1st value | 2nd value | 3rd value | 1st value | 2nd value | 3rd value | Very Light | Light | Normal | Heavy | |||||||||
| Mario | Standard MR | 0.5 | 35 | 7.35 | 0.0598 | 0.0149 | 0.8 | 0.0598 | 0.0198 | 0.85 | 0.98 | 0.0879 | 0.0635 | 0.9 | 0.7 | 0.5 | 0.3 | |
| Donkey Kong | Standard DK | 0.5 | 35 | 7.37 | 0.0508 | 0.0139 | 0.8 | 0.063 | 0.0198 | 0.85 | 0.98 | 0.0842 | 0.0659 | 0.85 | 0.62 | 0.4 | 0.22 | |
| Toad | Standard TD | 0.5 | 35 | 7.32 | 0.0659 | 0.0159 | 0.8 | 0.0659 | 0.021 | 0.85 | 0.98 | 0.0891 | 0.0647 | 0.92 | 0.74 | 0.55 | 0.34 | |
| Bowser | Standard BW | 0.5 | 35 | 7.39 | 0.0479 | 0.0139 | 0.8 | 0.054 | 0.0188 | 0.85 | 0.98 | 0.083 | 0.0647 | 0.84 | 0.6 | 0.38 | 0.2 | |
| Peach | Standard PC | 0.5 | 35 | 7.33 | 0.0598 | 0.0149 | 0.8 | 0.0718 | 0.021 | 0.85 | 0.98 | 0.0867 | 0.0684 | 0.88 | 0.67 | 0.46 | 0.27 | |
| Wario | Standard WR | 0.5 | 35 | 7.38 | 0.054 | 0.0139 | 0.8 | 0.054 | 0.0188 | 0.85 | 0.98 | 0.0867 | 0.0623 | 0.86 | 0.64 | 0.43 | 0.24 | |
| Yoshi | Standard YS | 0.5 | 35 | 7.34 | 0.0688 | 0.0159 | 0.8 | 0.0569 | 0.0198 | 0.85 | 0.98 | 0.0916 | 0.061 | 0.95 | 0.84 | 0.68 | 0.43 | |
| Luigi | Standard LG | 0.5 | 35 | 7.36 | 0.063 | 0.0149 | 0.8 | 0.0508 | 0.0188 | 0.85 | 0.98 | 0.0903 | 0.0598 | 0.94 | 0.79 | 0.61 | 0.38 | |
| Dry Bones | Standard DB | 0.5 | 35 | 7.31 | 0.0718 | 0.0159 | 0.8 | 0.0598 | 0.0198 | 0.85 | 0.98 | 0.0928 | 0.0623 | 0.96 | 0.9 | 0.75 | 0.48 | |
| Daisy | Standard DS | 0.5 | 35 | 7.35 | 0.0569 | 0.0149 | 0.8 | 0.0688 | 0.021 | 0.85 | 0.98 | 0.0854 | 0.0671 | 0.86 | 0.64 | 0.43 | 0.24 | |
| Waluigi | Standard WL | 0.5 | 35 | 7.36 | 0.0569 | 0.0149 | 0.8 | 0.0569 | 0.0198 | 0.85 | 0.98 | 0.0879 | 0.0635 | 0.88 | 0.67 | 0.46 | 0.27 | |
| ROB | Standard RB | 0.5 | 35 | 7.39 | 0.0569 | 0.0149 | 0.8 | 0.0479 | 0.0188 | 0.85 | 0.98 | 0.0891 | 0.0586 | 0.92 | 0.74 | 0.55 | 0.34 | |
| Shy Guy | Standard SG | 0.5 | 35 | 7.34 | 0.0688 | 0.0159 | 0.8 | 0.0569 | 0.0198 | 0.85 | 0.98 | 0.0916 | 0.061 | 0.95 | 0.84 | 0.68 | 0.43 | |
Courses
In addition to the sixteen standard courses, Mario Kart DS is the first game in the series to include the Retro Grand Prix, which has been carried over into every future installment in the series to date. The Retro Grand Prix consists of sixteen courses from past Mario Kart games updated and compiled into four additional cups. This makes a total of 8 cups and 32 courses. Mario Kart DS is the only Mario Kart game where there is no Mario Circuit in the Flower Cup, unlike other Mario Kart games.
This is the only Mario Kart game to have three Grand Prix introduction fanfares; one for Figure-8 Circuit, Waluigi Pinball, Mario Circuit, and GCN Luigi Circuit, one for Wario Stadium, and one for the other courses.
Some courses were playable on the Nintendo Wi-Fi Connection. They are marked with the service's logo below.
Additionally, each course has a Staff Ghost. Staff Ghosts are Time Trial races that were previously done by a Nintendo staff member. Every course has its unlockable Staff Ghost that the player can race against if their completion time is close to the Staff Ghost's. The player's record must be no more than 108% of the Staff Ghost's completion time to unlock.[9]
Nitro Grand Prix
Mushroom Cup | |||||||||||||||||||||||||||||||||||||||||||||||||||||||||||||||||||||||||||||||||||||||||||||||||||||||||||||||||||||||||||||||||||||||||||||||||||||||||||||||||||
|---|---|---|---|---|---|---|---|---|---|---|---|---|---|---|---|---|---|---|---|---|---|---|---|---|---|---|---|---|---|---|---|---|---|---|---|---|---|---|---|---|---|---|---|---|---|---|---|---|---|---|---|---|---|---|---|---|---|---|---|---|---|---|---|---|---|---|---|---|---|---|---|---|---|---|---|---|---|---|---|---|---|---|---|---|---|---|---|---|---|---|---|---|---|---|---|---|---|---|---|---|---|---|---|---|---|---|---|---|---|---|---|---|---|---|---|---|---|---|---|---|---|---|---|---|---|---|---|---|---|---|---|---|---|---|---|---|---|---|---|---|---|---|---|---|---|---|---|---|---|---|---|---|---|---|---|---|---|---|---|---|---|---|---|
|
|
|
| ||||||||||||||||||||||||||||||||||||||||||||||||||||||||||||||||||||||||||||||||||||||||||||||||||||||||||||||||||||||||||||||||||||||||||||||||||||||||||||||||
Flower Cup | |||||||||||||||||||||||||||||||||||||||||||||||||||||||||||||||||||||||||||||||||||||||||||||||||||||||||||||||||||||||||||||||||||||||||||||||||||||||||||||||||||
|
|
|
| ||||||||||||||||||||||||||||||||||||||||||||||||||||||||||||||||||||||||||||||||||||||||||||||||||||||||||||||||||||||||||||||||||||||||||||||||||||||||||||||||
Star Cup | |||||||||||||||||||||||||||||||||||||||||||||||||||||||||||||||||||||||||||||||||||||||||||||||||||||||||||||||||||||||||||||||||||||||||||||||||||||||||||||||||||
|
|
|
| ||||||||||||||||||||||||||||||||||||||||||||||||||||||||||||||||||||||||||||||||||||||||||||||||||||||||||||||||||||||||||||||||||||||||||||||||||||||||||||||||
Special Cup | |||||||||||||||||||||||||||||||||||||||||||||||||||||||||||||||||||||||||||||||||||||||||||||||||||||||||||||||||||||||||||||||||||||||||||||||||||||||||||||||||||
|
|
|
| ||||||||||||||||||||||||||||||||||||||||||||||||||||||||||||||||||||||||||||||||||||||||||||||||||||||||||||||||||||||||||||||||||||||||||||||||||||||||||||||||


Retro Grand Prix
Shell Cup | |||||||||||||||||||||||||||||||||||||||||||||||||||||||||||||||||||||||||||||||||||||||||||||||||||||||||||||||||||||||||||||||||||||||||||||||||||||||||||||||||||
|---|---|---|---|---|---|---|---|---|---|---|---|---|---|---|---|---|---|---|---|---|---|---|---|---|---|---|---|---|---|---|---|---|---|---|---|---|---|---|---|---|---|---|---|---|---|---|---|---|---|---|---|---|---|---|---|---|---|---|---|---|---|---|---|---|---|---|---|---|---|---|---|---|---|---|---|---|---|---|---|---|---|---|---|---|---|---|---|---|---|---|---|---|---|---|---|---|---|---|---|---|---|---|---|---|---|---|---|---|---|---|---|---|---|---|---|---|---|---|---|---|---|---|---|---|---|---|---|---|---|---|---|---|---|---|---|---|---|---|---|---|---|---|---|---|---|---|---|---|---|---|---|---|---|---|---|---|---|---|---|---|---|---|---|
|
|
|
| ||||||||||||||||||||||||||||||||||||||||||||||||||||||||||||||||||||||||||||||||||||||||||||||||||||||||||||||||||||||||||||||||||||||||||||||||||||||||||||||||
Banana Cup | |||||||||||||||||||||||||||||||||||||||||||||||||||||||||||||||||||||||||||||||||||||||||||||||||||||||||||||||||||||||||||||||||||||||||||||||||||||||||||||||||||
|
|
|
| ||||||||||||||||||||||||||||||||||||||||||||||||||||||||||||||||||||||||||||||||||||||||||||||||||||||||||||||||||||||||||||||||||||||||||||||||||||||||||||||||
Leaf Cup | |||||||||||||||||||||||||||||||||||||||||||||||||||||||||||||||||||||||||||||||||||||||||||||||||||||||||||||||||||||||||||||||||||||||||||||||||||||||||||||||||||
|
|
|
| ||||||||||||||||||||||||||||||||||||||||||||||||||||||||||||||||||||||||||||||||||||||||||||||||||||||||||||||||||||||||||||||||||||||||||||||||||||||||||||||||
Lightning Cup | |||||||||||||||||||||||||||||||||||||||||||||||||||||||||||||||||||||||||||||||||||||||||||||||||||||||||||||||||||||||||||||||||||||||||||||||||||||||||||||||||||
|
|
|
| ||||||||||||||||||||||||||||||||||||||||||||||||||||||||||||||||||||||||||||||||||||||||||||||||||||||||||||||||||||||||||||||||||||||||||||||||||||||||||||||||


Battle courses
| Nitro courses | |||||||||||||||||||||||
|---|---|---|---|---|---|---|---|---|---|---|---|---|---|---|---|---|---|---|---|---|---|---|---|
|
|
|
| ||||||||||||||||||||
| Retro courses | |||||||||||||||||||||||
|
| ||||||||||||||||||||||


Items
- For information on the probability of obtaining each item from an Item Box, see Mario Kart DS item probability distributions.
As with other Mario Kart games, a main element of Mario Kart DS are the pick-up items that allow the racer to take certain advantage over their opponents. An item can be obtained by driving into an Item Box. This causes the item roulette at the top-left corner of the screen. Racers in higher positions receive less powerful items than racers in lower positions. Some items are unavailable in Battle Mode, and in the mode, similar to normal races, leaders with the most Balloons or Shine Sprites receive less powerful items.
Each kart has an Items stats ratio, which determines the variety of items that a racer can receive; karts with a higher items ratio are more likely to receive rare items. In subsequent games, this stat was removed, making position the only factor that influences items. When the Item Roulette has chosen a normal item, it makes a simple plong sound, but if the racer receives a more powerful item, it makes a stronger plong sound.
The game introduces two items, Bullet Bill and Blooper, both of which have since appeared in every subsequent Mario Kart game. Most of Mario Kart DS's item artworks are from Mario Kart: Double Dash!! except for the Fake Item Box, Triple Bananas, Boo, Bullet Bill and Blooper.
| Image | Name | Instruction booklet description |
|---|---|---|

|
Mushroom | Provides a short speed boost. |

|
Triple Mushrooms | Each press of |

|
Golden Mushroom | Allows you to use Mushroom boosts as many times as you want for a short period of time. |

|
Item Box | Drive through the item boxes on the tracks to get the items contained within. The item inside is determined randomly. 1 In Balloon Battle, if the player is eliminated from the game and gets an Item Box, the player only receives an Item Box, as an actual item. This can be placed on the floor, and someone not eliminated can use it, but it only lasts for a short time before disappearing. |

|
Fake Item Box | Looks just like an item box, but when you run into it, it knocks you over. |

|
Banana | Makes karts spin out when run over. |

|
Triple Bananas | Press |

|
Green Shell | When thrown, this shell travels in a straight line and knocks over the first kart it hits. |

|
Triple Green Shells | Press |

|
Red Shell | These automatically lock onto and chase after the next kart in front of you. When hit, the kart rolls over. |

|
Triple Red Shells | Press |

|
Spiny Shell | This shell travels and chases after the lead kart and blows up when it reaches its target. Any kart in the blast radius will be knocked over or spun around. |

|
Star | Makes you invincible for a brief period of time. While invincible, you will knock over any kart you hit. |

|
Lightning | Makes all opponents spin out, drop their items, and shrink for a brief period of time. |

|
Bob-omb | Explodes after a brief pause or when another kart comes near it. Any kart in the blast radius will be knocked over or spun around. |

|
Blooper | Sprays ink on all of the karts in front of you, obscuring those drivers' view of the track. |

|
Bullet Bill | Briefly transforms the user into a Bullet Bill that soars through the air along the track, knocking over karts along the way. |

|
Boo | Unleashes Boo, who turns you invisible for a brief time, making you impervious to enemy attacks, and steals an opponent's item. |
1 - The instruction booklet provides this description in page 10
Racing techniques
Rocket Start
Throughout the entire series, the Rocket Start allow drivers to give them an extra speed boost and get a head start when a race begins. To use the technique for this installment, players should stay at the starting line and wait for the countdown to hit two. When it does reach that number and when it starts to fade, players should hold the ![]() button to rev up the kart's engine. When START appears on the race screen, the kart receives a small boost of speed out from the starting line, which is a very helpful move to get first place early on in a race. But, there is a risk to this move. If players hold the button before the two fades, it may make the player's kart falter, and takes a few seconds to get back up to normal speed. If the player holds the
button to rev up the kart's engine. When START appears on the race screen, the kart receives a small boost of speed out from the starting line, which is a very helpful move to get first place early on in a race. But, there is a risk to this move. If players hold the button before the two fades, it may make the player's kart falter, and takes a few seconds to get back up to normal speed. If the player holds the ![]() after the second "ding" sound is heard and end, the player can get a boost that is a little faster than the normal small boost.
after the second "ding" sound is heard and end, the player can get a boost that is a little faster than the normal small boost.
Drifting and powersliding

In the entire Mario Kart series, players drift by holding the ![]() button on a turn. Gray wisps come out of their kart as they turn around corners, possibly tighter or better than normal turning.
button on a turn. Gray wisps come out of their kart as they turn around corners, possibly tighter or better than normal turning.
The next step up is powersliding. While drifting, players can move the ![]() Control Pad right and left repeatedly to produce sparks behind the kart. If done correctly, the sparks change their colors and intensity from blue to orange on each alternated move. After the sparks turn orange, the player releases the
Control Pad right and left repeatedly to produce sparks behind the kart. If done correctly, the sparks change their colors and intensity from blue to orange on each alternated move. After the sparks turn orange, the player releases the ![]() button to stop drifting and release a brief Mini-Turbo after powersliding. This can be used to dodge Spiny Shell if combined with a hop only during 100cc and 150cc races.
button to stop drifting and release a brief Mini-Turbo after powersliding. This can be used to dodge Spiny Shell if combined with a hop only during 100cc and 150cc races.
A player can perform a useful technique known as snaking by performing consecutive mini-turbos in a zigzagged direction, which offers a player the boost they need to get further ahead. This technique is much easier to perform with karts with higher handling, especially with Dry Bones.
Slipstreaming
Back from Mario Kart 64, Slipstreaming is simply moving just behind another player. If racers can stay behind their opponent's vehicle for about four seconds, players get a momentary speed boost that is strong enough to pass the other player.
Multiplayer
The multiplayer mode allows up to eight players to play either by multi-card (Normal) or by Download Play (Simple) mode.
In Normal mode, players can select any character and kart combination they have unlocked. They can also pick any track that any Game Card has unlocked.
In Simple mode, players can only select courses from the Mushroom Cup and the Shell Cup. Only three of the battle courses are available—Nintendo DS, Tart Top and Pipe Plaza—which are always selected by the game at random. Download Play participants are forced to play as Shy Guy, whose color is selected by the game randomly. This applies even if everyone in the room has the game.
Options

In the options menu, the player can select "Settings", "Edit", or "Erase Data". Under "Settings", the sound output can be changed between stereo, headphones, and surround and the "Locate Friend" feature can be togged on or off. "Locate Friend" notifies the player about friends who are seeking opponents while connected to the internet. Under "Edit", the player can change their nickname and make their own emblem for racing throughout the game. They also have an option to make the emblem show up on the kart they are driving. Additionally, this emblem shows up next to a player's name while driving in a multiplayer or Nintendo WFC race. "Erase Data" clears all save data.
Gallery
- For this subject's image gallery, see Gallery:Mario Kart DS.
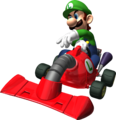
Luigi driving his Poltergust 4000
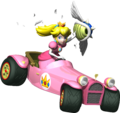
Peach driving her Royale holding a Spiny Shell
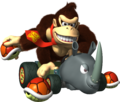
Donkey Kong driving his Rambi Rider with Triple Red Shells

Lakitu, holding up the Final Lap sign.


Media
- For a complete list of media for this subject, see List of Mario Kart DS media.
| File info 0:30 |
| File info 0:29 |
| File info 0:30 |
Pre-release and unused content
- Main article: List of Mario Kart DS pre-release and unused content
There were three unused items: the Chain Chomp, Bowser's Shell, and a purple Koopa Shell, although the Chain Chomp was the only one found in the item roulette. The Chain Chomp would have likely functioned the same as in Mario Kart: Double Dash!!. Professor Elvin Gadd was planned to be playable and would have had the Poltergust 4000 as his kart. Birdo may have also be planned as a playable character as there is a pink version of the Egg 1 found in the data.
Glitches
- Main article: List of Mario Kart DS glitches
Choco Mountain boulder glitch
In Choco Mountain, if the player goes to the lake and the water splashes before they fall, the boulder should hit them. If done correctly, they should start flying. The screen will then turn black as if they fell into the water. Lakitu will then pick them up. This glitch rarely works after the first time it is performed.
Mini-Spin turn item glitch
To perform this glitch, the player must drive towards an item box in any mode (battle mode is preferred) and sit themselves right in the center where it appears so that they continuously break it open when it appears again. Then, the player should hold either left or right on ![]() . When the item box appears again, it will break as usual, and the player will turn a very small amount in the direction pressed. Given time, so long as the player doesn't move, the player can turn all the way round in the direction pressed.
. When the item box appears again, it will break as usual, and the player will turn a very small amount in the direction pressed. Given time, so long as the player doesn't move, the player can turn all the way round in the direction pressed.
Pipe Plaza Bob-omb glitch
In Pipe Plaza, if the player has a Bob-omb and drops it near one of the pipe holes, another player or a CPU should hit the Bob-omb. If done correctly, the player should go through the pipe hole and they will fall. Lakitu will pick the player up as usual. This can also be done with a Star, but is harder to pull off.
Staff
- Main article: List of Mario Kart DS staff
A few staff members from Mario Kart: Double Dash!! returned to work on this game, including Hirotake Ohtsubo and Yoshihisa Morimoto as course designers and Yasuyuki Oyagi as one of the directors. Hiromu Takemura, who also worked as a course designer for Double Dash!! and a map designer for Super Mario Sunshine, led as the course director. Hideki Konno returns as a producer after being absent from Double Dash!!'s development. Shigeru Miyamoto served as the general producer and Satoru Iwata served as the executive producer.
Reception
Mario Kart DS received critical acclaim. It currently maintains a 9.2 average at Gamestats, the highest score for a Nintendo DS game on the site (as of December 2006).
Gamespy reviewer Bryn Williams said that online, Nintendo "trimmed it back a little too much for my liking", but was certain that "Even with a few online flaws, this is the best Mario Kart ever." With a rank of 5 out of 5 and describing the multiplayer experience as "great".
GameSpot reviewer Justin Calvert had similar quips with the online feature: "Whether these opponents were leaving voluntarily or because of network problems is anybody's guess, but it's equally irritating either way." He finished up similarly by saying "Mario Kart DS is without a doubt one of the best games to hit the Nintendo DS to date." Mario Kart DS received a score of 9.2 out of 10 and was regarded as GameSpot's Editor's Choice and DS game of the year.
IGN gave an overall score of 9.5 out of 10, granting the game the IGN Editor's Choice Award and DS game of the year. Reviewer Craig Harris commented that "it's just hard to ignore just how limited the online presentation is.", but ended the review with this: "The only way to finish this review is just to say it: this is the greatest Mario Kart game ever developed, and is without a doubt the best DS game of 2005."
| Reviews | |||
|---|---|---|---|
| Release | Reviewer, Publication | Score | Verdict |
| Nintendo DS | Bryn Williams, Gamespy | 5/5 | "In the end, it really boils down to this. If you're a fan of Nintendo, racing games, and want some of the best digital excitement 2005 has to offer, you need to get Mario Kart DS. The online shortcomings are annoying, yes, but very minor, and they are more than made up for by the amazing single-player content and local WiFi gameplay. If you absolutely hate, hate, hate karting games, then fair enough. Just be sure to book that next appointment with your shrink to figure out why that is." |
| Nintendo DS | Justin Calvert, GameSpot | 9.2/10 | "Mario Kart DS is without a doubt one of the best games to hit the Nintendo DS to date. The game plays every bit as well as any of its predecessors, and adds just enough new features to the mix to make it worthy of your attention, even if you're still playing any of those games on a regular basis. The online play is undoubtedly the icing on an especially yummy cake, and even if you're not in a position to sample said icing, a yummy cake without icing is still a yummy cake." |
| Nintendo DS | Craig Harris, IGN | 9.5/10 | "After experiencing Mario Kart DS, it's hard to imagine how Nintendo's going to improve on what they've done for this stunning portable rendition. There's so much gameplay and depth in this design, moreso than the series has ever had in the past. It's an amazingly addictive racer both in single and multiplayer modes, and even with the limitations of the online functions, it's impossible to avoid becoming addicted to the long distance Mario Kart match-ups. The only way to finish this review is just to say it: this is the greatest Mario Kart game ever developed, and is without a doubt the best DS game of 2005." |
| Nintendo DS | Jeremy Parish, 1UP | 8.7/10 | "Everything about MKDS comes together into a surprisingly compelling package, a portable racing game on par with anything ever to appear on a console. Even for a skeptic like me. Like the victor of a tough kart race, MKDS has come from behind against steep odds to snatch the gold from the clutches of cynicism." |
| Aggregators | |||
| Compiler | Platform / Score | ||
| Metacritic | 91 | ||
| GameRankings | 91.43% | ||
Sales
Mario Kart DS is the 3rd best selling game for the Nintendo DS, selling 23.60 million copies worldwide.
References to other games
- Super Mario Bros. 3: The course Airship Fortress is based of the many airship based levels in this game. Desert Hills is based on World 2 of this game, even featuring the Angry Sun, Podoboos, Firesnakes, the pyramid, and two pipe formations taken from a level in this world. Water Arena and Sand Arena use various objects from this game. A sprite of Mario and Luigi's heads appear on the Single Player and VS. mode bars.
- Super Mario Kart: Mario Circuit 1, Donut Plains 1, Koopa Beach 2, and Choco Island 2 return as retro courses.
- Donkey Kong Country: The Rambi Rider is based off Rambi from this game.
- Super Mario 64: The course Tick-Tock Clock is based off of the level of the same name in this game.
- Mario Kart 64: Moo Moo Farm, Frappe Snowland, Choco Mountain, and Banshee Boardwalk return as retro courses, and Block Fort returns as a playable battle course. Also, the name "Wario Stadium" is reused. Lastly, part of the credits theme from this game is used in the second part of the credits when Mirror Special Cup or Lightning Cup is beat in first place and the eight playable characters that are available from the start are taken from the eight playable characters in this game, including the same eight colored karts.
- Donkey Kong 64: Donkey Kong's voice clips are reused in the Beta Kiosk Demo of this game, but not in the final version.
- Mobile Golf: The Gold Mantis is based off Foreman Spike's excavator from his artwork for this game.
- Mario Kart: Super Circuit: Peach Circuit, Bowser Castle 2, Luigi Circuit, and Sky Garden return as retro courses. Also, the eight playable characters in this game were reused as the starting characters. The Lightning Cup returns as the highest-tier retro cup. The multiplayer-only Shy Guys and their kart share their statistics with Yoshi, similar to the multiplayer-only colored Yoshis from this game.
- Wario Land 4: The Brute is based off the Wario Car in this game.
- Luigi's Mansion: The Poltergust 4000 is based off the Poltergust 3000 from this game. Also a course of the same name is based on this game.
- Super Mario Sunshine: The course Delfino Square is based off the main area of this game, Delfino Plaza. Piantas also appear as spectators in this course.
- Mario Kart: Double Dash!!: Luigi Circuit, Baby Park, Mushroom Bridge, and Yoshi Circuit return as retro courses, and Pipe Plaza returns as a playable battle course. Also, Wario Stadium seems to use elements from Waluigi Stadium. Some sound effects and some of the playable characters' voice clips are also taken from this game, and the character icons from the character select menu are used at the end of a Grand Prix race and a VS. match. The 3-2-1 starting countdown is also taken from this game, and it has appeared in every recurring game since then.
- Super Mario 64 DS: All of the bosses, with the exception of King Whomp, return from this game. Mario, Luigi, Wario, and Yoshi also have voice clips recycled from this game.
- Donkey Kong Jungle Beat: Many of Donkey Kong's voice clips are recycled from this game.
References in later games
- New Super Mario Bros.: The Blooper's design and the Dash/Super Mushroom's menu design return for the first time in this game and become their standard designs in subsequent games.
- Nintendo Monopoly: The kart design on the space Mario Kart, the ? Block card "Take a spin in the Kart", and on the Brick Block card "Renew kart license" is the same from this game.
- Super Smash Bros. Brawl: Waluigi Pinball's theme is used as a song arrangement.
- Mario Kart Wii: Yoshi Falls, Delfino Square, Desert Hills, and Peach Gardens appear as classic race courses. Twilight House is a classic battle course. The item roulette and countdown chimes were reused in this game.
- Mario Sports Mix: Waluigi owns a pinball-themed course in this game, Waluigi Pinball.
- Mario Kart 7: Luigi's Mansion, Waluigi Pinball, DK Pass, and Airship Fortress appear as classic race courses. Palm Shore is a classic battle course. Also the design of the standard kart is similar but has a rounder appearance. Also, part of the credits theme is similar to that in Mario Kart DS, the karts B Dasher and Egg 1 re-appear too. The item roulette and countdown chimes were reused in this game once again.
- Mario Kart Arcade GP 2: Several character-exclusive karts greatly resemble ones present in this game.
- Mario Kart Arcade GP DX: Some of the character-exclusive karts present in Mario Kart Arcade GP 2 return in this game.
- Mario Kart 8: Cheep Cheep Beach, Wario Stadium, and Tick-Tock Clock return as classic race courses. The B Dasher returns as one of the four karts included in the first DLC pack.
- Super Smash Bros. for Nintendo 3DS / Wii U: Rainbow Road's theme is used in the "Rainbow Road Medley" arrangement.
- Mario Kart 8 Deluxe: An arrangement of the music for Luigi's Mansion is used in GCN Luigi's Mansion. Shroom Ridge, Waluigi Pinball, Peach Gardens, and Mario Circuit reappear as classic courses in the Booster Course Pass.
- Super Smash Bros. Ultimate: The B Dasher appears as a spirit.
- Mario Kart Tour: Luigi's Mansion, Waluigi Pinball, Shroom Ridge, DK Pass, Mario Circuit, Airship Fortress and Peach Gardens return as classic race courses. All of this game's classic courses also return except for N64 Moo Moo Farm, GCN Luigi Circuit and N64 Banshee Boardwalk. Twilight House returns as a classic battle course. The B Dasher, Poltergust 4000, Streamliner, Royale, Egg 1, Mushmellow, Rambi Rider and Dragonfly return as karts. Challenges with unique objectives return as the fourth and final race in every cup.
Names in other languages
| Language | Name | Meaning |
|---|---|---|
| Japanese | マリオカートDS Mario Kāto DS |
Mario Kart DS |
| Chinese | 瑪利歐賽車DS Mǎlìōu Sàichē DS |
Mario Racing DS |
| French | Mario Kart DS |
- |
| German | Mario Kart DS |
- |
| Italian | Mario Kart DS |
- |
| Korean | 마리오 카트 DS Mario Kateu DS |
Mario Kart DS |
| Spanish | Mario Kart DS |
- |
Trivia
- This and Mario Kart Tour are the only Mario Kart games in which Lakitu does not start the races.
- If the game is played on the original Nintendo DS, Mario says "Yahoo!" on the Nintendo logo screen, but if it is played on the DS Lite, DSi, 3DS, or Wii U, he instead says "Here we go!"[10][11]
- Mario Kart DS is one of the few Nintendo DS games with a "Language Block", meaning that the in-game language (except Japanese) is the same as that of the Nintendo DS system. Japanese is the only language available for Mario Kart DS releases in Japan.
- On page 12 of the Mario Kart DS instruction booklet, the text for the Blooper reads, "Sprays ink on the all of the karts in front of you", where there is an erroneous "the" between "on" and "all". Earlier versions of the instruction booklet also featured a misspelling of "perform" as "perfprm" on page 9, but this was fixed in later releases of the booklet.
References
- ^ Akfamilyhome (April 1, 2020). A History of Nintendo's Hong Kong Releases. YouTube (Chinese (English subtitles available)). Retrieved June 5, 2024. (Archived May 25, 2024, 11:22:53 UTC via Wayback Machine.)
- ^ Point System for 5 Players.
- ^ Point System for 6 Players.
- ^ Point System for 7 Players.
- ^ Mario Kart Super Circuit § Misc.
- ^ https://youtu.be/rHS3RQfqxSg?t=835
- ^ A transcription of the in-game statistics of Mario Kart DS. The values used to fill the bars in the kart selection screen are found in the kartmenuparam and charmenuparam sections.
- ^ A transcription of the in-game statistics of Mario Kart DS. Please note that due to the 16-bit Fixed Point format used by the game, rational numbers are shown as integers that must be divided by 4096.
- ^ https://docs.google.com/spreadsheets/d/1ekw2H8dZvsBGEOS-MJWkR2hDFflBpWnX3VhxcWhff_8/edit#gid=1195895108[better source needed]
- ^ Mario Kart DS (Wii U) - 150cc - Grand Prix: All Cups & End Credits (1080p60fps) YouTube. Retrieved October 11, 2015
- ^ For comparison, here is the game on a normal DS.