Pit of 100 Trials (Paper Mario: The Thousand-Year Door): Difference between revisions
(→Prizes) Tags: Mobile edit Advanced mobile edit |
|||
| (38 intermediate revisions by 24 users not shown) | |||
| Line 1: | Line 1: | ||
{{italic title|id=yes}} | {{italic title|id=yes}} | ||
{{ | {{location infobox | ||
|image=[[File:Pit Entrance.png|250px]]<br>[[Mario]] and [[Admiral Bobbery|Bobbery]] standing near the warp pipe leading to the Pit in the GameCube version | |||
|first_appearance=''[[Paper Mario: The Thousand-Year Door]]'' ([[List of games by date#2004|2004]]) | |||
|latest_appearance=''[[Paper Mario: The Thousand-Year Door (Nintendo Switch)|Paper Mario: The Thousand-Year Door]]'' ([[Nintendo Switch]]) ([[List of games by date#2024|2024]]) | |||
}} | |||
{{quote|DANGER!!! DO NOT ENTER! This pipe is the entrance to the Pit of 100 Trials! First Attack and Bump Attack badges don't work, so BEWAAAAAAAAAAARE!|The sign at the entrance to the Pit|[[Paper Mario: The Thousand-Year Door]]}} | |||
The '''Pit of 100 Trials''' of [[Rogueport]] appears in ''[[Paper Mario: The Thousand-Year Door]]''. It is the first Pit of 100 Trials to appear in the [[Paper Mario (series)|''Paper Mario'' series]], with ''[[Super Paper Mario]]'' expanding on the concept by introducing two new Pits: The [[Flipside Pit of 100 Trials]] and the [[Flopside Pit of 100 Trials]]. | The '''Pit of 100 Trials''' of [[Rogueport]] appears in ''[[Paper Mario: The Thousand-Year Door]]''. It is the first Pit of 100 Trials to appear in the [[Paper Mario (series)|''Paper Mario'' series]], with ''[[Super Paper Mario]]'' expanding on the concept by introducing two new Pits: The [[Flipside Pit of 100 Trials]] and the [[Flopside Pit of 100 Trials]]. | ||
The pipe that leads down to the Pit of 100 Trials is found near | The pipe that leads down to the Pit of 100 Trials is found near [[the Thousand-Year Door]]. According to [[Grifty]], the [[Shadow Queen]] created this dungeon and filled it with powerful monsters. She threw people she did not like into the pit and left them to the mercy of the monsters within it. Sometime after her defeat, the pit was closed off from the public. | ||
The early levels are relatively simple to clear, being inhabited by enemies found in early chapters. As the player progresses downward, however, the enemies become stronger, featuring more powerful enemies from later chapters and enemies unique to the Pit of 100 Trials itself. Upon reaching Level 100, the player faces [[Bonetail]], a zombified dragon which acts as a much stronger version of [[Hooktail]] and [[Gloomtail]]. In the [[Paper Mario: The Thousand-Year Door (Nintendo Switch)|Nintendo Switch remake]], [[Whacka]] replaces Bonetail as the Pit of 100 Trials final boss on repeat trips after Whacka has been hit eight times on [[Keelhaul Key]] and the [[Mailbox SP#RDM Extra Issue|RDM Extra Issue]] email is received. | |||
Every tenth floor, with the exception of the hundredth, contains a brief rest from battles, a treasure chest, and a pipe which takes the player back to entrance of the pit. Occasionally, [[Charlieton]] or a [[Mover]] can be found; Charlieton offers to sell the player items for abnormally high prices, while Movers accept payment for taking them back up to the surface or skipping him down two or five levels. Rest floors can, however, be skipped this way. In the Nintendo Switch remake, after completing the pit, the Mover appears at the entrance and offers to send Mario straight to Level 50 for 300 coins. | |||
In the remake, all battles in the Pit of 100 Trials provide a Clear Bonus of 5, 10 or 20 coins on completion, similar to chapter bosses. | |||
Two troubles at the [[Trouble Center]] require the player to enter the Pit; [[Pine T. Jr.]]'s [[Pine T. Sr.|father]] [[Help my Daddy!|needs to be rescued]] on Level 18, and [[Erase that graffiti!|another trouble necessitates]] the destruction of a wall on Level 50 using [[Admiral Bobbery]]'s field ability. | Two troubles at the [[Trouble Center]] require the player to enter the Pit; [[Pine T. Jr.]]'s [[Pine T. Sr.|father]] [[Help my Daddy!|needs to be rescued]] on Level 18, and [[Erase that graffiti!|another trouble necessitates]] the destruction of a wall on Level 50 using [[Admiral Bobbery]]'s field ability. | ||
==Enemies | |||
Each floor has one enemy in the overworld, but when Mario enters battle, there are usually at least 2 enemies in the battle, with the deeper floors having more. There is no way to get down to the next floor without winning the battle, as the defeat of the enemies causes a [[Warp Pipe]] to appear out of the ground, leading to the next room of the pit. However, if a Bandit steals from the player and runs away, the enemy will not be considered defeated and the fight will have to be restarted with the Bandit holding the stolen object. Since Bandits run away on their turn when holding a stolen object, it | ==Enemies== | ||
Each floor has one enemy in the overworld, but when Mario enters battle, there are usually at least 2 enemies in the battle, with the deeper floors having more. There is no way to get down to the next floor without winning the battle, as the defeat of the enemies causes a [[Warp Pipe]] to appear out of the ground, leading to the next room of the pit. However, if a Bandit steals from the player and runs away, the enemy will not be considered defeated and the fight will have to be restarted with the Bandit holding the stolen object. Since Bandits run away on their turn when holding a stolen object, it must be defeated on the first turn or it will simply run again. This can result in an [[unwinnable state]] should the player not have the means to deal enough damage quickly, though this generally does not happen when playing the game normally.<!--it's very hard to be unable to deal 5 damage in a turn at the progression you're supposed to fight a Bandit, and with Badge Bandits you're supposed to have have stuff like Super Boots and Art Attack--> | |||
===Floors 1-9=== | ===Floors 1-9=== | ||
{|style="text-align: center; width: 100% | {|class=wikitable style="text-align: center; width: 100%" | ||
|- | |- | ||
!width="30%"|Enemy!!width="15%"|HP!!width="15%"|Attack!!width="15%"|Defense!!width="25%"|Floor Locations | !width="30%"|Enemy!!width="15%"|HP!!width="15%"|Attack!!width="15%"|Defense!!width="25%"|Floor Locations | ||
|- | |- | ||
|[[Gloomba]]||7||3||0||1; 6 | |[[File:PMTTYDGloomba.png|55px]]<br>[[Gloomba]]||7||3||0||1; 6 | ||
|- | |- | ||
|[[Spinia]]||3||1||0||2; 7 | |[[File:Spinia.png|80px]]<br>[[Spinia]]||3||1||0||2; 7 | ||
|- | |- | ||
|[[Spania]]||3||1||0||3; 8 | |[[File:Spania.png|80px]]<br>[[Spania]]||3||1||0||3; 8 | ||
|- | |- | ||
|[[Dull Bones]]||1||2||1||4; 9 | |[[File:PMTTYDDullBones.png|75px]]<br>[[Dull Bones]]||1||2||1||4; 9 | ||
|- | |- | ||
|[[Fuzzy]]||3||1||0||5 | |[[File:PMTTYD Fuzzy.png|80px]]<br>[[Fuzzy]]||3||1||0||5 | ||
|} | |} | ||
===Floors 11-19=== | ===Floors 11-19=== | ||
{|style="text-align: center; width: 100% | {|class=wikitable style="text-align: center; width: 100%" | ||
|- | |- | ||
!width="30%"|Enemy!!width="15%"|HP!!width="15%"|Attack!!width="15%"|Defense!!width="25%"|Floor Locations | !width="30%"|Enemy!!width="15%"|HP!!width="15%"|Attack!!width="15%"|Defense!!width="25%"|Floor Locations | ||
|- | |- | ||
|[[Paragloomba]]||7||3||0||11; 16 | |[[File:PMTTYD Paragloomba Sprite.png|75px]]<br>[[Paragloomba]]||7||3||0||11; 16 | ||
|- | |- | ||
|[[Cleft]]||2||2||2||12; 17 | |[[File:Cleft TTYD sprite.png|80px]]<br>[[Cleft]]||2||2||2||12; 17 | ||
|- | |- | ||
|[[Pokey]]||4||3||0||13; 18 | |[[File:PMTTYD Pokey.png|70px]]<br>[[Pokey]]||4||3||0||13; 18 | ||
|- | |- | ||
|[[Dark Puff]]||3||2||0||14; 19 | |[[File:DarkPuff.png|100px]]<br>[[Dark Puff]]||3||2||0||14; 19 | ||
|- | |- | ||
|[[Pider]]||5||2||0||15 | |[[File:Pider PMTTYD.png|120px]]<br>[[Pider]]||5||2||0||15 | ||
|} | |} | ||
===Floors 21-29=== | ===Floors 21-29=== | ||
{|style="text-align: center; width: 100% | {|class=wikitable style="text-align: center; width: 100%" | ||
|- | |- | ||
!width="30%"|Enemy!!width="15%"|HP!!width="15%"|Attack!!width="15%"|Defense!!width="25%"|Floor Locations | !width="30%"|Enemy!!width="15%"|HP!!width="15%"|Attack!!width="15%"|Defense!!width="25%"|Floor Locations | ||
|- | |- | ||
|[[Spiky Gloomba]]||7||4||0||21; 26 | |[[File:Spiked Gloomba.png|55px]]<br>[[Spiky Gloomba]]||7||4||0||21; 26 | ||
|- | |- | ||
|[[Bandit]]||5||2||0||22; 27 | |[[File:Red Bandit.png|75px]]<br>[[Bandit]]||5||2||0||22; 27 | ||
|- | |- | ||
|[[Lakitu]]||5||2||0||23; 28 | |[[File:Lakitu.png|90px]]<br>[[Lakitu]]||5||2||0||23; 28 | ||
|- | |- | ||
|[[Spiny]]||3||3||3||Found wherever a Lakitu is located. | |[[File:Spiny PMTTYD.png|90px]]<br>[[Spiny]]||3||3||3||Found wherever a Lakitu is located. | ||
|- | |- | ||
|[[Bob-omb]]||4||2||1||24; 29 | |[[File:Bob-omb.png|80px]]<br>[[Bob-omb]]||4||2||1||24; 29 | ||
|- | |- | ||
|[[Boo]]||7||3||0||25 | |[[File:PMTTYD Boo Sprite.png|100px]]<br>[[Boo]]||7||3||0||25 | ||
|} | |} | ||
===Floors 31-39=== | ===Floors 31-39=== | ||
{|style="text-align: center; width: 100% | {|class=wikitable style="text-align: center; width: 100%" | ||
|- | |- | ||
!width="30%"|Enemy!!width="15%"|HP!!width="15%"|Attack!!width="15%"|Defense!!width="25%"|Floor Locations | !width="30%"|Enemy!!width="15%"|HP!!width="15%"|Attack!!width="15%"|Defense!!width="25%"|Floor Locations | ||
|- | |- | ||
|[[Dark Koopa]]||8||4||2||31; 36 | |[[File:Purple Koopa troopa.png|75px]]<br>[[Dark Koopa]]||8||4||2||31; 36 | ||
|- | |- | ||
|[[Hyper Cleft]]||4||3||3||32; 37 | |[[File:Hyper Cleft.png|80px]]<br>[[Hyper Cleft]]||4||3||3||32; 37 | ||
|- | |- | ||
|[[Para-Beetle|Parabuzzy]]/[[Buzzy Beetle]]||5||3||4||33; 38 | |[[File:PMTTYD Parabuzzy Sprite.png|70px]]<br>[[Para-Beetle|Parabuzzy]]/[[Buzzy Beetle]]||5||3||4||33; 38 | ||
|- | |- | ||
|[[Shady Koopa]]||8||3||1||34; 39 | |[[File:Sky Blue Troopa.png|75px]]<br>[[Shady Koopa]]||8||3||1||34; 39 | ||
|- | |- | ||
|[[Flower Fuzzy]]||6||3||0||35 | |[[File:Pink Fuzzyball.png|80px]]<br>[[Flower Fuzzy]]||6||3||0||35 | ||
|} | |} | ||
===Floors 41-49=== | ===Floors 41-49=== | ||
{|style="text-align: center; width: 100% | {|class=wikitable style="text-align: center; width: 100%" | ||
|- | |- | ||
!width="30%"|Enemy!!width="15%"|HP!!width="15%"|Attack!!width="15%"|Defense!!width="25%"|Floor Locations | !width="30%"|Enemy!!width="15%"|HP!!width="15%"|Attack!!width="15%"|Defense!!width="25%"|Floor Locations | ||
|- | |- | ||
|[[Dark Paratroopa]]||8||4||2||41; 46 | |[[File:DarkParatroopa.png|105px]]<br>[[Dark Paratroopa]]||8||4||2||41; 46 | ||
|- | |- | ||
|[[Bulky Bob-omb]]||6||2||1||42; 47 | |[[File:Bulky Bob-omb.png|150px]]<br>[[Bulky Bob-omb]]||6||2||1||42; 47 | ||
|- | |- | ||
|[[Lava Bubble]]||6||4||0||43; 48 | |[[File:Lava Bubble.png|55px]]<br>[[Lava Bubble]]||6||4||0||43; 48 | ||
|- | |- | ||
|[[Poison Pokey]]||8||4||0||44; 49 | |[[File:Poison Pokey.png|70px]]<br>[[Poison Pokey]]||8||4||0||44; 49 | ||
|- | |- | ||
|[[Spiky Parabuzzy]]/[[Spike Top]]||5||3||4||45 | |[[File:PMTTYD Spiky Parabuzzy Sprite.png|70px]]<br>[[Spiky Parabuzzy]]/[[Spike Top]]||5||3||4||45 | ||
|} | |} | ||
===Floors 51-59=== | ===Floors 51-59=== | ||
{|style="text-align: center; width: 100% | {|class=wikitable style="text-align: center; width: 100%" | ||
|- | |- | ||
!width="30%"|Enemy!!width="15%"|HP!!width="15%"|Attack!!width="15%"|Defense!!width="25%"|Floor Locations | !width="30%"|Enemy!!width="15%"|HP!!width="15%"|Attack!!width="15%"|Defense!!width="25%"|Floor Locations | ||
|- | |- | ||
|[[Badge Bandit]]||12||5||0||51; 56 | |[[File:Badge Bandit.png|75px]]<br>[[Badge Bandit]]||12||5||0||51; 56 | ||
|- | |- | ||
|[[Ice Puff]]||9||4||0||52; 57 | |[[File:IcePuff.png|100px]]<br>[[Ice Puff]]||9||4||0||52; 57 | ||
|- | |- | ||
|[[Dark Boo]]||8||5||0||53; 58 | |[[File:PMTTYD Dark Boo Sprite.png|100px]]<br>[[Dark Boo]]||8||5||0||53; 58 | ||
|- | |- | ||
|[[Red Chomp]]||6||5||3||54; 59 | |[[File:Red Chomp.png|180px]]<br>[[Red Chomp]]||6||5||3||54; 59 | ||
|- | |- | ||
|[[Moon Cleft]]||6||5||5||55 | |[[File:Moon Cleft.png|80px]]<br>[[Moon Cleft]]||6||5||5||55 | ||
|} | |} | ||
===Floors 61-69=== | ===Floors 61-69=== | ||
{|style="text-align: center; width: 100% | {|class=wikitable style="text-align: center; width: 100%" | ||
|- | |- | ||
!width="30%"|Enemy!!width="15%"|HP!!width="15%"|Attack!!width="15%"|Defense!!width="25%"|Floor Locations | !width="30%"|Enemy!!width="15%"|HP!!width="15%"|Attack!!width="15%"|Defense!!width="25%"|Floor Locations | ||
|- | |- | ||
|[[Dark Lakitu]]||13||5||0||61; 66 | |[[File:PMTTYD Dark Lakitu.png|90px]]<br>[[Dark Lakitu]]||13||5||0||61; 66 | ||
|- | |- | ||
|[[Sky-Blue Spiny]]||6||6||4||Found wherever a Dark Lakitu is located. | |[[File:SkyblueSpiny.png|90px]]<br>[[Sky-Blue Spiny]]||6||6||4||Found wherever a Dark Lakitu is located. | ||
|- | |- | ||
|[[Dry Bones]]||8||5||2||62; 67 | |[[File:Paper Dry Bones.png|75px]]<br>[[Dry Bones]]||8||5||2||62; 67 | ||
|- | |- | ||
|[[Dark Wizzerd]]||10||5||2||63; 68 | |[[File:DarkWizzerd.png|130px]]<br>[[Dark Wizzerd]]||10||5||2||63; 68 | ||
|- | |- | ||
|[[Frost Piranha]]||10||5||0||64; 69 | |[[File:PMTTYD Frost Piranha.png|100px]]<br>[[Frost Piranha]]||10||5||0||64; 69 | ||
|- | |- | ||
|[[Dark Craw]]||20||6||0||65 | |[[File:Dark Craw.png|80px]]<br>[[Dark Craw]]||20||6||0||63; 64; 65 | ||
|} | |} | ||
===Floors 71-79=== | ===Floors 71-79=== | ||
{|style="text-align: center; width: 100% | {|class=wikitable style="text-align: center; width: 100%" | ||
|- | |- | ||
!width="30%"|Enemy!!width="15%"|HP!!width="15%"|Attack!!width="15%"|Defense!!width="25%"|Floor Locations | !width="30%"|Enemy!!width="15%"|HP!!width="15%"|Attack!!width="15%"|Defense!!width="25%"|Floor Locations | ||
|- | |- | ||
|[[Wizzerd]]||10||6||3||71; 76 | |[[File:Wizzered.png|130px]]<br>[[Wizzerd]]||10||6||3||71; 75; 76 | ||
|- | |- | ||
|[[Dark Koopatrol]]||25||5||2||72; 77 | |[[File:Dark Koopatrol.png|80px]]<br>[[Dark Koopatrol]]||25||5||2||72; 77 | ||
|- | |- | ||
|[[Phantom Ember]]||10||5||0||73; 78 | |[[File:Phantom Ember.png|55px]]<br>[[Phantom Ember]]||10||5||0||73; 78 | ||
|- | |- | ||
|[[Swoopula]]||9||4||0||74; 79 | |[[File:Swoopula.png|100px]]<br>[[Swoopula]]||9||4||0||74; 79 | ||
|- | |- | ||
|[[Chain Chomp|Chain-Chomp]]||7||6||5||75 | |[[File:Chain Chomp PMTTYD sprite.png|180px]]<br>[[Chain Chomp|Chain-Chomp]]||7||6||5||75; 76 | ||
|} | |} | ||
===Floors 81-89=== | ===Floors 81-89=== | ||
{|style="text-align: center; width: 100% | {|class=wikitable style="text-align: center; width: 100%" | ||
|- | |- | ||
!width="30%"|Enemy!!width="15%"|HP!!width="15%"|Attack!!width="15%"|Defense!!width="25%"|Floor Locations | !width="30%"|Enemy!!width="15%"|HP!!width="15%"|Attack!!width="15%"|Defense!!width="25%"|Floor Locations | ||
|- | |- | ||
|[[Spunia]]||12||7||2||81; 85; 86 | |[[File:Spunia.png|80px]]<br>[[Spunia]]||12||7||2||81; 85; 86 | ||
|- | |- | ||
|[[Dark Bristle]]||8||8||4||82; 87 | |[[File:PMTTYD Dark Bristle.png|130px]]<br>[[Dark Bristle]]||8||8||4||82; 87 | ||
|- | |- | ||
|[[Arantula]]||16||7||0||83; 88 | |[[File:Arantula TTYD sprite.png|120px]]<br>[[Arantula]]||16||7||0||83; 88 | ||
|- | |- | ||
|[[Piranha Plant (Pit of 100 Trials)|Piranha Plant]]||15||9||0||84; 89 | |[[File:Piranha Plant PMTTYD.png|100px]]<br>[[Piranha Plant (Pit of 100 Trials)|Piranha Plant]]||15||9||0||84; 89 | ||
|} | |} | ||
===Floors 91-99=== | ===Floors 91-99=== | ||
{|style="text-align: center; width: 100% | {|class=wikitable style="text-align: center; width: 100%" | ||
|- | |- | ||
!width="30%"|Enemy!!width="15%"|HP!!width="15%"|Attack!!width="15%"|Defense!!width="25%"|Floor Locations | !width="30%"|Enemy!!width="15%"|HP!!width="15%"|Attack!!width="15%"|Defense!!width="25%"|Floor Locations | ||
|- | |- | ||
|[[Elite Wizzerd]]||12||8||5||91; 95; 99 | |[[File:EliteWizzerd.png|130px]]<br>[[Elite Wizzerd]]||12||8||5||91; 95; 99 | ||
|- | |- | ||
|[[Poison Puff]]||15||8||0||92; 96 | |[[File:PMTTYDPoisonPuff.png|100px]]<br>[[Poison Puff]]||15||8||0||92; 96 | ||
|- | |- | ||
|[[Bob-ulk]]||10||4||2||93; 97 | |[[File:PMTTYD Bob-ulk Sprite.png|150px]]<br>[[Bob-ulk]]||10||4||2||93; 97 | ||
|- | |- | ||
|[[Swampire]]||20||6||0||94; 98 | |[[File:Swampire.png|100px]]<br>[[Swampire]]||20||6||0||94; 98 | ||
|- | |- | ||
|[[Amazy Dayzee]]||20||20||1||Appears randomly amongst the other enemies. One may appear on 92, 93, 96 or 97; two may appear on 94 or 98; they never appear on 91, 95 or 99. | |[[File:Amazee Dayzee TTYD sprite.png|70px]]<br>[[Amazy Dayzee]]||20||20||1||Appears randomly amongst the other enemies. One may appear on 92, 93, 96 or 97; two may appear on 94 or 98; they never appear on 91, 95 or 99. | ||
|} | |} | ||
===Floor 100=== | ===Floor 100=== | ||
{|style="text-align: center; width: 100% | {|class=wikitable style="text-align: center; width: 100%" | ||
|- | |- | ||
!width="30%"|Enemy!!width="15%"|HP!!width="15%"|Attack!!width="15%"|Defense!!width="25%"|Floor Locations | !width="30%"|Enemy!!width="15%"|HP!!width="15%"|Attack!!width="15%"|Defense!!width="25%"|Floor Locations | ||
|- | |- | ||
|[[Bonetail]]||200||8||2||100 | |[[File:Bonetail.png|200px]]<br>[[Bonetail]]||200||8||2||100 | ||
|- | |||
|[[File:Whacka PMTTYD.png|100px]]<br>[[Whacka]]<br>(Repeat trips after receiving [[Mailbox_SP#RDM_Extra_Issue|RDM Extra Issue]], Nintendo Switch version only)||108||10||1||100 | |||
|} | |} | ||
==Enemy | ==Enemy formations== | ||
As Mario and his company advance down floor by floor, every floor will always have the same base enemy, | {{main|List of Paper Mario: The Thousand-Year Door enemy formations#Pit of 100 Trials}} | ||
As Mario and his company advance down floor by floor, every floor will always have the same base enemy present in the overworld; however, when a battle is initiated, the enemy formations that appear can vary between three possible combinations of enemies (with the exception of the 100th floor, on which the enemy is always the same). Below is the list of all of the possible enemy formations that can be encountered on each floor. | |||
===Floors 1-9=== | ===Floors 1-9=== | ||
{|style="text-align: center; width: 100% | {|class=wikitable style="text-align: center; width: 100%" | ||
|- | |- | ||
!width="20%"|Floor!!width="20%"|Enemy!!width="20%"|Combo 1!!width="20%"|Combo 2!!width="20%"|Combo 3 | !width="20%"|Floor!!width="20%"|Enemy!!width="20%"|Combo 1!!width="20%"|Combo 2!!width="20%"|Combo 3 | ||
|- | |- | ||
| Line 212: | Line 222: | ||
===Floors 11-19=== | ===Floors 11-19=== | ||
{|style="text-align: center; width: 100% | {|class=wikitable style="text-align: center; width: 100%" | ||
|- | |- | ||
!width="20%"|Floor!!width="20%"|Enemy!!width="20%"|Combo 1!!width="20%"|Combo 2!!width="20%"|Combo 3 | !width="20%"|Floor!!width="20%"|Enemy!!width="20%"|Combo 1!!width="20%"|Combo 2!!width="20%"|Combo 3 | ||
|- | |- | ||
| Line 236: | Line 246: | ||
===Floors 21-29=== | ===Floors 21-29=== | ||
{|style="text-align: center; width: 100% | {|class=wikitable style="text-align: center; width: 100%" | ||
|- | |- | ||
!width="20%"|Floor!!width="20%"|Enemy!!width="20%"|Combo 1!!width="20%"|Combo 2!!width="20%"|Combo 3 | !width="20%"|Floor!!width="20%"|Enemy!!width="20%"|Combo 1!!width="20%"|Combo 2!!width="20%"|Combo 3 | ||
|- | |- | ||
| Line 260: | Line 270: | ||
===Floors 31-39=== | ===Floors 31-39=== | ||
{| style="text-align: center; width: 100% | {|class=wikitable style="text-align: center; width: 100%" | ||
|- | |- | ||
!width="20%"|Floor!!width="20%"|Enemy!!width="20%"|Combo 1!!width="20%"|Combo 2!!width="20%"|Combo 3 | !width="20%"|Floor!!width="20%"|Enemy!!width="20%"|Combo 1!!width="20%"|Combo 2!!width="20%"|Combo 3 | ||
|- | |- | ||
| Line 284: | Line 294: | ||
===Floors 41-49=== | ===Floors 41-49=== | ||
{|style="text-align: center; width: 100% | {|class=wikitable style="text-align: center; width: 100%" | ||
|- | |- | ||
!width="20%"|Floor!!width="20%"|Enemy!!width="20%"|Combo 1!!width="20%"|Combo 2!!width="20%"|Combo 3 | !width="20%"|Floor!!width="20%"|Enemy!!width="20%"|Combo 1!!width="20%"|Combo 2!!width="20%"|Combo 3 | ||
|- | |- | ||
| Line 308: | Line 318: | ||
===Floors 51-59=== | ===Floors 51-59=== | ||
{|style="text-align: center; width: 100% | {|class=wikitable style="text-align: center; width: 100%" | ||
|- | |- | ||
!width="20%"|Floor!!width="20%"|Enemy!!width="20%"|Combo 1!!width="20%"|Combo 2!!width="20%"|Combo 3 | !width="20%"|Floor!!width="20%"|Enemy!!width="20%"|Combo 1!!width="20%"|Combo 2!!width="20%"|Combo 3 | ||
|- | |- | ||
| Line 332: | Line 342: | ||
===Floors 61-69=== | ===Floors 61-69=== | ||
{|style="text-align: center; width: 100% | {|class=wikitable style="text-align: center; width: 100%" | ||
|- | |- | ||
!width="20%"|Floor!!width="20%"|Enemy!!width="20%"|Combo 1!!width="20%"|Combo 2!!width="20%"|Combo 3 | !width="20%"|Floor!!width="20%"|Enemy!!width="20%"|Combo 1!!width="20%"|Combo 2!!width="20%"|Combo 3 | ||
|- | |- | ||
| Line 356: | Line 366: | ||
===Floors 71-79=== | ===Floors 71-79=== | ||
{|style="text-align: center; width: 100% | {|class=wikitable style="text-align: center; width: 100%" | ||
|- | |- | ||
!width="20%"|Floor!!width="20%"|Enemy!!width="20%"|Combo 1!!width="20%"|Combo 2!!width="20%"|Combo 3 | !width="20%"|Floor!!width="20%"|Enemy!!width="20%"|Combo 1!!width="20%"|Combo 2!!width="20%"|Combo 3 | ||
|- | |- | ||
| Line 380: | Line 390: | ||
===Floors 81-89=== | ===Floors 81-89=== | ||
{|style="text-align: center; width: 100% | {|class=wikitable style="text-align: center; width: 100%" | ||
|- | |- | ||
!width="20%"|Floor!!width="20%"|Enemy!!width="20%"|Combo 1!!width="20%"|Combo 2!!width="20%"|Combo 3 | !width="20%"|Floor!!width="20%"|Enemy!!width="20%"|Combo 1!!width="20%"|Combo 2!!width="20%"|Combo 3 | ||
|- | |- | ||
| Line 404: | Line 414: | ||
===Floors 91-99=== | ===Floors 91-99=== | ||
{|style="text-align: center; width: 100% | {|class=wikitable style="text-align: center; width: 100%" | ||
|- | |- | ||
!width="20%"|Floor!!width="20%"|Enemy!!width="20%"|Combo 1!!width="20%"|Combo 2!!width="20%"|Combo 3 | !width="20%"|Floor!!width="20%"|Enemy!!width="20%"|Combo 1!!width="20%"|Combo 2!!width="20%"|Combo 3 | ||
|- | |- | ||
| Line 427: | Line 437: | ||
|} | |} | ||
==Prizes | ==Prizes== | ||
{| | {| class="wikitable" | ||
| | !rowspan=2|Item | ||
! | !rowspan=2|Location | ||
!colspan=2|Images | |||
|- | |- | ||
!GameCube | |||
!Switch | |||
|- | |- | ||
|[[File: | |{{PMTTYD item|Sleepy Stomp|game=NS}} | ||
|On Floor 10. | |||
|rowspan=4|[[File:Pit of 100 Trials Chests 1-4.png|100px]] | |||
|rowspan=4|[[File:Pit of 100 Trials Treasure Chests 1-4 (Switch).png|100px]] | |||
|- | |- | ||
| | |{{PMTTYD item|Fire Drive|game=NS}} | ||
|On Floor 20. | |||
|- | |- | ||
| | |{{PMTTYD item|Zap Tap|game=NS}} | ||
|On Floor 30. | |||
|- | |- | ||
| | |{{PMTTYD item|Pity Flower|game=NS}} | ||
|On Floor 40. | |||
|- | |- | ||
|[[File: | |{{PMTTYD item|Strange Sack|game=NS}} | ||
|On Floor 50. | |||
|rowspan=3|[[File:Pit of 100 Trials Chests 5-7.png|100px]] | |||
|rowspan=3|[[File:Pit of 100 Trials Treasure Chests 5-7 (Switch).png|100px]] | |||
|- | |- | ||
| | |{{PMTTYD item|Double Dip|game=NS}} | ||
|On Floor 60. | |||
|- | |- | ||
| | |{{PMTTYD item|Double Dip P|game=NS}} | ||
|On Floor 70. | |||
|- | |- | ||
|[[File: | |{{PMTTYD item|Bump Attack|game=NS}} | ||
|On Floor 80. | |||
|rowspan=2|[[File:Pit of 100 Trials Chests 8-9.png|100px]] | |||
|rowspan=2|[[File:Pit of 100 Trials Treasure Chests 8-9 (Switch).png|100px]] | |||
|- | |- | ||
|[[File: | |{{PMTTYD item|Lucky Day|game=NS}} | ||
|On Floor 90. | |||
|- | |||
|{{PMTTYD item|Return Postage|game=NS}} | |||
|On Floor 100; after defeating Bonetail. | |||
|[[File:Pit of 100 Trials Chest 10.png|100px]] | |||
|[[File:Pit of 100 Trials Chest 10 (Switch).png|100px]] | |||
|- | |||
|{{PMTTYD item|Gold Whacka Bump|game=NS}} [[File:Nintendo Switch Logo.svg|15px|link=Nintendo Switch]] | |||
|On Floor 100; after defeating Whacka once. | |||
|N/A | |||
|[[File:TTYDNS Gold Whacka Bump drop.jpg|100px]] | |||
|- | |||
|{{PMTTYD item|Whacka Bump|game=NS}} [[File:Nintendo Switch Logo.svg|15px|link=Nintendo Switch]] | |||
|On Floor 100; after defeating Whacka a subsequent time. Unlimited source. | |||
|N/A | |||
| | |||
|} | |} | ||
== | ==Profiles== | ||
*''This is the Pit of 100 Trials. That pipe just seems to lead down forever... Still, the air seems kinda fresh here. I guess it's flowing down from above, huh? | *'''Tattles''' | ||
*''This is the Pit of 100 Trials, but I don't see any enemies in this room. At least there's a pipe to take us back to the entrance if you wanna bail. Then again, we'd have to fight our way back down to this level again... Better think it through before we do anything hasty, know what I mean? | **''This is the Pit of 100 Trials. That pipe just seems to lead down forever... Still, the air seems kinda fresh here. I guess it's flowing down from above, huh? | ||
*''This is an intermediate floor in the Pit of 100 Trials. These appear every 10 floors. At least there's a pipe to take us back to the entrance if you wanna bail. Then again, we'd have to fight our way back down to this level again... Better think it through before we do anything hasty, know what I mean? | **''This is the Pit of 100 Trials, but I don't see any enemies in this room. At least there's a pipe to take us back to the entrance if you wanna bail. Then again, we'd have to fight our way back down to this level again... Better think it through before we do anything hasty, know what I mean? | ||
*''This is the Pit of 100 Trials. We just gotta keep on fighting and descending... But this endless repetition of rooms is starting to totally wear me out, y'know? I guess we gotta soldier on, though... | **''This is an intermediate floor in the Pit of 100 Trials. These appear every 10 floors. At least there's a pipe to take us back to the entrance if you wanna bail. Then again, we'd have to fight our way back down to this level again... Better think it through before we do anything hasty, know what I mean? | ||
*''This is the Pit of 100 Trials. We've come pretty far, looks like. The air's getting super-dank... Who knows how deep it goes, but let's keep going as long as we can... | **''This is the Pit of 100 Trials. We just gotta keep on fighting and descending... But this endless repetition of rooms is starting to totally wear me out, y'know? I guess we gotta soldier on, though... | ||
*''This is the lowest floor in the Pit of 100 Trials. A zombified dragon named Bonetail used to protect this room. Yuuuuuck. Mario, I bet you're the first person to make it this far! I totally knew you'd do it! Now let's get out of this creepy place and back to the world above, OK? | **''This is the Pit of 100 Trials. We've come pretty far, looks like. The air's getting super-dank... Who knows how deep it goes, but let's keep going as long as we can... | ||
**''This is the lowest floor in the Pit of 100 Trials. A zombified dragon named Bonetail used to protect this room. Yuuuuuck. Mario, I bet you're the first person to make it this far! I totally knew you'd do it! Now let's get out of this creepy place and back to the world above, OK? | |||
==Gallery== | ==Gallery== | ||
<gallery> | <gallery> | ||
PMTTYD Pit of 100 Trials Gloomba.png | PMTTYD Pit of 100 Trials Gloomba.png|A Gloomba spotting Mario and Vivian | ||
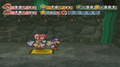
PMTTYD Pit of 100 Trials Healing.png | PMTTYD Pit of 100 Trials Healing.png|Goombella being healed | ||
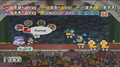
PMTTYD Pit of 100 Trials Swampire Battle.png | PMTTYD Pit of 100 Trials Swampire Battle.png|A battle from one of the lowest floors | ||
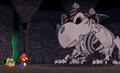
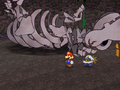
MeetBonetail.png | MeetBonetail.png|Mario and Goombella encountering Bonetail | ||
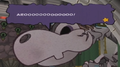
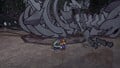
PMTTYD Pit of 100 Trials Bonetail.png | PMTTYD Pit of 100 Trials Bonetail.png|Bonetail howling | ||
PMTTYD Bonetail Defeated.png|Mario and Bobbery on the lowest floor after defeating [[Bonetail]]. | PMTTYD Bonetail Defeated.png|Mario and Bobbery on the lowest floor after defeating [[Bonetail]]. | ||
PMTTYDNS Bonetail Defeated.jpg|Mario and Bobbery on the lowest floor after defeating Bonetail in the remake. | |||
</gallery> | </gallery> | ||
| Line 476: | Line 520: | ||
|JapR=Hyakkai Danjon | |JapR=Hyakkai Danjon | ||
|JapM=100-Floor Dungeon | |JapM=100-Floor Dungeon | ||
|ChiT=100層地下城<ref>{{cite|author=Nintendo HK官方頻道|date=April 25, 2024|title=紙片瑪利歐RPG 介紹影片(香港)|url= | |ChiS=100层地下城 | ||
|ChiTR= | |ChiSR=Yībǎicéng Dìxiàchéng | ||
|ChiSM=100-Floor Dungeon | |||
|ChiT=100層地下城<ref>{{cite|author=Nintendo HK官方頻道|date=April 25, 2024|title=紙片瑪利歐RPG 介紹影片(香港)|url=www.youtube.com/watch?v=b5FxUKg1ieU|publisher=YouTube|language=zh-hant|accessdate=April 25, 2024}}</ref> | |||
|ChiTR=Yībǎicéng Dìxiàchéng | |||
|ChiTM=100-Floor Dungeon | |ChiTM=100-Floor Dungeon | ||
| | |Dut=Honderdlagenkerker<ref>{{cite|author=Nintendo Nederland|date=April 25, 2024|url=youtu.be/al9ZHfAQ-uQ?si=juAAdWrBoPTr_hpc|title=Een uitgebreide blik op Paper Mario: The Thousand-Year Door (Nintendo Switch)|publisher=YouTube|accessdate=May 1, 2024|language=nl}}</ref> | ||
| | |DutM=Hundred-layer dungeon | ||
|SpaA=Las Cien Pruebas | |||
|SpaAM=The One Hundred Trials | |||
|SpaE=Cien Mazmorras | |||
|SpaEM=One Hundred Dungeons | |||
|Ger=Duellkerker | |Ger=Duellkerker | ||
|GerM=Duel Dungeon | |GerM=Duel Dungeon | ||
| Line 487: | Line 538: | ||
|Ita=Labirinto dei 100 livelli | |Ita=Labirinto dei 100 livelli | ||
|ItaM=Labyrinth of 100 levels | |ItaM=Labyrinth of 100 levels | ||
|Kor=100층 던전 | |||
|KorR=100(Baek)-cheung Deonjeon | |||
|KorM=100-Floor Dungeon | |||
}} | }} | ||
==References== | |||
<references/> | |||
{{PMTTYD}} | {{PMTTYD}} | ||
[[Category:Dungeons]] | [[Category:Dungeons]] | ||
Latest revision as of 12:33, September 8, 2024
| Pit of 100 Trials | |
|---|---|
 Mario and Bobbery standing near the warp pipe leading to the Pit in the GameCube version | |
| First appearance | Paper Mario: The Thousand-Year Door (2004) |
| Latest appearance | Paper Mario: The Thousand-Year Door (Nintendo Switch) (2024) |
- “DANGER!!! DO NOT ENTER! This pipe is the entrance to the Pit of 100 Trials! First Attack and Bump Attack badges don't work, so BEWAAAAAAAAAAARE!”
- —The sign at the entrance to the Pit, Paper Mario: The Thousand-Year Door
The Pit of 100 Trials of Rogueport appears in Paper Mario: The Thousand-Year Door. It is the first Pit of 100 Trials to appear in the Paper Mario series, with Super Paper Mario expanding on the concept by introducing two new Pits: The Flipside Pit of 100 Trials and the Flopside Pit of 100 Trials.
The pipe that leads down to the Pit of 100 Trials is found near the Thousand-Year Door. According to Grifty, the Shadow Queen created this dungeon and filled it with powerful monsters. She threw people she did not like into the pit and left them to the mercy of the monsters within it. Sometime after her defeat, the pit was closed off from the public.
The early levels are relatively simple to clear, being inhabited by enemies found in early chapters. As the player progresses downward, however, the enemies become stronger, featuring more powerful enemies from later chapters and enemies unique to the Pit of 100 Trials itself. Upon reaching Level 100, the player faces Bonetail, a zombified dragon which acts as a much stronger version of Hooktail and Gloomtail. In the Nintendo Switch remake, Whacka replaces Bonetail as the Pit of 100 Trials final boss on repeat trips after Whacka has been hit eight times on Keelhaul Key and the RDM Extra Issue email is received.
Every tenth floor, with the exception of the hundredth, contains a brief rest from battles, a treasure chest, and a pipe which takes the player back to entrance of the pit. Occasionally, Charlieton or a Mover can be found; Charlieton offers to sell the player items for abnormally high prices, while Movers accept payment for taking them back up to the surface or skipping him down two or five levels. Rest floors can, however, be skipped this way. In the Nintendo Switch remake, after completing the pit, the Mover appears at the entrance and offers to send Mario straight to Level 50 for 300 coins.
In the remake, all battles in the Pit of 100 Trials provide a Clear Bonus of 5, 10 or 20 coins on completion, similar to chapter bosses.
Two troubles at the Trouble Center require the player to enter the Pit; Pine T. Jr.'s father needs to be rescued on Level 18, and another trouble necessitates the destruction of a wall on Level 50 using Admiral Bobbery's field ability.
Enemies[edit]
Each floor has one enemy in the overworld, but when Mario enters battle, there are usually at least 2 enemies in the battle, with the deeper floors having more. There is no way to get down to the next floor without winning the battle, as the defeat of the enemies causes a Warp Pipe to appear out of the ground, leading to the next room of the pit. However, if a Bandit steals from the player and runs away, the enemy will not be considered defeated and the fight will have to be restarted with the Bandit holding the stolen object. Since Bandits run away on their turn when holding a stolen object, it must be defeated on the first turn or it will simply run again. This can result in an unwinnable state should the player not have the means to deal enough damage quickly, though this generally does not happen when playing the game normally.
Floors 1-9[edit]
| Enemy | HP | Attack | Defense | Floor Locations |
|---|---|---|---|---|
 Gloomba |
7 | 3 | 0 | 1; 6 |
 Spinia |
3 | 1 | 0 | 2; 7 |
 Spania |
3 | 1 | 0 | 3; 8 |
 Dull Bones |
1 | 2 | 1 | 4; 9 |
 Fuzzy |
3 | 1 | 0 | 5 |
Floors 11-19[edit]
| Enemy | HP | Attack | Defense | Floor Locations |
|---|---|---|---|---|
Paragloomba |
7 | 3 | 0 | 11; 16 |
Cleft |
2 | 2 | 2 | 12; 17 |
 Pokey |
4 | 3 | 0 | 13; 18 |
 Dark Puff |
3 | 2 | 0 | 14; 19 |
 Pider |
5 | 2 | 0 | 15 |
Floors 21-29[edit]
| Enemy | HP | Attack | Defense | Floor Locations |
|---|---|---|---|---|
 Spiky Gloomba |
7 | 4 | 0 | 21; 26 |
 Bandit |
5 | 2 | 0 | 22; 27 |
 Lakitu |
5 | 2 | 0 | 23; 28 |
 Spiny |
3 | 3 | 3 | Found wherever a Lakitu is located. |
 Bob-omb |
4 | 2 | 1 | 24; 29 |
Boo |
7 | 3 | 0 | 25 |
Floors 31-39[edit]
| Enemy | HP | Attack | Defense | Floor Locations |
|---|---|---|---|---|
 Dark Koopa |
8 | 4 | 2 | 31; 36 |
 Hyper Cleft |
4 | 3 | 3 | 32; 37 |
Parabuzzy/Buzzy Beetle |
5 | 3 | 4 | 33; 38 |
 Shady Koopa |
8 | 3 | 1 | 34; 39 |
 Flower Fuzzy |
6 | 3 | 0 | 35 |
Floors 41-49[edit]
| Enemy | HP | Attack | Defense | Floor Locations |
|---|---|---|---|---|
 Dark Paratroopa |
8 | 4 | 2 | 41; 46 |
 Bulky Bob-omb |
6 | 2 | 1 | 42; 47 |
 Lava Bubble |
6 | 4 | 0 | 43; 48 |
 Poison Pokey |
8 | 4 | 0 | 44; 49 |
Spiky Parabuzzy/Spike Top |
5 | 3 | 4 | 45 |
Floors 51-59[edit]
| Enemy | HP | Attack | Defense | Floor Locations |
|---|---|---|---|---|
 Badge Bandit |
12 | 5 | 0 | 51; 56 |
 Ice Puff |
9 | 4 | 0 | 52; 57 |
Dark Boo |
8 | 5 | 0 | 53; 58 |
 Red Chomp |
6 | 5 | 3 | 54; 59 |
 Moon Cleft |
6 | 5 | 5 | 55 |
Floors 61-69[edit]
| Enemy | HP | Attack | Defense | Floor Locations |
|---|---|---|---|---|
 Dark Lakitu |
13 | 5 | 0 | 61; 66 |
 Sky-Blue Spiny |
6 | 6 | 4 | Found wherever a Dark Lakitu is located. |
 Dry Bones |
8 | 5 | 2 | 62; 67 |
 Dark Wizzerd |
10 | 5 | 2 | 63; 68 |
 Frost Piranha |
10 | 5 | 0 | 64; 69 |
 Dark Craw |
20 | 6 | 0 | 63; 64; 65 |
Floors 71-79[edit]
| Enemy | HP | Attack | Defense | Floor Locations |
|---|---|---|---|---|
 Wizzerd |
10 | 6 | 3 | 71; 75; 76 |
 Dark Koopatrol |
25 | 5 | 2 | 72; 77 |
 Phantom Ember |
10 | 5 | 0 | 73; 78 |
 Swoopula |
9 | 4 | 0 | 74; 79 |
Chain-Chomp |
7 | 6 | 5 | 75; 76 |
Floors 81-89[edit]
| Enemy | HP | Attack | Defense | Floor Locations |
|---|---|---|---|---|
 Spunia |
12 | 7 | 2 | 81; 85; 86 |
 Dark Bristle |
8 | 8 | 4 | 82; 87 |
Arantula |
16 | 7 | 0 | 83; 88 |
 Piranha Plant |
15 | 9 | 0 | 84; 89 |
Floors 91-99[edit]
| Enemy | HP | Attack | Defense | Floor Locations |
|---|---|---|---|---|
 Elite Wizzerd |
12 | 8 | 5 | 91; 95; 99 |
 Poison Puff |
15 | 8 | 0 | 92; 96 |
Bob-ulk |
10 | 4 | 2 | 93; 97 |
 Swampire |
20 | 6 | 0 | 94; 98 |
Amazy Dayzee |
20 | 20 | 1 | Appears randomly amongst the other enemies. One may appear on 92, 93, 96 or 97; two may appear on 94 or 98; they never appear on 91, 95 or 99. |
Floor 100[edit]
| Enemy | HP | Attack | Defense | Floor Locations |
|---|---|---|---|---|
 Bonetail |
200 | 8 | 2 | 100 |
 Whacka (Repeat trips after receiving RDM Extra Issue, Nintendo Switch version only) |
108 | 10 | 1 | 100 |
Enemy formations[edit]
As Mario and his company advance down floor by floor, every floor will always have the same base enemy present in the overworld; however, when a battle is initiated, the enemy formations that appear can vary between three possible combinations of enemies (with the exception of the 100th floor, on which the enemy is always the same). Below is the list of all of the possible enemy formations that can be encountered on each floor.
Floors 1-9[edit]
| Floor | Enemy | Combo 1 | Combo 2 | Combo 3 |
|---|---|---|---|---|
| 1 | Gloomba | 1 Gloomba | 1 Gloomba; 1 Spania | 1 Gloomba; 1 Dull Bones |
| 2 | Spinia | 1 Spinia; 1 Gloomba | 3 Spinia; 2 Spania | 5 Spinia |
| 3 | Spania | 1 Spania; 1 Gloomba | 2 Spania; 2 Fuzzies | 4 Spania |
| 4 | Dull Bones | 1 Dull Bones; 1 Gloomba | 1 Dull Bones; 2 Spinia | 4 Dull Bones |
| 5 | Fuzzy | 2 Fuzzies; 1 Gloomba | 2 Fuzzies; 2 Dull Bones | 5 Fuzzies |
| 6 | Gloomba | 1 Gloomba | 1 Gloomba; 1 Spania | 1 Gloomba; 1 Dull Bones |
| 7 | Spinia | 1 Spinia; 1 Gloomba | 3 Spinia; 2 Spania | 5 Spinia |
| 8 | Spania | 1 Spania; 1 Gloomba | 2 Spania; 2 Fuzzies | 4 Spania |
| 9 | Dull Bones | 1 Dull Bones; 1 Gloomba | 1 Dull Bones; 2 Spinia | 4 Dull Bones |
Floors 11-19[edit]
| Floor | Enemy | Combo 1 | Combo 2 | Combo 3 |
|---|---|---|---|---|
| 11 | Paragloomba | 2 Paragloombas | 1 Paragloomba; 2 Pokeys | 1 Paragloomba; 2 Piders |
| 12 | Cleft | 2 Clefts; 1 Paragloomba | 1 Cleft; 1 Pider; 1 Dark Puff | 4 Clefts |
| 13 | Pokey | 1 Pokey; 1 Dark Puff | 2 Pokeys; 2 Piders | 4 Pokeys |
| 14 | Dark Puff | 1 Dark Puff; 1 Paragloomba | 2 Dark Puffs; 1 Pokey | 3 Dark Puffs |
| 15 | Pider | 1 Pider; 1 Paragloomba | 2 Piders; 2 Pokeys | 4 Pider |
| 16 | Paragloomba | 2 Paragloombas | 1 Paragloomba; 2 Pokeys | 1 Paragloomba; 2 Piders |
| 17 | Cleft | 2 Clefts; 1 Paragloomba | 1 Cleft; 1 Pider; 1 Dark Puff | 4 Clefts |
| 18 | Pokey | 1 Pokey; 1 Dark Puff | 2 Pokeys; 2 Piders | 4 Pokeys |
| 19 | Dark Puff | 1 Dark Puff; 1 Paragloomba | 2 Dark Puffs; 1 Pokey | 3 Dark Puffs |
Floors 21-29[edit]
| Floor | Enemy | Combo 1 | Combo 2 | Combo 3 |
|---|---|---|---|---|
| 21 | Spiky Gloomba | 2 Spiky Gloombas; 2 Boos | 2 Spiky Gloomba; 1 Bob-omb; 1 Bandit | 3 Spiky Gloombas |
| 22 | Bandit | 1 Bandit; 1 Spiky Gloomba | 3 Bandits; 2 Boos | 5 Bandits |
| 23 | Lakitu | 1 Lakitu; 1 Spiky Gloomba | 2 Lakitus; 2 Bob-ombs | 4 Lakitus |
| 24 | Bob-omb | 2 Bob-ombs; 1 Spiky Gloomba | 2 Bob-ombs; 2 Boos | 4 Bob-ombs |
| 25 | Boo | 2 Boos; 1 Spiky Gloomba | 2 Boos; 2 Bandits | 4 Boos |
| 26 | Spiky Gloomba | 2 Spiky Gloombas; 2 Boos | 2 Spiky Gloomba; 1 Bob-omb; 1 Bandit | 3 Spiky Gloombas |
| 27 | Bandit | 1 Bandit; 1 Spiky Gloomba | 3 Bandits; 2 Boos | 5 Bandits |
| 28 | Lakitu | 1 Lakitu; 1 Spiky Gloomba | 2 Lakitus; 2 Bob-ombs | 4 Lakitus |
| 29 | Bob-omb | 2 Bob-ombs; 1 Spiky Gloomba | 2 Bob-ombs; 2 Boos | 4 Bob-ombs |
Floors 31-39[edit]
| Floor | Enemy | Combo 1 | Combo 2 | Combo 3 |
|---|---|---|---|---|
| 31 | Dark Koopa | 2 Dark Koopas | 1 Dark Koopa; 2 Flower Fuzzies | 1 Dark Koopa; 2 Parabuzzies |
| 32 | Hyper Cleft | 2 Hyper Clefts; 1 Shady Koopa | 2 Hyper Clefts; 1 Parabuzzy | 3 Hyper Clefts |
| 33 | Parabuzzy | 1 Parabuzzy; 1 Flower Fuzzy | 2 Parabuzzies; 2 Shady Koopas | 4 Parabuzzies |
| 34 | Shady Koopa | 2 Shady Koopas; 1 Parabuzzy | 2 Shady Koopas; 1 Dark Koopa | 4 Shady Koopas |
| 35 | Flower Fuzzy | 1 Flower Fuzzy; 1 Hyper Cleft | 2 Flower Fuzzies; 1 Dark Koopa | 5 Flower Fuzzies |
| 36 | Dark Koopa | 2 Dark Koopas | 1 Dark Koopa; 2 Flower Fuzzies | 1 Dark Koopa; 2 Parabuzzies |
| 37 | Hyper Cleft | 2 Hyper Clefts; 1 Shady Koopa | 2 Hyper Clefts; 1 Parabuzzy | 3 Hyper Clefts |
| 38 | Parabuzzy | 1 Parabuzzy; 1 Flower Fuzzy | 2 Parabuzzies; 2 Shady Koopas | 4 Parabuzzies |
| 39 | Shady Koopa | 2 Shady Koopas; 1 Parabuzzy | 2 Shady Koopas; 1 Dark Koopa | 4 Shady Koopas |
Floors 41-49[edit]
| Floor | Enemy | Combo 1 | Combo 2 | Combo 3 |
|---|---|---|---|---|
| 41 | Dark Paratroopa | 2 Dark Paratroopas; 1 Spiky Parabuzzy | 2 Dark Paratroopas; 1 Bulky Bob-omb | 4 Dark Paratroopas |
| 42 | Bulky Bob-omb | 2 Bulky Bob-ombs | 1 Bulky Bob-omb; 1 Poison Pokey; 1 Spiky Parabuzzy | 4 Bulky Bob-ombs |
| 43 | Lava Bubble | 3 Lava Bubbles | 2 Lava Bubbles; 1 Dark Paratroopa | 2 Lava Bubbles; 1 Poison Pokey; 1 Bulky Bob-omb |
| 44 | Poison Pokey | 1 Poison Pokey; 1 Dark Paratroopa | 2 Poison Pokeys; 2 Spiky Parabuzzies | 4 Poison Pokeys |
| 45 | Spiky Parabuzzy | 2 Spiky Parabuzzies | 2 Spiky Parabuzzies; 2 Lava Bubbles | 4 Spiky Parabuzzies |
| 46 | Dark Paratroopa | 2 Dark Paratroopas; 1 Spiky Parabuzzy | 2 Dark Paratroopas; 1 Bulky Bob-omb | 4 Dark Paratroopas |
| 47 | Bulky Bob-omb | 2 Bulky Bob-ombs | 1 Bulky Bob-omb; 1 Poison Pokey; 1 Spiky Parabuzzy | 4 Bulky Bob-ombs |
| 48 | Lava Bubble | 3 Lava Bubbles | 2 Lava Bubbles; 1 Dark Paratroopa | 2 Lava Bubbles; 1 Poison Pokey; 1 Bulky Bob-omb |
| 49 | Poison Pokey | 1 Poison Pokey; 1 Dark Paratroopa | 2 Poison Pokeys; 2 Spiky Parabuzzies | 4 Poison Pokeys |
Floors 51-59[edit]
| Floor | Enemy | Combo 1 | Combo 2 | Combo 3 |
|---|---|---|---|---|
| 51 | Badge Bandit | 2 Badge Bandits; 1 Dark Boo | 2 Badge Bandits; 1 Ice Puff | 3 Badge Bandits |
| 52 | Ice Puff | 1 Ice Puff; 1 Moon Cleft | 2 Ice Puffs; 1 Dark Boo | 4 Ice Puffs |
| 53 | Dark Boo | 2 Dark Boos; 1 Badge Bandit | 2 Dark Boos; 1 Red Chomp | 4 Dark Boos |
| 54 | Red Chomp | 2 Red Chomps; 1 Dark Boo | 1 Red Chomp; 2 Ice Puffs | 3 Red Chomps |
| 55 | Moon Cleft | 1 Moon Cleft; 2 Dark Boos | 2 Moon Clefts; 1 Red Chomp | 4 Moon Clefts |
| 56 | Badge Bandit | 2 Badge Bandits; 1 Dark Boo | 2 Badge Bandits; 1 Ice Puff | 3 Badge Bandits |
| 57 | Ice Puff | 1 Ice Puff; 1 Moon Cleft | 2 Ice Puffs; 1 Dark Boo | 4 Ice Puffs |
| 58 | Dark Boo | 2 Dark Boos; 1 Badge Bandit | 2 Dark Boos; 1 Red Chomp | 4 Dark Boos |
| 59 | Red Chomp | 2 Red Chomps; 1 Dark Boo | 1 Red Chomp; 2 Ice Puffs | 3 Red Chomps |
Floors 61-69[edit]
| Floor | Enemy | Combo 1 | Combo 2 | Combo 3 |
|---|---|---|---|---|
| 61 | Dark Lakitu | 1 Dark Lakitu; 1 Dark Wizzerd | 2 Dark Lakitus; 1 Dark Craw | 3 Dark Lakitus |
| 62 | Dry Bones | 1 Dry Bones; 1 Dark Craw | 1 Dry Bones; 2 Frost Piranhas | 4 Dry Bones |
| 63 | Dark Wizzerd | 1 Dark Wizzerd; 2 Dry Bones | 2 Dark Wizzerds; 1 Dark Craw | 3 Dark Wizzerds |
| 64 | Frost Piranha | 1 Frost Piranha; 1 Dark Craw | 1 Frost Piranha; 2 Dark Lakitus | 4 Frost Piranhas |
| 65 | Dark Craw | 1 Dark Craw; 1 Dark Lakitu | 2 Dark Craws | 3 Dark Craws |
| 66 | Dark Lakitu | 1 Dark Lakitu; 1 Dark Wizzerd | 2 Dark Lakitus; 1 Dark Craw | 3 Dark Lakitus |
| 67 | Dry Bones | 1 Dry Bones; 1 Dark Craw | 1 Dry Bones; 2 Frost Piranhas | 4 Dry Bones |
| 68 | Dark Wizzerd | 1 Dark Wizzerd; 2 Dry Bones | 2 Dark Wizzerds; 1 Dark Craw | 3 Dark Wizzerds |
| 69 | Frost Piranha | 1 Frost Piranha; 1 Dark Craw | 1 Frost Piranha; 2 Dark Lakitus | 4 Frost Piranhas |
Floors 71-79[edit]
| Floor | Enemy | Combo 1 | Combo 2 | Combo 3 |
|---|---|---|---|---|
| 71 | Wizzerd | 1 Wizzerd; 2 Chain-Chomps | 2 Wizzerds; 1 Dark Koopatrol | 3 Wizzerds |
| 72 | Dark Koopatrol | 1 Dark Koopatrol; 2 Chain-Chomps | 2 Dark Koopatrols; 1 Wizzerd | 3 Dark Koopatrols |
| 73 | Phantom Ember | 1 Phantom Ember; 1 Swoopula; 1 Chain-Chomp; 1 Dark Koopatrol | 3 Phantom Embers; 1 Wizzerd | 5 Phantom Embers |
| 74 | Swoopula | 2 Swoopulas; 2 Wizzerds | 2 Swoopulas; 2 Dark Koopatrols | 4 Swoopulas |
| 75 | Chain-Chomp | 1 Chain-Chomp; 2 Dark Koopatrols | 2 Chain-Chomps; 1 Wizzerd | 4 Chain-Chomps |
| 76 | Wizzerd | 1 Wizzerd; 2 Chain-Chomps | 2 Wizzerds; 1 Dark Koopatrol | 3 Wizzerds |
| 77 | Dark Koopatrol | 1 Dark Koopatrol; 2 Chain-Chomps | 2 Dark Koopatrols; 1 Wizzerd | 3 Dark Koopatrols |
| 78 | Phantom Ember | 1 Phantom Ember; 1 Swoopula; 1 Chain-Chomp; 1 Dark Koopatrol | 3 Phantom Embers; 1 Wizzerd | 5 Phantom Embers |
| 79 | Swoopula | 2 Swoopulas; 2 Wizzerds | 2 Swoopulas; 2 Dark Koopatrols | 4 Swoopulas |
Floors 81-89[edit]
| Floor | Enemy | Combo 1 | Combo 2 | Combo 3 |
|---|---|---|---|---|
| 81 | Spunia | 4 Spunias | 1 Spunia; 1 Piranha Plant; 1 Dark Bristle | 2 Spunias; 2 Arantulas |
| 82 | Dark Bristle | 2 Dark Bristles | 2 Dark Bristles; 1 Spunia | 1 Dark Bristle; 3 Arantulas |
| 83 | Arantula | 2 Arantulas; 1 Dark Bristle | 2 Arantulas; 1 Piranha Plant | 4 Arantulas |
| 84 | Piranha Plant | 2 Piranha Plants; 1 Dark Bristle | 1 Piranha Plant; 3 Spunias | 4 Piranha Plants |
| 85 | Spunia | 3 Spunias | 4 Spunias | 5 Spunias |
| 86 | Spunia | 4 Spunias | 1 Spunia; 1 Piranha Plant; 1 Dark Bristle | 2 Spunias; 2 Arantulas |
| 87 | Dark Bristle | 2 Dark Bristles | 2 Dark Bristles; 1 Spunia | 1 Dark Bristle; 3 Arantulas |
| 88 | Arantula | 2 Arantulas; 1 Dark Bristle | 2 Arantulas; 1 Piranha Plant | 4 Arantulas |
| 89 | Piranha Plant | 2 Piranha Plants; 1 Dark Bristle | 1 Piranha Plant; 3 Spunias | 4 Piranha Plants |
Floors 91-99[edit]
| Floor | Enemy | Combo 1 | Combo 2 | Combo 3 |
|---|---|---|---|---|
| 91 | Elite Wizzerd | 2 Elite Wizzerds; 1 Swampire | 1 Elite Wizzerd; 2 Poison Puffs | 5 Elite Wizzerds |
| 92 | Poison Puff | 2 Poison Puff; 1 Swampire; 1 Amazy Dayzee | 3 Poison Puffs; 1 Bob-ulk | 4 Poison Puffs |
| 93 | Bob-ulk | 2 Bob-ulks; 1 Elite Wizzerd | 3 Bob-ulks; 1 Amazy Dayzee | 4 Bob-ulks |
| 94 | Swampire | 1 Swampire; 2 Poison Puffs | 1 Swampire; 1 Elite Wizzerd; 2 Amazy Dayzees | 5 Swampires |
| 95 | Elite Wizzerd | 2 Elite Wizzerds; 1 Swampire | 1 Elite Wizzerd; 2 Poison Puffs | 5 Elite Wizzerds |
| 96 | Poison Puff | 2 Poison Puff; 1 Swampire; 1 Amazy Dayzee | 3 Poison Puffs; 1 Bob-ulk | 4 Poison Puffs |
| 97 | Bob-ulk | 2 Bob-ulks; 1 Elite Wizzerd | 3 Bob-ulks; 1 Amazy Dayzee | 4 Bob-ulks |
| 98 | Swampire | 1 Swampire; 2 Poison Puffs | 1 Swampire; 1 Elite Wizzerd; 2 Amazy Dayzees | 5 Swampires |
| 99 | Elite Wizzerd | 2 Elite Wizzerds; 1 Swampire | 1 Elite Wizzerd; 2 Poison Puffs | 5 Elite Wizzerds |
Prizes[edit]
| Item | Location | Images | |
|---|---|---|---|
| GameCube | Switch | ||
| On Floor 10. | 
|
.png)
| |
| On Floor 20. | |||
| On Floor 30. | |||
| On Floor 40. | |||
| On Floor 50. | 
|
.png)
| |
| On Floor 60. | |||
| On Floor 70. | |||
| On Floor 80. | 
|
.png)
| |
| On Floor 90. | |||
| On Floor 100; after defeating Bonetail. | 
|
.png)
| |
| On Floor 100; after defeating Whacka once. | N/A | 
| |
| On Floor 100; after defeating Whacka a subsequent time. Unlimited source. | N/A | ||
Profiles[edit]
- Tattles
- This is the Pit of 100 Trials. That pipe just seems to lead down forever... Still, the air seems kinda fresh here. I guess it's flowing down from above, huh?
- This is the Pit of 100 Trials, but I don't see any enemies in this room. At least there's a pipe to take us back to the entrance if you wanna bail. Then again, we'd have to fight our way back down to this level again... Better think it through before we do anything hasty, know what I mean?
- This is an intermediate floor in the Pit of 100 Trials. These appear every 10 floors. At least there's a pipe to take us back to the entrance if you wanna bail. Then again, we'd have to fight our way back down to this level again... Better think it through before we do anything hasty, know what I mean?
- This is the Pit of 100 Trials. We just gotta keep on fighting and descending... But this endless repetition of rooms is starting to totally wear me out, y'know? I guess we gotta soldier on, though...
- This is the Pit of 100 Trials. We've come pretty far, looks like. The air's getting super-dank... Who knows how deep it goes, but let's keep going as long as we can...
- This is the lowest floor in the Pit of 100 Trials. A zombified dragon named Bonetail used to protect this room. Yuuuuuck. Mario, I bet you're the first person to make it this far! I totally knew you'd do it! Now let's get out of this creepy place and back to the world above, OK?
Gallery[edit]

A Gloomba spotting Mario and Vivian
Goombella being healed
A battle from one of the lowest floors
Mario and Goombella encountering Bonetail
Bonetail howling
Mario and Bobbery on the lowest floor after defeating Bonetail.
Mario and Bobbery on the lowest floor after defeating Bonetail in the remake.


Names in other languages[edit]
| Language | Name | Meaning | Notes |
|---|---|---|---|
| Japanese | 100階ダンジョン[?] Hyakkai Danjon |
100-Floor Dungeon | |
| Chinese (simplified) | 100层地下城[?] Yībǎicéng Dìxiàchéng |
100-Floor Dungeon | |
| Chinese (traditional) | 100層地下城[1] Yībǎicéng Dìxiàchéng |
100-Floor Dungeon | |
| Dutch | Honderdlagenkerker[2] | Hundred-layer dungeon | |
| French | Donjon aux 100 étages[?] | 100 floor dungeon | |
| German | Duellkerker[?] | Duel Dungeon | |
| Italian | Labirinto dei 100 livelli[?] | Labyrinth of 100 levels | |
| Korean | 100층 던전[?] 100(Baek)-cheung Deonjeon |
100-Floor Dungeon | |
| Spanish (NOA) | Las Cien Pruebas[?] | The One Hundred Trials | |
| Spanish (NOE) | Cien Mazmorras[?] | One Hundred Dungeons |
References[edit]
- ^ Nintendo HK官方頻道 (April 25, 2024). 紙片瑪利歐RPG 介紹影片(香港). YouTube (Traditional Chinese). Retrieved April 25, 2024.
- ^ Nintendo Nederland (April 25, 2024). Een uitgebreide blik op Paper Mario: The Thousand-Year Door (Nintendo Switch). YouTube (Dutch). Retrieved May 1, 2024.