Tick Tock Clock: Difference between revisions
(sorry, i tried to change the old version because the old explanation of the timing-based entrance made about as much sense as a toaster with a cadbury crème egg stuffed inside. // (ugh, "pendulums"? it sounds like breathing through cardboard.)) |
m (Reverted edits by 187.23.202.35 (talk) to last revision by Sdman213) Tags: Rollback Mobile edit Advanced mobile edit |
||
| (125 intermediate revisions by 53 users not shown) | |||
| Line 1: | Line 1: | ||
{{ | {{about|the course in [[Super Mario 64]]|the racecourse|{{classic-link|DS|Tick-Tock Clock}}}} | ||
{{ | {{course infobox | ||
|image=[[File:Course14.png| | |image=[[File:Course14.png|200px]]<br>''Super Mario 64''<br>[[File:SM64DS Tick-Tock Clock.png|200px]]<br>''Super Mario 64 DS'' | ||
| | |missions='''''Super Mario 64'''''<br>[[Roll into the Cage]]<br>[[The Pit and the Pendulums]]<br>[[Get a Hand]]<br>[[Stomp on the Thwomp]]<br>[[Timed Jumps on Moving Bars]]<br>[[Stop Time for Red Coins]]<br>'''''Super Mario 64 DS'''''<br>[[Luigi in the Cage]]<br>[[The Pendulum Switch Star]]<br>[[Get a Hand]]<br>[[Stomp on the Thwomp]]<br>[[Timed Jumps on Moving Bars]]<br>[[Stop Time for Red Coins]]<br>[[Tick Tock Silver Stars]] | ||
|unlock= | |unlock=Open the [[Big Star Door]] on the third floor with 50 [[Power Star]]s. | ||
|boss=None | |boss=None | ||
|stars='''''Super Mario 64'':'''<br>[[File:Star SM64.png]][[File:Star SM64.png]][[File:Star SM64.png]][[File:Star SM64.png]][[File:Star SM64.png]][[File:Star SM64.png]]<br>'''''Super Mario 64 DS'':'''<br>[[File:Star SM64DS.png]][[File:Star SM64DS.png]][[File:Star SM64DS.png]][[File:Star SM64DS.png]][[File:Star SM64DS.png]][[File:Star SM64DS.png]][[File:Star SM64DS.png]] | |stars='''''Super Mario 64'':'''<br>[[File:Star SM64.png]][[File:Star SM64.png]][[File:Star SM64.png]][[File:Star SM64.png]][[File:Star SM64.png]][[File:Star SM64.png]]<br>'''''Super Mario 64 DS'':'''<br>[[File:Star SM64DS.png]][[File:Star SM64DS.png]][[File:Star SM64DS.png]][[File:Star SM64DS.png]][[File:Star SM64DS.png]][[File:Star SM64DS.png]][[File:Star SM64DS.png]] | ||
}} | }} | ||
{{ | {{quote2|There's something strange about that clock. As [[Mario|you]] jump inside, watch the position of the big hand.|[[Toad (species)|Toad]]|''[[Super Mario 64]]''}} | ||
'''Tick Tock Clock''' is the fourteenth course in ''[[Super Mario 64]]'' and ''[[Super Mario 64 DS]]''. To access the course, the player needs to open the [[Star Door]] on the third floor with 50 [[Power Star]]s. The entrance to Tick Tock Clock is the face of the large grandfather clock. Based on when the player | '''Tick Tock Clock''' is the fourteenth course in ''[[Super Mario 64]]'' and ''[[Super Mario 64 DS]]''. To access the course, the player needs to open the [[Big Star Door]] on the third floor of the [[Peach's Castle|Mushroom Castle]] with 50 [[Power Star]]s. The entrance to Tick Tock Clock is the face of the large grandfather clock. Based on when the player [[jump]]s into the clock (rounded to the nearest quarter hour), the speeds of the internal clockworks change: Entering when the minute hand is nearest "12" makes everything stop, entering near "3" makes everything move slowly, entering near "6" makes everything move randomly and change speeds frequently, and entering near "9" makes everything move quickly. If time is not still, several [[platform]]s will turn, move, or flip; [[Conveyor Belt|conveyor belt]]s will move; and [[pendulum]]s and the large hands will swing. | ||
Tick Tock Clock appears to be changed more than any other [[level]] in the DS remake, with many areas altered for easier difficulty, removing elements such as the triangular blocks and fog effects, and repositioning several areas of the level. It is one of two courses with both a Switch Star and [[Silver Star]]s, the other being [[Shifting Sand Land]]. | |||
Tick Tock Clock is referenced in various other games. It receives [[DS Tick-Tock Clock|a racetrack]] in ''[[Mario Kart DS]]'', and it returns in ''[[Mario Kart 8]]'' and ''[[Mario Kart 8 Deluxe]]''. The ''[[Mario Party 3]]'' minigame [[Ticktock Hop|Tick Tock Hop]] takes place on the clock's painting from ''Super Mario 64''; the [[minigame]] returns in ''[[Mario Party Superstars]]''. In the Super Mario Mash-up in ''[[Minecraft]]'', there is a painting of the entrance to Tick Tock Clock. [[Luigi]]'s Top Gear Sentry weapon in ''[[Mario + Rabbids Kingdom Battle]]'' references Tick Tock Clock, as the description mentions that the gear wheels on the weapon were taken from an old clocktower at Peach's Castle. | |||
==Layout== | ==Layout== | ||
[[File:SM64DS | [[File:SM64DS Tick Tock Clock Map.png|frame|left|Map of Tick Tock Clock in ''[[Super Mario 64 DS]]'']] | ||
[[File:SM64 TickTockClock.png|thumb| | [[File:SM64 TickTockClock.png|thumb|Tick Tock Clock entrance]] | ||
The player starts at the base of the clock's mechanics. In the DS version, there is additional ground around the base of the clock and [[Bob-omb]]s | The player starts at the base of the clock's mechanics. In the DS version, there is additional ground around the base of the clock, and [[Bob-omb]]s fall and attack the player in this area. To the left of the starting area are several ascending [[rotating bar]]s that spin if time is not still, along with a [[Spinning Heart]] below them; the rotating bars lead up to the area with the first rotating hand and are where all of the [[Red Coin]]s are placed. In front of the player's starting position is a large pendulum followed by a conveyor belt and a rotating block. Afterward is another pendulum followed by a ramp leading to three rotating blocks, followed by the platform that the earlier rotating bars lead to; it has a large clock hand swinging around nearby that brings the player to the [[Get a Hand|third Power Star]]. This platform has a [[! Block|yellow block]] with [[coin]]s, as well as a [[flame thrower (Flame Chomp)|flame thrower]] nearby. | ||
After the clock hand are several spinning platforms leading to a [[Roll into the Cage|caged Power Star]], followed by a small [[lift]] above, then a pole with an [[Amp]] circling it. After the player climbs up the pole, the path splits: To the left are a [[Heave-Ho]] and an area with a spinning triangular platform and two pendulums, leading to the [[The Pit and the Pendulums|second Power Star]]. To the right of the pole are lifts leading farther up the clock. Above the lifts are rotating blocks leading upward, with a mesh floor with [[Bomp|Moving Bar]]s behind them. Up the rotating blocks is a bending platform with Moving Bars placed under a cage that contains a yellow block full of coins. Afterward, a couple of conveyor belts lead to a long bending platform with several spinning platforms and triangular blocks (or square blocks in the DS version) breaking it up and a large platform in the middle. At the top of the platform is another clock hand that can bring the player to an area with a [[Thwomp]], which can carry the player to the [[Stomp on the Thwomp|fourth Power Star]]. | |||
{{br|left}} | {{br|left}} | ||
==Missions== | ==Missions== | ||
{|class="wikitable" text-align="center" | {|class="wikitable"text-align="center" | ||
!Mission | !Mission | ||
!Appears in | !Appears in | ||
!Summary | !Summary | ||
|- | |- | ||
![[File:Cage65.png|200px]]<br>[[ | ![[File:Cage65.png|200px]]<br>[[Roll into the Cage]] | ||
|''[[Super Mario 64 | |''[[Super Mario 64]]'' | ||
|This mission's objective is to collect the [[Power Star]] in a cage. | |This mission's objective is to collect the [[Power Star]] in a cage. | ||
|- | |||
![[File:SM64DS Luigi in the Cage.png|200px]]<br>[[Luigi in the Cage]] | |||
|''[[Super Mario 64 DS]]'' | |||
|This mission's objective is to collect the Power Star in a cage as [[Vanish Mario|Vanish Luigi]]. | |||
|- | |- | ||
![[File:Pit65.png|200px]]<br>[[The Pit and the Pendulums]] | ![[File:Pit65.png|200px]]<br>[[The Pit and the Pendulums]] | ||
|''[[Super Mario 64]]'' | |''[[Super Mario 64]]'' | ||
|The mission's objective is to collect the Power Star behind some | |The mission's objective is to collect the Power Star behind some [[pendulum]]s. | ||
|- | |- | ||
![[File: | ![[File:SM64DS Tick Tock Clock Star Switch.png|200px]]<br>[[The Pendulum Switch Star]] | ||
|''[[Super Mario 64 DS]]'' | |''[[Super Mario 64 DS]]'' | ||
|This mission's objective is to collect the course's | |This mission's objective is to collect the course's Switch Star. | ||
|- | |- | ||
![[File:Get_a_hand.png|200px]]<br>[[Get a Hand]] | ![[File:Get_a_hand.png|200px]]<br>[[Get a Hand]] | ||
| Line 40: | Line 50: | ||
![[File:SM64_Tick_Tock_Clock_Star_4.png|200px]]<br>[[Stomp on the Thwomp]] | ![[File:SM64_Tick_Tock_Clock_Star_4.png|200px]]<br>[[Stomp on the Thwomp]] | ||
|''[[Super Mario 64]]''<br>''[[Super Mario 64 DS]]'' | |''[[Super Mario 64]]''<br>''[[Super Mario 64 DS]]'' | ||
|This mission's objective is to reach the top of Tick Tock Clock. | |This mission's objective is to reach the top of Tick Tock Clock, where a [[Thwomp]] waits with the Power Star above it. | ||
|- | |- | ||
![[File:Timedjumps65.png|200px]]<br>[[Timed Jumps on Moving Bars]] | ![[File:Timedjumps65.png|200px]]<br>[[Timed Jumps on Moving Bars]] | ||
|''[[Super Mario 64]]''<br>''[[Super Mario 64 DS]]'' | |''[[Super Mario 64]]''<br>''[[Super Mario 64 DS]]'' | ||
|This mission's objective is to use | |This mission's objective is to use [[Bomp|Moving Bars]] to reach the Power Star. | ||
|- | |- | ||
![[File: | ![[File:Stop Time for Red Coins SM64.png|200px]]<br>[[Stop Time for Red Coins]] | ||
|''[[Super Mario 64]]''<br>''[[Super Mario 64 DS]]'' | |''[[Super Mario 64]]''<br>''[[Super Mario 64 DS]]'' | ||
|This mission's objective is to collect the course's [[Red Coin]]s. | |This mission's objective is to collect the course's [[Red Coin]]s. | ||
|- | |- | ||
![[File: | ![[File:Tick Tock Silver Stars.png|200px]]<br>[[Tick Tock Silver Stars]] | ||
|''[[Super Mario 64 DS]]'' | |''[[Super Mario 64 DS]]'' | ||
|This mission's objective is to collect the [[Silver Star]]s. | |This mission's objective is to collect the [[Silver Star]]s. | ||
| Line 56: | Line 66: | ||
==Enemies== | ==Enemies== | ||
<gallery> | |||
Bomb-omb SM64.png|[[Bob-omb]]s | |||
AmpSM64.png|[[Amp]]s | |||
BigSteelieSM64.png|[[Flame thrower (Flame Chomp)|Flame thrower]]s | |||
SM64_Asset_Model_Heave-Ho.png|[[Heave-Ho]]s | |||
ThwompSM64.png|[[Thwomp]] | |||
Timedjumps65.png|[[Bomp|Moving Bar]]s | |||
SM64DSGoombaModel.png|[[Goomba]]s (DS version only) | |||
</gallery> | |||
==Statistics from ''Super Mario 64''== | ==Statistics from ''Super Mario 64''== | ||
*'''Total Number of [[ | *'''Total Number of [[Coin]]s''': 128 | ||
*'''[[Cap]]s Found''': (none) | *'''[[Cap]]s Found''': (none) | ||
*'''[[Spinning Heart]]''': #1 : Near the | *'''[[Spinning Heart]]''': #1 : Near the starting point, on a lower platform, under spinning platforms with the Red Coins. #2: On the mesh right after the pole. | ||
*'''[[Cannon]]s''': (none) | *'''[[Cannon]]s''': (none) | ||
*'''[[1-Up Mushroom]]s''' (4): | *'''[[1-Up Mushroom|1UP Mushroom]]s''' (4): | ||
**''Homing Mushrooms'' : '''#1''' In the pole before the second | **''Homing Mushrooms'' : '''#1''' In the pole before the second Spinning Heart. | ||
**''Triggered Mushrooms'' : '''#2''' After the pole, climb up the elevator. The mushroom is activated by standing on the three | **''Triggered Mushrooms'' : '''#2''' After the pole, the player should climb up the elevator. The mushroom is activated by standing on the three Moving Bars. The 1-Up appears on the platform after them. | ||
**''Box Mushrooms'' : '''#3''' Near the top point of the clock, the box is on a platform accessed by three turning platforms. '''#4''' Near #3, on a separate mesh platform in the middle of the clock. Accessed by dropping from above or long jumping from near the two turning platforms. | **''Box Mushrooms'' : '''#3''' Near the top point of the clock, the box is on a platform accessed by three turning platforms. '''#4''' Near #3, on a separate mesh platform in the middle of the clock. Accessed by dropping from above or [[Long Jump|long-jumping]] from near the two turning platforms. | ||
*''' | *'''[[Warp]]s''': (none) | ||
==Gallery== | |||
<gallery> | |||
Tick Tock Clock Painting.png | |||
SM64-Facing Tick Tock Clock.png|The portal leading to Tick Tock Clock in the N64 version | |||
SM64DS Facing Tick Tock Clock.png|The portal leading to Tick Tock Clock in the DS version | |||
Tick Tock Clock Time Landing Position.png|The starting area in the N64 version | |||
</gallery> | |||
==Names in other languages== | ==Names in other languages== | ||
{{ | {{foreign names | ||
|Jap=チックタックロック | |Jap=チックタックロック | ||
|JapR=Chikkutakkurokku | |JapR=Chikkutakkurokku | ||
|JapM= | |JapM=Portmanteau of "tick-tock" and "clock" | ||
| | |Fre=Horloge Tic-Tac | ||
| | |FreM=Tic Tac Clock | ||
|Ger=Ticktack-Trauma | |Ger=Ticktack-Trauma | ||
|GerM=Tick Tock Trauma | |GerM=Tick Tock Trauma | ||
| Line 89: | Line 111: | ||
|KorR=Ttokttak Sigye | |KorR=Ttokttak Sigye | ||
|KorM=Tick Tock Clock | |KorM=Tick Tock Clock | ||
|Chi=摇摆古钟<ref name="iQue">From the {{ | |Chi=摇摆古钟<ref name="iQue">From the {{media link|SM64DS course list in Chinese.png|score sheet}} and the Power Star menu of ''Super Mario 64 DS'' as localized by [[iQue]].</ref> | ||
|ChiR=Yáobǎi Gǔzhōng | |ChiR=Yáobǎi Gǔzhōng | ||
|ChiM=Swaying Old Clock | |ChiM=Swaying Old Clock | ||
| Line 95: | Line 117: | ||
==Trivia== | ==Trivia== | ||
* | *In the N64 version, the last used speed of the clock can be seen in the credits. In the DS version, it will always appear to be moving at the speed when the clock is entered at the number 3; the same applies to the N64 version if it has not been visited by the player. | ||
*The ' | *The name of the 100-Coin Star is '''Multi-coin Blocks'''.<ref>M. Arakawa. ''Super Mario 64'' Player's Guide. Page 127.</ref> | ||
==References== | ==References== | ||
{{NIWA|Ukikipedia=1}} | |||
<references/> | <references/> | ||
{{SM64}} | {{SM64}} | ||
[[Category: | {{SM64 missions}} | ||
[[Category: | [[Category:Factories]] | ||
[[Category: | [[Category:Super Mario 64 locations]] | ||
[[Category:Super Mario 64 DS locations]] | |||
[[de:Ticktack-Trauma]] | [[de:Ticktack-Trauma]] | ||
[[it:Pendolo Tictoccato]] | [[it:Pendolo Tictoccato]] | ||
Latest revision as of 14:12, April 20, 2024
- This article is about the course in Super Mario 64. For the racecourse, see DS Tick-Tock Clock.
| Tick Tock Clock | |
|---|---|
 Super Mario 64  Super Mario 64 DS | |
| How to unlock | Open the Big Star Door on the third floor with 50 Power Stars. |
| Boss(es) | None |
| Mission(s) | Super Mario 64 Roll into the Cage The Pit and the Pendulums Get a Hand Stomp on the Thwomp Timed Jumps on Moving Bars Stop Time for Red Coins Super Mario 64 DS Luigi in the Cage The Pendulum Switch Star Get a Hand Stomp on the Thwomp Timed Jumps on Moving Bars Stop Time for Red Coins Tick Tock Silver Stars |
| Stars | Super Mario 64: Super Mario 64 DS: |
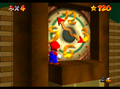
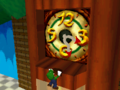
- “There's something strange about that clock. As you jump inside, watch the position of the big hand.”
- —Toad, Super Mario 64
Tick Tock Clock is the fourteenth course in Super Mario 64 and Super Mario 64 DS. To access the course, the player needs to open the Big Star Door on the third floor of the Mushroom Castle with 50 Power Stars. The entrance to Tick Tock Clock is the face of the large grandfather clock. Based on when the player jumps into the clock (rounded to the nearest quarter hour), the speeds of the internal clockworks change: Entering when the minute hand is nearest "12" makes everything stop, entering near "3" makes everything move slowly, entering near "6" makes everything move randomly and change speeds frequently, and entering near "9" makes everything move quickly. If time is not still, several platforms will turn, move, or flip; conveyor belts will move; and pendulums and the large hands will swing.
Tick Tock Clock appears to be changed more than any other level in the DS remake, with many areas altered for easier difficulty, removing elements such as the triangular blocks and fog effects, and repositioning several areas of the level. It is one of two courses with both a Switch Star and Silver Stars, the other being Shifting Sand Land.
Tick Tock Clock is referenced in various other games. It receives a racetrack in Mario Kart DS, and it returns in Mario Kart 8 and Mario Kart 8 Deluxe. The Mario Party 3 minigame Tick Tock Hop takes place on the clock's painting from Super Mario 64; the minigame returns in Mario Party Superstars. In the Super Mario Mash-up in Minecraft, there is a painting of the entrance to Tick Tock Clock. Luigi's Top Gear Sentry weapon in Mario + Rabbids Kingdom Battle references Tick Tock Clock, as the description mentions that the gear wheels on the weapon were taken from an old clocktower at Peach's Castle.
Layout[edit]


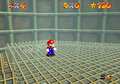
The player starts at the base of the clock's mechanics. In the DS version, there is additional ground around the base of the clock, and Bob-ombs fall and attack the player in this area. To the left of the starting area are several ascending rotating bars that spin if time is not still, along with a Spinning Heart below them; the rotating bars lead up to the area with the first rotating hand and are where all of the Red Coins are placed. In front of the player's starting position is a large pendulum followed by a conveyor belt and a rotating block. Afterward is another pendulum followed by a ramp leading to three rotating blocks, followed by the platform that the earlier rotating bars lead to; it has a large clock hand swinging around nearby that brings the player to the third Power Star. This platform has a yellow block with coins, as well as a flame thrower nearby.
After the clock hand are several spinning platforms leading to a caged Power Star, followed by a small lift above, then a pole with an Amp circling it. After the player climbs up the pole, the path splits: To the left are a Heave-Ho and an area with a spinning triangular platform and two pendulums, leading to the second Power Star. To the right of the pole are lifts leading farther up the clock. Above the lifts are rotating blocks leading upward, with a mesh floor with Moving Bars behind them. Up the rotating blocks is a bending platform with Moving Bars placed under a cage that contains a yellow block full of coins. Afterward, a couple of conveyor belts lead to a long bending platform with several spinning platforms and triangular blocks (or square blocks in the DS version) breaking it up and a large platform in the middle. At the top of the platform is another clock hand that can bring the player to an area with a Thwomp, which can carry the player to the fourth Power Star.
Missions[edit]
| Mission | Appears in | Summary |
|---|---|---|
 Roll into the Cage |
Super Mario 64 | This mission's objective is to collect the Power Star in a cage. |
 Luigi in the Cage |
Super Mario 64 DS | This mission's objective is to collect the Power Star in a cage as Vanish Luigi. |
 The Pit and the Pendulums |
Super Mario 64 | The mission's objective is to collect the Power Star behind some pendulums. |
 The Pendulum Switch Star |
Super Mario 64 DS | This mission's objective is to collect the course's Switch Star. |
 Get a Hand |
Super Mario 64 Super Mario 64 DS |
This mission's objective is to ride one of the clock hands. |
 Stomp on the Thwomp |
Super Mario 64 Super Mario 64 DS |
This mission's objective is to reach the top of Tick Tock Clock, where a Thwomp waits with the Power Star above it. |
 Timed Jumps on Moving Bars |
Super Mario 64 Super Mario 64 DS |
This mission's objective is to use Moving Bars to reach the Power Star. |
 Stop Time for Red Coins |
Super Mario 64 Super Mario 64 DS |
This mission's objective is to collect the course's Red Coins. |
 Tick Tock Silver Stars |
Super Mario 64 DS | This mission's objective is to collect the Silver Stars. |
Enemies[edit]

Goombas (DS version only)


Statistics from Super Mario 64[edit]
- Total Number of Coins: 128
- Caps Found: (none)
- Spinning Heart: #1 : Near the starting point, on a lower platform, under spinning platforms with the Red Coins. #2: On the mesh right after the pole.
- Cannons: (none)
- 1UP Mushrooms (4):
- Homing Mushrooms : #1 In the pole before the second Spinning Heart.
- Triggered Mushrooms : #2 After the pole, the player should climb up the elevator. The mushroom is activated by standing on the three Moving Bars. The 1-Up appears on the platform after them.
- Box Mushrooms : #3 Near the top point of the clock, the box is on a platform accessed by three turning platforms. #4 Near #3, on a separate mesh platform in the middle of the clock. Accessed by dropping from above or long-jumping from near the two turning platforms.
- Warps: (none)
Gallery[edit]

The portal leading to Tick Tock Clock in the N64 version
The portal leading to Tick Tock Clock in the DS version
The starting area in the N64 version


Names in other languages[edit]
| Language | Name | Meaning |
|---|---|---|
| Japanese | チックタックロック Chikkutakkurokku |
Portmanteau of "tick-tock" and "clock" |
| Chinese | 摇摆古钟[1] Yáobǎi Gǔzhōng |
Swaying Old Clock |
| French | Horloge Tic-Tac |
Tic Tac Clock |
| German | Ticktack-Trauma |
Tick Tock Trauma |
| Italian | Pendolo Tictoccato |
Tick-Tocked Pendulum |
| Korean | 똑딱시계 Ttokttak Sigye |
Tick Tock Clock |
| Spanish | Reloj Tictac |
Ticktock Clock |
Trivia[edit]
- In the N64 version, the last used speed of the clock can be seen in the credits. In the DS version, it will always appear to be moving at the speed when the clock is entered at the number 3; the same applies to the N64 version if it has not been visited by the player.
- The name of the 100-Coin Star is Multi-coin Blocks.[2]
References[edit]
- ^ From the score sheet and the Power Star menu of Super Mario 64 DS as localized by iQue.
- ^ M. Arakawa. Super Mario 64 Player's Guide. Page 127.