Neo Bowser Castle (Mario & Luigi: Dream Team)
- Not to be confused with Bowser's Castle or Neo Bowser City.
| Neo Bowser Castle | |
|---|---|
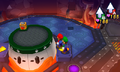
 Screenshot from Mario & Luigi: Dream Team | |
| Appears in | Mario & Luigi: Dream Team (2013) |
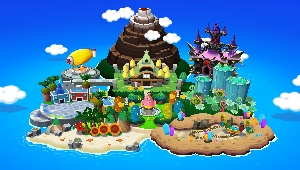
| Greater location | Pi'illo Island |
| Inhabitants | Bowser, Antasma, Kamek, Elite Trio, Fire Bros, Flaming Antasmatons, Inky Piranha Plants, Chain Chomps, Walker Guys, Shy Guy Airtubs R, Shy Guys R |
| Iteration of | Neo Bowser Castle |
Neo Bowser Castle is the final area in Mario & Luigi: Dream Team. It is a floating black castle, with purple and yellow spikes, serving as the base for both Bowser and Antasma. It does not appear until the middle of the game, where it appears high above Pi'illo Island, until it is later grounded and lands in the east, north of Somnom Woods and east of Mount Pajamaja. It can be reached by traveling north in the area between Mushrise Park and Somnom Woods.
Description[edit]

Neo Bowser Castle is a large, black, ominous castle that is a mix of Bowser and Antasma's designs. The outer walls have spikes and a red symbol of Bowser's face appears on the front, though this is added by the time Mario and Luigi reach the castle; when the castle is first created there are four screw bolts instead. It is topped with tall, purple towers and spires with the central tower being the tallest.
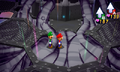
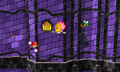
The interior of Neo Bowser Castle is like many of Bowser's previous castles, filled with seas of lava and spikes with some colored tiles of his face in red, blue, green and yellow. Not seen before in previous Bowser castles or final dungeons in the Mario & Luigi games, shadowy-themed elements from Antasma are also present: many dimly lit rooms; dark torches; strange, giant purple vines, structures and tendrils are seen throughout the castle with shadowy particles occasionally rising from the ground.
Neo Bowser Castle is vast and has many rooms and floors, each requiring the Bros. to clear several obstacles on one floor to advance to the next. Because puzzles in the castle are divided with the dream worlds there, the puzzles in the castle itself are relatively few and simple compared to previous final dungeons such as Bowser's Castle from Mario & Luigi: Superstar Saga and Shroob Castle from Mario & Luigi: Partners in Time. Near the main passageway in the castle are two Warp Pipes that can transport the Bros. to the upper floor they have previously cleared, and just outside the castle's entrance is a shop.
Area layout[edit]
Neo Bowser Castle is divided into four areas on the map.
- Area 1: Mario and Luigi enter the castle itself in this area, with a shop just outside the entrance. Switches that lower gates are present, with one gate blocking entry to the first dream world, where Kamek is fought.
- Area 2: A very expansive second floor, it is divided in two sections. Mega Bob-ombs are used to press the gates' switches. There are two dream world spots where the Bros. must go to defeat Kamek. On the first floor's foyer, two Warp Pipes are present which can transport the Bros.: the one on the left leads to the beginning of the floor; the pipe on the right leads to the end, near the elevator that leads to the third floor.
- Area 3: Three giant flames from the dream worlds blocking entry to the fourth area are present; the Bros. must make their way to the three dream worlds from the west and east sides to make them disappear. Several outdoor areas are here as well.
- Area 4: The final area of Neo Bowser Castle.
- Bowser's Bedroom: This room is where Bowser sleeps to provide power to the castle. The gigantic Dream Vines beneath Bowser's bed serve as a Dreampoint, to the seventh and final dream world. At the end of this room is an elevator that leads the brothers outside.
- Main Lair: This outside area is where Antasma is fought for the final time. At the end of this room is the entrance of the castle's tallest tower.
- Spiral Staircase: A long, spiral rainbow-colored passageway Mario and Luigi must work their way up to reach the elevator that goes to the balcony. The former Elite Trio is there to throw Bob-ombs and Mega Bob-ombs at them to slow them down. Later, when escaping the castle, Mario and Luigi have to also flee falling Mega Bob-ombs while backtracking through the staircase.
- Balcony: The final floor where the final battle with Dreamy Bowser is fought.
History[edit]

At the summit of Mount Pajamaja, with the Dream Stone charged, Antasma wishes for a castle for him and Bowser, one that is impenetrable and also one that is feared. A large castle, a mix between Bowser's and Antasma's designs, comes out of the Dream Stone and floats into the sky. Antasma then tries out the castle and destroys several small islands around Pi'illo Island with large lasers. Then a large impenetrable shield surrounds the castle. Bowser dubs this castle Neo Bowser Castle. Inaccessible for most of the game, Mario and Luigi gather the parts of the Ultibed to reach the Zeekeeper in the dream world, as he is the one who can break the shield surrounding Neo Bowser Castle and send it to the ground so the brothers can defeat Antasma and Bowser.
The inhabitants of the island are not entirely sure what to think about Neo Bowser Castle, and are unaware of the castle's true origin. Some people are extremely concerned, given the castle's destructive ability. Many of them ran away, causing chaos at Pi'illo Blimport. Other people think the castle is one of the island's attractions, and that the explosions were part of a show. Pi'illos hate it, for they knew Antasma used the Dream Stone to create it, and they consider Neo Bowser Castle to be against what the Dream Stone stands for.
After the Zeekeeper knocks the castle out of the sky with the Wakebeam, it crashes between Mushrise Park and Somnom Woods. It causes an earthquake, which is noticed by many NPCs. A Shell Hutch is opened just outside the castle, in a bid by its owner to make money off of potential desperation.
When Mario and Luigi storm the castle, most of the important areas are blocked with sturdy gates that must be lowered by pressing several switches that power the gate using all the navigational techniques they've learned throughout the game. Kamek will also hinder progress several times by casting spells on the doorways, warping the brothers in different sections than they intended, before going through dream portals created by Antasma. Scattered throughout a floor of the castle are Kamek Blocks that are used to reveal exactly where a spell warps the Bros. to and from on the map. By lowering the gates blocking floating Koopa Clown Cars that Luigi can then use to sleep on, the Bros. can get to Kamek through the puzzle-laden dream worlds, where they can defeat him to lift the spells placed on the doors so they can move forward. As they travel up the castle, Mega Bob-ombs will also come into play and the brothers must use air vents to navigate them into pressing the gates' switches if their abilities alone are not enough.

Deeper in the castle, after defeating Kamek a third time so that he no longer casts spells on the doorways, the brothers are stopped by several intense dark flames being shot out of portals from three Dream Worlds, which they must make their way to and destroy the pipes spewing them.

Upon succeeding in doing so, Mario and Luigi enter the doorway at the end to find Bowser sleeping on Antasma as a pillow with a barrier protecting him. Prince Dreambert states that the strange purple vines they've seen everywhere throughout the castle are what powers the building, and that they originate from Antasma. Luigi suggests they enter Bowser's Dream World, Prince Dreambert realizing they could try what they did with Big Massif with Bowser. Prince Dreambert connects himself to the vines as pillow form, and Luigi sleeps on him, Mario entering the Dream World where he and Dreamy Luigi confront and take down a powered-up Bowser. By defeating Bowser in his Dream World, the vines that supplied the power to the castle turn gray.
Mario and Luigi leave the Dream World and after pursuing Bowser and Antasma, discover that Bowser was planning to double-cross Antasma all along. Antasma reveals he had made a wish on the Dream Stone for the ability to create Dream Portals at some point, and flees from Bowser through one. Bowser, meanwhile, flees himself with a Paratroopa holding Princess Peach. Prince Dreambert decides to fight Antasma just as he did centuries ago, and loses. Mario decides to avenge him and jumps into the Dream Portal himself. Dreamy Luigi and a barely conscious Prince Dreambert join in the fight to assist him. After Mario defeats Antasma for good, they leave the Dream World, knowing they still have Bowser to take care of.
The Bros. then work their way up a long spiral passageway, and narrowly avoiding Private Goomp, Sergeant Guy, and Corporal Paraplonk's Mega Bob-omb attacks, Mario, Luigi, Starlow, and Prince Dreambert make it to the castle balcony, where Bowser and Peach await. Bowser boasts about the power he now has, with the Dream Stone and Peach in hand. Suddenly, Peach and Starlow activate their wish power from the previous game and, at the request of Prince Dreambert, destroy the Dream Stone. Bowser is initially shocked about this, but then screams in rage, "NOT YET!" as he inhales the Dream Stone's pieces and becomes a form known only as Dreamy Bowser. Mario and Luigi engage battle with him, and upon winning, knock him flying into the sky. Suddenly, without the Dream Stone to maintain it, the castle begins to crumble, but the Zeekeeper gives Mario and friends a lift back to Pi'illo Castle just in time.
Enemies[edit]

Inky Piranha Plants (background enemy)

Shy Guy Airtubs R (background enemy)

Dreamy Bowser (final boss)


Collectibles[edit]
NOTE: Items not included here are those bought from the Shell Hutch shop.
Beanholes[edit]
| Neo Bowser Castle – 18 Beans (4 Heart Beans, 2 Bros. Beans, 2 Power Beans, 2 Defense Beans, 5 Speed Beans, 3 Stache Beans) | ||
|---|---|---|
| Location | Type | Screenshot |
| In the room to the east of the room leading to the first elevator room, this Bean is found in the north-west, on high ground in a square patch of dirt. | Speed |

|
| In the first elevator room, these 2 Beans are found in the north-west in a patch of dirt. The north-western one is Defense Bean, the south-eastern one is Heart Bean. | Defense and Heart |

|
| In the room to the west of the room with the second Dreampoint, these 2 Beans are found in the far-west in a patch of dirt. The north-western one is Heart Bean, the south-eastern one is Power Bean. | Heart and Power |

|
| In the room to the east of the room with the third Dreampoint, these 2 Beans are found in the far-east in a patch of dirt. The north-western one is Stache Bean, the south-eastern one is Speed Bean. | Speed and Stache |

|
| In the room to the north-west of the room with the third Dreampoint, these 2 Beans are found in the north-west, behind a gate in a patch of dirt. The north-western one is Bros. Bean, the south-eastern one is Speed Bean. | Bros. and Speed |

|
| In the room to the south of the room with the three Dreampoints, these 2 Beans are found by the north-western exit, in a patch of dirt. The north-western one is Stache Bean, the south-eastern one is Heart Bean. | Heart and Stache |

|
| In the room to the south of the room with the three Dreampoints, these 2 Beans are found by the north-eastern exit, in a patch of dirt. The north-eastern one is Speed Bean, the south-western one is Defense Bean. | Defense and Speed |

|
| In the room to the south-east of the room with the three Dreampoints, these 2 Beans are found in the south. In the north-western patch of dirt is Heart Bean, in the south-eastern patch of dirt is Stache Bean. | Heart and Stache |

|
| In the room to the west of the room with the three Dreampoints, this Bean is found in the south-east in a patch of dirt on higher ground. | Speed |

|
| In the room to the east of the room with the three Dreampoints, this Bean is found in the north-west, in the north-western patch of dirt. | Power |

|
| In the room to the east of the room with the three Dreampoints, this Bean is found in the south-west, in the south-western patch of dirt. | Bros. |

|
Blocks[edit]
| Neo Bowser Castle – 70 Blocks (50 ?, 2 M, 4 L, 2 Bros., 1 Random, 10 Attack Piece, 1 Camera) | ||
|---|---|---|
| Item/s | Location | Screenshot |
Neo Bowser Castle Shot |
First Floor: In the third scene, in the southwest. | 
|
100-Coin and Ultrasyrup Jar |
First Floor: Same scene, in the northeast | 
|
Star Rocket Attack Piece |
First Floor: In the scene north of the third scene, in the north. | 
|
50-Coin |
First Floor: In the scene west of the third scene, in the northwest. | 
|
| 10x 10 50-Coins |
First Floor: Same scene, in the south. | 
|
Ultra Mushroom |
First Floor: In the scene north of the of the previous scene, in the northwest. | 
|
Star Rocket Attack Piece |
First Floor: Same scene, at the start of the east part. | 
|
Star Rocket Attack Piece and Ultra Candy |
First Floor: In the scene east of the third scene, in the northeast. | 
|
| 10x 10 50-Coins and Max Syrup Jar |
First Floor: In the scene east of the scene north of the third scene, at the end of the first Mini-Mario section. | 
|
Star Rocket Attack Piece and Crystal Hammer |
First Floor: Same scene, in the second Mini-Mario section. | 
|
Star Rocket Attack Piece |
First Floor: In the third scene, right of the Dreampoint. Accessible after lowering the cage. | 
|
50-Coin |
NOTE: Following 15 blocks are available only after returning from Dreamy Neo Bowser Castle accessed by the Dreampoint from the first Koopa Clown Car. First Floor: In the last scene of the floor, in the southeast. |

|
100-Coin |
First Floor: Same scene, in the southwest. | 
|
50-Coin |
Second Floor: In the first scene, left of the entrance. | 
|
Max Nut |
Second Floor: In the second scene, lowest of the three blocks found in the southwest. | 
|
Star Rocket Attack Piece |
Second Floor: Same scene, middle of the three blocks found in the southwest. | 
|
| 10x 10 50-Coins |
Second Floor: Same scene, upper of the three blocks found in the southwest. | 
|
100-Coin and Max Syrup Jar |
Second Floor: Same scene, in the middle west, behind the first bomb-track. | 
|
50-Coin |
Second Floor: In the scene east of the third scene, in the west part. | 
|
100-Coin and Secret Box |
Second Floor: In the scene west of the third scene, in the east upper part. | 
|
Star Rocket Attack Piece |
Second Floor: Same scene, in front of the previous two. | 
|
Star Rocket Attack Piece |
Second Floor: In the scene east of the third scene, in the southwest of the east part. | 
|
100-Coin and Max Nut |
Second Floor: Same scene, in the southeast, above the elevated ground. | 
|
Max Syrup Jar |
NOTE: Following 29 blocks are available only after returning from Dreamy Neo Bowser Castle accessed by the Dreampoint from the second Koopa Clown Car. Second Floor: In the part of the second scene accessible only from the previous scene, in the southwest. |

|
Star Rocket Attack Piece |
Second Floor: Same part, in the southeast. | 
|
Star Rocket Attack Piece and Gold Statue |
Second Floor: In the fourth scene, in the part accessible from the scene west of the third scene, at the end. | 
|
1-Up Deluxe and 10 100-Coins |
Second Floor: Same scene, at the end of the southeastern part. | 
|
50-Coin |
Second Floor: Same scene, near the exit. | 
|
| 2x 100-Coin (both) |
Second Floor: In the fifth scene, near the entrance. | 
|
Max Candy |
Second Floor: Same scene, on the left after the bomb-tracks. | 
|
Max Syrup Jar |
Second Floor: Same scene, in the middle after the bomb-tracks. | 
|
100-Coin |
Second Floor: Same scene, on the right after the bomb-tracks. | 
|
Refreshing Herb |
Second Floor: In the scene northwest of the fifth scene, in the east of the west part. | 
|
Secret Box |
Second Floor: Same scene, in the west of the west part. | 
|
| 10x 10 50-Coins |
Second Floor: In the scene east of the sixth scene, north of the entrance. | 
|
Max Candy |
Second Floor: In the scene north of the previous one, in the part with small islands, above the northwestern one. | 
|
| 10x 10 50-Coins and Max Mushroom |
Second Floor: Same scene, same part, above the middle one. | 
|
100-Coin |
Second Floor: Same scene, after the small islands part. | 
|
50-Coin and 100-Coin |
NOTE: Cannot be struck directly by bros, needed to be hit by bomb: first by turning on first 3 fans, second by turning on all fans but third and sixth. Second Floor: Same scene, in the north. |

|
Ultra Nut |
Second Floor: In the scene west of the seventh scene, in the west of the east part. | 
|
100-Coin |
NOTE: Cannot be struck directly by bros, needed to be hit by bomb after turning on first fan only. Second Floor: Same scene, same part, in the north. |

|
1-Up Deluxe and 100-Coin |
Second Floor: In the scene northwest of the fifth scene, in the part accessible from the previous scene, in the northeast. | 
|
1-Up Deluxe and Max Syrup Jar |
Second Floor: In the scene west of the seventh scene, in the northwest of the west part. | 
|
| 2x 50-Coin (both) |
NOTE: Cannot be struck directly by bros, needed to be hit by bomb: first by turning on first fan only, second by turning on second fan only. Second Floor: In the sixth scene, in the northwest. |

|
100-Coin |
NOTE: Following 11 blocks are available only after returning from Dreamy Neo Bowser Castle accessed by the Dreampoint from the third Koopa Clown Car. Second Floor: In the last scene of the floor, in the northwest. |

|
50-Coin |
Second Floor: Same scene, in the northeast. | 
|
1-Up Deluxe and Max Syrup Jar |
Third Floor: In the scene southwest of the scene with 3 Dreampoints, in the southwest. | 
|
Max Candy |
Third Floor: In the scene west of the scene with 3 Dreampoints, on the highest point of the scene. | 
|
| 10x 10 50-Coins |
Third Floor: In the scene south (on the map) of the scene with 3 Dreampoints, in the north. | 
|
| 10x 10 100-Coins |
Third Floor: Same scene, in the southeast Mini-Mario section. | 
|
Max Candy |
Third Floor: Same scene, in the south Mini-Mario section. | 
|
Angel Wear |
Third Floor: Same scene, in the southwest Mini-Mario section. | 
|
| 10x 10 50-Coins and POW Scarf DX |
Third Floor: In the scene southeast of the scene with 3 Dreampoints, in the southeast. | 
|
Pi'illo[edit]
| Neo Bowser Castle – 1 Pink Pi'illo | |||
|---|---|---|---|
| Location | Necessity | Type | Screenshot |
| This Pi'illo is found right outside the castle. (Note: Even though this Pi'illo is classified as Neo Bowser Castle Pi'illo in-game, Mario is transported to Dreamy Mushrise Park.) | Optional | Pink Pi'illo |

|
Gallery[edit]
A Koopa Clown Car acting as a Dreampoint
The Dreampoint located in Bowser's Bedroom
Mario, Princess Peach, and Luigi falling off the castle
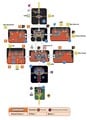
Map of Neo Bowser Castle's first floor
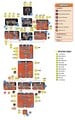
Map of Neo Bowser Castle's second floor
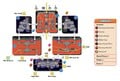
Map of Neo Bowser Castle's third floor
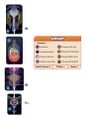
Map of Neo Bowser Castle's fourth floor


Names in other languages[edit]
| Language | Name | Meaning | Note(s) | Ref. |
|---|---|---|---|---|
| Japanese | ネオクッパ城 Neo Kuppa Jō |
Neo Koopa Castle | [?] | |
| Dutch | Bowsers Nieuwe Kasteel | Bowser's New Castle | [?] | |
| French (Canadian) | Château noir de Bowser | Bowser's black castle | [?] | |
| French (European) | Néobowserium | Neobowserium | [?] | |
| German | Bowsers Neue Festung | Bowser's New Fortress | [?] | |
| Italian | Neo-Castello di Bowser | Neo-Bowser Castle | [?] | |
| Korean | 네오 쿠파 성 Neo Kupa Seong |
Neo Bowser's Castle | [?] | |
| Portuguese | Neo Castelo do Bowser | Bowser's Neo Castle | [?] | |
| Portuguese (European) | Neocastelo do Bowser | Bowser's Neocastle | [?] | |
| Russian | Замколет Боузера Zamkolet Bouzera |
Bowser's Flying Castle | [?] | |
| Spanish (Latin American) | Neocastillo de Bowser | Bowser's Neocastle. | [?] | |
| Spanish (European) | Supercastillo de Bowser | Bowser's Supercastle | [?] |
See also[edit]
Notes[edit]
- The castle's music uses the beginning notes of Bowser's leitmotif in the Mario & Luigi series in the beginning, and during the chorus. The violins during the song's chorus is also a nod to Antasma, whose leimotif uses violins.
- The location of Neo Bowser Castle in Mario & Luigi: Dream Team from hanging in the sky to falling to the ground is the reverse of Bowser's Castle in Paper Mario, which rises from underground to floating in space.
- In the first room on the second floor northwest of the elevator are all four colors of the castle's tiles placed together. When the pattern is rotated counter-clockwise, it becomes the color pattern of the buttons on the Super Famicom controller.