List of hidden Toads in Paper Mario: The Origami King

- “You've found—and unfolded—all of the plants, animals and origami objects made from Toads. What a collection!”
- —Musée Champignon, Paper Mario: The Origami King
In Paper Mario: The Origami King, Mario can rescue Toads throughout the different streamer areas, receiving Toad Points in the process. These Toads are found in various forms; most commonly they are folded into origami, stuffed into small holes, or trapped behind or beneath objects. Mario can typically rescue the Toads by either using his hammer to unfold them, pulling on them, or using a Magic Circle. Rescuing all the Toads in a given area will show a message informing the player of their success. This page lists the locations of all 416 hidden Toads, including pictures and information on what form they are found in.
NOTES:
- Some Toads are trapped in areas that are inaccessible until returning later; these entries are highlighted in beige.
- Locations absent from the list have no Toads to rescue, specifically: Eddy River, Sweetpaper Valley, Fire Vellumental Cave, Scuffle Island, Diamond Island, Ice Vellumental Mountain, Spring of Jungle Mist, Spring of Rainbows, Bowser's Castle, Hotfoot Crater, and Origami Castle.
- Although The Great Sea has no Toads to rescue, the Toad's BBQ Foodeatery caretaker is found in a Big Shell retrieved here.
Red streamer[edit]
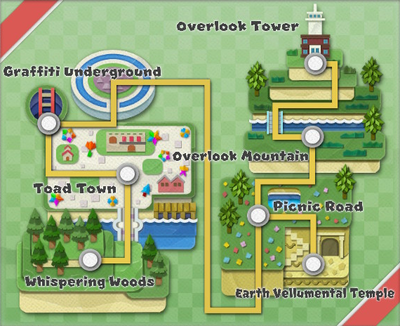
There are a total of 135 Hidden Toads to rescue in the red streamer area:
- Whispering Woods hides 12 Toads
- Graffiti Underground hides 2 Toads
- Toad Town hides 1 Toad
- Picnic Road hides 58 Toads
- Overlook Mountain hides 36 Toads
- Earth Vellumental Temple hides 7 Toads
- Overlook Tower 19 Toads
| Form | Description | Necessity | Image |
|---|---|---|---|
| Whispering Woods | 12 Toads | |||
 # 1 |
The first Toad to be rescued, stuck in a bush near the BBQ Foodeatery. Mario should hammer the Toad's body back into shape. |
Required | 
|
# 2 |
Inside the first of three tents is a squished Toad. Mario can help the Toad escape by opening the zipper. |
Optional | 
|
 # 3 |
A yellow Toad has been left with their head jabbed into a stump, near the campfire. | Optional | 
|
# 4 |
A Toad is stuck underneath a stool at the picnic tables, guarded by a Goomba. | Optional | 
|
# 5 |
Another Toad can be found stuck inside a bush near the cabin. | Optional | 
|
# 6 |
Just to the left of the cabin and behind the bushes, there is a crumpled Toad hidden away. | Optional | 
|
# 7 |
A Toad is stuffed into the tight space between some logs stored at the cabin. | Optional | 
|
 # 8 |
An origami cicada Toad is perched on one of the posts supporting the swing. | Optional | 
|
# 9 |
Another origami cicada Toad hides on a tree, behind the logs stored beside the campfire. | Optional | 
|
 # 10 |
A yellow Toad is folded into an origami egg, and lays on a plate at the picnic tables. | Optional | 
|
 # 11 |
One of the cabin's flower boxes appears empty. Mario must jump into it from below to reveal an origami flower Toad. | Optional | 
|
# 12 |
Required: Big Shell After retrieving the Big Shell from beneath The Great Sea, Mario can light the campfire with Fire Vellumental Magic Circle nearby and place the shell onto the grill. This frees the Foodeatery caretaker from inside. |
Optional | 
|
| Graffiti Underground | 2 Toads | |||
# 1 |
After entering the Graffiti Underground, Mario and Olivia find the Musée Champignon curator sitting in a corner. Following this, the Musée Champignon becomes accessible. | Required | 
|
# 2 |
Rather than using the exit Pipe, take a detour to the right. There is a crate guarded by Scaredy Rats, which releases a Toad when opened. | Optional | 
|
| Toad Town | 1 Toad | |||

|
After checking on Luigi among the remains of Peach's Castle, Mario finds the local shop owner held inside a bridge tower. Defeating the Goomba guarding the spot reveals a Magic Circle. Following this, the Toad Town Shop becomes accessible. | Required | 
|
| Picnic Road | 58 Toads | |||
 # 1 |
Near the entrance to Picnic Road is a green Toad, stuck in a bush beyond a large Not-Bottomless Hole. | Optional | 
|
# 2 |
Near the set of fences to the west is a Not-Bottomless Hole, which reveals an even smaller hole when repaired. Hammering near it will release a rolled up Toad. | Optional | 
|
 # 3 to 6 |
In a fenced off area to the west is a group of folded Toads guarded by two Shy Guys. | Optional | 
|
# 7 |
Another rolled up Toad can be found after hammering the western mountainside near a high-up hole. | Optional | 
|
 # 8 |
A purple origami butterfly Toad flutters around a set of flowers near the western mountainside. | Optional | 
|
 # 9 |
Further up the hill is a yellow Toad disguised as a tulip in a bed of flowers. | Optional | 
|
# 10 |
A crumpled Toad is hidden behind the sign near the pond. Hammering the sign will cause the Toad to hop to a more accessible spot. | Optional | 
|
# 11 |
Another crumpled Toad can be found at the western edge of the hill, behind some bushes. | Optional | 
|
# 12 to 14 |
Whacking the Sensor Lab mailbox will release a set of Toads folded into the shape of envelopes. | Optional | 
|
# 15 |
Just beside the Sensor Lab is a tree, which releases a crumpled Toad when hammered. | Optional | 
|
# 16 |
A yellow Toad is buried in the sand near the Goal Pole. | Optional | 
|
# 17 to 23 |
After hammering the ground near the Goal Pole to reveal a set of stairs, Mario can slide down the top of the pole, sending the green ball on top into the air and releasing a bundle of Toads in a display of fireworks. | Optional | 
|
# 24 to 27 |
A hole can be found on the eastern mountainside near the entrance to Overlook Mountain; hammering the wall repeatedly will release four Toads. | Optional | 
|
# 28 |
A tree near the eastern mountainside can be hammered to release a crumpled Toad from its branches. | Optional | 
|
 # 29 |
An origami swan Toad can be found floating across the pond. Mario must reveal several Hidden Blocks at the east edge to reach the Toad with his hammer. | Optional | 
|
 # 30 |
A blue Toad can be found fluttering about a flower patch outside the Sensor Lab. | Optional | 
|
 # 31 |
Further up the hill is a protruding ledge with a large Not-Bottomless Hole. Repairing the ground will allow a red Toad to descend in the form of a butterfly. | Optional | 
|
 # 32 |
After attempting to jump onto the Goal Pole, Mario can hammer the flag to reveal a green Toad. | Optional | 
|
.jpg)  # 33 & 34 |
Near the Goal Pole is a patch of flowers surrounding two holes in the ground, one of which needs a Not-Bottomless Hole repaired. Hammering near the holes will reveal two Toads disguised as a red tulip and a yellow butterfly. | Optional | 
|
 # 35 |
Near the eastern mountainside is a rock covering a hole in the ground. Hammering near the hole will cause an origami beetle Toad to emerge. | Optional | 
|
 # 36 |
A yellow Toad disguised as an origami prairie dog burrows in a secluded area to the east, accessed from the ledge nearby. The prairie dog will burrow into a different hole when Mario gets close, so he should hammer all but the bottom two holes to corner the critter. | Optional | 
|
 # 37 |
Guarding the path to Overlook Tower is an aggravated origami dog, which when hammered is revealed to be Toad Town's Battle Lab owner. Following this, Mario can access the Battle Lab in Toad Town. | Required | 
|
# 38 |
The Fun, Funky, and Functional Toad from Toad Town can be found folded and resting on a table outside the Earth Vellumental Temple. Following this rescue, Mario can purchase accessories in Toad Town. | Optional | 
|
# 39 |
A crumpled Toad can be found stuck in an alcove below the stairs to the Earth Vellumental Temple entrance. Mario can hammer the umbrella and use its canopy to reach the Toad. | Optional | 
|
# 40 |
Behind the Save Block near the Earth Vellumental Temple entrance, there is an obscured area with a crumpled Toad behind the window. | Optional | 
|
# 41 |
Just south of the entrance to the Earth Vellumental Temple is a set of stairs. Entering the path below, Mario can reach a crumpled Toad guarded by a Scaredy Rat. | Optional | 
|
# 42 to 51 |
A large group of Toads can be found behind a statue, above the shop stalls near the Earth Vellumental Temple. Mario must hammer a different statue in the mountainside to reveal a Magic Circle, then use the 1,000-Fold Arms to rescue the Toads. | Optional | 
|
# 52 to 55 |
Required: Earth Vellumental defeated Attempting to purchase popcorn from the green Toad in front of the popcorn machine will allow 4 crumpled Toads to escape its container. |
Optional | 
|
 # 56 |
Required: Earth Vellumental defeated There is a shop set up in front of the entrance to the Earth Vellumental Temple, with a peculiar looking mushroom at the end of the stands. Mario should hammer it to reveal a Toad. |
Optional | 
|
# 57 |
Required: Red streamer destroyed With the red streamer gone, Mario can head to the Sensor Lab and hammer the sign in front, revealing a crumpled Toad. |
Optional | 
|
 # 58 |
Required: Red streamer destroyed Since the Sensor Lab in Picnic Road is no longer blocked off by the red streamer, Mario can enter it and whack the yellow origami mushroom resting on the fax machine to reveal the Toad Researcher. |
Optional | 
|
| Overlook Mountain | 36 Toads | |||
 # 1 |
Just after entering Overlook Mountain, there is a Toad folded into the form of a signpost near the wall. | Optional | 
|
# 2 |
To the west of the entrance to Overlook Mountain is a path leading to a chest. Near the chest is a crumpled Toad hidden behind some grass. | Optional | 
|
# 3 |
After climbing the first ledge, Mario can approach a bush near the path from behind, causing an origami beetle Toad to scurry out of hiding. | Optional | 
|
 # 4 to 6 |
Three grasshoppers can be found among the bushes after climbing up the first ledge. One is already visible, but two of the grasshoppers hide behind a bush in front of the tree. Hammering the ground near one will trip them, making the task of unfolding them easier. | Optional | 
|
# 7 |
To the east of the entrance is a bench area with a blue roof. Mario can jump across this roof to rescue a crumpled Toad on a raised platform. | Optional | 
|
# 8 |
Near the Musée Pipe is a rock, which is revealed to be resting atop a Toad when broken. | Optional | 
|
# 9 |
Just north of the Musée Pipe and behind the trees is a hidden ledge, where a crumpled Toad hops on the ground. | Optional | 
|
# 10 |
After crossing the bridge, Mario should head to the left to find a Toad crawling the wall above a Not-Bottomless Hole, then repair the ground and hammer the wall to make the Toad fall. | Optional | 
|
# 11 to 15 |
After reaching the Save Block, Mario should head east towards the fishing dock. On the way he will pass five Toads he can pull up. One of the Toads will be chased back to the Musée Pipe by a Goomba. | Optional | 
|
 # 16 |
After obtaining the Blue Shell Stone, Mario can fish up a much more geometric fish from the pier. It can be hammered once caught, revealed to be a blue Toad. | Optional | 
|
# 17 |
After heading up the slope where Thwomps dropped down, Mario should head left and back down the slope, now between the mountain and the fence. Here he will find another crumpled Toad. | Optional | 
|
# 18 to 27 |
Once Mario reaches the tram area, he should go behind the set of stairs. Here there is a hidden area with a bundle of Toads tied up on the ground. | Optional | 
|
# 28 |
Mario can hammer the sign posted near Overlook Tower to reveal yet another crumpled Toad. | Optional | 
|
# 29 |
After reaching the peak of the mountain, Mario should head down the western path and go behind the bushes to find another origami grasshopper Toad. | Optional | 
|
# 30 |
When heading down the western path of the mountain, Mario should drop down from the gap in the fences. He will land on a small ledge with a ? Block containing a Toad. | Optional | 
|
# 31 |
After heading down the western path of the mountain, Mario will find a pair of Shy Guys passing a crumpled Toad around like a ball. Mario can either intercept the Toad or defeat the Shy Guys. | Optional | 
|
# 32 to 34 |
At the end of the western path down the mountain is a large field with three Paper Macho Shy Guys. After retrieving the Red Shell Stone from them, Mario can defeat them to release the Toads they held captive. | Optional | 
|
# 35 |
Required: Red streamer destroyed Once the red streamer is gone, Mario can access the tram station on the mountain. If Mario hits one of the flowerbeds from below, a crumpled Toad will fall out. |
Optional | 
|
# 36 |
Required: Red streamer destroyed With the red streamer now gone, the green Toad operating the tram station can now send Mario off to Autumn Mountain. Following this, Mario can also ride the tram between Overlook Mountain and Toad Town. |
Required | 
|
| Earth Vellumental Temple | 7 Toads | |||
 # 1 |
Mario should listen to tourist station 2, which will lure a green origami beetle out from behind the rock formation. | Optional | 
|
# 2 |
After listening to station 3, smash it with the hammer and pull out the green Toad trapped inside. | Optional | 
|
# 3 |
Just past station 4 are a set of ceiling lamps. Mario should jump into the fifth light. This will release a green, crumpled Toad. | Optional | 
|
 # 4 |
Three origami beetles pop out of a rock near station 5 after it is hammered. One beetle scurries away while the other two remain in the area. Hammering the yellow origami beetle on the wall will reveal a Fun, Funky, and Functional vendor Toad. | Optional | 
|
# 5 |
After breaking the rock near station 5, a green origami beetle will crawl on the ground close by. This too is a green Toad. | Optional | 
|
# 6 |
After breaking the rock near station 5, a green origami beetle will scurry under the stairwell. Hammering it will reveal another green Toad. | Optional | 
|
# 7 |
In the second area of the temple, Mario should repair and ride pillar as it descends, entering a small cave. Break the rock and defeat the Swoops to rescue the temple curator. | Optional | 
|
| Overlook Tower | 19 Toads | |||
 # 1 |
A Toad can be found folded amongst pamphlets on a rotary display. | Optional | 
|
 # 2 |
Against the wall are 4 flags, with a Toad folded and resting on one of them. | Optional | 
|
 # 3 to 5 |
3 blue Toads are folded into pointy hats on the display table to the right of the entrance. | Optional | 
|
# 6 to 8 |
3 Toads are rolled up and stuffed into a bin near the register. | Optional | 
|
# 9 |
A Blue Toad is stuck in the door of the elevator. Mario must open the door with the button. | Required | 
|
# 10 |
A blue Toad is stuck in the cabinet of the dining area. | Optional | 
|
# 11 |
In the kitchen, there is an origami egg Toad in one of the pans. | Optional | 
|
# 12 |
A crumpled Toad is trapped in the kitchen's trash can. | Optional | 
|
# 13 |
Hitting the kitchen's storage cabinet reveals a Toad that was stuck inside. | Required | 
|
# 14 |
An origami mushroom Toad rests on a scale atop the kitchen shelves. | Optional | 
|
# 15 |
At the end of the kitchen shelves there is a crumpled Toad on some plates. | Optional | 
|
# 16 |
At the stairway leading between the second and third floors, a blue Toad is taped to the wall. Mario can hit a Hidden Block to reach the tape. | Optional | 
|
 # 17 |
After exterminating all of the Mini Goombas, Overlook Tower's chef comes out of hiding and provides Mario with confetti to repair the stairs. | Required | 
|
.jpg) # 18 |
On the fourth floor, there is a blue Toad disguised as one of the pencils piercing the elevator shaft. | Optional | 
|
# 19 |
After defeating Colored Pencils, if Mario peers into the telescope on the right side, the view will be obscured by a Toad stuck to the front. Hammer this Toad to free them. | Optional | 
|
Blue streamer[edit]
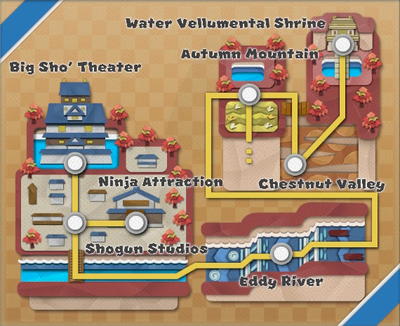
There are a total of 149 Hidden Toads to rescue in the blue streamer area:
- Autumn Mountain hides 22 Toads
- Chestnut Valley hides 8 Toads
- Water Vellumental Shrine hides 3 Toads
- Shogun Studios hides 45 Toads
- Ninja Attraction hides 4 Toads
- Big Sho' Theater hides 67 Toads
| Form | Description | Necessity | Image |
|---|---|---|---|
| Autumn Mountain | 22 Toads | |||
# 1 |
A crumpled green Toad lays on the floor of the tram station. This Toad happens to operate the tram from Autumn Mountain. | Optional | 
|
 # 2 |
The Sea Captain Toad can be found near the tram station in the form of a flopping blue fish. The captain will return to the harbor in Toad Town, granting access to The Great Sea. |
Required | 
|
.png) .png) # 3 and 4 |
Right behind the tram is a pile of 100-Coins, and a Toad folded into a red autumn leaf. Additionally there is a yellow origami leaf Toad, hidden beneath a leaf pile. |
Optional | 
|
# 5 |
On the edge of the dried-up lake is a crumpled red Toad next to the sign. | Optional | 
|
# 6 |
Near the tram in the patch of tall grass, Mario can drop into a small cave with a red Toad stuck in the ground. Pulling them out rewards Mario a +5 MAX UP Heart. | Optional | 
|
# 7 |
There is a red Toad hidden in the tall, dry grass to the left of the stairs. This Toad is intended to be found with use of |
Optional | 
|
# 8 |
A second Toad is hidden in the tall, dry grass just in front of the gap in the fence in the foreground. This Toad is intended to be found with use of |
Optional | 
|
# 9 |
Yet another red Toad is hidden in the field, near the exit leading to the bridge and the inward curve in the fence. This Toad is intended to be found with use of |
Optional | 
|
# 10 |
On the platform across the bridge is a tree Mario can hammer to drop a red leaf, revealed to be another Toad. | Optional | 
|
# 11 |
To the right of the Water Vellumental Shrine is a shortcut Pipe on a ledge next to a tree. Hammering the tree will drop a red origami leaf Toad. | Optional | 
|
.png) # 12 |
While crossing the shrine bridges and avoiding origami Cheep Cheeps, Mario may spot a Toad disguised as a red origami fish leaping in and out of the water between the middle platform. | Optional | 
|
# 13 |
Close to the Water Vellumental Shrine is a Toad taped to the wall. Mario must navigate through a hidden tunnel and drop a boulder down to reach the tape. | Optional | 
|
.png) # 14 |
Taking the shortcut Pipe brings Mario to a ledge above the dock. Here there is an origami dragonfly Toad flying about. | Optional | 
|
# 15 |
Above the dock is another ledge with an origami beetle crawling the wall. Hammer a nearby bush to reveal a Magic Circle and free the Toad with the 1,000-Fold Arms. | Optional | 
|
# 16 |
Between the Water Vellumental Shrine and Chestnut Valley is a secluded area with a bench and a Not-Bottomless Hole nearby. Patching this hole reveals a fax station satellite office, with a Sensor Lab Toad jammed into the fax machine inside. | Optional | 
|
# 17 to 19 |
Required: Eddy River is filled After refilling the lake, Mario can reach a tree next to a pile of boats. He can then hammer the tree to drop down a trio of Toads, each disguised as an autumn leaf. |
Optional | 
|
# 20 & 21 |
Required: Eddy River is filled Beneath the pile of boats is an origami beetle Toad, which crawls on the floor. Near the pile of boats Mario can find a yellow origami leaf Toad, resting on the edge of a crate. |
Optional | 
|
.png) # 22 |
Required: Eddy River is filled + Opened Can of Tuna Despite being seen when first arriving at Autumn Mountain, this origami monkey cannot be rescued until the Eddy River is filled. After Mario and co. find they cannot row the boat, they must collect a Canned Tuna from the monkey and follow it into the grassy field.
|
Required |  
|
| Chestnut Valley | 8 Toads | |||
.png) # 1 to 3 |
Mario must hammer the tree at the top of the second sloped section to drop a chestnut, which breaks open to reveal a yellow origami crown. Hammering this reveals a trio of yellow Toads. | Optional | .png)
|
# 4 to 6 |
After defeating the trio of Galoombas, Mario must hammer their tree to drop a trio of Toads from its branches. | Optional | .png)
|
# 7 |
There is a small hole in the ground behind the chestnut maze. Mario must hammer it to reveal a red scroll, which he must then pull out of the hole to reveal a Toad. | Optional | 
|
.png) # 8 |
When watching Bob-omb sleep peacefully on a tree stump, an origami butterfly Toad will descend onto a patch of flowers. | Optional | 
|
| Water Vellumental Shrine | 3 Toads | |||
# 1 |
In the southwest corner of the entrance room, Mario can find a red origami beetle Toad climbing above a Not-Bottomless Hole. | Optional | 
|
# 2 |
After completing the first puzzle, the middle platform begins to rotate. Mario can head below the platform via some stairs and find a blue Toad, folded and perched in a window. | Optional | 
|
# 3 |
Another blue Toad can be found in the room with the crying dragon statue. Mario must use the tunnel in the east wall, walk up to the window and hammer to push the Toad out the window. | Optional | 
|
| Shogun Studios | 45 Toads | |||
.png) # 1 |
Love Toad is found folded into a heart outside the gates and next to the Musée Pipe. | Optional | 
|
# 2 |
The owner of the local Fun, Funky, and Functional accessory shop hides behind a small structure in the center of the park. | Optional | 
|
# 3 |
Mario must hammer the sign on the roof of the Dress-Up Photo Studio to free this Toad. | Optional | 
|
# 4 |
Mario must hammer the bell on the Lookout Tower 30 times total to reveal a Toad. | Optional | 
|
# 5 |
A staff Toad is stuck inside the Lookout Tower. They can be freed by defeating the Goombas, removing the tape from the door and defeating the Paper Macho Koopa Troopa. | Optional | 
|
# 6 |
Mario must hammer the Toad head on the sign outside Big Sho' Theater. | Optional | 
|
# 7 |
Near the 2 Origami Shy Guys is a lamp post with a Toad folded inside. | Optional | 
|
# 8 |
Mario must hammer open an umbrella in front of the Tranquil Pipes Teahouse to reveal a Toad. | Optional | 
|
.png) # 9 |
Outside the Shuriken Dojo, Mario must hammer the origami shuriken stuck to the sign. | Optional | 
|
.png) # 10 & 11 |
In the Ninji training area, Mario must jump on the crates and hammer an origami lantern. Mario should also hammer a lamp post to reveal a Magic Circle, using the 1,000-Fold Arms to knock down another lantern. | Optional | 
|
.png) # 12 |
An origami dragonfly Toad is flying near the three potted plants right of the Save Block. | Optional | 
|
# 13 |
An origami dragonfly Toad is flying outside the staff room, in the northeast corner of the park. | Optional | 
|
.png) # 14 |
A yellow Toad is disguised as an origami dog and barking at Princess. | Optional | 
|
.png) # 15 |
A red Toad is folded into an origami fan in a building just outside the Souvenir Shop. | Optional | 
|
# 16 |
After fixing a Not-Bottomless Hole in the wall of a door, Mario must enter it and hammer an origami flower. | Optional | 
|
# 17 to 19 |
In a building directly south of the Shuriken Dojo, Mario must defeat the Shy Guy and hammer the drawers to release three Toads. | Optional | 
|
.png) # 20 |
In a house south of the Photo Studio, a cushion must be hammered to reveal an origami cat Toad sitting on the other side. | Optional | 
|
# 21 |
Inside the Dress-Up Photo Studio, a Toad hides in a frame on the left wall. | Optional | 
|
# 22 |
In a house near the Lookout Tower, Mario must pull a Toad out of some clothing hanging on the right side. | Optional | 
|
# 23 to 26 |
In a building just south of the House of Riddles, four Toads are hidden in the lanterns. | Optional | 
|
# 27 |
In a house on the right side of the main road leading to Big Sho' Theater, Mario must hammer the hat to free a crumpled Toad. | Optional | 
|
# 28 |
In the room leading to the Dry Bones, Mario must hammer to reveal a ? Block and then jump on it to push an origami flower Toad out of its pot. | Optional | 
|
# 29 to 32 |
In the right-side door of the building with 3 doors, four Toads have been folded into: a grasshopper, a scarab, a bonsai tree, and a butterfly, which can be revealed by hammering the barrels. | Optional | 
|
.png) # 33 |
After freeing the previous Toads, Mario must jump on the drawers and hammer broken section in the wall. A Toad is folded up as a fish in this room. | Optional | ![The thirty-third hidden Toad in Shogun Studios, disguised as a blue origami fish inside a three-door building. Mario must break down a wall to reach the Toad, as a Guy] blocks the door.](/File:PMTOK_Shogun_Studios_Hidden_Toad_33.jpg)
|
# 34 to 36 |
Near the training Ninjis, one house contains three Toads hiding in a pile of ash. | Optional | 
|
# 37 to 40 |
Hidden in the northeast corner of the park is a staff room with 4 employees inside: A folded Toad on a cabinet, the owner of the Shuriken Dojo sleeping inside a locker, a crumpled Toad in the trash bin, and a Toad stuck in the mouth of the Goomba Mask. | Locker and Mask ones required, cabinet and bin ones optional. | 
|
# 41 |
In the Tranquil Pipes Teahouse, Mario must hammer a cushion to reveal the face of a Toad. | Optional | 
|
.png) # 42 |
Required: Bone After Princess is fed Mario can enter her stable, where a staff Toad disguised as a scarab beetle drops down. |
Optional | 
|
.png) # 43 |
Required: Bone + Rescue Toad 42 A Toad is folded as a fish, swimming among Cheep Cheeps at the river near the Ninja Attraction. |
Optional | 
|
# 44 |
Required: Shogun Studios Master Key Mario must enter the locked building near the training Ninjis, and fill a hole in the wall to reveal a satellite office. Inside is a Sensor Lab Toad stuck in a fax machine. After being freed, Mario can fax travel to and from Shogun Studios. |
Optional | 
|
# 45 |
Required: Shogun Studios Master Key Inside the Souvenir Shop, Mario must rescue the shop owner by using the Master Key to open a sliding door and head upstairs. |
Optional | 
|
| Ninja Attraction | 4 Toads | |||
# 1 |
An origami beetle Toad can be found under a breakable rock near the entrance. | Optional | 
|
# 2 |
A staff Toad is taped to the roof, next to the attraction's sign. | Optional | 
|
# 3 & 4 |
In the maintenance room, one staff Toad is trapped under some boxes and must be pulled out, while another is taped to the inside of the middle locker. | Optional | 
|
| Big Sho' Theater | 67 Toads | |||
.png) # 1 |
If Mario exits stage left on the western-themed set, he will find an origami cactus that he can hammer to reveal a green Toad. | Optional | 
|
#2 to 67 |
A large group of Toads are restrained by rubber bands. After defeating Rubber Band, these Toads break free. | Required | 
|
Yellow streamer[edit]
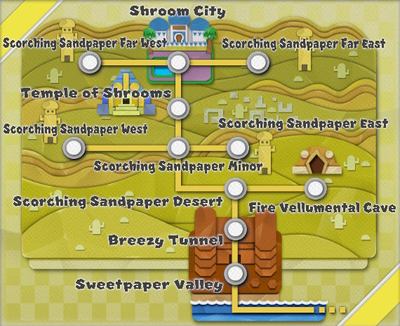
There are a total of 93 Hidden Toads to rescue in the yellow streamer area:
- Breezy Tunnel hides 2 Toads
- Scorching Sandpaper Desert hides 10 Toads
- Scorching Sandpaper Minor hides 2 Toads
- Scorching Sandpaper West hides 6 Toads
- Scorching Sandpaper East hides 5 Toads
- Shroom City hides 23 Toads
- Scorching Sandpaper Far West hides 1 Toad
- Scorching Sandpaper Far East hides 3 Toads
- Temple of Shrooms hides 41 Toads
| Form | Description | Necessity | Image |
|---|---|---|---|
| Breezy Tunnel | 2 Toads | |||
# 1 |
In the second area of Breezy Tunnel, a Toad mechanic is stuck under a Boot Car. Mario must pull the mechanic out, who gives Mario a Boot Whistle and the Boot Car in exchange. | Required | 
|
.png) # 2 |
Further down the tunnel is yellow Toad, disguised as an origami shovel. Mario can either hammer the Toad or ram full speed into the shovel with the Boot Car. | Optional | 
|
| Scorching Sandpaper Desert | 10 Toads | |||
# 1 |
There is a Toad disguised as a yellow beetle, climbing the tower's right foot. | Optional | 
|
.png) # 2 |
There is a Toad disguised as a yellow scorpion, in one of the southeast village strongholds. | Optional | 
|
.png) # 3 |
There is a Toad disguised as a green lizard, climbing the cliff wall below the desert satellite office. Mario must slide down to knock it off and then hammer it. | Optional | 
|
# 4 |
There is a Toad buried in the ground between the entrance to Breezy Tunnel and a group of bird statues. | Optional | 
|
# 5 |
Another Toad buried in the ground at a small distance southeast of the Sun Altar. | Optional | 
|
# 6 |
A Toad's hand is seen sticking out of the ground southeast of the tower, between the dunes. | Optional | 
|
# 7 |
There is a Toad stuck in the arm of a cactus in secluded area just east of the ruins, in front of a Café door. | Optional | 
|
# 8 |
A green Sensor Lab Toad can be found jammed into the fax machine of this desert satellite office, south of the tower. After being freed, Mario can fax travel to and from the Scorching Sandpaper Desert. | Optional | 
|
# 9 |
Required: Sun Incense After placing the Sun Incense onto the Sun Altar, Mario must fight the Mega Paper Macho Pokey. Upon its defeat, Professor Toad is saved and becomes Mario's ally. |
Required | 
|
 # 10 |
Required: Yellow streamer destroyed Captain T. Ode is frozen in a large chunk of ice below the Sun Altar, which opens up once the sun has been returned to its place in the sky. Mario must activate a Magic Circle to transform Olivia into the Fire Vellumental and thaw out the ice. |
Required | 
|
| Scorching Sandpaper Minor | 2 Toads | |||
# 1 |
A yellow Toad is disguised as a beetle, crawling on a cactus in the west side of the area. | Optional | 
|
# 2 |
A green Toad is disguised as a cactus, near the entrance to Shroom City. | Optional | 
|
| Scorching Sandpaper West | 6 Toads | |||
# 1 |
Just south of the tower is a yellow origami beetle Toad, crawling on a cactus. | Optional | 
|
# 2 |
Near the entrance is a pair of cacti, with a small origami cactus between them. Hammer it to reveal a green Toad. | Optional | 
|
.png) # 3 to 6 |
A Toad in the form of an origami skull can be found stuck to a cactus below a Crowber. At the foot of the cactus are 3 more Toads, buried in the sand. | Optional | 
|
| Scorching Sandpaper East | 5 Toads | |||
# 1 |
A Toad is buried beneath a cactus, near the entrance to Scorching Sandpaper Minor. | Optional | 
|
.png) # 2 |
In the middle of the village ruins sits a pot, which releases five origami snake Toads when broken. The first snake stays where the pot was broken. | Optional | 
|
# 3 |
The next origami snake Toad moves to a spot near two walls, at the southeast corner of the ruins. | Optional | 
|
# 4 |
Another origami snake Toad moves to the east side of the ruins, behind a small set of bricks. | Optional | 
|
# 5 |
The last origami snake Toad moves to the area directly north of the pot with a more enclosed set of ruins. | Optional | 
|
| Shroom City | 23 Toads | |||
# 1 |
A Toad is folded into a beetle on a Snifit pillar above a building near the entrance. Mario can access the rooftop of the building by walking behind it from the right, and then hammer the beetle to rescue the Toad. | Optional | 
|
# 2 |
Inside the spotlight to the left of the hotel entrance there is a yellow origami mushroom. Mario must jump onto the railing from the barrels in the raised middle section of town then whack it out of the spotlight. | Optional | 
|
# 3 |
An origami tulip Toad can be found resting on one of the barrels north of the lake. | Optional | 
|
# 4 |
The Master Toad is stuck to the entrance sign. Mario must jump from the rooftop of a nearby building onto a see-saw, catapulting a Snifit into the back of the sign. This knocks the Toad and some items loose. | Optional | 
|
# 5 |
Near the northside of the lake is a set of crates, which when broken reveal a hole. Hammering the wall will release a Toad from this hole. | Optional | 
|
# 6 |
A crumpled yellow Toad rests on a palm tree, which can be reached by hitting a Hidden Block by the stall north of the lake. | Optional | 
|
# 7 |
The crumpled item shop owner of Shroom City is stuck in the sign for the record shop. Hitting the sign will release the Toad. | Optional | 
|
# 8 |
Inside DJ Toad's Groovy Sound Discs shop, a folded Yellow Toad sits atop a record shelf on the right wall. | Optional | 
|
.png) # 9 |
This Toad is being used as a surfboard by a Snifit in the hotel pool. Defeat a Scaredy Rat hiding in a crate to the left of the pool, then shut off the valve using the 1,000-Fold Arms to reach them. | Optional | 
|
# 10 |
A yellow Toad can be found sandwiched between two crates to the right of the pool. | Optional | 
|
# 11 |
A yellow Toad is stuck under the baggage trolley in the hotel lobby, which can be pushed off with Mario's hammer. | Optional | 
|
# 12 |
An origami beetle Toad can be found inside a vase, at the end of the right wing of the hotel. | Optional | 
|
# 13 |
Required: Lamp Booth completed An origami beetle Toad can be found beneath some crates accessed from behind the booth with a large lamp. |
Optional | 
|
# 14 to 23 |
Required: Yellow streamer destroyed There is a stack of Toads tied up in an area behind the accessory shop, southwest of the oasis. |
Optional | 
|
| Scorching Sandpaper Far West | 1 Toad | |||
|
|
Just south of the tower is a bulbous cactus. Breaking it will reveal a Toad buried in the sand. | Optional | 
|
| Scorching Sandpaper Far East | 3 Toads | |||
# 1 & 2 |
A pair of origami scorpion Toads can be found in a pit among a group of Pokeys. Approaching will make all of them submerge, so in order to save them, the player must keep track of their positions and dig up the Toads with Professor Toad's shovel. | Optional | 
|
# 3 |
A Toad is buried in the sand near a cactus and set of bushes west of the tower. | Optional | 
|
| Temple of Shrooms | 41 Toads | |||
# 1 |
The first faceless Toad is encountered in the triangle switch puzzle room, caught in a swarm of Mini Scuttlebugs. | Required | 
|
# 2 |
After rescuing the first faceless Toad, Mario can break the coffin on the right-side wall, opening a passage to a hidden room. Inside, Mario can navigate up a staircase in the back and open a chest to free another faceless Toad. | Required | 
|
# 3 to 5 |
Upon completing the triangle switch puzzle, the north coffin should open. When Mario walks down the passage and a trio of Toads bound by webs will drop down. | Required | 
|
# 6 to 8 |
Following this, Mario comes across a room full of cylinders, which must be pressed down with Mario's hammer. Another trio of faceless Toads can be released from these cylinders. | Required | 
|
# 9 to 14 |
Inside the disco hall, Mario can find two groups of faceless Toads spinning the Paper Macho Shy Guys on both sides of the dance floor. | Required | 
|
# 15 & 16 |
Required: "Thrills at Night" + 10 faceless Toads Down the stairs from the disco hall is a large area lined with coffins. Two of these coffins will shake if music is playing from the boombox, and will both release faceless Toads when opened. |
Required | 
|
# 17 to 40 |
Required: "Thrills at Night" + 10 faceless Toads After opening the moon-branded coffin in the second row and descending into the main tomb. Mario will be ambushed by Scuttlebugs. Defeating the swarm will release a Magic Circle, allowing Mario to free the remaining faceless Toads from a giant web using the 1,000-Fold Arms. |
Required | 
|
# 41 |
Required: "Thrills at Night" + 40 faceless Toads After bringing all faceless Toads to the dancefloor, Mario convinces Hole Punch to enter the room. Upon defeat their faces are restored, and the group along with the DJ Toad are able to leave the temple. |
Required | 
|
Purple streamer[edit]
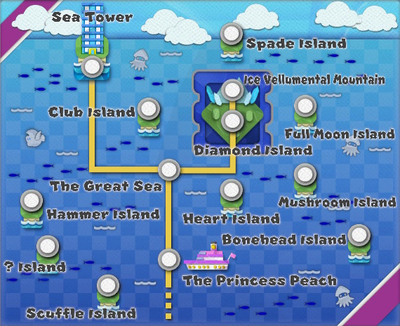
There are a total of 38 Hidden Toads[a] to rescue in the purple streamer area:
- The Princess Peach hides 17 Toads
- Bonehead Island hides 1 Toad
- Mushroom Island hides 3 Toads
- Heart Island hides 2 Toads
- Spade Island hides 5 Toads
- Club Island hides 4 Toads
- Full Moon Island hides 3 Toads
- ? Island hides 2 Toads
- Hammer Island hides 1 Toad
- Sea Tower hides 85 Toads[a]
- Footnotes
| Form | Description | Necessity | Image |
|---|---|---|---|
| The Princess Peach | 17 Toads | |||
 # 1 |
In the main hall of the first floor, there is a crumpled Toad in the southwest corner. | Optional | 
|
.png) # 2 |
There is a purple polka dot vase in the lounge, revealed to be a Toad when hammered. | Optional | 
|
# 3 |
When climbing the stairs connecting the first and second floors, Mario ends up stepping on the head of a Toad, startling him and Bob-omb. | Required | 
|
# 4 |
In the ship's hold, there is a Toad trapped underneath a crate. | Optional | 
|
# 5 |
In the engine room, Mario must walk through the gap in the railing to find a Toad sandwiched between two machines in the corner. | Optional | 
|
# 6 |
On the second floor, there is a Toad stuck underneath the black goop, just in front of a barricaded door. | Optional | 
|
#7 to 17 |
Several Toads are rescued after defeating the Paper Macho Gooper Blooper, including the ship's captain. | Required | 
|
| Bonehead Island | 1 Toad | |||
|
|
On the westside of the island near the earhole of the giant skull, there is an alcove with a crumpled Toad on the ground. | Optional | 
|
| Mushroom Island | 3 Toads | |||
# 1 |
There is a blue origami fish to the right of the house. It will unfold into a blue Toad when hammered. | Optional | 
|
# 2 |
In the backyard, there is another blue origami fish to the left of the house. It will unfold into another blue Toad when hammered. | Optional | 
|
# 3 |
The Origami Craftsman is hidden in a back wall of the house's basement. Mario must reach a book atop the bookshelf with the help of Luigi, revealing a Magic Circle. Mario will then use the 1,000‑Fold Arms to peel off the wall and remove an Olly Tape to free him. | Required | 
|
| Heart Island | 2 Toads | |||
# 1 |
There are 2 bushes with buttons Mario should hammer: a bush near the stairs leading up from the dock, and a bush closest to the start of the ramp up the island. These light up a pattern in the center, raising an origami heart Toad up the platform. | Optional | 
|
 # 2 |
After completing the main puzzle of Heart Island to reach the Toad statue, Mario can drop down to a ledge and enter through a tunnel to reach a chest with a red Toad inside. | Optional | 
|
| Spade Island | 5 Toads | |||
# 1 |
A green Toad is inside a coconut in a tree with two coconuts next to the Toad statue. Mario must hammer this tree twice to drop the coconuts and break the crumpled Toad free. | Optional | 
|
# 2 |
Mario must repair the Not-Bottomless Hole across two barrels, then jump to a barrel with a square panel. Opening the Hidden Block above the panel will release a yellow Toad. | Optional | 
|
# 3 |
A blue Toad is stuck to the back of a folding chair occupied by a Goomba. Mario must fold the chair (defeating the Goomba in the process) and then whack the Toad free. | Optional | 
|
# 4 |
A purple Toad can be freed by breaking a small barrel near the Toad statue. | Optional | 
|
# 5 |
A red Toad is stuck in a barrel. After four other Toads are rescued, they insert themselves into the barrel's slots. Mario must push each Toad deeper into the slot to break open the barrel, and release the shirtless Toad. | Optional | 
|
| Club Island | 4 Toads | |||
# 1 |
Joy of the Feelin' Fungi, at the edge of the tall grass in Club Island. | Optional | 
|
# 2 |
Anger of the Feelin' Fungi is hidden in the northeast side of the tall grass, with a coin close by. This Toad is intended to be found with use of |
Optional | 
|
# 3 |
Pathos of the Feelin' Fungi is hidden in the southwest side of the tall grass. This Toad is intended to be found with use of |
Optional | 
|
# 4 |
Humor of the Feelin' Fungi is in the west side of the tall grass, with a coin close by. This Toad is intended to be found with use of |
Optional | 
|
| Crescent Moon Island / Full Moon Island | 3 Toads | |||
# 1 |
Once the Sidestepper has been caught, Mario can find an origami fish swimming among Cheep Cheeps and Bloopers. It will unfold into a blue Toad when hammered. | Optional | 
|
.png) # 2 |
There is a pile of leaves with an origami rabbit that will unfold into a yellow Toad when hammered. | Optional | 
|
.png) # 3 |
Once the central portion of the island surfaces, a red origami fish can be found flopping on the western side of the island. It will unfold into a red Toad when hammered. | Optional | 
|
| ? Island | 2 Toads | |||
# 1 |
Near the Toad statue at the highest point of the island, Mario can find a Toad folded into a sign. | Optional | 
|
# 2 |
A purple Sensor Lab Toad can be found jammed into the fax machine of this island's satellite office. After being freed, Mario can fax travel to and from ? Island. | Optional | 
|
| Hammer Island | 1 Toad | |||
|
|
After defeating the ambushing Fire Bros, the fire at the center of the island will subside. This event reveals holes in the ground, one of which releases a Toad when hammered. | Optional | 
|
| Sea Tower | 85 Toads | |||
|
|
A group of Toads are bound to the outer walls of the Sea Tower with long strips of tape. Once Tape is defeated, these Toads are released from the wall, though their whereabouts afterwards are not shown. | Required | 
|
Green streamer[edit]
There is only 1 hidden Toad to rescue in the Green streamer area, found in Shangri-Spa.
| Form | Description | Necessity | Image |
|---|---|---|---|
| Shangri-Spa | 1 Toad | |||
| Behind the entrance hall to Shangri-Spa is a satellite office, where the local Sensor Lab Toad can be found jammed into the fax machine. After being freed, Mario can fax travel to and from Shangri-Spa. | Optional | 
| |
Statistics[edit]
This chart shows the number of hidden Toads for each location, with the total amount at the bottom and in sections based on the forms the Toads are found in.
| Location | Stuck/crumpled/folded | Folded into origami | Total |
|---|---|---|---|
| Whispering Woods | 8 | 4 | 12 |
| Graffiti Underground | 2 | 0 | 2 |
| Toad Town | 1 | 0 | 1 |
| Picnic Road | 45 | 13 | 58 |
| Overlook Mountain | 29 | 7 | 36 |
| Earth Vellumental Temple | 3 | 4 | 7 |
| Overlook Tower | 11 | 8 | 19 |
| Autumn Mountain | 8 | 14 | 22 |
| Chestnut Valley | 4 | 4 | 8 |
| Water Vellumental Shrine | 2 | 1 | 3 |
| Shogun Studios | 27 | 18 | 45 |
| Ninja Attraction | 3 | 1 | 4 |
| Big Sho' Theater | 66 | 1 | 67 |
| Breezy Tunnel | 1 | 1 | 2 |
| Scorching Sandpaper Desert | 7 | 3 | 10 |
| Scorching Sandpaper Minor | 0 | 2 | 2 |
| Scorching Sandpaper West | 3 | 3 | 6 |
| Scorching Sandpaper East | 1 | 4 | 5 |
| Shroom City | 17 | 6 | 23 |
| Scorching Sandpaper Far West | 1 | 0 | 1 |
| Scorching Sandpaper Far East | 1 | 2 | 3 |
| Temple of Shrooms | 41 | 0 | 41 |
| The Princess Peach | 16 | 1 | 17 |
| Bonehead Island | 1 | 0 | 1 |
| Mushroom Island | 1 | 2 | 3 |
| Heart Island | 1 | 1 | 2 |
| Spade Island | 5 | 0 | 5 |
| Club Island | 4 | 0 | 4 |
| Crescent Moon Island / Full Moon Island | 0 | 3 | 3 |
| ? Island | 1 | 1 | 2 |
| Hammer Island | 1 | 0 | 1 |
| Shangri-Spa | 1 | 0 | 1 |
| Total | 312 | 104 | 416 |
See also[edit]
- List of ? Blocks in Paper Mario: The Origami King
- List of Collectible Treasures in Paper Mario: The Origami King
- Not-Bottomless Hole