List of Super Mario 3D World stamps
- This article is about the collectibles found in Super Mario 3D World. For other uses of "Stamp", see Stamp.

Stamps are collectibles that appear in Super Mario 3D World and its Nintendo Switch port. There are eighty-five Stamps hidden throughout the Sprixie Kingdom, found in every world except World Mushroom and World Flower. Most courses and all Sprixie Houses have one Stamp each, totaling eighty, while the remaining five are collected when each of the five playable characters completes every course, including courses without Stamps. In the original Wii U version, they are black and white and used to customize Miiverse posts with a special image of a character or item from within the game.[1][2] However, following the discontinuation of the Miiverse service on November 7, 2017, the Stamps no longer serve any use.[3]
In the Nintendo Switch port, Stamps are now in color and higher-quality. Due to the lack of Miiverse on the Nintendo Switch, they can instead be stuck onto surfaces within Snapshot Mode. Several default Stamps have been added exclusively for use in Snapshot Mode.
List of stamps[edit]
| Image | Depiction | Level | Location | |
|---|---|---|---|---|
| Wii U | Switch | |||
| World 1 | ||||

|

|
Cat Mario | World 1-1: Super Bell Hill | Between two Bell Trees near the midpoint lies a Warp Pipe that leads to a room containing the course's Stamp. |

|

|
Coin | World 1-2: Koopa Troopa Cave | Just after the clear pipe to the last room, there is a rectangular question block. Mario needs to get on top of it and jump to reveal a hidden rectangular question block. Mario then need to jump on top of that block to reveal another, reaching a ledge. Mario needs to enter the clear pipe on the wall to warp into an enclosure below the ledge containing the Stamp and several coin stacks. |

|

|
Cat Goomba | World 1-3: Mount Beanpole | The Stamp is between two walls near the beginning of the course. |

|

|
Plessie | World 1-4: Plessie's Plunging Falls | Halfway through the course, at the end of the zig-zagging section of the river, lies the course's Stamp. |

|

|
Super Bell | World 1-5: Switch Scramble Circus | Atop the platform closest to the Goal Pole is the course's Stamp. |

|

|
Bowser | World 1- |
Near the beginning after the set of moving platforms is a wall of gray blocks. A bomb from the nearby cannons must be kicked into the blocks to find the course's Stamp. |
| World 2 | ||||

|

|
Mario jumping | World 2-1: Conkdor Canyon | Right before the set of shifting platforms that lead to the Goal Pole. |

|

|
Goomba | World 2-2: Puffprod Peaks | Near the beginning of the course are two blue touch screen platforms. The Stamp can be found under the right platform. |

|

|
Potted Piranha Plant lunging | World 2-3: Shadow-Play Alley | Under the ground during the shadow section, near the Big Piranha Plant. |

|

|
Small Mario dashing | World 2-4: Really Rolling Hills | Near the beginning to the right, found by hitting a Mario switch. |

|

|
Fire Peach holding a fireball | World 2-5: Double Cherry Pass | Right after the checkpoint flag, the player should look for 3 ? Blocks on the left. The player should place one clone on top of the left block, then have another clone hit the block to reach the Stamp. |

|

|
Boom Boom | World 2- |
Right after the second green star in a gated area behind some wooden crates. |

|

|
Happy green Sprixie Princess | World 2- |
The Sprixie House is in front of World 2-3 and is available immediately. |
| World 3 | ||||

|

|
Para-Biddybud | World 3-1: Snowball Park | Right before the Warp Pipe that leads to the Goal Pole is an ice area with three Snow Pokeys. The Stamp is on a small, circular offshoot. |

|

|
Cat Luigi pawing | World 3-2: Chain-Link Charge | Shortly after the checkpoint flag is a gated area with a pipe. The Cat Suit must be used to acquire the course's Stamp up the fence. |

|

|
Boo | World 3-3: Shifty Boo Mansion | Shortly after the large painting with the first green star is a couch, which must be used to ride to the course's Stamp. |

|

|
Small Peach | World 3-4: Pretty Plaza Panic | Halfway through the level is a Peach switch on a platform, which must be hit to get the Stamp. |

|

|
Cheep Cheep | World 3-5: Pipeline Lagoon | Just past the checkpoint flag, the player must swim up into an alcove with this Stamp. |

|

|
Rabbit hopping | World 3-6: Mount Must Dash | After the checkpoint flag is a jump pad with several bouncy pads that lead to the Stamp. |

|

|
Stingby | World 3-7: Switchboard Falls | Right at the end of the level is an alternate track that leads to the Stamp. |

|

|
Pom Pom disappearing | World 3- |
Before taking the pipe to the boss, the player must hop into the conductor's room where a Fire Bro is located to find the course's Stamp. |

|

|
Crying yellow Sprixie Princess | World 3- |
The Sprixie House is located northwest of World 3-2 and is available immediately. |
| World 4 | ||||

|

|
Ant Trooper | World 4-1: Ant Trooper Hill | The Stamp is located right above some Ant Troopers in the cave area. |

|

|
Warp Pipe | World 4-2: Piranha Creeper Creek | Bounce off the Piranha Creeper coming out of the wall after the checkpoint to find a secret area with the course's Stamp. |

|

|
Double Cherry | World 4-3: Beep Block Skyway | Use the 4-person platform next to the checkpoint to reach the course's Stamp. |

|

|
1-Up Mushroom | World 4-4: Big Bounce Byway | The Stamp is in the middle of two wheels of Para-Biddybuds during the big bouncing platform ride. |

|

|
Spike | World 4-5: Spike's Lost City | After the long slope at the beginning of the course, there is a ledge near the Spikes that will lead to this level's Stamp. |

|

|
Brolder rolling | World 4- |
The player must use a Cat Suit to climb up the wall after blasting through the Clear Pipe. |

|

|
Mad blue Sprixie Princess | World 4- |
The Sprixie House can be accessed after beating World 4-B, Fire Bros. Hideout #1. |
| World 5 | ||||

|

|
Koopa Troopa knocked out of its Shell | World 5-1: Sunshine Seaside | At the Plessie section, the player must cross the third moving platform, then jump along 3 platforms to get it. |

|

|
Luigi jumping | World 5-2: Tricky Trapeze Theater | After the Piranha Plant arena, on the second stair. |

|

|
Small Toad chasing a Super Mushroom | World 5-3: Backstreet Bustle | Near the Goal Pole is a Toad Switch. The player must use Toad to press it and earn the course's Stamp. |

|

|
Cat Peach | World 5-4: Sprawling Savanna | The character must fall into the hole the Ant Troopers enter in the large savanna area. There is a Warp Box leading to a small cave containing a Big Ant Trooper with the Stamp on its back. |

|

|
Bob-omb | World 5-5: Bob-ombs Below | A cracked portion of the wall must be opened after the checkpoint, revealing a secret area with the Stamp. |

|

|
Peach holding a flower chain | World 5-6: Cakewalk Flip | A Double Cherry is needed to activate a 2-person platform near the Goal Pole. |

|

|
Toad jumping | World 5-7: Searchlight Sneak | This level's Stamp is located on some blocks after the checkpoint. The player must carefully avoid a Spotlight to get it. |

|

|
Chargin' Chuck | World 5- |
Go to the area with the rolling spiked squares and Chargin' Chucks. Using the Cat Suit, climb up above the third square. |

|

|
Laughing orange Sprixie Princess | World 5- |
The Sprixie House is unlocked after beating World 5-5. |
| World 6 | ||||

|

|
Captain Toad on a rope | World 6-1: Clear Pipe Cruise | Use a Cat Suit or a well timed Side Somersault to get on top of the Clear Pipe next to the checkpoint. The Stamp is located here. |

|

|
Fire Flower | World 6-2: Spooky Seasick Wreck | The Stamp is above a group of Peepas inside the cargo ship. |

|

|
Coin Coffer and a Coin | World 6-3: Hands-On Hall | In the optional area, the player must leave the building through a secret passage in front of the first set of Spikes. There, the player must use a Propeller Box to fly up to the middle roof, where the course's Stamp is. |

|

|
Cat Toad sleeping | World 6-4: Deep Jungle Drift | Climb up the blue gate located next to Green Star 1. |

|

|
Mario in an Ice Skate | World 6-5: Ty-Foo Flurries | Hijack the ice skate from the first Goomba, and skate to its right to get it. |

|

|
Stunned Galoomba | World 6-6: Bullet Bill Base | Climb up a wall just left of the checkpoint, jump on the blocks, then jump again. |

|

|
Fuzzy | World 6-7: Fuzzy Time Mine | Near the beginning of the course, the stamp is placed behind a compactor. |

|

|
Blockstepper | World 6- |
After the third green star, Mario must grab a Bob-omb and destroy the cracked wall located behind the Warp Pipe leading to the course's boss fight. |

|

|
Thinking purple Sprixie Princess | World 6- |
The Sprixie House can be accessed immediately, by taking the Clear Pipe at the bottom of the World 6 Map. |
| World Castle (World 7) | ||||

|

|
Fire Mario throwing a fireball | World |
The player must ground pound the ? block located in the center of the second fire bar. |

|

|
Spiny | World |
After riding the moving platform in a lava-filled room, the player must jump on the walkway on the right to claim it. |

|

|
Super Leaf | World |
After the second Green Star, while running along the path on the left side, jump over the gap and collect the stamp above another gap. |

|

|
Brick Block | World |
On a small circular platform before the Mystery Box. |

|

|
Magikoopa | World |
After Mario reaches the top of the first tower, he should drop off the left side of it to find a cloud platform holding a stamp. |

|

|
Blooper | World |
In the final Rammerhead section, in a high alcove. |

|

|
Boomerang Flower | World |
After the checkpoint, on a lower level. |

|

|
Boomerang Mario Throwing a boomerang | World |
At the top of a shaft, trapped by Rock Blocks. |

|

|
Surprised cyan Sprixie Princess | World |
The Sprixie House can be accessed by beating World Castle-3. |
| World Bowser (World 8) | ||||

|

|
Parabones | World |
Near the checkpoint, on an orange spike path leading southwest. |

|

|
? Block | World |
The player should ride Plessie in between two Bowser sand statues to find the course's Stamp. |

|

|
Boomerang Toad holding a boomerang | World |
Take out the first Ant Trooper line to reveal a small compartment containing the stamp. |

|

|
Conkdor slamming its head down | World |
While inside the train car, ground-pound the second ? block to access the course's Stamp. |

|

|
Bullet Bill | World |
On invisible stairs, and the right side of a Cat Bullet Bill Launcher. |

|

|
Madpole | World |
In the top-left corner of the first spike section. |

|

|
Small Luigi knocked down | World |
After passing the first POW block, press the Luigi switch to get it. |

|

|
Skipsqueak | World |
After the first downhill section, above a Hammer Bro. |

|

|
Meowser | World |
Atop a Bell Tree near the Goal Pole. |

|

|
Scared red Sprixie Princess | World |
The Sprixie House can be accessed by beating World Bowser-4. |
| World Star (World 9) | ||||

|

|
Checkpoint Flag | World |
Stick to the right side of the Plessie section. |

|

|
Rosalina reading to two Lumas | World |
After the Checkpoint Flag, at the very top of a group of blue spinning platforms. |

|

|
Small Rosalina | World |
Press the Rosalina switch after the checkpoint to get it. |

|

|
Tanooki Mario whipping | World |
The player must surpass the first Walleye to find the Stamp. |

|

|
Kitsune Luigi gliding | World |
Behind a gigantic Brick Block, at the very bottom of the stage. |

|

|
Octoomba spitting | World |
On a hard-to-get side that can be claimed by the boomerang suit. |

|

|
Mega Mushroom | World |
Encased by Rock Blocks that can be destroyed by the Mega Mushroom. |

|

|
Cat Rosalina clawing | World |
On the far right side of the bridge area. |

|

|
Cannon Box firing a cannonball | World |
Found when the player fires a charged shot at the first four ? blocks. |

|

|
Cat Mario climbing | World |
The Sprixie House is located south of the Captain Toad level. |
| World Crown (World 12) | ||||

|

|
Lucky Cat Mario | World |
In plain sight at the end of the level, on the steps leading to the flagpole. |

|

|
8-Bit Mario | World |
The Sprixie House is located on the bottom-right corner of World Crown. |

|

|
Super Star | World |
In the final room. |

|

|
Captain Toad Character Icon | World |
In plain sight at the end of the level on the cloud. |
| Others | ||||

|

|
Mario Character Icon | - | Complete all levels as Mario. |

|

|
Luigi Character Icon | - | Complete all levels as Luigi. |

|

|
Peach Character Icon | - | Complete all levels as Peach. |

|

|
Toad Character Icon | - | Complete all levels as Toad. |

|

|
Rosalina Character Icon | - | Complete all levels as Rosalina. |
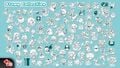
Gallery[edit]
Artwork[edit]
Stamp background

Silhouettes of various stamps

Mario stamp

Cat Mario stamp

Sprixie Princess stamp

Super Bell stamp

Boo stamp

Double Cherry stamp

1-Up Mushroom stamp


Super Mario 3D World + Bowser's Fury default stamps[edit]

Large spiky circle default stamp

Small spiky circle default stamp

Flowery circle default stamp

Dotted circle default stamp

Exclamation mark default stamp

Music note default stamp

Twinkle default stamp

Dust cloud default stamp


Screenshots[edit]
Completed stamp collection from Super Mario 3D World

Completed stamp collection from Super Mario 3D World + Bowser's Fury
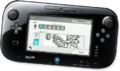
Making a Miiverse post with stamps
Making a Miiverse post with stamps
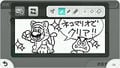
Example of a Miiverse post with stamps made by developers of Super Mario 3D World
Example of a Miiverse post with stamps made by developers of Super Mario 3D World
Example of a Miiverse post with the Luigi stamp made by developers of Super Mario 3D World

Example of a Miiverse post with stamps made by developers of Super Mario 3D World

Example of a Miiverse post with stamps made by developers of Super Mario 3D World
Example of a Miiverse post with stamps made by developers of Super Mario 3D World

Example of a Miiverse post with stamps made by developers of Super Mario 3D World

Example of a Miiverse post with stamps made by developers of Super Mario 3D World

Example of a Miiverse post with the Boo stamp made by developers of Super Mario 3D World
Example of a Miiverse post with stamps made by developers of Super Mario 3D World
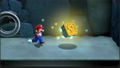
Mario running towards a stamp


Names in other languages[edit]
| Language | Name | Meaning | Note(s) | Ref. |
|---|---|---|---|---|
| Japanese | ハンコ Hanko |
Seal | [4] | |
| Chinese (Traditional) | 印章 Yìnzhāng |
Seal | [5] | |
| Dutch | Stempel | Stamp | [6] | |
| French (Canadian) | Étampe | Stamp | [7] | |
| French (European) | Sceau | Seal | [8] | |
| German | Stempel | Stamp | [9] | |
| Italian | Timbro | Rubber Stamp | [10] | |
| Korean | 도장 Dojang |
Stamp | [11] | |
| Portuguese | Carimbo | Stamp | [12][13] | |
| Russian | Печать Pechat' |
Seal | [?] | |
| Spanish | Sello | Stamp/Seal | [14][15] |
References[edit]
- ^ Official Nintendo UK game page for Super Mario 3D World
- ^ Official Japanese website for Super Mario 3D World
- ^ "Miiverse Service Discontinuation FAQ". Nintendo. n.d. Retrieved June 4, 2021. (Archived May 23, 2021, 08:42:25 UTC via Wayback Machine.)
- ^ November 2013. スーパーマリオ3Dワールド (Super Mario 3D World) electronic manual (PDF). nintendo.co.jp (Japanese). Page 19. Retrieved February 22, 2025.
- ^ 2021. 超級瑪利歐 3D世界 + 狂怒世界 | Nintendo Switch | 任天堂. nintendo.com. Retrieved February 22, 2025.
- ^ November 2013. Super Mario 3D World electronic manual (PDF). nintendo.com (Dutch). Page 25. Retrieved February 22, 2025.
- ^ November 2013. Super Mario 3D World electronic manual (PDF). nintendo.com (Canadian French). Page 25. Retrieved February 22, 2025.
- ^ November 2013. Super Mario 3D World electronic manual (PDF). nintendo.com (French). Page 25. Retrieved February 22, 2025.
- ^ November 2013. Super Mario 3D World electronic manual (PDF). nintendo.com (German). Page 25. Retrieved February 22, 2025.
- ^ November 2013. Super Mario 3D World electronic manual (PDF). nintendo.com (Italian). Page 25. Retrieved February 22, 2025.
- ^ 2021. 슈퍼 마리오 3D 월드 + 퓨리 월드 | Nintendo Switch | 닌텐도. nintendo.com. Retrieved February 22, 2025.
- ^ November 2013. Super Mario 3D World electronic manual (PDF). nintendo.com (Portuguese). Page 25. Retrieved February 22, 2025.
- ^ Nintendo Portugal (January 13, 2021). Super Mario 3D World + Bowser's Fury! - Explorem um mundo de diversão Mario em conjunto. YouTube. Retrieved January 13, 2021.
- ^ November 2013. Super Mario 3D World electronic manual (PDF). nintendo.com (Latin American Spanish). Page 24. Retrieved February 22, 2025.
- ^ November 2013. Super Mario 3D World electronic manual (PDF). nintendo.com (Spanish). Page 24. Retrieved February 22, 2025.