Luiginary Attack: Difference between revisions
From the Super Mario Wiki, the Mario encyclopedia
Jump to navigationJump to search
(→List of Luiginary Attacks: Added specific Dream World locations (even if most of them are Dreampoints)) Tag: Mobile edit |
m (Undo revision 3950805 by Aatif Patel (talk) Don't alter in-game descriptions.) Tag: Undo |
||
| (10 intermediate revisions by 8 users not shown) | |||
| Line 1: | Line 1: | ||
[[File:Luiginary Attack Artwork1 - Mario & Luigi Dream Team.png|thumb|170px|Artwork of the Luiginary Ball]] | [[File:Luiginary Attack Artwork1 - Mario & Luigi Dream Team.png|thumb|170px|Artwork of the Luiginary Ball]] | ||
'''Luiginary Attacks''' are [[List of | '''Luiginary Attacks''' are [[List of moves|special moves]] that are utilized by [[Mario]] during battles in the [[Dream World]] in ''[[Mario & Luigi: Dream Team]]''. Upon selecting a Luiginary Attack, Mario will summon several [[Luiginoid]]s to help execute the attack, and doing so will fill up [[Luigi]]'s side of the [[badge]] meter. There are six Luiginary Attacks in the game, and like the [[Bros. Attack]]s in ''[[Mario & Luigi: Bowser's Inside Story]]'' and the Real World of this game, each Luiginary Attack is unlocked by collecting ten [[Attack Piece]]s in their respective areas. | ||
__TOC__ | __TOC__ | ||
{{br|right}} | {{br|right}} | ||
| Line 7: | Line 7: | ||
{|width=100% cellspacing=0 border=2 cellpadding=3 style="border:2px solid black; border-collapse:collapse;" | {|width=100% cellspacing=0 border=2 cellpadding=3 style="border:2px solid black; border-collapse:collapse;" | ||
!style="background-color: #39a842" width=10%|Luiginary Attack | !style="background-color: #39a842" width=10%|Luiginary Attack | ||
!style="background-color: #39a842" |Illustration | |||
!style="background-color: #39a842" |Description | !style="background-color: #39a842" |Description | ||
!style="background-color: #39a842" |Effects | !style="background-color: #39a842" |Effects | ||
| Line 14: | Line 15: | ||
|- | |- | ||
|style="background-color: #bfd3e3" align="center"|[[File:LuiginaryBall.png]]<br>[[Luiginary Ball]]* | |style="background-color: #bfd3e3" align="center"|[[File:LuiginaryBall.png]]<br>[[Luiginary Ball]]* | ||
|[[File:M&LDT Luiginary Ball illustration page 1.png]]<br>[[File:M&LDT Luiginary Ball illustration page 2.png]] | |||
|align="center"|''Tilt the [[Nintendo 3DS]] to move the ball. Grab Luiginoids to make the ball bigger! Line it up, and kick it with the A Button! A bigger ball means more damage!'' | |align="center"|''Tilt the [[Nintendo 3DS]] to move the ball. Grab Luiginoids to make the ball bigger! Line it up, and kick it with the A Button! A bigger ball means more damage!'' | ||
|align="center"|Tilt the 3DS to control the small ball of Luiginoids. Use the ball to collect more Luigis for more damage, then kick the ball with {{button|3ds|A}}. | |align="center"|Tilt the 3DS to control the small ball of Luiginoids. Use the ball to collect more Luigis for more damage, then kick the ball with {{button|3ds|A}}. | ||
|align="center"|6 | |align="center"|6 | ||
|align="center"|Boots | |align="center"|Boots | ||
|align="center"|[[Dreamy Mushrise Park]] ([[Eldream]]'s | |align="center"|[[Dreamy Mushrise Park]] ([[Eldream]]'s area) | ||
|- | |- | ||
|style="background-color: #bfd3e3" align="center"|[[File:LuiginaryStack.png]]<br>[[Luiginary Stack]] | |style="background-color: #bfd3e3" align="center"|[[File:LuiginaryStack.png]]<br>[[Luiginary Stack]] | ||
|[[File:M&LDT Luiginary Stack illustration page 1.png]]<br>[[File:M&LDT Luiginary Stack illustration page 2.png]]<br>[[File:M&LDT Luiginary Stack illustration page 3.png]] | |||
|align="center"|''Jump with the B Button and stack up Luiginoids as straight as possible! While jumping, adjust the landing zone with left/right on the circle pad! Press the B Button as the stack lands. Use the A Button at the end for Mario.'' | |align="center"|''Jump with the B Button and stack up Luiginoids as straight as possible! While jumping, adjust the landing zone with left/right on the circle pad! Press the B Button as the stack lands. Use the A Button at the end for Mario.'' | ||
|align="center"|Perform well-timed jumps to make a large, stable stack of Luiginoids. If they are unbalanced, they may fall or inflict less damage. | |align="center"|Perform well-timed jumps to make a large, stable stack of Luiginoids. If they are unbalanced, they may fall or inflict less damage. | ||
|align="center"|10 | |align="center"|10 | ||
|align="center"|Boots | |align="center"|Boots | ||
|align="center"|[[Dreamy Dozing Sands]] (Dreampoint) | |align="center"|[[Dreamy Dozing Sands]] ([[Dream Stone]] Dreampoint) | ||
|- | |- | ||
|style="background-color: #bfd3e3" align="center"|[[File:LuiginaryHammer.png]]<br>[[Luiginary Hammer]] | |style="background-color: #bfd3e3" align="center"|[[File:LuiginaryHammer.png]]<br>[[Luiginary Hammer]] | ||
|[[File:M&LDT Luiginary Hammer illustration page 1.png]]<br>[[File:M&LDT Luiginary Hammer illustration page 2.png]]<br>[[File:M&LDT Luiginary Hammer illustration page 3.png]] | |||
|align="center"|''Press the B Button repeatedly to form the Luiginoids into a giant hammer! It will tilt, so use left/right on the Circle Pad to help Mario keep it balanced. As Mario runs, aim with up/down on the Circle Pad and swing with the A Button.'' | |align="center"|''Press the B Button repeatedly to form the Luiginoids into a giant hammer! It will tilt, so use left/right on the Circle Pad to help Mario keep it balanced. As Mario runs, aim with up/down on the Circle Pad and swing with the A Button.'' | ||
|align="center"|Mash the {{button|3ds|B}} Button to make Luiginoids jump onto Mario's hammer to form a Luiginary Hammer. Use the {{button|3ds|Stick}} to balance the unsteady hammer, otherwise Mario will tumble and the Luiginoids will also fall and disperse. | |align="center"|Mash the {{button|3ds|B}} Button to make Luiginoids jump onto Mario's hammer to form a Luiginary Hammer. Use the {{button|3ds|Stick}} to balance the unsteady hammer, otherwise Mario will tumble and the Luiginoids will also fall and disperse. | ||
|align="center"|10 | |align="center"|10 | ||
|align="center"|Hammer | |align="center"|Hammer | ||
|align="center"|[[Dreamy Mount Pajamaja]] (Dreampoint) | |align="center"|[[Dreamy Mount Pajamaja]] (Summit Dreampoint) | ||
|- | |- | ||
|style="background-color: #bfd3e3" align="center"|[[File:LuiginaryFlame.png]]<br>[[Luiginary Flame]] | |style="background-color: #bfd3e3" align="center"|[[File:LuiginaryFlame.png]]<br>[[Luiginary Flame]] | ||
|[[File:M&LDT Luiginary Flame illustration page 1.png]]<br>[[File:M&LDT Luiginary Flame illustration page 2.png]]<br>[[File:M&LDT Luiginary Flame illustration page 3.png]] | |||
|align="center"|''The fire will bounce at a steady pace. Press the B Button to make it bigger! Mario will cover the spots where the Luiginoids aren't. Use the A Button here. Press the A Button once to make Mario hammer the flame at the foes!'' | |align="center"|''The fire will bounce at a steady pace. Press the B Button to make it bigger! Mario will cover the spots where the Luiginoids aren't. Use the A Button here. Press the A Button once to make Mario hammer the flame at the foes!'' | ||
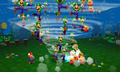
|align="center"|Press {{button|3ds|B}} just as a fireball lands on a group of Luiginoids or {{button|3ds|A}} as it lands on Mario to bounce the fireball to the next group. If successful, Mario will volley the fireball with his hammer into the group of enemies. | |align="center"|Press {{button|3ds|B}} just as a fireball lands on a group of Luiginoids or {{button|3ds|A}} as it lands on Mario to bounce the fireball to the next group. If successful, Mario will volley the fireball with his hammer into the group of enemies. | ||
|align="center"|14 | |align="center"|14 | ||
|align="center"|Fire | |align="center"|Fire | ||
|align="center"|[[Dreamy Driftwood Shore]] ( | |align="center"|[[Dreamy Driftwood Shore]] ([[Seadric]]'s Dreampoint) | ||
|- | |- | ||
|style="background-color: #bfd3e3" align="center"|[[File:LuiginaryWall.png]]<br>[[Luiginary Wall]] | |style="background-color: #bfd3e3" align="center"|[[File:LuiginaryWall.png]]<br>[[Luiginary Wall]] | ||
|[[File:M&LDT Luiginary Wall illustration page 1.png]]<br>[[File:M&LDT Luiginary Wall illustration page 2.png]]<br>[[File:M&LDT Luiginary Wall illustration page 3.png]] | |||
|align="center"|''Use left/right on the Circle Pad to move and the A Button to hit Dreamy Luigi! Hit Dreamy Luigi where the foes are gathering to deliver more damage! Depending on Mario's position when you swing, Dreamy Luigi's angle will change.'' | |align="center"|''Use left/right on the Circle Pad to move and the A Button to hit Dreamy Luigi! Hit Dreamy Luigi where the foes are gathering to deliver more damage! Depending on Mario's position when you swing, Dreamy Luigi's angle will change.'' | ||
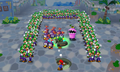
|align="center"|Mario will hit Luigi forward, spinning him and charging through all enemies like a game of Breakout. Players will need to avoid focusing on the same spots of the Luiginoid Wall, otherwise the wall will break and the attack will be more likely to fail. | |align="center"|Mario will hit Luigi forward, spinning him and charging through all enemies like a game of Breakout. Players will need to avoid focusing on the same spots of the Luiginoid Wall, otherwise the wall will break and the attack will be more likely to fail. | ||
|align="center"|14 | |align="center"|14 | ||
|align="center"|Hammer | |align="center"|Hammer | ||
|align="center"|[[Dreamy Wakeport]] ([[Bedsmith]]'s | |align="center"|[[Dreamy Wakeport]] ([[Bedsmith]]'s area) | ||
|- | |- | ||
|style="background-color: #bfd3e3" align="center"|[[File:LuiginaryTyphoon.png]]<br>[[Luiginary Typhoon]] | |style="background-color: #bfd3e3" align="center"|[[File:LuiginaryTyphoon.png]]<br>[[Luiginary Typhoon]] | ||
|[[File:M&LDT Luiginary Typhoon illustration page 1.png]]<br>[[File:M&LDT Luiginary Typhoon illustration page 2.png]]<br>[[File:M&LDT Luiginary Typhoon illustration page 3.png]] | |||
|align="center"|''Wind up the Luiginoid rope, and yank it with the A Button for a typhoon. You can move the typhoon with the Circle Pad to swallow up your foes. Rapidly press the B Button to deal more damage with the Luiginoids' spin!'' | |align="center"|''Wind up the Luiginoid rope, and yank it with the A Button for a typhoon. You can move the typhoon with the Circle Pad to swallow up your foes. Rapidly press the B Button to deal more damage with the Luiginoids' spin!'' | ||
|align="center"|Hold {{button|3ds|B}} to pull a string of Luiginoids to make a large Luiginary typhoon. The more time players leave before letting go of {{button|3ds|B}}, the longer the typhoon will last for. Failure at that point will result in little damage. Pressing {{button|3ds|B}} while the Luiginary Typhoon has enemies inside it will make the Luiginoids hit them with their hammers for more damage. | |align="center"|Hold {{button|3ds|B}} to pull a string of Luiginoids to make a large Luiginary typhoon. The more time players leave before letting go of {{button|3ds|B}}, the longer the typhoon will last for. Failure at that point will result in little damage. Pressing {{button|3ds|B}} while the Luiginary Typhoon has enemies inside it will make the Luiginoids hit them with their hammers for more damage. | ||
|align="center"|16 | |align="center"|16 | ||
|align="center"|Hammer | |align="center"|Hammer | ||
|align="center"|[[Dreamy Somnom Woods]] (Dreampoint) | |align="center"|[[Dreamy Somnom Woods]] ([[Ultibed]] Dreampoint) | ||
|} | |} | ||
| Line 67: | Line 74: | ||
MLDT - Dream BrosMove 6 Tornado.png|Luiginary Typhoon | MLDT - Dream BrosMove 6 Tornado.png|Luiginary Typhoon | ||
</gallery> | </gallery> | ||
==Names in other languages== | |||
{{foreign names | |||
|Jap=ミラクルアタック | |||
|JapR=Mirakuru Atakku | |||
|JapM=Miracle Attack | |||
|Fre=Attaques Luimagik | |||
|Ger=Traum-Attacke | |||
|GerM=Dream Attack | |||
|Spa=Ataque luiginario | |||
|SpaM=Luiginary Attack | |||
}} | |||
{{M&LDT}} | {{M&LDT}} | ||
[[Category:Mario & Luigi: Dream Team | [[Category:Mario & Luigi: Dream Team attacks|*]] | ||
Latest revision as of 22:07, June 30, 2023

Luiginary Attacks are special moves that are utilized by Mario during battles in the Dream World in Mario & Luigi: Dream Team. Upon selecting a Luiginary Attack, Mario will summon several Luiginoids to help execute the attack, and doing so will fill up Luigi's side of the badge meter. There are six Luiginary Attacks in the game, and like the Bros. Attacks in Mario & Luigi: Bowser's Inside Story and the Real World of this game, each Luiginary Attack is unlocked by collecting ten Attack Pieces in their respective areas.
List of Luiginary Attacks[edit]
| Luiginary Attack | Illustration | Description | Effects | BP | Type | Location |
|---|---|---|---|---|---|---|
Luiginary Ball* |
 
|
Tilt the Nintendo 3DS to move the ball. Grab Luiginoids to make the ball bigger! Line it up, and kick it with the A Button! A bigger ball means more damage! | Tilt the 3DS to control the small ball of Luiginoids. Use the ball to collect more Luigis for more damage, then kick the ball with |
6 | Boots | Dreamy Mushrise Park (Eldream's area) |
Luiginary Stack |
  
|
Jump with the B Button and stack up Luiginoids as straight as possible! While jumping, adjust the landing zone with left/right on the circle pad! Press the B Button as the stack lands. Use the A Button at the end for Mario. | Perform well-timed jumps to make a large, stable stack of Luiginoids. If they are unbalanced, they may fall or inflict less damage. | 10 | Boots | Dreamy Dozing Sands (Dream Stone Dreampoint) |
Luiginary Hammer |
  
|
Press the B Button repeatedly to form the Luiginoids into a giant hammer! It will tilt, so use left/right on the Circle Pad to help Mario keep it balanced. As Mario runs, aim with up/down on the Circle Pad and swing with the A Button. | Mash the |
10 | Hammer | Dreamy Mount Pajamaja (Summit Dreampoint) |
Luiginary Flame |
  
|
The fire will bounce at a steady pace. Press the B Button to make it bigger! Mario will cover the spots where the Luiginoids aren't. Use the A Button here. Press the A Button once to make Mario hammer the flame at the foes! | Press |
14 | Fire | Dreamy Driftwood Shore (Seadric's Dreampoint) |
Luiginary Wall |
  
|
Use left/right on the Circle Pad to move and the A Button to hit Dreamy Luigi! Hit Dreamy Luigi where the foes are gathering to deliver more damage! Depending on Mario's position when you swing, Dreamy Luigi's angle will change. | Mario will hit Luigi forward, spinning him and charging through all enemies like a game of Breakout. Players will need to avoid focusing on the same spots of the Luiginoid Wall, otherwise the wall will break and the attack will be more likely to fail. | 14 | Hammer | Dreamy Wakeport (Bedsmith's area) |
Luiginary Typhoon |
  
|
Wind up the Luiginoid rope, and yank it with the A Button for a typhoon. You can move the typhoon with the Circle Pad to swallow up your foes. Rapidly press the B Button to deal more damage with the Luiginoids' spin! | Hold |
16 | Hammer | Dreamy Somnom Woods (Ultibed Dreampoint) |
* - Mandatory Luiginary Attack.
Gallery[edit]
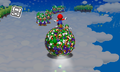
Luiginary Ball
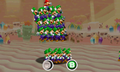
Luiginary Stack
Luiginary Hammer
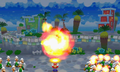
Luiginary Flame
Luiginary Wall
Luiginary Typhoon


Names in other languages[edit]
| Language | Name | Meaning |
|---|---|---|
| Japanese | ミラクルアタック Mirakuru Atakku |
Miracle Attack |
| French | Attaques Luimagik |
- |
| German | Traum-Attacke |
Dream Attack |
| Spanish | Ataque luiginario |
Luiginary Attack |