Dreamy Neo Bowser Castle: Difference between revisions
(→Enemies: Fck sakes) Tag: Mobile edit |
m (→Trivia: fixed a typo) Tag: Mobile edit |
||
| (33 intermediate revisions by 19 users not shown) | |||
| Line 1: | Line 1: | ||
{{ | {{location infobox | ||
| | |title=Dreamy Neo Bowser Castle | ||
|image=DreamyNeoBowserCastle.png | |image=[[File:DreamyNeoBowserCastle.png|250px]] | ||
| | |greater_location=[[Dream World]] | ||
| | |inhabitants=[[Kamek]], [[Bowser]], [[Mechakoopa]]s, [[Big Tail Goomba]]s, [[Antasman|Antasmen]], [[Lakitu R|Lakitus R]], [[Spiny R|Spinies R]], [[Gold Beanie]]s | ||
|inhabitants=[[Kamek]], [[Mechakoopa]]s, [[Big Tail Goomba]]s, [[Antasman|Antasmen]], [[Lakitu R]], [[Spiny R]] | |||
|first_appearance=''[[Mario & Luigi: Dream Team]]'' ([[List of games by date#2013|2013]]) | |first_appearance=''[[Mario & Luigi: Dream Team]]'' ([[List of games by date#2013|2013]]) | ||
}} | }} | ||
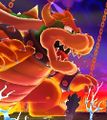
'''Dreamy Neo Bowser Castle''' is the [[Dream World]] version of [[ | '''Dreamy Neo Bowser Castle''' is the [[Dream World]] version of [[Neo Bowser Castle]] in ''[[Mario & Luigi: Dream Team]]''. It is the last dream world area in the game. [[Kamek]] is fought three times here, followed by a giant boss fight against [[Giant Bowser|Bowser's dreamy self]] and a different boss fight with [[Antasma]]. | ||
Kamek uses his magic to scramble the doorways of Neo Bowser Castle, then retreats to Dreamy Neo Bowser Castle with a [[Dream Portal]] created by Antasma. Luigi sleeps on a hovering Koopa Clown Car, opening a portal for Mario to chase Kamek. Kamek flees from this battle, although the spell is broken. Kamek does this two more times in the real world, and the Bros. have to return two more times, defeating Kamek in the third battle. After Kamek is defeated, Mario and Luigi enter the the main hall of Neo Bowser Castle, where three portals from Dreamy Neo Bowser Castle spew intense flames that block the passage. Mario has to enter the Dream World for each flame, and destroy the flamethrowers. Past the main hallway, the Bros. see Bowser sleeping in a strange device and being protected by a barrier. To wake him up, [[Prince Dreambert]] binds himself to the [[Dream Vines|vines]] allowing passage into Bowser's Dream. Mario and Dreamy Luigi confront Dreamy Bowser in the final Giant Battle. After defeating Bowser in the dream world, he wakes up, causing the cessation of dream energy to the castle. | |||
Antasma is later battled in the Dream World, the only section of the game that takes place in a dreamy version of the outdoor/rooftop section of Neo Bowser Castle. | |||
Neo Bowser Castle is destroyed during the game, and it is unknown if Dreamy Neo Bowser Castle still exists afterward. | |||
Dreamy Neo Bowser Castle has multiple rooms where lava rises from below. The lava only starts to rise after Mario passes a boundary in the room, and resets if it touches Mario or Luigi. Flamethrowers are recurring obstacles. | |||
==Dream Worlds== | ==Dream Worlds== | ||
| Line 24: | Line 29: | ||
*'''Area F:''' A Dream World where a flamethrower that hinders progress through the castle's third area is found. Located on the back-east side of the hallway, at the Dreampoint. This dream world is where the [[Luiginary Cylinder]] is used. | *'''Area F:''' A Dream World where a flamethrower that hinders progress through the castle's third area is found. Located on the back-east side of the hallway, at the Dreampoint. This dream world is where the [[Luiginary Cylinder]] is used. | ||
*'''Area G (Bowser's Dream):''' The final Dreampoint where Bowser sleeps to provide power to the castle. It is located in the fourth area. A Dream World version of Bowser serves as the final giant | *'''Area G (Bowser's Dream):''' The final Dreampoint where Bowser sleeps to provide power to the castle. It is located in the fourth area. Bowser impedes the bros in the overworld by rolling a giant spike ball at them. Giant Bowser heads appear in the background, but in one room they appear in the foreground, blocking view of small platforms. A Dream World version of Bowser serves as the final giant boss. A shop run by Dreamy [[Broque Monsieur]] is located here. | ||
*'''Antasma's Battlefield:''' Not technically a part of Dreamy Neo Bowser Castle, this dream world created by Antasma is where Mario and Luigi fight the bat king. It is located in the fourth area of the castle. | *'''Antasma's Battlefield:''' Not technically a part of Dreamy Neo Bowser Castle, this dream world created by Antasma is where Mario and Luigi fight the bat king. It is located in the fourth area of the castle. | ||
==Enemies== | ==Enemies== | ||
<gallery> | |||
MechakoopaMLDT.png|[[Mechakoopa]]s (Areas A, B, D, F) | |||
M&LDT Big Tail Goomba.png|[[Big Tail Goomba]]s (Areas B, D, F, G) | |||
Antasman.png|[[Antasman|Antasmen]] (Areas C, D, E, G) | |||
MLSSBMLakitu.png|[[Lakitu R|Lakitus R]] (Areas A, B, D, E, G) | |||
SpinyR.png|[[Spiny R|Spinies R]] (Areas A, B, D, E, G) | |||
Gold Beanie Screenshot - Dream Team.png|[[Gold Beanie]]s (Areas A-G) | |||
KamekDT.png|[[Kamek]] (boss, fought three times; Areas A, B, C) | |||
MLBISBJJDryBones2.png|[[Dry Bones]] | |||
MLDT-KamekGreenFlying.png|[[Kamek (Green)]] | |||
MLDT-KamekRedFlying.png|[[Kamek (Red)]] | |||
MLDT-KamekWhiteFlying.png|[[Kamek (White)]] | |||
Giant Dreamy Bowser.jpg|[[Super Bowser|Bowser]] (giant boss; Area G) | |||
AntasmaStaticSprite.png|[[Antasma]] (boss; Antasma's Battlefield) | |||
</gallery> | |||
==Block locations== | |||
===Area A=== | |||
{|border=1 cellpadding=2 style="text-align: center; border-collapse: collapse; border: 1px solid black; width:100%" | |||
!colspan="3"style="background:orange; height:2em"|[[Dreamy Neo Bowser Castle]] (Koopa Clown Car Dreampoint 1) - 20 Blocks (19 ?, 1 Red Coin) | |||
|-style="background:orange; height:2em" | |||
!Item/s | |||
!Location | |||
!Screenshot | |||
|- | |||
|[[File:MLPJ50Coin.png]] [[File:MLSSBM100Coin.png]] [[File:MLSSBM100Coin.png]]<br>50-Coin (upper right), 100-Coin (rest) | |||
|In the third scene, left of the entrance pipe. Reachable only with [[Luiginary Antigravity]]. | |||
|[[File:Dreamy Neo Bowser Castle (Koopa Clown Car Dreampoint 1) Blocks 1-3.png]] | |||
|- | |||
|[[File:MLPJ50Coin.png]] [[File:MLPJ50Coin.png]] [[File:MLSSBMRefreshingHerb.png]]<br>Refreshing Herb (right), 50-Coin (rest) | |||
|Same scene, in the south. Reachable only with Luiginary Antigravity. | |||
|[[File:Dreamy Neo Bowser Castle (Koopa Clown Car Dreampoint 1) Blocks 4-6.png]] | |||
|- | |||
|[[File:M&LDT Candy.png]]<br>Ultra Candy | |||
|Same scene, in the northeast. Reachable only with Luiginary Antigravity. | |||
|[[File:Dreamy Neo Bowser Castle (Koopa Clown Car Dreampoint 1) Block 7.png]] | |||
|- | |||
|[[File:Red Coin SMR.png|21px]][[File:Red Coin SMR.png|21px]][[File:Red Coin SMR.png|21px]][[File:Red Coin SMR.png|21px]][[File:Red Coin SMR.png|21px]][[File:Red Coin SMR.png|21px]][[File:Red Coin SMR.png|21px]][[File:Red Coin SMR.png|21px]] 44x[[File:Dream Team Coin.png]]<br>8 Red Coins and 44 Coins | |||
|In the fourth scene, near the exit. Reachable only with Luiginary Antigravity. | |||
|[[File:Dreamy Neo Bowser Castle (Koopa Clown Car Dreampoint 1) Block 8.png]] | |||
|- | |||
|[[File:M&LDT Nut.png]]<br>Max Nut | |||
|In the fifth scene, in the southwest. Reachable only with Luiginary Antigravity. | |||
|[[File:Dreamy Neo Bowser Castle (Koopa Clown Car Dreampoint 1) Block 9.png]] | |||
|- | |||
|[[File:M&LDT Mushroom.png]]<br>Max Mushroom | |||
|Same scene, in the southeast. Reachable only with Luiginary Antigravity. | |||
|[[File:Dreamy Neo Bowser Castle (Koopa Clown Car Dreampoint 1) Block 10.png]] | |||
|- | |||
|[[File:MLSSBM100Coin.png]]<br>100-Coin | |||
|Same scene, in the northeast. Reachable only with Luiginary Antigravity. | |||
|[[File:Dreamy Neo Bowser Castle (Koopa Clown Car Dreampoint 1) Block 11.png]] | |||
|- | |||
|[[File:MLPJ50Coin.png]]<br>50-Coin | |||
|In the sixth scene, near the entrance. | |||
|[[File:Dreamy Neo Bowser Castle (Koopa Clown Car Dreampoint 1) Block 12.png]] | |||
|- | |||
|[[File:MLPJ50Coin.png]]<br>50-Coin | |||
|Same scene, above the upper middle platform. | |||
|[[File:Dreamy Neo Bowser Castle (Koopa Clown Car Dreampoint 1) Block 13.png]] | |||
|- | |||
|[[File:M&LDT Mushroom.png]]<br>Ultra Mushroom | |||
|Same scene, above the right platform. | |||
|[[File:Dreamy Neo Bowser Castle (Koopa Clown Car Dreampoint 1) Block 14.png]] | |||
|- | |||
|[[File:M&LDT Syrup.png]]<br>Max Syrup Jar | |||
|In the second scene, in the part reachable only from previous scene. | |||
|[[File:Dreamy Neo Bowser Castle (Koopa Clown Car Dreampoint 1) Block 15.png]] | |||
|- | |||
|[[File:MLSSBM100Coin.png]]<br>100-Coin | |||
|In the seventh scene, in the middle. Reachable only with Luiginary Antigravity. | |||
|[[File:Dreamy Neo Bowser Castle (Koopa Clown Car Dreampoint 1) Block 16.png]] | |||
|- | |||
|[[File:M&LDT Candy.png]]<br>Max Candy | |||
|Same scene, in the northeast. Reachable only with Luiginary Antigravity. | |||
|[[File:Dreamy Neo Bowser Castle (Koopa Clown Car Dreampoint 1) Block 17.png]] | |||
|- | |||
|[[File:M&LDT Nut.png]]<br>Ultra Nut | |||
|In the second scene, in the middle of the main part. Reachable only with Luiginary Antigravity. | |||
|[[File:Dreamy Neo Bowser Castle (Koopa Clown Car Dreampoint 1) Block 18.png]] | |||
|- | |||
|[[File:M&LDT Mushroom.png]]<br>Max Mushroom | |||
|Same scene, in the southeast of the main part. | |||
|[[File:Dreamy Neo Bowser Castle (Koopa Clown Car Dreampoint 1) Block 19.png]] | |||
|- | |||
|[[File:MLSSBM100Coin.png]]<br>100-Coin | |||
|In the eighth part, near the exit pipe. | |||
|[[File:Dreamy Neo Bowser Castle (Koopa Clown Car Dreampoint 1) Block 20.png]] | |||
|} | |||
===Area B=== | |||
{|border=1 cellpadding=2 style="text-align: center; border-collapse: collapse; border: 1px solid black; width:100%" | |||
!colspan="3"style="background:orange; height:2em"|Dreamy Neo Bowser Castle (Koopa Clown Car Dreampoint 2) - 4 Blocks (3 ?, 1 M) | |||
|-style="background:orange; height:2em" | |||
!Item/s | |||
!Location | |||
!Screenshot | |||
|- | |||
|[[File:M&LDT Candy.png]]<br>Max Candy | |||
|In the second scene, in the east. | |||
|[[File:Dreamy Neo Bowser Castle (Koopa Clown Car Dreampoint 2) Block 1.png]] | |||
|- | |||
|[[File:M&LDT Candy.png]]<br>Max Candy | |||
|In the third scene, at the very top. | |||
|[[File:Dreamy Neo Bowser Castle (Koopa Clown Car Dreampoint 2) Block 2.png]] | |||
|- | |||
|[[File:MLSSBM100Coin.png]]<br>100-Coin | |||
|In the fourth scene, near the entrance. | |||
|[[File:Dreamy Neo Bowser Castle (Koopa Clown Car Dreampoint 2) Block 3.png]] | |||
|- | |||
|[[File:M&LDT Syrup.png]]<br>Ultrasyrup Jar | |||
|In the fifth scene, at the end. | |||
|[[File:Dreamy Neo Bowser Castle (Koopa Clown Car Dreampoint 2) Block 4.png]] | |||
|} | |||
===Area C=== | |||
{|border=1 cellpadding=2 style="text-align: center; border-collapse: collapse; border: 1px solid black; width:100%" | |||
!colspan="3"style="background:orange; height:2em"|Dreamy Neo Bowser Castle (Koopa Clown Car Dreampoint 3) - 5 Blocks (4 ?, 1 L) | |||
|-style="background:orange; height:2em" | |||
!Item/s | |||
!Location | |||
!Screenshot | |||
|- | |||
|[[File:MLPJ50Coin.png]][[File:MLPJ50Coin.png]][[File:MLPJ50Coin.png]][[File:MLPJ50Coin.png]][[File:MLPJ50Coin.png]][[File:MLPJ50Coin.png]][[File:MLPJ50Coin.png]][[File:MLPJ50Coin.png]][[File:MLPJ50Coin.png]][[File:MLPJ50Coin.png]]<br>10 50-Coins | |||
|In the first scene, right of the Dream Portal. | |||
|[[File:Dreamy Neo Bowser Castle (Koopa Clown Car Dreampoint 3) Block 1.png]] | |||
|- | |||
|[[File:MLPJ50Coin.png]]<br>50-Coin | |||
|Same scene, near the west exit. | |||
|[[File:Dreamy Neo Bowser Castle (Koopa Clown Car Dreampoint 3) Block 2.png]] | |||
|- | |||
|[[File:MLSSBMRefreshingHerb.png]]<br>Refreshing Herb | |||
|In the second scene, in the west. | |||
|[[File:Dreamy Neo Bowser Castle (Koopa Clown Car Dreampoint 3) Block 3.png]] | |||
|- | |||
|[[File:M&LDT Syrup.png]]<br>Ultrasyrup Jar | |||
|In the third scene, near the exit, under the platforms. | |||
|[[File:Dreamy Neo Bowser Castle (Koopa Clown Car Dreampoint 3) Block 4.png]] | |||
|- | |||
|[[File:Dream Team Boots.png]]<br>Dark Boots | |||
|In the fifth scene, right of the exit pipe. | |||
|[[File:Dreamy Neo Bowser Castle (Koopa Clown Car Dreampoint 3) Block 5.png]] | |||
|} | |||
===Area D=== | |||
{|border=1 cellpadding=2 style="text-align: center; border-collapse: collapse; border: 1px solid black; width:100%" | |||
!colspan="3"style="background:orange; height:2em"|Dreamy Neo Bowser Castle (Koopa Clown Car Dreampoint 4) - 3 Blocks (1 ?, 1 L, 1 Red Coin) | |||
|-style="background:orange; height:2em" | |||
!Item/s | |||
!Location | |||
!Screenshot | |||
|- | |||
|[[File:Red Coin SMR.png|21px]][[File:Red Coin SMR.png|21px]][[File:Red Coin SMR.png|21px]][[File:Red Coin SMR.png|21px]][[File:Red Coin SMR.png|21px]][[File:Red Coin SMR.png|21px]][[File:Red Coin SMR.png|21px]][[File:Red Coin SMR.png|21px]]<br>8 Red Coins | |||
|In the second scene, in the west. Reachable only with Luiginary Antigravity. | |||
|[[File:Dreamy Neo Bowser Castle (Koopa Clown Car Dreampoint 4) Block 1.png]] | |||
|- | |||
|[[File:MLSSBM100Coin.png]] [[File:MLSSBMRefreshingHerb.png]]<br>100-Coin, Refreshing Herb | |||
|In the third scene, above the platform. | |||
|[[File:Dreamy Neo Bowser Castle (Koopa Clown Car Dreampoint 4) Blocks 2-3.png]] | |||
|} | |||
===Area E=== | |||
{|border=1 cellpadding=2 style="text-align: center; border-collapse: collapse; border: 1px solid black; width:100%" | |||
!colspan="3"style="background:orange; height:2em"|Dreamy Neo Bowser Castle (Dark Stone Platform Dreampoint 1) - 1 ? Block | |||
|-style="background:orange; height:2em" | |||
!Item/s | |||
!Location | |||
!Screenshot | |||
|- | |||
|[[File:M&LDT Nut.png]]<br>Max Nut | |||
|In the second scene, near the exit. | |||
|[[File:Dreamy Neo Bowser Castle (Dark Stone Platform Dreampoint 1) Block.png]] | |||
|} | |||
===Area F=== | |||
{|border=1 cellpadding=2 style="text-align: center; border-collapse: collapse; border: 1px solid black; width:100%" | |||
!colspan="3"style="background:orange; height:2em"|Dreamy Neo Bowser Castle (Dark Stone Platform Dreampoint 2) - 3 Blocks (2 ?, 1 M) | |||
|-style="background:orange; height:2em" | |||
!Item/s | |||
!Location | |||
!Screenshot | |||
|- | |||
|[[File:MLSSBM100Coin.png]] [[File:MLPJ50Coin.png]]<br>100-Coin, 50-Coin | |||
|In the first scene, near the east exit. | |||
|[[File:Dreamy Neo Bowser Castle (Dark Stone Platform Dreampoint 2) Blocks 1-2.png]] | |||
|- | |||
|[[File:M&LDT Nut.png]]<br>Max Nut | |||
|Same scene, above the previous two. | |||
|[[File:Dreamy Neo Bowser Castle (Dark Stone Platform Dreampoint 2) Block 3.png]] | |||
|} | |||
===Area G=== | |||
{|border=1 cellpadding=2 style="text-align: center; border-collapse: collapse; border: 1px solid black; width:100%" | |||
!colspan="3"style="background:orange; height:2em"|Dreamy Neo Bowser Castle (Bowser Dreampoint) - 9 Blocks (7 ?, 1 M, 1 L) | |||
|-style="background:orange; height:2em" | |||
!Item/s | |||
!Location | |||
!Screenshot | |||
|- | |||
|[[File:M&LDT Mushroom.png]]<br>Max Mushroom | |||
|In the second scene, near the exit pipe. | |||
|[[File:Dreamy Neo Bowser Castle (Bowser Dreampoint) Block 1.png]] | |||
|- | |||
|[[File:M&LDT Secret Box.png]]<br>Secret Box | |||
|In the fourth scene, in the middle. | |||
|[[File:Dreamy Neo Bowser Castle (Bowser Dreampoint) Block 2.png]] | |||
|- | |||
|[[File:MLSSBM100Coin.png]][[File:MLSSBM100Coin.png]][[File:MLSSBM100Coin.png]][[File:MLSSBM100Coin.png]][[File:MLSSBM100Coin.png]][[File:MLSSBM100Coin.png]][[File:MLSSBM100Coin.png]][[File:MLSSBM100Coin.png]][[File:MLSSBM100Coin.png]][[File:MLSSBM100Coin.png]]<br>10 100-Coins | |||
|Same scene, near the exit. | |||
|[[File:Dreamy Neo Bowser Castle (Bowser Dreampoint) Block 3.png]] | |||
|- | |||
|[[File:MLPJ50Coin.png]][[File:MLPJ50Coin.png]][[File:MLPJ50Coin.png]][[File:MLPJ50Coin.png]][[File:MLPJ50Coin.png]][[File:MLPJ50Coin.png]][[File:MLPJ50Coin.png]][[File:MLPJ50Coin.png]][[File:MLPJ50Coin.png]][[File:MLPJ50Coin.png]]<br>10 50-Coins | |||
|In the sixth scene, in the middle. | |||
|[[File:Dreamy Neo Bowser Castle (Bowser Dreampoint) Block 4.png]] | |||
|- | |||
|[[File:M&LDT Nut.png]]<br>Max Nut | |||
|Same scene, above the first straight platform. | |||
|[[File:Dreamy Neo Bowser Castle (Bowser Dreampoint) Block 5.png]] | |||
|- | |||
|[[File:M&LDT Candy.png]]<br>Max Candy | |||
|In the ninth scene, above the right middle platform. | |||
|[[File:Dreamy Neo Bowser Castle (Bowser Dreampoint) Block 6.png]] | |||
|- | |||
|[[File:MLSSBM100Coin.png]]<br>100-Coin | |||
|In the tenth scene (east of the first scene), near the entrance. | |||
|[[File:Dreamy Neo Bowser Castle (Bowser Dreampoint) Block 7.png]] | |||
|- | |||
|[[File:M&LDT Syrup.png]]<br>Max Syrup Jar | |||
|Same scene, near the west exit. | |||
|[[File:Dreamy Neo Bowser Castle (Bowser Dreampoint) Block 8.png]] | |||
|- | |||
|[[File:M&LDT Candy.png]]<br>Max Candy | |||
|In the eleventh scene, at the very top, before the cannon. | |||
|[[File:Dreamy Neo Bowser Castle (Bowser Dreampoint) Block 9.png]] | |||
|} | |||
==Names in other languages== | ==Names in other languages== | ||
{{foreign names | {{foreign names | ||
| | |Jap=夢のネオクッパ城 | ||
| | |JapR=Yume no Neo Kuppa Jō | ||
| | |JapM=Neo Bowser Castle of Dreams | ||
| | |FreA=Château noir de Bowser rêve | ||
|FreAM=Dreamy Bowser's Black Castle | |||
|FreE=Néobowserium onirique | |||
|FreEM=Oneiric Neobowserium | |||
|SpaE=Supercastillo de Bowser en sueños | |SpaE=Supercastillo de Bowser en sueños | ||
|SpaEM=Bowser | |SpaEM=Neo Bowser Castle in dreams | ||
|Ger=Bowsers neue Festung | |Ger=Bowsers neue Festung | ||
|GerM=Bowser's new fortress | |GerM=Bowser's new fortress | ||
|Ita=Neo-Castello di Bowser onirico | |||
|ItaM=Dreamy Neo Bowser Castle | |||
|SpaA=Neocastillo de Bowser onírico | |||
|SpaAM=Dreamy Neo Bowser castle | |||
}} | }} | ||
==Trivia== | |||
Two rooms in Bowser's Dream are [[unrevisitable area]]s. The cannon that launches the Bros into the room with cutscene with Bowser and the minions can no longer be used after the battle. The room where the battle takes place is exited through a [[Warp Pipe]] that ends in the ceiling of a prior room, with no platforms to climb back up nor mechanics to allow entry otherwise. | |||
{{M&LDT}} | {{M&LDT}} | ||
[[Category:Bowser's | [[Category:Bowser's castles]] | ||
[[Category:Dreamy]] | [[Category:Dreamy]] | ||
[[Category:Mario & Luigi: Dream Team | [[Category:Mario & Luigi: Dream Team locations]] | ||
[[de:Bowsers neue Festung]] | |||
[[it:Neo-Castello di Bowser onirico]] | [[it:Neo-Castello di Bowser onirico]] | ||
Latest revision as of 10:23, September 8, 2024
| Dreamy Neo Bowser Castle | |
|---|---|

| |
| First appearance | Mario & Luigi: Dream Team (2013) |
| Greater location | Dream World |
| Inhabitants | Kamek, Bowser, Mechakoopas, Big Tail Goombas, Antasmen, Lakitus R, Spinies R, Gold Beanies |
Dreamy Neo Bowser Castle is the Dream World version of Neo Bowser Castle in Mario & Luigi: Dream Team. It is the last dream world area in the game. Kamek is fought three times here, followed by a giant boss fight against Bowser's dreamy self and a different boss fight with Antasma.
Kamek uses his magic to scramble the doorways of Neo Bowser Castle, then retreats to Dreamy Neo Bowser Castle with a Dream Portal created by Antasma. Luigi sleeps on a hovering Koopa Clown Car, opening a portal for Mario to chase Kamek. Kamek flees from this battle, although the spell is broken. Kamek does this two more times in the real world, and the Bros. have to return two more times, defeating Kamek in the third battle. After Kamek is defeated, Mario and Luigi enter the the main hall of Neo Bowser Castle, where three portals from Dreamy Neo Bowser Castle spew intense flames that block the passage. Mario has to enter the Dream World for each flame, and destroy the flamethrowers. Past the main hallway, the Bros. see Bowser sleeping in a strange device and being protected by a barrier. To wake him up, Prince Dreambert binds himself to the vines allowing passage into Bowser's Dream. Mario and Dreamy Luigi confront Dreamy Bowser in the final Giant Battle. After defeating Bowser in the dream world, he wakes up, causing the cessation of dream energy to the castle.
Antasma is later battled in the Dream World, the only section of the game that takes place in a dreamy version of the outdoor/rooftop section of Neo Bowser Castle.
Neo Bowser Castle is destroyed during the game, and it is unknown if Dreamy Neo Bowser Castle still exists afterward.
Dreamy Neo Bowser Castle has multiple rooms where lava rises from below. The lava only starts to rise after Mario passes a boundary in the room, and resets if it touches Mario or Luigi. Flamethrowers are recurring obstacles.
Dream Worlds[edit]
- Area A: A Dream World where Kamek is fought for the first time, which is required to clear the spell on the doorways in the first floor of Neo Bowser Castle. It is only accessible after lowering the metal gate that surrounds the hovering Koopa Clown Car that Luigi can sleep on. This dream world is where Mario learns Luiginary Antigravity.
- Area B: A Dream World where Kamek is fought for the second time, which is required to clear the spell on the doorways in the second floor of Neo Bowser Castle. It is only accessible after lowering the metal gate that surrounds the Koopa Clown Car. This dream world primarily makes use of the Luiginary Stache Tree.
- Area C: A Dream World where Kamek is fought for the last time, which is required to clear the spell on the doorway to the third floor, in the second floor of Neo Bowser Castle. This dream world is located at the end of the castle's second area. It is only accessible after lowering the metal gate that surrounds the Koopa Clown Car. This dream world primarily uses the Luiginary Propeller.
- Area D: A Dream World where a flamethrower that hinders progress through the castle's third area is found. Located on the west side of the hallway, at the hovering Koopa Clown Car. This dream world uses Luiginary Antigravity.
- Area E: A Dream World where a flamethrower that hinders progress through the castle's third area is found. Located on the front-east side of the hallway, at the Dreampoint. This dream world incorporates the Luiginary Speedometer.
- Area F: A Dream World where a flamethrower that hinders progress through the castle's third area is found. Located on the back-east side of the hallway, at the Dreampoint. This dream world is where the Luiginary Cylinder is used.
- Area G (Bowser's Dream): The final Dreampoint where Bowser sleeps to provide power to the castle. It is located in the fourth area. Bowser impedes the bros in the overworld by rolling a giant spike ball at them. Giant Bowser heads appear in the background, but in one room they appear in the foreground, blocking view of small platforms. A Dream World version of Bowser serves as the final giant boss. A shop run by Dreamy Broque Monsieur is located here.
- Antasma's Battlefield: Not technically a part of Dreamy Neo Bowser Castle, this dream world created by Antasma is where Mario and Luigi fight the bat king. It is located in the fourth area of the castle.
Enemies[edit]

Mechakoopas (Areas A, B, D, F)

Big Tail Goombas (Areas B, D, F, G)

Antasmen (Areas C, D, E, G)

Lakitus R (Areas A, B, D, E, G)

Spinies R (Areas A, B, D, E, G)

Gold Beanies (Areas A-G)

Kamek (boss, fought three times; Areas A, B, C)
Bowser (giant boss; Area G)
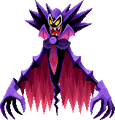
Antasma (boss; Antasma's Battlefield)


Block locations[edit]
Area A[edit]
| Dreamy Neo Bowser Castle (Koopa Clown Car Dreampoint 1) - 20 Blocks (19 ?, 1 Red Coin) | ||
|---|---|---|
| Item/s | Location | Screenshot |
50-Coin (upper right), 100-Coin (rest) |
In the third scene, left of the entrance pipe. Reachable only with Luiginary Antigravity. | _Blocks_1-3.png)
|
Refreshing Herb (right), 50-Coin (rest) |
Same scene, in the south. Reachable only with Luiginary Antigravity. | _Blocks_4-6.png)
|
Ultra Candy |
Same scene, in the northeast. Reachable only with Luiginary Antigravity. | _Block_7.png)
|
8 Red Coins and 44 Coins |
In the fourth scene, near the exit. Reachable only with Luiginary Antigravity. | _Block_8.png)
|
Max Nut |
In the fifth scene, in the southwest. Reachable only with Luiginary Antigravity. | _Block_9.png)
|
Max Mushroom |
Same scene, in the southeast. Reachable only with Luiginary Antigravity. | _Block_10.png)
|
100-Coin |
Same scene, in the northeast. Reachable only with Luiginary Antigravity. | _Block_11.png)
|
50-Coin |
In the sixth scene, near the entrance. | _Block_12.png)
|
50-Coin |
Same scene, above the upper middle platform. | _Block_13.png)
|
Ultra Mushroom |
Same scene, above the right platform. | _Block_14.png)
|
Max Syrup Jar |
In the second scene, in the part reachable only from previous scene. | _Block_15.png)
|
100-Coin |
In the seventh scene, in the middle. Reachable only with Luiginary Antigravity. | _Block_16.png)
|
Max Candy |
Same scene, in the northeast. Reachable only with Luiginary Antigravity. | _Block_17.png)
|
Ultra Nut |
In the second scene, in the middle of the main part. Reachable only with Luiginary Antigravity. | _Block_18.png)
|
Max Mushroom |
Same scene, in the southeast of the main part. | _Block_19.png)
|
100-Coin |
In the eighth part, near the exit pipe. | _Block_20.png)
|
Area B[edit]
| Dreamy Neo Bowser Castle (Koopa Clown Car Dreampoint 2) - 4 Blocks (3 ?, 1 M) | ||
|---|---|---|
| Item/s | Location | Screenshot |
Max Candy |
In the second scene, in the east. | _Block_1.png)
|
Max Candy |
In the third scene, at the very top. | _Block_2.png)
|
100-Coin |
In the fourth scene, near the entrance. | _Block_3.png)
|
Ultrasyrup Jar |
In the fifth scene, at the end. | _Block_4.png)
|
Area C[edit]
| Dreamy Neo Bowser Castle (Koopa Clown Car Dreampoint 3) - 5 Blocks (4 ?, 1 L) | ||
|---|---|---|
| Item/s | Location | Screenshot |
10 50-Coins |
In the first scene, right of the Dream Portal. | _Block_1.png)
|
50-Coin |
Same scene, near the west exit. | _Block_2.png)
|
Refreshing Herb |
In the second scene, in the west. | _Block_3.png)
|
Ultrasyrup Jar |
In the third scene, near the exit, under the platforms. | _Block_4.png)
|
Dark Boots |
In the fifth scene, right of the exit pipe. | _Block_5.png)
|
Area D[edit]
| Dreamy Neo Bowser Castle (Koopa Clown Car Dreampoint 4) - 3 Blocks (1 ?, 1 L, 1 Red Coin) | ||
|---|---|---|
| Item/s | Location | Screenshot |
8 Red Coins |
In the second scene, in the west. Reachable only with Luiginary Antigravity. | _Block_1.png)
|
100-Coin, Refreshing Herb |
In the third scene, above the platform. | _Blocks_2-3.png)
|
Area E[edit]
| Dreamy Neo Bowser Castle (Dark Stone Platform Dreampoint 1) - 1 ? Block | ||
|---|---|---|
| Item/s | Location | Screenshot |
Max Nut |
In the second scene, near the exit. | _Block.png)
|
Area F[edit]
| Dreamy Neo Bowser Castle (Dark Stone Platform Dreampoint 2) - 3 Blocks (2 ?, 1 M) | ||
|---|---|---|
| Item/s | Location | Screenshot |
100-Coin, 50-Coin |
In the first scene, near the east exit. | _Blocks_1-2.png)
|
Max Nut |
Same scene, above the previous two. | _Block_3.png)
|
Area G[edit]
| Dreamy Neo Bowser Castle (Bowser Dreampoint) - 9 Blocks (7 ?, 1 M, 1 L) | ||
|---|---|---|
| Item/s | Location | Screenshot |
Max Mushroom |
In the second scene, near the exit pipe. | _Block_1.png)
|
Secret Box |
In the fourth scene, in the middle. | _Block_2.png)
|
10 100-Coins |
Same scene, near the exit. | _Block_3.png)
|
10 50-Coins |
In the sixth scene, in the middle. | _Block_4.png)
|
Max Nut |
Same scene, above the first straight platform. | _Block_5.png)
|
Max Candy |
In the ninth scene, above the right middle platform. | _Block_6.png)
|
100-Coin |
In the tenth scene (east of the first scene), near the entrance. | _Block_7.png)
|
Max Syrup Jar |
Same scene, near the west exit. | _Block_8.png)
|
Max Candy |
In the eleventh scene, at the very top, before the cannon. | _Block_9.png)
|
Names in other languages[edit]
| Language | Name | Meaning | Notes |
|---|---|---|---|
| Japanese | 夢のネオクッパ城[?] Yume no Neo Kuppa Jō |
Neo Bowser Castle of Dreams | |
| French (NOA) | Château noir de Bowser rêve[?] | Dreamy Bowser's Black Castle | |
| French (NOE) | Néobowserium onirique[?] | Oneiric Neobowserium | |
| German | Bowsers neue Festung[?] | Bowser's new fortress | |
| Italian | Neo-Castello di Bowser onirico[?] | Dreamy Neo Bowser Castle | |
| Spanish (NOA) | Neocastillo de Bowser onírico[?] | Dreamy Neo Bowser castle | |
| Spanish (NOE) | Supercastillo de Bowser en sueños[?] | Neo Bowser Castle in dreams |
Trivia[edit]
Two rooms in Bowser's Dream are unrevisitable areas. The cannon that launches the Bros into the room with cutscene with Bowser and the minions can no longer be used after the battle. The room where the battle takes place is exited through a Warp Pipe that ends in the ceiling of a prior room, with no platforms to climb back up nor mechanics to allow entry otherwise.