Luiginoid Formation: Difference between revisions
m (→Stack) |
(→Stack) |
||
| (7 intermediate revisions by 5 users not shown) | |||
| Line 1: | Line 1: | ||
[[File:3DS MarioLuigi3DS 022013 Scrn05.png|thumb|The Luiginoid | [[File:3DS MarioLuigi3DS 022013 Scrn05.png|thumb|The Luiginoid Formation and a single [[Luiginoid]] jumping out of it.]] | ||
The '''Luiginoid Formation'''<ref>Knight, David.''Mario & Luigi: Dream Team'' [[Prima Games|Prima]] Official Game Guide, page 19.</ref> is a type of [[Mario & Luigi: Dream Team#Luiginary Works|Luiginary Work]] in ''[[Mario & Luigi: Dream Team]]''. It has many uses for [[Mario]] and [[Dreamy Luigi]]. It is described by Prince Dreambert as being a "legendary" Luiginary Work. | The '''Luiginoid Formation'''<ref>Knight, David.''Mario & Luigi: Dream Team'' [[Prima Games|Prima]] Official Game Guide, page 19.</ref> is a type of [[Mario & Luigi: Dream Team#Luiginary Works|Luiginary Work]] in ''[[Mario & Luigi: Dream Team]]''. It has many uses for [[Mario]] and [[Dreamy Luigi]]. It is described by Prince Dreambert as being a "legendary" Luiginary Work. | ||
While using Luiginoid Formation, all enemies that come into contact with the Luiginoids are instantly defeated without battling them, along with permenantly removing them from the overworld. | |||
==Stack== | ==Stack== | ||
[[File:Mldt-luigistack.jpg|thumb|Using the static stack in [[Dreamy Dozing Sands]].]] | [[File:Mldt-luigistack.jpg|thumb|Using the static stack in [[Dreamy Dozing Sands]].]] | ||
If the | If the formation contains a Luigi stack, then a stack of [[Luiginoid]]s will form and Mario will climb to the top. This form is first used in Dreamy Dozing Sands. While in this form, the Bros. will plow through most enemies and are able to perform the following techniques: | ||
===Jump=== | ===Jump=== | ||
| Line 25: | Line 27: | ||
===Spin Jump=== | ===Spin Jump=== | ||
Pressing {{button|3ds|B}} makes the cone jump, which falls slower than a normal jump. Pressing {{button|3ds|A}} while midair makes cone drop quickly. | Pressing {{button|3ds|B}} makes the cone jump, which falls slower than a normal jump. Pressing {{button|3ds|A}} while midair makes the cone drop quickly. | ||
===Hover Spin=== | ===Hover Spin=== | ||
| Line 40: | Line 42: | ||
===Hookshot=== | ===Hookshot=== | ||
Pressing {{button|3ds|B}} aims the ball at the Hookshot point and pressing {{button|3ds|B}} again launches | Pressing {{button|3ds|B}} aims the ball at the Hookshot point and pressing {{button|3ds|B}} again launches the ball and a string of [[Luiginoid]]s to the nearby point. If the line is not aimed at a Hookshot point, the ball will spring back. | ||
This move is a reference to the [[Zeldawiki:Hookshot|Hookshot]] from the ''Legend of Zelda'' series, and the move works almost the same as the aforementioned item. | This move is a reference to the [[Zeldawiki:Hookshot|Hookshot]] from the ''Legend of Zelda'' series, and the move works almost the same as the aforementioned item. | ||
==Revert== | ==Revert== | ||
To revert to normal, the player can press {{button|3ds|L}} to pile the Luiginoids and then press {{button|3ds|A}} or {{button|3ds|B}} to make them jump back into the Luiginoid | To revert to normal, the player can press {{button|3ds|L}} to pile the Luiginoids and then press {{button|3ds|A}} or {{button|3ds|B}} to make them jump back into the Luiginoid Formation. Pressing {{button|3ds|R}} cycles through the various forms the Luiginoids create, if there is access to more than one, in this order: Stack → Cone → Ball → Pile. | ||
==References== | ==References== | ||
<references/> | <references/> | ||
{{M&LDT}} | {{M&LDT}} | ||
[[Category:Mario & Luigi: Dream Team | [[Category:Mario & Luigi: Dream Team moves]] | ||
Latest revision as of 10:24, September 26, 2021

The Luiginoid Formation[1] is a type of Luiginary Work in Mario & Luigi: Dream Team. It has many uses for Mario and Dreamy Luigi. It is described by Prince Dreambert as being a "legendary" Luiginary Work.
While using Luiginoid Formation, all enemies that come into contact with the Luiginoids are instantly defeated without battling them, along with permenantly removing them from the overworld.
Stack[edit]

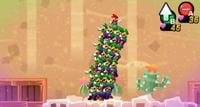
If the formation contains a Luigi stack, then a stack of Luiginoids will form and Mario will climb to the top. This form is first used in Dreamy Dozing Sands. While in this form, the Bros. will plow through most enemies and are able to perform the following techniques:
Jump[edit]
Pressing makes the stack jump. Mario and the stack can use this to reach platforms or activate switches too high to reach.
Lean Over[edit]
While the stack is on a ledge, the player can use to make the stack lean over. The Luiginoids can activate switches this way. If there's nothing to lean against, however, the stack loses its balance and collapses.
Ground Pound[edit]
While the stack is midair, can be used to ground pound. The Luiginoids will break through most blocks with a ground pound.
Crouch[edit]
Pressing makes Mario flatten the stack. While the stack is flattened, Mario and the Luiginoids will be able to move through low ceilings. Pressing
reverts the stack to normal.
Spring Jump[edit]
While the stack is crouching, pressing causes the stack to spring, allowing the stack to jump many times higher and crush blocks above it.
Cone[edit]
Pressing turns the stack into the cone formation, which looks like an inverted cone, with Mario on top. This form is first used in Dreamy Mount Pajamaja. While in this form, the Bros. will also plow through most enemies and are able to perform the following techniques:
Spin Jump[edit]
Pressing makes the cone jump, which falls slower than a normal jump. Pressing
while midair makes the cone drop quickly.
Hover Spin[edit]
Pressing while midair makes Mario Jump, making the cone rise a bit, increasing the aerial duration a bit. Mario will also be able to hit ? Blocks above him.
Tornado[edit]
Pressing creates a large tornado, with all the Luiginoids whirling around. The player can control where Mario goes with
, and push crates that have been affected by the tornado. Pressing
will return Mario and all the Luiginoids to their original location.
Ball[edit]
Pressing turns the cone into the ball formation, which looks like a sphere, with Mario balancing on top. This form is first used in Dream's Deep in Dreamy Pi'illo Castle, later in the game. While in this form, the Bros. will plow through most enemies, move faster than other Luiginary Forms, fly up ramps, and are able to perform the following techniques:
Ball Hammer[edit]
Pressing causes Mario to swing the ball around and around, breaking certain obstacles. Mario can move up and down in this state. Pressing
again will launch the ball a far distance, returning to Mario almost immediately. Pressing
will cause Mario to balance on the ball again.
Hookshot[edit]
Pressing aims the ball at the Hookshot point and pressing
again launches the ball and a string of Luiginoids to the nearby point. If the line is not aimed at a Hookshot point, the ball will spring back.
This move is a reference to the Hookshot from the Legend of Zelda series, and the move works almost the same as the aforementioned item.
Revert[edit]
To revert to normal, the player can press to pile the Luiginoids and then press
or
to make them jump back into the Luiginoid Formation. Pressing
cycles through the various forms the Luiginoids create, if there is access to more than one, in this order: Stack → Cone → Ball → Pile.