Energy Hold
| Energy Hold | |
|---|---|
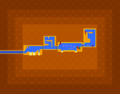
 Mario and Luigi using the Spin Jump to cross a gap in the Energy Hold | |
| First appearance | Mario & Luigi: Bowser's Inside Story (2009) |
| Latest appearance | Mario & Luigi: Bowser's Inside Story + Bowser Jr.'s Journey (2018) |
| Greater location | Bowser's body |
| Inhabitants | Emoglobins, Napses, Peps, Piranha Plorps, Pwallops |
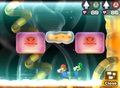
The Energy Hold is the largest area within Bowser's body in Mario & Luigi: Bowser's Inside Story and its remake. It is located in Bowser's liver. This area, along with the Lumbar Nook and Leg Outpost, are accessible to Mario and Luigi once Bowser is pushing the drill in the Tunnel. It is split into three parts, with its first area being relatively straightforward with a few pits of mucus that act as Quicksand, the second area consisting of a hub with some paths that must be traversed to complete the Star Panel and continue forward, and the third area having some screens that hide objects.
Starlow and the Mario Bros. first come here in pursuit of Durmite, but she slips under a wall of three Boo-like blocks that block the path; Mario and Starlow ponder their next course of action as Luigi falls in the area's pits repeatedly. Meanwhile, Bowser makes his way to Dimble Wood in pursuit of the Star Cure; along the way, he discovers the Tower of Yikk and defeats it in battle while in his giant form, gaining entry to the tower. Inside, Bowser encounters Yikk himself, who demonstrates how to operate the Boo-ray Machine; its light causes the barrier of blocks to disappear and allows Starlow and the Mario Bros. to venture further into the Energy Hold.
Mario and Luigi must use the Boo-ray Machine's light to manipulate the environment and navigate through the Energy Hold; the light reveals invisible platforms, as well as Boo-faced platforms that appear and vanish depending on whether the light is present. Most parts of the area also require the Spin Jump to progress. Mario and Luigi also learn how to burrow underground, and can collect the area's ten Attack Pieces to unlock the Super Bouncer Bros. Attack.
Mario and Luigi eventually find Durmite again, but she slips through a door which can only be opened by collecting all the parts of the Star Panel. After a few more doors, they finally catch Durmite, who reveals her true name to be Wisdurm, and challenges the Bros. to a battle for the first Star Cure. Upon defeating Wisdurm, she morphs into her true form before making good on her promise and giving Mario and Luigi the Star Cure. Wisdurm then leaves Bowser's body, removing two obstructions from a doorway in the process that allows the two to exit the Energy Hold; this also unlocks the Joint Tower for them to visit.
Enemies[edit]
Items[edit]
The following are overworld items found in this area:[1]
Field/Given[edit]
| Item | Location | Image ( |
Image ( |
|---|---|---|---|
Star Cure |
Given by Wisdurm deep beyond the star-shaped door. | .png)
|
_(Star_Cure).png)
|
Star Panels |
Star Panels of various shapes can be solidified with the Boo-ray Machine, and their shapes can be controlled by blocks beyond each door. There are three shapes that can be used:
|
.png) .png) .png)
|
_(Inverted_Triangle_Star_Panel).png) _(Oddly_Shaped_Star_Panel).png) _(Star-Shaped_Star_Panel).png)
|
Original only[edit]
| Item | Location | Image |
|---|---|---|
| 3x 3 Coins |
In the middle scene of the upper right section of the second area, specifically near the northeastern corner. | .png)
|
Beanholes[edit]
| Location | Item | Image ( |
Image ( |
|---|---|---|---|
| In the area corresponding to the top corner of the Star Panel, there is a cave where the player learns the Drill Bros. move. One scene past the entrance of the cave there will be four beans in the lower area. In the remake, one of the beanholes have been removed. | 4x Heart (x2) and Special (x2) Heart, Special and Speed |

|

|
| In the upper area of the same scene, there will be five beans in the higher area. In the remake, three of the beanholes have been removed. | 5x Heart (x4) and Special Defense and Power |
 
|

|
| In the area corresponding to the bottom-left corner of the Star Panel, there is a cave leading to a treasure room, which requires the Star Panel with all but the two bottom corners for entrance. In the room are several ? Blocks. There are also three beans beneath the last ? Block. | 3x Heart (x2) and Special Flex, Heart and Special |

|

|
| In the area corresponding to the upper-left corner of the Star Panel, there is an exit to the upper-right of the big maze that leads to the upper area of the next scene. There will be a Rally Block containing four Attack Pieces. Beneath the Rally Block are five beans. In the remake, two of the beanholes have been removed. | 5x Heart (x4) and Special 2x Heart (x2) and Special |

|

|
Blocks[edit]
| Item | Location | Image ( |
Image ( |
|---|---|---|---|
Super Nut |
First area: In the third scene, above the westernmost boo platform. | 
|
_Block_1.png)
|
| 12x 12 Coins 15x 15 Coins, 3 Five Coins and 2 10-Coins |
First area: In the middle of the fourth scene. | 
|
_Block_2.png)
|
| 2x 2 Refreshing Herbs 6x 6 Refreshing Herbs |
First area: Same scene, at the top. | 
|
_Block_3.png)
|
50-Coin 3x 3 Nuts |
Second area: In the fifth scene, above the westernmost platform. | 
|
_Block_4.png)
|
Super Bouncer Attack Piece |
Second area: Same scene, in the southwestern corner. | 
|
_Block_5.png)
|
1-Up Deluxe |
Second area: In the second scene of the upper-right area from the star-shaped door, in the northeast. | 
|
_Block_6.png)
|
Super Mushroom 2x 2 Super Mushrooms |
Second area: In the first scene of the upper-right area from the star-shaped door. | 
|
_Block_7.png)
|
10-Coin Supersyrup Jar |
Second area: In the second scene of the upper-left area from the star-shaped door, in the upper-left part of the first reflector wall. | 
|
_Block_8.png)
|
| 10x 10 Five Coins 2x 2 Super Mushrooms |
Second area: Same scene, in the upper-middle part of the first reflector wall. | 
|
_Block_9.png)
|
1-Up Deluxe |
Second area: Same scene, in the upper right part of the first reflector wall. | 
|
_Block_10.png)
|
Hero Wear Mushroom Boots |
Second area: Same scene, in the southwest part of the second reflector wall. | 
|
_Block_11.png)
|
| 4x 4 Super Bouncer Attack Pieces |
Second area: In the third scene of the upper-left area from the star-shaped door, in the upper part. This block is a Rally Block with a objective of being struck five times. | 
|
_Block_12.png)
|
50-Coin 10-Coin |
Second area: Same scene, in the lower part. | 
|
_Block_13.png)
|
| 10x 10 Five Coins 2x 2 1-Up Mushrooms |
Second area: In the first scene of the upper-left area from the star-shaped door. | 
|
_Block_14.png)
|
| 2x 2 Super Mushrooms |
Second area: In the scene behind the door of the second scene in the upper area from the star-shaped door, in the northeast. | 
|
_Block_15.png)
|
50-Coin |
Second area: In the first scene of the upper area from the star-shaped door. | 
|
_Block_18.png)
|
50-Coin 10x 10 Five Coins |
Second area: In the second scene of the lower-left area from the star-shaped door, in the southeast. | 
|
_Block_19.png)
|
| 2x 2 Super Mushrooms Ultra Nut |
Second area: Same scene, in the northwest. | 
|
_Block_20.png)
|
| 10x 10 10-Coins, Special Boots and Star Candy |
Second area: In the room behind the third scene in the lower-left area from the star-shaped door. |  
|
_Blocks_21-23.png)
|
Super Mushroom Supersyrup Jar |
Second area: In the first scene of the lower-left area from the star-shaped door. | 
|
_Block_24.png)
|
| 4x 4 Super Bouncer Attack Pieces |
Second area: In the rightmost scene in the lower-right area from the star-shaped door, in the Mini-Mario maze. | 
|
_Block_25.png)
|
| 9x 9 10-Coins and Supersyrup Jar 10x 10 10-Coins and Supersyrup Jar |
Second area: Same scene, above the maze. | 
|
_Blocks_26-27.png)
|
Super Bouncer Attack Piece |
Second area: In the second scene in the lower-right area from the star-shaped door, in the northwest. This ? Block is one of the special ? Blocks: After the initial ? Block has been struck, it shows a pattern of 5 M and L Blocks, then they turn to 5 ? Blocks and must be struck in the same pattern to get the content hidden in the initial ? Block. | 
|
_Block_28.png)
|
Nurse Socks Fill-Up Socks |
Second area: In the first scene of the lower-right area from the star-shaped door. | 
|
_Block_29.png)
|
Super Nut |
Third area: In the first scene beyond the star-shaped door, in the west. | 
|
_Block_30.png)
|
Supersyrup Jar 2x 2 Supersyrup Jars |
Third area: Same scene, in the east, near the exit. | 
|
_Block_31.png)
|
100-Coin |
Third area: In the second scene beyond the star-shaped door, in the northwest. | 
|
_Block_32.png)
|
| 10x 10 Five Coins |
Third area: Same scene, above the lowest left boo block. | 
|
_Block_33.png)
|
Star Candy |
Third area: Same scene, above the lowest right boo block. | 
|
_Block_34.png)
|
| 12x 12 Coins 12x 12 Five Coins |
Third area: In the scene accessed by the first yellow/fourth pipe from the second scene beyond the star-shaped door. | 
|
_Block_35.png)
|
50-Coin and Supersyrup Jar 7x 7 50-Coins and Vengeance Patch |
Third area: In the scene accessed by the fifth red/eleventh pipe from the second scene beyond the star-shaped door. | 
|
_Blocks_36-37.png)
|
Super Nut |
Third area: In the third scene beyond the star-shaped door, behind the first reflector wall. Block can be found right of the first hole. | 
|
_Block_38.png)
|
100-Coin 50-Coin |
Third area: Same scene, southwest of the reflector wall. | 
|
_Block_39.png)
|
| 2x 10 Five Coins and 10-Coin 10x 10 Five Coins and Supersyrup Jar |
Third area: In the fourth scene beyond the star-shaped door, at the top. | 
|
_Blocks_40-41.png)
|
50-Coin Delicious Gloves |
Third area: Back in the third scene, found left of the second reflector wall. | 
|
_Block_42.png)
|
Delicious Gloves 1-Up Deluxe |
Third area: Same scene, southwest of the second reflector wall. | 
|
_Block_43.png)
|
Retry Clock 1-Up Deluxe |
Third area: In the fifth scene beyond the star-shaped door, in the southeast. | 
|
_Block_44.png)
|
| 2x 2 Super Nuts |
Third area: Same scene, in the northwest. | 
|
_Block_45.png)
|
Remake only[edit]
| Item | Location | Image |
|---|---|---|
1-Up Deluxe and 5 50-Coins |
Second area: In the scene behind the door of the second scene in the upper area from the star-shaped door, in the northwest. | _Blocks_16-17.png)
|
Gallery[edit]
In-game map of the first area
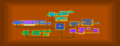
In-game map of the second area
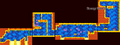
In-game map of the third area
Map of the first area
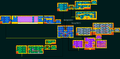
Map of the second area
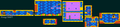
Map of the third area
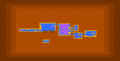
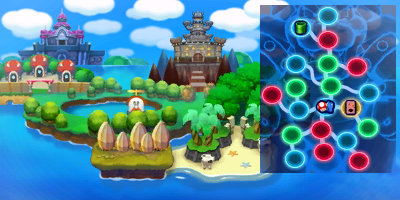
The Energy Hold in Mario & Luigi: Bowser's Inside Story + Bowser Jr.'s Journey


Prima Official Game Guide description[edit]
- "After Toadley identified the first Star Sage for Mario and Luigi, the Bros. must return to Bowser's body and seek it out. Because the Durmite was inhaled when Bowser ate that Giga-Carrot, it is likely that the Durmite is now somewhere in the Energy Hold. The Bros. must dive into the metabolic processing plant and seek out the Sage to claim the first of the three Star Cures and, hopefully, rescue the Toads from the Blorbs."
Names in other languages[edit]
| Language | Name | Meaning | Note(s) | Ref. |
|---|---|---|---|---|
| Japanese | エネルギースペース Enerugī Supēsu |
Energy Space (Enerugī is imported from the German Energie, not the English Energy, thus it is pronounced with a hard g.) | [?] | |
| French | Zone énergétique | Energetic area | [?] | |
| German | Energiekammer | Energy Chamber | [?] | |
| Italian | Apparato Traslucido | Translucent System | [?] | |
| Korean | 에너지 스페이스 Eneoji Seupeiseu |
Energy Space | [?] | |
| Spanish (Latin America) | Templo de los Rayos | Temple of Rays (because of the Boo-ray Machine) | [2][3] | |
| Spanish (Europe) | Sala Energética | Energetic/Energy Hall | [4][5] |
References[edit]
- ^ abcd9146 (December 30, 2009). Mario & Luigi: Bowser's Inside Story FAQ/Walkthrough. GameFAQs (English). Retrieved July 2, 2024.
- ^ https://youtu.be/wF77hX-f26s?t=223
- ^ https://youtu.be/sXXOmQpTovM&t=566
- ^ https://www.youtube.com/live/Z91S0HtVMQU?t=8987
- ^ https://youtu.be/kj2autFgECQ&t=541