Peach's Castle (Mario & Luigi: Bowser's Inside Story)
It has been requested that more images be uploaded for this article. Remove this notice only after the additional images have been added. Specifics: Remake
| Peach's Castle | |
|---|---|
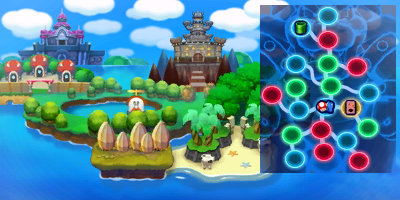
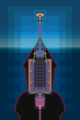
 The castle in the title screen of Mario & Luigi: Bowser's Inside Story | |
| First appearance | Mario & Luigi: Bowser's Inside Story (2009) |
| Latest appearance | Mario & Luigi: Bowser's Inside Story + Bowser Jr.'s Journey (2018) |
| Ruler | Princess Peach |
| Iteration of | Peach's Castle |
Peach's Castle is one of the locations in Mario & Luigi: Bowser's Inside Story and its remake. It begins with Mario and Luigi traveling through the main interior to attend the meeting room. The meeting is about the blorbs disease that has infected much of the Mushroom Kingdom, though it is cut short when Bowser shows up. After being defeated by Mario, Bowser is sent out of the castle by Peach and Starlow. Bowser later returns under the effects of the Vacuum Shroom and inhales everyone present before falling unconscious. Bowser is removed from the castle again by Fawful when the latter arrives.

Peach's Castle later becomes the final area, and is taken over by Fawful. In the remake, the conquered castle features Fawful's likeness everywhere, and it has dark blue castle walls and towers, magenta roofs and tower tops, blocked off windows, a much darker interior, and dark clouds above the castle. In the original, the only major difference with the castle is its ruined state. The castle is transformed by Fawful into a giant robot, who is fought by Bowser. It is possible for Mario and Luigi to access the castle in this state, but not beyond the entrance because only Bowser can destroy the Fawful statues in the way. However, the Mario Bros. can access a secret passage to obtain a piece of equipment and some beans. After Fawful and the Dark Star are defeated, Peach's Castle can be seen gradually restoring to normal over the course of the credits.
Enemies[edit]

Alarm Bob-omb (alongside Naplock)

Dark Mechawful.5 (upgraded Dark Mechawful)

Dark Fawful Guy (alongside Dark Fawful Bomb)

Blizzard Midbus (boss)

Snawful (alongside Blizzard Midbus)

Dark Fawful (boss)

Vacuum Helmet (alongside Dark Fawful)

Dark Bowser (final boss)

Dark Star Core (alongside Dark Bowser)


Items[edit]
- For a list of items in the garden area, see Peach's Castle Garden § Items.
NOTE: Not included items are items bought from the Shop Block and 3 Blitties from Naplocks, Dark Trashures and Dark Mechawfuls.
Here is a list of the overworld items found in Peach's Castle during the events of Mario & Luigi: Bowser's Inside Story:[1]
Dropped[edit]
| Item | Location | Image ( |
Image ( |
|---|---|---|---|
Blue Key |
Chasing a Fawfulcopter to the southern room and knocking it there. Required to progress. | _(Blue_Key).png)
|
_(Blue_Key).png)
|
Green Key |
Going after a Fawfulcopter in the southeastern corner of a room filled with spikes. | _(Green_Key).png)
|
_(Green_Key).png)
|
Red Key |
Chasing a Fawfulcopter to the highest spot of the dirt wall area in the northwest. | _(Red_Key).png)
|
_(Red_Key).png)
|
Beanholes[edit]
| Location | Item | Image ( |
Image ( |
|---|---|---|---|
| On the first floor of the castle, in the east beanch which Mario and Luigi can access, three beanholes can be found in the northwesternmost chunk within that branch. | 3x Heart (x3) 5x Defense (5×), Heart (5×) and Speed (5×) |

|

|
Original only[edit]
| Location | Image ( |
|---|---|
| On the first floor of the castle, in the east beanch which Mario and Luigi can access, there is a room with bookshelves. A beanhole can be found in the northwest corner of the chunk. Heart |

|
Remake only[edit]
| Location | Item | Image ( |
|---|---|---|
| On the first floor of the castle, in the east branch which Mario and Luigi can access, there is a room with bookshelves. Fill up Mario with water in the previous room to use that water to put out the fire in the fireplace in this one. After putting out the fire, enter the fireplace. Here, the Bean Hollow is found in the upper part of this new area, but to get to it, the Bros. have to use the Drill Bros. move. | 5x Flex (5×) |

|
Blocks[edit]
Non-Fawfulized castle (missable)[edit]
| Item | Location | Image ( |
Image ( |
|---|---|---|---|
Five Coin Coin |
In the second scene, above the hedge, right of the right platform. | _Block_1.png)
|
_Block_1.png)
|
Coin Mushroom |
Same scene, above the left platform. | _Block_2.png)
|
_Block_2.png)
|
Coin 10x 10 Coins |
Same scene, above the hedge in the northwestern corner. | _Block_3.png)
|
_Block_3.png)
|
| 10x 10 Coins Mushroom |
Same scene, above the hedge in the northeastern corner. In the remake, the block was move above the orange pillar next to the hedge. | _Block_4.png)
|
_Block_4.png)
|
Five Coin Mushroom |
In the third scene, found in the west. | _Block_5.png)
|
_Block_5.png)
|
Fawfulized castle[edit]
| Item | Location | Image ( |
Image ( |
|---|---|---|---|
100-Coin |
NOTE: Following 38 blocks can be accessed only after learning Spike Ball in Peach's Castle Garden. Second floor: In the entrance scene, in the southwestern corner. |
_Block_6.png)
|
_Block_36.png)
|
| 2x 2 TNT Drumsticks KO Band |
Second floor: Same scene, in the northeastern corner. | _Block_7.png)
|
_Block_37.png)
|
50-Coin and 100-Coin 100-Coin and Cheesy Drumstick |
Second floor: In the second scene filled with Fawful statues, in the middle. | _Blocks_8-9.png)
|
_Blocks_38-39.png)
|
Ultrasyrup Jar Ultra Cheese |
Second floor: In the scene where Naplocks are first encountered, in the south. | _Block_10.png)
|
_Block_40.png)
|
Retry Clock Cheesy Drumstick |
Second floor: In the scene left of the Princess Peach's room, left on the upper part. | _Block_11.png)
|
_Block_41.png)
|
Wicked Shell |
Second floor: In the scene left of the previous one, on the northeastern platform. | _Block_12.png)
|
_Block_42.png)
|
50-Coin 100-Coin |
Second floor: In the dining room, in front of the left table. | _Block_13.png)
|
_Block_43.png)
|
50-Coin, 100-Coin and Max Syrup Jar 100-Coin, Miracle Cheese and TNT Drumstick |
Second floor: In the second room of the right freezer. | _Blocks_14-16.png)
|
_Blocks_44-46.png)
|
Power Band + |
Second floor: In the scene two scenes east of the dining room, right of the upper part. | _Block_17.png)
|
_Block_47.png)
|
100-Coin Ultra Cheese |
Second floor: In the scene one scene down of the left kitchen (one scene left of the dining room), in the southwest. | _Block_18.png)
|
_Block_48.png)
|
| 2x 2 TNT Drumsticks |
Second floor: Same scene, right on the platform | _Block_19.png)
|
_Block_49.png)
|
50-Coin 3x 3 Fiery Drumsticks |
Second floor: In the scene with Fawful posters, between red and purple platforms. | _Block_20.png)
|
_Block_50.png)
|
Ultrasyrup Jar 3x 3 Super Cheeses |
Second floor: In the scene with red carpet and four pillars (one scene down of the dining room), in front of the left sofa. | _Block_21.png)
|
_Block_51.png)
|
50-Coin 100-Coin |
Second floor: In the scene between two spike-floor scenes, in the southwestern corner. | _Block_22.png)
|
_Block_52.png)
|
Economy Ring Lucky Ring DX |
Second floor: In the scene with three doors, behind the green door. | _Block_23.png)
|
_Block_53.png)
|
| 2x 2 TNT Drumsticks |
Second floor: Same scene, behind the blue door, to the left. | _Block_24.png)
|
_Block_54.png)
|
50-Coin |
Second floor: In the last scene of the second floor, under the left exit. | _Block_25.png)
|
_Block_55.png)
|
Supersyrup Jar 2x 2 Super Cheeses |
Second floor: In the scene to the right of the previous one. | _Block_26.png)
|
_Block_56.png)
|
Stamina Band |
Third floor: In the right part of the first scene, which is accessed by entering right exit in the previous scene. | _Block_27.png)
|
_Block_57.png)
|
100-Coin TNT Drumstick |
Third floor: In the scene one scene right of the scene with bomb dispensers, in the lower part. | _Block_28.png)
|
_Block_58.png)
|
50-Coin 3x 3 Fiery Drumsticks |
Third floor: In the scene three scenes right of the scene with bomb dispensers, near the entrance. | _Block_29.png)
|
_Block_59.png)
|
Restore Ring |
Third floor: Same scene, on the highest platform. | _Block_30.png)
|
_Block_60.png)
|
Star Candy Cheesy Drumstick |
Third floor: In the scene one scene right of the scene with bomb dispensers, in the upper part. | _Block_31.png)
|
_Block_61.png)
|
Max Syrup Jar Miracle Cheese |
Third floor: In the scene north of the scene two scenes right of the scene with bomb dispensers, at the end of the upper part. | _Block_32.png)
|
_Block_62.png)
|
| 3x 100-Coin (all 3) |
Third floor: In the scene two scenes left of the scene with bomb dispensers, at the end of the upper part. | _Blocks_33-35.png)
|
_Blocks_63-65.png)
|
Retry Clock 5x 5 Hot Drumsticks |
Third floor: In the scene north of the scene with bomb dispensers, in the northeastern corner. | _Block_36.png)
|
_Block_68.png)
|
50-Coin 100-Coin |
Third floor: In the scene north of the previous one, on the right. | _Block_37.png)
|
_Block_69.png)
|
100-Coin Ultra Cheese |
Third floor: In the scene right of the scene where Bowser can be launched on the roof. | _Block_38.png)
|
_Block_70.png)
|
100-Coin and TNT Drumstick |
Third floor: In the scene south of the right roof scene, in the northeast. | _Blocks_39-40.png)
|
_Blocks_71-72.png)
|
100-Coin |
Second floor: In the scene with stairs, in the northeastern corner. | _Block_41.png)
|
_Block_73.png)
|
| 3x 3 TNT Drumsticks and Ultrasyrup Jar 3x 3 TNT Drumsticks and Ultra Cheese |
First floor: In the first Bowser-only scene, in the southwestern corner. | _Blocks_42-43.png)
|
_Blocks_74-75.png)
|
Retry Clock Cheesy Drumstick |
NOTE: Following 20 blocks can be accessed only after completing Airway. First floor: In the scene with the entrance door, northwest of the upper-left pillar. |
_Block_44.png)
|
_Block_76.png)
|
Special Fangs X |
First floor: In the fountain scene, on the right platform. | _Block_45.png)
|
_Block_77.png)
|
50-Coin Miracle Cheese |
First floor: Same scene, in the northeastern corner. | _Block_46.png)
|
_Block_78.png)
|
100-Coin |
First floor: Same scene, in the northwestern corner. | _Block_47.png)
|
_Block_79.png)
|
100-Coin |
First floor: In the throne room, left of the left pillar. | _Block_48.png)
|
_Block_80.png)
|
Star Candy Cheesy Drumstick |
First floor: Same scene, in the northeastern corner. | _Block_49.png)
|
_Block_81.png)
|
Ultrasyrup Jar Ultra Cheese |
First floor: In the scene left of the throne room, in the southwestern corner. | _Block_50.png)
|
_Block_82.png)
|
Star Candy TNT Drumstick |
First floor: Same scene, in the northwestern corner. | _Block_51.png)
|
_Block_83.png)
|
100-Coin Cheesy Drumstick |
First floor: Same scene, in the northeastern corner. | _Block_52.png)
|
_Block_84.png)
|
100-Coin 2x 2 Cheesy Drumsticks |
First floor: In the conference room, left of the table. | _Block_53.png)
|
_Block_85.png)
|
Retry Clock 1-Up Deluxe |
First floor: In the scene with the entrance door, in the Bros. only section, near the exit. | _Block_54.png)
|
_Block_86.png)
|
Star Candy 5x 5 100-Coins |
First floor: In the second Bros. only scene, in the southwestern corner. | _Block_55.png)
|
_Block_87.png)
|
100-Coin 3x 3 Max Syrup Jars |
First floor: Same scene, in the middle, on the highest platform. | _Block_56.png)
|
_Block_88.png)
|
| 2x 2 Max Mushrooms 3x 3 Max Mushrooms |
First floor: In the third Bros. only scene, on the platform in the west part. | _Block_57.png)
|
_Block_89.png)
|
100-Coin 10x 10 100-Coins |
First floor: Same scene, above the previous one. | _Block_58.png)
|
_Block_90.png)
|
| 10x 10 50-Coins |
First floor: Same scene, in the east part, surrounded by large platform. | _Block_59.png)
|
_Block_91.png)
|
50-Coin and Max Nut |
First floor: In the fourth Bros. only scene (the one with fireplace), in the west part. | _Blocks_60-61.png)
|
_Blocks_92-93.png)
|
D-Star Wear Master Wear |
First floor: In the scene accessed by the fireplace in the previous scene, at the end. | _Block_62.png)
|
_Block_94.png)
|
Max Syrup Jar 2x 2 Star Candies |
First floor: In the third Bros. only scene, at the end of the large platform. | _Block_63.png)
|
_Block_95.png)
|
100-Coin and TNT Drumstick 3x 3 Refreshing Herbs and TNT Drumstick |
NOTE: Following 12 blocks are available only after defeating Super Peach's Castle of Fury in Peach's Castle Garden. Tower: In the first scene, in the southwest |
_Blocks_64-65.png)
|
_Blocks_96-97.png)
|
| 3x 3 Refreshing Herbs Miracle Cheese |
Tower: Same scene, in the middle-east. | _Block_66.png)
|
_Block_98.png)
|
Max Syrup Jar Cheesy Drumstick |
Tower: Same scene, in the northwest. | _Block_67.png)
|
_Block_99.png)
|
100-Coin 2x 2 TNT Drumsticks |
Tower: In the left corridor scene, on the first platform. | _Block_68.png)
|
_Block_100.png)
|
Star Candy Cheesy Drumstick |
Tower: In the left corridor scene, on the third platform. | _Block_69.png)
|
_Block_101.png)
|
100-Coin 2x 2 Miracle Cheeses |
Tower: In the right corridor scene, on the first platform. | _Block_70.png)
|
_Block_102.png)
|
Max Syrup Jar Cheesy Drumstick |
Tower: In the right corridor scene, on the third platform. | _Block_71.png)
|
_Block_103.png)
|
| 3x 3 TNT Drumsticks |
Tower: In the scene with the last Save Block, in the southeast. | _Block_72.png)
|
_Block_104.png)
|
100-Coin 2x 2 Ultra Cheeses |
Tower: Same scene, in the northwest, left of the Save Block. | _Block_73.png)
|
_Block_105.png)
|
Retry Clock and Star Candy Cheesy Drumstick and Miracle Cheese |
Tower: Same scene, on the path to the final boss. | _Blocks_74-75.png)
|
_Blocks_106-107.png)
|
Remake only[edit]
| Item | Location | Image |
|---|---|---|
| 3x 3 Super Cheeses |
Third floor: In the scene after the walking Bob-omb scene, in the northwestern corner. | _Block_66.png)
|
Cheesy Drumstick |
Third floor: Same scene, in the northeastern corner. | _Block_67.png)
|
Body Slam panel[edit]
| Item | Location | Image ( |
Image ( |
|---|---|---|---|
| 5x 5 Nuclear Drumsticks/5 Max Mushrooms/5 Max Nuts/5 Max Syrup Jars/5 Star Candies/5 1-Up Deluxes Boo Biscuit/100-Coin/TNT Drumstick/Miracle Cheese/Cheesy Drumstick/Refreshing Herb |
On the second floor, found in the second room of the left freezer. | 
|
.png)
|
Profiles[edit]
Prima Official Game Guide description[edit]
- "There is no known cure. An emergency meeting is called at Peach's Castle in the heart of the Mushroom Kingdom. Peach brings together her best counsel, including the wise Toadsworth, to come up with a plan to stop the Blorbs and rescue the afflicted Toads to their normal sizes. Peach requests the help of the Star Sprites to solve the Blorb problem, and the Star Sprites send one of their pluckiest to assist: Starlow. But Starlow isn't the only help Peach has summoned. The heroes of the Mushroom Kingdom are on their way, too." (Peach's Castle, first visit)
- "The second floor of Peach Castle's[sic] is strictly Bowser's domain. There are too many spikes is[sic] Fawful's new decorations for the Bros. to chase down the villain. Bowser rolls roughshod over the monsters that haunt the halls of the castle. He must collect three special keys to move on to the castle's third floor, but to get all of the keys, Bowser must fancy himself a pinball and try not to tilt." (Peach's Castle—2F)
- "Bowser finally reaches the third floor of Peach's Castle, closing in on Fawful. The third floor requires Bowser use his Spike Ball to further ascend the castle. What he doesn't count on, though, is learning that Fawful has a terribly fantastic green thumb. Fawful has raised a pair of giant Piranha Plants to guard the castle—and they are hungry." (Peach's Castle—3F)
- "Bowser has finally caught up with Fawful and Midbus. The diabolical duo have almost powered up the Dark Star with Princess Peach's energy. if Bowser doesn't stop them now, the Dark Star will come to life. Should Fawful harness the fury of the Dark Star, the whole kingdom teeters on doom." (Peach's Castle & Airway)
- "This is it. Only Bowser can finish off Dark Bowser. The Koopa King must ascend the tower of Peach's Castle and challenge the Dark Star's evil Bowser doppelganger to a duel. Dark Bowser will be a worthy opponent. He has taken all of Bowser's skills and powered them up with the fury of the Dark Star. But Bowser has a secret weapon, even if he doesn't know it. Waiting in Bowser's belly are Mario and Luigi, ready to take on the essence of the Dark Star itself. All Bowser needs to do is to separate it from Dark Bowser and let the heroes go to work on it." (Peach's Castle Tower)
Gallery[edit]
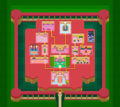
Peach's Castle (first floor)
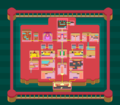
Peach's Castle (second floor)
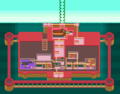
Peach's Castle (third floor)
Peach's Castle (tower)
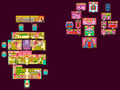
Peach's Castle Garden and Peach's Castle (first floor) map areas
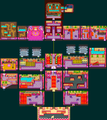
Peach's Castle (second floor) map areas
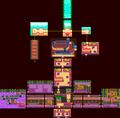
Peach's Castle (third floor) map areas

Peach's Castle (tower) map areas


%2BPeach%27sCastle(Garden).png)
.png)
.png)
Names in other languages[edit]
| Language | Name | Meaning | Note(s) | Ref. |
|---|---|---|---|---|
| Italian | Castello di Peach | Peach's Castle | [2] |
References[edit]
- ^ abcd9146 (December 30, 2009). Mario & Luigi: Bowser's Inside Story FAQ/Walkthrough. GameFAQs. Retrieved May 30, 2024.
- ^ «Castello di Peach» – Save file. Mario & Luigi: Viaggio al Centro di Bowser. Nintendo of Europe (Italian). Retrieved January 29, 2025.