Rattle Battle (Donkey Kong Country 2: Diddy's Kong Quest)
Template:Level Rattle Battle is the fourteenth level of Donkey Kong Country 2: Diddy's Kong Quest and Donkey Kong Land 2. It is also the fourth area of Krem Quay in Diddy's Kong Quest, as well as the ninth area of Krem Cauldron in Donkey Kong Land 2.
Taking place on the deck of Glimmer's Galleon, the Kongs discover an Animal Barrel here, containing Rattly the Rattlesnake, who must be played as throughout almost the whole level. Rattly's jumping skills prove useful here, as they are needed to cross large gaps and to reach highly-placed items. Kannons, Zingers and Flitters can be found here, as well as Kaboings, who populate most of the stage.
Level Layout
Donkey Kong Country 2
At the beginning of the level, the monkeys walk into a small room of the ship and turn into Rattly. When the rattlesnake gets back on deck, he travels east and defeats a few Kaboings hopping along. Two gaps are farther ahead, and the second gap is particularly large. Three Kaboings are also in Rattly's path near the abysses. He passes more enemies along the way, along with an additional abyss. There is a Zinger over this abyss, who can help Rattly get to the other side of bounced on. The rattlesnake can move on and defeat more Kaboings, then jump across a small gap following them. Another gap is right after this one, and it is too large to cross with a normal jump, unless the Zinger inside of it is bounced on; Rattly must use his super-jump ability to cross without assistance. After this obstacle is overcome, Rattly jumps on a pile of barrels and travels over another gap, with the aid of a Zinger, whom he can bounce on. The Star Barrel is on the other side of the gap.
Halfway through the level, Rattly can continue forward and avoid a Kannon shooting kannonballs at him. Then, the snake is able to jump across a small gap. A Zinger is between both sides of the abyss, whom he can jump on to reach the other end. More abysses are farther ahead for him to jump over, and some Kaboings after them as well. A Zinger is located in the center of a large abyss placed near the enemies, and it must be bounced off of to get across. More enemies can be found in the area after the gap, such as Kannons, Zingers, and Kaboings. A small gap is present on the rattlesnake's travels through here as well. Soon, Rattly comes up to a very big abyss, and it is way too big to cross with any of his jumps. The only way to cross is by using barrels shooting in the air, coming from a nearby Kannon. The Animal Buddy needs to use his special jump move to bounce high in the air, and then reach one of the barrels. On the other side of the gap, Rattly can keep going east across the ship and defeat a few more enemies, until he passes the No Animal Sign, which makes him turn back into the Kongs. Without the help of their Animal Buddy, the heroes need to continue forward, where they can find the End of Level Target.
Donkey Kong Land 2
From the start of the level, the heroes get into a Rattly Barrel and turn into the rattlesnake. Rattly begins by traveling east and pass a few enemies. Soon, he gets across an abyss, which can easily be crossed by a simple jump. There is another gap after this as well, and, althoug wide, has a Flitter in its center to help Rattly cross it. Another third abyss is located after this, and a Zinger waits in the center of it. Two more gaps are farther ahead, and piles of barrels scattered on the deck can help the snake cross it. Kaboings are placed in the areas after the gaps, and another gap is located after them with two Zingers in it. The Star Barrel is on the other side of this gap.
From the barrel, Rattly comes up to many enemies, including Kannons and Kaboings. Another few gaps can be reached on the way, and, although the first gap is quite small, the abyss following it is too large to get across with a normal jump; Rattly's super-jump move must be used to cross it. More gaps are farther ahead of here, and some of them have an insect enemy flying in them. The final gap has two Zingers inside of it, and they can be bounced on to allow the snake to get across more easily. A spring is at the other end of this final gap, and it leads out of the level.
Secrets
Donkey Kong Country 2
Bonus Level(s)
- At the very start of the level, the Kongs must jump in the air. They should land in an invisible barrel, which will shoot them to a higher part of the ship. The heroes can collect a Banana Coin and a Banana Bunch. They will also find a Bonus Barrel up here, but it is too high in the air to reach with a normal jump. The group need to use their Team-up move and toss a monkeys into it. Now in the Bonus Level, they must climb atop rows of barrels. The Kremkoin is on the top row.
- At some point of the level, the monkeys will find a bunch of Kaboings bouncing around near a small gap in the ship. They need to jump down in the gap and grab two bananas, then travel west into the ship. They will get in a hidden Bonus Barrel, leading to the Bonus Level. Here, Rattly must be used to bounce off of several Zingers over a large abyss. Once he hops across the gap, the Kremkoin will appear.
- Later in the level, Rattly and the Kongs should find a barrel with an arrow above it, pointing up. The rattlesnake needs to get on this barrel and use his special jump to fling high into the air, where he should land in a Bonus Barrel, leading to the Bonus Level. In this special stage, the snake must bounce on piles of barrel to collect stars in the air. Once he grabs them all, the Kremkoin will appear.
DK Coin
- At some point of the level, the heroes should see several barrels pile up on each other, with Kaboings bouncing on them. Rattly and the monkeys must approach the abyss near this part, and jump into the side of the ship, watching out for the Zinger above. They should get the DK Coin here, and then be shot out of the inside by a hidden barrel.
Golden Feather (GBA Only)
- About halfway through the level, the heroes will find the first Kannon. They need to pass him and jump across a large abyss, where they will spot a pile of two barrels. They must climb up these barrels, and grab the Golden Feather on top of it.
Photograph (GBA Only)
- Around the letter G, found on a large pile of barrels, the heroes will find several Kaboings. One of these enemies will have a Photograph over its head. The heroes must defeat this certain foe to get the photo. Once the photo is obtained, Diddy and Dixie will be given a picture to add in Wrinkly's Scrapbook.
Donkey Kong Land 2
Bonus Level(s)
- Around the beginning of the level, the heroes should find an arrangement of barrels, with three barrels on the bottom row, and two on the top. Rattly's special jump should be used to bounce high in the air to the left. If he jumped high enough, he should land in the Bonus Barrel, leading to the Bonus Level. Here, the rattlesnake needs to bounce off of several Zingers floating around. After he hop off of all of them all the way to the end of the stage, the Kremkoin will appear.
DK Coin
- At some point in the level, before the Star Barrel, Rattly should find a barrel with an arrow above it, pointing upwards. He needs to stand on that barrel, and then jump up in the air, where he might get the DK Coin.
Names in Other Languages
Gallery
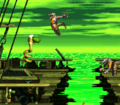
Rattly adventures through the level.
- Rattly's adventure 65.jpg
The beginning of the level.
