The Gauntlet: Difference between revisions
m (typo) |
No edit summary |
||
| (2 intermediate revisions by 2 users not shown) | |||
| Line 8: | Line 8: | ||
|width2=207 | |width2=207 | ||
}} | }} | ||
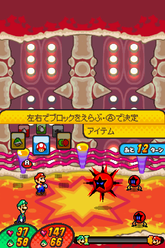
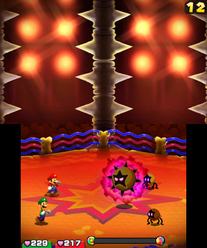
'''The Gauntlet''' is an area in the [[Challenge Node]] that appears in ''[[Mario & Luigi: Bowser's Inside Story]]'' and its | '''The Gauntlet''' is an area in the [[Challenge Node]] that appears in ''[[Mario & Luigi: Bowser's Inside Story]]'' and its [[Mario & Luigi: Bowser's Inside Story + Bowser Jr.'s Journey|Nintendo 3DS version]]. It is where [[Mario]] and [[Luigi]] can face harder versions of seven bosses whom they have battled over the course of the game; the [[Emoglobin]] near the entrance explains that they mined the Bros.' memories to create stronger versions of bosses previously encountered. All of the boss rematches are denoted with the letter "X" (e.g. [[Durmite X]] for [[Durmite]]), and use faster and more powerful variants of attacks from their base movesets. A similar area called the [[Battle Ring]] appears in ''[[Mario & Luigi: Dream Team]]'' and ''[[Mario & Luigi: Paper Jam]]''. | ||
For Mario and Luigi's battles, there are seven classes, with each representing one of the seven bosses that the Bros. fought previously; each class is only available once Mario and Luigi have defeated the respective boss, and costs a certain amount of [[coin]]s to fight, with the Emoglobin also giving a recommended level for Mario and Luigi to reach before trying a given class. The prices for each class steadily rises as more are unlocked; clearing a given class allows Mario and Luigi to play it again for free whenever they want, and saves a record of the fewest amount of turns spent. | For Mario and Luigi's battles, there are seven classes, with each representing one of the seven bosses that the Bros. fought previously; each class is only available once Mario and Luigi have defeated the respective boss, and costs a certain amount of [[coin]]s to fight, with the Emoglobin also giving a recommended level for Mario and Luigi to reach before trying a given class. The prices for each class steadily rises as more are unlocked; clearing a given class allows Mario and Luigi to play it again for free whenever they want, and saves a record of the fewest amount of turns spent. | ||
| Line 19: | Line 16: | ||
The seventh class is only unlocked when the other six are cleared, featuring a boss rush of all six previous classes and culminating with [[Bowser X]] as the seventh and final battle in the set. In the remake, defeating Bowser X also unlocks the songs "The Grand Finale", "Battle Time!" and "A Journey to Remember" in the [[List of Mario & Luigi: Bowser's Inside Story + Bowser Jr.'s Journey music|music player]]. | The seventh class is only unlocked when the other six are cleared, featuring a boss rush of all six previous classes and culminating with [[Bowser X]] as the seventh and final battle in the set. In the remake, defeating Bowser X also unlocks the songs "The Grand Finale", "Battle Time!" and "A Journey to Remember" in the [[List of Mario & Luigi: Bowser's Inside Story + Bowser Jr.'s Journey music|music player]]. | ||
The following Mario Bros. Bosses can be fought in The Gauntlet: | |||
{|class=wikitable style="text-align:center" | {|class=wikitable style="text-align:center" | ||
!Class!!Boss!!Accompanying enemies!!Coins required!!Recommended level!!Turn limit!!Prize (DS / 3DS) | !Image!!Class!!Boss!!Accompanying enemies!!Coins required!!Recommended level!!Turn limit!!Prize (DS / 3DS) | ||
|- | |- | ||
|Class 1||'''[[Durmite X]]'''||Straw X, [[Biffidus X]]||200||18+||5||1000 coins / 600 coins, Sequel Scarf | |[[File:Durmite X Artwork.png|100px]]||Class 1||'''[[Durmite X]]'''||Straw X, [[Biffidus X]]||200||18+||5||1000 coins / 600 coins, Sequel Scarf | ||
|- | |- | ||
|Class 2||'''[[Kretin X]]'''||||400||22+||15||2000 coins / 1200 coins, [[Advice Patch]] | |[[File:Alpha Kretin X Artwork.png|100px]]||Class 2||'''[[Kretin X]]'''||||400||22+||15||2000 coins / 1200 coins, [[Advice Patch]] | ||
|- | |- | ||
|Class 3||'''[[Wisdurm X]]'''||Magic Rod X||800||26+||18||4000 coins / 2400 coins, Speed Star | |[[File:Wisdurm X Artwork.png|100px]]||Class 3||'''[[Wisdurm X]]'''||Magic Rod X||800||26+||18||4000 coins / 2400 coins, Speed Star | ||
|- | |- | ||
|Class 4||'''[[Bowser Memory MLX]]'''||||1200||30+||10||6000 coins / 3600 coins, [[Badge#Mario & Luigi: Bowser's Inside Story / Mario & Luigi: Bowser's Inside Story + Bowser Jr.'s Journey|Expert Badge]] | |[[File:Bowser Memory MLX Artwork.png|100px]]||Class 4||'''[[Bowser Memory MLX]]'''||||1200||30+||10||6000 coins / 3600 coins, [[Badge#Mario & Luigi: Bowser's Inside Story / Mario & Luigi: Bowser's Inside Story + Bowser Jr.'s Journey|Expert Badge]] | ||
|- | |- | ||
|Class 5||'''[[Junker X]]'''||[[Junker Can X]]||1800||35+||15||9000 coins / 5400 coins, [[List of clothing in Mario & Luigi: Bowser's Inside Story#Challenge Medal|Challenge Medal]] | |[[File:Junker X Artwork.png|100px]]||Class 5||'''[[Junker X]]'''||[[Junker Can X]]||1800||35+||15||9000 coins / 5400 coins, [[List of clothing in Mario & Luigi: Bowser's Inside Story#Challenge Medal|Challenge Medal]] | ||
|- | |- | ||
|Class 6||'''[[Dark Star X]]'''||[[Dark Satellmite X]]||2500||40+||12||12500 coins / 7500 coins, Excellent Wear | |[[File:Dark Star X Artwork.png|100px]]||Class 6||'''[[Dark Star X]]'''||[[Dark Satellmite X]]||2500||40+||12||12500 coins / 7500 coins, Excellent Wear | ||
|- | |- | ||
|rowspan=2|Class 7*||colspan=2 rowspan=2|All of the previous classes plus '''[[Bowser X]]||rowspan=2|5000||50+ ([[Nintendo DS|DS]])||rowspan=2|35||rowspan=2|25000 coins / 15000 coins, Golden Shell | |rowspan=2|[[File:Bowser X Artwork.png|100px]] || rowspan=2|Class 7{{footnote|main|*}}||colspan=2 rowspan=2|All of the previous classes plus '''[[Bowser X]]||rowspan=2|5000||50+ ([[Nintendo DS|DS]])||rowspan=2|35||rowspan=2|25000 coins / 15000 coins, Golden Shell | ||
|- | |- | ||
|45+ ([[Nintendo 3DS|3DS]]) | |45+ ([[Nintendo 3DS|3DS]]) | ||
|} | |} | ||
{{footnote|note|*|Player must beat all previous classes in order to unlock.}} | |||
In ''Mario & Luigi: Bowser's Inside Story + Bowser Jr.'s Journey'', [[Super Bowser|Giant Bowser]]'s bosses can be refought here as well. They are faster and more powerful, and no mushrooms appear during the battles. They are, as follows: | |||
{|class=wikitable style="text-align:center" | {|class=wikitable style="text-align:center" | ||
!Class!!Boss!!Coins required!!Prize | !Image!!Class!!Boss!!Coins required!!Prize | ||
|- | |- | ||
|Class 1||'''[[Bowser's Castle]]'''||200||400 coins, Stamina Shell | |[[File:M&LBIS Bowser's Castle Artwork.png|100px]]||Class 1||'''[[Bowser's Castle]]'''||200||400 coins, Stamina Shell | ||
|- | |- | ||
|Class 2||'''[[Tower of Yikk]]'''||400||800 coins, Greedy Ring | |[[File:M&LBIS Tower of Yikk Artwork.png|100px]]||Class 2||'''[[Tower of Yikk]]'''||400||800 coins, Greedy Ring | ||
|- | |- | ||
|Class 3||'''[[Fawful Express]]'''||800||1600 coins, Gaudy Fangs | |[[File:M&LBIS Fawful Express Artwork.png|100px]]||Class 3||'''[[Fawful Express]]'''||800||1600 coins, Gaudy Fangs | ||
|- | |- | ||
|Class 4||'''[[Super Peach's Castle of Fury]]'''||1200||2400 coins, Breath Fangs | |[[File:M&LBIS Super Peach's Castle of Fury Artwork.png|100px]]||Class 4||'''[[Super Peach's Castle of Fury]]'''||1200||2400 coins, Breath Fangs | ||
|} | |} | ||
==Names in other languages== | ==Names in other languages== | ||
Latest revision as of 14:28, February 4, 2024
The Gauntlet is an area in the Challenge Node that appears in Mario & Luigi: Bowser's Inside Story and its Nintendo 3DS version. It is where Mario and Luigi can face harder versions of seven bosses whom they have battled over the course of the game; the Emoglobin near the entrance explains that they mined the Bros.' memories to create stronger versions of bosses previously encountered. All of the boss rematches are denoted with the letter "X" (e.g. Durmite X for Durmite), and use faster and more powerful variants of attacks from their base movesets. A similar area called the Battle Ring appears in Mario & Luigi: Dream Team and Mario & Luigi: Paper Jam.
For Mario and Luigi's battles, there are seven classes, with each representing one of the seven bosses that the Bros. fought previously; each class is only available once Mario and Luigi have defeated the respective boss, and costs a certain amount of coins to fight, with the Emoglobin also giving a recommended level for Mario and Luigi to reach before trying a given class. The prices for each class steadily rises as more are unlocked; clearing a given class allows Mario and Luigi to play it again for free whenever they want, and saves a record of the fewest amount of turns spent.
After selecting a class, the Emoglobin menu offers an opportunity for Mario and Luigi to review the battle's rules and switch their badges, even if the Bros. should enter this area before receiving them from Princess Lipid; switching badges will reset their in-battle meter. Upon starting the class, the Emoglobin either creates or transforms into the boss in question, and the battle begins. Each fight takes place in a boxing ring-like arena that can be seen in the background of the pre-battle menu. The battle must be cleared in a certain amount of the Bros.' turns, displayed both in the pre-battle menu and on the screen during battle; if this turn counter expires or both Mario and Luigi are KOed, they lose and are forced to try again. Defeating the boss rewards the Bros. with a coin payout equal to five times the starting price in the original; in the remake the payout is reduced to three times the price, but they are also rewarded with an additional item. A trophy of the boss is also displayed on the top screen in the class selection menu. The Giant bosses in the remake reward twice the amount of coins paid alongside gear for Bowser, and have no turn limits.
The seventh class is only unlocked when the other six are cleared, featuring a boss rush of all six previous classes and culminating with Bowser X as the seventh and final battle in the set. In the remake, defeating Bowser X also unlocks the songs "The Grand Finale", "Battle Time!" and "A Journey to Remember" in the music player.
The following Mario Bros. Bosses can be fought in The Gauntlet:
| Image | Class | Boss | Accompanying enemies | Coins required | Recommended level | Turn limit | Prize (DS / 3DS) |
|---|---|---|---|---|---|---|---|
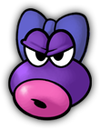 |
Class 1 | Durmite X | Straw X, Biffidus X | 200 | 18+ | 5 | 1000 coins / 600 coins, Sequel Scarf |
 |
Class 2 | Kretin X | 400 | 22+ | 15 | 2000 coins / 1200 coins, Advice Patch | |
 |
Class 3 | Wisdurm X | Magic Rod X | 800 | 26+ | 18 | 4000 coins / 2400 coins, Speed Star |
 |
Class 4 | Bowser Memory MLX | 1200 | 30+ | 10 | 6000 coins / 3600 coins, Expert Badge | |
 |
Class 5 | Junker X | Junker Can X | 1800 | 35+ | 15 | 9000 coins / 5400 coins, Challenge Medal |
 |
Class 6 | Dark Star X | Dark Satellmite X | 2500 | 40+ | 12 | 12500 coins / 7500 coins, Excellent Wear |
 |
Class 7* | All of the previous classes plus Bowser X | 5000 | 50+ (DS) | 35 | 25000 coins / 15000 coins, Golden Shell | |
| 45+ (3DS) | |||||||
* - Player must beat all previous classes in order to unlock.
In Mario & Luigi: Bowser's Inside Story + Bowser Jr.'s Journey, Giant Bowser's bosses can be refought here as well. They are faster and more powerful, and no mushrooms appear during the battles. They are, as follows:
| Image | Class | Boss | Coins required | Prize |
|---|---|---|---|---|
 |
Class 1 | Bowser's Castle | 200 | 400 coins, Stamina Shell |
 |
Class 2 | Tower of Yikk | 400 | 800 coins, Greedy Ring |
 |
Class 3 | Fawful Express | 800 | 1600 coins, Gaudy Fangs |
 |
Class 4 | Super Peach's Castle of Fury | 1200 | 2400 coins, Breath Fangs |
Names in other languages[edit]
| Language | Name | Meaning |
|---|---|---|
| Japanese | バトルコロシアム Batoru Koroshiamu |
Battle Colloseum |
| Italian | Arena |
Gauntlet |
| Korean | 배틀 콜로세움 Baeteul Koloseum |
Battle Colloseum |
| Spanish (NOA) | Guantelete |
Gauntlet |
| Spanish (NOE) | Coliseo Batalla |
Battle Colloseum |
