Slime Climb (Donkey Kong Country 2: Diddy's Kong Quest): Difference between revisions
mNo edit summary |
(This is getting very annoying. WHY the HELL is Mario Wiki so GOD DAMNED SLOW?) |
||
| Line 1: | Line 1: | ||
{{ | {{LevelboxDKL2 | ||
|title=Slime Climb | |title=Slime Climb | ||
|image=[[Image:Slime_Climb.png|300px]] | |image=[[Image:Slime_Climb.png|300px]] | ||
| Line 6: | Line 6: | ||
|game=''[[Donkey Kong Country 2: Diddy's Kong Quest]]'', ''[[Donkey Kong Land 2]]'' | |game=''[[Donkey Kong Country 2: Diddy's Kong Quest]]'', ''[[Donkey Kong Land 2]]'' | ||
|notes=This level involves the water-level rising, and is also the first stage to feature Snapjaws in ''Diddy's Kong Quest''. | |notes=This level involves the water-level rising, and is also the first stage to feature Snapjaws in ''Diddy's Kong Quest''. | ||
| | |before1=[[Rattle Battle|<<]] | ||
| | |after1=[[Bramble Blast|>>]] | ||
|before2=[[Rattle Battle|<<]] | |||
|after2=[[Hornet Hole|>>]] | |||
}} | }} | ||
'''Slime Climb''' is the fifteenth level of ''[[Donkey Kong Country 2: Diddy's Kong Quest]]'' and ''[[Donkey Kong Land 2]]''. It is the fifth area of [[Krem Quay]] in ''Diddy's Kong Quest'', as well as the tenth level of [[Krem Cauldron]] in ''Donkey Kong Land 2''. | '''Slime Climb''' is the fifteenth level of ''[[Donkey Kong Country 2: Diddy's Kong Quest]]'' and ''[[Donkey Kong Land 2]]''. It is the fifth area of [[Krem Quay]] in ''Diddy's Kong Quest'', as well as the tenth level of [[Krem Cauldron]] in ''Donkey Kong Land 2''. | ||
Revision as of 20:18, April 25, 2010
Template:LevelboxDKL2 Slime Climb is the fifteenth level of Donkey Kong Country 2: Diddy's Kong Quest and Donkey Kong Land 2. It is the fifth area of Krem Quay in Diddy's Kong Quest, as well as the tenth level of Krem Cauldron in Donkey Kong Land 2.
This is a unique rigging level, as the water continuously rises throughout it. The heroes cannot dawdle, as a Snapjaw lurks in the water, and must be avoided at all costs. If they happen to fall into the water, the enemy will very quickly dash up to them, and attack a monkey. In Donkey Kong Land 2, Snapjaws did not appear. However, the water can automatically hurt Diddy or Dixie if they touch it. This may make the level a bit trickier. Klomps, Klingers, Krunchas, Klobbers, Neeks, Click-Clacks, Flitters, Zingers, and a single Kannon, all are obstacles in the Kongs' path to the top.
Level Layout
Donkey Kong Country 2
At the start of the level, the heroes must travel east and jump across the ship's masts. There are a few Click-Clacks on the way to faze them. Soon, they will meet a dead end, where they will see ropes hanging from above. They need to climb up with these ropes, but quickly, as the water below is rising at a fast pace. When they reach the higher mast, the water will cease to rise, and the Kongs can now walk on west to the other side of the ship masts. On the way, there are some more Click-Clacks, but the biggest threat on the way is the mighty Kruncha, who can push the monkeys into the water, where a hungry Snapjaw waits. After these enemies are avoided, they must climb up the nearby ropes. The water will rise again, and this time, it won't stop right away. The Kongs must race up the ropes and jump across all the platforms to the right. They will turn west then, and hop up more platforms. At some point, the group will get to a platform with a Klomp on it, and the water will stop moving up. They should then get to the ropes after the last platform, and climb up. There are some Klingers sliding down these ropes, as well as a Zinger in Diddy and Dixie's path, so they need to be careful. The wate will also continue to rise here. The heroes will soon have to jump through the air onto more ropes, and climb up back to the masts, where the water will stop going up again. From there, they should move on east, where they will find the Star Barrel.
Now halfway through the level, the Kongs need to avoid the Kannon in their way and climb up more ropes. As usual, the water will rise again, and the heroes will have to act fast. After they climb up the long ropes, they need to move up across more ship masts, going west. Then, they must get up another rope and get to a higher mast. From there, the group will see a Flitter floating in the air. They should bounce off of it, and then grab onto more ropes, which have Klingers crawling about on them. The water will stop rising at this point. After this, they must go right and bounce off another Flitter, leading back onto the masts. The water will go up again here, and the heroes must climb up more ropes. This time, the water will rise a bit faster, and Zingers will be flying around as the Kongs jump rope-to-rope. A while after this, they must hop off of three Flitters in the air, and get back on the ropes. At the next mast, the monkeys must run east and climb up another set of ropes at the dead-end. Once they get up these ropes, the heroes need to hop up to the mast above them, and then jump west across several platforms. There are Klomps on these platforms, so they need to be cautious. They should soon reach another mast, and climb up the next ropes to the highest point of the level. Here, the water will no long rise, and the group should simply bounce off of two Flitters and land in a barrel. When they shoot out of it, they will hit the landing pad and be able to exit the level.
Donkey Kong Land 2
Starting from the beginning, the monkeys need to race east across the platforms and climb up the rope. The water is rising quickly, so there is no time to rest. Once at the next mast, they must dash west, avoiding a few Click-Clacks and a Kruncha. Then, they should move along another rope and hop off to the next rope nearby, where they need to climb up. Now at a higher part of the level, Diddy and Dixie must continue to run through, as the water is still rising at it's fast pace. They'll need to climb across more ropes as they travel upwards. There are several Zingers in their path on the way, and the foes can easily finish the Kongs. When the heroes get off the ropes, they must move across the mast and onto the next rope. As they move about on the ropes, they will have to pass many Zingers, a Klinger, and a Flitter, until they jump down back to a mast, where they need to continue west. Soon, they will have to get on some hooks and travel east to yet another rope. There, the group must climb across it and cling onto more hooks to get to the above platforms, where they will then go west again. Eventually, they will bounce off of a Flitter and reach the Star Barrel.
From here, the heroes must cling onto more ropes, As they climb across and jump rope-to-rope, there will be Klingers sliding by, who can knock a Kong into the dangerous water. Once the group manages to make it to the next mast, they should travel east and bounce off more Flitters to even more ropes. At this part of the level, they need to act very fast, because at this point, the water can be too far below. There are more Klingers on the way, and the monkeys need to maneuver around them. Soon, they will get back on a mast, and have to go west, defeating a few enemies, such as Click-Clacks. After that, they must get onto some hooks and hop to the next mast. Here, they will need to move west and cling on more hooks to, yet again, get to a higher mast, where they'll have to travel east. There are a few more enemies on the way, including two Krunchas, and a Kaboing. When the heroes reach the dead-end, they should jump up to the platform to the left, and move along. They will soon have to bounce off of a few more Flitters, and then cling onto another rope. Here, they need to go right and watch out for Zingers. Finally, the monkeys will get onto the next mast. There is a spring here, and it leads out of the level.
Secrets
Donkey Kong Country 2
Bonus Level(s)
- Near the Star Barrel, the heroes should see a Kannon standing on a mast. Next to him, is a ! Barrel. They need to defeat the foe, and break the barrel. It will grant them temporary invisibility. Therefore, they may go through the water without being attacked by the nasty Snapjaw. The Kongs must jump through the small gap nearby and swim through the water, following the path of bananas. Eventually, they should meet up with the Bonus Barrel, and be taken to it's Bonus Level. Here, the monkeys will collect stars by hopping off of some ropes floating in the air. When all the objects are collected, the Kremkoin will appear.
- Near the end of the level, the heroes should see a kannonball sitting along a mast. They must pick it up and hop across the nearby platforms. There are Klomps on these platforms to attack the monkeys, so they need to carefully maneuver around them, without dropping the ball. Soon, they will come up to a cannon, in which they must place the ball in. After this, they should walk into the cannon, and be lead to the Bonus Level. Here, the group needs to throw kannonballs at Flitters and Zingers, as they make their way up the stage. When the baddies are defeated, the Kremkoin will appear a the top of the Bonus Level.
DK Coin
When the Kong reach the highest mast at the end of the level, they should find a ! Barrel hidden in the corner of the screen. Using the Team Up move, they need to toss a monkey in the air and break the barrel, giving them temporary invisibility. After this, they must jump into the gap below the two Flitters and swim east, where they should be able to get the DK Coin.
Golden Feather (GBA Only)
Before te end of the level, the heroes must look to the left, where they should see a ! Barrel. With the Team Up move, they can reach it and be invisible for a short amount of time. Then, they must jump through the gap to the right and swim slightly west. They should find the Golden Feather right next to them.
Donkey Kong Land 2
Bonus Level(s)
- A while after the Star Barrel, the heroes will grab a ! Barrel and bounce off of a Flitter. Instead of landing on the mast, they should drop down under it and fall along a short path of bananas. Soon, they will land in the Bonus Barrel, leading to the Bonus Level. Here, the monkeys need to jump up several platforms, and then climb across a long rope. Then, they must drop down through the air and go across another rope. Eventually, they will reach the Kremkoin.
DK Coin
After that Star Barrel, the monkeys must climb along many ropes nearby. Before the next DK Barrel is passed, they should see a Flitter flying to the left of a rope. The group needs to bounce off this enemy, who is followed by another Flitter to bounce off of. Then, they will drop down onto a hidden mast, where the DK Coin is.
Gallery
- Snapjaw attack 65.png
The Kongs are attacked by a Snapjaw.
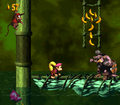
Dixie meets the only Kannon in the level.
