Hideout Helm: Difference between revisions
(→Diddy Kong: grammar) |
(added image) |
||
| Line 1: | Line 1: | ||
{{DK64World | {{DK64World | ||
|image=[[File: | |image=[[File:Hideout Helm start.png|250px]]<br>[[Tiny Kong]] in the start of Hideout Helm. | ||
|ent= 100 Golden Bananas | |ent= 100 Golden Bananas | ||
|boss= ''None | |boss= ''None | ||
| Line 45: | Line 44: | ||
==Battle Arena Pad== | ==Battle Arena Pad== | ||
Name: Shockwave Showdown | *Name: Shockwave Showdown | ||
Time: 90 Seconds | *Time: 90 Seconds | ||
Enemies: Kritter, Kasplat x2 (a third Kasplat appears towards the end) | *Enemies: Kritter, Kasplat x2 (a third Kasplat appears towards the end) | ||
Location: In the Blast-o-Matic room, use Diddy's Rocketbarrel Boost to fly to the top of the machine where the [[Battle Arena Pad]] is. | *Location: In the Blast-o-Matic room, use Diddy's Rocketbarrel Boost to fly to the top of the machine where the [[Battle Arena Pad]] is. | ||
==Enemies | ==Enemies== | ||
*[[Kritter]] | *[[Kritter]] | ||
*[[Klaptrap]] | *[[Klaptrap]] | ||
| Line 57: | Line 56: | ||
*[[Kosha]] (Bonus Level only) | *[[Kosha]] (Bonus Level only) | ||
*[[Mechanical Zinger]] (Bonus Level only) | *[[Mechanical Zinger]] (Bonus Level only) | ||
==Gallery== | |||
<gallery> | |||
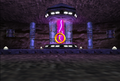
Hideout Helm generator.png|Full view of the Blast-o-Matic generator | |||
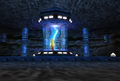
Hideout Helm control room.png|The control room of Hideout Helm | |||
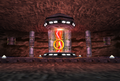
Hideout Helm reactor room 1.png|First reactor room | |||
Hideout Helm reactor room 2.png|Second reactor room | |||
Hideout Helm reactor room 3.png|Third reactor room | |||
Hideout Helm reactor room 4.png|Fourth reactor room | |||
Hideout Helm reactor room 5.png|Fifth reactor room | |||
</gallery> | |||
==Trivia== | ==Trivia== | ||
Revision as of 18:01, November 24, 2018
- “You must locate and deactivate the machine in the main cavern. Hurry, or you won't have an island to go back to!”
- —Snide, Donkey Kong 64
Hideout Helm is the eighth and final world of Donkey Kong 64. The world hub can be accessed after the Kongs unlock the sixth and seventh padlocks on K. Lumsy's cage. The Kongs must have a minimum of 100 Golden Bananas to enter the world itself.
Description
Hideout Helm functions as the control room of the Crocodile Isle. The Kongs' objective is to decommission the Blast-o-Matic before it fully charges, and King K. Rool fires it at Donkey Kong Island. The Kongs have a limited amount of time to meet this objective. The timer counts from ten minutes by default, but Snide can delay it from firing by a minute for each Blueprint the Kongs give to him. There are forty Blueprints in total, meaning that the countdown can begin from fifty minutes at highest. This timer even counts down during the Bonus Stages and the Battle Arena challenge.
Hideout Helm is unique from the previous worlds in that it has few collectibles. Its only collectibles are five Banana Medals and a Battle Arena Crown, the former of which replaces the Golden Bananas. The Kong Family shops and Snide's H.Q. are also absent.
Hideout Helm has the eighth and final Boss Key locked behind a door that the Kongs can only open with the Nintendo Coin and Rareware Coin. There is also a Banana Fairy inside the room, which can be captured even outside the room via the Banana Fairy's Camera.
Bonus Barrels
The world's Bonus Stages take place inside a steel drum with K. Rool's head instead of normal Bonus Barrels. Each Kong must complete two challenges, which deactivates their corresponding colored section of the Blast-o-Matic when completed. Each Kong receives a Banana Medal for completing their challenges.
This section is possibly inspired from Ocarina of Time, where Link must be assisted by Sages to deactivate each colored barrier of Ganon's Castle.
Donkey Kong
- Left Barrel: Jump into the Barrel Cannon and shoot Donkey Kong into three of the four targets in under 30 seconds.
- Right Barrel: Rambi must defeat 18 Kritters while avoiding the electrical pylons in under 30 seconds.
Chunky Kong
- Left Barrel: In a twenty second time limit, Chunky (as Hunky Chunky) must break open ? crates with his Primate Punch until he finds a lone Kritter, whom he must defeat.
- Right Barrel: From the podium, Chunky has fire at five Kritters in 30 seconds. The challenge is easier with homing missiles, because the Kritters tend to move around.
Tiny Kong
- Left Barrel: Tiny has to Ponytail Twirl through three DK stars. She is on top of metal boxes and cannot touch the ground, otherwise she loses. The third star is at an extreme angle. After she touches the stars, Tiny has to Simian Slam a switch.
- Right Barrel: Similar to the left barrel, Tiny must bounce off mushrooms and Ponytail Twirl through three DK stars. She also does not lose from touching the ground.
Lanky Kong
- Left Barrel: Within 25 seconds, he must use OrangSprint to quickly navigate through a maze, hit a switch, and cross the finish line. Lanky must also avoid some Klumps and Koshas.
- Right Barrel: Lanky must shoot down three Mechanical Zingers, who get defeated from three hits each. The homing ammo makes the challenge easier because the enemies move around fast.
Diddy Kong
- Left Barrel: There are a lot of Kritters in the room. Within 30 seconds, Diddy has to defeat the Kritter who activated the switch, and then press it. A sound effect plays if he defeats the right Kritter.
- Right Barrel: Within 45 seconds, Diddy must use Rocketbarrel Boost to go up and fire at four up-arrow switches. Then he must go down, avoid Koshas, and Simian Slam on the blue switch.
Battle Arena Pad
- Name: Shockwave Showdown
- Time: 90 Seconds
- Enemies: Kritter, Kasplat x2 (a third Kasplat appears towards the end)
- Location: In the Blast-o-Matic room, use Diddy's Rocketbarrel Boost to fly to the top of the machine where the Battle Arena Pad is.
Enemies
- Kritter
- Klaptrap
- Klump
- Kasplat (Battle Arena only)
- Kosha (Bonus Level only)
- Mechanical Zinger (Bonus Level only)
Gallery
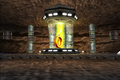
Full view of the Blast-o-Matic generator
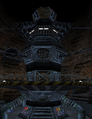
The control room of Hideout Helm
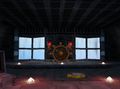
First reactor room
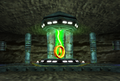
Second reactor room
Third reactor room
Fourth reactor room
Fifth reactor room


Trivia
- As the countdown grows closer to zero, K. Rool's laughter sounds out more frequently. It sounds out at the 30 minute mark, the 20 minute mark, the 15 minute mark, the 10 minute mark, the 5 minute mark, and every minute mark past 3 minutes.
- For some reason, in the bridge, there is a monitor with an image of the moon displayed on its screen. What the Kremlings planned on doing to it is unknown.
- This is the only level in Donkey Kong 64 in which a Kasplat doesn't appear (excluding its appearance in the Battle Arena as well as the Kasplat that K. Rool sicced one of his giant Klaptraps on in a prior cutscene).
- There is a major glitch in Hideout Helm. If the player deactivates the Blast-o-Matic and leaves the world without collecting the Banana Medals, they will not appear again upon re-entering, thus making it impossible to get 101% completion.
- This is the only level where the Wrinkly Kong doors in the lobby do not appear.
- The main theme for the level was originally composed as part of Mayahem Temple while it was going to be a level in Banjo-Kazooie, also while it was known as Project Dream.
Names in other languages
| Language | Name | Meaning |
|---|---|---|
| Japanese | ハイドアウト Haidoauto |
Hideout |
| French | Planque-Panique |
|
| German | K.Rools Kommandantur |
K. Rool's Commander's Office |
| Spanish | Escondite Extremo |
Extreme Hideout |