
Not-Bottomless Hole: Difference between revisions
mNo edit summary |
m (→Green Streamer: "yellow streamer area" -> "green streamer area") |
||
| (15 intermediate revisions by 4 users not shown) | |||
| Line 1: | Line 1: | ||
{{ | {{italic title|Not-Bottomless Hole}} | ||
[[File: | [[File:Not-Bottomless Hole Warning.png|thumb|320px|[[Olivia]] warns [[Mario]] before he falls into the Not-Bottomless Hole.]] | ||
{{Quote|Do you see that huge hole in the ground? I don't think you'd like falling into it! Maybe there's a way to fix it... But how? Hmm...|Olivia|Paper Mario: The Origami King}} | {{Quote|Do you see that huge hole in the ground? I don't think you'd like falling into it! Maybe there's a way to fix it... But how? Hmm...|Olivia|Paper Mario: The Origami King}} | ||
'''Not-Bottomless Holes''' are types of terrain found in almost every area in ''[[Paper Mario: The Origami King]]'', mainly caused by [[Paper Macho Soldier]]s. They can be filled up by using [[confetti]], with the amount needed to fix them depending on their size. If [[Mario]] falls into one, he loses seven [[Heart Point|HP]]. Not-Bottomless Holes work similarly to [[colorless spot]]s from ''[[Paper Mario: Color Splash]]'' | '''Not-Bottomless Holes''' are types of terrain found in almost every area in ''[[Paper Mario: The Origami King]]'', mainly caused by [[Paper Macho Soldier]]s. They can be filled up by using [[confetti]], with the amount needed to fix them depending on their size. If [[Mario]] falls into one, he loses seven [[Heart Point|HP]]. Not-Bottomless Holes work similarly to [[colorless spot]]s from ''[[Paper Mario: Color Splash]]''; completely filling a hole with confetti causes the hole to turn back to normal, usually rewarding the player with several [[coin]]s. Filling in all of the Not-Bottomless Holes in a given area will show a message informing the player that all of the holes in the area have been repaired, and the music for that area will be unlocked within the [[Musée_Champignon#Sound_Gallery|Musée Champignon Sound Gallery]]. This page lists the locations of all '''349''' Not-Bottomless Holes, including pictures and information on where exactly they are. | ||
'''NOTES''': | |||
:*Some holes are found in areas that are inaccessible until returning later; these entries are highlighted in beige. | |||
{| | :*Locations absent from the list contain no Not-Bottomless Holes, specifically: [[Big Sho' Theater]], [[Breezy Tunnel]], [[Scorching Sandpaper Minor]], [[The Great Sea]], [[Mushroom Island]], [[Hammer Island]], [[Scuffle Island]], [[Diamond Island]], [[Hotfoot Crater]], [[Peach's Castle]], and [[Origami Castle]]. | ||
! | |||
==Red Streamer== | |||
<!--Image maps created by [[User:Eldritchdraaks/sandbox#PMTOK_Maps|Eldritchdraaks]] and modified for the purposes of this page--> | |||
<imagemap> | |||
File:PMTOK Red Streamer Map.png|400px|thumb|Click an area to see the Not-Botttomless Holes found there. | |||
rect 33 388 222 414 [[#Whispering Woods|Whispering Woods]] | |||
circle 128 370 16 [[#Whispering Woods|Whispering Woods]] | |||
rect 45 258 167 279 [[#Toad Town|Toad Town]] | |||
circle 181 248 16 [[#Toad Town|Toad Town]] | |||
rect 3 92 233 112 [[#Graffiti Underground|Graffiti Underground]] | |||
circle 69 176 16 [[#Graffiti Underground|Graffiti Underground]] | |||
circle 65 150 25 [[#Graffiti Underground|Graffiti Underground]] | |||
rect 385 282 523 305 [[#Picnic Road|Picnic Road]] | |||
circle 368 307 16 [[#Picnic Road|Picnic Road]] | |||
rect 243 211 443 232 [[#Overlook Mountain|Overlook Mountain]] | |||
circle 445 195 16 [[#Overlook Mountain|Overlook Mountain]] | |||
rect 332 406 565 428 [[#EV Temple|Earth Vellumental Temple]] | |||
circle 447 376 16 [[#EV Temple|Earth Vellumental Temple]] | |||
rect 248 27 429 49 [[#Overlook Tower|Overlook Tower]] | |||
circle 449 90 16 [[#Overlook Tower|Overlook Tower]] | |||
rect 430 0 468 88 [[#Overlook Tower|Overlook Tower]] | |||
</imagemap><noinclude><!--[[Category:Image map templates]]--></noinclude> | |||
There are a total of 96 Not-Bottomless Holes to fill in the red streamer area: | |||
*[[Whispering Woods]] have '''25 Holes''' | |||
*[[Graffiti Underground]] has '''16 Holes''' | |||
*[[Toad_Town#Paper_Mario:_The_Origami_King|Toad Town]] has '''5 Holes''' | |||
*[[Picnic Road]] has '''17 Holes''' | |||
*[[Overlook Mountain]] has '''19 Holes''' | |||
*[[Earth Vellumental Temple]] has '''11 Holes''' | |||
*[[Overlook Tower]] has '''3 Holes''' | |||
{| style="text-align: center; width: 95%; margin: 0 auto; border: #d09091; border-collapse: collapse;" border="1" cellpadding="4" cellspacing="1" | |||
|-style="background: #CB4C57;font-size:14pt;color:white" | |||
!Description | |||
!width="25%"|Image | |||
|-style="background: #d09091;font-size:120%;color:#202122" id="Whispering Woods" | |||
|colspan=3|'''[[Whispering Woods|{{color|Whispering Woods|#202122}}]] ­ ­ ­ ­|­ ­ ­ ­ 25 Holes''' | |||
|- | |- | ||
|On the path south of where Mario falls after getting out of the tree at the start of Whispering Woods. The first Not-Bottomless Hole in the game and is required to save Olivia. | |On the path south of where Mario falls after getting out of the tree at the start of Whispering Woods. The first Not-Bottomless Hole in the game and is required to save Olivia. | ||
|[[File:PMTOK Whispering Woods Not-Bottomless Hole 1.jpg| | |[[File:PMTOK Whispering Woods Not-Bottomless Hole 1.jpg|360px]] | ||
|- | |- | ||
|Near the first [[Save Block]], in the second area of Whispering Woods. | |Near the first [[Save Block]], in the second area of Whispering Woods. | ||
|[[File:PMTOK Whispering Woods Not-Bottomless Hole 2.jpg| | |[[File:PMTOK Whispering Woods Not-Bottomless Hole 2.jpg|360px]] | ||
|- | |- | ||
|In the dark area, to the left of a tree that is to the left of a spike trap. | |In the dark area, to the left of a tree that is to the left of a spike trap. | ||
|[[File:PMTOK Whispering Woods Not-Bottomless Hole 3.jpg| | |[[File:PMTOK Whispering Woods Not-Bottomless Hole 3.jpg|360px]] | ||
|- | |- | ||
|In front of the spike trap mentioned above. | |In front of the spike trap mentioned above. | ||
|[[File:PMTOK Whispering Woods Not-Bottomless Hole 4.jpg| | |[[File:PMTOK Whispering Woods Not-Bottomless Hole 4.jpg|360px]] | ||
|- | |- | ||
|Behind the spike trap mentioned above, below a ? Block. | |Behind the spike trap mentioned above, below a ? Block. | ||
|[[File:PMTOK Whispering Woods Not-Bottomless Hole 5.png| | |[[File:PMTOK Whispering Woods Not-Bottomless Hole 5.png|360px]] | ||
|- | |- | ||
|On the left of the declining path south of the spike trap mentioned above. | |On the left of the declining path south of the spike trap mentioned above. | ||
|[[File:PMTOK Whispering Woods Not-Bottomless Hole 6.jpg| | |[[File:PMTOK Whispering Woods Not-Bottomless Hole 6.jpg|360px]] | ||
|- | |- | ||
|To the right of the next spike trap after the decline. | |To the right of the next spike trap after the decline. | ||
|[[File:PMTOK Whispering Woods Not-Bottomless Hole 7.jpg| | |[[File:PMTOK Whispering Woods Not-Bottomless Hole 7.jpg|360px]] | ||
|- | |- | ||
|On the side of a small cliff, to the left of the trees with vines. | |On the side of a small cliff, to the left of the trees with vines. | ||
|[[File:PMTOK Whispering Woods Not-Bottomless Hole 8.jpg| | |[[File:PMTOK Whispering Woods Not-Bottomless Hole 8.jpg|360px]] | ||
|- | |- | ||
|Under the vine in the bottom-right of the area. | |Under the vine in the bottom-right of the area. | ||
|[[File:PMTOK Whispering Woods Not-Bottomless Hole 9.jpg| | |[[File:PMTOK Whispering Woods Not-Bottomless Hole 9.jpg|360px]] | ||
|- | |- | ||
|South of the golden ball, right on the ledge. | |South of the golden ball, right on the ledge. | ||
|[[File:PMTOK Whispering Woods Not-Bottomless Hole 10.jpg| | |[[File:PMTOK Whispering Woods Not-Bottomless Hole 10.jpg|360px]] | ||
|- | |- | ||
|On a path north-east of the golden ball, before entering the area where Ol' Grandsappy can be found. | |On a path north-east of the golden ball, before entering the area where Ol' Grandsappy can be found. | ||
|[[File:PMTOK Whispering Woods Not-Bottomless Hole 11.png| | |[[File:PMTOK Whispering Woods Not-Bottomless Hole 11.png|360px]] | ||
|- | |- | ||
|Near the save block on the way to the spring. | |Near the save block on the way to the spring. | ||
|[[File:PMTOK Whispering Woods Not-Bottomless Hole 12.jpg| | |[[File:PMTOK Whispering Woods Not-Bottomless Hole 12.jpg|360px]] | ||
|- | |- | ||
|On the left of the declining path, directly after the hole above. | |On the left of the declining path, directly after the hole above. | ||
|[[File:PMTOK Whispering Woods Not-Bottomless Hole 13.png| | |[[File:PMTOK Whispering Woods Not-Bottomless Hole 13.png|360px]] | ||
|- | |- | ||
|Blocking the path towards the spring. | |Blocking the path towards the spring. | ||
|[[File:PMTOK Whispering Woods Not-Bottomless Hole 14.jpg| | |[[File:PMTOK Whispering Woods Not-Bottomless Hole 14.jpg|360px]] | ||
|- | |- | ||
|To the left of the tree after the small drop, in front of the spring. | |To the left of the tree after the small drop, in front of the spring. | ||
|[[File:PMTOK Whispering Woods Not-Bottomless Hole 15.png| | |[[File:PMTOK Whispering Woods Not-Bottomless Hole 15.png|360px]] | ||
|- | |- | ||
|South-west of the above hole, left of an origami Goomba that was hiding in a bush. | |South-west of the above hole, left of an origami Goomba that was hiding in a bush. | ||
|[[File:PMTOK Whispering Woods Not-Bottomless Hole 16.png| | |[[File:PMTOK Whispering Woods Not-Bottomless Hole 16.png|360px]] | ||
|- | |- | ||
|Can be found by going left past the platform used to throw items into the spring. | |Can be found by going left past the platform used to throw items into the spring. | ||
|[[File:PMTOK Whispering Woods Not-Bottomless Hole 17.png| | |[[File:PMTOK Whispering Woods Not-Bottomless Hole 17.png|360px]] | ||
|- | |- | ||
|To the right of the tree that is to the right of the spring. | |To the right of the tree that is to the right of the spring. | ||
|[[File:PMTOK Whispering Woods Not-Bottomless Hole 18.png| | |[[File:PMTOK Whispering Woods Not-Bottomless Hole 18.png|360px]] | ||
|- | |- | ||
|On Ol' Grandsappy. | |On Ol' Grandsappy. | ||
|[[File:PMTOK Whispering Woods Not-Bottomless Hole 19.png| | |[[File:PMTOK Whispering Woods Not-Bottomless Hole 19.png|360px]] | ||
|- | |- | ||
|On the path after knocking over the white fence. | |On the path after knocking over the white fence. | ||
|[[File:PMTOK Whispering Woods Not-Bottomless Hole 20.png| | |[[File:PMTOK Whispering Woods Not-Bottomless Hole 20.png|360px]] | ||
|- | |- | ||
|In front of the zipped-up tent that is on the left of the path. | |In front of the zipped-up tent that is on the left of the path. | ||
|[[File:PMTOK Whispering Woods Not-Bottomless Hole 21.png| | |[[File:PMTOK Whispering Woods Not-Bottomless Hole 21.png|360px]] | ||
|- | |- | ||
|Behind the path just before crossing the bridge. | |Behind the path just before crossing the bridge. | ||
|[[File:PMTOK Whispering Woods Not-Bottomless Hole 22.jpg| | |[[File:PMTOK Whispering Woods Not-Bottomless Hole 22.jpg|360px]] | ||
|- | |- | ||
|In between the bench and the undercover picnic tables. | |In between the bench and the undercover picnic tables. | ||
|[[File:PMTOK Whispering Woods Not-Bottomless Hole 23.png| | |[[File:PMTOK Whispering Woods Not-Bottomless Hole 23.png|360px]] | ||
|- | |- | ||
|In front of the second picnic table. | |In front of the second picnic table. | ||
|[[File:PMTOK Whispering Woods Not-Bottomless Hole 24.png| | |[[File:PMTOK Whispering Woods Not-Bottomless Hole 24.png|360px]] | ||
|- | |- | ||
|To the right of the log cabin. | |To the right of the log cabin. | ||
|[[File:PMTOK Whispering Woods Not-Bottomless Hole 25.png| | |[[File:PMTOK Whispering Woods Not-Bottomless Hole 25.png|360px]] | ||
| | |-style="background: #d09091;font-size:120%;color:#202122" id="Toad Town" | ||
|colspan=3|'''[[Toad Town|{{color|Toad Town|#202122}}]] ­ ­ ­ ­|­ ­ ­ ­ 16 Holes''' | |||
|- | |- | ||
|Immediately seen at the start of the Toad Town area. | |Immediately seen at the start of the Toad Town area. | ||
|[[File:PMTOK Toad Town Not-Bottomless Hole 1.png| | |[[File:PMTOK Toad Town Not-Bottomless Hole 1.png|360px]] | ||
|- | |- | ||
|On the path after defeating Origami Goombas. | |On the path after defeating Origami Goombas. | ||
|[[File:PMTOK Toad Town Not-Bottomless Hole 2.png| | |[[File:PMTOK Toad Town Not-Bottomless Hole 2.png|360px]] | ||
|- | |- | ||
|After the path starts heading downwards, multiple ledges are seen. Hole is on the highest ledge under the ? Block. | |After the path starts heading downwards, multiple ledges are seen. Hole is on the highest ledge under the ? Block. | ||
|[[File:PMTOK Toad Town Not-Bottomless Hole 3.png| | |[[File:PMTOK Toad Town Not-Bottomless Hole 3.png|360px]] | ||
|- | |- | ||
|In the wall after the ledges. | |In the wall after the ledges. | ||
|[[File:PMTOK Toad Town Not-Bottomless Hole 4.png| | |[[File:PMTOK Toad Town Not-Bottomless Hole 4.png|360px]] | ||
|- | |- | ||
|Left of the entrance to Toad Town. | |Left of the entrance to Toad Town. | ||
|[[File:PMTOK Toad Town Not-Bottomless Hole 5.png| | |[[File:PMTOK Toad Town Not-Bottomless Hole 5.png|360px]] | ||
|- | |- | ||
|In front of the Battle Lab. | |In front of the Battle Lab. | ||
|[[File:PMTOK Toad Town Not-Bottomless Hole 6.png| | |[[File:PMTOK Toad Town Not-Bottomless Hole 6.png|360px]] | ||
|- | |- | ||
|On the house which was being eaten by Paper Macho Goomba. | |On the house which was being eaten by Paper Macho Goomba. | ||
|[[File:PMTOK Toad Town Not-Bottomless Hole 7.png| | |[[File:PMTOK Toad Town Not-Bottomless Hole 7.png|360px]] | ||
|- | |- | ||
|On the door of the red brick house next to the harbor. | |On the door of the red brick house next to the harbor. | ||
|[[File:PMTOK Toad Town Not-Bottomless Hole 8.png| | |[[File:PMTOK Toad Town Not-Bottomless Hole 8.png|360px]] | ||
|- | |- | ||
|On the ground between the fountain and red brick house. | |On the ground between the fountain and red brick house. | ||
|[[File:PMTOK Toad Town Not-Bottomless Hole 9.png| | |[[File:PMTOK Toad Town Not-Bottomless Hole 9.png|360px]] | ||
|- | |- | ||
|In front of the mansion's entrance. | |In front of the mansion's entrance. | ||
|[[File:PMTOK Toad Town Not-Bottomless Hole 10.png| | |[[File:PMTOK Toad Town Not-Bottomless Hole 10.png|360px]] | ||
|- | |- | ||
|Under the mansion's scafolding. | |Under the mansion's scafolding. | ||
|[[File:PMTOK Toad Town Not-Bottomless Hole 11.png| | |[[File:PMTOK Toad Town Not-Bottomless Hole 11.png|360px]] | ||
|- | |- | ||
|On the bottom floor of the mansion. | |On the bottom floor of the mansion. | ||
|[[File:PMTOK Toad Town Not-Bottomless Hole 12.png| | |[[File:PMTOK Toad Town Not-Bottomless Hole 12.png|360px]] | ||
|- | |- | ||
|In front of the stairs south of the house with Graffiti Underground entrance. | |In front of the stairs south of the house with Graffiti Underground entrance. | ||
|[[File:PMTOK Toad Town Not-Bottomless Hole 13.png| | |[[File:PMTOK Toad Town Not-Bottomless Hole 13.png|360px]] | ||
|- | |- | ||
|On the house reached by the stairs opposite the house with captive Red Shy Guy. | |On the house reached by the stairs opposite the house with captive Red Shy Guy. | ||
|[[File:PMTOK Toad Town Not-Bottomless Hole 14.png| | |[[File:PMTOK Toad Town Not-Bottomless Hole 14.png|360px]] | ||
|- | |- | ||
|On the door of the house with the captive Red Shy Guy. | |On the door of the house with the captive Red Shy Guy. | ||
|[[File:PMTOK Toad Town Not-Bottomless Hole 15.png| | |[[File:PMTOK Toad Town Not-Bottomless Hole 15.png|360px]] | ||
|- | |- | ||
|On the ground in the Fun, Funky, Functional Accessories Shop | |-style="background:beige" | ||
|[[File:PMTOK Toad Town Not-Bottomless Hole 16.png| | |''Required'': ''Rescue the owner of the shop in [[Picnic Road]].''<br><br>On the ground in the Fun, Funky, Functional Accessories Shop. | ||
| | |[[File:PMTOK Toad Town Not-Bottomless Hole 16.png|360px]] | ||
|-style="background: #d09091;font-size:120%;color:#202122" id="Graffiti Underground" | |||
|colspan=3|'''[[Graffiti Underground|{{color|Graffiti Underground|#202122}}]] ­ ­ ­ ­|­ ­ ­ ­ 5 Holes''' | |||
|- | |- | ||
|After turning on the light in the first area, the hole is seen left of the ladder. | |After turning on the light in the first area, the hole is seen left of the ladder. | ||
|[[File:PMTOK Graffiti Underground Not-Bottomless Hole 1.png| | |[[File:PMTOK Graffiti Underground Not-Bottomless Hole 1.png|360px]] | ||
|- | |- | ||
|Left of the stairs in the second area. | |Left of the stairs in the second area. | ||
|[[File:PMTOK Graffiti Underground Not-Bottomless Hole 2.png| | |[[File:PMTOK Graffiti Underground Not-Bottomless Hole 2.png|360px]] | ||
|- | |- | ||
|Left of the handrail in the drainage pipe area. | |Left of the handrail in the drainage pipe area. | ||
|[[File:PMTOK Graffiti Underground Not-Bottomless Hole 3.png| | |[[File:PMTOK Graffiti Underground Not-Bottomless Hole 3.png|360px]] | ||
|- | |- | ||
|On the wall above the drainage pipe. | |On the wall above the drainage pipe. | ||
|[[File:PMTOK Graffiti Underground Not-Bottomless Hole 4.png| | |[[File:PMTOK Graffiti Underground Not-Bottomless Hole 4.png|360px]] | ||
|- | |- | ||
|At the very end of the last area on the wall. | |At the very end of the last area on the wall. | ||
|[[File:PMTOK Graffiti Underground Not-Bottomless Hole 5.png| | |[[File:PMTOK Graffiti Underground Not-Bottomless Hole 5.png|360px]] | ||
| | |-style="background: #d09091;font-size:120%;color:#202122" id="Picnic Road" | ||
|colspan=3|'''[[Picnic Road|{{color|Picnic Road|#202122}}]] ­ ­ ­ ­|­ ­ ­ ­ 17 Holes''' | |||
|- | |- | ||
|Immediately seen on the left after entering the Picnic Road area. | |Immediately seen on the left after entering the Picnic Road area. | ||
|[[File:PMTOK Picnic Road Not-Bottomless Hole 1.png| | |[[File:PMTOK Picnic Road Not-Bottomless Hole 1.png|360px]] | ||
|- | |- | ||
|Also immediately seen, this time on the wall next to the path. | |Also immediately seen, this time on the wall next to the path. | ||
|[[File:PMTOK Picnic Road Not-Bottomless Hole 2.png| | |[[File:PMTOK Picnic Road Not-Bottomless Hole 2.png|360px]] | ||
|- | |- | ||
|In front of the white fence | |In front of the white fence | ||
|[[File:PMTOK Picnic Road Not-Bottomless Hole 3.png| | |[[File:PMTOK Picnic Road Not-Bottomless Hole 3.png|360px]] | ||
|- | |- | ||
|Above the previous one, left of of the path. | |Above the previous one, left of of the path. | ||
|[[File:PMTOK Picnic Road Not-Bottomless Hole 4.png| | |[[File:PMTOK Picnic Road Not-Bottomless Hole 4.png|360px]] | ||
|- | |- | ||
|On the path, next to a hole with ? Block above it. | |On the path, next to a hole with ? Block above it. | ||
|[[File:PMTOK Picnic Road Not-Bottomless Hole 5.png| | |[[File:PMTOK Picnic Road Not-Bottomless Hole 5.png|360px]] | ||
|- | |- | ||
|Right of the path and under the ? Block. | |Right of the path and under the ? Block. | ||
|[[File:PMTOK Picnic Road Not-Bottomless Hole 6.png| | |[[File:PMTOK Picnic Road Not-Bottomless Hole 6.png|360px]] | ||
|- | |- | ||
|In front of a tree with hedge fence next to it. | |In front of a tree with hedge fence next to it. | ||
|[[File:PMTOK Picnic Road Not-Bottomless Hole 7.png| | |[[File:PMTOK Picnic Road Not-Bottomless Hole 7.png|360px]] | ||
|- | |- | ||
|On the path in front of the Sensor Lab. | |On the path in front of the Sensor Lab. | ||
|[[File:PMTOK Picnic Road Not-Bottomless Hole 8.png| | |[[File:PMTOK Picnic Road Not-Bottomless Hole 8.png|360px]] | ||
|- | |- | ||
|Right of the previous one. | |Right of the previous one. | ||
|[[File:PMTOK Picnic Road Not-Bottomless Hole 9.png| | |[[File:PMTOK Picnic Road Not-Bottomless Hole 9.png|360px]] | ||
|- | |- | ||
|Under the Red Toad butterfly, seen right of the Sensor Lab. | |Under the Red Toad butterfly, seen right of the Sensor Lab. | ||
|[[File:PMTOK Picnic Road Not-Bottomless Hole 10.png| | |[[File:PMTOK Picnic Road Not-Bottomless Hole 10.png|360px]] | ||
|- | |- | ||
|South of the goal pole. | |South of the goal pole. | ||
|[[File:PMTOK Picnic Road Not-Bottomless Hole 11.png| | |[[File:PMTOK Picnic Road Not-Bottomless Hole 11.png|360px]] | ||
|- | |- | ||
|South of the highest ? Block in the area. | |South of the highest ? Block in the area. | ||
|[[File:PMTOK Picnic Road Not-Bottomless Hole 12.png| | |[[File:PMTOK Picnic Road Not-Bottomless Hole 12.png|360px]] | ||
|- | |- | ||
|Under the previous one, next to a tree. | |Under the previous one, next to a tree. | ||
|[[File:PMTOK Picnic Road Not-Bottomless Hole 13.png| | |[[File:PMTOK Picnic Road Not-Bottomless Hole 13.png|360px]] | ||
|- | |- | ||
|On the wall, right of the small lake. | |On the wall, right of the small lake. | ||
|[[File:PMTOK Picnic Road Not-Bottomless Hole 14.png| | |[[File:PMTOK Picnic Road Not-Bottomless Hole 14.png|360px]] | ||
|- | |- | ||
|Also on the wall, above the stairs leading to Earth Vellumental Temple entrance. | |Also on the wall, above the stairs leading to Earth Vellumental Temple entrance. | ||
|[[File:PMTOK Picnic Road Not-Bottomless Hole 15.png| | |[[File:PMTOK Picnic Road Not-Bottomless Hole 15.png|360px]] | ||
|- | |- | ||
|In the corner after going down the first set of stairs leading to Earth Vellumental Temple entrance. | |In the corner after going down the first set of stairs leading to Earth Vellumental Temple entrance. | ||
|[[File:PMTOK Picnic Road Not-Bottomless Hole 16.png| | |[[File:PMTOK Picnic Road Not-Bottomless Hole 16.png|360px]] | ||
|- | |- | ||
|On the stairs seen in front of the Earth Vellumental Temple entrance. | |On the stairs seen in front of the Earth Vellumental Temple entrance. | ||
|[[File:PMTOK Picnic Road Not-Bottomless Hole 17.png| | |[[File:PMTOK Picnic Road Not-Bottomless Hole 17.png|360px]] | ||
| | |-style="background: #d09091;font-size:120%;color:#202122" id="Overlook Mountain" | ||
|colspan=3|'''[[Overlook Mountain|{{color|Overlook Mountain|#202122}}]] ­ ­ ­ ­|­ ­ ­ ­ 19 Holes''' | |||
|- | |- | ||
|Immediately seen on the wall after entering Overlook Mountain area. | |Immediately seen on the wall after entering Overlook Mountain area. | ||
|[[File:PMTOK Overlook Mountain Not-Bottomless Hole 1.jpg| | |[[File:PMTOK Overlook Mountain Not-Bottomless Hole 1.jpg|360px]] | ||
|- | |- | ||
|Under the bench area with blue roof. | |Under the bench area with blue roof. | ||
|[[File:PMTOK Overlook Mountain Not-Bottomless Hole 2.png| | |[[File:PMTOK Overlook Mountain Not-Bottomless Hole 2.png|360px]] | ||
|- | |- | ||
|Right of the blue roof, under the ? Block. | |Right of the blue roof, under the ? Block. | ||
|[[File:PMTOK Overlook Mountain Not-Bottomless Hole 3.png| | |[[File:PMTOK Overlook Mountain Not-Bottomless Hole 3.png|360px]] | ||
|- | |- | ||
|On the path above the first ? Block. | |On the path above the first ? Block. | ||
|[[File:PMTOK Overlook Mountain Not-Bottomless Hole 4.png| | |[[File:PMTOK Overlook Mountain Not-Bottomless Hole 4.png|360px]] | ||
|- | |- | ||
|On the wall, left of the Monty Mole auctioner. | |On the wall, left of the Monty Mole auctioner. | ||
|[[File:PMTOK Overlook Mountain Not-Bottomless Hole 5.png| | |[[File:PMTOK Overlook Mountain Not-Bottomless Hole 5.png|360px]] | ||
|- | |- | ||
|On the tree left of the pipe to Musée Champignon. | |On the tree left of the pipe to Musée Champignon. | ||
|[[File:PMTOK Overlook Mountain Not-Bottomless Hole 6.png| | |[[File:PMTOK Overlook Mountain Not-Bottomless Hole 6.png|360px]] | ||
|- | |- | ||
|Between the tree and bridge. | |Between the tree and bridge. | ||
|[[File:PMTOK Overlook Mountain Not-Bottomless Hole 7.png| | |[[File:PMTOK Overlook Mountain Not-Bottomless Hole 7.png|360px]] | ||
|- | |- | ||
|Behind previously mentioned trees is a secret ledge. On it is another hole. | |Behind previously mentioned trees is a secret ledge. On it is another hole. | ||
|[[File:PMTOK Overlook Mountain Not-Bottomless Hole 8.png| | |[[File:PMTOK Overlook Mountain Not-Bottomless Hole 8.png|360px]] | ||
|- | |- | ||
|Left of the other end of the bridge, under a Toad stuck on the wall. | |Left of the other end of the bridge, under a Toad stuck on the wall. | ||
|[[File:PMTOK Overlook Mountain Not-Bottomless Hole 9.png| | |[[File:PMTOK Overlook Mountain Not-Bottomless Hole 9.png|360px]] | ||
|- | |- | ||
|Right of the other end of the bridge. | |Right of the other end of the bridge. | ||
|[[File:PMTOK Overlook Mountain Not-Bottomless Hole 10.png| | |[[File:PMTOK Overlook Mountain Not-Bottomless Hole 10.png|360px]] | ||
|- | |- | ||
|Right of the Save Block. | |Right of the Save Block. | ||
|[[File:PMTOK Overlook Mountain Not-Bottomless Hole 11.png| | |[[File:PMTOK Overlook Mountain Not-Bottomless Hole 11.png|360px]] | ||
|- | |- | ||
|Left of the fishing spot, under a ? Block. | |Left of the fishing spot, under a ? Block. | ||
|[[File:PMTOK Overlook Mountain Not-Bottomless Hole 12.png| | |[[File:PMTOK Overlook Mountain Not-Bottomless Hole 12.png|360px]] | ||
|- | |- | ||
|Continuing from previous one to the left takes Mario into a secret area with treasure chest and hole. | |Continuing from previous one to the left takes Mario into a secret area with treasure chest and hole. | ||
|[[File:PMTOK Overlook Mountain Not-Bottomless Hole 13.png| | |[[File:PMTOK Overlook Mountain Not-Bottomless Hole 13.png|360px]] | ||
|- | |- | ||
|After defeating a row of Thwomps with Superstar, this hole is seen on the left on the wall. | |After defeating a row of Thwomps with Superstar, this hole is seen on the left on the wall. | ||
|[[File:PMTOK Overlook Mountain Not-Bottomless Hole 14.png| | |[[File:PMTOK Overlook Mountain Not-Bottomless Hole 14.png|360px]] | ||
|- | |- | ||
|After defeating a row of Thwomps with Superstar, this hole is seen on the right on the wall. | |After defeating a row of Thwomps with Superstar, this hole is seen on the right on the wall. | ||
|[[File:PMTOK Overlook Mountain Not-Bottomless Hole 15.png| | |[[File:PMTOK Overlook Mountain Not-Bottomless Hole 15.png|360px]] | ||
|- | |- | ||
|Continuing from previous one, keep going to the right to find another hole in the corner with ? Block above it. | |Continuing from previous one, keep going to the right to find another hole in the corner with ? Block above it. | ||
|[[File:PMTOK Overlook Mountain Not-Bottomless Hole 16.png| | |[[File:PMTOK Overlook Mountain Not-Bottomless Hole 16.png|360px]] | ||
|- | |- | ||
|In front of the wooden stairs in the tram area. | |In front of the wooden stairs in the tram area. | ||
|[[File:PMTOK Overlook Mountain Not-Bottomless Hole 17.png| | |[[File:PMTOK Overlook Mountain Not-Bottomless Hole 17.png|360px]] | ||
|- | |- | ||
|After the wooden stairs, this hole is seen on the wall. | |After the wooden stairs, this hole is seen on the wall. | ||
|[[File:PMTOK Overlook Mountain Not-Bottomless Hole 18.png| | |[[File:PMTOK Overlook Mountain Not-Bottomless Hole 18.png|360px]] | ||
|- | |- | ||
|On the stairs in front of the tram to Autumn Mountain | |-style="background:beige" | ||
|[[File:PMTOK Overlook Mountain Not-Bottom Hole 19.png| | |''Required'': ''Destroy the red streamer.''<br><br>On the stairs in front of the tram to Autumn Mountain. | ||
| | |[[File:PMTOK Overlook Mountain Not-Bottom Hole 19.png|360px]] | ||
|-style="background: #d09091;font-size:120%;color:#202122" id="EV Temple" | |||
|colspan=3|'''[[Earth Vellumental Temple|{{color|Earth Vellumental Temple|#202122}}]] ­ ­ ­ ­|­ ­ ­ ­ 11 Holes''' | |||
|- | |- | ||
|After the first [[Save Block]], on one of the pillars | |After the first [[Save Block]], on one of the pillars | ||
|[[File:PMTOK Earth Vellumental Temple Not-Bottomless Hole 1.png| | |[[File:PMTOK Earth Vellumental Temple Not-Bottomless Hole 1.png|360px]] | ||
|- | |- | ||
|To the right of the Earth Vellumental-like platform | |To the right of the Earth Vellumental-like platform | ||
|[[File:PMTOK Earth Vellumental Temple Not-Bottomless Hole 2.png| | |[[File:PMTOK Earth Vellumental Temple Not-Bottomless Hole 2.png|360px]] | ||
|- | |- | ||
|Near the [[? Block]] after fixing Not-Bottomless Hole #2 | |Near the [[? Block]] after fixing Not-Bottomless Hole #2 | ||
|[[File:PMTOK Earth Vellumental Temple Not-Bottomless Hole 3.png| | |[[File:PMTOK Earth Vellumental Temple Not-Bottomless Hole 3.png|360px]] | ||
|- | |- | ||
|On the pillar that gets the player back up from the pit | |On the pillar that gets the player back up from the pit | ||
|[[File:PMTOK Earth Vellumental Temple Not-Bottomless Hole 4.png| | |[[File:PMTOK Earth Vellumental Temple Not-Bottomless Hole 4.png|360px]] | ||
|- | |- | ||
|After being pushed off by the pushing pillars | |After being pushed off by the pushing pillars | ||
|[[File:PMTOK Earth Vellumental Temple Not-Bottomless Hole 5.png| | |[[File:PMTOK Earth Vellumental Temple Not-Bottomless Hole 5.png|360px]] | ||
|- | |- | ||
|After passing the pushing pillars | |After passing the pushing pillars | ||
|[[File:PMTOK Earth Vellumental Temple Not-Bottomless Hole 6.png| | |[[File:PMTOK Earth Vellumental Temple Not-Bottomless Hole 6.png|360px]] | ||
|- | |- | ||
|Before the Save Block, on the right side of the ledge | |Before the Save Block, on the right side of the ledge | ||
|[[File:PMTOK Earth Vellumental Temple Not-Bottomless Hole 7.png| | |[[File:PMTOK Earth Vellumental Temple Not-Bottomless Hole 7.png|360px]] | ||
|- | |- | ||
|Two are before the double fire trap | |Two are before the double fire trap | ||
|[[File:PMTOK Earth Vellumental Temple Not-Bottomless Holes 8 and 9.png| | |[[File:PMTOK Earth Vellumental Temple Not-Bottomless Holes 8 and 9.png|360px]] | ||
|- | |- | ||
|On the floor before the stronger fire trap | |On the floor before the stronger fire trap | ||
|[[File:PMTOK Earth Vellumental Temple Not-Bottomless Hole 10.png| | |[[File:PMTOK Earth Vellumental Temple Not-Bottomless Hole 10.png|360px]] | ||
|- | |- | ||
|After avoiding the gigantic shell | |After avoiding the gigantic shell | ||
|[[File: PMOK Run Away.png| | |[[File: PMOK Run Away.png|360px]] | ||
| | |-style="background: #d09091;font-size:120%;color:#202122" id="Overlook Tower" | ||
|colspan=3|'''[[Overlook Tower|{{color|Overlook Tower|#202122}}]] ­ ­ ­ ­|­ ­ ­ ­ 3 Holes''' | |||
|- | |- | ||
|In front of the elevator on the first floor. | |In front of the elevator on the first floor. | ||
|[[File:PMTOK Overlook Tower Not-Bottom Hole 1.png| | |[[File:PMTOK Overlook Tower Not-Bottom Hole 1.png|360px]] | ||
|- | |- | ||
|In front of the stairs on the first floor. | |In front of the stairs on the first floor. | ||
|[[File:PMTOK Overlook Tower Not-Bottom Hole 2.png| | |[[File:PMTOK Overlook Tower Not-Bottom Hole 2.png|360px]] | ||
|- | |- | ||
|In front of the stairs on the second floor leading to the third floor. | |In front of the stairs on the second floor leading to the third floor. | ||
|[[File:PMTOK Overlook Tower Not-Bottom Hole 3.png| | |[[File:PMTOK Overlook Tower Not-Bottom Hole 3.png|360px]] | ||
|} | |} | ||
===[[Autumn Mountain]] | ==Blue Streamer== | ||
{| | <imagemap> | ||
! | File:PMTOK Blue Streamer Map.png|400px|thumb|Click an area to see the Not-Bottomless Holes found there. | ||
rect 251 64 462 90 [[#Autumn Mountain|Autumn Mountain]] | |||
circle 356 135 16 [[#Autumn Mountain|Autumn Mountain]] | |||
rect 362 248 554 276 [[#Chestnut Valley|Chestnut Valley]] | |||
circle 420 235 16 [[#Chestnut Valley|Chestnut Valley]] | |||
rect 172 18 473 45 [[#WV Shrine|Water Vellumental Shrine]] | |||
circle 489 64 16 [[#WV Shrine|Water Vellumental Shrine]] | |||
rect 465 22 505 64 [[#WV Shrine|Water Vellumental Shrine]] | |||
rect 334 387 473 413 [[#Eddy River|Eddy River]] | |||
circle 401 361 16 [[#Eddy River|Eddy River]] | |||
rect 119 341 302 367 [[#Shogun Studios|Shogun Studios]] | |||
circle 107 318 16 [[#Shogun Studios|Shogun Studios]] | |||
rect 137 243 324 271 [[#Ninja Attraction|Ninja Attraction]] | |||
circle 194 316 16 [[#Ninja Attraction|Ninja Attraction]] | |||
</imagemap><noinclude><!--[[Category:Image map templates]]--></noinclude> | |||
There are a total of 71 Not-Bottomless Holes to fill in the blue streamer area: | |||
*[[Autumn Mountain]] has '''18 Holes''' | |||
*[[Chestnut Valley]] has '''12 Holes''' | |||
*[[Water Vellumental Shrine]] has '''10 Holes''' | |||
*[[Eddy River]] has '''8 Holes''' | |||
*[[Shogun Studios]] have '''21 Holes''' | |||
*[[Ninja Attraction]] has '''2 Holes''' | |||
{| style="text-align: center; width: 95%; margin: 0 auto; border: #7b9ec3; border-collapse: collapse;" border="1" cellpadding="4" cellspacing="1" | |||
|-style="background: #2977B5;font-size:14pt;color:white" | |||
!Description | |||
!width="25%"|Image | |||
|-style="background: #7b9ec3;font-size:120%;color:#202122" id="Autumn Mountain" | |||
|colspan=3|'''[[Autumn Mountain|{{color|Autumn Mountain|#202122}}]] ­ ­ ­ ­|­ ­ ­ ­ 18 Holes''' | |||
|- | |- | ||
|In the area near the tram are 4 holes - one in the fence in the foreground, two in the ground near the tree, and one tucked away in the wall behind the tree. | |In the area near the tram are 4 holes - one in the fence in the foreground, two in the ground near the tree, and one tucked away in the wall behind the tree. | ||
|[[File:PMTOK Autumn Mountain Not-Bottomless Holes 1-4.png| | |[[File:PMTOK Autumn Mountain Not-Bottomless Holes 1-4.png|360px]] | ||
|- | |- | ||
|At the end of the hidden cave underneath the tall grass field. This one must be repaired to get out of the cave. | |At the end of the hidden cave underneath the tall grass field. This one must be repaired to get out of the cave. | ||
|[[File:PMTOK Autumn Mountain Not-Bottomless Hole 5.png| | |[[File:PMTOK Autumn Mountain Not-Bottomless Hole 5.png|360px]] | ||
|- | |- | ||
|In front of the wooden gate after the wooden bridge. | |In front of the wooden gate after the wooden bridge. | ||
|[[File:PMTOK Autumn Mountain Not-Bottomless Hole 6.png| | |[[File:PMTOK Autumn Mountain Not-Bottomless Hole 6.png|360px]] | ||
|- | |- | ||
|After going up the 3 sets of wooden stairs next to the wooden bench. This hole is transformed into a Sensor Lab's satellite office door. | |After going up the 3 sets of wooden stairs next to the wooden bench. This hole is transformed into a Sensor Lab's satellite office door. | ||
|[[File: Not-Bottomless Hole Autumn Mountain 1.png| | |[[File: Not-Bottomless Hole Autumn Mountain 1.png|360px]] | ||
|- | |- | ||
|On the side of the mountain, left of the bench and satellite office door. | |On the side of the mountain, left of the bench and satellite office door. | ||
|[[File:PMTOK Autumn Mountain Not-Bottomless Holes 8 and 9.png| | |[[File:PMTOK Autumn Mountain Not-Bottomless Holes 8 and 9.png|360px]] | ||
|- | |- | ||
|On the right side of the cliff wall, near the bridge. | |On the right side of the cliff wall, near the bridge. | ||
|[[File:PMTOK Autumn Mountain Not-Bottomless Hole 10.png| | |[[File:PMTOK Autumn Mountain Not-Bottomless Hole 10.png|360px]] | ||
|- | |- | ||
|On the wall in a secluded area reached by a pipe on the right side of the shrine. | |On the wall in a secluded area reached by a pipe on the right side of the shrine. | ||
|[[File:PMTOK Autumn Mountain Not-Bottomless Hole 11.png| | |[[File:PMTOK Autumn Mountain Not-Bottomless Hole 11.png|360px]] | ||
|- | |- | ||
|There are 3 holes left of the Water Vellumental Temple entrance, surrounding the ? Block. | |There are 3 holes left of the Water Vellumental Temple entrance, surrounding the ? Block. | ||
|[[File:PMTOK Autumn Mountain Not-Bottomless Holes 12-14.png| | |[[File:PMTOK Autumn Mountain Not-Bottomless Holes 12-14.png|360px]] | ||
|- | |- | ||
|After leaving Chestnut Valley, this hole is seen on the wall to the right. | |-style="background:beige" | ||
|[[File:PMTOK Autumn Mountain Not-Bottomless Hole 15.png| | |''Required'': ''Navigate [[Chestnut Valley]].''<br><br>After leaving Chestnut Valley, this hole is seen on the wall to the right. | ||
|[[File:PMTOK Autumn Mountain Not-Bottomless Hole 15.png|360px]] | |||
|- | |- | ||
|Continue from previous one to reach wooden stairs and wooden fence. In this fence is a hole. Mario has to drop down to reach another two holes. | |-style="background:beige" | ||
|[[File:PMTOK Autumn Mountain Not-Bottomless Holes 16 and 17.png| | |''Required'': ''Navigate Chestnut Valley.''<br><br>Continue from previous one to reach wooden stairs and wooden fence. In this fence is a hole. Mario has to drop down to reach another two holes. | ||
|[[File:PMTOK Autumn Mountain Not-Bottomless Holes 16 and 17.png|360px]] | |||
|- | |- | ||
|The last Not-Bottomless Hole can be found on the ledge adjacent the lake, left of the treasure chest in the middle. | |-style="background:beige" | ||
|[[File:PMTOK Autumn Mountain Last Collectibles.png| | |''Required'': ''[[Eddy River]] is filled.''<br><br>The last Not-Bottomless Hole can be found on the ledge adjacent the lake, left of the treasure chest in the middle. | ||
| | |[[File:PMTOK Autumn Mountain Last Collectibles.png|360px]] | ||
|-style="background: #7b9ec3;font-size:120%;color:#202122" id="Chestnut Valley" | |||
|colspan=3|'''[[Chestnut Valley|{{color|Chestnut Valley|#202122}}]] ­ ­ ­ ­|­ ­ ­ ­ 12 Holes''' | |||
|- | |- | ||
|Three at the start of the level with two in the wall and one in the ground. | |Three at the start of the level with two in the wall and one in the ground. | ||
|[[File:PMTOK Chestnut Valley Not-Bottomless Holes 1-3.png| | |[[File:PMTOK Chestnut Valley Not-Bottomless Holes 1-3.png|360px]] | ||
|- | |- | ||
|In the wall between the second and third sections. | |In the wall between the second and third sections. | ||
|[[File:PMTOK Chestnut Valley Not-Bottomless Holes 4 and 5.png| | |[[File:PMTOK Chestnut Valley Not-Bottomless Holes 4 and 5.png|360px]] | ||
|- | |- | ||
|In the wall behind the tree with 3 yellow Toads. | |In the wall behind the tree with 3 yellow Toads. | ||
|[[File:PMTOK Chestnut Valley Not-Bottomless Hole 6.png| | |[[File:PMTOK Chestnut Valley Not-Bottomless Hole 6.png|360px]] | ||
|- | |- | ||
|In the wall behind the Galoomba tree. | |In the wall behind the Galoomba tree. | ||
|[[File:PMTOK Chestnut Valley Not-Bottomless Hole 7.png| | |[[File:PMTOK Chestnut Valley Not-Bottomless Hole 7.png|360px]] | ||
|- | |- | ||
|In the cliff wall near the end of the slope after the Save Block. | |In the cliff wall near the end of the slope after the Save Block. | ||
|[[File:PMTOK Chestnut Valley Not-Bottomless Hole 8.png| | |[[File:PMTOK Chestnut Valley Not-Bottomless Hole 8.png|360px]] | ||
|- | |- | ||
|In the cliff wall at the start of the final slope section. | |In the cliff wall at the start of the final slope section. | ||
|[[File:PMTOK Chestnut Valley Not-Bottomless Holes 9 and 10.png| | |[[File:PMTOK Chestnut Valley Not-Bottomless Holes 9 and 10.png|360px]] | ||
|- | |- | ||
|In the cliff wall at the end of the final slope section. | |In the cliff wall at the end of the final slope section. | ||
|[[File:PMTOK Chestnut Valley Not-Bottomless Holes 11 and 12.png| | |[[File:PMTOK Chestnut Valley Not-Bottomless Holes 11 and 12.png|360px]] | ||
| | |-style="background: #7b9ec3;font-size:120%;color:#202122" id="WV Shrine" | ||
|colspan=3|'''[[Water Vellumental Shrine|{{color|Water Vellumental Shrine|#202122}}]] ­ ­ ­ ­|­ ­ ­ ­ 10 Holes''' | |||
|- | |- | ||
|In the ground in the southwest corner of the main room. | |In the ground in the southwest corner of the main room. | ||
|[[File:WaterVellumentalShrineHoleA.jpg| | |[[File:WaterVellumentalShrineHoleA.jpg|360px]] | ||
|- | |- | ||
|In the stairs leading up to the room with the easier tile puzzle. | |In the stairs leading up to the room with the easier tile puzzle. | ||
|[[File:WaterVellumentalShrineHoleB.jpg| | |[[File:WaterVellumentalShrineHoleB.jpg|360px]] | ||
|- | |- | ||
|In the ground in the southeast corner of the main room. | |In the ground in the southeast corner of the main room. | ||
|[[File:WaterVellumentalShrineHoleC.jpg| | |[[File:WaterVellumentalShrineHoleC.jpg|360px]] | ||
|- | |- | ||
|Below the wheel, guarded by [[Swoop]]s. | |Below the wheel, guarded by [[Swoop]]s. | ||
|[[File:WaterVellumentalShrineHoleD.jpg| | |[[File:WaterVellumentalShrineHoleD.jpg|360px]] | ||
|- | |- | ||
|On the right wall at the start of the breakable block room. | |On the right wall at the start of the breakable block room. | ||
|[[File:WaterVellumentalShrineBlockF.jpg| | |[[File:WaterVellumentalShrineBlockF.jpg|360px]] | ||
|- | |- | ||
|On the left wall in the middle of the breakable block room. | |On the left wall in the middle of the breakable block room. | ||
|[[File:WaterVellumentalShrineHoleE.jpg| | |[[File:WaterVellumentalShrineHoleE.jpg|360px]] | ||
|- | |- | ||
|Beneath one of the breakable blocks closer to the entrance of the room. | |Beneath one of the breakable blocks closer to the entrance of the room. | ||
|[[File:WaterVellumentalShrineHoleF.jpg| | |[[File:WaterVellumentalShrineHoleF.jpg|360px]] | ||
|- | |- | ||
|In the wall in the northeast corner of the room with the smaller stone dragon head. | |In the wall in the northeast corner of the room with the smaller stone dragon head. | ||
|[[File:WaterVellumentalShrineHoleG.jpg| | |[[File:WaterVellumentalShrineHoleG.jpg|360px]] | ||
|- | |- | ||
|In the right side of the cavern area. | |In the right side of the cavern area. | ||
|[[File:WaterVellumentalShrineHoleH.jpg| | |[[File:WaterVellumentalShrineHoleH.jpg|360px]] | ||
|- | |- | ||
|On the other side of the cavern in the shape of a mushroom, revealed to be the door to a coffee shop when filled in. | |On the other side of the cavern in the shape of a mushroom, revealed to be the door to a coffee shop when filled in. | ||
|[[File:WaterVellumentalShrineHoleI.jpg| | |[[File:WaterVellumentalShrineHoleI.jpg|360px]] | ||
| | |-style="background: #7b9ec3;font-size:120%;color:#202122" id="Eddy River" | ||
|colspan=3|'''[[Eddy River|{{color|Eddy River|#202122}}]] ­ ­ ­ ­|­ ­ ­ ­ 8 Holes''' | |||
|- | |- | ||
|On the ground just before the first waterfall. | |On the ground just before the first waterfall. | ||
|[[File:PMTOK Eddy River Not-Bottomless Hole 1.png| | |[[File:PMTOK Eddy River Not-Bottomless Hole 1.png|360px]] | ||
|- | |- | ||
|On the wall before the second and third waterfalls. | |On the wall before the second and third waterfalls. | ||
|[[File:PMTOK Eddy River Not-Bottomless Hole 2.png| | |[[File:PMTOK Eddy River Not-Bottomless Hole 2.png|360px]] | ||
|- | |- | ||
|In the section with driftwood, on the wall before the fourth waterfall. | |In the section with driftwood, on the wall before the fourth waterfall. | ||
|[[File:PMTOK Eddy River Not-Bottomless Hole 3.png| | |[[File:PMTOK Eddy River Not-Bottomless Hole 3.png|360px]] | ||
|- | |- | ||
|In the section with falling rocks, on the ground under the third one. | |In the section with falling rocks, on the ground under the third one. | ||
|[[File:PMTOK Eddy River Not-Bottomless Hole 4.png| | |[[File:PMTOK Eddy River Not-Bottomless Hole 4.png|360px]] | ||
|- | |- | ||
|In the section with falling rocks and driftwood, on the ground under the second fallen rock. | |In the section with falling rocks and driftwood, on the ground under the second fallen rock. | ||
|[[File:PMTOK Eddy River Not-Bottomless Hole 5.png| | |[[File:PMTOK Eddy River Not-Bottomless Hole 5.png|360px]] | ||
|- | |- | ||
|In the same section, on the wall above the third fallen rock. | |In the same section, on the wall above the third fallen rock. | ||
|[[File:PMTOK Eddy River Not-Bottomless Hole 6.png| | |[[File:PMTOK Eddy River Not-Bottomless Hole 6.png|360px]] | ||
|- | |- | ||
|In the section with mini whirlpools, on the wall just after the second top whirpool. | |In the section with mini whirlpools, on the wall just after the second top whirpool. | ||
|[[File:PMTOK Eddy River Not-Bottomless Hole 7.png| | |[[File:PMTOK Eddy River Not-Bottomless Hole 7.png|360px]] | ||
|- | |- | ||
|On the wall after the massive whirlpool and wooden tunnel. | |On the wall after the massive whirlpool and wooden tunnel. | ||
|[[File:PMTOK Eddy River Not-Bottomless Hole 8.png| | |[[File:PMTOK Eddy River Not-Bottomless Hole 8.png|360px]] | ||
| | |-style="background: #7b9ec3;font-size:120%;color:#202122" id="Shogun Studios" | ||
|colspan=3|'''[[Shogun Studios|{{color|Shogun Studios|#202122}}]] ­ ­ ­ ­|­ ­ ­ ­ 21 Holes''' | |||
|- | |- | ||
|Found by going right from the Save Block found in front of the Big Sho' Theater. | |Found by going right from the Save Block found in front of the Big Sho' Theater. | ||
|[[File:PMTOK Shogun Studios Not-Bottomless Holes 1 and 2.png| | |[[File:PMTOK Shogun Studios Not-Bottomless Holes 1 and 2.png|360px]] | ||
|- | |- | ||
|In front of the hidden entrance to the staff room. | |In front of the hidden entrance to the staff room. | ||
|[[File:PMTOK Shogun Studios Not-Bottomless Holes 3 and 4.png| | |[[File:PMTOK Shogun Studios Not-Bottomless Holes 3 and 4.png|360px]] | ||
|- | |- | ||
|Under the tree in front of the staff room door. | |Under the tree in front of the staff room door. | ||
|[[File:PMTOK Shogun Studios Collectible Treasure 4.png| | |[[File:PMTOK Shogun Studios Collectible Treasure 4.png|360px]] | ||
|- | |- | ||
|On the wall, right of the Shuriken Dojo. | |On the wall, right of the Shuriken Dojo. | ||
|[[File:PMTOK Shogun Studios Not-Bottomless Hole 6.png| | |[[File:PMTOK Shogun Studios Not-Bottomless Hole 6.png|360px]] | ||
|- | |- | ||
|Found near the water by going right from the intersection in the middle of the park. | |Found near the water by going right from the intersection in the middle of the park. | ||
|[[File:PMTOK Shogun Studios Not-Bottomless Holes 7 and 8.png| | |[[File:PMTOK Shogun Studios Not-Bottomless Holes 7 and 8.png|360px]] | ||
|- | |- | ||
|Above the previous two, around the house. | |Above the previous two, around the house. | ||
|[[File:PMTOK Shogun Studios Not-Bottomless Holes 9-11.png| | |[[File:PMTOK Shogun Studios Not-Bottomless Holes 9-11.png|360px]] | ||
|- | |- | ||
|In front of the right parasol, found in front of Tranquil Pipes Teahouse. | |In front of the right parasol, found in front of Tranquil Pipes Teahouse. | ||
|[[File:PMTOK Shogun Studios Not-Bottomless Holes 12 and 13.png| | |[[File:PMTOK Shogun Studios Not-Bottomless Holes 12 and 13.png|360px]] | ||
|- | |- | ||
|After getting Princess the Bone, found in front of the Ninja Attraction | |After getting Princess the Bone, found in front of the Ninja Attraction | ||
|[[File:PMTOK Shogun Studios Not-Bottomless Holes 14-16.png| | |[[File:PMTOK Shogun Studios Not-Bottomless Holes 14-16.png|360px]] | ||
|- | |- | ||
|Found left of the Ninja Attraction, near the Olly Tape. | |Found left of the Ninja Attraction, near the Olly Tape. | ||
|[[File:PMTOK Shogun Studios Not-Bottomless Hole 17.png| | |[[File:PMTOK Shogun Studios Not-Bottomless Hole 17.png|360px]] | ||
|- | |- | ||
|Found on the first door on the left from the intersection in the middle of the park. | |Found on the first door on the left from the intersection in the middle of the park. | ||
|[[File:PMTOK Shogun Studios Not-Bottomless Hole 18.png| | |[[File:PMTOK Shogun Studios Not-Bottomless Hole 18.png|360px]] | ||
|- | |- | ||
|In front of the Lookout Tower, on the wall. | |In front of the Lookout Tower, on the wall. | ||
|[[File:PMTOK Shogun Studios Not-Bottomless Hole 19.png| | |[[File:PMTOK Shogun Studios Not-Bottomless Hole 19.png|360px]] | ||
|- | |- | ||
|Between the Lookout Tower and Dress-Up Photo Studio, next to the wheelbarrow. | |Between the Lookout Tower and Dress-Up Photo Studio, next to the wheelbarrow. | ||
|[[File:PMTOK Shogun Studios Not-Bottomless Hole 20.png| | |[[File:PMTOK Shogun Studios Not-Bottomless Hole 20.png|360px]] | ||
|- | |- | ||
| | |-style="background:beige" | ||
|[[File:PMTOK Shogun Studios Not-Bottomless Hole 21.png| | |''Required'': ''[[Shogun Studios Master Key]].''<br><br>Found by unlocking the door near the training Ninjis and going left. This hole becomes a door to the satellite office of Sensor Lab. | ||
| | |[[File:PMTOK Shogun Studios Not-Bottomless Hole 21.png|360px]] | ||
|-style="background: #7b9ec3;font-size:120%;color:#202122" id="Ninja Attraction" | |||
|colspan=3|'''[[Ninja Attraction|{{color|Ninja Attraction|#202122}}]] ­ ­ ­ ­|­ ­ ­ ­ 2 Holes''' | |||
|- | |- | ||
|Found in the maintenance room, below Luigi when he is stuck in the gears. | |Found in the maintenance room, below Luigi when he is stuck in the gears. | ||
|[[File:PMTOK Ninja Attraction Not-Bottomless Hole 1.png| | |[[File:PMTOK Ninja Attraction Not-Bottomless Hole 1.png|360px]] | ||
|- | |- | ||
|In the back wall above the spike floor room. | |In the back wall above the spike floor room. | ||
|[[File:PMTOK Ninja Attraction Not-Bottomless Hole 2.png| | |[[File:PMTOK Ninja Attraction Not-Bottomless Hole 2.png|360px]] | ||
|} | |} | ||
===[[Sweetpaper Valley]] | ==Yellow Streamer== | ||
{| | <imagemap> | ||
! | File:PMTOK Yellow Streamer Map.png|400px|thumb|Click an area to see the Not-Bottomless Holes found there. | ||
rect 106 391 321 419 [[#Sweetpaper Valley|Sweetpaper Valley]] | |||
circle 335 390 16 [[#Sweetpaper Valley|Sweetpaper Valley]] | |||
rect 17 273 321 302 [[#Sandpaper Desert|Scorching Sandpaper Desert]] | |||
circle 336 269 16 [[#Sandpaper Desert|Scorching Sandpaper Desert]] | |||
rect 350 283 570 308 [[#FV Cave|Fire Vellumental Cave]] | |||
circle 452 269 16 [[#FV Cave|Fire Vellumental Cave]] | |||
rect 412 200 492 257 [[#FV Cave|Fire Vellumental Cave]] | |||
rect 3 173 213 194 [[#Sandpaper West|Scorching Sandpaper West]] | |||
circle 106 211 16 [[#Sandpaper West|Scorching Sandpaper West]] | |||
rect 308 162 557 190 [[#Sandpaper East|Scorching Sandpaper East]] | |||
circle 339 211 16 [[#Sandpaper East|Scorching Sandpaper East]] | |||
rect 184 4 324 30 [[#Shroom City|Shroom City]] | |||
circle 254 89 16 [[#Shroom City|Shroom City]] | |||
rect 3 50 241 71 [[#Sandpaper Far West|Scorching Sandpaper Far West]] | |||
circle 128 89 16 [[#Sandpaper Far West|Scorching Sandpaper Far West]] | |||
rect 314 50 553 74 [[#Sandpaper Far East|Scorching Sandpaper Far East]] | |||
circle 368 89 16 [[#Sandpaper Far East|Scorching Sandpaper Far East]] | |||
rect 27 120 248 144 [[#Temple of Shrooms|Temple of Shrooms]] | |||
circle 255 155 16 [[#Temple of Shrooms|Temple of Shrooms]] | |||
</imagemap><noinclude><!--[[Category:Image map templates]]--></noinclude> | |||
There are a total of 69 Not-Bottomless Holes to fill in the yellow streamer area: | |||
*[[Sweetpaper Valley]] has '''6 Holes''' | |||
*[[Scorching Sandpaper Desert]] has '''12 Holes''' | |||
*[[Scorching Sandpaper West]] has '''5 Holes''' | |||
*[[Scorching Sandpaper East]] has '''5 Holes''' | |||
*[[Shroom City (Paper Mario: The Origami King)|Shroom City]] has '''6 Holes''' | |||
*[[Scorching Sandpaper Far West]] has '''2 Holes''' | |||
*[[Scorching Sandpaper Far East]] has '''2 Holes''' | |||
*[[Fire Vellumental Cave]] has '''10 Holes''' | |||
*[[Temple of Shrooms]] has '''21 Holes''' | |||
{| style="text-align: center; width: 95%; margin: 0 auto; border: #cbc689; border-collapse: collapse;" border="1" cellpadding="4" cellspacing="1" | |||
|-style="background: #bf9b1c;font-size:14pt;color:white" | |||
!Description | |||
!width="25%"|Image | |||
|-style="background: #cbc689;font-size:120%;color:#202122" id="Sweetpaper Valley" | |||
|colspan=3|'''[[Sweetpaper Valley|{{color|Sweetpaper Valley|#202122}}]] ­ ­ ­ ­|­ ­ ­ ­ 6 Holes''' | |||
|- | |- | ||
|These three are visible right at the start of the area. | |These three are visible right at the start of the area. | ||
|[[File:PMTOK Sweetpaper Valley Not-Bottomless Holes 1-3.png| | |[[File:PMTOK Sweetpaper Valley Not-Bottomless Holes 1-3.png|360px]] | ||
|- | |- | ||
|Continuing forward, these two can be seen under the left box and between the first and second bushes respectively. | |Continuing forward, these two can be seen under the left box and between the first and second bushes respectively. | ||
|[[File:PMTOK Sweetpaper Valley Not-Bottomless Holes 4 and 5.png| | |[[File:PMTOK Sweetpaper Valley Not-Bottomless Holes 4 and 5.png|360px]] | ||
|- | |- | ||
|On the left just before the entrance to Breezy Tunnel. | |On the left just before the entrance to Breezy Tunnel. | ||
|[[File:PMTOK Sweetpaper Valley Not-Bottomless Hole 6.png| | |[[File:PMTOK Sweetpaper Valley Not-Bottomless Hole 6.png|360px]] | ||
| | |-style="background: #cbc689;font-size:120%;color:#202122" id="Sandpaper Desert" | ||
|colspan=3|'''[[Scorching Sandpaper Desert|{{color|Scorching Sandpaper Desert|#202122}}]] ­ ­ ­ ­|­ ­ ­ ­ 12 Holes''' | |||
|- | |- | ||
|In the wall rounding the altar and the ruins. | |In the wall rounding the altar and the ruins. | ||
|[[File:ScorchingSandpaperDesertNotBottomlessHole1.png| | |[[File:ScorchingSandpaperDesertNotBottomlessHole1.png|360px]] | ||
|- | |- | ||
|In the ground just before the narrow path to [[Scorching Sandpaper Minor]]. | |In the ground just before the narrow path to [[Scorching Sandpaper Minor]]. | ||
|[[File:ScorchingSandpaperDesertNotBottomlessHole2.png| | |[[File:ScorchingSandpaperDesertNotBottomlessHole2.png|360px]] | ||
|- | |- | ||
|In the cliff wall next to the origami lizard. | |In the cliff wall next to the origami lizard. | ||
|[[File:ScorchingSandpaperDesertNotBottomlessHole3.png| | |[[File:ScorchingSandpaperDesertNotBottomlessHole3.png|360px]] | ||
|- | |- | ||
|Above the previous one, revealed to be the door to a [[Sensor Lab]] when filled in. | |Above the previous one, revealed to be the door to a [[Sensor Lab]] when filled in. | ||
|[[File:ScorchingSandpaperDesertNotBottomlessHole4.png| | |[[File:ScorchingSandpaperDesertNotBottomlessHole4.png|360px]] | ||
|- | |- | ||
|In the wall rounding out the southwestern area of the desert. | |In the wall rounding out the southwestern area of the desert. | ||
|[[File:ScorchingSandpaperDesertNotBottomlessHole5.png| | |[[File:ScorchingSandpaperDesertNotBottomlessHole5.png|360px]] | ||
|- | |- | ||
|Two in the ground at the start of the ruins section and another one in the wall above the ruins, next to the ? Block. | |Two in the ground at the start of the ruins section and another one in the wall above the ruins, next to the ? Block. | ||
|[[File:ScorchingSandpaperDesertNotBottomlessHole6.png| | |[[File:ScorchingSandpaperDesertNotBottomlessHole6.png|360px]] | ||
|- | |- | ||
|Below a ? Block in the southwestern portion of the desert. | |Below a ? Block in the southwestern portion of the desert. | ||
|[[File:ScorchingSandpaperDesertBlock6.png| | |[[File:ScorchingSandpaperDesertBlock6.png|360px]] | ||
|- | |- | ||
|In the southeastern part of the ruins. | |In the southeastern part of the ruins. | ||
|[[File:ScorchingSandpaperDesertNotBottomlessHole7.png| | |[[File:ScorchingSandpaperDesertNotBottomlessHole7.png|360px]] | ||
|- | |- | ||
|At the end of the hidden area to the right of the ruins revealed to be the door to a coffee shop when filled in. | |At the end of the hidden area to the right of the ruins revealed to be the door to a coffee shop when filled in. | ||
|[[File:ScorchingSandpaperDesertNotBottomlessHole8.png| | |[[File:ScorchingSandpaperDesertNotBottomlessHole8.png|360px]] | ||
|- | |- | ||
|On the sarcophagus in the tower. | |On the sarcophagus in the tower. | ||
|[[File:PMTOK Scorching Sandpaper Desert Not-Bottomless Hole 12.png| | |[[File:PMTOK Scorching Sandpaper Desert Not-Bottomless Hole 12.png|360px]] | ||
| | |-style="background: #cbc689;font-size:120%;color:#202122" id="Sandpaper West" | ||
|colspan=3|'''[[Scorching Sandpaper West|{{color|Scorching Sandpaper West|#202122}}]] ­ ­ ­ ­|­ ­ ­ ­ 5 Holes''' | |||
|- | |- | ||
|Seen right away as Mario enters the area on the upper wall. | |Seen right away as Mario enters the area on the upper wall. | ||
|[[File:PMTOK Scorching Sandpaper Desert West Not-Bottomless Hole 1.png| | |[[File:PMTOK Scorching Sandpaper Desert West Not-Bottomless Hole 1.png|360px]] | ||
|- | |- | ||
|Near the wall under the fourth cactus. | |Near the wall under the fourth cactus. | ||
|[[File:PMTOK Scorching Sandpaper Desert West Not-Bottomless Hole 2.png| | |[[File:PMTOK Scorching Sandpaper Desert West Not-Bottomless Hole 2.png|360px]] | ||
|- | |- | ||
|Right of the Desert Tower, near the wall. | |Right of the Desert Tower, near the wall. | ||
|[[File:PMTOK Scorching Sandpaper Desert West Not-Bottomless Hole 3.png| | |[[File:PMTOK Scorching Sandpaper Desert West Not-Bottomless Hole 3.png|360px]] | ||
|- | |- | ||
|On the wall left of the Desert Tower. | |On the wall left of the Desert Tower. | ||
|[[File:PMTOK Scorching Sandpaper Desert West Not-Bottomless Hole 4.png| | |[[File:PMTOK Scorching Sandpaper Desert West Not-Bottomless Hole 4.png|360px]] | ||
|- | |- | ||
|On the sarcophagus in the tower. | |On the sarcophagus in the tower. | ||
|[[File:PMTOK Scorching Sandpaper Desert West Not-Bottomless Hole 5.png| | |[[File:PMTOK Scorching Sandpaper Desert West Not-Bottomless Hole 5.png|360px]] | ||
| | |-style="background: #cbc689;font-size:120%;color:#202122" id="Sandpaper East" | ||
|colspan=3|'''[[Scorching Sandpaper East|{{color|Scorching Sandpaper East|#202122}}]] ­ ­ ­ ­|­ ­ ­ ­ 5 Holes''' | |||
|- | |- | ||
|On the wall in the northwestern part of the ruins | |On the wall in the northwestern part of the ruins | ||
|[[File:PMTOK Scorching Sandpaper Desert East Not-Bottomless Hole 1.png| | |[[File:PMTOK Scorching Sandpaper Desert East Not-Bottomless Hole 1.png|360px]] | ||
|- | |- | ||
|In the middle of the ruins, partially hidden by bricks. | |In the middle of the ruins, partially hidden by bricks. | ||
|[[File:PMTOK Scorching Sandpaper Desert East Not-Bottomless Hole 2.png| | |[[File:PMTOK Scorching Sandpaper Desert East Not-Bottomless Hole 2.png|360px]] | ||
|- | |- | ||
|From the opening that leads to the previous one, Mario must go to the right to find another, smaller one. | |From the opening that leads to the previous one, Mario must go to the right to find another, smaller one. | ||
|[[File:PMTOK Scorching Sandpaper Desert East Not-Bottomless Hole 3.png| | |[[File:PMTOK Scorching Sandpaper Desert East Not-Bottomless Hole 3.png|360px]] | ||
|- | |- | ||
|Two in the eastern part of the ruins. | |Two in the eastern part of the ruins. | ||
|[[File:PMTOK Scorching Sandpaper Desert East Not-Bottomless Holes 4 and 5.png| | |[[File:PMTOK Scorching Sandpaper Desert East Not-Bottomless Holes 4 and 5.png|360px]] | ||
| | |-style="background: #cbc689;font-size:120%;color:#202122" id="Shroom City" | ||
|colspan=3|'''[[Shroom City (Paper Mario: The Origami King)|{{color|Shroom City|#202122}}]] ­ ­ ­ ­|­ ­ ­ ­ 6 Holes''' | |||
|- | |- | ||
|Right of the Save Block. | |Right of the Save Block. | ||
|[[File:PMTOK Shroom City Not-Bottomless Hole 1.png| | |[[File:PMTOK Shroom City Not-Bottomless Hole 1.png|360px]] | ||
|- | |- | ||
|Right of the first stairs leading to the hotel. | |Right of the first stairs leading to the hotel. | ||
|[[File:PMTOK Shroom City Not-Bottomless Hole 2.png| | |[[File:PMTOK Shroom City Not-Bottomless Hole 2.png|360px]] | ||
|- | |- | ||
|Between first and second stairs leading to the hotel. | |Between first and second stairs leading to the hotel. | ||
|[[File:PMTOK Shroom City Not-Bottomless Hole 3.png| | |[[File:PMTOK Shroom City Not-Bottomless Hole 3.png|360px]] | ||
|- | |- | ||
|Going left from the reception and then into the left door, seen next to the bed on the wall. | |Going left from the reception and then into the left door, seen next to the bed on the wall. | ||
|[[File:PMTOK Shroom City Not-Bottomless Hole 4.png| | |[[File:PMTOK Shroom City Not-Bottomless Hole 4.png|360px]] | ||
|- | |- | ||
|Going right from the reception and then into the right door, seen next to the bed on the wall. | |Going right from the reception and then into the right door, seen next to the bed on the wall. | ||
|[[File:PMTOK Shroom City Not-Bottomless Hole 5.png| | |[[File:PMTOK Shroom City Not-Bottomless Hole 5.png|360px]] | ||
|- | |- | ||
|In the area behind the accessory shop is a hole that when filled is transformed into a café | |-style="background:beige" | ||
|[[File:PMTOK Shroom City Hidden Toad 14.png| | |''Required'': ''Destroy the yellow streamer.''<br><br>In the area behind the accessory shop is a hole that when filled is transformed into a café. | ||
| | |[[File:PMTOK Shroom City Hidden Toad 14.png|360px]] | ||
|-style="background: #cbc689;font-size:120%;color:#202122" id="Sandpaper Far West" | |||
|colspan=3|'''[[Scorching Sandpaper Far West|{{color|Scorching Sandpaper Far West|#202122}}]] ­ ­ ­ ­|­ ­ ­ ­ 2 Holes''' | |||
|- | |- | ||
|Seen right away as Mario enters the area, surrounded by 3 glowing spots that Professor Toad can dig up. | |Seen right away as Mario enters the area, surrounded by 3 glowing spots that Professor Toad can dig up. | ||
|[[File:PMTOK Scorching Sandpaper Far West Not-Bottomless Hole 1.png| | |[[File:PMTOK Scorching Sandpaper Far West Not-Bottomless Hole 1.png|360px]] | ||
|- | |- | ||
|Left of the Desert Tower, on the wall. | |Left of the Desert Tower, on the wall. | ||
|[[File:PMTOK Scorching Sandpaper Far West Not-Bottomless Hole 2.png| | |[[File:PMTOK Scorching Sandpaper Far West Not-Bottomless Hole 2.png|360px]] | ||
| | |-style="background: #cbc689;font-size:120%;color:#202122" id="Sandpaper Far East" | ||
|colspan=3|'''[[Scorching Sandpaper Far East|{{color|Scorching Sandpaper Far East|#202122}}]] ­ ­ ­ ­|­ ­ ­ ­ 2 Holes''' | |||
|- | |- | ||
|Right of the Desert Tower, with one above on the wall and another one under on the ground. | |Right of the Desert Tower, with one above on the wall and another one under on the ground. | ||
|[[File:PMTOK Scorching Sandpaper Far East Not-Bottomless Holes.png| | |[[File:PMTOK Scorching Sandpaper Far East Not-Bottomless Holes.png|360px]] | ||
| | |-style="background: #cbc689;font-size:120%;color:#202122" id="FV Cave" | ||
|colspan=3|'''[[Fire Vellumental Cave|{{color|Fire Vellumental Cave|#202122}}]] ­ ­ ­ ­|­ ­ ­ ­ 10 Holes''' | |||
|- | |- | ||
|In the ground on the north end of the second room, near a [[Save Block]]. | |In the ground on the north end of the second room, near a [[Save Block]]. | ||
|[[File:PMTOK Fire Vellumental Cave Not-Bottomless Hole 1.png| | |[[File:PMTOK Fire Vellumental Cave Not-Bottomless Hole 1.png|360px]] | ||
|- | |- | ||
|Two on the wall of the third room. | |Two on the wall of the third room. | ||
|[[File:PMTOK Fire Vellumental Cave Not-Bottomless Holes 2 and 3.png| | |[[File:PMTOK Fire Vellumental Cave Not-Bottomless Holes 2 and 3.png|360px]] | ||
|- | |- | ||
|In the ground at the end of the first path in the sixth room. | |In the ground at the end of the first path in the sixth room. | ||
|[[File:PMTOK Fire Vellumental Cave Not-Bottomless Hole 4.png| | |[[File:PMTOK Fire Vellumental Cave Not-Bottomless Hole 4.png|360px]] | ||
|- | |- | ||
|In the ground near the middle of this section, below a [[? Block]] containing a Shiny Mushroom. | |In the ground near the middle of this section, below a [[? Block]] containing a Shiny Mushroom. | ||
|[[File:PMTOK Fire Vellumental Cave Not-Bottomless Hole 5.png| | |[[File:PMTOK Fire Vellumental Cave Not-Bottomless Hole 5.png|360px]] | ||
|- | |- | ||
|Two on the wall at the end of this room. | |Two on the wall at the end of this room. | ||
|[[File:PMTOK Fire Vellumental Cave Not-Bottomless Holes 6 and 7.png| | |[[File:PMTOK Fire Vellumental Cave Not-Bottomless Holes 6 and 7.png|360px]] | ||
|- | |- | ||
|On the wall in the seventh room. | |On the wall in the seventh room. | ||
|[[File:PMTOK Fire Vellumental Cave Not-Bottomless Hole 8.png| | |[[File:PMTOK Fire Vellumental Cave Not-Bottomless Hole 8.png|360px]] | ||
|- | |- | ||
|Two are seen right away in the ground near the start of the tenth room. | |Two are seen right away in the ground near the start of the tenth room. | ||
|[[File:PMTOK Fire Vellumental Cave Not-Bottomless Holes 9 and 10.png| | |[[File:PMTOK Fire Vellumental Cave Not-Bottomless Holes 9 and 10.png|360px]] | ||
| | |-style="background: #cbc689;font-size:120%;color:#202122" id="Temple of Shrooms" | ||
|colspan=3|'''[[Temple of Shrooms|{{color|Temple of Shrooms|#202122}}]] ­ ­ ­ ­|­ ­ ­ ­ 21 Holes''' | |||
|- | |- | ||
|Right at the start of the area, on the left on the wall. | |Right at the start of the area, on the left on the wall. | ||
|[[File:PMTOK Temple of Shrooms Not-Bottomless Hole 1.png| | |[[File:PMTOK Temple of Shrooms Not-Bottomless Hole 1.png|360px]] | ||
|- | |- | ||
|In the second room, seen right away on the right on the wall. | |In the second room, seen right away on the right on the wall. | ||
|[[File:PMTOK Temple of Shrooms Not-Bottomless Hole 2.png| | |[[File:PMTOK Temple of Shrooms Not-Bottomless Hole 2.png|360px]] | ||
|- | |- | ||
|In the same room, on the left in the pillar. | |In the same room, on the left in the pillar. | ||
|[[File:PMTOK Temple of Shrooms Not-Bottomless Hole 3.png| | |[[File:PMTOK Temple of Shrooms Not-Bottomless Hole 3.png|360px]] | ||
|- | |- | ||
|In the third room, on the ground in the corridor. | |In the third room, on the ground in the corridor. | ||
|[[File:PMTOK Temple of Shrooms Not-Bottomless Hole 4.png| | |[[File:PMTOK Temple of Shrooms Not-Bottomless Hole 4.png|360px]] | ||
|- | |- | ||
|Continuing forward, next one is on the wall. | |Continuing forward, next one is on the wall. | ||
|[[File:PMTOK Temple of Shrooms Not-Bottomless Hole 5.png| | |[[File:PMTOK Temple of Shrooms Not-Bottomless Hole 5.png|360px]] | ||
|- | |- | ||
|On the ground in the same corridor as last two. | |On the ground in the same corridor as last two. | ||
|[[File:PMTOK Temple of Shrooms Not-Bottomless Hole 6.png| | |[[File:PMTOK Temple of Shrooms Not-Bottomless Hole 6.png|360px]] | ||
|- | |- | ||
|Last in this corridor, in front of the Save Block. | |Last in this corridor, in front of the Save Block. | ||
|[[File:PMTOK Temple of Shrooms Not-Bottomless Hole 7.png| | |[[File:PMTOK Temple of Shrooms Not-Bottomless Hole 7.png|360px]] | ||
|- | |- | ||
|In the fourth room (the one with Paper Macho Mummy Goombas), seen right away on the wall as Mario enters. | |In the fourth room (the one with Paper Macho Mummy Goombas), seen right away on the wall as Mario enters. | ||
|[[File:PMTOK Temple of Shrooms Not-Bottomless Hole 8.png| | |[[File:PMTOK Temple of Shrooms Not-Bottomless Hole 8.png|360px]] | ||
|- | |- | ||
|In the same room, on the right wall. | |In the same room, on the right wall. | ||
|[[File:PMTOK Temple of Shrooms Not-Bottomless Hole 9.png| | |[[File:PMTOK Temple of Shrooms Not-Bottomless Hole 9.png|360px]] | ||
|- | |- | ||
|Two in the room right of the room where the first faceless Toad have been encountered, surrounding a Collectible Treasure chest. | |Two in the room right of the room where the first faceless Toad have been encountered, surrounding a Collectible Treasure chest. | ||
|[[File:PMTOK Temple of Shrooms Not-Bottomless Holes 10 and 11.png| | |[[File:PMTOK Temple of Shrooms Not-Bottomless Holes 10 and 11.png|360px]] | ||
|- | |- | ||
|In the room after the room where the party sees faceless Toads in a huge spiderweb for the first time, right as Mario enters. | |In the room after the room where the party sees faceless Toads in a huge spiderweb for the first time, right as Mario enters. | ||
|[[File:PMTOK Temple of Shrooms Not-Bottomless Hole 12.png| | |[[File:PMTOK Temple of Shrooms Not-Bottomless Hole 12.png|360px]] | ||
|- | |- | ||
|In the same room, seen after the second statue falls down and breaks. | |In the same room, seen after the second statue falls down and breaks. | ||
|[[File:PMTOK Temple of Shrooms Not-Bottomless Hole 13.png| | |[[File:PMTOK Temple of Shrooms Not-Bottomless Hole 13.png|360px]] | ||
|- | |- | ||
|In the same room, at the right end. | |In the same room, at the right end. | ||
|[[File:PMTOK Temple of Shrooms Not-Bottomless Hole 14.png| | |[[File:PMTOK Temple of Shrooms Not-Bottomless Hole 14.png|360px]] | ||
|- | |- | ||
|Two in the next room (the one where Mario has to hammer a star to make stairs appear), seen right as Mario enters. | |Two in the next room (the one where Mario has to hammer a star to make stairs appear), seen right as Mario enters. | ||
|[[File:PMTOK Temple of Shrooms Not-Bottomless Holes 15 and 16.png| | |[[File:PMTOK Temple of Shrooms Not-Bottomless Holes 15 and 16.png|360px]] | ||
|- | |- | ||
|In the same room, on the left next to the ? Block. | |In the same room, on the left next to the ? Block. | ||
|[[File:PMTOK Temple of Shrooms Not-Bottomless Hole 17.png| | |[[File:PMTOK Temple of Shrooms Not-Bottomless Hole 17.png|360px]] | ||
|- | |- | ||
|In the room with boss arena, left of the right inactive Paper Macho Shy Guy. | |In the room with boss arena, left of the right inactive Paper Macho Shy Guy. | ||
|[[File:PMTOK Temple of Shrooms Not-Bottomless Hole 18.png| | |[[File:PMTOK Temple of Shrooms Not-Bottomless Hole 18.png|360px]] | ||
|- | |- | ||
|In the room with 15 pushable sarcophagi, on the left wall. | |In the room with 15 pushable sarcophagi, on the left wall. | ||
|[[File:PMTOK Temple of Shrooms Not-Bottomless Hole 19.png| | |[[File:PMTOK Temple of Shrooms Not-Bottomless Hole 19.png|360px]] | ||
|- | |- | ||
|In the same room, on the right wall. | |In the same room, on the right wall. | ||
|[[File:PMTOK Temple of Shrooms Not-Bottomless Hole 20.png| | |[[File:PMTOK Temple of Shrooms Not-Bottomless Hole 20.png|360px]] | ||
|- | |- | ||
|In the next room (the one with Thrills at Night disc), seen on the ground. | |In the next room (the one with Thrills at Night disc), seen on the ground. | ||
|[[File:PMTOK Temple of Shrooms Not-Bottomless Hole 21.png| | |[[File:PMTOK Temple of Shrooms Not-Bottomless Hole 21.png|360px]] | ||
|} | |} | ||
===[[The Princess Peach]] | ==Purple Streamer== | ||
{| | <imagemap> | ||
! | File:PMTOK Purple Streamer Map.png|400px|thumb|Click an area to see the Not-Bottomless Holes found there. | ||
rect 257 387 480 411 [[#Princess Peach|The Princess Peach]] | |||
circle 241 369 16 [[#Princess Peach|The Princess Peach]] | |||
rect 257 350 338 400 [[#Princess Peach|The Princess Peach]] | |||
rect 310 328 498 354 [[#Bonehead|Bonehead Island]] | |||
circle 512 334 16 [[#Bonehead|Bonehead Island]] | |||
rect 256 297 402 323 [[#Heart|Heart Island]] | |||
circle 330 270 16 [[#Heart|Heart Island]] | |||
rect 350 50 499 74 [[#Spade|Spade Island]] | |||
circle 330 49 16 [[#Spade|Spade Island]] | |||
rect 65 148 195 170 [[#Club|Club Island]] | |||
circle 212 155 16 [[#Club|Club Island]] | |||
rect 404 178 565 201 [[#Moon|Full Moon Island]] | |||
circle 436 151 16 [[#Moon|Full Moon Island]] | |||
rect 2 367 101 394 [[#Question|? Island]] | |||
circle 68 351 16 [[#Question|? Island]] | |||
rect 345 102 554 125 [[#IV Mountain|Ice Vellumental Mountain]] | |||
rect 275 100 390 220 [[#IV Mountain|Ice Vellumental Mountain]] | |||
rect 72 13 194 36 [[#Sea Tower|Sea Tower]] | |||
circle 131 94 16 [[#Sea Tower|Sea Tower]] | |||
rect 115 100 147 0 [[#Sea Tower|Sea Tower]] | |||
</imagemap><noinclude><!--[[Category:Image map templates]]--></noinclude> | |||
There are a total of 78 Not-Bottomless Holes to fill in the purple streamer area: | |||
*[[The Princess Peach]] has '''20 Holes''' | |||
*[[Bonehead Island]] has '''5 Holes''' | |||
*[[Heart Island]] has '''5 Holes''' | |||
*[[Spade Island]] has '''1 Hole''' | |||
*[[Club Island]] has '''1 Hole''' | |||
*[[Full Moon Island]] has '''3 Holes''' | |||
*[[? Island]] has '''6 Holes''' | |||
*[[Ice Vellumental Mountain]] has '''19 Holes''' | |||
*[[Sea Tower]] has '''18 Holes''' | |||
{| style="text-align: center; width: 95%; margin: 0 auto; border: #ad7caa; border-collapse: collapse;" border="1" cellpadding="4" cellspacing="1" | |||
|-style="background: #90248A;font-size:14pt;color:white" | |||
!Description | |||
!width="25%"|Image | |||
|-style="background: #ad7caa;font-size:120%;color:#202122" id="Princess Peach" | |||
|colspan=3|'''[[The Princess Peach|{{color|The Princess Peach|#202122}}]] ­ ­ ­ ­|­ ­ ­ ­ 20 Holes''' | |||
|- | |- | ||
|Three in the pool area. | |Three in the pool area. | ||
|[[File:PMTOK The Princess Peach Not-Bottomless Holes 1-3.png| | |[[File:PMTOK The Princess Peach Not-Bottomless Holes 1-3.png|360px]] | ||
|- | |- | ||
|Two on the second floor deck, in front of the barricaded door. | |Two on the second floor deck, in front of the barricaded door. | ||
|[[File:PMTOK The Princess Peach Not-Bottomless Holes 4 and 5.png| | |[[File:PMTOK The Princess Peach Not-Bottomless Holes 4 and 5.png|360px]] | ||
|- | |- | ||
|On the smokestack next to the MAX UP Heart chest. | |On the smokestack next to the MAX UP Heart chest. | ||
|[[File:PMTOK The Princess Peach Not-Bottomless Hole 6.png| | |[[File:PMTOK The Princess Peach Not-Bottomless Hole 6.png|360px]] | ||
|- | |- | ||
|In the center of the first floor room with the elevator and another one on the wall to the right of it. | |In the center of the first floor room with the elevator and another one on the wall to the right of it. | ||
|[[File:PMTOK The Princess Peach Not-Bottomless Holes 7 and 8.png| | |[[File:PMTOK The Princess Peach Not-Bottomless Holes 7 and 8.png|360px]] | ||
|- | |- | ||
|On the ground, left of the previous two. | |On the ground, left of the previous two. | ||
|[[File:PMTOK The Princess Peach Not-Bottomless Hole 9.png| | |[[File:PMTOK The Princess Peach Not-Bottomless Hole 9.png|360px]] | ||
|- | |- | ||
|In the hallway between main hall and lounge. | |In the hallway between main hall and lounge. | ||
|[[File:PMTOK The Princess Peach Not-Bottomless Hole 10.png| | |[[File:PMTOK The Princess Peach Not-Bottomless Hole 10.png|360px]] | ||
|- | |- | ||
|In the middle of the lounge. | |In the middle of the lounge. | ||
|[[File:PMTOK The Princess Peach Not-Bottomless Hole 11.png| | |[[File:PMTOK The Princess Peach Not-Bottomless Hole 11.png|360px]] | ||
|- | |- | ||
|On the wall in the stairway room with the ladder to the ship's hold. | |On the wall in the stairway room with the ladder to the ship's hold. | ||
|[[File:PMTOK The Princess Peach Question Block 1.png| | |[[File:PMTOK The Princess Peach Question Block 1.png|360px]] | ||
|- | |- | ||
|Four on the left side of the first room of the ship's hold. The one in the corner is at first hidden by a breakable crate. | |Four on the left side of the first room of the ship's hold. The one in the corner is at first hidden by a breakable crate. | ||
|[[File:PMTOK The Princess Peach Not-Bottomless Holes 13-16.png| | |[[File:PMTOK The Princess Peach Not-Bottomless Holes 13-16.png|360px]] | ||
|- | |- | ||
|In the engine room, Mario must find the gap in the upper railing, drop down and go left to find another two. | |In the engine room, Mario must find the gap in the upper railing, drop down and go left to find another two. | ||
|[[File:PMTOK The Princess Peach Not-Bottomless Holes 17 and 18.png| | |[[File:PMTOK The Princess Peach Not-Bottomless Holes 17 and 18.png|360px]] | ||
|- | |- | ||
|On the wall, at the end of the engine room's stairs. | |On the wall, at the end of the engine room's stairs. | ||
|[[File:PMTOK The Princess Peach Not-Bottomless Hole 19.png| | |[[File:PMTOK The Princess Peach Not-Bottomless Hole 19.png|360px]] | ||
|- | |- | ||
|In the machinery in the southwest corner of this room. | |In the machinery in the southwest corner of this room. | ||
|[[File:PMTOK The Princess Peach Not-Bottomless Hole 20.png| | |[[File:PMTOK The Princess Peach Not-Bottomless Hole 20.png|360px]] | ||
| | |-style="background: #ad7caa;font-size:120%;color:#202122" id="Bonehead" | ||
|colspan=3|'''[[Bonehead Island|{{color|Bonehead Island|#202122}}]] ­ ­ ­ ­|­ ­ ­ ­ 5 Holes''' | |||
|- | |- | ||
|4 holes seen right away | |4 holes seen right away from the ship as it arrives on the island. | ||
|[[File:PMTOK Bonehead Island Not-Bottomless Holes 1-4.png| | |[[File:PMTOK Bonehead Island Not-Bottomless Holes 1-4.png|360px]] | ||
|- | |- | ||
|Going right until a screen changes, there is another hole next to a lone ? Block. When filled in, this hole becomes a door to the café. | |Going right until a screen changes, there is another hole next to a lone ? Block. When filled in, this hole becomes a door to the café. | ||
|[[File:PMTOK Bonehead Island Not-Bottomless Hole 5.png| | |[[File:PMTOK Bonehead Island Not-Bottomless Hole 5.png|360px]] | ||
| | |-style="background: #ad7caa;font-size:120%;color:#202122" id="Heart" | ||
|colspan=3|'''[[Heart Island|{{color|Heart Island|#202122}}]] ­ ­ ­ ­|­ ­ ­ ­ 5 Holes''' | |||
|- | |- | ||
|Two are seen right away as the ship reaches the island. | |Two are seen right away as the ship reaches the island. | ||
|[[File:PMTOK Heart Island Not-Bottomless Holes 1 and 2.png| | |[[File:PMTOK Heart Island Not-Bottomless Holes 1 and 2.png|360px]] | ||
|- | |- | ||
|Right of the heart shaped pillar on the ground. | |Right of the heart shaped pillar on the ground. | ||
|[[File:PMTOK Heart Island Not-Bottomless Hole 3.png| | |[[File:PMTOK Heart Island Not-Bottomless Hole 3.png|360px]] | ||
|- | |- | ||
|Two to the left of the heart shaped pillar. | |Two to the left of the heart shaped pillar. | ||
|[[File:PMTOK Heart Island Hidden Toad 1.jpg| | |[[File:PMTOK Heart Island Hidden Toad 1.jpg|360px]] | ||
| | |-style="background: #ad7caa;font-size:120%;color:#202122" id="Spade" | ||
|colspan=3|'''[[Spade Island|{{color|Spade Island|#202122}}]] ­ ­ ­ ­|­ ­ ­ ­ 1 Hole''' | |||
|- | |- | ||
|On the west side of the island. Repairing this hole reveals two large barrels. This is required to rescue one of the hidden Toads on the island. | |On the west side of the island. Repairing this hole reveals two large barrels. This is required to rescue one of the hidden Toads on the island. | ||
|[[File:PMTOK Spade Island Not-Bottomless Hole.jpg| | |[[File:PMTOK Spade Island Not-Bottomless Hole.jpg|360px]] | ||
| | |-style="background: #ad7caa;font-size:120%;color:#202122" id="Club" | ||
|colspan=3|'''[[Club Island|{{color|Club Island|#202122}}]] ­ ­ ­ ­|­ ­ ­ ­ 1 Hole''' | |||
|- | |- | ||
|Found in front of the bench. | |Found in front of the bench. | ||
|[[File:PMTOK Mario on Club Island.jpg| | |[[File:PMTOK Mario on Club Island.jpg|360px]] | ||
| | |-style="background: #ad7caa;font-size:120%;color:#202122" id="Moon" | ||
|colspan=3|'''[[Full Moon Island|{{color|Full Moon Island|#202122}}]] ­ ­ ­ ­|­ ­ ­ ­ 3 Holes''' | |||
|- | |- | ||
|Seen right away as Mario steps on the island from the dock. | |Seen right away as Mario steps on the island from the dock. | ||
|[[File:PMTOK Full Moon Island Not-Bottomless Holes 1 and 2.png| | |[[File:PMTOK Full Moon Island Not-Bottomless Holes 1 and 2.png|360px]] | ||
|- | |- | ||
|At the fishing spot. | |At the fishing spot. | ||
|[[File:PMTOK Full Moon Island Not-Bottomless Hole 3.png| | |[[File:PMTOK Full Moon Island Not-Bottomless Hole 3.png|360px]] | ||
| | |-style="background: #ad7caa;font-size:120%;color:#202122" id="Question" | ||
|colspan=3|'''[[? Island|{{color|? Island|#202122}}]] ­ ­ ­ ­|­ ­ ­ ­ 6 Holes''' | |||
|- | |- | ||
|Two seen right away right of the small palm tree. | |Two seen right away right of the small palm tree. | ||
|[[File:PMTOK Question Mark Island Not-Bottomless Holes 1 and 2.png| | |[[File:PMTOK Question Mark Island Not-Bottomless Holes 1 and 2.png|360px]] | ||
|- | |- | ||
|Two right of the huge amount of ? Blocks. | |Two right of the huge amount of ? Blocks. | ||
|[[File:PMTOK Question Mark Island Not-Bottomless Holes 3 and 4.png| | |[[File:PMTOK Question Mark Island Not-Bottomless Holes 3 and 4.png|360px]] | ||
|- | |- | ||
|Two left of the huge amount of ? Blocks. One is in front of the Toad Statue and the second is next to the chest with Collectible Treasure, accessed by dropping down of the ledge with the previous one. The second one also turns into a door to the Sensor Lab's satellite office. | |Two left of the huge amount of ? Blocks. One is in front of the Toad Statue and the second is next to the chest with Collectible Treasure, accessed by dropping down of the ledge with the previous one. The second one also turns into a door to the Sensor Lab's satellite office. | ||
|[[File:PMTOK Question Mark Island Not-Bottomless Holes 5 and 6.png| | |[[File:PMTOK Question Mark Island Not-Bottomless Holes 5 and 6.png|360px]] | ||
| | |-style="background: #ad7caa;font-size:120%;color:#202122" id="IV Mountain" | ||
|colspan=3|'''[[Ice Vellumental Mountain|{{color|Ice Vellumental Mountain|#202122}}]] ­ ­ ­ ­|­ ­ ­ ­ 19 Holes''' | |||
|- | |- | ||
|Three in the ice floor of the second room and one on the wall. | |Three in the ice floor of the second room and one on the wall. | ||
|[[File:PMTOK Ice Vellumental Mountain Not-Bottomless Holes 1-4.png| | |[[File:PMTOK Ice Vellumental Mountain Not-Bottomless Holes 1-4.png|360px]] | ||
|- | |- | ||
|Two in the ice floor of the adjacent section. | |Two in the ice floor of the adjacent section. | ||
|[[File:PMTOK Ice Vellumental Mountain Not-Bottomless Holes 5 and 6.png| | |[[File:PMTOK Ice Vellumental Mountain Not-Bottomless Holes 5 and 6.png|360px]] | ||
|- | |- | ||
|In the stairs leading up to [[Sledge Bro]]. | |In the stairs leading up to [[Sledge Bro]]. | ||
|[[File:PMTOK Ice Vellumental Mountain Not-Bottomless Hole 7.png| | |[[File:PMTOK Ice Vellumental Mountain Not-Bottomless Hole 7.png|360px]] | ||
|- | |- | ||
|Two in the north wall of the next ice slab puzzle section. | |Two in the north wall of the next ice slab puzzle section. | ||
|[[File:PMTOK Ice Vellumental Mountain Not-Bottomless Holes 8 and 9.png| | |[[File:PMTOK Ice Vellumental Mountain Not-Bottomless Holes 8 and 9.png|360px]] | ||
|- | |- | ||
|On the ground in front of the precipice. | |On the ground in front of the precipice. | ||
|[[File:PMTOK Ice Vellumental Mountain Not-Bottomless Hole 10.png| | |[[File:PMTOK Ice Vellumental Mountain Not-Bottomless Hole 10.png|360px]] | ||
|- | |- | ||
|On the ground in the second opening next to the stairs with a HP heart floating above it. | |On the ground in the second opening next to the stairs with a HP heart floating above it. | ||
|[[File:PMTOK Ice Vellumental Mountain Not-Bottomless Hole 11.png| | |[[File:PMTOK Ice Vellumental Mountain Not-Bottomless Hole 11.png|360px]] | ||
|- | |- | ||
|Halfway up the precipice, at the base of the pillar. | |Halfway up the precipice, at the base of the pillar. | ||
|[[File:PMTOK Ice Vellumental Mountain Collectible Treasure 1.png| | |[[File:PMTOK Ice Vellumental Mountain Collectible Treasure 1.png|360px]] | ||
|- | |- | ||
|Two in the north wall of the following slab section and one on the west one. | |Two in the north wall of the following slab section and one on the west one. | ||
|[[File:PMTOK Ice Vellumental Mountain Not-Bottomless Holes 13-15.png| | |[[File:PMTOK Ice Vellumental Mountain Not-Bottomless Holes 13-15.png|360px]] | ||
|- | |- | ||
|In the northwest corner of this section. | |In the northwest corner of this section. | ||
|[[File:PMTOK Ice Vellumental Mountain Not-Bottomless Hole 16.png| | |[[File:PMTOK Ice Vellumental Mountain Not-Bottomless Hole 16.png|360px]] | ||
|- | |- | ||
|In the southeast corner of the adjacent section. | |In the southeast corner of the adjacent section. | ||
|[[File:PMTOK Ice Vellumental Mountain Not-Bottomless Hole 17.png| | |[[File:PMTOK Ice Vellumental Mountain Not-Bottomless Hole 17.png|360px]] | ||
|- | |- | ||
|Two next to the [[Save Block]] before the boss. | |Two next to the [[Save Block]] before the boss. | ||
|[[File:PMTOK Ice Vellumental Mountain Not-Bottomless Holes 18 and 19.png| | |[[File:PMTOK Ice Vellumental Mountain Not-Bottomless Holes 18 and 19.png|360px]] | ||
| | |-style="background: #ad7caa;font-size:120%;color:#202122" id="Sea Tower" | ||
|colspan=3|'''[[Sea Tower|{{color|Sea Tower|#202122}}]] ­ ­ ­ ­|­ ­ ­ ­ 18 Holes''' | |||
|- | |- | ||
|Three found after crossing the pillars: one on the ground near the Earth Vellumental room, one in the middle on the stairs, and one on the right wall. | |Three found after crossing the pillars: one on the ground near the Earth Vellumental room, one in the middle on the stairs, and one on the right wall. | ||
|[[File:PMTOK Sea Tower Not-Bottomless Holes 1-3.png| | |[[File:PMTOK Sea Tower Not-Bottomless Holes 1-3.png|360px]] | ||
|- | |- | ||
|On the pillar in the Earth Vellumental room seen right as Mario enters. | |On the pillar in the Earth Vellumental room seen right as Mario enters. | ||
|[[File:PMTOK Sea Tower Not-Bottomless Hole 4.png| | |[[File:PMTOK Sea Tower Not-Bottomless Hole 4.png|360px]] | ||
|- | |- | ||
|On the left pillar in the southwest corner of the room. | |On the left pillar in the southwest corner of the room. | ||
|[[File:PMTOK Sea Tower Not-Bottomless Hole 5.png| | |[[File:PMTOK Sea Tower Not-Bottomless Hole 5.png|360px]] | ||
|- | |- | ||
|Three are seen right away as Mario enters Fire Vellumental and Ice Vellumental room. | |Three are seen right away as Mario enters Fire Vellumental and Ice Vellumental room. | ||
|[[File:PMTOK Sea Tower 2nd Floor.jpg| | |[[File:PMTOK Sea Tower 2nd Floor.jpg|360px]] | ||
|- | |- | ||
|On the wall above the stairs before the sliding puzzle area. | |On the wall above the stairs before the sliding puzzle area. | ||
|[[File:PMTOK Sea Tower Not-Bottomless Hole 9.png| | |[[File:PMTOK Sea Tower Not-Bottomless Hole 9.png|360px]] | ||
|- | |- | ||
|Six in the sliding puzzle area, with 3 of them initially being hidden under clumps of snow. | |Six in the sliding puzzle area, with 3 of them initially being hidden under clumps of snow. | ||
|[[File:PMTOK Sea Tower Not-Bottomless Holes 10-15.png| | |[[File:PMTOK Sea Tower Not-Bottomless Holes 10-15.png|360px]] | ||
|- | |- | ||
|On the back wall of the small puzzle reset room. | |On the back wall of the small puzzle reset room. | ||
|[[File:PMTOK Sea Tower Not-Bottomless Hole 16.png| | |[[File:PMTOK Sea Tower Not-Bottomless Hole 16.png|360px]] | ||
|- | |- | ||
|On the back wall of the Fire Vellumental Cave room. | |On the back wall of the Fire Vellumental Cave room. | ||
|[[File:PMTOK Sea Tower Not-Bottomless Hole 17.png| | |[[File:PMTOK Sea Tower Not-Bottomless Hole 17.png|360px]] | ||
|- | |- | ||
|On the wall outside after the second floor. | |On the wall outside after the second floor. | ||
|[[File:PMTOK Sea Tower Not-Bottomless Hole 18.png| | |[[File:PMTOK Sea Tower Not-Bottomless Hole 18.png|360px]] | ||
|} | |} | ||
===[[Shangri-Spa]] | ==Green Streamer== | ||
{| | <imagemap> | ||
! | File:PMTOK Green Streamer Map.png|400px|thumb|Click an area to see the Not-Bottomless Holes found there. | ||
rect 341 231 489 257 [[#Spa|Shangri-Spa]] | |||
circle 318 242 16 [[#Spa|Shangri-Spa]] | |||
rect 2 69 217 94 [[#Jungle|Spring of Jungle Mist]] | |||
circle 108 146 16 [[#Jungle|Spring of Jungle Mist]] | |||
rect 23 317 231 346 [[#Rainbow|Spring of Rainbows]] | |||
circle 251 328 16 [[#Rainbow|Spring of Rainbows]] | |||
rect 227 117 413 144 [[#Bowser|Bowser's Castle]] | |||
circle 317 162 16 [[#Bowser|Bowser's Castle]] | |||
</imagemap><noinclude><!--[[Category:Image map templates]]--></noinclude> | |||
There are a total of 35 Not-Bottomless Holes to fill in the green streamer area: | |||
*[[Shangri-Spa]] has '''5 Holes''' | |||
*[[Spring of Jungle Mist]] has '''11 Holes''' | |||
*[[Spring of Rainbows]] has '''3 Holes''' | |||
*[[Bowser%27s_Castle#Paper_Mario:_The_Origami_King|Bowser's Castle]] has '''16 Holes''' | |||
{| style="text-align: center; width: 95%; margin: 0 auto; border: #73cb76; border-collapse: collapse;" border="1" cellpadding="4" cellspacing="1" | |||
|-style="background: #239D53;font-size:14pt;color:white" | |||
!Description | |||
!width="25%"|Image | |||
|-style="background: #73cb76;font-size:120%;color:#202122" id="Spa" | |||
|colspan=3|'''[[Shangri-Spa|{{color|Shangri-Spa|#202122}}]] ­ ­ ­ ­|­ ­ ­ ­ 5 Holes''' | |||
|- | |- | ||
|Down the steps behind the entrance hall building is a Not-Bottomless Hole Mario must fill in to reveal as a door to a [[Sensor Lab]] satellite office. | |Down the steps behind the entrance hall building is a Not-Bottomless Hole Mario must fill in to reveal as a door to a [[Sensor Lab]] satellite office. | ||
|[[File:PMTOK Shangri-Spa Not-Bottomless Hole 1.png| | |[[File:PMTOK Shangri-Spa Not-Bottomless Hole 1.png|360px]] | ||
|- | |- | ||
|Behind the bushes all the way on the northeast side of the plaza is a very small lift which takes Mario to a Not-Bottomless Hole serving as the door to a coffee shop. | |Behind the bushes all the way on the northeast side of the plaza is a very small lift which takes Mario to a Not-Bottomless Hole serving as the door to a coffee shop. | ||
|[[File:PMTOK Shangri-Spa Not-Bottomless Hole 2.png| | |[[File:PMTOK Shangri-Spa Not-Bottomless Hole 2.png|360px]] | ||
|- | |- | ||
|There is a Not-Bottomless Hole in the wall next to the chest containing Collectible Treasure #96: Water Vellumental Idol. | |There is a Not-Bottomless Hole in the wall next to the chest containing Collectible Treasure #96: Water Vellumental Idol. | ||
|[[File:PMTOK Shangri-Spa Not-Bottomless Hole 3.jpg| | |[[File:PMTOK Shangri-Spa Not-Bottomless Hole 3.jpg|360px]] | ||
|- | |- | ||
|There is a Not-Bottomless Hole on a blue pipe behind the [[Spring of Bliss]], from which cold water is leaking from. After defeating a [[Hammer Bro]] who is guarding this hole, Mario is required to fill it in to direct cold water into the hot spring. | |There is a Not-Bottomless Hole on a blue pipe behind the [[Spring of Bliss]], from which cold water is leaking from. After defeating a [[Hammer Bro]] who is guarding this hole, Mario is required to fill it in to direct cold water into the hot spring. | ||
|[[File:PMTOK Shangri-Spa Not-Bottomless Hole 4.png| | |[[File:PMTOK Shangri-Spa Not-Bottomless Hole 4.png|360px]] | ||
|- | |- | ||
|The final Not-Bottomless Hole is found within the ruins of the banquet hall. | |The final Not-Bottomless Hole is found within the ruins of the banquet hall. | ||
|[[File:PMTOK Shangri-Spa Not-Bottomless Hole 5.jpg| | |[[File:PMTOK Shangri-Spa Not-Bottomless Hole 5.jpg|360px]] | ||
| | |-style="background: #73cb76;font-size:120%;color:#202122" id="Jungle" | ||
|colspan=3|'''[[Spring of Jungle Mist|{{color|Spring of Jungle Mist|#202122}}]] ­ ­ ­ ­|­ ­ ­ ­ 11 Holes''' | |||
|- | |- | ||
|Along the second wrong path. | |Along the second wrong path. | ||
|[[File:PMTOK Spring of Jungle Mist Not-Bottomless Hole 1.png| | |[[File:PMTOK Spring of Jungle Mist Not-Bottomless Hole 1.png|360px]] | ||
|- | |- | ||
|Two along the second right path. Filling these two provides access to the ? Block and Collectible Treasure chest. | |Two along the second right path. Filling these two provides access to the ? Block and Collectible Treasure chest. | ||
|[[File:PMTOK Spring of Jungle Mist Not-Bottomless Holes 2 and 3.png| | |[[File:PMTOK Spring of Jungle Mist Not-Bottomless Holes 2 and 3.png|360px]] | ||
|- | |- | ||
|Two at the supposed dead end. | |Two at the supposed dead end. | ||
|[[File:PMTOK Spring of Jungle Mist Not-Bottomless Holes 4 and 5.png| | |[[File:PMTOK Spring of Jungle Mist Not-Bottomless Holes 4 and 5.png|360px]] | ||
|- | |- | ||
|On the other side of the broken bridge while looking for a way to lower the ladder, Mario comes across another 5 holes. | |On the other side of the broken bridge while looking for a way to lower the ladder, Mario comes across another 5 holes. | ||
|[[File:PMTOK Spring of Jungle Mist Not-Bottomless Holes 6-10.png| | |[[File:PMTOK Spring of Jungle Mist Not-Bottomless Holes 6-10.png|360px]] | ||
|- | |- | ||
|In the side of the treetop below the second ladder. | |In the side of the treetop below the second ladder. | ||
|[[File:PMTOK Spring of Jungle Mist Not-Bottomless Hole 11.png| | |[[File:PMTOK Spring of Jungle Mist Not-Bottomless Hole 11.png|360px]] | ||
| | |-style="background: #73cb76;font-size:120%;color:#202122" id="Rainbow" | ||
|colspan=3|'''[[Spring of Rainbows|{{color|Spring of Rainbows|#202122}}]] ­ ­ ­ ­|­ ­ ­ ­ 3 Holes''' | |||
|- | |- | ||
|There is a [[Not-Bottomless Hole]] in the wall at the start of the cavern section. | |There is a [[Not-Bottomless Hole]] in the wall at the start of the cavern section. | ||
|[[File:SpringofRainbowsHoleA.jpg| | |[[File:SpringofRainbowsHoleA.jpg|360px]] | ||
|- | |- | ||
|There is a Not-Bottomless Hole in the wall near the start of the cavern section, right after the first [[Fuzzy]]. | |There is a Not-Bottomless Hole in the wall near the start of the cavern section, right after the first [[Fuzzy]]. | ||
|[[File:SpringofRainbowsHoleB.jpg| | |[[File:SpringofRainbowsHoleB.jpg|360px]] | ||
|- | |- | ||
|There is a Not-Bottomless Hole serving as the door to a coffee shop behind the spring. | |There is a Not-Bottomless Hole serving as the door to a coffee shop behind the spring. | ||
|[[File:SpringofRainbowsHoleC.jpg| | |[[File:SpringofRainbowsHoleC.jpg|360px]] | ||
| | |-style="background: #73cb76;font-size:120%;color:#202122" id="Bowser" | ||
|colspan=3|'''[[Bowser%27s_Castle#Paper_Mario:_The_Origami_King|{{color|Bowser's Castle|#202122}}]] ­ ­ ­ ­|­ ­ ­ ­ 16 Holes''' | |||
|- | |- | ||
|On the ground level of the mess hall, on the right wall. | |On the ground level of the mess hall, on the right wall. | ||
|[[File:PMTOK Bowser's Castle Not-Bottomless Hole 1.png| | |[[File:PMTOK Bowser's Castle Not-Bottomless Hole 1.png|360px]] | ||
|- | |- | ||
|Two on the wall in the elevated section of the mess hall. | |Two on the wall in the elevated section of the mess hall. | ||
|[[File:PMTOK Folded Soldiers Feast alt.png| | |[[File:PMTOK Folded Soldiers Feast alt.png|360px]] | ||
|- | |- | ||
|On the wall after going up the right stairs. | |On the wall after going up the right stairs. | ||
|[[File:PMTOK Bowser's Castle Not-Bottomless Hole 4.png| | |[[File:PMTOK Bowser's Castle Not-Bottomless Hole 4.png|360px]] | ||
|- | |- | ||
|Two on the left side, one on the stairs and second on the wall. | |Two on the left side, one on the stairs and second on the wall. | ||
|[[File:PMTOK Bowser's Castle Not-Bottomless Holes 5 and 6.png| | |[[File:PMTOK Bowser's Castle Not-Bottomless Holes 5 and 6.png|360px]] | ||
|- | |- | ||
|Seen right away as Mario enters a room leading to enemy quarters. | |Seen right away as Mario enters a room leading to enemy quarters. | ||
|[[File:PMTOK Bowser's Castle Not-Bottomless Hole 7.png| | |[[File:PMTOK Bowser's Castle Not-Bottomless Hole 7.png|360px]] | ||
|- | |- | ||
|After going through pile of rubble, there are three holes on the left of the red carpet with one on the wall, one on the pillar and one on the ground. | |After going through pile of rubble, there are three holes on the left of the red carpet with one on the wall, one on the pillar and one on the ground. | ||
|[[File:PMTOK Bowser's Castle Not-Bottomless Holes 8-10.png| | |[[File:PMTOK Bowser's Castle Not-Bottomless Holes 8-10.png|360px]] | ||
|- | |- | ||
|Continuing on the red carpet, another three holes are seen with one on the broken pillar, one on the painting and one on the ground above the carpet. | |Continuing on the red carpet, another three holes are seen with one on the broken pillar, one on the painting and one on the ground above the carpet. | ||
|[[File:PMTOK Bowser's Castle Not-Bottomless Holes 11-13.png| | |[[File:PMTOK Bowser's Castle Not-Bottomless Holes 11-13.png|360px]] | ||
|- | |- | ||
|Two on the last two doors in the enemy quarters. | |Two on the last two doors in the enemy quarters. | ||
|[[File:PMTOK Bowser's Castle Not-Bottomless Holes 14 and 15.png| | |[[File:PMTOK Bowser's Castle Not-Bottomless Holes 14 and 15.png|360px]] | ||
|- | |- | ||
|In the room after going through the first door in the enemy quarters. | |In the room after going through the first door in the enemy quarters. | ||
|[[File:PMTOK Bowser's Castle Not-Bottomless Hole 16.png| | |[[File:PMTOK Bowser's Castle Not-Bottomless Hole 16.png|360px]] | ||
|} | |} | ||
== | ==Statistics== | ||
This chart shows the number of Not-Bottomless Holes for each location, with the total amount at the bottom. | |||
{|class="sortable" width=30% border=1 cellpadding=2 style="text-align: center; border-collapse: collapse; border: 1px solid black" | |||
|-style="background:Peru" | |||
!data-sort-type="alphabetical"|Location | |||
!data-sort-type="number"|Count | |||
|- | |||
|[[Whispering Woods]] | |||
|25 | |||
|- | |||
|[[Toad_Town#Paper_Mario:_The_Origami_King|Toad Town]] | |||
|16 | |||
|- | |||
|[[Graffiti Underground]] | |||
|5 | |||
|- | |||
|[[Picnic Road]] | |||
|17 | |||
|- | |||
|[[Overlook Mountain]] | |||
|19 | |||
|- | |||
|[[Earth Vellumental Temple]] | |||
|11 | |||
|- | |||
|[[Overlook Tower]] | |||
|3 | |||
|- | |||
|[[Autumn Mountain]] | |||
|18 | |||
|- | |||
|[[Chestnut Valley]] | |||
|12 | |||
|- | |||
|[[Water Vellumental Shrine]] | |||
|10 | |||
|- | |||
|[[Eddy River]] | |||
|8 | |||
|- | |||
|[[Shogun Studios]] | |||
|21 | |||
|- | |||
|[[Ninja Attraction]] | |||
|2 | |||
|- | |||
|[[Sweetpaper Valley]] | |||
|6 | |||
|- | |||
|[[Scorching Sandpaper Desert]] | |||
|12 | |||
|- | |||
|[[Scorching Sandpaper West]] | |||
|5 | |||
|- | |||
|[[Scorching Sandpaper East]] | |||
|5 | |||
|- | |||
|[[Shroom City (Paper Mario: The Origami King)|Shroom City]] | |||
|6 | |||
|- | |||
|[[Scorching Sandpaper Far West]] | |||
|2 | |||
|- | |||
|[[Scorching Sandpaper Far East]] | |||
|2 | |||
|- | |||
|[[Fire Vellumental Cave]] | |||
|10 | |||
|- | |||
|[[Temple of Shrooms]] | |||
|21 | |||
|- | |||
|[[The Princess Peach]] | |||
|20 | |||
|- | |||
|[[Bonehead Island]] | |||
|5 | |||
|- | |||
|[[Heart Island]] | |||
|5 | |||
|- | |||
|[[Spade Island]] | |||
|1 | |||
|- | |||
|[[Club Island]] | |||
|1 | |||
|- | |||
|[[Full Moon Island]] | |||
|3 | |||
|- | |||
|[[? Island]] | |||
|6 | |||
|- | |||
|[[Ice Vellumental Mountain]] | |||
|19 | |||
|- | |||
|[[Sea Tower]] | |||
|18 | |||
|- | |||
|[[Shangri-Spa]] | |||
|5 | |||
|- | |||
|[[Spring of Jungle Mist]] | |||
|11 | |||
|- | |||
|[[Spring of Rainbows]] | |||
|3 | |||
|- | |||
|[[Bowser%27s_Castle#Paper_Mario:_The_Origami_King|Bowser's Castle]] | |||
|16 | |||
|-style="background:gold" | |||
!'''Total''' | |||
!349 | |||
|} | |||
==Names in other languages== | ==Names in other languages== | ||
| Line 1,008: | Line 1,198: | ||
|KorM=Empty Hole | |KorM=Empty Hole | ||
}} | }} | ||
==See also== | |||
*[[List of hidden Toads in Paper Mario: The Origami King]] | |||
*[[List of ? Blocks in Paper Mario: The Origami King]] | |||
*[[List of Collectible Treasures in Paper Mario: The Origami King]] | |||
{{PMTOK}} | {{PMTOK}} | ||
[[Category:Item locations|Not-Bottomless Holes in Paper Mario: The Origami King]] | [[Category:Item locations|Not-Bottomless Holes in Paper Mario: The Origami King]] | ||
[[Category:Paper Mario: The Origami King]] | |||
[[Category:Paper Mario: The Origami King objects]] | [[Category:Paper Mario: The Origami King objects]] | ||
[[it:Strappi strambi]] | [[it:Strappi strambi]] | ||
Latest revision as of 20:34, May 11, 2023

- “Do you see that huge hole in the ground? I don't think you'd like falling into it! Maybe there's a way to fix it... But how? Hmm...”
- —Olivia, Paper Mario: The Origami King
Not-Bottomless Holes are types of terrain found in almost every area in Paper Mario: The Origami King, mainly caused by Paper Macho Soldiers. They can be filled up by using confetti, with the amount needed to fix them depending on their size. If Mario falls into one, he loses seven HP. Not-Bottomless Holes work similarly to colorless spots from Paper Mario: Color Splash; completely filling a hole with confetti causes the hole to turn back to normal, usually rewarding the player with several coins. Filling in all of the Not-Bottomless Holes in a given area will show a message informing the player that all of the holes in the area have been repaired, and the music for that area will be unlocked within the Musée Champignon Sound Gallery. This page lists the locations of all 349 Not-Bottomless Holes, including pictures and information on where exactly they are.
NOTES:
- Some holes are found in areas that are inaccessible until returning later; these entries are highlighted in beige.
- Locations absent from the list contain no Not-Bottomless Holes, specifically: Big Sho' Theater, Breezy Tunnel, Scorching Sandpaper Minor, The Great Sea, Mushroom Island, Hammer Island, Scuffle Island, Diamond Island, Hotfoot Crater, Peach's Castle, and Origami Castle.
Red StreamerEdit
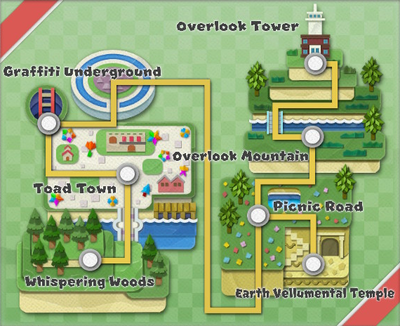
There are a total of 96 Not-Bottomless Holes to fill in the red streamer area:
- Whispering Woods have 25 Holes
- Graffiti Underground has 16 Holes
- Toad Town has 5 Holes
- Picnic Road has 17 Holes
- Overlook Mountain has 19 Holes
- Earth Vellumental Temple has 11 Holes
- Overlook Tower has 3 Holes
| Description | Image | |
|---|---|---|
| Whispering Woods | 25 Holes | ||
| On the path south of where Mario falls after getting out of the tree at the start of Whispering Woods. The first Not-Bottomless Hole in the game and is required to save Olivia. | 
| |
| Near the first Save Block, in the second area of Whispering Woods. | 
| |
| In the dark area, to the left of a tree that is to the left of a spike trap. | 
| |
| In front of the spike trap mentioned above. | 
| |
| Behind the spike trap mentioned above, below a ? Block. | 
| |
| On the left of the declining path south of the spike trap mentioned above. | 
| |
| To the right of the next spike trap after the decline. | 
| |
| On the side of a small cliff, to the left of the trees with vines. | 
| |
| Under the vine in the bottom-right of the area. | 
| |
| South of the golden ball, right on the ledge. | 
| |
| On a path north-east of the golden ball, before entering the area where Ol' Grandsappy can be found. | 
| |
| Near the save block on the way to the spring. | 
| |
| On the left of the declining path, directly after the hole above. | 
| |
| Blocking the path towards the spring. | 
| |
| To the left of the tree after the small drop, in front of the spring. | 
| |
| South-west of the above hole, left of an origami Goomba that was hiding in a bush. | 
| |
| Can be found by going left past the platform used to throw items into the spring. | 
| |
| To the right of the tree that is to the right of the spring. | 
| |
| On Ol' Grandsappy. | 
| |
| On the path after knocking over the white fence. | 
| |
| In front of the zipped-up tent that is on the left of the path. | 
| |
| Behind the path just before crossing the bridge. | 
| |
| In between the bench and the undercover picnic tables. | 
| |
| In front of the second picnic table. | 
| |
| To the right of the log cabin. | 
| |
| Toad Town | 16 Holes | ||
| Immediately seen at the start of the Toad Town area. | 
| |
| On the path after defeating Origami Goombas. | 
| |
| After the path starts heading downwards, multiple ledges are seen. Hole is on the highest ledge under the ? Block. | 
| |
| In the wall after the ledges. | 
| |
| Left of the entrance to Toad Town. | 
| |
| In front of the Battle Lab. | 
| |
| On the house which was being eaten by Paper Macho Goomba. | 
| |
| On the door of the red brick house next to the harbor. | 
| |
| On the ground between the fountain and red brick house. | 
| |
| In front of the mansion's entrance. | 
| |
| Under the mansion's scafolding. | 
| |
| On the bottom floor of the mansion. | 
| |
| In front of the stairs south of the house with Graffiti Underground entrance. | 
| |
| On the house reached by the stairs opposite the house with captive Red Shy Guy. | 
| |
| On the door of the house with the captive Red Shy Guy. | 
| |
| Required: Rescue the owner of the shop in Picnic Road. On the ground in the Fun, Funky, Functional Accessories Shop. |

| |
| Graffiti Underground | 5 Holes | ||
| After turning on the light in the first area, the hole is seen left of the ladder. | 
| |
| Left of the stairs in the second area. | 
| |
| Left of the handrail in the drainage pipe area. | 
| |
| On the wall above the drainage pipe. | 
| |
| At the very end of the last area on the wall. | 
| |
| Picnic Road | 17 Holes | ||
| Immediately seen on the left after entering the Picnic Road area. | 
| |
| Also immediately seen, this time on the wall next to the path. | 
| |
| In front of the white fence | 
| |
| Above the previous one, left of of the path. | 
| |
| On the path, next to a hole with ? Block above it. | 
| |
| Right of the path and under the ? Block. | 
| |
| In front of a tree with hedge fence next to it. | 
| |
| On the path in front of the Sensor Lab. | 
| |
| Right of the previous one. | 
| |
| Under the Red Toad butterfly, seen right of the Sensor Lab. | 
| |
| South of the goal pole. | 
| |
| South of the highest ? Block in the area. | 
| |
| Under the previous one, next to a tree. | 
| |
| On the wall, right of the small lake. | 
| |
| Also on the wall, above the stairs leading to Earth Vellumental Temple entrance. | 
| |
| In the corner after going down the first set of stairs leading to Earth Vellumental Temple entrance. | 
| |
| On the stairs seen in front of the Earth Vellumental Temple entrance. | 
| |
| Overlook Mountain | 19 Holes | ||
| Immediately seen on the wall after entering Overlook Mountain area. | 
| |
| Under the bench area with blue roof. | 
| |
| Right of the blue roof, under the ? Block. | 
| |
| On the path above the first ? Block. | 
| |
| On the wall, left of the Monty Mole auctioner. | 
| |
| On the tree left of the pipe to Musée Champignon. | 
| |
| Between the tree and bridge. | 
| |
| Behind previously mentioned trees is a secret ledge. On it is another hole. | 
| |
| Left of the other end of the bridge, under a Toad stuck on the wall. | 
| |
| Right of the other end of the bridge. | 
| |
| Right of the Save Block. | 
| |
| Left of the fishing spot, under a ? Block. | 
| |
| Continuing from previous one to the left takes Mario into a secret area with treasure chest and hole. | 
| |
| After defeating a row of Thwomps with Superstar, this hole is seen on the left on the wall. | 
| |
| After defeating a row of Thwomps with Superstar, this hole is seen on the right on the wall. | 
| |
| Continuing from previous one, keep going to the right to find another hole in the corner with ? Block above it. | 
| |
| In front of the wooden stairs in the tram area. | 
| |
| After the wooden stairs, this hole is seen on the wall. | 
| |
| Required: Destroy the red streamer. On the stairs in front of the tram to Autumn Mountain. |

| |
| Earth Vellumental Temple | 11 Holes | ||
| After the first Save Block, on one of the pillars | 
| |
| To the right of the Earth Vellumental-like platform | 
| |
| Near the ? Block after fixing Not-Bottomless Hole #2 | 
| |
| On the pillar that gets the player back up from the pit | 
| |
| After being pushed off by the pushing pillars | 
| |
| After passing the pushing pillars | 
| |
| Before the Save Block, on the right side of the ledge | 
| |
| Two are before the double fire trap | 
| |
| On the floor before the stronger fire trap | 
| |
| After avoiding the gigantic shell | 
| |
| Overlook Tower | 3 Holes | ||
| In front of the elevator on the first floor. | 
| |
| In front of the stairs on the first floor. | 
| |
| In front of the stairs on the second floor leading to the third floor. | 
| |
Blue StreamerEdit
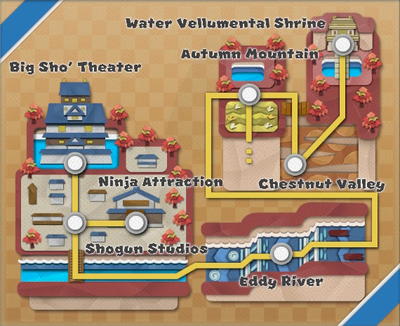
There are a total of 71 Not-Bottomless Holes to fill in the blue streamer area:
- Autumn Mountain has 18 Holes
- Chestnut Valley has 12 Holes
- Water Vellumental Shrine has 10 Holes
- Eddy River has 8 Holes
- Shogun Studios have 21 Holes
- Ninja Attraction has 2 Holes
| Description | Image | |
|---|---|---|
| Autumn Mountain | 18 Holes | ||
| In the area near the tram are 4 holes - one in the fence in the foreground, two in the ground near the tree, and one tucked away in the wall behind the tree. | 
| |
| At the end of the hidden cave underneath the tall grass field. This one must be repaired to get out of the cave. | 
| |
| In front of the wooden gate after the wooden bridge. | 
| |
| After going up the 3 sets of wooden stairs next to the wooden bench. This hole is transformed into a Sensor Lab's satellite office door. | 
| |
| On the side of the mountain, left of the bench and satellite office door. | 
| |
| On the right side of the cliff wall, near the bridge. | 
| |
| On the wall in a secluded area reached by a pipe on the right side of the shrine. | 
| |
| There are 3 holes left of the Water Vellumental Temple entrance, surrounding the ? Block. | 
| |
| Required: Navigate Chestnut Valley. After leaving Chestnut Valley, this hole is seen on the wall to the right. |

| |
| Required: Navigate Chestnut Valley. Continue from previous one to reach wooden stairs and wooden fence. In this fence is a hole. Mario has to drop down to reach another two holes. |

| |
| Required: Eddy River is filled. The last Not-Bottomless Hole can be found on the ledge adjacent the lake, left of the treasure chest in the middle. |

| |
| Chestnut Valley | 12 Holes | ||
| Three at the start of the level with two in the wall and one in the ground. | 
| |
| In the wall between the second and third sections. | 
| |
| In the wall behind the tree with 3 yellow Toads. | 
| |
| In the wall behind the Galoomba tree. | 
| |
| In the cliff wall near the end of the slope after the Save Block. | 
| |
| In the cliff wall at the start of the final slope section. | 
| |
| In the cliff wall at the end of the final slope section. | 
| |
| Water Vellumental Shrine | 10 Holes | ||
| In the ground in the southwest corner of the main room. | 
| |
| In the stairs leading up to the room with the easier tile puzzle. | 
| |
| In the ground in the southeast corner of the main room. | 
| |
| Below the wheel, guarded by Swoops. | 
| |
| On the right wall at the start of the breakable block room. | 
| |
| On the left wall in the middle of the breakable block room. | 
| |
| Beneath one of the breakable blocks closer to the entrance of the room. | 
| |
| In the wall in the northeast corner of the room with the smaller stone dragon head. | 
| |
| In the right side of the cavern area. | 
| |
| On the other side of the cavern in the shape of a mushroom, revealed to be the door to a coffee shop when filled in. | 
| |
| Eddy River | 8 Holes | ||
| On the ground just before the first waterfall. | 
| |
| On the wall before the second and third waterfalls. | 
| |
| In the section with driftwood, on the wall before the fourth waterfall. | 
| |
| In the section with falling rocks, on the ground under the third one. | 
| |
| In the section with falling rocks and driftwood, on the ground under the second fallen rock. | 
| |
| In the same section, on the wall above the third fallen rock. | 
| |
| In the section with mini whirlpools, on the wall just after the second top whirpool. | 
| |
| On the wall after the massive whirlpool and wooden tunnel. | 
| |
| Shogun Studios | 21 Holes | ||
| Found by going right from the Save Block found in front of the Big Sho' Theater. | 
| |
| In front of the hidden entrance to the staff room. | 
| |
| Under the tree in front of the staff room door. | 
| |
| On the wall, right of the Shuriken Dojo. | 
| |
| Found near the water by going right from the intersection in the middle of the park. | 
| |
| Above the previous two, around the house. | 
| |
| In front of the right parasol, found in front of Tranquil Pipes Teahouse. | 
| |
| After getting Princess the Bone, found in front of the Ninja Attraction | 
| |
| Found left of the Ninja Attraction, near the Olly Tape. | 
| |
| Found on the first door on the left from the intersection in the middle of the park. | 
| |
| In front of the Lookout Tower, on the wall. | 
| |
| Between the Lookout Tower and Dress-Up Photo Studio, next to the wheelbarrow. | 
| |
| Required: Shogun Studios Master Key. Found by unlocking the door near the training Ninjis and going left. This hole becomes a door to the satellite office of Sensor Lab. |

| |
| Ninja Attraction | 2 Holes | ||
| Found in the maintenance room, below Luigi when he is stuck in the gears. | 
| |
| In the back wall above the spike floor room. | 
| |
Yellow StreamerEdit
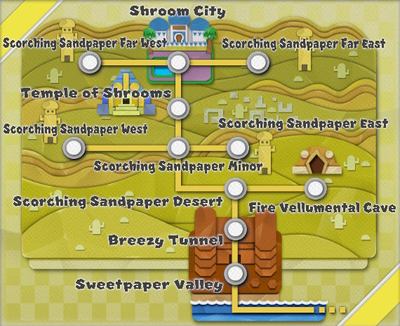
There are a total of 69 Not-Bottomless Holes to fill in the yellow streamer area:
- Sweetpaper Valley has 6 Holes
- Scorching Sandpaper Desert has 12 Holes
- Scorching Sandpaper West has 5 Holes
- Scorching Sandpaper East has 5 Holes
- Shroom City has 6 Holes
- Scorching Sandpaper Far West has 2 Holes
- Scorching Sandpaper Far East has 2 Holes
- Fire Vellumental Cave has 10 Holes
- Temple of Shrooms has 21 Holes
| Description | Image | |
|---|---|---|
| Sweetpaper Valley | 6 Holes | ||
| These three are visible right at the start of the area. | 
| |
| Continuing forward, these two can be seen under the left box and between the first and second bushes respectively. | 
| |
| On the left just before the entrance to Breezy Tunnel. | 
| |
| Scorching Sandpaper Desert | 12 Holes | ||
| In the wall rounding the altar and the ruins. | 
| |
| In the ground just before the narrow path to Scorching Sandpaper Minor. | 
| |
| In the cliff wall next to the origami lizard. | 
| |
| Above the previous one, revealed to be the door to a Sensor Lab when filled in. | 
| |
| In the wall rounding out the southwestern area of the desert. | 
| |
| Two in the ground at the start of the ruins section and another one in the wall above the ruins, next to the ? Block. | 
| |
| Below a ? Block in the southwestern portion of the desert. | 
| |
| In the southeastern part of the ruins. | 
| |
| At the end of the hidden area to the right of the ruins revealed to be the door to a coffee shop when filled in. | 
| |
| On the sarcophagus in the tower. | 
| |
| Scorching Sandpaper West | 5 Holes | ||
| Seen right away as Mario enters the area on the upper wall. | 
| |
| Near the wall under the fourth cactus. | 
| |
| Right of the Desert Tower, near the wall. | 
| |
| On the wall left of the Desert Tower. | 
| |
| On the sarcophagus in the tower. | 
| |
| Scorching Sandpaper East | 5 Holes | ||
| On the wall in the northwestern part of the ruins | 
| |
| In the middle of the ruins, partially hidden by bricks. | 
| |
| From the opening that leads to the previous one, Mario must go to the right to find another, smaller one. | 
| |
| Two in the eastern part of the ruins. | 
| |
| Shroom City | 6 Holes | ||
| Right of the Save Block. | 
| |
| Right of the first stairs leading to the hotel. | 
| |
| Between first and second stairs leading to the hotel. | 
| |
| Going left from the reception and then into the left door, seen next to the bed on the wall. | 
| |
| Going right from the reception and then into the right door, seen next to the bed on the wall. | 
| |
| Required: Destroy the yellow streamer. In the area behind the accessory shop is a hole that when filled is transformed into a café. |

| |
| Scorching Sandpaper Far West | 2 Holes | ||
| Seen right away as Mario enters the area, surrounded by 3 glowing spots that Professor Toad can dig up. | 
| |
| Left of the Desert Tower, on the wall. | 
| |
| Scorching Sandpaper Far East | 2 Holes | ||
| Right of the Desert Tower, with one above on the wall and another one under on the ground. | 
| |
| Fire Vellumental Cave | 10 Holes | ||
| In the ground on the north end of the second room, near a Save Block. | 
| |
| Two on the wall of the third room. | 
| |
| In the ground at the end of the first path in the sixth room. | 
| |
| In the ground near the middle of this section, below a ? Block containing a Shiny Mushroom. | 
| |
| Two on the wall at the end of this room. | 
| |
| On the wall in the seventh room. | 
| |
| Two are seen right away in the ground near the start of the tenth room. | 
| |
| Temple of Shrooms | 21 Holes | ||
| Right at the start of the area, on the left on the wall. | 
| |
| In the second room, seen right away on the right on the wall. | 
| |
| In the same room, on the left in the pillar. | 
| |
| In the third room, on the ground in the corridor. | 
| |
| Continuing forward, next one is on the wall. | 
| |
| On the ground in the same corridor as last two. | 
| |
| Last in this corridor, in front of the Save Block. | 
| |
| In the fourth room (the one with Paper Macho Mummy Goombas), seen right away on the wall as Mario enters. | 
| |
| In the same room, on the right wall. | 
| |
| Two in the room right of the room where the first faceless Toad have been encountered, surrounding a Collectible Treasure chest. | 
| |
| In the room after the room where the party sees faceless Toads in a huge spiderweb for the first time, right as Mario enters. | 
| |
| In the same room, seen after the second statue falls down and breaks. | 
| |
| In the same room, at the right end. | 
| |
| Two in the next room (the one where Mario has to hammer a star to make stairs appear), seen right as Mario enters. | 
| |
| In the same room, on the left next to the ? Block. | 
| |
| In the room with boss arena, left of the right inactive Paper Macho Shy Guy. | 
| |
| In the room with 15 pushable sarcophagi, on the left wall. | 
| |
| In the same room, on the right wall. | 
| |
| In the next room (the one with Thrills at Night disc), seen on the ground. | 
| |
Purple StreamerEdit
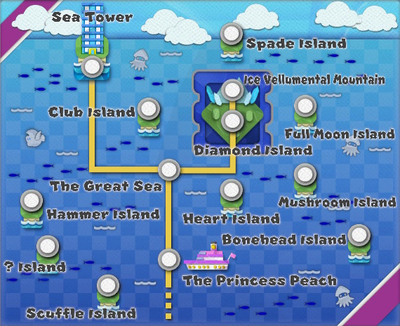
There are a total of 78 Not-Bottomless Holes to fill in the purple streamer area:
- The Princess Peach has 20 Holes
- Bonehead Island has 5 Holes
- Heart Island has 5 Holes
- Spade Island has 1 Hole
- Club Island has 1 Hole
- Full Moon Island has 3 Holes
- ? Island has 6 Holes
- Ice Vellumental Mountain has 19 Holes
- Sea Tower has 18 Holes
| Description | Image | |
|---|---|---|
| The Princess Peach | 20 Holes | ||
| Three in the pool area. | 
| |
| Two on the second floor deck, in front of the barricaded door. | 
| |
| On the smokestack next to the MAX UP Heart chest. | 
| |
| In the center of the first floor room with the elevator and another one on the wall to the right of it. | 
| |
| On the ground, left of the previous two. | 
| |
| In the hallway between main hall and lounge. | 
| |
| In the middle of the lounge. | 
| |
| On the wall in the stairway room with the ladder to the ship's hold. | 
| |
| Four on the left side of the first room of the ship's hold. The one in the corner is at first hidden by a breakable crate. | 
| |
| In the engine room, Mario must find the gap in the upper railing, drop down and go left to find another two. | 
| |
| On the wall, at the end of the engine room's stairs. | 
| |
| In the machinery in the southwest corner of this room. | 
| |
| Bonehead Island | 5 Holes | ||
| 4 holes seen right away from the ship as it arrives on the island. | 
| |
| Going right until a screen changes, there is another hole next to a lone ? Block. When filled in, this hole becomes a door to the café. | 
| |
| Heart Island | 5 Holes | ||
| Two are seen right away as the ship reaches the island. | 
| |
| Right of the heart shaped pillar on the ground. | 
| |
| Two to the left of the heart shaped pillar. | 
| |
| Spade Island | 1 Hole | ||
| On the west side of the island. Repairing this hole reveals two large barrels. This is required to rescue one of the hidden Toads on the island. | 
| |
| Club Island | 1 Hole | ||
| Found in front of the bench. | 
| |
| Full Moon Island | 3 Holes | ||
| Seen right away as Mario steps on the island from the dock. | 
| |
| At the fishing spot. | 
| |
| ? Island | 6 Holes | ||
| Two seen right away right of the small palm tree. | 
| |
| Two right of the huge amount of ? Blocks. | 
| |
| Two left of the huge amount of ? Blocks. One is in front of the Toad Statue and the second is next to the chest with Collectible Treasure, accessed by dropping down of the ledge with the previous one. The second one also turns into a door to the Sensor Lab's satellite office. | 
| |
| Ice Vellumental Mountain | 19 Holes | ||
| Three in the ice floor of the second room and one on the wall. | 
| |
| Two in the ice floor of the adjacent section. | 
| |
| In the stairs leading up to Sledge Bro. | 
| |
| Two in the north wall of the next ice slab puzzle section. | 
| |
| On the ground in front of the precipice. | 
| |
| On the ground in the second opening next to the stairs with a HP heart floating above it. | 
| |
| Halfway up the precipice, at the base of the pillar. | 
| |
| Two in the north wall of the following slab section and one on the west one. | 
| |
| In the northwest corner of this section. | 
| |
| In the southeast corner of the adjacent section. | 
| |
| Two next to the Save Block before the boss. | 
| |
| Sea Tower | 18 Holes | ||
| Three found after crossing the pillars: one on the ground near the Earth Vellumental room, one in the middle on the stairs, and one on the right wall. | 
| |
| On the pillar in the Earth Vellumental room seen right as Mario enters. | 
| |
| On the left pillar in the southwest corner of the room. | 
| |
| Three are seen right away as Mario enters Fire Vellumental and Ice Vellumental room. | 
| |
| On the wall above the stairs before the sliding puzzle area. | 
| |
| Six in the sliding puzzle area, with 3 of them initially being hidden under clumps of snow. | 
| |
| On the back wall of the small puzzle reset room. | 
| |
| On the back wall of the Fire Vellumental Cave room. | 
| |
| On the wall outside after the second floor. | 
| |
Green StreamerEdit
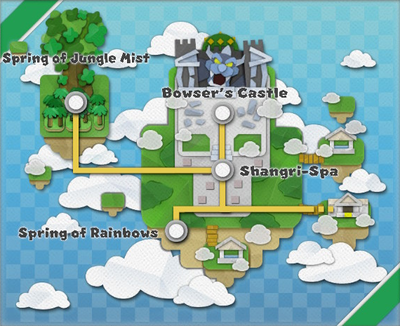
There are a total of 35 Not-Bottomless Holes to fill in the green streamer area:
- Shangri-Spa has 5 Holes
- Spring of Jungle Mist has 11 Holes
- Spring of Rainbows has 3 Holes
- Bowser's Castle has 16 Holes
| Description | Image | |
|---|---|---|
| Shangri-Spa | 5 Holes | ||
| Down the steps behind the entrance hall building is a Not-Bottomless Hole Mario must fill in to reveal as a door to a Sensor Lab satellite office. | 
| |
| Behind the bushes all the way on the northeast side of the plaza is a very small lift which takes Mario to a Not-Bottomless Hole serving as the door to a coffee shop. | 
| |
| There is a Not-Bottomless Hole in the wall next to the chest containing Collectible Treasure #96: Water Vellumental Idol. | 
| |
| There is a Not-Bottomless Hole on a blue pipe behind the Spring of Bliss, from which cold water is leaking from. After defeating a Hammer Bro who is guarding this hole, Mario is required to fill it in to direct cold water into the hot spring. | 
| |
| The final Not-Bottomless Hole is found within the ruins of the banquet hall. | 
| |
| Spring of Jungle Mist | 11 Holes | ||
| Along the second wrong path. | 
| |
| Two along the second right path. Filling these two provides access to the ? Block and Collectible Treasure chest. | 
| |
| Two at the supposed dead end. | 
| |
| On the other side of the broken bridge while looking for a way to lower the ladder, Mario comes across another 5 holes. | 
| |
| In the side of the treetop below the second ladder. | 
| |
| Spring of Rainbows | 3 Holes | ||
| There is a Not-Bottomless Hole in the wall at the start of the cavern section. | 
| |
| There is a Not-Bottomless Hole in the wall near the start of the cavern section, right after the first Fuzzy. | 
| |
| There is a Not-Bottomless Hole serving as the door to a coffee shop behind the spring. | 
| |
| Bowser's Castle | 16 Holes | ||
| On the ground level of the mess hall, on the right wall. | 
| |
| Two on the wall in the elevated section of the mess hall. | 
| |
| On the wall after going up the right stairs. | 
| |
| Two on the left side, one on the stairs and second on the wall. | 
| |
| Seen right away as Mario enters a room leading to enemy quarters. | 
| |
| After going through pile of rubble, there are three holes on the left of the red carpet with one on the wall, one on the pillar and one on the ground. | 
| |
| Continuing on the red carpet, another three holes are seen with one on the broken pillar, one on the painting and one on the ground above the carpet. | 
| |
| Two on the last two doors in the enemy quarters. | 
| |
| In the room after going through the first door in the enemy quarters. | 
| |
StatisticsEdit
This chart shows the number of Not-Bottomless Holes for each location, with the total amount at the bottom.
Names in other languagesEdit
| Language | Name | Meaning |
|---|---|---|
| Japanese | スカスカ穴 Sukasuka Ana |
Hollow Hole |
| German | Grundloses Loch |
both "meaningless hole" and "bottomless hole" |
| Italian | Strappo strambo |
Odd rip |
| Korean | 텅텅구멍 Teongteong Gumeong |
Empty Hole |
| Spanish | Agujero con fondo |
Hole with Bottom |
See alsoEdit
- List of hidden Toads in Paper Mario: The Origami King
- List of ? Blocks in Paper Mario: The Origami King
- List of Collectible Treasures in Paper Mario: The Origami King