Angry Aztec
This article needs improvement. Specifically:
- Rewrite to get rid of the second-person issues and fix poor grammar
| Angry Aztec | |||||||
|---|---|---|---|---|---|---|---|

| |||||||
| Entrance requirement | 5 Golden Bananas | ||||||
| Boss | Dogadon | ||||||
| Boss requirement | 120 bananas | ||||||
| Trapped Kongs | Tiny and Lanky | ||||||
| |||||||
Angry Aztec is the second level of Donkey Kong 64. It is located in the desert, and it models the ancient Aztec civilization, including some Egyptian inspiration. Kongs must have at least five Golden Bananas for B. Locker to allow them in. Most of the area is engulfed in quicksand, which damages the Kongs. Lanky Kong and Tiny Kong are held captive in separate temples and become playable once freed by Donkey Kong and Diddy Kong. It is the first level to have Candy's Music Shop, and by extension, Music Pads and the use of instruments.
In this level, Diddy Kong can practice his Rocketbarrel Boost skills with the Buzzard. Donkey Kong can free a Llama, who later assists the Kongs in his temple by cooling the lava with his spit. There is also the Beetle who Tiny races down a large slide. The level's boss is Dogadon, who requires 120 colored bananas to fight, and is fought by Diddy Kong. A notable area in this level is the five-door temple in which the Kroc resides. A large, spinning totem appears in the center of the one of the outdoor areas.
Areas[edit]
First tunnel[edit]
This is the entrance of the level. There is a 1 pad, and two sand pits with vines. There are also two rooms in the tunnel. The first one is for Donkey Kong, which contains his Kasplat and Donkey Barrels, while the second one is for Chunky, which contains a puzzle where he puts vases in their correct spots.
First central area[edit]
This is the first overworld area. It has a grass field in the center with a dirt pile and a Tag Barrel. Candy's Music Shop is located around the grass field. There is a llama cage where the llama can be freed, and a domed temple where Tiny is imprisoned. Diddy's Kasplat is located at the top of the dome. The 1 and 2 pads are located here.
Second tunnel[edit]
There are three sections of the tunnel. At the end of the first section, there is Tiny's Kasplat, a Chunky Barrel, and Cranky's Lab, and a 3 pad. At the end of the second section, there is a cage with a Bonus Barrel inside it.
Second central area[edit]
This is the largest area of the level. It contains the Llama's Temple where Lanky Kong is jailed, the Temple with Five Doors, and a temple where Tiny races a beetle. Funky's Store and Snide's H.Q. are in the back of the area. There is a totem at the center of the area, where Diddy can use Rocketbarrel Boost to free the Buzzard or open the Temple with Five Doors.
Llama's Temple[edit]

The Llama's Temple,[1][2] or Llama Temple,[3][4][5] is located east of the entrance to the second central area. Lanky Kong's cage is located under the water here. Outside the temple is a Donkey Pad. Completing the Baboon Blast course frees the llama from his cage. Once this has been done, the llama will return to the temple and Target Switches will appear on it. Shooting one of these switches opens the temple's front door, allowing the Kongs to enter. Donkey Kong can use his Bongo Blast to wake the llama and have him cool the hot water inside the temple, allowing DK to reach Lanky Kong's cage. Other notable areas inside the temple are a room in which Lanky Kong can play a memory game with monkey heads and a room with lava accessible only by shrinking Tiny Kong or using the temple's second Bananaport Pad.
Temple with Five Doors[edit]

The Temple with Five Doors,[5] also known as the Five-Doored Temple,[6] is located near Funky's Store. At first, the temple's interiors are inaccessible. Diddy must Simian Slam a switch on the temple's roof to activate the totem pole in the center, then feed the totem pole peanuts to spawn Target Switches over the temple's doors. Each of its five passages requires a different Kong's weapon to enter and leads to a Golden Banana. However, once the Golden Banana has been obtained, Kroc takes aim at the player and says, "Get out!" At this point a timer appears and the player must race back to entrance before the timer hits 0. If the timer runs out, Kroc fires its weapon and causes the player to lose a slice of their health meter for each shot.
A glitch exists where, apparently, the switches are not loaded into memory right away, so every time the Kongs enter Angry Aztec and pass by the "loading seam" for the second main area (which starts roughly where the big boulder in the nearby cave is), the sound of the five switches spawning can be heard once Diddy Kong has unlocked them. Also, if Lanky and Chunky Kong need to re-enter their rooms in the temple for any reason after getting their Golden Bananas, Kroc attacks them again. Lanky and Chunky Kong are the only two Kongs that have Bonus Barrels in their temple mazes instead of being given a Golden Banana outright.
Third tunnel[edit]
The smallest area of the level, it contains a Bonus Barrel, and when complete, a 5 pad appears. The tunnel is almost entirely in quicksand. It is only accessible after Donkey presses a switch in the Llama's Temple.
Enemies[edit]
Golden Bananas[edit]
Donkey Kong[edit]
| Images | Description | Type |
|---|---|---|

|
Behind a coconut door in the first tunnel. Defeat the yellow Kasplat and give their blueprint to Snide. | |
 
|
Complete the barrel challenge on Donkey Kong's Kong Pad in front of the Llama's Temple. A Golden Banana will appear in the Llama's cage in the first central area near Candy's Music Shop. | |

|
Once the Llama is freed Donkey Kong can use his Music Pad inside the Llama's Temple to wake the llama up and make the water safe to swim in. Reach Lanky Kong's cage by swimming underwater and free him to get a Golden Banana. | |
 
|
Hit a switch inside the Llama's Temple with Donkey Kong and then use the Strong Kong barrel to reach the Golden Banana in the newly opened cave near the Bananaporter #5. | Stealthy Snoop! |
 
|
At the end of the Temple with Five Doors. Hit the switch at the top of said temple with Diddy Kong using his Rocketbarrel Boost ability to open the temple. |
Diddy Kong[edit]
| Images | Description | Type |
|---|---|---|

|
Atop the first temple near Candy's Music Shop, use Diddy Kong's Rocketbarrel Boost barrel on a lone palm tree to get there. Defeat the red Kasplat and give their blueprint to Snide. | |

|
Reach Diddy Kong's Music Pad inside the first temple by hitting the Diddy Kong switch on the ground and climbing the newly extended tongues. Once the ice melted dive underwater to reach the room with Tiny Kong's cage. Use the Music Pad and hit the 4 KONG switches in order using Chimpy Charge. | |
 
|
Fly through the sun emblem atop the totem three times. A Buzzard will be freed and spawn several rings, fly through them all to spawn a Golden Banana inside the sun emblem. | |
 
|
Use Chimpy Charge to hit the four gongs near Diddy Kong's Rocketbarrel Boost barrel in the second central area. Fly atop the tower using the Rocketbarrel Boost ability to collect the Golden Banana. | |

|
At the end of the Temple with Five Doors. Hit the switch at the top of said temple with Diddy Kong using his Rocketbarrel Boost ability to open the temple. |
Lanky Kong[edit]
| Images | Description | Type |
|---|---|---|

|
Inside the first temple, swim to the room with the raised platform and hit the switch above it with Lanky Kong. Shoot the released Buzzard four times for them to drop the Golden Banana. | |
 
|
Inside the Llama's Temple, open the big door in the first room by hitting the grape switch next to it. Hit the Lanky Kong switch inside and solve the memory-puzzle by shooting the colored monkey faces that make the same sound when shot. | |
 
|
Use Lanky Kong's Music Pad inside the Llama's Temple and jump into the newly appeared Bonus Barrel atop the snake heads using Lanky Kong's OrangStand ability. | Teetering Turtle Trouble! |

|
Right next to a Bananaporter #2 inside the Llama's Temple, has to be unlocked with Tiny Kong using Mini-Monkey by going through a small hole. Defeat the blue Kasplat and give their blueprint to Snide. | |

|
At the end of the Temple with Five Doors. Hit the switch at the top of said temple with Diddy Kong using his Rocketbarrel Boost ability to open the temple. | Big Bug Bash! |
Tiny Kong[edit]
| Images | Description | Type |
|---|---|---|

|
Defeat the Klaptraps found in the room accessed underwater by Mini-Tiny in the first room of the first temple. | |

|
At the mid-point of the second tunnel near Cranky's Lab. Defeat the purple Kasplat and give their blueprint to Snide. | |
 
|
Enter the tower that Diddy Kong surfaced while collecting his Golden Banana by using the nearby Tiny Kong Music Pad while using the Mini-Monkey ability. Win the race against the Beetle while collecting 50 coins. | |
 
|
Enter the small hole with the Mini-Monkey ability in the first room of the Llama's Temple. Hit the three switches with Tiny Kong in the next room to reach the Golden Banana. | |

|
At the end of the Temple with Five Doors. Hit the switch at the top of said temple with Diddy Kong using his Rocketbarrel Boost ability to open the temple. |
Chunky Kong[edit]
| Images | Description | Type |
|---|---|---|
 
|
Right after entering Angry Aztec, open the door by hitting the pineapple switches. Place the vases found inside the room on their corresponding pad. | |
 
|
Use Chunky Kong's Music Pad inside the first temple and defeat all enemies in the newly opened room. | |
 
|
Use the Hunky Chunky ability to grab a boulder in the second tunnel and place it on the big switch at the tunnel mid-point near Cranky's Lab. The cage surrounding a bonus barrel will be raised and become accessible. | Busy Barrel Barrage! |

|
At the end of the Temple with Five Doors. Hit the switch at the top of said temple with Diddy Kong using his Rocketbarrel Boost ability to open the temple. | Kremling Kosh! |

|
Next to the second pineapple switch inside the Temple with Five Doors. Defeat the green Kasplat and give their blueprint to Snide. |
Colored Bananas[edit]
- Main article: List of Bananas in Angry Aztec
There are a total of 500 Bananas (100 for each Kong) to collect.
Banana Coins[edit]
- Main article: List of Banana Coins in Angry Aztec
There are a total of 93 Banana Coins across all five Kongs and 2 5-Banana Coin to collect.
Banana Fairies[edit]
| Image | Description |
|---|---|
|
|
Inside the first room of the Llama's Temple in front of a small hole for Tiny Kong with her Mini-Monkey ability. |

|
Behind the small tunnel inside Tiny Kong's door of the Temple with Five Doors. Use the Mini-Monkey barrel next to it. |
Battle Arena Pads[edit]
| Image | Description |
|---|---|

|
Underwater behind the raised platform in the first temple. Hit the switch with Lanky Kong atop the raised platform, shoot the Buzzard four times and collect their Golden Banana to lower the water. |
Gallery[edit]
Exterior[edit]
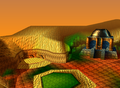
1st area
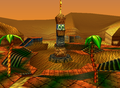
2nd area


Interior[edit]
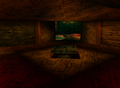
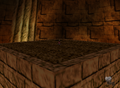
Caves
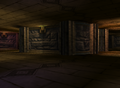
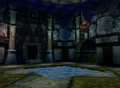
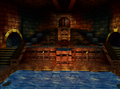
Temple with Five Doors
The temple where Tiny is imprisoned
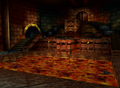
Llama's Temple (hot water)
Llama's Temple (cooled water)
Boss arena


.png)
Miscellaneous[edit]
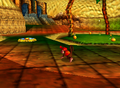
Diddy Kong exploring the level
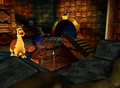
Lanky Kong and the Llama in the Llama's Temple

Sandstorm screen


Names in other languages[edit]
| Language | Name | Meaning | Note(s) | Ref. |
|---|---|---|---|---|
| Japanese | アステカンウインド Asutekan Uindo |
Aztecan Wind | [7] | |
| French | Aztec à sec | Dry Aztec | [?] | |
| German | Azteken Arena | Aztec Arena | [?] | |
| Italian | Aztechi Furiosi | Furious Aztecs | [8] | |
| Spanish | Azteca Airado | Enraged Aztec | [?] |
Notes[edit]
- The name of this level is a reference to the ancient Aztec civilization, and many aspects of the level are taken from their culture. However, the level's llamas are taken from Incan civilization, a civilization in the same time period as the Aztecs that raised them, and the inclusion of a scarab beetle is a reference to Ancient Egypt, who believed the scarab was holy.
- The main theme for the level is based on an unused track in Banjo-Kazooie, also while it was known as Project Dream. The music track was named "Lost 1" by the composer of both Banjo-Kazooie and Donkey Kong 64, Grant Kirkhope.[9] "Lost 1" would also be reused in Banjo-Tooie as the theme of Mayahem Temple with the sections from Angry Aztec excised.
- After the player frees the Buzzard held captive outside Snide's HQ, completes its challenge and receives its Golden Banana, it will fly away. If the player revisits Angry Aztec later, it will appear inside its cell again, with no way of freeing it.
References[edit]
- ^ "Match the sounds with Lanky in the back of the Llama's Temple" – Wrinkly Kong. Donkey Kong 64.
- ^ "Enter the Llama’s Temple and play your Bongos... Oh, no Bongos? Go talk to Candy for the latest in instrumental technology, and then play your new drums on the Musicpad in the temple." – Lockhart, Ryan (1999). Donkey Kong 64 Official Perfect Guide. Versus Books (American English). Page 26.
- ^ Lockhart, Ryan (1999). Donkey Kong 64 Official Perfect Guide. Versus Books (American English). Page 25.
- ^ Barton, Jeff, Mario De Govia, and Donato Tica (December 1, 1999). Donkey Kong 64 Prima's Official Strategy Guide. Prima Games (American English). ISBN 0-7615-2279-4. Page 52, 58, 61.
- ^ a b Donkey Kong 64 Banana Guide. Nintendo of America (American English). Archived February 29, 2000, 05:11:20 UTC from the original via Wayback Machine. Retrieved June 2, 2024.
- ^ "Remember that Blueprint piece you got in the five-doored temple? Talk to Snide and he'll give up another Golden Banana." – Barton, Jeff, Mario De Govia, and Donato Tica (December 1, 1999). Donkey Kong 64 Prima's Official Strategy Guide. Prima Games (American English). ISBN 0-7615-2279-4. Page 64.
- ^ 「ドンキーコング64任天堂公式ガイドブック」 (Donkey Kong 64 Nintendo Kōshiki Guidebook). Shogakukan (Japanese). Page 37.
- ^ 1999. Donkey Kong 64 Manuale di Istruzioni. Großostheim: Nintendo of Europe GmbH (Italian). Page 40. (Archived 14 Aug. 2021 via Mario's Castle by Alessandro "Stormkyleis" Imbesi.)
- ^ Other Music Tracks. The Cutting Room Floor. Retrieved June 2, 2024.