Perilous Palace Path: Difference between revisions
m (→Spaces) |
Nikenpelle (talk | contribs) (Removed unavailable variables from infobox) |
||
| (33 intermediate revisions by 16 users not shown) | |||
| Line 1: | Line 1: | ||
{{ | {{board infobox | ||
|image=[[File:PerilousPalacePathIntro.png|250px]] | |||
|image=[[File:PerilousPalacePathIntro.png| | |appears_in=''[[Mario Party: Island Tour]]'' | ||
| | |||
|skill=4 | |skill=4 | ||
|luck=3 | |luck=3 | ||
| Line 10: | Line 7: | ||
|time=45-60 minutes | |time=45-60 minutes | ||
}} | }} | ||
'''Perilous Palace Path''' is one of the seven boards in ''[[Mario Party: Island Tour]]''. It takes the longest time to complete. There are items that help the player and/or hinder their opponents. The player can also use Bonus [[Dice Block]]s which add a number of spaces to the players' roll. This board takes 45-60 minutes | '''Perilous Palace Path''' is one of the seven boards in ''[[Mario Party: Island Tour]]''. It takes the longest time to complete. There are items that help the player and/or hinder their opponents. The player can also use Bonus [[Dice Block]]s which add a number of spaces to the players' roll. This board takes 45-60 minutes. After everyone has moved, a minigame will be played, and Bonus Dice Blocks will be awarded based on placement. The layout includes some cows, a [[Chain Chomp]], trees, a river, bridges, a castle at the end, and a volcanic lava-filled area called the Bowser Zone. | ||
== Events == | == Events == | ||
*The first event involves a Thwomp. There are three switches, colored red, green and blue. One button allows the character to proceed. If pressed, the character is allowed to go across the bridge, which | *The first event involves a Thwomp. There are three switches, colored red, green, and blue. One button allows the character to proceed. If the correct button is pressed, the character is allowed to go across the bridge, which will at that point lower, and the Thwomp is destroyed. The character will then move any amount of spaces left on their roll. But if they hit one of the two incorrect buttons, the bridge starts to lower, but then comes back up, at which point the Thwomp slams the player, ending their turn. | ||
*The next event takes place roughly halfway through the path. A [[Goomba Tower]] will be holding up an arrow sign. It will spin around, and depending on which direction it points, the player will continue through the normal path or be | *The next event takes place roughly halfway through the path. A [[Goomba Tower]] will be holding up an arrow sign. It will spin around, and depending on which direction it points, the player will continue through the normal path (if the sign points left) or be thrown into the Bowser Zone (if the sign points right) by a Monty Mole, abruptly ending their turn in the process should they be thrown into the Bowser Zone. If the player is allowed to continue on the main path, they will also be allowed to move any amount of spaces left on their roll. | ||
*When a player hits the end of the path, they will battle a [[Whomp]]. At first, its health is 6. The player must roll a 6 on the dice block to defeat it and win, but if a lower number is rolled, it will still take that amount of damage. | *When a player hits the end of the path, they will battle a [[Whomp]]. At first, its health is 6. The player must roll a 6 on the dice block to defeat it and win, but if a lower number is rolled, it will still take that amount of damage. If the Whomp was not defeated, the player will then get crushed by it, and their turn ends. The next time someone gets to the Whomp, they must roll a number equivalent to the amount of health it has (e.g. if the Whomp has 3 health points, the player must roll a 3 or higher). If a player is already at the Dead-End Space when their turn starts, any Bonus Dice Blocks or items they have acquired are usable, allowing them to boost their chances at beating it. | ||
==Description== | ==Description== | ||
* | *American English version: ''Power yourself up and knock opponents out of the way with special items as you race to the finish!'' | ||
* | *British English version: ''Race to the castle and use items to help you along the way!'' | ||
==Minigame Results== | ==Minigame Results== | ||
===Main=== | ===Main=== | ||
{{ | {{MPIT results|Perilous Palace Path/main}} | ||
===[[Duel Space|Duel]]=== | ===[[Duel Space|Duel]]=== | ||
{{ | {{MPIT results|Perilous Palace Path/duel}} | ||
== Spaces == | == Spaces == | ||
{|border=1 | {|border=1 | ||
! | ! | ||
![[ | ![[Advance Space|Dash Space]]s | ||
![[Item Space | ![[Item Space]]s | ||
![[Green Space | ![[Green Space]]s | ||
![[Piranha Plant Space | ![[Piranha Plant Space]]s | ||
![[Lucky Space | ![[Lucky Space]]s | ||
![[ | ![[Minigame Space|Free-for-All Spaces]] | ||
![[Bowser Space | ![[Bowser Space]]s | ||
![[Unlucky Space | ![[Unlucky Space]] | ||
![[Special Event Space|Dead-End Spaces]] | ![[Special Event Space|Dead-End Spaces]] | ||
!Total | !Total | ||
| Line 63: | Line 59: | ||
PerilousPalacePathBoardFinish.jpg|The end of the board with some [[Toad (species)|Toads]] and [[Bowser Jr.]] | PerilousPalacePathBoardFinish.jpg|The end of the board with some [[Toad (species)|Toads]] and [[Bowser Jr.]] | ||
</gallery> | </gallery> | ||
==Music== | |||
{{media table | |||
|file1=MPIT Perilous Palace Path.oga | |||
|title1=Perilous Palace Path | |||
|length1=0:30 | |||
}} | |||
==Names in other languages== | ==Names in other languages== | ||
| Line 69: | Line 72: | ||
|JapR=Aitemu Kyassaru Rando | |JapR=Aitemu Kyassaru Rando | ||
|JapM=Item Castle Land | |JapM=Item Castle Land | ||
| | |FreA=Royaume des objets | ||
| | |FreAM=Items Kingdom | ||
| | |FreE=Royaume des Bonus | ||
| | |FreEM=Bonus Kingdom | ||
|Por=Caminho do Palácio | |Por=Caminho do Palácio | ||
|PorM=Palace Way | |PorM=Palace Way | ||
|Rus=Сказочная долина | |||
|RusR=Skazochnaya dolina | |||
|RusM=Fairy-tale valley | |||
|Ger=Item-Imperium | |Ger=Item-Imperium | ||
|GerM=Item Empire | |GerM=Item Empire | ||
|Spa=Reino de los objetos | |Spa=Reino de los objetos | ||
|SpaM=Items | |SpaM=Items Kingdom | ||
|Ita=Sentiero per il maniero | |Ita=Sentiero per il maniero | ||
|ItaM=Path to the manor | |ItaM=Path to the manor | ||
|Dut=Voorwerpwereld | |Dut=Voorwerpwereld | ||
|DutM=Item world | |DutM=Item world | ||
|Kor=아이템 캐슬 랜드 | |||
|KorR=aitem kaeseul laendeu | |||
|KorM=Item Castle Land | |||
}} | }} | ||
{{Mario Party | {{Mario Party boards}} | ||
{{MPIT}} | {{MPIT}} | ||
[[Category:Forests | [[Category:Forests]] | ||
[[Category:Mario Party: Island Tour | [[Category:Mario Party: Island Tour boards]] | ||
[[it:Sentiero per il maniero]] | [[it:Sentiero per il maniero]] | ||
Latest revision as of 17:48, March 14, 2024
| Perilous Palace Path | |
|---|---|

| |
| Appears in | Mario Party: Island Tour |
| Skill | |
| Luck | |
| Minigames | |
| Time | 45-60 minutes |
Perilous Palace Path is one of the seven boards in Mario Party: Island Tour. It takes the longest time to complete. There are items that help the player and/or hinder their opponents. The player can also use Bonus Dice Blocks which add a number of spaces to the players' roll. This board takes 45-60 minutes. After everyone has moved, a minigame will be played, and Bonus Dice Blocks will be awarded based on placement. The layout includes some cows, a Chain Chomp, trees, a river, bridges, a castle at the end, and a volcanic lava-filled area called the Bowser Zone.
Events[edit]
- The first event involves a Thwomp. There are three switches, colored red, green, and blue. One button allows the character to proceed. If the correct button is pressed, the character is allowed to go across the bridge, which will at that point lower, and the Thwomp is destroyed. The character will then move any amount of spaces left on their roll. But if they hit one of the two incorrect buttons, the bridge starts to lower, but then comes back up, at which point the Thwomp slams the player, ending their turn.
- The next event takes place roughly halfway through the path. A Goomba Tower will be holding up an arrow sign. It will spin around, and depending on which direction it points, the player will continue through the normal path (if the sign points left) or be thrown into the Bowser Zone (if the sign points right) by a Monty Mole, abruptly ending their turn in the process should they be thrown into the Bowser Zone. If the player is allowed to continue on the main path, they will also be allowed to move any amount of spaces left on their roll.
- When a player hits the end of the path, they will battle a Whomp. At first, its health is 6. The player must roll a 6 on the dice block to defeat it and win, but if a lower number is rolled, it will still take that amount of damage. If the Whomp was not defeated, the player will then get crushed by it, and their turn ends. The next time someone gets to the Whomp, they must roll a number equivalent to the amount of health it has (e.g. if the Whomp has 3 health points, the player must roll a 3 or higher). If a player is already at the Dead-End Space when their turn starts, any Bonus Dice Blocks or items they have acquired are usable, allowing them to boost their chances at beating it.
Description[edit]
- American English version: Power yourself up and knock opponents out of the way with special items as you race to the finish!
- British English version: Race to the castle and use items to help you along the way!
Minigame Results[edit]
Main[edit]
| Minigame Results | |||
|---|---|---|---|
| First | |||
| Second | |||
| Third | |||
| Fourth | N/A | ||
Duel[edit]
| Minigame Results | |||
|---|---|---|---|
| First | First item | ||
| Second | Second item | ||
| Third | Third item | ||
| Fourth | N/A | ||
Spaces[edit]
| Dash Spaces | Item Spaces | Green Spaces | Piranha Plant Spaces | Lucky Spaces | Free-for-All Spaces | Bowser Spaces | Unlucky Space | Dead-End Spaces | Total | |
|---|---|---|---|---|---|---|---|---|---|---|
| Perilous Palace Path | 9 | 18 (4) | 13 (1) | 5 (1) | 2 | 5 | 3 (1) | 1 | 1 | 57 (7) |
Numbers in parentheses are spaces only accessible if the player is forced onto the Bowser Zone.
Gallery[edit]
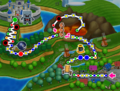
Map of Perilous Palace Path
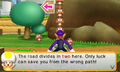
An event with the Goomba Tower

The end of the board with some Toads and Bowser Jr.


Music[edit]
| File info 0:30 |
Names in other languages[edit]
| Language | Name | Meaning |
|---|---|---|
| Japanese | アイテムキャッスルランド Aitemu Kyassaru Rando |
Item Castle Land |
| Dutch | Voorwerpwereld |
Item world |
| French (NOA) | Royaume des objets |
Items Kingdom |
| French (NOE) | Royaume des Bonus |
Bonus Kingdom |
| German | Item-Imperium |
Item Empire |
| Italian | Sentiero per il maniero |
Path to the manor |
| Korean | 아이템 캐슬 랜드 aitem kaeseul laendeu |
Item Castle Land |
| Portuguese | Caminho do Palácio |
Palace Way |
| Russian | Сказочная долина Skazochnaya dolina |
Fairy-tale valley |
| Spanish | Reino de los objetos |
Items Kingdom |