Stormy Seas: Difference between revisions
m (Robot: Changing template: Foreignname) |
m (Reverted edits by Arthur2 (talk) to last revision by LinkTheLefty) Tags: Rollback Mobile edit Advanced mobile edit |
||
| (29 intermediate revisions by 18 users not shown) | |||
| Line 1: | Line 1: | ||
{{level | {{level infobox | ||
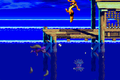
|image=[[File:Stormy Seas DKC3 GBA.png]] | |||
|image=[[File:Stormy Seas. | |||
|code=7 - 2 | |code=7 - 2 | ||
|game=''[[Donkey Kong Country 3 | |world=[[Pacifica]] | ||
| | |game=''[[Donkey Kong Country 3 (Game Boy Advance)|Donkey Kong Country 3]]'' ([[Game Boy Advance]]) | ||
|track=Stilt Village | |||
|before=[[Dingy Drain-Pipe|<<]] | |before=[[Dingy Drain-Pipe|<<]] | ||
|after=[[Sunken Spruce|>>]] | |after=[[Sunken Spruce|>>]] | ||
}} | }} | ||
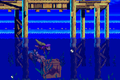
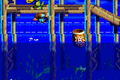
'''Stormy Seas''' is the thirty-second [[level]] in the [[Game Boy Advance]] version of ''[[Donkey Kong Country 3 | '''Stormy Seas''' is the thirty-second [[level]] in the [[Game Boy Advance]] version of ''[[Donkey Kong Country 3 (Game Boy Advance)|Donkey Kong Country 3]]'' and the second level of [[Pacifica]]. It takes place at a lakeside, on a series of boardwalks. Storm clouds and strong waves are shown in the background. [[Dixie Kong|Dixie]] and [[Kiddy Kong|Kiddy]] encounter [[Re-Koil]], [[Kracka]]s, and [[Sneek]]s on the boardwalks. The [[Kong]]s must also climb across [[rope]]s and swim in the dark lake below. [[Klasp]]s and [[Buzz (enemy)|Buzz]]es are enemies that appear around the ropes, usually guarding items such as [[bear coin]]s. The Kongs can finish the level without using any of the ropes except for one directly before the level exit. Halfway through the level, under the [[Star Barrel]], the Kongs can ride [[Enguarde]] after breaking his [[animal crate]]. Enguarde can help by defeating [[Koco]]s and obtain [[KONG Letters|the letter N]] by defeating a [[Bounty Bass]] along the way. | ||
==Layout== | |||
[[File:Stormy Seas DKC3 GBA Kracka.png|thumb|left|240px|The Kongs run from a Kracka]] | |||
At the beginning of the level, the heroes travel under some roofs, supported by strong stilts, and walk down a few slanted pathways to find a small gap of water. They must cross it and head through another tunnel, entering the water afterwards. In the ocean, they find the letter K, and then get back onto the wharf to meet a Kracka. Moving on, the apes trudge along some more straight or slanted boardwalks to find the letter O on top of a tunnel. After that, the monkeys drop down from a ledge, finding two more Krackas. They need to dodge both and continue forward to pass three Sneeks, as well as find the [[Star Barrel]]. | |||
About halfway into the level, the heroes walk across more of the wharf to find some tightropes. Climbing across to avoid the stormy, enemy-filled ocean, they dodge the land foes, Buzzes and Klasps. Once they get back on the boardwalks, the apes make their way under a tunnel to find another set of horizontal tightropes. Again, they should be used to cross the wavy ocean below. While climbing across the ropes, the monkeys jump between two green Buzzes, whom they must make sure to avoid. Hopping off of the tightropes, the monkeys head under yet another small tunnel and meet the border between the wharf and the water. They must swim through the liquid and pass the [[No Animal Sign]], which makes Enguarde disappear if he was used. Leaping up some ledges on the wharf, [[Dixie Kong]] and [[Kiddy Kong]] will find two [[Banana Bunch]]es under a tunnel surrounded by Krackas, and then head across a straight set of boardwalks to spot some more tightropes. As usual, they must be used to cross the dangerous waters below. After dodging all the Buzzes around the tightropes, the Kongs head along another set of boardwalks until they find some small tightropes, supported by stilts that progressively become higher. Hopping rope-to-rope over the ocean, they soon end up in a high area of the wharf and avoid several enemies. After traveling over some boardwalks and passing through a small tunnel, the monkeys find a flagpole. Raising its flag ends the level. | |||
{{br|left}} | |||
== | ==Enemies== | ||
*[[Bazza]]: Infinite | |||
*[[Bounty Bass]]: 1 | |||
*[[Buzz (enemy)|Buzz]]: 2 | |||
*[[Klasp]]: 3 | |||
*[[Knocka]]: 2 | |||
*[[Koco]]: 25 | |||
*[[Kracka]]: 8 | |||
*[[Lurchin]]: 2 | |||
*[[Nibbla]]: 1 (Bonus Level only) | |||
*[[Re-Koil]]: 3 | |||
*[[Sneek]]: 8 | |||
==Items and objects== | |||
*[[Banana Bunch]]: 7 | |||
*[[Bear coin]]: 4 | |||
*[[DK Barrel]]: 3 | |||
*[[Red Balloon]]: 1 | |||
===K-O-N-G Letters=== | |||
*'''K:''' Between two Koco east of the first Lurchin | |||
*'''O:''' On top of a house near some Re-Koil. The house itself has a Banana Bunch | |||
*'''N:''' Inside of a Bounty Bass. In order to defeat the Bounty Bass, the Kongs must utilize Enguarde | |||
*'''G:''' Found underneath the level's Koin. East of it is the second bonus barrel | |||
== | ===DK Coin=== | ||
On the last boardwalk, the Kongs must pass [[Koin]] and go to the Level Flag; the [[Iron Barrel|Steel Barrel]] is on a roof to the right. Kiddy must use [[team up]] to throw Dixie onto the roof. They must pick up the Steel Barrel and go back to Koin. The Kongs must throw the Steel Barrel at a wall behind Koin, which defeats him and gives the [[DK Coin]] to the Kongs. | |||
* | ==Bonus Levels== | ||
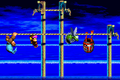
[[File:Stormy Seas DKC3 GBA Bonus Level 1.png|thumb|The first Bonus Level of Stormy Seas]] | |||
Stormy Seas has two [[Bonus room|Bonus Level]]s, listed by type: | |||
*'''''Collect 20 Bananas!''''': After the letter O, Dixie must use [[team up]] to carry Kiddy on her back. She must perform a team up throw by throwing Kiddy onto a crack of the boardwalk. They must jump down it and swim by a green Koco to find the nearby [[Bonus Barrel]]. In the [[Bonus Level]], the Kongs have 60 seconds to collect 20 [[green banana]]s over a horizontal rope while avoiding a fast-moving Klasp along the rope and a Nibbla in the lake below. After the Kongs collect every green banana, the [[Bonus Coin (Donkey Kong franchise)|Bonus Coin]] appears on a boardwalk to the right. | |||
*'''''Find the Coin!''''': Near the end of the level, the Kongs must jump off a wharf, left of three tightropes, and swim in the lake below. They must carefully swim forward and avoid the Bazzas below them. The second Bonus Barrel is in a narrow passage under the boardwalk with Koin. In the Bonus Level, the Kongs have 10 seconds to get the Bonus Coin to the right. They must move past a Klasp on the first rope and then jump over three stacked Buzzes, who are located between the two horizontal ropes. The Kongs can walk under the second rope, which another Klasp is climbing across, to reach the Bonus Coin at the end. | |||
== | ==Gallery== | ||
<gallery> | |||
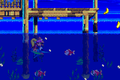
Stormy Seas DKC3 GBA boardwalk.png|Dixie swimming to a boardwalk | |||
Stormy Seas DKC3 GBA rope climb.png|Dixie and Kiddy climb across a rope | |||
Stormy Seas DKC3 GBA Enguarde Crate.png|Dixie and Kiddy swim to the Enguarde Box | |||
Stormy Seas DKC3 GBA riding Enguarde.png|The Kongs ride Enguarde | |||
Stormy Seas DKC3 GBA Bonus Barrel 2.png|Kiddy finds the second Bonus Barrel | |||
</gallery> | |||
==Names in other languages== | ==Names in other languages== | ||
| Line 30: | Line 63: | ||
|JapR=Arashi no mae | |JapR=Arashi no mae | ||
|JapM=Before the Storm | |JapM=Before the Storm | ||
|Fre=Mers houleuses | |||
|FreM=Stormy Seas | |||
|Ger=Wirbelnde Wellen | |||
|GerM=Swirling Waves | |||
|Ita=Onde Selvagge | |||
|ItaM=Wild Waves | |||
|Spa=Mares Bravos | |Spa=Mares Bravos | ||
|SpaM=Rough Seas | |SpaM=Rough Seas | ||
}} | |||
{{DKC3}} | {{DKC3}} | ||
[[Category: | [[Category:Aquatic areas]] | ||
[[Category: | [[Category:Donkey Kong levels]] | ||
[[Category:Donkey Kong Country 3 (Game Boy Advance)]] | |||
[[Category:Donkey Kong Country 3 | |||
Latest revision as of 11:22, April 8, 2024
| Level | |
|---|---|
| Stormy Seas | |

| |
| Level code | 7 - 2 |
| World | Pacifica |
| Game | Donkey Kong Country 3 (Game Boy Advance) |
| Music track | Stilt Village |
| << Directory of levels >> | |
Stormy Seas is the thirty-second level in the Game Boy Advance version of Donkey Kong Country 3 and the second level of Pacifica. It takes place at a lakeside, on a series of boardwalks. Storm clouds and strong waves are shown in the background. Dixie and Kiddy encounter Re-Koil, Krackas, and Sneeks on the boardwalks. The Kongs must also climb across ropes and swim in the dark lake below. Klasps and Buzzes are enemies that appear around the ropes, usually guarding items such as bear coins. The Kongs can finish the level without using any of the ropes except for one directly before the level exit. Halfway through the level, under the Star Barrel, the Kongs can ride Enguarde after breaking his animal crate. Enguarde can help by defeating Kocos and obtain the letter N by defeating a Bounty Bass along the way.
Layout[edit]

At the beginning of the level, the heroes travel under some roofs, supported by strong stilts, and walk down a few slanted pathways to find a small gap of water. They must cross it and head through another tunnel, entering the water afterwards. In the ocean, they find the letter K, and then get back onto the wharf to meet a Kracka. Moving on, the apes trudge along some more straight or slanted boardwalks to find the letter O on top of a tunnel. After that, the monkeys drop down from a ledge, finding two more Krackas. They need to dodge both and continue forward to pass three Sneeks, as well as find the Star Barrel.
About halfway into the level, the heroes walk across more of the wharf to find some tightropes. Climbing across to avoid the stormy, enemy-filled ocean, they dodge the land foes, Buzzes and Klasps. Once they get back on the boardwalks, the apes make their way under a tunnel to find another set of horizontal tightropes. Again, they should be used to cross the wavy ocean below. While climbing across the ropes, the monkeys jump between two green Buzzes, whom they must make sure to avoid. Hopping off of the tightropes, the monkeys head under yet another small tunnel and meet the border between the wharf and the water. They must swim through the liquid and pass the No Animal Sign, which makes Enguarde disappear if he was used. Leaping up some ledges on the wharf, Dixie Kong and Kiddy Kong will find two Banana Bunches under a tunnel surrounded by Krackas, and then head across a straight set of boardwalks to spot some more tightropes. As usual, they must be used to cross the dangerous waters below. After dodging all the Buzzes around the tightropes, the Kongs head along another set of boardwalks until they find some small tightropes, supported by stilts that progressively become higher. Hopping rope-to-rope over the ocean, they soon end up in a high area of the wharf and avoid several enemies. After traveling over some boardwalks and passing through a small tunnel, the monkeys find a flagpole. Raising its flag ends the level.
Enemies[edit]
- Bazza: Infinite
- Bounty Bass: 1
- Buzz: 2
- Klasp: 3
- Knocka: 2
- Koco: 25
- Kracka: 8
- Lurchin: 2
- Nibbla: 1 (Bonus Level only)
- Re-Koil: 3
- Sneek: 8
Items and objects[edit]
- Banana Bunch: 7
- Bear coin: 4
- DK Barrel: 3
- Red Balloon: 1
K-O-N-G Letters[edit]
- K: Between two Koco east of the first Lurchin
- O: On top of a house near some Re-Koil. The house itself has a Banana Bunch
- N: Inside of a Bounty Bass. In order to defeat the Bounty Bass, the Kongs must utilize Enguarde
- G: Found underneath the level's Koin. East of it is the second bonus barrel
DK Coin[edit]
On the last boardwalk, the Kongs must pass Koin and go to the Level Flag; the Steel Barrel is on a roof to the right. Kiddy must use team up to throw Dixie onto the roof. They must pick up the Steel Barrel and go back to Koin. The Kongs must throw the Steel Barrel at a wall behind Koin, which defeats him and gives the DK Coin to the Kongs.
Bonus Levels[edit]

Stormy Seas has two Bonus Levels, listed by type:
- Collect 20 Bananas!: After the letter O, Dixie must use team up to carry Kiddy on her back. She must perform a team up throw by throwing Kiddy onto a crack of the boardwalk. They must jump down it and swim by a green Koco to find the nearby Bonus Barrel. In the Bonus Level, the Kongs have 60 seconds to collect 20 green bananas over a horizontal rope while avoiding a fast-moving Klasp along the rope and a Nibbla in the lake below. After the Kongs collect every green banana, the Bonus Coin appears on a boardwalk to the right.
- Find the Coin!: Near the end of the level, the Kongs must jump off a wharf, left of three tightropes, and swim in the lake below. They must carefully swim forward and avoid the Bazzas below them. The second Bonus Barrel is in a narrow passage under the boardwalk with Koin. In the Bonus Level, the Kongs have 10 seconds to get the Bonus Coin to the right. They must move past a Klasp on the first rope and then jump over three stacked Buzzes, who are located between the two horizontal ropes. The Kongs can walk under the second rope, which another Klasp is climbing across, to reach the Bonus Coin at the end.
Gallery[edit]
Dixie swimming to a boardwalk
Dixie and Kiddy climb across a rope
Dixie and Kiddy swim to the Enguarde Box
The Kongs ride Enguarde
Kiddy finds the second Bonus Barrel


Names in other languages[edit]
| Language | Name | Meaning |
|---|---|---|
| Japanese | あらしのまえ Arashi no mae |
Before the Storm |
| French | Mers houleuses |
Stormy Seas |
| German | Wirbelnde Wellen |
Swirling Waves |
| Italian | Onde Selvagge |
Wild Waves |
| Spanish | Mares Bravos |
Rough Seas |