Floodlit Fish: Difference between revisions
m (per MarioWiki:Categories) |
No edit summary |
||
| (28 intermediate revisions by 13 users not shown) | |||
| Line 1: | Line 1: | ||
{{level | {{level infobox | ||
|image=[[File:Floodlit Fish.png]] | |||
|image=[[File: | |||
|code=6 - 3 | |code=6 - 3 | ||
|world=[[Razor Ridge]] | |||
|game=''[[Donkey Kong Country 3: Dixie Kong's Double Trouble!]] | |game=''[[Donkey Kong Country 3: Dixie Kong's Double Trouble!]] | ||
| | |track=Water World<br>Cavern Caprice (GBA only) | ||
|before=[[Kong-Fused Cliffs|<<]] | |before=[[Kong-Fused Cliffs|<<]] | ||
|after=[[Pot Hole Panic (Donkey Kong Country 3: Dixie Kong's Double Trouble!)|>>]] | |after=[[Pot Hole Panic (Donkey Kong Country 3: Dixie Kong's Double Trouble!)|>>]] | ||
}} | }} | ||
'''Floodlit Fish''' is the twenty-eighth [[level]] in ''[[Donkey Kong Country 3: Dixie Kong's Double Trouble!]]'' | '''Floodlit Fish''' is the twenty-eighth [[level]] in ''[[Donkey Kong Country 3: Dixie Kong's Double Trouble!]]'' and the third level of [[Razor Ridge]]. Much like [[Glimmer's Galleon (Donkey Kong Country 2: Diddy's Kong Quest)|Glimmer's Galleon]] from ''[[Donkey Kong Country 2: Diddy's Kong Quest]]'', Floodlit Fish is a very dark underwater level. At the start of the level, [[Dixie Kong|Dixie]] and [[Kiddy Kong|Kiddy]] are transformed into [[Enguarde]] by entering his [[Animal Barrel]], and they remain as Enguarde until reaching the [[No Animal Sign]] at the end. [[Gleamin' Bream]]s are the main enemy of the level, and Enguarde must stab them to illuminate the area. The light emitted by a Gleamin' Bream slowly fades, causing the level to become dark again. [[Lurchin]]s are another common enemy in the level, and they are either dormant or swim through narrow, vertical paths. There are some diverging paths that lead to items such as [[KONG Letters|K-O-N-G Letters]], [[banana]]s, or a [[Bonus Barrel]]. Like the other underwater levels, Floodlit Fish ends with a cave area, which is where the level's [[Koin]] and [[Level Flag]] appear. | ||
In the [[Donkey Kong Country 3 (Game Boy Advance)|Game Boy Advance version]], Floodlit Fish has a brighter scenery, meaning that Enguarde is not required to hit any Gleamin' Breams to see his way through the level. | |||
==Layout== | |||
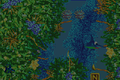
[[File:FloodlitFish-GBA-K.png|thumb|left|Floodlit Fish in the Game Boy Advance version]] | |||
At the start of the level, the Kongs will swim around the bend and enter an [[Animal Barrel]] laid in their path. It will turn them into Enguarde, who will need to light up the area with a Gleamin' Bream to the right and travel through a twisty pathway. After avoiding countless Kocos around him, the fish will find another Gleamin' Bream to the left of the first Lurchin, who can help light up the darkness. Moving forward, Enguarde should head down the narrow passageway and follow a few banana trails to the right. Not following these trails can also take the hero to the letter O. Swimming to the south into the depths of the lake, the swordfish will maneuver around some Lurchins and hit the nearby Gleamin' Bream. Once the area is lit, Enguarde will continue on and swim down a long pathway, with a pair of Lurchins right above him. At the bottom of the path, he should move through the rest of the coral reef and travel to the left, entering an area full of Lurchins. Once he gets out of this part of the level, he will find the [[Star Barrel]], as he nears his way down the path. | |||
About halfway into the level, Enguarde will pass a Gleamin' Bream and trudge between the groups of brightly colored coral. He will soon meet some Lurchins in his path, whom he can avoid by swimming into small alcoves on the side of the path. Eventually, the fish will find the letter N and swim to a trail of bananas in the top-left corner of the maze-like area. Curving along the path, he will soon head downwards and dodge a school of Kocos. After passing a [[DK Barrel]], Enguarde will head south again between two pairs of Lurchins and enter a different area. There, the [[Animal Friend]] will make his way around another bend and continue moving south, surrounded by countless numbers of Lurchins. Hovering downwards in a straight pathway, the fish will avoid more Lurchins with the use of small alcoves and soon find a fork in the road. Both ways will take him through a U shaped road, though the left passage will have the letter G in it. Falling south at the meeting of these two paths, Enguarde will soon find himself maneuvering around many Lurchins, still trying to move downwards. Eventually, he will enter a safe area and pass a [[No Animal Sign]], which will turn him back into the Kongs. After that, the monkeys will need to swim into a small cave. In this cave, they will blast through a [[Barrel Cannon]] to land near a flagpole. Raising the flag on the pole will end the level. | |||
{{br|left}} | |||
==Enemies== | |||
The following enemies appear in the following quantities: | |||
<gallery> | |||
Bounty Bass DKC3.png|[[Bounty Bass]] (2) | |||
Gleamin Bream DKC3.png|[[Gleamin' Bream]] (11) | |||
Koco DKC3 red.png|[[Koco]] (red) (17) | |||
Koco DKC3 green.png|Koco (green) (9) | |||
Lurchin DKC3.png|[[Lurchin]] (43) | |||
</gallery> | |||
== | ==Items and objects== | ||
=== | The following items and objects appear in the following quantities: | ||
* | <gallery> | ||
* | Enguarde Barrel sprite.png|[[Animal Barrel]] ([[Enguarde]]) | ||
Banana Bunch DKC SNES.png|[[Banana Bunch]] (6) | |||
Bear Coin.png|[[Bear coin]] (3) | |||
DK Barrel.png|[[DK Barrel]] (2) | |||
</gallery> | |||
===K-O-N-G Letters=== | |||
*'''K:''' Enguarde can defeat the first [[Bounty Bass]] to obtain the letter K | |||
*'''O:''' At a fork in the path shortly after a [[Gleamin' Bream]], Enguarde must go left and down. | |||
*'''N:''' Found past some pairs of Lurchin | |||
*'''G:''' At a later point in the level, the route forward will split into three paths; the letter G can be found by taking the left one | |||
===DK Coin=== | ===DK Coin=== | ||
[[File:Floodlit Fish GBA Koin.png|thumb|The Koin of Floodlit Fish in the Game Boy Advance version]] | |||
In the cave area at the end, the Kongs must enter an [[Blast Barrel|Auto-Fire Barrel]] and blast up to the left area with a [[Iron Barrel|Steel Barrel]]. Dixie or Kiddy must pick up the Steel Barrel and jump over a gap and onto an area to the right. There, the Kongs encounter the [[Koin]] just before the Level Flag. They must throw the Steel Barrel at the short wall behind Koin, causing it to roll into him from behind and defeat him. The Kongs are rewarded the [[DK Coin]]. | |||
{{br}} | |||
==Bonus Levels== | |||
{{multiframe|[[File:FloodlitFish-GBA-Bonus.png|200px]] [[File:Floodlit Fish Bonus Level 2.png|200px]]|size=420|The first and second Bonus Levels respectively}} | |||
Floodlit Fish has two [[Bonus Level]]s, listed by type: | |||
*'''Collect 90 Stars!''': Shortly after the letter O, Enguarde must pas a Gleamin' Bream and move down through the dark pathway. After swimming below two Lurchins, Enguarde encounters a few red Kocos while continuing down. When Enguarde encounters the third Koco, he must swim into an area to the right and swim into a [[Bonus Barrel]] below. In the [[Bonus Level]], Enguarde must collect 90 [[star (Donkey Kong franchise)|star]]s within 30 seconds, around a dark area in the shape of a plus sign. When Enguarde collects every star, the [[Bonus Coin (Donkey Kong franchise)|Bonus Coin]] appears. | |||
*'''Collect 40 Stars!''': Just before the letter G, where the path splits in three directions, Enguarde must swim down a narrow path with three pairs of Lurchins. When Enguarde reaches the bottom of the area, he must maneuver under a fourth pair of Lurchins and go down into a Bonus Barrel in the area below. In the Bonus Level, Enguarde has 20 seconds to collect 40 stars by following a trail of them in a dark pathway. When Enguarde collects every star, the Bonus Coin appears at the end of the path. | |||
==Gallery== | |||
<gallery> | |||
FloodlitFish-SNES.png|Enguarde stabs a Gleamin' Bream to brighten the level | |||
FloodlitFish-SNES-O.png|The letter O | |||
Floodlit Fish Lurchins.png|Enguarde in an area with some Lurchins | |||
FloodlitFish-GBA-N.png|The letter N in the Game Boy Advance version | |||
</gallery> | |||
==Names in other languages== | ==Names in other languages== | ||
{{ | {{foreign names | ||
|Jap=くら闇 すい中めいろ | |Jap=くら闇 すい中めいろ | ||
|JapR=Kurayami suichū meiro | |JapR=Kurayami suichū meiro | ||
| Line 32: | Line 68: | ||
|Spa=Pez Iluminado | |Spa=Pez Iluminado | ||
|SpaM=Illuminated Fish | |SpaM=Illuminated Fish | ||
| | |Fre=Poissons Lumineux | ||
| | |FreM=Bright Fish | ||
|Ger=Flutlicht-Fische | |Ger=Flutlicht-Fische | ||
|GerM=Floodlit Fish | |GerM=Floodlit Fish | ||
|Ita=Mare d'Ombre | |||
|ItaM=Sea of Shadows | |||
}} | }} | ||
{{DKC3}} | {{DKC3}} | ||
[[Category: | [[Category:Aquatic areas]] | ||
[[Category:Donkey Kong Country 3: Dixie Kong's Double Trouble! levels]] | |||
[[Category:Donkey Kong Country 3: Dixie Kong's Double Trouble! | |||
Latest revision as of 17:13, January 20, 2024
| Level | |
|---|---|
| Floodlit Fish | |

| |
| Level code | 6 - 3 |
| World | Razor Ridge |
| Game | Donkey Kong Country 3: Dixie Kong's Double Trouble! |
| Music track | Water World Cavern Caprice (GBA only) |
| << Directory of levels >> | |
Floodlit Fish is the twenty-eighth level in Donkey Kong Country 3: Dixie Kong's Double Trouble! and the third level of Razor Ridge. Much like Glimmer's Galleon from Donkey Kong Country 2: Diddy's Kong Quest, Floodlit Fish is a very dark underwater level. At the start of the level, Dixie and Kiddy are transformed into Enguarde by entering his Animal Barrel, and they remain as Enguarde until reaching the No Animal Sign at the end. Gleamin' Breams are the main enemy of the level, and Enguarde must stab them to illuminate the area. The light emitted by a Gleamin' Bream slowly fades, causing the level to become dark again. Lurchins are another common enemy in the level, and they are either dormant or swim through narrow, vertical paths. There are some diverging paths that lead to items such as K-O-N-G Letters, bananas, or a Bonus Barrel. Like the other underwater levels, Floodlit Fish ends with a cave area, which is where the level's Koin and Level Flag appear.
In the Game Boy Advance version, Floodlit Fish has a brighter scenery, meaning that Enguarde is not required to hit any Gleamin' Breams to see his way through the level.
Layout[edit]

At the start of the level, the Kongs will swim around the bend and enter an Animal Barrel laid in their path. It will turn them into Enguarde, who will need to light up the area with a Gleamin' Bream to the right and travel through a twisty pathway. After avoiding countless Kocos around him, the fish will find another Gleamin' Bream to the left of the first Lurchin, who can help light up the darkness. Moving forward, Enguarde should head down the narrow passageway and follow a few banana trails to the right. Not following these trails can also take the hero to the letter O. Swimming to the south into the depths of the lake, the swordfish will maneuver around some Lurchins and hit the nearby Gleamin' Bream. Once the area is lit, Enguarde will continue on and swim down a long pathway, with a pair of Lurchins right above him. At the bottom of the path, he should move through the rest of the coral reef and travel to the left, entering an area full of Lurchins. Once he gets out of this part of the level, he will find the Star Barrel, as he nears his way down the path.
About halfway into the level, Enguarde will pass a Gleamin' Bream and trudge between the groups of brightly colored coral. He will soon meet some Lurchins in his path, whom he can avoid by swimming into small alcoves on the side of the path. Eventually, the fish will find the letter N and swim to a trail of bananas in the top-left corner of the maze-like area. Curving along the path, he will soon head downwards and dodge a school of Kocos. After passing a DK Barrel, Enguarde will head south again between two pairs of Lurchins and enter a different area. There, the Animal Friend will make his way around another bend and continue moving south, surrounded by countless numbers of Lurchins. Hovering downwards in a straight pathway, the fish will avoid more Lurchins with the use of small alcoves and soon find a fork in the road. Both ways will take him through a U shaped road, though the left passage will have the letter G in it. Falling south at the meeting of these two paths, Enguarde will soon find himself maneuvering around many Lurchins, still trying to move downwards. Eventually, he will enter a safe area and pass a No Animal Sign, which will turn him back into the Kongs. After that, the monkeys will need to swim into a small cave. In this cave, they will blast through a Barrel Cannon to land near a flagpole. Raising the flag on the pole will end the level.
Enemies[edit]
The following enemies appear in the following quantities:

Bounty Bass (2)

Gleamin' Bream (11)

Koco (red) (17)

Koco (green) (9)

Lurchin (43)


Items and objects[edit]
The following items and objects appear in the following quantities:

Banana Bunch (6)

Bear coin (3)

DK Barrel (2)


K-O-N-G Letters[edit]
- K: Enguarde can defeat the first Bounty Bass to obtain the letter K
- O: At a fork in the path shortly after a Gleamin' Bream, Enguarde must go left and down.
- N: Found past some pairs of Lurchin
- G: At a later point in the level, the route forward will split into three paths; the letter G can be found by taking the left one
DK Coin[edit]

In the cave area at the end, the Kongs must enter an Auto-Fire Barrel and blast up to the left area with a Steel Barrel. Dixie or Kiddy must pick up the Steel Barrel and jump over a gap and onto an area to the right. There, the Kongs encounter the Koin just before the Level Flag. They must throw the Steel Barrel at the short wall behind Koin, causing it to roll into him from behind and defeat him. The Kongs are rewarded the DK Coin.
Bonus Levels[edit]


Floodlit Fish has two Bonus Levels, listed by type:
- Collect 90 Stars!: Shortly after the letter O, Enguarde must pas a Gleamin' Bream and move down through the dark pathway. After swimming below two Lurchins, Enguarde encounters a few red Kocos while continuing down. When Enguarde encounters the third Koco, he must swim into an area to the right and swim into a Bonus Barrel below. In the Bonus Level, Enguarde must collect 90 stars within 30 seconds, around a dark area in the shape of a plus sign. When Enguarde collects every star, the Bonus Coin appears.
- Collect 40 Stars!: Just before the letter G, where the path splits in three directions, Enguarde must swim down a narrow path with three pairs of Lurchins. When Enguarde reaches the bottom of the area, he must maneuver under a fourth pair of Lurchins and go down into a Bonus Barrel in the area below. In the Bonus Level, Enguarde has 20 seconds to collect 40 stars by following a trail of them in a dark pathway. When Enguarde collects every star, the Bonus Coin appears at the end of the path.
Gallery[edit]
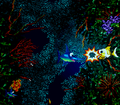
Enguarde stabs a Gleamin' Bream to brighten the level
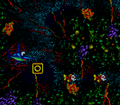
The letter O
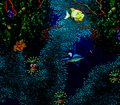
Enguarde in an area with some Lurchins
The letter N in the Game Boy Advance version


Names in other languages[edit]
| Language | Name | Meaning |
|---|---|---|
| Japanese | くら闇 すい中めいろ Kurayami suichū meiro |
Dark Underwater Labyrinth |
| French | Poissons Lumineux |
Bright Fish |
| German | Flutlicht-Fische |
Floodlit Fish |
| Italian | Mare d'Ombre |
Sea of Shadows |
| Spanish | Pez Iluminado |
Illuminated Fish |