Creepy Caverns: Difference between revisions
(Per proposal) |
(phew this took a while) |
||
| Line 1: | Line 1: | ||
{{about|a level from | {{about|a level from Donkey Kong Country 3: Dixie Kong's Double Trouble!|the similarly-named gameboard from [[Mario Party 3]]|[[Creepy Cavern]]}} | ||
{{Levelbox | {{Levelbox | ||
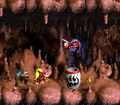
|image=[[File:Creepy Caverns.png]] | |||
|image=[[File:Creepy Caverns.png | |||
|code=7 - 2 (SNES)<br>8 - 2 (GBA) | |code=7 - 2 (SNES)<br>8 - 2 (GBA) | ||
|world=[[KAOS Kore]] | |world=[[KAOS Kore]] | ||
| Line 10: | Line 9: | ||
|after=[[Lightning Lookout|>>]] | |after=[[Lightning Lookout|>>]] | ||
}} | }} | ||
'''Creepy Caverns''' is the thirty-second [[level]] in ''[[Donkey Kong Country 3: Dixie Kong's Double Trouble!]]'' | '''Creepy Caverns''' is the thirty-second [[level]] in ''[[Donkey Kong Country 3: Dixie Kong's Double Trouble!]]'' and the second level of [[KAOS Kore]]. In the [[Game Boy Advance]] remake, Creepy Caverns was changed to thirty-eighth level, due to the addition of [[Pacifica]]. | ||
==Summary== | |||
The main obstacle and of Creepy Caverns are [[Boo Barrel]]s; they function similar to [[Auto-Fire Barrel]]s, except Boo Barrels have a distinguishable trait where they disappear then reappear every few seconds. Some Boo Barrel reorient themselves every time that they reappear. [[Dixie Kong|Dixie]] and [[Kiddy Kong|Kiddy]] must avoid going into some Boo Barrels, including ones that point in the direction of a [[Buzz (enemy)|Buzz]] or a pit below, or ones that block the path forward. The [[Kong]]s must quickly pass these Boo Barrels when they turn invisible. | |||
== | Just after the [[Star Barrel]], the Kongs can reach a platform with a [[Animal Crate|Squitter Crate]] by defeating a green Buzz under an Auto-Fire Barrel. From the Auto-Fire Barrel, the Kongs can reach the Squitter Crate to release [[Squitter the Spider]], who assists by defeating enemies with his web projectiles along the way. Dixie and Kiddy can only ride on Squitter briefly, and taking Squitter past the [[No Animal Sign]] rewards a [[Bear Coin]] to them. | ||
[[File:CreepyCaverns-GBA.png|thumb|left| | |||
==Layout== | |||
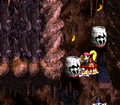
[[File:CreepyCaverns-GBA.png|thumb|left|The Kongs and Squitter encounter a Buzz in the Game Boy Advance remake]] | |||
When the level begins, the heroes travel through the lowest part of the caverns, avoiding a few types of enemies, such as Krumples. Soon, they find a Boo Barrel that fires them to a higher area. In this area, the Kongs move down some stair-like platforms to reach a small set of barrels. The barrels fire the Kongs into a Boo Barrel, which shoots them into the next floor. There, they head west and avoid more enemies. Shortly after, the animals drop into a small gap and jump over a red Buzz to land in a tricky Boo Barrel. The barrel blasts them to another barrel, which then fires them into the next area. At this point, the group should make their way into another Boo Barrel and shoot upwards. The barrel shoots them, as before, into a second barrel, that takes them to the next area. In this area, the monkeys move under a Buzz, trying not to touch the appearing and disappearing Boo Barrel under it. Traveling a little farther takes the heroes to a raised platform with the [[Star Barrel]]. | When the level begins, the heroes travel through the lowest part of the caverns, avoiding a few types of enemies, such as Krumples. Soon, they find a Boo Barrel that fires them to a higher area. In this area, the Kongs move down some stair-like platforms to reach a small set of barrels. The barrels fire the Kongs into a Boo Barrel, which shoots them into the next floor. There, they head west and avoid more enemies. Shortly after, the animals drop into a small gap and jump over a red Buzz to land in a tricky Boo Barrel. The barrel blasts them to another barrel, which then fires them into the next area. At this point, the group should make their way into another Boo Barrel and shoot upwards. The barrel shoots them, as before, into a second barrel, that takes them to the next area. In this area, the monkeys move under a Buzz, trying not to touch the appearing and disappearing Boo Barrel under it. Traveling a little farther takes the heroes to a raised platform with the [[Star Barrel]]. | ||
| Line 27: | Line 29: | ||
*[[Krumple]] | *[[Krumple]] | ||
== | ==Items and objects== | ||
*[[Banana Bunch]]: 1 | |||
*[[Bear Coin]]s: 3 | |||
*[[DK Barrel]]s: 3 | |||
===K-O-N-G Letters=== | ===K-O-N-G Letters=== | ||
*K: Above and to the right of the first Boo Barrel. | *K: Above and to the right of the first Boo Barrel. | ||
*O: Above and to the left of a Boo Barrel in a part of the cave with a tall ceiling. | *O: Above and to the left of a Boo Barrel in a part of the cave with a tall ceiling. | ||
*N: Located below the Arrow Cannon access by finishing the second | *N: Located below the Arrow Cannon access by finishing the second Bonus Level. | ||
*G: Found at the bottom of a pit. Instead of following the banana trail over the pit, jump directly | *G: Found at the bottom of a pit. Instead of following the banana trail over the pit, the Kongs must jump down into it directly. | ||
===DK Coin=== | |||
Near the end of the level, the Kongs can find a [[Steel Keg]]. They must throw it at an upward angle, without hitting a red Buzz, and then quickly jump into a Boo Barrel, which blasts them to the upper-right at the [[Koin]]. As the Steel Keg slowly rolls toward Koin, the Kongs must stay behind Koin for it to hit him from behind. The Koin is defeated as a results, and the Kongs obtain the [[DK Coin]]. | |||
==Bonus Levels== | |||
{|class="dktable-brown" | |||
!Image | |||
!Type and description | |||
|- | |||
|[[File:Creepy Caverns Bonus Level 1.png]] | |||
|'''Collect 50 Stars!'''<br>Before the Star Barrel, the Kongs must go into a Boo Barrel just below two red Buzzes to blast up into an Auto-Fire Barrel, which then blasts them to the right. Instead of continuing right, the Kongs must go left and roll jump under the gap with the Auto-Fire Barrel to land on the ground to the left. With the [[Team-up]] move, Kiddy must throw Dixie into the [[Bonus Barrel]]. | |||
In the [[Bonus Level]], the Kongs must collect all 50 [[Star (Donkey Kong Country series)|star]]s within 40 seconds, which they can acquire by blasting from a Boo Barrel, which reorients in a different direction every time it reappears. In the [[Game Boy Advance]] version, the stars were rearranged, and the Kongs are no longer required to use the Ghost Barrel to reach every star because the Team-up throw is a substitute. Once the Kongs obtain every star, a [[Bonus Coin]] appears to the right. | |||
|- | |||
|align=center|[[File:Creepy Caverns GBA Bonus Level 2.png]] | |||
|'''Find the Coin!'''<br>Right before the letter N, Squitter must use his web platforms to go up a gap in the ceiling and travel around four Boo Barrels. The Kongs and Squitter must avoid entering the Boo Barrels, which are arranged in in a zigzag pattern, because they blast them down onto the ground. A banana is on the opposite side of each Boo Barrel, and from the fourth banana, the Kongs and Squitter must jump left onto a platform and go into the Bonus Barrel. | |||
In the Bonus Level, the Kongs and Squitter have thirty seconds to get the Bonus Coin on the other side. The room has several red Buzzes and Boo Barrels that each aim directly at the Buzzes. To safely reach the other side, Squitter must make web platforms under the Buzzes while avoiding the Ghost Barrels. | |||
|} | |||
==Gallery== | |||
<gallery> | |||
Creepy Caverns DKC3 red Buzz.png|A Boo Barrel pointing up to a red Buzz | |||
Creepy Caverns DKC3 two red Buzzes.png|The Kongs jump to a Boo Barrel between two red Buzzes | |||
Creepy Caverns DKC3 Boo Barrels.png|The Kongs and Squitter between two Boo Barrels in a path up to the second Bonus Barrel | |||
</gallery> | |||
==Names in other languages== | ==Names in other languages== | ||
Revision as of 00:43, October 20, 2019
- This article is about a level from Donkey Kong Country 3: Dixie Kong's Double Trouble!. For the similarly-named gameboard from Mario Party 3, see Creepy Cavern.
Template:Levelbox Creepy Caverns is the thirty-second level in Donkey Kong Country 3: Dixie Kong's Double Trouble! and the second level of KAOS Kore. In the Game Boy Advance remake, Creepy Caverns was changed to thirty-eighth level, due to the addition of Pacifica.
Summary
The main obstacle and of Creepy Caverns are Boo Barrels; they function similar to Auto-Fire Barrels, except Boo Barrels have a distinguishable trait where they disappear then reappear every few seconds. Some Boo Barrel reorient themselves every time that they reappear. Dixie and Kiddy must avoid going into some Boo Barrels, including ones that point in the direction of a Buzz or a pit below, or ones that block the path forward. The Kongs must quickly pass these Boo Barrels when they turn invisible.
Just after the Star Barrel, the Kongs can reach a platform with a Squitter Crate by defeating a green Buzz under an Auto-Fire Barrel. From the Auto-Fire Barrel, the Kongs can reach the Squitter Crate to release Squitter the Spider, who assists by defeating enemies with his web projectiles along the way. Dixie and Kiddy can only ride on Squitter briefly, and taking Squitter past the No Animal Sign rewards a Bear Coin to them.
Layout

When the level begins, the heroes travel through the lowest part of the caverns, avoiding a few types of enemies, such as Krumples. Soon, they find a Boo Barrel that fires them to a higher area. In this area, the Kongs move down some stair-like platforms to reach a small set of barrels. The barrels fire the Kongs into a Boo Barrel, which shoots them into the next floor. There, they head west and avoid more enemies. Shortly after, the animals drop into a small gap and jump over a red Buzz to land in a tricky Boo Barrel. The barrel blasts them to another barrel, which then fires them into the next area. At this point, the group should make their way into another Boo Barrel and shoot upwards. The barrel shoots them, as before, into a second barrel, that takes them to the next area. In this area, the monkeys move under a Buzz, trying not to touch the appearing and disappearing Boo Barrel under it. Traveling a little farther takes the heroes to a raised platform with the Star Barrel.
About halfway into the level, the Kongs pass some more enemies and jump over a lone Buzz, without bumping into the nearby Boo Barrel. They soon get in a Barrel Cannon that aims to another Boo Barrel. Once this Boo Barrel is aimed correctly, they should shoot into it and reach the next area. There, they avoid more enemies and soon find the letter N. If they continue on, they pass a few Knockas and make their way to a small gap. Falling into this, the apes avoid some Krumples and jump over a red Buzz again to land in a Boo Barrel. Without correct time, the Kongs hit into the Buzz under the Boo Barrel. Once this barrel leads them to a higher area, Kiddy Kong and Dixie Kong must travel to another Boo Barrel. When the barrel aims itself correctly, they should get in it and shoot to the top floor of the level. Moving under a Buzz and heading east over the rocky pathway, they use a Boo Barrel to shoot onto a high ledge. On the ledge, they head over and under some red Buzzes. Nearby Boo Barrels appear suddenly throughout this area to blast the heroes into these Buzzes. Once all the wasps are past, the apes need to roll into a small gap and jump upwards as they fall to land near a flagpole. If they raise the pole's flag, the level ends.
Enemies
Items and objects
- Banana Bunch: 1
- Bear Coins: 3
- DK Barrels: 3
K-O-N-G Letters
- K: Above and to the right of the first Boo Barrel.
- O: Above and to the left of a Boo Barrel in a part of the cave with a tall ceiling.
- N: Located below the Arrow Cannon access by finishing the second Bonus Level.
- G: Found at the bottom of a pit. Instead of following the banana trail over the pit, the Kongs must jump down into it directly.
DK Coin
Near the end of the level, the Kongs can find a Steel Keg. They must throw it at an upward angle, without hitting a red Buzz, and then quickly jump into a Boo Barrel, which blasts them to the upper-right at the Koin. As the Steel Keg slowly rolls toward Koin, the Kongs must stay behind Koin for it to hit him from behind. The Koin is defeated as a results, and the Kongs obtain the DK Coin.
Bonus Levels
| Image | Type and description |
|---|---|

|
Collect 50 Stars! Before the Star Barrel, the Kongs must go into a Boo Barrel just below two red Buzzes to blast up into an Auto-Fire Barrel, which then blasts them to the right. Instead of continuing right, the Kongs must go left and roll jump under the gap with the Auto-Fire Barrel to land on the ground to the left. With the Team-up move, Kiddy must throw Dixie into the Bonus Barrel. In the Bonus Level, the Kongs must collect all 50 stars within 40 seconds, which they can acquire by blasting from a Boo Barrel, which reorients in a different direction every time it reappears. In the Game Boy Advance version, the stars were rearranged, and the Kongs are no longer required to use the Ghost Barrel to reach every star because the Team-up throw is a substitute. Once the Kongs obtain every star, a Bonus Coin appears to the right. |

|
Find the Coin! Right before the letter N, Squitter must use his web platforms to go up a gap in the ceiling and travel around four Boo Barrels. The Kongs and Squitter must avoid entering the Boo Barrels, which are arranged in in a zigzag pattern, because they blast them down onto the ground. A banana is on the opposite side of each Boo Barrel, and from the fourth banana, the Kongs and Squitter must jump left onto a platform and go into the Bonus Barrel. In the Bonus Level, the Kongs and Squitter have thirty seconds to get the Bonus Coin on the other side. The room has several red Buzzes and Boo Barrels that each aim directly at the Buzzes. To safely reach the other side, Squitter must make web platforms under the Buzzes while avoiding the Ghost Barrels. |
Gallery
A Boo Barrel pointing up to a red Buzz

The Kongs jump to a Boo Barrel between two red Buzzes
The Kongs and Squitter between two Boo Barrels in a path up to the second Bonus Barrel


Names in other languages
| Language | Name | Meaning |
|---|---|---|
| Japanese | おばけタルの洞窟 Obake taru no doukutsu |
Cave of the Ghost Barrels |
| German | Höhlen-Holerö |
Cave Greetings |
| Italian | Caverne del Terrore |
Caves of Terror |
| Spanish | Cuevas del Terror |
Caves of Terror |