Cliffside Blast: Difference between revisions
LinkTheLefty (talk | contribs) mNo edit summary |
LinkTheLefty (talk | contribs) mNo edit summary |
||
| (11 intermediate revisions by 7 users not shown) | |||
| Line 1: | Line 1: | ||
{{ | {{level infobox | ||
|image=[[File:Cliffside Blast DKC3 GBA.png]] | |image=[[File:Cliffside Blast DKC3 GBA.png]] | ||
|code=7 - 4 | |code=7 - 4 | ||
|world=[[Pacifica]] | |world=[[Pacifica]] | ||
|game=''[[Donkey Kong Country 3 | |game=''[[Donkey Kong Country 3 (Game Boy Advance)|Donkey Kong Country 3]]'' ([[Game Boy Advance]]) | ||
| | |track=Rockface Rumble | ||
|before=[[Sunken Spruce|<<]] | |before=[[Sunken Spruce|<<]] | ||
|after=[[Ripcurl Reef|>>]] | |after=[[Ripcurl Reef|>>]] | ||
}} | }} | ||
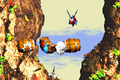
'''Cliffside Blast''' is the thirty-fourth [[level]] in the [[Game Boy Advance]] remake of ''[[Donkey Kong Country 3 | '''Cliffside Blast''' is the thirty-fourth [[level]] in the [[Game Boy Advance]] remake of ''[[Donkey Kong Country 3 (Game Boy Advance)|Donkey Kong Country 3]]'' It is the fourth level of [[Pacifica]]. It takes place at a cliffside, unlike other Pacifica levels, and [[Dixie Kong]] and [[Kiddy Kong]] must go up the cliffs. During the first half, the [[Kong]]s must blast from [[Barrel Cannon]]s around numerous [[Buzz (enemy)|Buzz]]es, who are either stationary or in set paths and patterns. For the second half, the Kongs must climb up many [[rope]]s. [[Kopter]]s also appear throughout the level. | ||
==Layout== | ==Layout== | ||
The level begins with a short pathway to a Barrel Cannon. With the cannon, they must aim to another barrel and continually blast through a long chain of barrels, dodging a red Buzz on the way. Soon, the monkeys enter an open area, where they find four barrels in a diamond shape. Shooting through the middle of this area takes them to the letter K and then to a different barrel. Still blasting upwards, the apes go through numerous Barrel Cannons and shoot to a barrel surrounded by two green Buzzes. With careful aim, they must get away from the two enemies and soon find themselves being fired to a vertical tightrope. Climbing up the rope, they pass a pair of Buzzes and jump into another Barrel Cannon above a ledge. The barrel fires them to another rope, which the group must climb up. Hopping to the right of this rope and trudging up a steel hill, the monkeys pass two Re-Koils and get into yet another Barrel Cannon. Blasting through another set of barrels, the monkeys dodge several red and green Buzzes flooding the area. Once they finally reach a safe platform, they shoot through one barrel, an [[Blast Barrel|Auto-Fire Barrel]], to land near the [[Star Barrel]]. | The level begins with a short pathway to a Barrel Cannon. With the cannon, they must aim to another barrel and continually blast through a long chain of barrels, dodging a red Buzz on the way. Soon, the monkeys enter an open area, where they find four barrels in a diamond shape. Shooting through the middle of this area takes them to [[KONG Letters|the letter K]] and then to a different barrel. Still blasting upwards, the apes go through numerous Barrel Cannons and shoot to a barrel surrounded by two green Buzzes. With careful aim, they must get away from the two enemies and soon find themselves being fired to a vertical tightrope. Climbing up the rope, they pass a pair of Buzzes and jump into another Barrel Cannon above a ledge. The barrel fires them to another rope, which the group must climb up. Hopping to the right of this rope and trudging up a steel hill, the monkeys pass two Re-Koils and get into yet another Barrel Cannon. Blasting through another set of barrels, the monkeys dodge several red and green Buzzes flooding the area. Once they finally reach a safe platform, they shoot through one barrel, an [[Blast Barrel|Auto-Fire Barrel]], to land near the [[Star Barrel]]. | ||
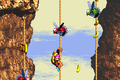
About halfway into the level, the heroes grab onto another rope and climb to a ledge with a barrel above it. Once they jump into the barrel, they are automatically blasted to a long, vertical rope. While the apes clamber up this rope, they meet many Kopters, whom they need to avoid. Eventually, the monkeys find a Buzz in their path, so they are forced to use the newly appearing ropes to the left and right. Maneuvering through this area and dodging some Buzzes takes the Kongs to the letter N. Soon, they exit the area and walk up a rigid hill to find another rope. With the second rope to the right, the heroes must move through the next area, watching out for the few Kopters in their path. Shortly after, [[Kiddy Kong]] and [[Dixie Kong]] find themselves clambering up one long tightrope, avoiding several green Buzzes on the way. If they safely make it to the end of this rope, they find a | About halfway into the level, the heroes grab onto another rope and climb to a ledge with a barrel above it. Once they jump into the barrel, they are automatically blasted to a long, vertical rope. While the apes clamber up this rope, they meet many Kopters, whom they need to avoid. Eventually, the monkeys find a Buzz in their path, so they are forced to use the newly appearing ropes to the left and right. Maneuvering through this area and dodging some Buzzes takes the Kongs to the letter N. Soon, they exit the area and walk up a rigid hill to find another rope. With the second rope to the right, the heroes must move through the next area, watching out for the few Kopters in their path. Shortly after, [[Kiddy Kong]] and [[Dixie Kong]] find themselves clambering up one long tightrope, avoiding several green Buzzes on the way. If they safely make it to the end of this rope, they find a [[Level Flag]] to the right, and raising it ends the level, allowing the Kongs to swim in the waters at the lower half of Pacifica and access [[Cranky's Dojo]], the [[secret cave]] "Whirlpool Wreck", and [[Ripcurl Reef]]. | ||
==Enemies== | ==Enemies== | ||
| Line 30: | Line 24: | ||
*[[Iron Barrel|Steel Barrel]]: 1 | *[[Iron Barrel|Steel Barrel]]: 1 | ||
*[[Bear coin]]s: 4 | *[[Bear coin]]s: 4 | ||
===K-O-N-G Letters=== | ===K-O-N-G Letters=== | ||
*K: The "K" is above a green Buzz orbiting a barrel cannon. | *K: The "K" is above a green Buzz orbiting a barrel cannon. | ||
| Line 38: | Line 31: | ||
===DK Coin=== | ===DK Coin=== | ||
[[File:Cliffside Blast GBA Koin.png|thumb|The Koin of Cliffside Blast]] | |||
After the letter O, the Kongs must blast from a few more Steel Kegs. From a rotating Barrel Cannon, the Kongs must launch to a ledge with the [[Iron Barrel|Steel Barrel]] on the left. Dixie or Kiddy must pick up the Steel Barrel and drop with it to the ground below. The Kongs must avoid a fast-moving red Buzz as they fall. The [[Koin]] is on the ground, and the Kongs must throw the Steel Barrel at the wall behind Koin so that it bounces into him from behind. The Kongs are rewarded the [[DK Coin]]. | |||
{{br}} | |||
==Bonus Levels== | |||
[[File:Cliffside Blast GBA Bonus Level 1.png|thumb|The first Bonus Level of Cliffside Blast]] | |||
Cliffside Blast has two [[Bonus room|Bonus Level]]s, listed by type: | |||
*'''Collect 22 Stars!''': After the letter K, the Kongs can climb up the first rope in the level. To the right, between the two circling Buzzes, is a small tunnel to the right. The Kongs must walk through it and drop into the [[Bonus Barrel]] below. In the [[Bonus Level]], the Kongs have 15 seconds to collect 22 [[star (Donkey Kong franchise)|star]]s. The stars located on three ropes in a small rocky area; the rope at the top-right is short and only has three stars. While climbing the ropes, the Kongs must avoid two Kopters; one is left of the left rope and the other is right of the middle rope. After the Kongs collect every star, a [[Bonus Coin (Donkey Kong franchise)|Bonus Coin]] appears at the top-right ledge. | |||
*'''Find the Coin!''': After the letter G, when the Kongs reach the Level Flag, they must go left and defeat a Re-Koil in front of a tunnel. The tunnel leads to an enclosed area, and the Bonus Barrel is in the air. In the Bonus Level, the Kongs have 10 seconds to climb across a long, horizontal rope and collect the Bonus Coin on the other side. They must avoid four Kopters along the way. | |||
== Bonus Levels == | {{br}} | ||
|'''Collect 22 Stars!''' | |||
==Gallery== | ==Gallery== | ||
| Line 67: | Line 50: | ||
{{foreign names | {{foreign names | ||
|Jap=タルたいほうのがけ | |Jap=タルたいほうのがけ | ||
|JapR=Taru | |JapR=Taru taihō no gake | ||
|JapM=Barrel Cannon Cliff | |JapM=Barrel Cannon Cliff | ||
|Fre=Falaise explosive | |||
|FreM=Explosive Cliff | |||
|Ger=Stürmische Klippen | |||
|GerM=Stormy Cliffs | |||
|Ita=Esplosioni Collinari | |||
|ItaM=Hill Explosions | |||
|Spa=Explosión en la Colina | |Spa=Explosión en la Colina | ||
|SpaM=Explosion in the Hill | |SpaM=Explosion in the Hill | ||
}} | }} | ||
{{DKC3}} | {{DKC3}} | ||
[[Category:Mountains]] | [[Category:Mountains]] | ||
[[Category:Donkey Kong Country 3 | [[Category:Donkey Kong levels]] | ||
[[Category:Donkey Kong Country 3 (Game Boy Advance)]] | |||
Latest revision as of 19:41, January 2, 2024
| Level | |
|---|---|
| Cliffside Blast | |

| |
| Level code | 7 - 4 |
| World | Pacifica |
| Game | Donkey Kong Country 3 (Game Boy Advance) |
| Music track | Rockface Rumble |
| << Directory of levels >> | |
Cliffside Blast is the thirty-fourth level in the Game Boy Advance remake of Donkey Kong Country 3 It is the fourth level of Pacifica. It takes place at a cliffside, unlike other Pacifica levels, and Dixie Kong and Kiddy Kong must go up the cliffs. During the first half, the Kongs must blast from Barrel Cannons around numerous Buzzes, who are either stationary or in set paths and patterns. For the second half, the Kongs must climb up many ropes. Kopters also appear throughout the level.
Layout[edit]
The level begins with a short pathway to a Barrel Cannon. With the cannon, they must aim to another barrel and continually blast through a long chain of barrels, dodging a red Buzz on the way. Soon, the monkeys enter an open area, where they find four barrels in a diamond shape. Shooting through the middle of this area takes them to the letter K and then to a different barrel. Still blasting upwards, the apes go through numerous Barrel Cannons and shoot to a barrel surrounded by two green Buzzes. With careful aim, they must get away from the two enemies and soon find themselves being fired to a vertical tightrope. Climbing up the rope, they pass a pair of Buzzes and jump into another Barrel Cannon above a ledge. The barrel fires them to another rope, which the group must climb up. Hopping to the right of this rope and trudging up a steel hill, the monkeys pass two Re-Koils and get into yet another Barrel Cannon. Blasting through another set of barrels, the monkeys dodge several red and green Buzzes flooding the area. Once they finally reach a safe platform, they shoot through one barrel, an Auto-Fire Barrel, to land near the Star Barrel.
About halfway into the level, the heroes grab onto another rope and climb to a ledge with a barrel above it. Once they jump into the barrel, they are automatically blasted to a long, vertical rope. While the apes clamber up this rope, they meet many Kopters, whom they need to avoid. Eventually, the monkeys find a Buzz in their path, so they are forced to use the newly appearing ropes to the left and right. Maneuvering through this area and dodging some Buzzes takes the Kongs to the letter N. Soon, they exit the area and walk up a rigid hill to find another rope. With the second rope to the right, the heroes must move through the next area, watching out for the few Kopters in their path. Shortly after, Kiddy Kong and Dixie Kong find themselves clambering up one long tightrope, avoiding several green Buzzes on the way. If they safely make it to the end of this rope, they find a Level Flag to the right, and raising it ends the level, allowing the Kongs to swim in the waters at the lower half of Pacifica and access Cranky's Dojo, the secret cave "Whirlpool Wreck", and Ripcurl Reef.
Enemies[edit]
Items and objects[edit]
- DK Barrels: 2
- Steel Barrel: 1
- Bear coins: 4
K-O-N-G Letters[edit]
- K: The "K" is above a green Buzz orbiting a barrel cannon.
- O: A barrel cannon should blast the Kongs up a rope they can climb to get the "O".
- N: Near two Red Buzzes shortly after the checkpoint.
- G: When the Kongs come across two Krimps, going to the left side will allow them to get to the barrel cannon launching them to the "G".
DK Coin[edit]

After the letter O, the Kongs must blast from a few more Steel Kegs. From a rotating Barrel Cannon, the Kongs must launch to a ledge with the Steel Barrel on the left. Dixie or Kiddy must pick up the Steel Barrel and drop with it to the ground below. The Kongs must avoid a fast-moving red Buzz as they fall. The Koin is on the ground, and the Kongs must throw the Steel Barrel at the wall behind Koin so that it bounces into him from behind. The Kongs are rewarded the DK Coin.
Bonus Levels[edit]

Cliffside Blast has two Bonus Levels, listed by type:
- Collect 22 Stars!: After the letter K, the Kongs can climb up the first rope in the level. To the right, between the two circling Buzzes, is a small tunnel to the right. The Kongs must walk through it and drop into the Bonus Barrel below. In the Bonus Level, the Kongs have 15 seconds to collect 22 stars. The stars located on three ropes in a small rocky area; the rope at the top-right is short and only has three stars. While climbing the ropes, the Kongs must avoid two Kopters; one is left of the left rope and the other is right of the middle rope. After the Kongs collect every star, a Bonus Coin appears at the top-right ledge.
- Find the Coin!: After the letter G, when the Kongs reach the Level Flag, they must go left and defeat a Re-Koil in front of a tunnel. The tunnel leads to an enclosed area, and the Bonus Barrel is in the air. In the Bonus Level, the Kongs have 10 seconds to climb across a long, horizontal rope and collect the Bonus Coin on the other side. They must avoid four Kopters along the way.
Gallery[edit]
Kiddy blasting between Barrel Cannons
The letter N


Names in other languages[edit]
| Language | Name | Meaning |
|---|---|---|
| Japanese | タルたいほうのがけ Taru taihō no gake |
Barrel Cannon Cliff |
| French | Falaise explosive |
Explosive Cliff |
| German | Stürmische Klippen |
Stormy Cliffs |
| Italian | Esplosioni Collinari |
Hill Explosions |
| Spanish | Explosión en la Colina |
Explosion in the Hill |