Parrot Chute Panic (Donkey Kong Country 2): Difference between revisions
(→Trivia) |
Fawfulfury65 (talk | contribs) No edit summary |
||
| Line 1: | Line 1: | ||
{{construction}} | |||
{{level | {{level | ||
|title=Parrot Chute Panic | |title=Parrot Chute Panic | ||
| Line 8: | Line 9: | ||
|after=[[Web Woods|>>]] | |after=[[Web Woods|>>]] | ||
}} | }} | ||
'''Parrot Chute Panic''' is the twenty-sixth level of ''[[Donkey Kong Country 2: Diddy's Kong Quest]]'' and ''[[Donkey Kong Land 2]]''. It is the fourth area of [[Gloomy Gulch]] in both games. | '''Parrot Chute Panic''' is the twenty-sixth level of ''[[Donkey Kong Country 2: Diddy's Kong Quest]]'' and ''[[Donkey Kong Land 2]]''. It is also the fourth area of [[Gloomy Gulch]] in both games. The level's name is a wordplay of "Parachute Panic." | ||
In the last of all the hive levels, the Kongs must use the help of [[Flapper the Parrot]] to descend through the dangerous area. The | In the last of all the hive levels, the Kongs must use the help of [[Flapper the Parrot]] to descend through the dangerous area. The primates must use the parrot to slowly glide downward and avoid several [[Zinger]]s crowding the hive below. Therefore, the [[Animal Buddy]] serves as a huge help for the Kongs who cannot descend as easily with their abilities alone. Though the Zingers themselves are the primary obstacle in this level, [[Klampon]]s, [[Spiny (Donkey Kong)|Spinies]] and [[Click-Clack]]s also stand in the way of the Kongs. [[Squawks the Parrot]] appears in this level along with Flapper, but he only appears in a [[Bonus Level]]. | ||
==Level Layout== | ==Level Layout== | ||
| Line 26: | Line 27: | ||
==Secrets== | ==Secrets== | ||
===''Donkey Kong Country 2=== | ===''Donkey Kong Country 2=== | ||
====K-O-N-G Letters==== | |||
====Bonus Level(s)==== | ====Bonus Level(s)==== | ||
*Near the beginning of the level, the | *Near the beginning of the level, the primates defeat two Klampons and then descend through the hive with Flapper. After the bird maneuvers around several Zingers, it enters a more spacious area. Here, the bird should hurry to the left side, where it can hover over an small ledge. A [[No Animal Sign]] here causes the bird to disappear, putting the Kongs on foot again. An entryway is nearby that leads into a [[Bonus Level]]. Here they need to get on [[Squawks the Parrot]] and fly upwards through the area. Eventually, the heroes can reach the [[Kremkoin]]. | ||
*After the heroes let go of the second Flapper past the Star Barrel, they must jump across an abyss and grab onto a hidden, gooey honey wall. They need to climb up the wall | *After the heroes let go of the second Flapper past the Star Barrel, they must jump across an abyss and grab onto a hidden, gooey honey wall. They need to climb up the wall and then enter the Bonus Level through the opening in the wall. In this Bonus Stage, the Kongs must cling onto Squawks and fly around the hive. After the animals defeat all of the Zingers scattered around the area, the Kremkoin appears. | ||
====DK Coin==== | ====DK Coin==== | ||
When the Kongs jump down the abyss at the beginning of the level, they should feel around the left wall. They | *When the Kongs jump down the abyss at the beginning of the level, they should feel around the left wall. They can land right into a small gap in the wall. The [[DK Coin]] is here. | ||
====Golden Feather (Game Boy Advance version only)==== | |||
====Golden Feather ( | *After passing three Click-Clacks, the heroes must descend through more of the hive with Flapper. As they go, they should see the [[Golden Feather]] in plain sight up in a tight corner. | ||
After passing three Click-Clacks, the heroes must | ====Photograph (Game Boy Advance version only)==== | ||
*To find the [[photograph]] found exclusively in the [[Game Boy Advance]] remake of ''Donkey Kong Country 2'', the heroes should head a little bit past the Star Barrel to find a crate lying on the ground. They should let go of their friendly buddy, Flapper, and pick up the crate. Nearby in a pit, they can see a Zinger with a photograph over its head. The heroes have to throw the crate at this foe to defeat him and claim their new photograph, which can be added to their scrapbook. | |||
====Photograph ( | ===''Donkey Kong Land 2=== | ||
To find the [[photograph]] found exclusively in the [[Game Boy Advance]] remake of ''Donkey Kong Country 2'', the heroes should head a little bit past the Star Barrel to find a crate lying on the ground. They should let go of their friendly buddy, Flapper, and pick up the crate. Nearby in a pit, they | ====K-O-N-G Letters==== | ||
===Donkey Kong Land 2=== | |||
====Bonus Level(s)==== | ====Bonus Level(s)==== | ||
*After passing the first No Animal Sign, the Kongs should look for a hidden hook around the nearby abyss. They must use this hook to climb up to the [[Bonus Barrel]] above. It | *After passing the first No Animal Sign, the Kongs should look for a hidden hook around the nearby abyss. They must use this hook to climb up to the [[Bonus Barrel]] above. It takes them to the first [[Bonus Level]], where they must run through the enemy infested hive. When they reach the end of the stage, the Kremkoin can be found spinning in the air, waiting to be grabbed. | ||
*Once | *Once the Kongs get off of the second Flapper, they must jump around the area until they find a hidden hook. Once they find the object, they can continue right and grab more hooks until they reach a Bonus Barrel. In its Bonus Level, they need to use all the barrels they see to defeat Zingers. At the end of the area, they should realize that the Kremkoin has not yet appeared, although they seemed to have beaten each Zinger. However, the Kongs must pick up the final barrel and throw it to the above left corner from near the exit. There is a hidden Zinger there, and once it is defeated, the Kremkoin appears. | ||
====DK Coin==== | ====DK Coin==== | ||
After the Star Barrel, the heroes | *After the Star Barrel, the heroes can find a Flitter over a wide abyss. They should bounce off of it to land in a nearby barrel. The barrels shoots them up to the [[DK Coin]]. | ||
==Gallery== | ==Gallery== | ||
<center><gallery> | <center><gallery> | ||
Image:Parrot_Chute_Panic.png|The beginning of the level. | Image:Parrot_Chute_Panic.png|The Kongs in the beginning of the level. | ||
Image:FlapperQuawks65.jpg| | Image:FlapperQuawks65.jpg|Diddy Kong descends with a Flapper. | ||
Image:Parrot Chute Panic GBA 65.jpg|The [[Game Boy Advance]] version of the level. | Image:Parrot Chute Panic GBA 65.jpg|The [[Game Boy Advance]] version of the level. | ||
</gallery></center> | </gallery></center> | ||
==Names in Other Languages== | ==Names in Other Languages== | ||
Revision as of 19:13, March 20, 2011
This article is under construction. Therefore, please excuse its informal appearance while it is being worked on. We hope to have it completed as soon as possible.
Template:Level Parrot Chute Panic is the twenty-sixth level of Donkey Kong Country 2: Diddy's Kong Quest and Donkey Kong Land 2. It is also the fourth area of Gloomy Gulch in both games. The level's name is a wordplay of "Parachute Panic."
In the last of all the hive levels, the Kongs must use the help of Flapper the Parrot to descend through the dangerous area. The primates must use the parrot to slowly glide downward and avoid several Zingers crowding the hive below. Therefore, the Animal Buddy serves as a huge help for the Kongs who cannot descend as easily with their abilities alone. Though the Zingers themselves are the primary obstacle in this level, Klampons, Spinies and Click-Clacks also stand in the way of the Kongs. Squawks the Parrot appears in this level along with Flapper, but he only appears in a Bonus Level.
Level Layout
Donkey Kong Country 2
When the begin the level, the Kongs must jump down a large abyss and collect several bananas. Then, they have to walk through some sticky honey, and grab onto Flapper. Flapper will start to descend down the hive, where the heroes will find many Zingers. After safely maneuvering around the foes, the Animal Buddy will drop them and the monkeys will then have to walk west. Once they dodge only a few enemies, the monkeys must get on another Flapper, and glide downwards. After they avoid each Zinger in the way again, Flapper will drop the Kongs onto safe ground. Here, they need to jump over a Zinger and defeat a few Klampons. Then, they should grab onto the Flapper nearby. The parrot must guide the heroes to their next destination. Once it takes them around several Zingers, it will let go of the group, who must then grab onto another Flapper. After squeezing through the tight, Zinger filled spaces in the next area, this Flapper will let go of the monkeys, just as the others. As they fall, the monkeys will run into the Star Barrel.
After that, the Kongs need to cling onto yet another Flapper. It will guide them around many Zingers in one small space, and soon drop them off on land, where they must jump up to another parrot buddy. After this one takes them past a few foes, it will drop them to safe ground again. Here, the heroes need to beat a Spiny and get on another Flapper. This time, it will take them a longer distance than the before Flappers, and try to sneak the Kongs between many close together Zingers. Soon, it will drop them to an area with a lone Klampon. After they defeat this enemy, they must jump down a gap to beat three Click-Clacks, and hop over to the next Flapper. It will guide the group to another Flapper. This bird must descend through the deep hive and watch out for several bee swarms. After it dodges all the Zingers, the parrot needs to squeeze into a tight space and drop the Kongs off to the Ending Pad, which will allow them to exit the level.
Donkey Kong Land 2
From the start of the level, the Kongs must hop into the Flapper barrel and turn into Flapper. Then, the heroes, as the bird, must float down through the hive. It's a long way down, but the Zingers are all spread well apart around the path. So, Flapper should be able to descend through with relative ease. Eventually, the parrot will pass the No Animal Sign, and turn back into the Kongs, who need to run down the path and jump through an abyss. After that, they will find the Star Barrel.
Halfway through the level, the monkeys must run across the thin walkway and defeat several enemies. After passing all of these foes, the Kongs must get in an Animal Barrel to turn into their Flapper form. Flapper needs to descend through more of this dangerous hive then, and maneuver around many, many more Zingers. As the flight progresses, the path becomes even deadlier, and the are gets smaller than other times. Once the bird makes its way to the No Animal Sign, Flapper will turn back into the monkeys. As their original forms, the heroes need to defeat a few enemies, and soon get into the third Animal Barrel, turning them into Flapper. This time, Flapper must float down through another swarm of Zingers. The way down is short, though, and the bird will soon cross the No Animal Sign, and turn back into the monkeys. Once again back to normal, the group must walk west and bounce off of a spring to exit the level.
Secrets
Donkey Kong Country 2
K-O-N-G Letters
Bonus Level(s)
- Near the beginning of the level, the primates defeat two Klampons and then descend through the hive with Flapper. After the bird maneuvers around several Zingers, it enters a more spacious area. Here, the bird should hurry to the left side, where it can hover over an small ledge. A No Animal Sign here causes the bird to disappear, putting the Kongs on foot again. An entryway is nearby that leads into a Bonus Level. Here they need to get on Squawks the Parrot and fly upwards through the area. Eventually, the heroes can reach the Kremkoin.
- After the heroes let go of the second Flapper past the Star Barrel, they must jump across an abyss and grab onto a hidden, gooey honey wall. They need to climb up the wall and then enter the Bonus Level through the opening in the wall. In this Bonus Stage, the Kongs must cling onto Squawks and fly around the hive. After the animals defeat all of the Zingers scattered around the area, the Kremkoin appears.
DK Coin
- When the Kongs jump down the abyss at the beginning of the level, they should feel around the left wall. They can land right into a small gap in the wall. The DK Coin is here.
Golden Feather (Game Boy Advance version only)
- After passing three Click-Clacks, the heroes must descend through more of the hive with Flapper. As they go, they should see the Golden Feather in plain sight up in a tight corner.
Photograph (Game Boy Advance version only)
- To find the photograph found exclusively in the Game Boy Advance remake of Donkey Kong Country 2, the heroes should head a little bit past the Star Barrel to find a crate lying on the ground. They should let go of their friendly buddy, Flapper, and pick up the crate. Nearby in a pit, they can see a Zinger with a photograph over its head. The heroes have to throw the crate at this foe to defeat him and claim their new photograph, which can be added to their scrapbook.
Donkey Kong Land 2
K-O-N-G Letters
Bonus Level(s)
- After passing the first No Animal Sign, the Kongs should look for a hidden hook around the nearby abyss. They must use this hook to climb up to the Bonus Barrel above. It takes them to the first Bonus Level, where they must run through the enemy infested hive. When they reach the end of the stage, the Kremkoin can be found spinning in the air, waiting to be grabbed.
- Once the Kongs get off of the second Flapper, they must jump around the area until they find a hidden hook. Once they find the object, they can continue right and grab more hooks until they reach a Bonus Barrel. In its Bonus Level, they need to use all the barrels they see to defeat Zingers. At the end of the area, they should realize that the Kremkoin has not yet appeared, although they seemed to have beaten each Zinger. However, the Kongs must pick up the final barrel and throw it to the above left corner from near the exit. There is a hidden Zinger there, and once it is defeated, the Kremkoin appears.
DK Coin
- After the Star Barrel, the heroes can find a Flitter over a wide abyss. They should bounce off of it to land in a nearby barrel. The barrels shoots them up to the DK Coin.
Gallery
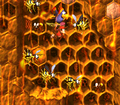
The Kongs in the beginning of the level.
- FlapperQuawks65.jpg
Diddy Kong descends with a Flapper.
- Parrot Chute Panic GBA 65.jpg
The Game Boy Advance version of the level.

Names in Other Languages