Poisonous Pipeline: Difference between revisions
(updated) |
No edit summary |
||
| (17 intermediate revisions by 6 users not shown) | |||
| Line 1: | Line 1: | ||
{{ | {{level infobox | ||
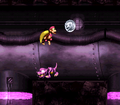
|image=[[File:Poisonous Pipeline screenshot.png]] | |image=[[File:Poisonous Pipeline screenshot.png]] | ||
|code=7 - 5 (SNES)<br>8 - 5 (GBA) | |code=7 - 5 (SNES)<br>8 - 5 (GBA) | ||
|world=[[ | |world=[[Kaos Kore]] | ||
|game=''[[Donkey Kong Country 3: Dixie Kong's Double Trouble!]] | |game=''[[Donkey Kong Country 3: Dixie Kong's Double Trouble!]] | ||
| | |track=Pokey Pipes | ||
|before=[[Koindozer Klamber|<<]] | |before=[[Koindozer Klamber|<<]] | ||
|after=[[Kastle | |after=[[Kastle Kaos|>>]] | ||
}} | }} | ||
'''Poisonous Pipeline''' is the thirty-fifth [[level]] in ''[[Donkey Kong Country 3: Dixie Kong's Double Trouble!]]'' | '''Poisonous Pipeline''' is the thirty-fifth [[level]] in ''[[Donkey Kong Country 3: Dixie Kong's Double Trouble!]]'', the fifth level of [[Kaos Kore]], and the final level of the game, not including those from [[Krematoa]]. In the [[Game Boy Advance]] remake, it is the forty-first level instead, due to the introduction of [[Pacifica]] and its six levels. Poisonous Pipeline takes place in a long, flooded pipeline, and for almost the entire level, [[Dixie Kong|Dixie]] and [[Kiddy Kong|Kiddy]] must swim through poisonous, purple liquid. The liquid does not harm the [[Kong]]s although it reverses the left and right buttons on the player's directional input. For the first half, the Kongs must swim to the bottom. During the second half, they must swim back up to the top to reach the [[Level Flag]] on the other side. For most of the first half, the Kongs can enter an [[Animal Barrel]] to transform into [[Enguarde]] up until the [[No Animal Sign]], which is shortly after the [[Star Barrel]]. | ||
Poisonous Pipeline takes place in a long, flooded pipeline, and for almost the entire level, [[Dixie Kong|Dixie]] and [[Kiddy Kong|Kiddy]] must swim through poisonous, purple liquid. The liquid does not harm the [[Kong]]s although it reverses the left and right buttons on the player's directional input. For the first half, the Kongs must swim to the bottom. During the second half, they must swim back up to the top to reach the [[Level Flag]] on the other side | |||
==Layout== | ==Layout== | ||
At the beginning of the level, the Kongs swim through a long pipeline, passing many Lurchins and Kocos. At the end of the long pathway, the Kongs head through a smaller area downwards and swim left. They will meet more enemies here, especially the shell-covered Lurchins. Soon, they take a small pathway down to a lower part of the level. There, they will travel east and head down the first opening they see. Continuing downwards, they find the letter O and move to the right to find an upward pathway. Swimming around a few Lurchins, they make it to a slightly higher area, where they pass a large group of Lurchins and move downwards. They head through a thin pipe, where they find the [[Star Barrel]]. | [[File:Poisonous Pipeline GBA Lurchins.png|thumb|left|Poisonous Pipeline in the Game Boy Advance version]] | ||
At the beginning of the level, the Kongs swim through a long pipeline, passing many Lurchins and Kocos. At the end of the long pathway, the Kongs head through a smaller area downwards and swim left. They will meet more enemies here, especially the shell-covered Lurchins. Soon, they take a small pathway down to a lower part of the level. There, they will travel east and head down the first opening they see. Continuing downwards, they find [[KONG Letters|the letter O]] and move to the right to find an upward pathway. Swimming around a few Lurchins, they make it to a slightly higher area, where they pass a large group of Lurchins and move downwards. They head through a thin pipe, where they find the [[Star Barrel]]. | |||
About halfway through the level, the Kongs enter another long area, where they swim down a large pipeline and avoid countless schools of enemies. Soon, they find two Lurchins moving through a small pathway. Going under the enemies, they make their way into another area. There, they pass several Kocos and also find the letter K in an above alcove. Farther on, the Kongs pass many more Lurchins, assisted by the small Kocos. Once they begin to take an upward pathway at the end of the area, they will dodge some Kocos and travel west. Shortly after going this direction, they will come up to another pathway, which they should head up. They move around a few Lurchins as they make their way into the next part of the level, where they travel east past more enemies. Heading up again, they sneak between two Lurchins to see yet another upwards pathway. If they continue up from this area, they will eventually reach the surface of the poisonous water. On the nearby platform, they will also see a flagpole. If they pull on the end of the flagpole, the level will end. | About halfway through the level, the Kongs enter another long area, where they swim down a large pipeline and avoid countless schools of enemies. Soon, they find two Lurchins moving through a small pathway. Going under the enemies, they make their way into another area. There, they pass several Kocos and also find the letter K in an above alcove. Farther on, the Kongs pass many more Lurchins, assisted by the small Kocos. Once they begin to take an upward pathway at the end of the area, they will dodge some Kocos and travel west. Shortly after going this direction, they will come up to another pathway, which they should head up. They move around a few Lurchins as they make their way into the next part of the level, where they travel east past more enemies. Heading up again, they sneak between two Lurchins to see yet another upwards pathway. If they continue up from this area, they will eventually reach the surface of the poisonous water. On the nearby platform, they will also see a flagpole. If they pull on the end of the flagpole, the level will end. | ||
==Enemies== | ==Enemies== | ||
The following enemies appear in the following quantities: | |||
<gallery> | |||
Krimp DKC3.png|[[Krimp]] (1) | |||
Koco DKC3 green.png|[[Koco]] (green) (28) | |||
Koco DKC3 red.png|Koco (red) (12) | |||
Lurchin DKC3.png|[[Lurchin]] (45) | |||
</gallery> | |||
| | |||
==Items and objects== | ==Items and objects== | ||
The following items and objects appear in the following quantities: | |||
<gallery> | |||
Enguarde Barrel sprite.png|[[Animal Barrel]] ([[Enguarde]]) (1) | |||
Banana Bunch DKC SNES.png|[[Banana Bunch]] (2) | |||
Bear Coin.png|[[Bear coin]] (2) | |||
DK Barrel.png|[[DK Barrel]] (4) | |||
|[[ | Red Extra Life Balloon DKC3.png|[[Red Balloon]] (1) | ||
|[[Banana Bunch]] | </gallery> | ||
|[[ | |||
|[[DK Barrel]] | |||
|[[Red Balloon]] | |||
===DK Coin=== | ===DK Coin=== | ||
[[File:Poisonous Pipeline DKC3 Koin.png|thumb|The Koin of Poisonous Pipeline]] | |||
Right above the letter G, the Kongs must jump out the water and onto a small platform. A [[Iron Barrel|Steel Barrel]] and the [[Koin]] are on the platform. Dixie or Kiddy must pick up the Steel Barrel and throw it at the wall on the right. The Steel Barrel then bounces back and hits Koin from behind, which defeats him and rewards the [[DK Coin]] to the Kongs. | |||
{{br}} | |||
===K-O-N-G Letters=== | ===K-O-N-G Letters=== | ||
[[File:Poisonous Pipeline DKC3 G.png|thumb|The letter G]] | |||
*'''K:''' Found above the second Lurchin in the level | |||
*'''O:''' A banana trail leading into a narrow pipe has the letter O at the end | |||
*'''N:''' Above the No Animal Sign | |||
*'''G:''' Below the area with the level's Koin, west of the End of Level Flag | |||
{{br}} | |||
== Bonus Levels == | ==Bonus Levels== | ||
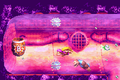
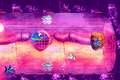
{| | {{multiframe|[[File:Poisonous Pipeline DKC3 Bonus Area 1.png|200px]] [[File:Poisonous Pipeline DKC3 Bonus Area 2.png|200px]]|size=420|The first and second Bonus Levels respectively}} | ||
*'''Bash the Baddies!''': After a platform with a Krimp, the Kongs must go down and then swim all the way left to find a Bonus Barrel behind two Lurchins. The Kongs must swim between the two Lurchins to enter the [[Bonus Barrel]]. In the [[Bonus Level]], the Kongs are automatically transformed into Enguarde, who has 25 seconds to defeat numerous Kocos, after which the [[Bonus Coin (Donkey Kong franchise)|Bonus Coin]] appears. | |||
*'''Collect 30 Stars!''': Near the end of the level, when the Kongs find a banana trail in a gap leading to the Level Flag, they must ignore it and swim left past three Lurchins. They must then swim down around two Lurchins that move up and down a tight passage. The Bonus Barrel is at the very bottom. In the Bonus Level, the Kongs have 25 seconds to collect 30 [[Star (Donkey Kong franchise)|star]]s in a circular area. The stars are arranged as a trail that loops to the left back at the starting point, where the Bonus Coin appears. When the Kongs return to the main level, they are sent under the letter G. | |||
|[[File:Poisonous Pipeline DKC3 Bonus Area | |||
==Gallery== | ==Gallery== | ||
<gallery> | <gallery> | ||
Poisonous Pipeline DKC3 K.png|The letter K | |||
Poisonous Pipeline DKC3 O.png|The letter O | |||
Poisonous Pipeline DKC3 N.png|The letter N | |||
Poisonous Pipeline.png|Kiddy finds the first Bonus Barrel | Poisonous Pipeline.png|Kiddy finds the first Bonus Barrel | ||
Poisonous Pipeline DKC3 Krimp.png|Dixie jumps to a | Poisonous Pipeline DKC3 Krimp.png|Dixie jumps to a bear coin above a Krimp | ||
Poisonous Pipeline GBA first Bonus Barrel.png|The Kongs swim to the first Bonus Barrel in the Game Boy Advance version | |||
Poisonous Pipeline GBA Enguarde Barrel.png|The Animal Barrel of Enguarde in the Game Boy Advance version | |||
Poisonous Pipeline GBA Bonus Level 2.png|Dixie collects stars in the second Bonus Level in the Game Boy Advance version | |||
Poisonous Pipeline GBA first Bonus Barrel.png|The Kongs swim to the first Bonus Barrel | |||
Poisonous Pipeline GBA Enguarde Barrel.png|The Animal Barrel of Enguarde | |||
Poisonous Pipeline GBA Bonus Level 2.png|Dixie collects stars in the second Bonus Level | |||
</gallery> | </gallery> | ||
| Line 126: | Line 71: | ||
|Spa=Tubería Venenosa | |Spa=Tubería Venenosa | ||
|SpaM= | |SpaM= | ||
| | |Fre=Pipeline Tout Naze | ||
| | |FreM=Useless Pipeline | ||
|Ger=Pillepalle-Pipeline | |Ger=Pillepalle-Pipeline | ||
|GerM=Easy-Peasy Pipeline | |GerM=Easy-Peasy Pipeline | ||
| Line 133: | Line 78: | ||
|ItaM=Poisonous Pipelines | |ItaM=Poisonous Pipelines | ||
}} | }} | ||
{{DKC3}} | {{DKC3}} | ||
[[Category: | [[Category:Aquatic areas]] | ||
[[Category: | [[Category:Sewers]] | ||
[[Category:Donkey Kong Country 3: Dixie Kong's Double Trouble! | [[Category:Donkey Kong Country 3: Dixie Kong's Double Trouble! levels]] | ||
Latest revision as of 17:19, January 20, 2024
| Level | |
|---|---|
| Poisonous Pipeline | |

| |
| Level code | 7 - 5 (SNES) 8 - 5 (GBA) |
| World | Kaos Kore |
| Game | Donkey Kong Country 3: Dixie Kong's Double Trouble! |
| Music track | Pokey Pipes |
| << Directory of levels >> | |
Poisonous Pipeline is the thirty-fifth level in Donkey Kong Country 3: Dixie Kong's Double Trouble!, the fifth level of Kaos Kore, and the final level of the game, not including those from Krematoa. In the Game Boy Advance remake, it is the forty-first level instead, due to the introduction of Pacifica and its six levels. Poisonous Pipeline takes place in a long, flooded pipeline, and for almost the entire level, Dixie and Kiddy must swim through poisonous, purple liquid. The liquid does not harm the Kongs although it reverses the left and right buttons on the player's directional input. For the first half, the Kongs must swim to the bottom. During the second half, they must swim back up to the top to reach the Level Flag on the other side. For most of the first half, the Kongs can enter an Animal Barrel to transform into Enguarde up until the No Animal Sign, which is shortly after the Star Barrel.
Layout[edit]

At the beginning of the level, the Kongs swim through a long pipeline, passing many Lurchins and Kocos. At the end of the long pathway, the Kongs head through a smaller area downwards and swim left. They will meet more enemies here, especially the shell-covered Lurchins. Soon, they take a small pathway down to a lower part of the level. There, they will travel east and head down the first opening they see. Continuing downwards, they find the letter O and move to the right to find an upward pathway. Swimming around a few Lurchins, they make it to a slightly higher area, where they pass a large group of Lurchins and move downwards. They head through a thin pipe, where they find the Star Barrel.
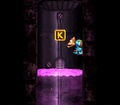
About halfway through the level, the Kongs enter another long area, where they swim down a large pipeline and avoid countless schools of enemies. Soon, they find two Lurchins moving through a small pathway. Going under the enemies, they make their way into another area. There, they pass several Kocos and also find the letter K in an above alcove. Farther on, the Kongs pass many more Lurchins, assisted by the small Kocos. Once they begin to take an upward pathway at the end of the area, they will dodge some Kocos and travel west. Shortly after going this direction, they will come up to another pathway, which they should head up. They move around a few Lurchins as they make their way into the next part of the level, where they travel east past more enemies. Heading up again, they sneak between two Lurchins to see yet another upwards pathway. If they continue up from this area, they will eventually reach the surface of the poisonous water. On the nearby platform, they will also see a flagpole. If they pull on the end of the flagpole, the level will end.
Enemies[edit]
The following enemies appear in the following quantities:


Items and objects[edit]
The following items and objects appear in the following quantities:

Animal Barrel (Enguarde) (1)

Banana Bunch (2)

Bear coin (2)

DK Barrel (4)

Red Balloon (1)


DK Coin[edit]

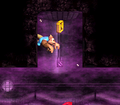
Right above the letter G, the Kongs must jump out the water and onto a small platform. A Steel Barrel and the Koin are on the platform. Dixie or Kiddy must pick up the Steel Barrel and throw it at the wall on the right. The Steel Barrel then bounces back and hits Koin from behind, which defeats him and rewards the DK Coin to the Kongs.
K-O-N-G Letters[edit]

- K: Found above the second Lurchin in the level
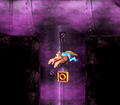
- O: A banana trail leading into a narrow pipe has the letter O at the end
- N: Above the No Animal Sign
- G: Below the area with the level's Koin, west of the End of Level Flag
Bonus Levels[edit]


- Bash the Baddies!: After a platform with a Krimp, the Kongs must go down and then swim all the way left to find a Bonus Barrel behind two Lurchins. The Kongs must swim between the two Lurchins to enter the Bonus Barrel. In the Bonus Level, the Kongs are automatically transformed into Enguarde, who has 25 seconds to defeat numerous Kocos, after which the Bonus Coin appears.
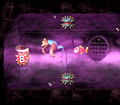
- Collect 30 Stars!: Near the end of the level, when the Kongs find a banana trail in a gap leading to the Level Flag, they must ignore it and swim left past three Lurchins. They must then swim down around two Lurchins that move up and down a tight passage. The Bonus Barrel is at the very bottom. In the Bonus Level, the Kongs have 25 seconds to collect 30 stars in a circular area. The stars are arranged as a trail that loops to the left back at the starting point, where the Bonus Coin appears. When the Kongs return to the main level, they are sent under the letter G.
Gallery[edit]
The letter K
The letter O
The letter N
Kiddy finds the first Bonus Barrel
Dixie jumps to a bear coin above a Krimp
The Kongs swim to the first Bonus Barrel in the Game Boy Advance version
The Animal Barrel of Enguarde in the Game Boy Advance version
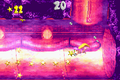
Dixie collects stars in the second Bonus Level in the Game Boy Advance version


Names in other languages[edit]
| Language | Name | Meaning |
|---|---|---|
| Japanese | さかさまパイプライン Sakasama paipurain |
Reversed Pipeline |
| French | Pipeline Tout Naze |
Useless Pipeline |
| German | Pillepalle-Pipeline |
Easy-Peasy Pipeline |
| Italian | Condutture Velenose |
Poisonous Pipelines |
| Spanish | Tubería Venenosa |
|