Klobber Karnage (Donkey Kong Country 2: Diddy's Kong Quest): Difference between revisions
(no proper infobox photo? or gba image?) |
No edit summary |
||
| (39 intermediate revisions by 17 users not shown) | |||
| Line 1: | Line 1: | ||
{{ | {{italic title|id=yes}} | ||
{{ | {{level infobox | ||
|image=[[File:Klobber Karnage DKC2.png]] | |||
|image=[[File:Klobber Karnage DKC2.png | |||
|code=8 - 3 | |code=8 - 3 | ||
|world=[[Lost World (Donkey Kong Country 2: Diddy's Kong Quest)|Lost World]] | |||
|game=''[[Donkey Kong Country 2: Diddy's Kong Quest]]'' | |game=''[[Donkey Kong Country 2: Diddy's Kong Quest]]'' | ||
| | |track=Primal Rave | ||
|before=[[Mudhole Marsh (Donkey Kong Country 2: Diddy's Kong Quest)|<<]] | |||
|before=[[ | |after=[[Krocodile Kore (Donkey Kong Country 2: Diddy's Kong Quest)|>>]] | ||
|after=[[ | |||
}} | }} | ||
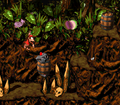
'''Klobber Karnage''' is the third [[level]] of the [[Lost World (Donkey Kong Country 2: Diddy's Kong Quest)|Lost World]]. It can be accessed | '''Klobber Karnage''' is the third [[level]] of the [[Lost World (Donkey Kong Country 2: Diddy's Kong Quest)|Lost World]] in ''[[Donkey Kong Country 2: Diddy's Kong Quest]]''. It can be accessed from the [[Klubba's Kiosk]] of [[Krazy Kremland]] after paying 15 [[Kremkoin]]s. Every type of [[Klobber]] is featured in this level, including the green, yellow, and black ones, and their explosive variant, [[Kaboom]]s. These enemies often appear in groups, attempting to push the Kongs into nearby pits or spikes. Many pits and large spikes appear in the level, and the only way for [[Diddy Kong|Diddy]] and [[Dixie Kong]] to cross them is by using [[Barrel Cannon]]s. Near the end, the Kongs begin using [[Spinner Barrel|Rotatable Barrel]]s for crossing pits. Several red and yellow [[Zinger]]s are above the pitfalls. | ||
==Layout== | |||
[[File:Klobber Karnage DKC2 GBA.png|thumb|left|Klobber Karnage in the Game Boy Advance version]] | |||
At the start of the level, the Kongs must travel along the level and dodge a few Klobbers. Then, they will have to cross several large spike-filled pits. After they cross these gaps, the Kongs must face more Klobbers, including yellow [[banana]]-stealing ones. Next, the heroes must jump in either the Diddy or Dixie barrel to be launched to a set of barrels. With careful aim, they should make their way to the other side of the abyss. From there, they will need to cross a gap and fight off several more Klobbers, with some even stealing lives. After getting over a few more gaps, the Kongs will have to travel up to another abyss and cross it by using barrels. The monkeys will have to shoot into a Diddy or Dixie Barrel (depending on which Kong is in the lead) and continue to blast over the spikes below. Soon, they will land on a small platform, and have to hop right back into another barrel. They must shoot through the many barrels and eventually get to the other end of a wide abyss. Here, they will find the [[Star Barrel]]. | |||
Halfway through the level, the Kongs must jump over two small gaps and watch out for a few Klobbers and Kabooms. They will then have to hop into another barrel and begin to shoot into the following barrels after it. This time around, the abyss that must be crossed is much wider than the before ones, and Zingers can be found more often around each barrel. After shooting over some Zingers, the group will finally get to the other side and have to dodge a few Kabooms and Klobbers. After that, they will need to choose either a Diddy or Dixie Barrel to start shooting over another spike-filled abyss. Obstacles are placed more frequently over this pit. The heroes will make it to the other side after shooting over several Zingers. At this point, they will have to hop over some spikes to reach some ledges. As they watch out for gray Klobbers on the ledges, they must climb up and find the [[End of Level Target]], which has either a [[Banana Bunch]], a [[Banana Coin]], or a [[Red Balloon]] for a prize. When they hit it, they may exit the level. | |||
==Enemies== | |||
The following enemies appear in the following quantities: | |||
<gallery> | |||
Kaboom DKC2.png|[[Kaboom]] (4) | |||
Klobber DKC2 green.png|[[Klobber]] (green) (5) | |||
Klobber DKC2 yellow.png|Klobber (yellow) (6) | |||
Klobber DKC2 gray.png|Klobber (gray) (6) | |||
Zinger DKC2 yellow.png|[[Zinger]] (yellow) (45) | |||
</gallery> | |||
==Items and objects== | |||
The following items and objects appear in the following quantities: | |||
<gallery> | |||
DKC2 Barrel.png|[[Barrel]] (3)<!--Excluding those worn by Klobbers--> | |||
Banana Bunch DKC SNES.png|[[Banana Bunch]] (7) | |||
Banana Coin.png|[[Banana Coin]] (4) | |||
Diddy Barrel.png|[[Diddy & Dixie Barrels|Diddy Barrel]] (6) | |||
Dixie Barrel.png|[[Diddy & Dixie Barrels|Dixie Barrel]] (7) | |||
DK Barrel.png|[[DK Barrel]] (4) | |||
Invincibility Barrel.png|[[Invincibility Barrel|Exclamation Point Barrel]] (2) | |||
Red Extra Life Balloon DKC2.png|[[Red Balloon]] (1) | |||
Rotatable Barrel.png|[[Spinner Barrel|Rotatable Barrel]] (24) | |||
</gallery> | |||
=== | ===KONG Letters=== | ||
* | *'''K:''' After a few spike pits near the start of the level, Dixie must jump into a Dixie Barrel to launch herself at the K. The K also may be obtained by simply jumping towards it. | ||
*'''O:''' Directly after the first black Klobber of the level, the O is seen floating above a pit. Dixie should jump down the pit to grab the letter, as there is a Dixie Barrel that launches her back up. | |||
*'''N:''' While riding in a [[Spinner Barrel|Rotatable Barrel]], the Kongs have to launch themselves under three Zingers. The N is found directly after this section. | |||
*'''G:''' While riding in the second moving Rotatable Barrel, the G can be obtained by launching up to it after dodging two Zingers. | |||
==== | ===Key items=== | ||
*After the Star Barrel in the second half of the level, the | *'''[[Golden feather]] (Game Boy Advance version only):''' The golden feather is found within the stone archway at the very end of the level. | ||
*'''[[Photograph]] (Game Boy Advance version only):''' After the Star Barrel in the second half of the level, the Kongs should find a Kaboom with a camera icon over its head. If they jump on this enemy and destroy its barrel, they are rewarded with a [[photograph]], giving them another picture for their [[Scrapbook (Donkey Kong Country series)|scrapbook]]. | |||
==Bonus Level== | |||
[[File:Klobber Karnage Bonus Area GBA.png|thumb|The Bonus Level of Klobber Karnage in the Game Boy Advance version]] | |||
There is only one [[Bonus room|Bonus Level]], of the following type: | |||
*'''''Destroy them All!''''': At the very end of the level, the Kongs should pass up the End of Level Target and find a lone banana above them. They can use the [[team up]] move to throw a Kong to the banana, or simply use the Diddy barrel. If they do so, they will land right into a hidden [[Bonus Barrel]]. In the Bonus Level, they must defeat several Zingers. However, they are all above an abyss filled with sharp spikes. The Kongs' only option is to touch the [[Invincibility Barrel|Exclamation Point Barrel]] and become temporarily invincible. They can then run over the spikes and defeat all the Zingers, but before the special ability wears off. After all the enemies are gone, the [[DK Coin|Video Game Hero Coin]] will appear. | |||
{{br}} | |||
==Gallery== | ==Gallery== | ||
<gallery> | <gallery> | ||
Klobber Karnage DKC2 GBA.png|The | Klobber Karnage DKC2 Letter O.png|Dixie near the Letter O. | ||
Klobber Karnage DKC2 Yellow Klobber.png|Dixie prepares to throw a barrel at a yellow Klobber. | |||
Klobber Karnage DKC2 Zingers.png|Zingers around a Rotatable Barrel. | |||
Klobber Karnage DKC2 Rotatable Barrels.png|Rotatable Barrels and Zingers. | |||
Klobber Karnage DKC2 Black Klobber.png|Diddy is about to jump on a black Klobber. | |||
Klobber Karnage DKC2 GBA Start.png|The start of the level in the Game Boy Advance remake. | |||
</gallery> | </gallery> | ||
==Names in other languages== | ==Names in other languages== | ||
{{foreign names | {{foreign names | ||
|Jap=クロコ ジャングル | |||
|JapR=Kuroko Janguru | |||
|JapM=Croc Jungle | |||
|Spa=Masacre de Klobber | |Spa=Masacre de Klobber | ||
|SpaM=Klobber Massacre | |SpaM=Klobber Massacre | ||
|Ger=Klobber-Chaos | |Ger=Klobber-Chaos | ||
|GerM=Klobber Chaos | |GerM=Klobber Chaos | ||
| | |Fre=Châtaignes et Marrons | ||
| | |FreM=Chestnut and Marrons | ||
| | |Ita=Bottidrilli a Go-go | ||
| | |ItaM= | ||
}} | |||
==Trivia== | ==Trivia== | ||
| Line 58: | Line 93: | ||
|caption2=Second version | |caption2=Second version | ||
}} | }} | ||
Like Jungle Jinx, the Bonus Area's colors were changed between the [[Donkey Kong Country 2: Diddy's Kong Quest# | *Like Jungle Jinx, the Bonus Area's colors were changed between the [[Donkey Kong Country 2: Diddy's Kong Quest#Differences in other versions|two versions]] of the original [[Super Nintendo Entertainment System]] release. | ||
*In the Super Nintendo Entertainment System version, placing a Klobber or Kaboom (when he retreats inside his barrel) into the pit of spikes will leave it temporarily unharmed until it reveals itself, then the spikes will immediately defeat him. In the [[Game Boy Advance]] version, dropping its barrel in the pit of spikes simply causes it to disappear. | |||
{{DKC2}} | {{DKC2}} | ||
[[Category:Secret | [[Category:Secret levels]] | ||
[[Category:Crocodile Isle]] | [[Category:Crocodile Isle]] | ||
[[Category: | [[Category:Jungles]] | ||
[[Category:Donkey Kong Country 2: Diddy's Kong Quest | [[Category:Donkey Kong Country 2: Diddy's Kong Quest levels]] | ||
Latest revision as of 16:48, January 20, 2024
| Level | |
|---|---|
| Klobber Karnage | |

| |
| Level code | 8 - 3 |
| World | Lost World |
| Game | Donkey Kong Country 2: Diddy's Kong Quest |
| Music track | Primal Rave |
| << Directory of levels >> | |
Klobber Karnage is the third level of the Lost World in Donkey Kong Country 2: Diddy's Kong Quest. It can be accessed from the Klubba's Kiosk of Krazy Kremland after paying 15 Kremkoins. Every type of Klobber is featured in this level, including the green, yellow, and black ones, and their explosive variant, Kabooms. These enemies often appear in groups, attempting to push the Kongs into nearby pits or spikes. Many pits and large spikes appear in the level, and the only way for Diddy and Dixie Kong to cross them is by using Barrel Cannons. Near the end, the Kongs begin using Rotatable Barrels for crossing pits. Several red and yellow Zingers are above the pitfalls.
Layout[edit]

At the start of the level, the Kongs must travel along the level and dodge a few Klobbers. Then, they will have to cross several large spike-filled pits. After they cross these gaps, the Kongs must face more Klobbers, including yellow banana-stealing ones. Next, the heroes must jump in either the Diddy or Dixie barrel to be launched to a set of barrels. With careful aim, they should make their way to the other side of the abyss. From there, they will need to cross a gap and fight off several more Klobbers, with some even stealing lives. After getting over a few more gaps, the Kongs will have to travel up to another abyss and cross it by using barrels. The monkeys will have to shoot into a Diddy or Dixie Barrel (depending on which Kong is in the lead) and continue to blast over the spikes below. Soon, they will land on a small platform, and have to hop right back into another barrel. They must shoot through the many barrels and eventually get to the other end of a wide abyss. Here, they will find the Star Barrel.
Halfway through the level, the Kongs must jump over two small gaps and watch out for a few Klobbers and Kabooms. They will then have to hop into another barrel and begin to shoot into the following barrels after it. This time around, the abyss that must be crossed is much wider than the before ones, and Zingers can be found more often around each barrel. After shooting over some Zingers, the group will finally get to the other side and have to dodge a few Kabooms and Klobbers. After that, they will need to choose either a Diddy or Dixie Barrel to start shooting over another spike-filled abyss. Obstacles are placed more frequently over this pit. The heroes will make it to the other side after shooting over several Zingers. At this point, they will have to hop over some spikes to reach some ledges. As they watch out for gray Klobbers on the ledges, they must climb up and find the End of Level Target, which has either a Banana Bunch, a Banana Coin, or a Red Balloon for a prize. When they hit it, they may exit the level.
Enemies[edit]
The following enemies appear in the following quantities:


Items and objects[edit]
The following items and objects appear in the following quantities:

Barrel (3)

Banana Bunch (7)

Banana Coin (4)

Diddy Barrel (6)

Dixie Barrel (7)

DK Barrel (4)

Red Balloon (1)

Rotatable Barrel (24)


KONG Letters[edit]
- K: After a few spike pits near the start of the level, Dixie must jump into a Dixie Barrel to launch herself at the K. The K also may be obtained by simply jumping towards it.
- O: Directly after the first black Klobber of the level, the O is seen floating above a pit. Dixie should jump down the pit to grab the letter, as there is a Dixie Barrel that launches her back up.
- N: While riding in a Rotatable Barrel, the Kongs have to launch themselves under three Zingers. The N is found directly after this section.
- G: While riding in the second moving Rotatable Barrel, the G can be obtained by launching up to it after dodging two Zingers.
Key items[edit]
- Golden feather (Game Boy Advance version only): The golden feather is found within the stone archway at the very end of the level.
- Photograph (Game Boy Advance version only): After the Star Barrel in the second half of the level, the Kongs should find a Kaboom with a camera icon over its head. If they jump on this enemy and destroy its barrel, they are rewarded with a photograph, giving them another picture for their scrapbook.
Bonus Level[edit]

There is only one Bonus Level, of the following type:
- Destroy them All!: At the very end of the level, the Kongs should pass up the End of Level Target and find a lone banana above them. They can use the team up move to throw a Kong to the banana, or simply use the Diddy barrel. If they do so, they will land right into a hidden Bonus Barrel. In the Bonus Level, they must defeat several Zingers. However, they are all above an abyss filled with sharp spikes. The Kongs' only option is to touch the Exclamation Point Barrel and become temporarily invincible. They can then run over the spikes and defeat all the Zingers, but before the special ability wears off. After all the enemies are gone, the Video Game Hero Coin will appear.
Gallery[edit]
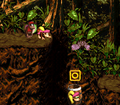
Dixie near the Letter O.
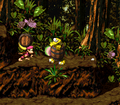
Dixie prepares to throw a barrel at a yellow Klobber.
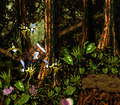
Zingers around a Rotatable Barrel.
Rotatable Barrels and Zingers.
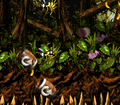
Diddy is about to jump on a black Klobber.

The start of the level in the Game Boy Advance remake.


Names in other languages[edit]
| Language | Name | Meaning |
|---|---|---|
| Japanese | クロコ ジャングル Kuroko Janguru |
Croc Jungle |
| French | Châtaignes et Marrons |
Chestnut and Marrons |
| German | Klobber-Chaos |
Klobber Chaos |
| Italian | Bottidrilli a Go-go |
|
| Spanish | Masacre de Klobber |
Klobber Massacre |
Trivia[edit]


- Like Jungle Jinx, the Bonus Area's colors were changed between the two versions of the original Super Nintendo Entertainment System release.
- In the Super Nintendo Entertainment System version, placing a Klobber or Kaboom (when he retreats inside his barrel) into the pit of spikes will leave it temporarily unharmed until it reveals itself, then the spikes will immediately defeat him. In the Game Boy Advance version, dropping its barrel in the pit of spikes simply causes it to disappear.