Windy Well (Donkey Kong Country 2: Diddy's Kong Quest): Difference between revisions
No edit summary |
mNo edit summary |
||
| (46 intermediate revisions by 21 users not shown) | |||
| Line 1: | Line 1: | ||
{{ | {{italic title|id=yes}} | ||
{{ | {{DKC level infobox | ||
|image=[[File:Windy Well.png]] | |||
|image=[[File: | |||
|code=6 - 2 (SNES)<br>6 - 4 (GBA) | |code=6 - 2 (SNES)<br>6 - 4 (GBA) | ||
|world=[[K. Rool's Keep]] | |||
|game=''[[Donkey Kong Country 2: Diddy's Kong Quest]]'' | |game=''[[Donkey Kong Country 2: Diddy's Kong Quest]]'' | ||
| | |track=Kannon's Klaim<!--"Mining Melancholy" is an unofficial title, "Kannon's Klaim" is from the official GBA sound test--> | ||
|before=[[Arctic Abyss (Donkey Kong Country 2: Diddy's Kong Quest)|<<]] | |before=[[Arctic Abyss (Donkey Kong Country 2: Diddy's Kong Quest)|<<]] | ||
|after=[[Castle Crush|>>]] | |after=[[Castle Crush|>>]] | ||
| | |before3=[[Clapper's Cavern (Donkey Kong Country 2: Diddy's Kong Quest)|<<]] | ||
| | |after3=[[Chain Link Chamber (Donkey Kong Country 2: Diddy's Kong Quest)|>>]] | ||
}} | }} | ||
'''Windy Well''' is the | '''Windy Well''' is the 29th [[level]] of ''[[Donkey Kong Country 2: Diddy's Kong Quest]]'' (or the 31st in the [[Donkey Kong Country 2 (Game Boy Advance)|Game Boy Advance remake]]). It is also the second level of [[K. Rool's Keep]], or the fourth in the [[Game Boy Advance]] remake where it switched positions with [[Castle Crush]] and moved to being after [[Clapper's Cavern]]. It is the final mine shaft level, as well as the only one not in [[Crocodile Cauldron]]. The main feature is the strong gusts of [[wind]], which pulls [[Diddy Kong|Diddy]] and [[Dixie Kong]] higher into the level. The wind stops blowing when the Kongs go onto a platform or, in some cases, when they reach a certain point. The main and most common enemies are yellow [[Zinger]]s, who appear throughout the level. The Kongs must carefully maneuver themselves in the air to avoid any obstacles. There are parts where the Kongs have to horizontally navigate through Zingers as the wind continues blowing upward. | ||
==Layout== | |||
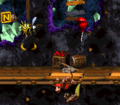
[[File:Windy Well GBA Zingers.png|thumb|left|Windy Well in the Game Boy Advance version]] | |||
When they start the level, the heroes must cross a few gaps and try not to fall off the small platforms between them, as the Click-Clacks on them can be quite an obstacles. Soon, they monkeys must jump up and be lifted upwards by the strong winds. When they get on the platform above, the heroes must ascend again and sneak between some Zingers to get to another platform. Here, they will have to dodge a Kutlass and cross a gap. They will then get to a hook, which must be hopped off of for the wind to pick them up again. | |||
The Kongs must travel around many Zingers as they come up to the next platform, where they must then jump between several Zingers without being pulled into them by the winds. The group must make their way east, and jump off of a hook to journey even higher. When they avoid all the Zingers and get to the next platform, they will need to jump up again and travel higher. This time, they will meet only a few Zingers, although they will encounter a Krook, too, and he can be a big hazard if they are not careful. | |||
At the platform above this foe, the Kongs must ascend to a barrel and shoot up to a few more platforms. The monkeys' time on solid ground won't last long through, because they will have to jump yet again and wind travel to another platform. They will have to go west from here, however, there is a large wall of three Zingers blocking their path. So, they should carefully float under these foes with the wind, and get to the next platform. Jumping here will cause the wind to pick them up again, and drag them to an area cluttered with all kinds of Zingers. Once these foes are all passed, the monkeys will land on a platform with the [[Star Barrel]] on it. | |||
Halfway through the level, the Kongs must climb up a few more platforms and watch out for a couple of Krooks. Soon, they will have to journey east, although there are several Zingers in the way. They must jump between the foes as they move back and fourth. This would normally be easily, however, the wind will pull the heroes up to the top Zinger, so it can be tricky. Once passed this area, the heroes must jump up again to get to glide up to another platform. Several prizes float above them at this point, but they shouldn't get them, and instead travel west, where they will have to cling onto some hooks, then jump off. The wind will pick them up and take them to a higher floor. When they travel upwards, though, they must be careful, as there are Krooks hanging around on the sides. The heroes must try to avoid the hooks thrown at them, and shortly after get to the platform above. Here, they should follow the [[banana]] trail to another platform, and then jump at this point to be lifted up by the wind again. | |||
As the Kongs ascend, they will encounter many Zingers flying all around. They need to use their skills to get away from the wasps, and then land on a small platform. Right after landing on it, though, they should hop again and by pulled higher. They will have to make their way to the platform in the far corner of the area then, and hop west. The wind will pick them up, by not pull them too high. Instead, it will keep them at a certain level, as the heroes slide under the nearby group of Zingers. After passing these foes, they must make a turn in direction, and ascend north. As they go, they will need to watch out for several Zingers and finally make it back up to land. But, they have to jump again here, and travel higher into the mine shaft. Four Krooks will be throwing their weapons at the Kongs as they float upwards, followed by a swarm of Zingers that must be avoided at all cost. Finally, though, [[Diddy Kong]] and [[Dixie Kong]] will make it to the highest platform, where they must walk east and cross a small gap. The End of Level Target is nearby, with prizes including a [[Banana Coin]], [[Banana Bunch]], or the letter G. | |||
==Enemies== | |||
The following enemies appear in the following quantities: | |||
<gallery> | |||
Click Clack DKC2.png|[[Click-Clack]] (3) | |||
Flitter DKC2.png|[[Flitter]] (9) | |||
Kannon DKC2 enemy.png|[[Kannon]] (1) | |||
Klampon DKC2.png|[[Klampon]] (1) | |||
Klobber DKC2 yellow.png|[[Klobber]] (yellow) (1) | |||
Krook DKC2.png|[[Krook]] (9) | |||
Kruncha DKC2 blue.png|[[Kruncha]] (blue) (1) | |||
Kutlass DKC2 green.png|[[Kutlass]] (green) (4) | |||
Spiny DKC2.png|[[Spiny (Donkey Kong Country 2: Diddy's Kong Quest)|Spiny]] (2) | |||
Zinger DKC2 yellow.png|[[Zinger]] (yellow) (57) | |||
</gallery> | |||
==Items and objects== | |||
The following items and objects appear in the following quantities: | |||
<gallery> | |||
Banana Bunch DKC SNES.png|[[Banana Bunch]] (3) | |||
Banana Coin.png|[[Banana Coin]] (4) | |||
DK Barrel.png|[[DK Barrel]] (4) | |||
Red Extra Life Balloon DKC2.png|[[Red Balloon]] (1) | |||
</gallery> | |||
=== | ===KONG Letters=== | ||
After the Kongs | *'''K:''' At the very start, the Kongs must jump into the first gap. The letter K is located here, and an [[Arrow Barrel]] blasts the Kongs back onto the main stage. | ||
*'''O:''' After floating past two groups of Zingers, the Kongs can find a Click-Clack on a platform. By jumping up, the wind carries the Kongs up to two Zingers, of which the O is floating between. | |||
*'''N:''' After the Star Barrel, the Kongs must pass two Krooks and some Zingers. After this, they must jump onto another platform and allow the wind to carry them up to another platform with an Extra Life Balloon and the letter N between a pair of three Zingers. | |||
*'''G:''' One of the End of Level Target prizes | |||
====Golden | ===Key items=== | ||
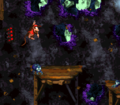
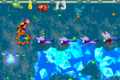
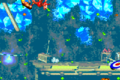
At the start of the level, the | [[File:Windy Well DK Coin location.png|thumb|The Kongs float up to the Video Game Hero Coin]] | ||
*'''[[DK Coin|Cranky's Video Game Hero Coin]]:''' After the letter N, the Kongs must pass two Krooks to and float up onto a platform. There are three bananas above them, which they would normally follow up to the next platform. Instead of following the bananas, the Kongs must jump all the way right for the wind to carry them past three Zingers and to the Video Game Hero Coin at the far end. If the Kongs float up onto the above platform without obtaining the Video Game Hero Coin, they cannot return to collect it. | |||
*'''[[Golden feather]] (Game Boy Advance version only):''' At the start of the level, the Kongs must go onto the platform with the first DK Barrel floating above. Instead of jumping to the DK Barrel, the Kongs must cartwheel underneath the floorboard and grab the golden feather. After doing so, they are blasted back onto the main level. | |||
{{br}} | |||
==Bonus Areas== | |||
{{multiframe|[[File:Windy Well Bonus Barrel 1.png|200px]] [[File:Windy Well Bonus Barrel 2.png|200px]]|size=420|The locations for the first and second Bonus Barrels each.}} | |||
Windy Well has two [[Bonus Level]]s, listed by type: | |||
*'''Destroy them All!''': After collecting the letter O, the Kongs must pass a Krook and go left to reach a pair of two platforms, the bottom one having the [[Bonus Barrel]]. They must slowly float themselves to the end and into the Bonus Barrel. In this Bonus Area, Diddy and Dixie must defeat nine Flitters within 20 seconds. At the start, they can jump to float up to a hook and then bounce off several Flitters to fall back down to the other side of the ground with the [[Kremkoin]]. | |||
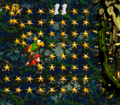
*'''Collect the Stars!''': At the very end, the Kongs can find a Kutlass and a Klobber below the End of Level Target. The lead Kong must pick up the Klobber and ram it into Kutlass to safely cross into the Bonus Barrel. The Bonus Area takes places in an enclosed [[bramble]] area. [[Squawks]] is floating directly above the start point. The Kongs must ride Squawks and go up to collect all 80 stars with 15 seconds. After collecting every star, the Kremkoin appears on a platform at the right. | |||
{{br}} | |||
==Gallery== | |||
<gallery> | |||
Windy Well layout.jpg|The original design layout for Windy Well | |||
Windy Well Click-Clack.png|Diddy jumps above a Click-Clack at the start | |||
Windy Well DKC2 floating.png|Diddy and Dixie floating through the level, below two Zingers. | |||
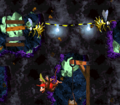
Windy Well DKC2 Zingers.png|Diddy floating up to three Zingers shortly before the Star Barrel. | |||
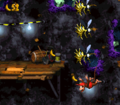
Windy Well Letter N.png|Location of the letter N and an Extra Life Balloon | |||
Windy Well Bonus Area 2.png|The second Bonus Level | |||
Windy Well GBA Bonus Area 1.png|The first Bonus Level in the Game Boy Advance version | |||
Windy Well GBA Golden Feather.png|The location of the golden feather in the Game Boy Advance version | |||
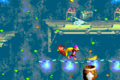
Windy Well DKC2 GBA.png|Diddy and Dixie floating to the End of Level Target in the Game Boy Advance version | |||
</gallery> | |||
==Names in other languages== | ==Names in other languages== | ||
{{ | {{foreign names | ||
|Jap=かぜのこうざん | |Jap=かぜのこうざん | ||
|JapR=Kaze no | |JapR=Kaze no Kōzan | ||
|JapM=Windy Mine | |JapM=Windy Mine | ||
|Spa=Pozo Ventoso | |Spa=Pozo Ventoso | ||
|SpaM= | |SpaM=Windy Well | ||
| | |Fre=Gouffre Glacial | ||
| | |FreM=Icy Chasm | ||
|Ger=Windhöhle | |Ger=Windhöhle | ||
|GerM=Wind Cave | |GerM=Wind Cave | ||
|Ita=Venti Ascensionali | |||
|ItaM=Ascending Winds | |||
}} | |||
= | |||
{{DKC2}} | {{DKC2}} | ||
[[Category: | [[Category:Mines]] | ||
[[Category:Crocodile Isle]] | [[Category:Crocodile Isle]] | ||
[[Category:Donkey Kong Country 2: Diddy's Kong Quest levels]] | |||
[[Category:Donkey Kong Country 2: Diddy's Kong Quest]] | |||
Latest revision as of 12:15, March 7, 2024
| Level | |
|---|---|
| Windy Well | |

| |
| Level code | 6 - 2 (SNES) 6 - 4 (GBA) |
| World | K. Rool's Keep |
| Game | Donkey Kong Country 2: Diddy's Kong Quest |
| Music track | Kannon's Klaim |
| << Directory of levels (SNES) >> | |
| << Directory of levels (GBA) >> | |
Windy Well is the 29th level of Donkey Kong Country 2: Diddy's Kong Quest (or the 31st in the Game Boy Advance remake). It is also the second level of K. Rool's Keep, or the fourth in the Game Boy Advance remake where it switched positions with Castle Crush and moved to being after Clapper's Cavern. It is the final mine shaft level, as well as the only one not in Crocodile Cauldron. The main feature is the strong gusts of wind, which pulls Diddy and Dixie Kong higher into the level. The wind stops blowing when the Kongs go onto a platform or, in some cases, when they reach a certain point. The main and most common enemies are yellow Zingers, who appear throughout the level. The Kongs must carefully maneuver themselves in the air to avoid any obstacles. There are parts where the Kongs have to horizontally navigate through Zingers as the wind continues blowing upward.
Layout[edit]

When they start the level, the heroes must cross a few gaps and try not to fall off the small platforms between them, as the Click-Clacks on them can be quite an obstacles. Soon, they monkeys must jump up and be lifted upwards by the strong winds. When they get on the platform above, the heroes must ascend again and sneak between some Zingers to get to another platform. Here, they will have to dodge a Kutlass and cross a gap. They will then get to a hook, which must be hopped off of for the wind to pick them up again.
The Kongs must travel around many Zingers as they come up to the next platform, where they must then jump between several Zingers without being pulled into them by the winds. The group must make their way east, and jump off of a hook to journey even higher. When they avoid all the Zingers and get to the next platform, they will need to jump up again and travel higher. This time, they will meet only a few Zingers, although they will encounter a Krook, too, and he can be a big hazard if they are not careful.
At the platform above this foe, the Kongs must ascend to a barrel and shoot up to a few more platforms. The monkeys' time on solid ground won't last long through, because they will have to jump yet again and wind travel to another platform. They will have to go west from here, however, there is a large wall of three Zingers blocking their path. So, they should carefully float under these foes with the wind, and get to the next platform. Jumping here will cause the wind to pick them up again, and drag them to an area cluttered with all kinds of Zingers. Once these foes are all passed, the monkeys will land on a platform with the Star Barrel on it.
Halfway through the level, the Kongs must climb up a few more platforms and watch out for a couple of Krooks. Soon, they will have to journey east, although there are several Zingers in the way. They must jump between the foes as they move back and fourth. This would normally be easily, however, the wind will pull the heroes up to the top Zinger, so it can be tricky. Once passed this area, the heroes must jump up again to get to glide up to another platform. Several prizes float above them at this point, but they shouldn't get them, and instead travel west, where they will have to cling onto some hooks, then jump off. The wind will pick them up and take them to a higher floor. When they travel upwards, though, they must be careful, as there are Krooks hanging around on the sides. The heroes must try to avoid the hooks thrown at them, and shortly after get to the platform above. Here, they should follow the banana trail to another platform, and then jump at this point to be lifted up by the wind again.
As the Kongs ascend, they will encounter many Zingers flying all around. They need to use their skills to get away from the wasps, and then land on a small platform. Right after landing on it, though, they should hop again and by pulled higher. They will have to make their way to the platform in the far corner of the area then, and hop west. The wind will pick them up, by not pull them too high. Instead, it will keep them at a certain level, as the heroes slide under the nearby group of Zingers. After passing these foes, they must make a turn in direction, and ascend north. As they go, they will need to watch out for several Zingers and finally make it back up to land. But, they have to jump again here, and travel higher into the mine shaft. Four Krooks will be throwing their weapons at the Kongs as they float upwards, followed by a swarm of Zingers that must be avoided at all cost. Finally, though, Diddy Kong and Dixie Kong will make it to the highest platform, where they must walk east and cross a small gap. The End of Level Target is nearby, with prizes including a Banana Coin, Banana Bunch, or the letter G.
Enemies[edit]
The following enemies appear in the following quantities:

Click-Clack (3)

Flitter (9)

Kannon (1)

Klampon (1)

Klobber (yellow) (1)

Krook (9)

Kruncha (blue) (1)

Kutlass (green) (4)

Spiny (2)

Zinger (yellow) (57)


Items and objects[edit]
The following items and objects appear in the following quantities:

Banana Bunch (3)

Banana Coin (4)

DK Barrel (4)

Red Balloon (1)


KONG Letters[edit]
- K: At the very start, the Kongs must jump into the first gap. The letter K is located here, and an Arrow Barrel blasts the Kongs back onto the main stage.
- O: After floating past two groups of Zingers, the Kongs can find a Click-Clack on a platform. By jumping up, the wind carries the Kongs up to two Zingers, of which the O is floating between.
- N: After the Star Barrel, the Kongs must pass two Krooks and some Zingers. After this, they must jump onto another platform and allow the wind to carry them up to another platform with an Extra Life Balloon and the letter N between a pair of three Zingers.
- G: One of the End of Level Target prizes
Key items[edit]

- Cranky's Video Game Hero Coin: After the letter N, the Kongs must pass two Krooks to and float up onto a platform. There are three bananas above them, which they would normally follow up to the next platform. Instead of following the bananas, the Kongs must jump all the way right for the wind to carry them past three Zingers and to the Video Game Hero Coin at the far end. If the Kongs float up onto the above platform without obtaining the Video Game Hero Coin, they cannot return to collect it.
- Golden feather (Game Boy Advance version only): At the start of the level, the Kongs must go onto the platform with the first DK Barrel floating above. Instead of jumping to the DK Barrel, the Kongs must cartwheel underneath the floorboard and grab the golden feather. After doing so, they are blasted back onto the main level.
Bonus Areas[edit]


Windy Well has two Bonus Levels, listed by type:
- Destroy them All!: After collecting the letter O, the Kongs must pass a Krook and go left to reach a pair of two platforms, the bottom one having the Bonus Barrel. They must slowly float themselves to the end and into the Bonus Barrel. In this Bonus Area, Diddy and Dixie must defeat nine Flitters within 20 seconds. At the start, they can jump to float up to a hook and then bounce off several Flitters to fall back down to the other side of the ground with the Kremkoin.
- Collect the Stars!: At the very end, the Kongs can find a Kutlass and a Klobber below the End of Level Target. The lead Kong must pick up the Klobber and ram it into Kutlass to safely cross into the Bonus Barrel. The Bonus Area takes places in an enclosed bramble area. Squawks is floating directly above the start point. The Kongs must ride Squawks and go up to collect all 80 stars with 15 seconds. After collecting every star, the Kremkoin appears on a platform at the right.
Gallery[edit]
The original design layout for Windy Well
Diddy jumps above a Click-Clack at the start
Diddy and Dixie floating through the level, below two Zingers.
Diddy floating up to three Zingers shortly before the Star Barrel.
Location of the letter N and an Extra Life Balloon
The second Bonus Level
The first Bonus Level in the Game Boy Advance version
The location of the golden feather in the Game Boy Advance version
Diddy and Dixie floating to the End of Level Target in the Game Boy Advance version


Names in other languages[edit]
| Language | Name | Meaning |
|---|---|---|
| Japanese | かぜのこうざん Kaze no Kōzan |
Windy Mine |
| French | Gouffre Glacial |
Icy Chasm |
| German | Windhöhle |
Wind Cave |
| Italian | Venti Ascensionali |
Ascending Winds |
| Spanish | Pozo Ventoso |
Windy Well |