Rambi Rumble (Donkey Kong Country 2: Diddy's Kong Quest): Difference between revisions
mNo edit summary |
(merging the longest level page on dk wiki. added extra details & rewrote) |
||
| Line 2: | Line 2: | ||
{{levelbox | {{levelbox | ||
|title=Rambi Rumble | |title=Rambi Rumble | ||
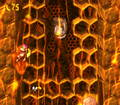
|image=[[File:RambiRumbleSNES1.png | |image=[[File:RambiRumbleSNES1.png]] | ||
|code=4 - 6 | |code=4 - 6 | ||
|world=[[Krazy Kremland]] | |world=[[Krazy Kremland]] | ||
|game=''[[Donkey Kong Country 2: Diddy's Kong Quest]]'' | |game=''[[Donkey Kong Country 2: Diddy's Kong Quest]]'' | ||
|song=Flight of the Zinger<br>Run, Rambi! Run! | |song=Flight of the Zinger<br>Run, Rambi! Run! | ||
|before=[[Mudhole Marsh (Donkey Kong Country 2: Diddy's Kong Quest)|<<]] | |before=[[Mudhole Marsh (Donkey Kong Country 2: Diddy's Kong Quest)|<<]] | ||
|after=[[King Zing Sting (Donkey Kong Country 2: Diddy's Kong Quest)|>>]] | |after=[[King Zing Sting (Donkey Kong Country 2: Diddy's Kong Quest)|>>]] | ||
}} | }} | ||
'''Rambi Rumble''' is the twenty-second level of ''[[Donkey Kong Country 2: Diddy's Kong Quest]]'' | '''Rambi Rumble''' is the twenty-second level of ''[[Donkey Kong Country 2: Diddy's Kong Quest]]'' and the sixth level of [[Krazy Kremland]]. | ||
==Description== | |||
Rambi Rumble is the second beehive level, following after [[Hornet Hole (Donkey Kong Country 2: Diddy's Kong Quest)|Hornet Hole]]. It has honey-coated floors and walls, numerous [[Zinger]]s (including a couple of red ones), and a playable [[Animal Friend]]. As stated by the level name, [[Rambi the Rhino]] is the playable Animal Friend. [[Diddy Kong]] and [[Dixie Kong]] transform into him from a [[Animal Barrel|Rambi Barrel]] during the second half of the level. | |||
== | Rambi Rumble is one of the few levels the Kongs start the level facing west. During the first half, the Kongs must jump from numerous honey-coated walls and avoid numerous Zingers within the tight gaps. Diddy and Dixie must also jump onto a few small platforms in the air, which are patrolled by either a [[Klampon]] or a [[Kutlass]]. | ||
In the second half, Rambi must descend further into the level. He also encounters numerous Zingers and a few [[Kannon]]s (which the Kongs do not encounter themselves). Near the end, Rambi is chased by [[King Zing]] for a remainder of the level, up until he hits a dead end. A couple of [[Kruncha]]s appear in the second [[Bonus Level]], which is located just before the [[End of Level Target]]. | |||
==Layout== | |||
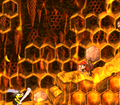
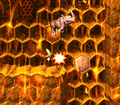
[[File:Rambi Rumble DKC2 shot.png|left|thumb|Diddy hangs onto a wall covered in honey.]] | [[File:Rambi Rumble DKC2 shot.png|left|thumb|Diddy hangs onto a wall covered in honey.]] | ||
The level begins with a pathway leading to a Kutlass near a raised area. Honey is splattered over the raised area, and a group of Zingers fly in a large circle, similar to [[Boo Buddies]]. A [[DK Barrel]] wobbles between them. A gap with a long wall on the other side of it is ahead. This wall is covered in honey from top to bottom, allowing the Kongs to stick to it and climb. As they climb it, a Zinger stands in their way. Soon, they can reach a floating platform to the right of the wall with honey on the side of it. They can use this honey to climb to the top of the platform, which has a Klampon on it. Another large platform floats ahead with honey on the side of it. The primates must travel on top of it while dodging a second Klampon to reach a hook. They can use it to assist them in reaching a set of two walls above, which is covered in sticky honey. After the primates climb most of the wall, avoiding a Zinger on the way, they come up to a Barrel Cannon that rotates when entered. With good aim, they must shoot upwards between two Zinger to more honey on the walls. | The level begins with a pathway leading to a Kutlass near a raised area. Honey is splattered over the raised area, and a group of Zingers fly in a large circle, similar to [[Boo Buddies]]. A [[DK Barrel]] wobbles between them. A gap with a long wall on the other side of it is ahead. This wall is covered in honey from top to bottom, allowing the Kongs to stick to it and climb. As they climb it, a Zinger stands in their way. Soon, they can reach a floating platform to the right of the wall with honey on the side of it. They can use this honey to climb to the top of the platform, which has a Klampon on it. Another large platform floats ahead with honey on the side of it. The primates must travel on top of it while dodging a second Klampon to reach a hook. They can use it to assist them in reaching a set of two walls above, which is covered in sticky honey. After the primates climb most of the wall, avoiding a Zinger on the way, they come up to a Barrel Cannon that rotates when entered. With good aim, they must shoot upwards between two Zinger to more honey on the walls. | ||
| Line 24: | Line 28: | ||
A large gap is ahead that the Kongs cannot cross with a normal jump. Honey splattered along the walls on the sides of the gap can be clung onto to avoiding falling. A Kutlass is located ahead of here, along with a passage leading into a cavern-like area in the hive. An [[Animal Barrel]] is located in the cave, but it is high in the air. The heroes must jump from a honey wall to reach it. When they access the barrel, they are turned into Rambi the Rhinoceros, who must leave the cave area through a different passage found to the right. On the outside of the cave, Rambi can find a [[DK Coin]] against a honey wall and a Zinger in a tight space blocking his path. He can slam through the Zinger with his strength. Two Zingers float in a gap ahead of here. The abyss is too big to cross with a normal jump, but Rambi can bounce on the wasps to cross. A gap leading into a lower area is ahead. A Zinger is also above it, who can be bounced on to reach a DK Barrel. If Rambi hops into the previously mentioned gap, he can enter a lower area with a Kannon at the beginning of it. This foe shoots barrels at the hero. Another abyss is nearby that Rambi can pass by bouncing on a Zinger. A flat pathway splattered with honey is straight ahead. Zingers float above it with a the letter N above them. A Kannon also shoots [[kannonball]]s across the area. | A large gap is ahead that the Kongs cannot cross with a normal jump. Honey splattered along the walls on the sides of the gap can be clung onto to avoiding falling. A Kutlass is located ahead of here, along with a passage leading into a cavern-like area in the hive. An [[Animal Barrel]] is located in the cave, but it is high in the air. The heroes must jump from a honey wall to reach it. When they access the barrel, they are turned into Rambi the Rhinoceros, who must leave the cave area through a different passage found to the right. On the outside of the cave, Rambi can find a [[DK Coin]] against a honey wall and a Zinger in a tight space blocking his path. He can slam through the Zinger with his strength. Two Zingers float in a gap ahead of here. The abyss is too big to cross with a normal jump, but Rambi can bounce on the wasps to cross. A gap leading into a lower area is ahead. A Zinger is also above it, who can be bounced on to reach a DK Barrel. If Rambi hops into the previously mentioned gap, he can enter a lower area with a Kannon at the beginning of it. This foe shoots barrels at the hero. Another abyss is nearby that Rambi can pass by bouncing on a Zinger. A flat pathway splattered with honey is straight ahead. Zingers float above it with a the letter N above them. A Kannon also shoots [[kannonball]]s across the area. | ||
Zingers fly in an additional abyss located nearby. Once the rhinoceros bounces on them to travel over the gap, he can find a passage leading downwards, which is guarded by a Zinger. He lands in another lower area when he falls into here. A red, indestructible Zinger is near the end of this area to the right, floating next to another passage. Once the hero drops into this passage, he is greeted by King Zing, who begins to chase him. At the beginning of the chase, Rambi races towards a few Zingers found floating only slightly above the ground, which has honey on it in some spots. The rhinoceros can stomp through honey and then approach a large abyss that he must cross by bouncing on the three Zingers found in it. A passage leading farther downwards is ahead of here with more Zingers guarding it. In this lower area, more Zingers can be seen along the ground. A large abyss is in the center of here with four Zingers in it. The rhinoceros must use his abilities to bounce on the Zingers so he can cross the abyss. There is one last passage at this gap with a red Zinger in front of it. The hero can fall into it to reach the lowest part of the hive, where two more red Zingers stand in his way. After the hero travels over the flat area and passes these Zingers, he can reach an Auto Fire Barrel that blasts him to a raised piece of land that King Zing cannot get onto. A [[No Animal Sign]] is here that causes Rambi to turn back into the primates. The [[End of Level Target]] is near here | Zingers fly in an additional abyss located nearby. Once the rhinoceros bounces on them to travel over the gap, he can find a passage leading downwards, which is guarded by a Zinger. He lands in another lower area when he falls into here. A red, indestructible Zinger is near the end of this area to the right, floating next to another passage. Once the hero drops into this passage, he is greeted by King Zing, who begins to chase him. At the beginning of the chase, Rambi races towards a few Zingers found floating only slightly above the ground, which has honey on it in some spots. The rhinoceros can stomp through honey and then approach a large abyss that he must cross by bouncing on the three Zingers found in it. A passage leading farther downwards is ahead of here with more Zingers guarding it. In this lower area, more Zingers can be seen along the ground. A large abyss is in the center of here with four Zingers in it. The rhinoceros must use his abilities to bounce on the Zingers so he can cross the abyss. There is one last passage at this gap with a red Zinger in front of it. The hero can fall into it to reach the lowest part of the hive, where two more red Zingers stand in his way. After the hero travels over the flat area and passes these Zingers, he can reach an Auto Fire Barrel that blasts him to a raised piece of land that King Zing cannot get onto. A [[No Animal Sign]] is here that causes Rambi to turn back into the primates. The [[End of Level Target]] is near here, and Diddy and Dixie can optionally use a nearby Barrel Cannon to blast on the target and win a prize. The Kongs can win either a Banana, Banana Bunch, or the letter G. | ||
==Enemies== | |||
{| class="dktable-brown" width=25% | |||
!Name | |||
!Count | |||
|- | |||
|align=center|[[File:Kannon DKC2 enemy.png]]<br>[[Kannon]] | |||
|2 | |||
|- | |||
|align=center|[[File:Klampon DKC2.png]]<br>[[Klampon]] | |||
|4 | |||
|- | |||
|align=center|[[File:Kutlass DKC2 yellow.png]]<br>[[Kutlass]] (yellow) | |||
|3 | |||
|- | |||
|align=center|[[File:Kruncha DKC2 blue.png]]<br>[[Kruncha]] | |||
|6 (Bonus Level only) | |||
|- | |||
|align=center|[[File:Zinger DKC2 yellow.png]] [[File:Zinger DKC2 red.png]]<br>[[Zinger]] (yellow and red) | |||
|35 (yellow)<br>7 (red)<br>'''Total:''' 42 | |||
|} | |||
== | ==Items and objects== | ||
== | {| class="dktable-brown" width=25% | ||
!Name | |||
!Count | |||
|- | |||
|align=center|[[File:Banana Bunch DKC SNES.png]]<br>[[Banana|Banana Bunch]] | |||
|2 | |||
|- | |||
|align=center|[[File:Banana Coin.png]]<br>[[Banana Coin|Banana Bunch Coin]] | |||
|2 | |||
|- | |||
|align=center|[[File:DK Barrel.png]]<br>[[DK Barrel]] | |||
|3 | |||
|} | |||
==== | ===Collectibles=== | ||
[[File:Rambi Rumble | {|class="dktable-brown" width=70% | ||
|- | |||
!Item | |||
= | !Location | ||
|- | |||
|align=center|[[File:Rambi Rumble DKC2 DK Coin.png]]<br>[[DK Coin]] | |||
|After the Star Barrel, the Kongs encounter a Kutlass and a wall opening that leads into a room with the Rambi Barrel. Just left of the entrance, the Kongs must jump to grab a hidden hook, then jump to the next hidden hook, and cross above the room with the Rambi Barrel. To their right, the Kongs can find a honey-coated wall, which they can climb to obtain the DK Coin at the top. Rambi cannot obtain the DK Coin as he cannot climb honey-coated walls. | |||
|- | |||
|align=center|[[File:Rambi Rumble GBA Golden Feather.png]]<br>[[Golden Feather]] (GBA version) | |||
|When the Kongs encounter the second Klampon on a small platform, they must jump down from the right and grab on a hook. By jumping to the right again, Diddy and Dixie can land into an [[Arrow Barrel]], which blasts them into the Golden Feather. | |||
|- | |||
|align=center|[[File:Rambi Rumble GBA Photograph location.png]]<br>[[Photograph]] (GBA version) | |||
|Next to the letter O, the Kongs encounter a Kutlass with a camera icon over its head. They must defeat it to obtain a photograph of a Kutlass for the sixth page of their [[scrapbook]]. | |||
|} | |||
==== | ===K-O-N-G Letters=== | ||
{|class="dktable-brown" width=70% | |||
==== | |- | ||
!Letter | |||
!Location | |||
|- | |||
| align="center" |[[File:Letter K.png]] | |||
|Hanging from a hook just southeast of the first Klampon encountered. | |||
|- | |||
| align="center" |[[File:Letter O.png]] | |||
| The letter O is in a gap between the second Kutlass and a Zinger. The Kongs can reach it by doing a roll jump. | |||
|- | |||
| align="center" |[[File:Letter N.png]] | |||
|Shortly after Rambi passes the first Kannon, he must bounce on three Zingers; the letter N is floating above the middle Zinger. | |||
|- | |||
| align="center" |[[File:Letter G.png]] | |||
|One of the [[End of Level Target]] prizes | |||
|} | |||
==Bonus Levels== | |||
{|class="dktable-brown" width=70% | |||
|- | |||
!Image | |||
!Type and description | |||
|- | |||
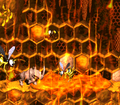
|[[File:Rambi Rumble Bonus Area 1.png]] | |||
|'''Find the Coin!'''<br>After the Kongs blast from the second Barrel Cannon, they must land on a platform to their right. From there they must jump to a floating banana in midair, which uncovers a hidden hook. From there the Kongs must jump left, grab onto a small honey-coated wall and then jump up two more until reaching the top. They must continue left into a wall opening to enter the Bonus Level. The objective is for the Kongs to collect the Kremkoin within 15 seconds. They must first jump up a honey-coated wall on the left and then continue jumping up one on the right; there are three bananas on each wall. After reaching top of the second honey patch, the Kongs can jump right onto the high platform to obtain the [[Kremkoin]]. | |||
|- | |||
| | |||
|'''Destroy Them All!'''<br>At the end of the King Zing chase, below an [[Auto-Fire Barrel]], Rambi must Supercharge into the wall to enter the second Bonus Level. Here Rambi must defeat eight enemies within 15 seconds, more specifically six Krunchas and two yellow Zingers. He must quickly run down the area, which quickly changes direction between left and right. After defeating every enemy, the Kremkoin appears at the very bottom, next to the exit. By exiting, Rambi is sent back into the main level, right before the No Animal Sign. | |||
|} | |||
==Gallery== | ==Gallery== | ||
===Super Nintendo Entertainment System=== | |||
<gallery> | |||
Rambi Rumble start.png|Diddy encounters the first Kutlass, near the start of the level | |||
Rambi Rumble Zinger circle.png|Diddy jumps to a DK Barrel centered between a circle of Zingers | |||
Rambi Rumble Klampon platform.png|The Kongs cling to a honey wall on a platform with a Klampon | |||
Rambi Rumble two honey walls.png|The Kongs grab onto a honey wall in a narrow area, with two Zingers overhead. | |||
Rambi Rumble Animal Barrel.png|The Kongs in the room with the Rambi Barrel. | |||
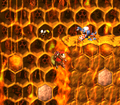
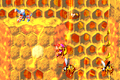
Rambi Rumble DKC2 King Zing chase.png|The start of the King Zing chase | |||
Rambi Rumble Red Zinger bounce.png|Rambi bounces off a red Zinger | |||
RambiRumbleSNES2.png|Dixie performing on the End of Level Target | |||
Rambi Rumble concept.jpg|Concept drawing outlining the level design | |||
</gallery> | |||
===Game Boy Advance=== | |||
<gallery> | <gallery> | ||
Rambi Rumble GBA wall.png|The Kongs cling on a honey-coated wall | |||
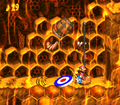
Rambi Rumble DKC2 GBA.png|Rambi | Rambi Rumble DKC2 GBA.png|Rambi running away from King Zing | ||
</gallery> | </gallery> | ||
| Line 64: | Line 147: | ||
==Trivia== | ==Trivia== | ||
* | *In the [[Game Boy Advance]] version, during the King Zing chase, [[Screech]]'s theme "Bad Bird Rag" plays instead of "Run, Rambi! Run!". Despite this, the latter theme is included in the game's Sound Test menu. It is unknown why "Run, Rambi! Run!" does not play during the chase. | ||
{{DKC2}} | {{DKC2}} | ||
[[Category:Crocodile Isle]] | [[Category:Crocodile Isle]] | ||
[[Category:Donkey Kong Country 2: Diddy's Kong Quest Levels]] | [[Category:Donkey Kong Country 2: Diddy's Kong Quest Levels]] | ||
Revision as of 15:41, July 5, 2019
Template:Levelbox Rambi Rumble is the twenty-second level of Donkey Kong Country 2: Diddy's Kong Quest and the sixth level of Krazy Kremland.
Description
Rambi Rumble is the second beehive level, following after Hornet Hole. It has honey-coated floors and walls, numerous Zingers (including a couple of red ones), and a playable Animal Friend. As stated by the level name, Rambi the Rhino is the playable Animal Friend. Diddy Kong and Dixie Kong transform into him from a Rambi Barrel during the second half of the level.
Rambi Rumble is one of the few levels the Kongs start the level facing west. During the first half, the Kongs must jump from numerous honey-coated walls and avoid numerous Zingers within the tight gaps. Diddy and Dixie must also jump onto a few small platforms in the air, which are patrolled by either a Klampon or a Kutlass.
In the second half, Rambi must descend further into the level. He also encounters numerous Zingers and a few Kannons (which the Kongs do not encounter themselves). Near the end, Rambi is chased by King Zing for a remainder of the level, up until he hits a dead end. A couple of Krunchas appear in the second Bonus Level, which is located just before the End of Level Target.
Layout

The level begins with a pathway leading to a Kutlass near a raised area. Honey is splattered over the raised area, and a group of Zingers fly in a large circle, similar to Boo Buddies. A DK Barrel wobbles between them. A gap with a long wall on the other side of it is ahead. This wall is covered in honey from top to bottom, allowing the Kongs to stick to it and climb. As they climb it, a Zinger stands in their way. Soon, they can reach a floating platform to the right of the wall with honey on the side of it. They can use this honey to climb to the top of the platform, which has a Klampon on it. Another large platform floats ahead with honey on the side of it. The primates must travel on top of it while dodging a second Klampon to reach a hook. They can use it to assist them in reaching a set of two walls above, which is covered in sticky honey. After the primates climb most of the wall, avoiding a Zinger on the way, they come up to a Barrel Cannon that rotates when entered. With good aim, they must shoot upwards between two Zinger to more honey on the walls.
If they climb the remaining part of the honey-covered walls, they can reach a flat area of land with a Klampon on it. A DK Barrel is above the foe. Honey walls cover the walls of a gap found to the left of here. The primates must climb down the walls of the gap while dodging a total of three Zingers to reach another solid area of land with a Klampon on it. There is an abyss farther west of here with a wall of honey on the other side of it. A pair of Zingers fly around the wall, along with the wall found across from it higher in the area, as the heroes climb. Soon, they can reach a Barrel Cannon that they must utilize to blast upwards. The Kongs can reach more honey on the walls with the barrel. If they crawl to the top of the wall, they can find a gap ahead of them with another wall of honey on the other side of it. A Zinger is at the bottom of the wall. A Kutlass also waits to attack at the top of this wall on the solid ground. The letter O is in a gap near the armed enemy. There is a honey wall with a Zinger at the bottom of it on the other end of this abyss. Once the wall is climbed, the heroes can find a solid area of land with the Star Barrel above it.

A large gap is ahead that the Kongs cannot cross with a normal jump. Honey splattered along the walls on the sides of the gap can be clung onto to avoiding falling. A Kutlass is located ahead of here, along with a passage leading into a cavern-like area in the hive. An Animal Barrel is located in the cave, but it is high in the air. The heroes must jump from a honey wall to reach it. When they access the barrel, they are turned into Rambi the Rhinoceros, who must leave the cave area through a different passage found to the right. On the outside of the cave, Rambi can find a DK Coin against a honey wall and a Zinger in a tight space blocking his path. He can slam through the Zinger with his strength. Two Zingers float in a gap ahead of here. The abyss is too big to cross with a normal jump, but Rambi can bounce on the wasps to cross. A gap leading into a lower area is ahead. A Zinger is also above it, who can be bounced on to reach a DK Barrel. If Rambi hops into the previously mentioned gap, he can enter a lower area with a Kannon at the beginning of it. This foe shoots barrels at the hero. Another abyss is nearby that Rambi can pass by bouncing on a Zinger. A flat pathway splattered with honey is straight ahead. Zingers float above it with a the letter N above them. A Kannon also shoots kannonballs across the area.
Zingers fly in an additional abyss located nearby. Once the rhinoceros bounces on them to travel over the gap, he can find a passage leading downwards, which is guarded by a Zinger. He lands in another lower area when he falls into here. A red, indestructible Zinger is near the end of this area to the right, floating next to another passage. Once the hero drops into this passage, he is greeted by King Zing, who begins to chase him. At the beginning of the chase, Rambi races towards a few Zingers found floating only slightly above the ground, which has honey on it in some spots. The rhinoceros can stomp through honey and then approach a large abyss that he must cross by bouncing on the three Zingers found in it. A passage leading farther downwards is ahead of here with more Zingers guarding it. In this lower area, more Zingers can be seen along the ground. A large abyss is in the center of here with four Zingers in it. The rhinoceros must use his abilities to bounce on the Zingers so he can cross the abyss. There is one last passage at this gap with a red Zinger in front of it. The hero can fall into it to reach the lowest part of the hive, where two more red Zingers stand in his way. After the hero travels over the flat area and passes these Zingers, he can reach an Auto Fire Barrel that blasts him to a raised piece of land that King Zing cannot get onto. A No Animal Sign is here that causes Rambi to turn back into the primates. The End of Level Target is near here, and Diddy and Dixie can optionally use a nearby Barrel Cannon to blast on the target and win a prize. The Kongs can win either a Banana, Banana Bunch, or the letter G.
Enemies
| Name | Count |
|---|---|
 Kannon |
2 |
Klampon |
4 |
Kutlass (yellow) |
3 |
Kruncha |
6 (Bonus Level only) |
Zinger (yellow and red) |
35 (yellow) 7 (red) Total: 42 |
Items and objects
| Name | Count |
|---|---|
Banana Bunch |
2 |
Banana Bunch Coin |
2 |
DK Barrel |
3 |
Collectibles
| Item | Location |
|---|---|
 DK Coin |
After the Star Barrel, the Kongs encounter a Kutlass and a wall opening that leads into a room with the Rambi Barrel. Just left of the entrance, the Kongs must jump to grab a hidden hook, then jump to the next hidden hook, and cross above the room with the Rambi Barrel. To their right, the Kongs can find a honey-coated wall, which they can climb to obtain the DK Coin at the top. Rambi cannot obtain the DK Coin as he cannot climb honey-coated walls. |
 Golden Feather (GBA version) |
When the Kongs encounter the second Klampon on a small platform, they must jump down from the right and grab on a hook. By jumping to the right again, Diddy and Dixie can land into an Arrow Barrel, which blasts them into the Golden Feather. |
 Photograph (GBA version) |
Next to the letter O, the Kongs encounter a Kutlass with a camera icon over its head. They must defeat it to obtain a photograph of a Kutlass for the sixth page of their scrapbook. |
K-O-N-G Letters
| Letter | Location |
|---|---|
| Hanging from a hook just southeast of the first Klampon encountered. | |
| The letter O is in a gap between the second Kutlass and a Zinger. The Kongs can reach it by doing a roll jump. | |
| Shortly after Rambi passes the first Kannon, he must bounce on three Zingers; the letter N is floating above the middle Zinger. | |
| One of the End of Level Target prizes |
Bonus Levels
| Image | Type and description |
|---|---|

|
Find the Coin! After the Kongs blast from the second Barrel Cannon, they must land on a platform to their right. From there they must jump to a floating banana in midair, which uncovers a hidden hook. From there the Kongs must jump left, grab onto a small honey-coated wall and then jump up two more until reaching the top. They must continue left into a wall opening to enter the Bonus Level. The objective is for the Kongs to collect the Kremkoin within 15 seconds. They must first jump up a honey-coated wall on the left and then continue jumping up one on the right; there are three bananas on each wall. After reaching top of the second honey patch, the Kongs can jump right onto the high platform to obtain the Kremkoin. |
| Destroy Them All! At the end of the King Zing chase, below an Auto-Fire Barrel, Rambi must Supercharge into the wall to enter the second Bonus Level. Here Rambi must defeat eight enemies within 15 seconds, more specifically six Krunchas and two yellow Zingers. He must quickly run down the area, which quickly changes direction between left and right. After defeating every enemy, the Kremkoin appears at the very bottom, next to the exit. By exiting, Rambi is sent back into the main level, right before the No Animal Sign. |
Gallery
Super Nintendo Entertainment System
Diddy encounters the first Kutlass, near the start of the level
Diddy jumps to a DK Barrel centered between a circle of Zingers
The Kongs cling to a honey wall on a platform with a Klampon
The Kongs grab onto a honey wall in a narrow area, with two Zingers overhead.
The Kongs in the room with the Rambi Barrel.
The start of the King Zing chase
Rambi bounces off a red Zinger
Dixie performing on the End of Level Target
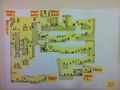
Concept drawing outlining the level design


Game Boy Advance
The Kongs cling on a honey-coated wall
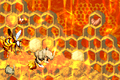
Rambi running away from King Zing


Names in other languages
| Language | Name | Meaning |
|---|---|---|
| Japanese | ランビといっしょ Ranbi to issho |
Be with Rambi |
| German | Rambis Donnergetöse (SNES) Rambizamba (GBA) |
Rambi's Thunder Roar Rambimatazz |
| Spanish | Fragor de Rambi |
Rambi's Clash |
Trivia
- In the Game Boy Advance version, during the King Zing chase, Screech's theme "Bad Bird Rag" plays instead of "Run, Rambi! Run!". Despite this, the latter theme is included in the game's Sound Test menu. It is unknown why "Run, Rambi! Run!" does not play during the chase.