Mudhole Marsh (Donkey Kong Country 2: Diddy's Kong Quest): Difference between revisions
m (→Gallery) |
LinkTheLefty (talk | contribs) mNo edit summary |
||
| (44 intermediate revisions by 15 users not shown) | |||
| Line 1: | Line 1: | ||
{{ | {{italic title|id=yes}} | ||
{{ | {{level infobox | ||
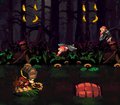
|image=[[File:Mudhole Marsh DKC2 screenshot.png]] | |||
|image=[[File: | |||
|code=4 - 5 | |code=4 - 5 | ||
|world=[[Krazy Kremland]] | |||
|game=''[[Donkey Kong Country 2: Diddy's Kong Quest]]'' | |game=''[[Donkey Kong Country 2: Diddy's Kong Quest]]'' | ||
| | |track=Bayou Boogie | ||
|before=[[Rickety Race (Donkey Kong Country 2: Diddy's Kong Quest)|<<]] | |before=[[Rickety Race (Donkey Kong Country 2: Diddy's Kong Quest)|<<]] | ||
|after=[[Rambi Rumble (Donkey Kong Country 2: Diddy's Kong Quest)|>>]] | |after=[[Rambi Rumble (Donkey Kong Country 2: Diddy's Kong Quest)|>>]] | ||
|secret=<sup>[[Klobber Karnage (Donkey Kong Country 2: Diddy's Kong Quest)|KK]] | |||
}} | }} | ||
'''Mudhole Marsh''' is the twenty-first level of ''[[Donkey Kong Country 2: Diddy's Kong Quest]]''. It is also the fifth | '''Mudhole Marsh''', named the '''Swamp Level''' on one occasion,<ref>''Nintendo Magazine System'' (AU) Issue #36, page 20.</ref> is the twenty-first level of ''[[Donkey Kong Country 2: Diddy's Kong Quest]]''. It is also the fifth level of [[Krazy Kremland]]. It takes place in a swamp just outside the exit of the Kremland amusement park. It is the only swamp level to not appear in [[Krem Quay]], and the last one overall in the game. There are many gaps for [[Diddy Kong]] and [[Dixie Kong]] to cross throughout the level, either by jumping from [[Krockhead]]s, lilypad platforms, barrel platforms, cattails, [[Flitter]]s, or even [[barrel]]s shot by [[Kannon]]s. While on land, the Kongs must go across moss-covered piers, where they encounter [[Cat O' 9 Tails]]: these enemies can fling them up to collectible items and, in one instance, a [[Bonus Barrel]]. | ||
==Layout== | |||
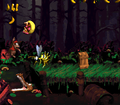
[[File:Mudhole Marsh DKC2 GBA.png|thumb|left|Mudhole Marsh in the Game Boy Advance version]] | |||
The level begins on a grassy bridge that is held over the swamp water. Three Flitters attack the heroes as they walk across this area, but they can use the enemies to their advantage by jumping on them to reach a [[Banana Coin]]. A water area is ahead that they must cross by using half-sunken barrels and lily pads. A hook floats in the air above the objects. As the Kongs approach land again, Flitters attack them and they meet the first Cat O' 9 Tails in the game. It can throw them to the [[KONG Letters|letter K]] or harm them. Another gap full of water is ahead that must be crossed with the hooks floating above it. Click-Clacks walk along a small platform ahead of here. There is another water section after this platform that can be crossed if the Kongs jump along the lily pads and half-sunken barrels in it. Mini-Neckys attack them as they cross, diving at them. A treasure chest containing a [[Banana Bunch]] is on the first lily pad as well. | |||
Once the Kongs cross the water area, they reach another small platform supported over the swamp. It has a Cat O' 9 Tails on it. Using more hooks, the primates can cross most of a long section of water after here. Zingers surround some of the hooks. A Flitter is also after one of the hooks that must be bounced on to avoid landing in the liquid. Lily pads and barrels must be jumped on throughout the remaining part of the water area once the heroes bounce on this Flitter. As the primates travel down the swamp with the lily pads and barrels, Mini-Neckys swoop down at them. They come up to a [[DK Barrel]] and many treasure chests on the way as well. As the heroes approach the end of the water section, they encounter a few Flitters, whom they must bounce on to cross small gaps between lily pads. Once they Kongs cross this water area, they reach another bridge platform supported over the liquid. It has a Cat O' 9 Tails on it, as well as a [[Bonus Barrel]] above it. There is another water area just ahead of here, which the heroes begin crossing by bouncing on a Flitter to reach a lily pad. They must continue along the lily pads and the barrels in the water to progress safely. The [[Star Barrel]] floats above the first half-sunken barrel in the water. | |||
A single lily pad is located after the special barrel. It is followed by another solid bridge platform. A Cat O' 9 Tails rests here. A pair of Zingers also fly in the air above the platform, guarding a group of [[banana]]s. If the Kongs travel forward, they can find another water area with more lily pads and barrels that they need to cross. Vines must also be used in this area to progress. A Kannon is on the first barrel, and the letter N is right in front of it. Three vines follow the foe, allowing the primates to reach a Krockhead that can fling them over a Zinger and onto a platform held above the water. Here, there are two Cat O' 9 Tails, along with a second Zinger, who guards bananas and a Banana Coin. A third Zinger is at the end of the platform at the beginning of another water area. Here, the Kongs must hop along lily pads and barrels to progress. A Kannon shoots at them as they hop along the objects. They pass a DK Barrel and a [[cannonball|kannonball]] on the way across as well. A barrel holding a [[Cannon|kannon]] that can shoot them to a [[Bonus Level]] is after the Kannon. Another platform is also immediately after it, and three Click-Clacks march along it. An additional area of water is ahead. After the heroes bounce on a Flitter here to cross a rather large gap, they reach a vine that they can cling onto. Using more vines, lily pads, barrels, and even a Krockhead, they must hop over the gaps in the water area. | |||
After they pass the second Flitter, they reach a large gap that they can cross by bouncing on a barrel shot from a Kannon nearby. A few Flitters are ahead of here that can aid the Kongs in crossing the area. A bridge platform that supports a treasure chest, containing a Banana Bunch, is right after the Kannon enemy. A small gap of water is after it, but only a green Krockhead must be hopped on to cross it. On the other side of the water area, the primates can spot two Cat O' 9 Tails and a few Zingers who fly near the letter G. There is another water area following this. Once they hop along the first lily pad and the first barrel, they find a large gap ahead of them. A Kannon is on the other side of the gap shooting barrels, so the heroes must bounce on its projectiles to cross. A Flitter flies over a gap immediately after the Kannon that the Kongs can bounce on to reach a solid platform with another Kannon on it. An [[End of Level Target]] is at the end of this platform. They must jump on it to complete the level. They can win a prize from the target mechanism if they jump on it from one of the barrels shot from the nearby Kannon. The prizes include the [[DK Coin|Video Game Hero Coin]], a Banana Coin, a Banana Bunch or a red [[Extra Life Balloon]]. | |||
{{br}} | |||
==Enemies== | |||
The following enemies appear in the following quantities: | |||
<gallery> | |||
Cat O 9 Tails DKC2.png|[[Cat O' 9 Tails]] (8) | |||
Click Clack DKC2.png|[[Click-Clack]] (5) | |||
Flitter DKC2.png|[[Flitter]] (21) | |||
Kannon DKC2 enemy.png|[[Kannon]] (5) | |||
Krockhead DKC2 red.png|Krockhead (brown) (2) | |||
Krockhead DKC2 green.png|Krockhead (green) (1) | |||
Mini Necky DKC2.png|[[Mini-Necky]] (23) | |||
Zinger DKC2 yellow.png|[[Zinger]] (yellow) (14) | |||
</gallery> | |||
==Items and objects== | |||
The following items and objects appear in the following quantities: | |||
<gallery> | |||
Banana Coin.png|[[Banana Coin]] (4) | |||
Crate DKC2.png|[[Crate]] (1) | |||
DK Barrel.png|[[DK Barrel]] (3) | |||
Invincibility Barrel.png|[[Invincibility Barrel|Exclamation Point Barrel]] (1) | |||
Kannonball.png|[[Cannonball|Kannonball]] (3) | |||
Treasure Chest DKC2.png|[[Treasure Chest]] (7) | |||
</gallery> | |||
===K-O-N-G Letters=== | |||
*'''K:''' Floating above the first Cat O' 9 Tails. The Kongs can reach it by either being flung from the Cat O' 9 Tails or by using [[team up]]. | |||
*'''O:''' Inside the third Treasure Chest of the level | |||
*'''N:''' After the Star Barrel, the Kongs encounter the first Kannon. The letter N is floating left of the Kannon. | |||
*'''G:''' Floating between two Zingers near the end of the level. Like the letter K, the Kongs can reach it from either a Cat O' 9 Tails or their team up move. | |||
===Key items=== | |||
[[File:Mudhole Marsh DKC2 shot 3.png|thumb|The Video Game Hero Coin is one of the End of Level Target prizes]] | |||
*'''[[DK Coin|Cranky's Video Game Hero Coin]]:''' The Video Game Hero Coin is one of the [[End of Level Target]] prizes. To obtain it, the Kongs must jump on a [[barrel]] shot from a nearby Kannon and land on the target the instant it shows the Video Game Hero Coin. | |||
*'''[[Golden feather]] (Game Boy Advance version only):''' After the second Bonus Level, the Kongs must continue past three Click-Clacks. Shortly afterward, they encounter barrels being shot at them from a distance. By continuing further, the Kongs encounter the Kannon firing the barrels at them. The golden feather is floating above the swamp, left of the Kannon. | |||
*'''[[Photograph]] (Game Boy Advance version only):''' Shortly after the letter N, the Kongs encounter a group of Mini-Neckys. A photograph hovers over a Mini-Necky, who is flying above two Mini-Neckys directly below him. By defeating the Mini-Necky, the Kongs obtain a photograph of the enemy, which appears in the seventh page of the [[Scrapbook (Donkey Kong Country series)|Scrapbook]]. | |||
{{br}} | {{br}} | ||
== | ==Bonus Levels== | ||
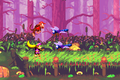
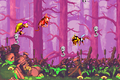
{{multiframe|[[File:Mudhole Marsh GBA Bonus Level 1.png|200px]] [[File:Mudhole Marsh Bonus Level 2.png|200px]]|size=420|The first and second Bonus Levels respectively}} | |||
Mudhole Marsh has two Bonus Levels, sorted by type: | |||
*'''Collect the Stars!''': After the Treasure Chest with the letter O, the Kongs must continue past numerous Mini-Neckys. This leads to a small pier with a Cat O' 9 Tails and a [[Bonus Barrel]] above, which can be entered either from the Cat O' 9 Tails or a team-up throw. The Bonus Level's objective is for the Kongs to collect 30 [[star (Donkey Kong franchise)|star]]s within 30 seconds. They start at the edge of the pier, which has a [[DK Barrel]] appearing above it. Ten stars are hovering over each of the three platforms. The first and third platforms are a large barrel and the middle one is a lilypad. The Kongs are required to use team up to collect each star. Once every star is obtained, the [[Kremkoin]] spawns on the pier to the right. | |||
*'''Destroy Them All!''': After the letter N, Diddy and Dixie must continue past more enemies. They eventually find a kannonball on a lilypad. They must pick up the item and continue across more platforms. They must put the kannonball into the kannon to go to the second Bonus Level. Here, the goal is to defeat three Zingers and two Flitters within 20 seconds. The first two Zingers are each floating above a barrel platform, the two Flitters are flying back and forth high above the pier in the center of the area, and the third Zinger is floating over a lilypad. The Kongs can use one or two kannonballs to defeat each enemy; they can alternatively use team up to defeat the two Flitters. After defeating all five enemies, a Kremkoin appears on a platform at the very right. | |||
* | |||
==Gallery== | ==Gallery== | ||
===Super Nintendo Entertainment System=== | |||
<gallery> | <gallery> | ||
MudholeMarsh.png|Dixie running to some Flitters at the start of the level | |||
Mudhole Marsh DKC2 Cat-O-9-Tails.png|Diddy encounters a Cat O' 9 Tails below the letter K | |||
Mudhole Marsh DKC2 shot.png|The Kongs hang on a hook around Zingers | |||
Mudhole Marsh DKC2 shot 2.png|Diddy Kong hops towards a Krockhead | |||
Mudhole Marsh DKC2 Mini-Necky swooping.png|A Mini-Necky swooping at Dixie, who is holding up a [[Treasure Chest]] for defense | |||
Mudhole Marsh DKC2 brown Krockhead.png|Diddy and Dixie bouncing off a brown Krockhead | |||
</gallery> | |||
===Game Boy Advance=== | |||
<gallery> | |||
Mudhole Marsh GBA Flitters.png|The Kongs encounter two Flitters | |||
Mudhole Marsh GBA hooks.png|The Kongs jump from [[hook]]s | |||
Mudhole Marsh GBA Click-Clacks.png|Dixie spinning into three Click-Clacks in a row | |||
Mudhole Marsh GBA Golden Feather.png|The Kongs jump at a barrel shot by a Kannon; the golden feather is just left of the Kannon | |||
</gallery> | </gallery> | ||
==Names in other languages== | ==Names in other languages== | ||
{{foreign names | {{foreign names | ||
|Jap=ドロドロみどろがぬま | |Jap=ドロドロみどろがぬま | ||
|JapR=Dorodoro | |JapR=Dorodoro Midoro ga Numa | ||
|JapM= | |JapM=Muddied Swamp | ||
|Spa=Pantano Cenagoso | |Spa=Pantano Cenagoso | ||
|SpaM=Boggy Swamp | |SpaM=Boggy Swamp | ||
| | |Fre=Marais Marrants | ||
| | |FreM=Fun Marsh | ||
|Ger=Moor des Schreckens | |Ger=Moor des Schreckens | ||
|GerM=Swamp of Horrors}} | |GerM=Swamp of Horrors | ||
|Ita=Malsano Pantano | |||
|ItaM=Unhealthy Quagmire | |||
}} | |||
==References== | |||
<references/> | |||
{{DKC2}} | {{DKC2}} | ||
[[Category:Crocodile Isle]] | [[Category:Crocodile Isle]] | ||
[[Category:Swamps]] | [[Category:Swamps]] | ||
[[Category:Donkey Kong Country 2: Diddy's Kong Quest levels]] | |||
[[Category:Donkey Kong Country 2: Diddy's Kong Quest | |||
Latest revision as of 13:18, March 30, 2024
| Level | |
|---|---|
| Mudhole Marsh | |

| |
| Level code | 4 - 5 |
| World | Krazy Kremland |
| Game | Donkey Kong Country 2: Diddy's Kong Quest |
| Music track | Bayou Boogie |
| << Directory of levels >> KK | |
Mudhole Marsh, named the Swamp Level on one occasion,[1] is the twenty-first level of Donkey Kong Country 2: Diddy's Kong Quest. It is also the fifth level of Krazy Kremland. It takes place in a swamp just outside the exit of the Kremland amusement park. It is the only swamp level to not appear in Krem Quay, and the last one overall in the game. There are many gaps for Diddy Kong and Dixie Kong to cross throughout the level, either by jumping from Krockheads, lilypad platforms, barrel platforms, cattails, Flitters, or even barrels shot by Kannons. While on land, the Kongs must go across moss-covered piers, where they encounter Cat O' 9 Tails: these enemies can fling them up to collectible items and, in one instance, a Bonus Barrel.
Layout[edit]

The level begins on a grassy bridge that is held over the swamp water. Three Flitters attack the heroes as they walk across this area, but they can use the enemies to their advantage by jumping on them to reach a Banana Coin. A water area is ahead that they must cross by using half-sunken barrels and lily pads. A hook floats in the air above the objects. As the Kongs approach land again, Flitters attack them and they meet the first Cat O' 9 Tails in the game. It can throw them to the letter K or harm them. Another gap full of water is ahead that must be crossed with the hooks floating above it. Click-Clacks walk along a small platform ahead of here. There is another water section after this platform that can be crossed if the Kongs jump along the lily pads and half-sunken barrels in it. Mini-Neckys attack them as they cross, diving at them. A treasure chest containing a Banana Bunch is on the first lily pad as well.
Once the Kongs cross the water area, they reach another small platform supported over the swamp. It has a Cat O' 9 Tails on it. Using more hooks, the primates can cross most of a long section of water after here. Zingers surround some of the hooks. A Flitter is also after one of the hooks that must be bounced on to avoid landing in the liquid. Lily pads and barrels must be jumped on throughout the remaining part of the water area once the heroes bounce on this Flitter. As the primates travel down the swamp with the lily pads and barrels, Mini-Neckys swoop down at them. They come up to a DK Barrel and many treasure chests on the way as well. As the heroes approach the end of the water section, they encounter a few Flitters, whom they must bounce on to cross small gaps between lily pads. Once they Kongs cross this water area, they reach another bridge platform supported over the liquid. It has a Cat O' 9 Tails on it, as well as a Bonus Barrel above it. There is another water area just ahead of here, which the heroes begin crossing by bouncing on a Flitter to reach a lily pad. They must continue along the lily pads and the barrels in the water to progress safely. The Star Barrel floats above the first half-sunken barrel in the water.
A single lily pad is located after the special barrel. It is followed by another solid bridge platform. A Cat O' 9 Tails rests here. A pair of Zingers also fly in the air above the platform, guarding a group of bananas. If the Kongs travel forward, they can find another water area with more lily pads and barrels that they need to cross. Vines must also be used in this area to progress. A Kannon is on the first barrel, and the letter N is right in front of it. Three vines follow the foe, allowing the primates to reach a Krockhead that can fling them over a Zinger and onto a platform held above the water. Here, there are two Cat O' 9 Tails, along with a second Zinger, who guards bananas and a Banana Coin. A third Zinger is at the end of the platform at the beginning of another water area. Here, the Kongs must hop along lily pads and barrels to progress. A Kannon shoots at them as they hop along the objects. They pass a DK Barrel and a kannonball on the way across as well. A barrel holding a kannon that can shoot them to a Bonus Level is after the Kannon. Another platform is also immediately after it, and three Click-Clacks march along it. An additional area of water is ahead. After the heroes bounce on a Flitter here to cross a rather large gap, they reach a vine that they can cling onto. Using more vines, lily pads, barrels, and even a Krockhead, they must hop over the gaps in the water area.
After they pass the second Flitter, they reach a large gap that they can cross by bouncing on a barrel shot from a Kannon nearby. A few Flitters are ahead of here that can aid the Kongs in crossing the area. A bridge platform that supports a treasure chest, containing a Banana Bunch, is right after the Kannon enemy. A small gap of water is after it, but only a green Krockhead must be hopped on to cross it. On the other side of the water area, the primates can spot two Cat O' 9 Tails and a few Zingers who fly near the letter G. There is another water area following this. Once they hop along the first lily pad and the first barrel, they find a large gap ahead of them. A Kannon is on the other side of the gap shooting barrels, so the heroes must bounce on its projectiles to cross. A Flitter flies over a gap immediately after the Kannon that the Kongs can bounce on to reach a solid platform with another Kannon on it. An End of Level Target is at the end of this platform. They must jump on it to complete the level. They can win a prize from the target mechanism if they jump on it from one of the barrels shot from the nearby Kannon. The prizes include the Video Game Hero Coin, a Banana Coin, a Banana Bunch or a red Extra Life Balloon.
Enemies[edit]
The following enemies appear in the following quantities:

Cat O' 9 Tails (8)

Click-Clack (5)

Flitter (21)

Kannon (5)

Krockhead (brown) (2)

Krockhead (green) (1)

Mini-Necky (23)

Zinger (yellow) (14)


Items and objects[edit]
The following items and objects appear in the following quantities:

Banana Coin (4)

Crate (1)

DK Barrel (3)

Kannonball (3)

Treasure Chest (7)


K-O-N-G Letters[edit]
- K: Floating above the first Cat O' 9 Tails. The Kongs can reach it by either being flung from the Cat O' 9 Tails or by using team up.
- O: Inside the third Treasure Chest of the level
- N: After the Star Barrel, the Kongs encounter the first Kannon. The letter N is floating left of the Kannon.
- G: Floating between two Zingers near the end of the level. Like the letter K, the Kongs can reach it from either a Cat O' 9 Tails or their team up move.
Key items[edit]

- Cranky's Video Game Hero Coin: The Video Game Hero Coin is one of the End of Level Target prizes. To obtain it, the Kongs must jump on a barrel shot from a nearby Kannon and land on the target the instant it shows the Video Game Hero Coin.
- Golden feather (Game Boy Advance version only): After the second Bonus Level, the Kongs must continue past three Click-Clacks. Shortly afterward, they encounter barrels being shot at them from a distance. By continuing further, the Kongs encounter the Kannon firing the barrels at them. The golden feather is floating above the swamp, left of the Kannon.
- Photograph (Game Boy Advance version only): Shortly after the letter N, the Kongs encounter a group of Mini-Neckys. A photograph hovers over a Mini-Necky, who is flying above two Mini-Neckys directly below him. By defeating the Mini-Necky, the Kongs obtain a photograph of the enemy, which appears in the seventh page of the Scrapbook.
Bonus Levels[edit]


Mudhole Marsh has two Bonus Levels, sorted by type:
- Collect the Stars!: After the Treasure Chest with the letter O, the Kongs must continue past numerous Mini-Neckys. This leads to a small pier with a Cat O' 9 Tails and a Bonus Barrel above, which can be entered either from the Cat O' 9 Tails or a team-up throw. The Bonus Level's objective is for the Kongs to collect 30 stars within 30 seconds. They start at the edge of the pier, which has a DK Barrel appearing above it. Ten stars are hovering over each of the three platforms. The first and third platforms are a large barrel and the middle one is a lilypad. The Kongs are required to use team up to collect each star. Once every star is obtained, the Kremkoin spawns on the pier to the right.
- Destroy Them All!: After the letter N, Diddy and Dixie must continue past more enemies. They eventually find a kannonball on a lilypad. They must pick up the item and continue across more platforms. They must put the kannonball into the kannon to go to the second Bonus Level. Here, the goal is to defeat three Zingers and two Flitters within 20 seconds. The first two Zingers are each floating above a barrel platform, the two Flitters are flying back and forth high above the pier in the center of the area, and the third Zinger is floating over a lilypad. The Kongs can use one or two kannonballs to defeat each enemy; they can alternatively use team up to defeat the two Flitters. After defeating all five enemies, a Kremkoin appears on a platform at the very right.
Gallery[edit]
Super Nintendo Entertainment System[edit]
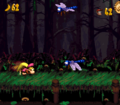
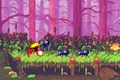
Dixie running to some Flitters at the start of the level
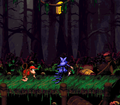
Diddy encounters a Cat O' 9 Tails below the letter K
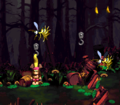
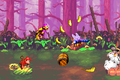
The Kongs hang on a hook around Zingers
Diddy Kong hops towards a Krockhead
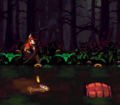
A Mini-Necky swooping at Dixie, who is holding up a Treasure Chest for defense
Diddy and Dixie bouncing off a brown Krockhead


Game Boy Advance[edit]
The Kongs encounter two Flitters
The Kongs jump from hooks
Dixie spinning into three Click-Clacks in a row
The Kongs jump at a barrel shot by a Kannon; the golden feather is just left of the Kannon


Names in other languages[edit]
| Language | Name | Meaning |
|---|---|---|
| Japanese | ドロドロみどろがぬま Dorodoro Midoro ga Numa |
Muddied Swamp |
| French | Marais Marrants |
Fun Marsh |
| German | Moor des Schreckens |
Swamp of Horrors |
| Italian | Malsano Pantano |
Unhealthy Quagmire |
| Spanish | Pantano Cenagoso |
Boggy Swamp |
References[edit]
- ^ Nintendo Magazine System (AU) Issue #36, page 20.