Clapper's Cavern (Donkey Kong Country 2: Diddy's Kong Quest): Difference between revisions
m (Improved directions to the Video Game Hero Coin and removed mention of a non-existent hidden hook.) |
|||
| (34 intermediate revisions by 13 users not shown) | |||
| Line 1: | Line 1: | ||
{{ | {{italic title|id=yes}} | ||
{{ | {{DKC level infobox | ||
|image=[[File:Clappers Cavern.png]] | |||
|image=[[File:Clappers Cavern.png | |||
|code=6 - 4 (SNES) <br> 6 - 3 (GBA) | |code=6 - 4 (SNES) <br> 6 - 3 (GBA) | ||
|world=[[K. Rool's Keep]] | |||
|game=''[[Donkey Kong Country 2: Diddy's Kong Quest]]'' | |game=''[[Donkey Kong Country 2: Diddy's Kong Quest]]'' | ||
| | |track=In a Snow-bound Land | ||
|before=[[Castle Crush|<<]] | |before=[[Castle Crush|<<]] | ||
|after=[[Chain Link Chamber (Donkey Kong Country 2: Diddy's Kong Quest)|>>]] | |after=[[Chain Link Chamber (Donkey Kong Country 2: Diddy's Kong Quest)|>>]] | ||
| | |before3=[[Castle Crush|<<]] | ||
| | |after3=[[Windy Well (Donkey Kong Country 2: Diddy's Kong Quest)|>>]] | ||
}} | }} | ||
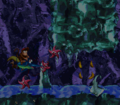
'''Clapper's Cavern''' is the thirty-first level of ''[[Donkey Kong Country 2: Diddy's Kong Quest]]'' | '''Clapper's Cavern''' is the thirty-first level of ''[[Donkey Kong Country 2: Diddy's Kong Quest]]'', as well as the fourth level of [[K. Rool's Keep]], though the [[Donkey Kong Country 2 (Game Boy Advance)|Game Boy Advance version]] features it as the third level, making it the thirtieth level in that version. Clapper's Cavern takes place in an icy cavern, though shares some similarities with [[Slime Climb (Donkey Kong Country 2: Diddy's Kong Quest)|Slime Climb]] in that the water rises, and a [[Snapjaw (Donkey Kong Country 2: Diddy's Kong Quest)|Snapjaw]] is chasing after [[Diddy Kong|Diddy]] and [[Dixie Kong]] for most of the level Because the [[Kong]]s cannot safely enter the water, they must rely on [[Clapper]]'s assistance by jumping on its back to temporarily freeze the water and safely go across. In various parts of the level, the Kongs need to gain momentum on the ice and then [[crouch]] to slide beneath the Zingers, whether it is for collecting items or progressing. Midway through the level, the Kongs can swim through a section without being followed by Snapjaw, and the start of this section has an [[animal crate]] containing [[Enguarde]]. | ||
==Layout== | |||
[[File:Clapper's Cavern DKC2 GBA.png|thumb|left|Clapper's Cavern in the Game Boy Advance version]] | |||
At the start of the level, the Kongs must continue right, and can find Clapper along the way. They then need to jump on him to make him cool down the water. Once it is frozen, they can walk on it, avoiding the Snapjaw below them. Quickly, the two monkeys must run across the ice, jumping over [[Zinger]]s, before it warms up and becomes a liquid. Once back on land, the Kongs must avoid a few enemies and jump on another Clapper, who freezes the water again. As they run across the ice again, there will be a few [[Neek]]s and some Zingers to jump over. Afterward, the heroes must walk into the nearby barrel that shoots them up to a higher part of the level. From there, the apes need to travel west and jump across two small gaps, then jump on the third Clapper to cool the water down. | |||
At that point, they must jump over a group of two Zingers and also slide under another Zinger. There is a barrel that the Kongs must go in. It shoots them up to an even higher area of the level, where the Snapjaw will stop pursuing the Kongs, and the Kongs can get on [[Enguarde]], the [[Animal Friend]]. With the swordfish, they should ride north through a wide crevice and shortly after, pass a [[No Animal Sign]] sign, making them lose their Animal Friend and exit the water alone. Diddy and Dixie then need to jump across a rather small gap and break the [[Star Barrel]]. | |||
Halfway through the level, another Snapjaw will make an appearance, requiring the Kongs to jump on a Clapper, and run across the ice again. There, they have to fight or avoid many enemies, such as Neeks and Zingers. Once they reach land, they need to carefully avoid some enemies and hop on the chains to reach the highest part of the level. Here, the group must jump across a gap and land on a Clapper, freezing the water yet again. When running across the solid ice, Diddy and Dixie need to avoid some enemies and even slide under three Zingers, then quickly jump on another Clapper. Still on the ice, they must jump over or slide under many Zingers until they reach the [[End of Level Target]], whose prizes include a [[banana]], a [[Banana Bunch]], or a [[Banana Coin]]. | |||
Halfway through the level, another Snapjaw will make an appearance, requiring the Kongs to jump on a Clapper, and run across the ice again. There, they have to fight or avoid many enemies, such as Neeks and Zingers. Once they reach land, they need to carefully avoid some enemies and hop on the chains to reach the highest part of the level. Here, the group must jump across a gap and land on a Clapper, freezing the water yet again. When running across the solid ice, Diddy and Dixie need to avoid some enemies and even slide under three Zingers, then quickly jump on another Clapper. Still on the ice, they must jump over or slide under many Zingers until they | |||
==Enemies== | ==Enemies== | ||
The following enemies appear in the following quantities: | |||
<gallery> | |||
Click Clack DKC2.png|[[Click-Clack]] (1) | |||
Flotsam DKC2 blue.png|[[Flotsam]] (blue) (3) | |||
Klampon DKC2.png|[[Klampon]] (1) | |||
Kruncha DKC2 blue.png|[[Kruncha]] (blue) (3) | |||
Kruncha DKC2 pink.png|Kruncha (pink) (6) | |||
Neek DKC2.png|[[Neek]] (2) | |||
Puftup DKC2.png|[[Puftup]] (3) | |||
Shuri DKC2.png|[[Shuri]] (3) | |||
Snapjaw DKC2 sprite.png|[[Snapjaw (Donkey Kong Country 2: Diddy's Kong Quest)|Snapjaw]] (1) | |||
Spiny DKC2.png|[[Spiny (Donkey Kong Country 2: Diddy's Kong Quest)|Spiny]] (9) | |||
Zinger DKC2 yellow.png|[[Zinger]] (yellow) (25) | |||
</gallery> | |||
== | ==Items and objects== | ||
The following items and objects appear in the following quantities: | |||
<gallery> | <gallery> | ||
Banana Coin.png|[[Banana Coin]] (5) | |||
DKC2 Barrel.png|[[Barrel]] (1) | |||
DK Barrel.png|[[DK Barrel]] (2) | |||
</gallery> | </gallery> | ||
===KONG Letters=== | |||
*'''K:''' There are two letter K's: one of them is floating above a Zinger near the start of the level. The other one is located just before the Video Game Hero Coin, appearing directly above the Kongs after they exit the first Bonus Area. | |||
*'''O:''' Located to the left of two vertically-sorted Zingers. | |||
*'''N:''' After the Star Barrel, the Kongs must jump onto Clapper and then run across the large sheet of ice. As they continue across the ice, they notice the letter N beneath a Zinger, only obtainable by ducking and sliding beneath it. | |||
*'''G:''' Shortly after obtaining the letter N, the Kongs must continue upward by jumping from four hooks. The letter G is floating high above these hooks. | |||
=== | ===Key items=== | ||
[[File:Clapper's Cavern DKC2 GBA collectibles.png|thumb|The nearby location of both the Video Game Hero Coin and the golden feather.]] | |||
*'''[[DK Coin|Cranky's Video Game Hero Coin]]:''' Immediately after finishing the first Bonus Area, the Kongs must use Team-up to reach an off-screen hook above the letter K. The Kongs can then jump from the hook to obtain the Video Game Hero Coin. Alternatively, after passing the letter K floating above a Zinger, the Kongs can stand on the following platform with a Kruncha and use Team-up at an opening above them. By aiming to the left, the Kongs can land on a ledge and continue left to the dead-end where the first Bonus Area spawns them. | |||
*'''[[Golden feather]] (Game Boy Advance version only):''' From the Video Game Hero Coin, the Kongs must go slightly right and perform a team up throw at the golden feather. | |||
The [[ | *'''[[Photograph]]s (Game Boy Advance version only):''' There are two photographs to collect: | ||
**Just before the location of the second Bonus Level, the Kongs and Enguarde find three Puftups. The middle Puftup has a [[photograph]] over its head, and the Kongs can obtain it by stabbing it with Enguarde. This photograph adds a picture of Puftup on the fourth page of the [[Scrapbook (Donkey Kong Country series)|Scrapbook]]. | |||
**Right after the letter N, the heroes can find a lone banana floating in the air. They must use Team-up to obtain the banana, revealing an [[Invincibility Barrel|Exclamation Point Barrel]]. With their invincibility, the Kongs must swim down a corridor to the left to obtain the [[photograph]] along with three Banana Coins and some bananas. The photograph is of [[Clapper]], on page 15 of the Scrapbook. | |||
{{br}} | |||
== | ==Bonus Areas== | ||
[[File:Clapper's Cavern Bonus Area 2 location.png|thumb|The second Bonus Area's location is hinted to by a banana]] | |||
* | Clapper's Cavern has two [[Bonus Level]]s, listed by type: | ||
*'''Find the Token!''': At the very start of the level, Diddy and Dixie must use [[Team-up]] to reach a hidden hook directly above them. The Kongs must then jump to the second hook and then continue heading right on an icy platform. From there, they must pass four Spinies and a Klampon and walk into an opening leading to the first Bonus Area. Here, the Kongs have twenty seconds to jump across the icy platforms until they reach the end platform with the [[Kremkoin]]. | |||
*'''Find the Token!''': When the Kongs open the Enguarde Box, they must ride on him and pass three [[Flotsam]]s and then three [[Shuri]]s. They must continue by swimming up, then taking left, and pass two inflated Puftups. At the end of this path is a deflated Puftup and a lone banana. Enguarde must use his Supercharge ability on the wall to the right of the banana to reveal an opening to the Bonus Area. In it, the Kongs and Enguarde have 15 seconds to swim to the bottom and obtain the [[Kremkoin]]. The water level quickly drops in the Bonus Area, so the Kongs and Enguarde must move quickly via Enguarde's Supercharge ability before the time runs out. | |||
{{br}} | |||
==Gallery== | ==Gallery== | ||
<gallery> | <gallery> | ||
Clapper's Cavern DK Coin location.png|The Video Game Hero Coin's location | |||
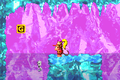
ClappersCavernSNES2.png|Diddy | ClappersCavernSNES2.png|Diddy sliding beneath a group of three Zingers | ||
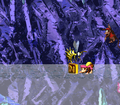
ClappersCavernSNES3.png| | ClappersCavernSNES3.png|Clapper freezing the water | ||
Clapper's Cavern GBA.png|GBA version | ClappersCavern-SNES-O.png|Location of the letter O | ||
Clapper's Cavern DKC2 Shuri.png|Enguarde defeats a Shuri by stabbing it | |||
ClappersCavern-SNES-N.png|Location of the letter N | |||
Clapper's Cavern DKC2 GBA.png|The Kongs walk across a frozen sheet of ice in the Game Boy Advance version | |||
ClappersCavern-GBA-G.png|The letter G in the Game Boy Advance version | |||
</gallery> | </gallery> | ||
| Line 72: | Line 80: | ||
{{foreign names | {{foreign names | ||
|Jap=こおりのみずうみ | |Jap=こおりのみずうみ | ||
|JapR=Kōri no | |JapR=Kōri no Mizuumi | ||
|JapM=Iced Lake | |JapM=Iced Lake | ||
|Spa=Caverna Clapper | |Spa=Caverna Clapper | ||
|SpaM=Clapper Cavern | |SpaM=Clapper Cavern | ||
| | |Fre=Caverne de Clapper | ||
| | |FreM=Clapper's Cavern | ||
|Ger=Clappers Höhle | |Ger=Clappers Höhle | ||
|GerM=Clapper's Cave | |GerM=Clapper's Cave | ||
|Ita=Grotta Artica | |||
|ItaM=Arctic Cave | |||
}} | }} | ||
{{DKC2}} | {{DKC2}} | ||
[[Category:Crocodile Isle]] | [[Category:Crocodile Isle]] | ||
[[Category: | [[Category:Aquatic areas]] | ||
[[Category: | [[Category:Ice caves]] | ||
[[Category:Donkey Kong Country 2: Diddy's Kong Quest | [[Category:Donkey Kong Country 2: Diddy's Kong Quest levels]] | ||
Latest revision as of 13:31, April 16, 2024
| Level | |
|---|---|
| Clapper's Cavern | |

| |
| Level code | 6 - 4 (SNES) 6 - 3 (GBA) |
| World | K. Rool's Keep |
| Game | Donkey Kong Country 2: Diddy's Kong Quest |
| Music track | In a Snow-bound Land |
| << Directory of levels (SNES) >> | |
| << Directory of levels (GBA) >> | |
Clapper's Cavern is the thirty-first level of Donkey Kong Country 2: Diddy's Kong Quest, as well as the fourth level of K. Rool's Keep, though the Game Boy Advance version features it as the third level, making it the thirtieth level in that version. Clapper's Cavern takes place in an icy cavern, though shares some similarities with Slime Climb in that the water rises, and a Snapjaw is chasing after Diddy and Dixie Kong for most of the level Because the Kongs cannot safely enter the water, they must rely on Clapper's assistance by jumping on its back to temporarily freeze the water and safely go across. In various parts of the level, the Kongs need to gain momentum on the ice and then crouch to slide beneath the Zingers, whether it is for collecting items or progressing. Midway through the level, the Kongs can swim through a section without being followed by Snapjaw, and the start of this section has an animal crate containing Enguarde.
Layout[edit]

At the start of the level, the Kongs must continue right, and can find Clapper along the way. They then need to jump on him to make him cool down the water. Once it is frozen, they can walk on it, avoiding the Snapjaw below them. Quickly, the two monkeys must run across the ice, jumping over Zingers, before it warms up and becomes a liquid. Once back on land, the Kongs must avoid a few enemies and jump on another Clapper, who freezes the water again. As they run across the ice again, there will be a few Neeks and some Zingers to jump over. Afterward, the heroes must walk into the nearby barrel that shoots them up to a higher part of the level. From there, the apes need to travel west and jump across two small gaps, then jump on the third Clapper to cool the water down.
At that point, they must jump over a group of two Zingers and also slide under another Zinger. There is a barrel that the Kongs must go in. It shoots them up to an even higher area of the level, where the Snapjaw will stop pursuing the Kongs, and the Kongs can get on Enguarde, the Animal Friend. With the swordfish, they should ride north through a wide crevice and shortly after, pass a No Animal Sign sign, making them lose their Animal Friend and exit the water alone. Diddy and Dixie then need to jump across a rather small gap and break the Star Barrel.
Halfway through the level, another Snapjaw will make an appearance, requiring the Kongs to jump on a Clapper, and run across the ice again. There, they have to fight or avoid many enemies, such as Neeks and Zingers. Once they reach land, they need to carefully avoid some enemies and hop on the chains to reach the highest part of the level. Here, the group must jump across a gap and land on a Clapper, freezing the water yet again. When running across the solid ice, Diddy and Dixie need to avoid some enemies and even slide under three Zingers, then quickly jump on another Clapper. Still on the ice, they must jump over or slide under many Zingers until they reach the End of Level Target, whose prizes include a banana, a Banana Bunch, or a Banana Coin.
Enemies[edit]
The following enemies appear in the following quantities:

Click-Clack (1)

Flotsam (blue) (3)

Klampon (1)

Kruncha (blue) (3)

Kruncha (pink) (6)

Neek (2)

Puftup (3)

Shuri (3)

Snapjaw (1)

Spiny (9)

Zinger (yellow) (25)


Items and objects[edit]
The following items and objects appear in the following quantities:

Banana Coin (5)

Barrel (1)

DK Barrel (2)


KONG Letters[edit]
- K: There are two letter K's: one of them is floating above a Zinger near the start of the level. The other one is located just before the Video Game Hero Coin, appearing directly above the Kongs after they exit the first Bonus Area.
- O: Located to the left of two vertically-sorted Zingers.
- N: After the Star Barrel, the Kongs must jump onto Clapper and then run across the large sheet of ice. As they continue across the ice, they notice the letter N beneath a Zinger, only obtainable by ducking and sliding beneath it.
- G: Shortly after obtaining the letter N, the Kongs must continue upward by jumping from four hooks. The letter G is floating high above these hooks.
Key items[edit]

- Cranky's Video Game Hero Coin: Immediately after finishing the first Bonus Area, the Kongs must use Team-up to reach an off-screen hook above the letter K. The Kongs can then jump from the hook to obtain the Video Game Hero Coin. Alternatively, after passing the letter K floating above a Zinger, the Kongs can stand on the following platform with a Kruncha and use Team-up at an opening above them. By aiming to the left, the Kongs can land on a ledge and continue left to the dead-end where the first Bonus Area spawns them.
- Golden feather (Game Boy Advance version only): From the Video Game Hero Coin, the Kongs must go slightly right and perform a team up throw at the golden feather.
- Photographs (Game Boy Advance version only): There are two photographs to collect:
- Just before the location of the second Bonus Level, the Kongs and Enguarde find three Puftups. The middle Puftup has a photograph over its head, and the Kongs can obtain it by stabbing it with Enguarde. This photograph adds a picture of Puftup on the fourth page of the Scrapbook.
- Right after the letter N, the heroes can find a lone banana floating in the air. They must use Team-up to obtain the banana, revealing an Exclamation Point Barrel. With their invincibility, the Kongs must swim down a corridor to the left to obtain the photograph along with three Banana Coins and some bananas. The photograph is of Clapper, on page 15 of the Scrapbook.
Bonus Areas[edit]

Clapper's Cavern has two Bonus Levels, listed by type:
- Find the Token!: At the very start of the level, Diddy and Dixie must use Team-up to reach a hidden hook directly above them. The Kongs must then jump to the second hook and then continue heading right on an icy platform. From there, they must pass four Spinies and a Klampon and walk into an opening leading to the first Bonus Area. Here, the Kongs have twenty seconds to jump across the icy platforms until they reach the end platform with the Kremkoin.
- Find the Token!: When the Kongs open the Enguarde Box, they must ride on him and pass three Flotsams and then three Shuris. They must continue by swimming up, then taking left, and pass two inflated Puftups. At the end of this path is a deflated Puftup and a lone banana. Enguarde must use his Supercharge ability on the wall to the right of the banana to reveal an opening to the Bonus Area. In it, the Kongs and Enguarde have 15 seconds to swim to the bottom and obtain the Kremkoin. The water level quickly drops in the Bonus Area, so the Kongs and Enguarde must move quickly via Enguarde's Supercharge ability before the time runs out.
Gallery[edit]
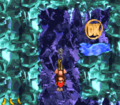
The Video Game Hero Coin's location
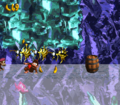
Diddy sliding beneath a group of three Zingers
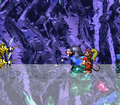
Clapper freezing the water
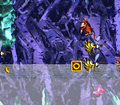
Location of the letter O
Enguarde defeats a Shuri by stabbing it
Location of the letter N
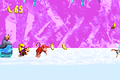
The Kongs walk across a frozen sheet of ice in the Game Boy Advance version
The letter G in the Game Boy Advance version


Names in other languages[edit]
| Language | Name | Meaning |
|---|---|---|
| Japanese | こおりのみずうみ Kōri no Mizuumi |
Iced Lake |
| French | Caverne de Clapper |
Clapper's Cavern |
| German | Clappers Höhle |
Clapper's Cave |
| Italian | Grotta Artica |
Arctic Cave |
| Spanish | Caverna Clapper |
Clapper Cavern |