Jungle Jinx (Donkey Kong Country 2: Diddy's Kong Quest): Difference between revisions
m (Bot: Automated text replacement (-\| *title *= *[^a-z][^\n\|\[\]{}<>\/]+\n +)) |
No edit summary |
||
| (7 intermediate revisions by 4 users not shown) | |||
| Line 5: | Line 5: | ||
|world=[[Lost World (Donkey Kong Country 2: Diddy's Kong Quest)|Lost World]] | |world=[[Lost World (Donkey Kong Country 2: Diddy's Kong Quest)|Lost World]] | ||
|game=''[[Donkey Kong Country 2: Diddy's Kong Quest]]'' | |game=''[[Donkey Kong Country 2: Diddy's Kong Quest]]'' | ||
| | |track=Primal Rave | ||
|before=[[ | |before=[[Hot-Head Hop|<<]] | ||
|after=[[ | |after=[[Krocodile Kore (Donkey Kong Country 2: Diddy's Kong Quest)|>>]] | ||
}} | }} | ||
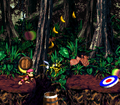
'''Jungle Jinx''' is the first level of the [[Lost World (Donkey Kong Country 2: Diddy's Kong Quest)|Lost World]] in ''[[Donkey Kong Country 2: Diddy's Kong Quest]]''. It can be accessed | '''Jungle Jinx''' is the first level of the [[Lost World (Donkey Kong Country 2: Diddy's Kong Quest)|Lost World]] in ''[[Donkey Kong Country 2: Diddy's Kong Quest]]''. It can be accessed from the [[Klubba's Kiosk]] in [[Crocodile Cauldron]]. The level's name is a reference to the first level from ''[[Donkey Kong Country]]'', [[Jungle Hijinxs (Donkey Kong Country)|Jungle Hijinxs]]. Jungle Jinx is the first jungle-themed level of the Lost World. There are numerous sets of long spikes throughout the level, in gaps and on the main path alike. The Kongs can safely cross over these pits by jumping from giant, rolling [[Tire (object)|tires]], which also allow them to reach some higher areas. In specific parts of the level, the tires fall down onto the path and begin to roll—while these objects do not hurt the Kongs, they can easily shove the Kongs down into a pit. [[Zinger]]s appear more commonly than the other enemies. | ||
==Layout== | ==Layout== | ||
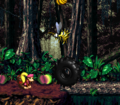
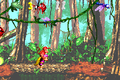
[[File: | [[File:JungleJinx-GBA-1.png|thumb|left|Jungle Jinx in the Game Boy Advance version]] | ||
From the start of the level, the Kongs must walk east and bounce off of a tire to reach the other end of a ledge. Then, they need to cross an abyss, and then land right on a tire. It will bounce them over some spikes and to safety. From there, they must use some more tires to get up to the top of two high ledges. After that, the heroes will need to jump over the giant tires rolling towards them, and watch out for a Zinger in the air. Once they drop down a high ledge, the monkeys will have to bounce off of another tire to get above two nasty Zingers, and get to the next ledge. Here, they will find a vicious Kutlass, whom they must defeat only when his blades are in the ground, and then travel eastward. After they beat a group of four Spinies, they should watch out for a Klampon and bounce atop of some more tires, which can throw them over Zingers. Then, they will reach an abyss, which is filled with sharp and unwanted spikes. They have to use the fast moving tire to jump over a Zinger, and then safely land on the next ledge. From there, the heroes must cross a small gap and bounce off of several tires to get over more dangerous spikes. Once they pass that part, they need to jump down a ledge, hop off a Flitter, and hit into the [[Star Barrel]]. | From the start of the level, the Kongs must walk east and bounce off of a tire to reach the other end of a ledge. Then, they need to cross an abyss, and then land right on a tire. It will bounce them over some spikes and to safety. From there, they must use some more tires to get up to the top of two high ledges. After that, the heroes will need to jump over the giant tires rolling towards them, and watch out for a Zinger in the air. Once they drop down a high ledge, the monkeys will have to bounce off of another tire to get above two nasty Zingers, and get to the next ledge. Here, they will find a vicious Kutlass, whom they must defeat only when his blades are in the ground, and then travel eastward. After they beat a group of four Spinies, they should watch out for a Klampon and bounce atop of some more tires, which can throw them over Zingers. Then, they will reach an abyss, which is filled with sharp and unwanted spikes. They have to use the fast moving tire to jump over a Zinger, and then safely land on the next ledge. From there, the heroes must cross a small gap and bounce off of several tires to get over more dangerous spikes. Once they pass that part, they need to jump down a ledge, hop off a Flitter, and hit into the [[Star Barrel]]. | ||
Halfway through the level, the monkeys will have to travel over the path and leap over another small gap. After that, they must dodge some enemies, including the quick foe, Kutlass. Then, they need to bounce off of several tire, and get over rows of jagged spikes sticking out of the ground. From there, the monkeys must defeat a couple of Klampons, and soon hop down another ledge. A tire will sweep them away from the ground, though, but also save them from possibly landing on the thorny spikes. The Kongs have to jump over tires and other hazards, until they meet up with a huge abyss. This time, there are no tires to help them, so they must follow the banana trail downwards, while trying to stay between the Zingers nearby. They will land into some barrels. With good aim, the heroes should shoot carefully to all the barrels and soon get back up to the other side. Here, they need to bounce off of more tire to get over a few spikes, and then another gap. After that, the monkeys must face their biggest challenge yet. They will have to get over many spikes, using several tires. While doing this, they need to also watch out for the gaps below them, and do their best not to fall in one. Finally, they should make it safely to the other end of the area, and travel more eastward. Once they pass a few enemies and abysses, the heroes will eventually find the [[End of Level Target]]. The possible prizes include a | Halfway through the level, the monkeys will have to travel over the path and leap over another small gap. After that, they must dodge some enemies, including the quick foe, Kutlass. Then, they need to bounce off of several tire, and get over rows of jagged spikes sticking out of the ground. From there, the monkeys must defeat a couple of Klampons, and soon hop down another ledge. A tire will sweep them away from the ground, though, but also save them from possibly landing on the thorny spikes. The Kongs have to jump over tires and other hazards, until they meet up with a huge abyss. This time, there are no tires to help them, so they must follow the [[banana]] trail downwards, while trying to stay between the Zingers nearby. They will land into some barrels. With good aim, the heroes should shoot carefully to all the barrels and soon get back up to the other side. Here, they need to bounce off of more tire to get over a few spikes, and then another gap. After that, the monkeys must face their biggest challenge yet. They will have to get over many spikes, using several tires. While doing this, they need to also watch out for the gaps below them, and do their best not to fall in one. Finally, they should make it safely to the other end of the area, and travel more eastward. Once they pass a few enemies and abysses, the heroes will eventually find the [[End of Level Target]]. The possible prizes include a banana, [[Banana Bunch]], or the letter G. | ||
==Enemies== | ==Enemies== | ||
The following enemies appear in the following quantities: | |||
<gallery> | |||
Flitter DKC2.png|[[Flitter]] (5) | |||
Klampon DKC2.png|[[Klampon]] (8) | |||
Klobber DKC2 yellow.png|[[Klobber]] (yellow) (1) | |||
Kutlass DKC2 yellow.png|[[Kutlass]] (yellow) (2) | |||
Spiny DKC2.png|[[Spiny (Donkey Kong Country 2: Diddy's Kong Quest)|Spiny]] (5) | |||
Zinger DKC2 yellow.png|[[Zinger]] (13) | |||
</gallery> | |||
==Items and objects== | ==Items and objects== | ||
The following items and objects appear in the following quantities: | |||
<gallery> | |||
Banana Bunch DKC SNES.png|[[Banana Bunch]] (1) | |||
Banana Coin.png|[[Banana Coin]] (5) | |||
DK Barrel.png|[[DK Barrel]] (3) | |||
</gallery> | |||
===K-O-N-G Letters=== | ===K-O-N-G Letters=== | ||
*'''K:''' Floating above the first set of spikes; it can only be reached by bouncing onto a tire. | |||
*'''O:''' Further into the level, there is a Flitter floating above some spikes, just before the [[Star Barrel]]. The Kongs must roll down a path on their left to collect the letter O. | |||
*'''N:''' After passing the Star Barrel, the Kongs must continue on until they encounter two Klampons at a ledge. When a tire approaches the Kongs, they must bounce on it to reach the letter N. Alternatively, Dixie can reach it by using her [[Helicopter Twirl]]. | |||
*'''G:''' The letter G is one of the possible prizes rewarded from the End of Level Target. | |||
===Key items=== | |||
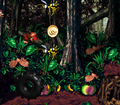
[[File:JungleJinx-GBA-3.png|thumb|The location of the golden feather]] | |||
*'''[[Golden feather]] (Game Boy Advance version only):''' Shortly after the Star Barrel, the Kongs encounter a yellow Kutlass. They must roll into a pit just after the Kutlass to obtain a golden feather. The Kongs must carefully move out to avoid touching the spikes or being shoved offtrack by a rolling tire. | |||
*'''[[Photograph]] (Game Boy Advance version only):''' At some point after passing the letter K, the Kongs encounter a group of four Spinies. To the right of these enemies is a pit containing two [[Dixie Barrel]]s. Dixie, the only Kong who can use these barrels, must jump into a Dixie Barrel to be shot to the next. The second one shoots her up into a [[photograph]] and back on path. The photograph takes up the second half of page 8, and it shows Dixie playing guitar. | |||
{{br}} | |||
==Bonus Level== | ==Bonus Level== | ||
{{multiframe|[[File:Jungle Jinx Bonus Area V1.png|200px]] [[File:Jungle Jinx Bonus Area V2.png|200px]]|size=420|The Bonus Level of Jungle Jinx, as it appears in ''Donkey Kong Country 2: Diddy's Kong Quest''{{'}}s first version (left) and second version (right)}} | |||
{ | There is only one Bonus Level in Jungle Jinx, of the following type: | ||
|[[File:Jungle Jinx Bonus Area V1.png]] [[File: | |||
|''' | |||
In the | *'''Destroy Them All!''': Before the Star Barrel, the Kongs must go down a pit behind a Flitter, where they can find letter O and a few bananas leading into a [[Bonus Barrel]]. In the [[Bonus Level]], the Kongs must defeat four Flitters within 15 seconds while avoiding the Zingers orbiting above. There is a DK Barrel at the start, in case the player is missing a Kong. The entire Bonus Area takes place on flat ground, and does not feature any pitfalls. After defeating the Flitters, the Kongs can collect the [[DK Coin|Video Game Hero Coin]] at the end of the path. On a side note, similarly to Klobber Karnage, the Bonus Area's colors differ between the [[Donkey Kong Country 2: Diddy's Kong Quest#Differences in other versions|two versions]] of the original [[Super Nintendo Entertainment System]] release. | ||
==Gallery== | ==Gallery== | ||
<gallery> | <gallery> | ||
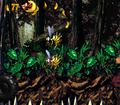
Jungle Jinx.png|Dixie standing | Jungle Jinx.png|Dixie standing below a Zinger | ||
Jungle Jinx DKC2 bouncing.png|Dixie bounces from the large tire to cross above two Zingers | |||
Jungle Jinx DKC2 Banana Coin.png|Diddy bouncing from the tire to obtain the Banana Coin placed between two Zingers | Jungle Jinx DKC2 Banana Coin.png|Diddy bouncing from the tire to obtain the Banana Coin placed between two Zingers | ||
JungleJinx-SNES-4.png|The location of the Bonus Barrel | |||
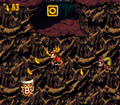
JungleJinx-SNES-6.png|Dixie must defeat a Zinger to enter the Barrel Cannon, allowing her to obtain a prize from the End of Level Target. | JungleJinx-SNES-6.png|Dixie must defeat a Zinger to enter the Barrel Cannon, allowing her to obtain a prize from the End of Level Target. | ||
JungleJinx-GBA-2.png|The first Bonus Level in the Game Boy Advance version | |||
JungleJinx-GBA- | |||
</gallery> | </gallery> | ||
==Names in other languages== | ==Names in other languages== | ||
{{foreign names | {{foreign names | ||
|Jap=タイヤ ジャングル | |||
|JapR=Taiya Janguru | |||
|JapM=Tire Jungle | |||
|Spa=Maldición de Selva | |Spa=Maldición de Selva | ||
|SpaM=Jungle Curse | |SpaM=Jungle Curse | ||
|Ger=Dschungelzauber | |Ger=Dschungelzauber | ||
|GerM=Jungle Magic | |GerM=Jungle Magic | ||
| | |Fre=Jungle Ensorcelée | ||
| | |FreM=Bewitched Jungle | ||
|Ita=Giungla Gincana | |Ita=Giungla Gincana | ||
|ItaM=Gymkhana Jungle | |ItaM=Gymkhana Jungle; same as [[Jungle Hijinxs (Donkey Kong Country)|Jungle Hijinxs]] | ||
| | |||
}} | }} | ||
{{DKC2}} | {{DKC2}} | ||
[[Category:Secret levels]] | [[Category:Secret levels]] | ||
Latest revision as of 16:47, January 20, 2024
| Level | |
|---|---|
| Jungle Jinx | |

| |
| Level code | 8 - 1 |
| World | Lost World |
| Game | Donkey Kong Country 2: Diddy's Kong Quest |
| Music track | Primal Rave |
| << Directory of levels >> | |
Jungle Jinx is the first level of the Lost World in Donkey Kong Country 2: Diddy's Kong Quest. It can be accessed from the Klubba's Kiosk in Crocodile Cauldron. The level's name is a reference to the first level from Donkey Kong Country, Jungle Hijinxs. Jungle Jinx is the first jungle-themed level of the Lost World. There are numerous sets of long spikes throughout the level, in gaps and on the main path alike. The Kongs can safely cross over these pits by jumping from giant, rolling tires, which also allow them to reach some higher areas. In specific parts of the level, the tires fall down onto the path and begin to roll—while these objects do not hurt the Kongs, they can easily shove the Kongs down into a pit. Zingers appear more commonly than the other enemies.
Layout[edit]

From the start of the level, the Kongs must walk east and bounce off of a tire to reach the other end of a ledge. Then, they need to cross an abyss, and then land right on a tire. It will bounce them over some spikes and to safety. From there, they must use some more tires to get up to the top of two high ledges. After that, the heroes will need to jump over the giant tires rolling towards them, and watch out for a Zinger in the air. Once they drop down a high ledge, the monkeys will have to bounce off of another tire to get above two nasty Zingers, and get to the next ledge. Here, they will find a vicious Kutlass, whom they must defeat only when his blades are in the ground, and then travel eastward. After they beat a group of four Spinies, they should watch out for a Klampon and bounce atop of some more tires, which can throw them over Zingers. Then, they will reach an abyss, which is filled with sharp and unwanted spikes. They have to use the fast moving tire to jump over a Zinger, and then safely land on the next ledge. From there, the heroes must cross a small gap and bounce off of several tires to get over more dangerous spikes. Once they pass that part, they need to jump down a ledge, hop off a Flitter, and hit into the Star Barrel.
Halfway through the level, the monkeys will have to travel over the path and leap over another small gap. After that, they must dodge some enemies, including the quick foe, Kutlass. Then, they need to bounce off of several tire, and get over rows of jagged spikes sticking out of the ground. From there, the monkeys must defeat a couple of Klampons, and soon hop down another ledge. A tire will sweep them away from the ground, though, but also save them from possibly landing on the thorny spikes. The Kongs have to jump over tires and other hazards, until they meet up with a huge abyss. This time, there are no tires to help them, so they must follow the banana trail downwards, while trying to stay between the Zingers nearby. They will land into some barrels. With good aim, the heroes should shoot carefully to all the barrels and soon get back up to the other side. Here, they need to bounce off of more tire to get over a few spikes, and then another gap. After that, the monkeys must face their biggest challenge yet. They will have to get over many spikes, using several tires. While doing this, they need to also watch out for the gaps below them, and do their best not to fall in one. Finally, they should make it safely to the other end of the area, and travel more eastward. Once they pass a few enemies and abysses, the heroes will eventually find the End of Level Target. The possible prizes include a banana, Banana Bunch, or the letter G.
Enemies[edit]
The following enemies appear in the following quantities:


Items and objects[edit]
The following items and objects appear in the following quantities:

Banana Bunch (1)

Banana Coin (5)

DK Barrel (3)


K-O-N-G Letters[edit]
- K: Floating above the first set of spikes; it can only be reached by bouncing onto a tire.
- O: Further into the level, there is a Flitter floating above some spikes, just before the Star Barrel. The Kongs must roll down a path on their left to collect the letter O.
- N: After passing the Star Barrel, the Kongs must continue on until they encounter two Klampons at a ledge. When a tire approaches the Kongs, they must bounce on it to reach the letter N. Alternatively, Dixie can reach it by using her Helicopter Twirl.
- G: The letter G is one of the possible prizes rewarded from the End of Level Target.
Key items[edit]

- Golden feather (Game Boy Advance version only): Shortly after the Star Barrel, the Kongs encounter a yellow Kutlass. They must roll into a pit just after the Kutlass to obtain a golden feather. The Kongs must carefully move out to avoid touching the spikes or being shoved offtrack by a rolling tire.
- Photograph (Game Boy Advance version only): At some point after passing the letter K, the Kongs encounter a group of four Spinies. To the right of these enemies is a pit containing two Dixie Barrels. Dixie, the only Kong who can use these barrels, must jump into a Dixie Barrel to be shot to the next. The second one shoots her up into a photograph and back on path. The photograph takes up the second half of page 8, and it shows Dixie playing guitar.
Bonus Level[edit]


There is only one Bonus Level in Jungle Jinx, of the following type:
- Destroy Them All!: Before the Star Barrel, the Kongs must go down a pit behind a Flitter, where they can find letter O and a few bananas leading into a Bonus Barrel. In the Bonus Level, the Kongs must defeat four Flitters within 15 seconds while avoiding the Zingers orbiting above. There is a DK Barrel at the start, in case the player is missing a Kong. The entire Bonus Area takes place on flat ground, and does not feature any pitfalls. After defeating the Flitters, the Kongs can collect the Video Game Hero Coin at the end of the path. On a side note, similarly to Klobber Karnage, the Bonus Area's colors differ between the two versions of the original Super Nintendo Entertainment System release.
Gallery[edit]
Dixie standing below a Zinger
Dixie bounces from the large tire to cross above two Zingers
Diddy bouncing from the tire to obtain the Banana Coin placed between two Zingers
The location of the Bonus Barrel
Dixie must defeat a Zinger to enter the Barrel Cannon, allowing her to obtain a prize from the End of Level Target.
The first Bonus Level in the Game Boy Advance version


Names in other languages[edit]
| Language | Name | Meaning |
|---|---|---|
| Japanese | タイヤ ジャングル Taiya Janguru |
Tire Jungle |
| French | Jungle Ensorcelée |
Bewitched Jungle |
| German | Dschungelzauber |
Jungle Magic |
| Italian | Giungla Gincana |
Gymkhana Jungle; same as Jungle Hijinxs |
| Spanish | Maldición de Selva |
Jungle Curse |