Bouncy Bonanza: Difference between revisions
m (Text replacement - "<br />" to "<br>") |
|||
| (13 intermediate revisions by 4 users not shown) | |||
| Line 1: | Line 1: | ||
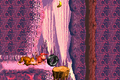
{{ | {{level infobox | ||
|title=Bouncy Bonanza | |title=Bouncy Bonanza | ||
|image=[[File:Bouncy Bonanza 5.png | |image=[[File:Bouncy Bonanza 5.png]] | ||
|code=2-3 | |code=2-3 | ||
|world=[[Monkey Mines]] | |world=[[Monkey Mines]] | ||
| Line 7: | Line 7: | ||
|before=[[Mine Cart Carnage|<<]] | |before=[[Mine Cart Carnage|<<]] | ||
|after=[[Stop & Go Station|>>]] | |after=[[Stop & Go Station|>>]] | ||
| | |track=Cave Dweller Concert | ||
}} | }} | ||
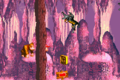
'''Bouncy Bonanza''' is the eighth level in ''[[Donkey Kong Country]]'' and the third level of [[Monkey Mines]]. | '''Bouncy Bonanza''' is the eighth level in ''[[Donkey Kong Country]]'' and the third level of [[Monkey Mines]]. It takes place in a dark cave with a purple background. [[Donkey Kong]] and [[Diddy Kong]] can bounce from [[Tire (object)|tire]]s to access secret locations, some of which are [[Bonus room|Bonus Level]]s. Every Kritter in the level can bounce, either in a straight, vertical pattern or in an arch. On the other hand, Zingers pose as obstacles both mid-air and in crawlspaces of the cave. About halfway through the level, the Kongs can find [[Winky]] in his [[animal crate]]. | ||
==Layout== | ==Layout== | ||
[[File: | {{multiframe|[[File:BouncyBonanza-GBC.png]] [[File:BouncyBonanza-GBA.png|180px]]|Bouncy Bonanza's appearance in the Game Boy Color version, top, and Game Boy Advance version, bottom|align=left|size=200}} | ||
At the beginning of the level | At the beginning of the level is a Kritter bouncing in front of a higher area of land. If the heroes climb onto this piece of land, they can find a [[barrel]] near a raised piece of land that is surrounded by a Zinger. A tire stands on this piece of land that can be rolled along the ground towards and area with a long alcove in it. A raised piece of land stands in the center of the alcove with the [[KONG Letters|letter K]] above it. A pair of Kritters also hop over the small gaps around this piece of land. After passing this long alcove, the heroes reach two smaller alcoves with a Zinger flying between them. The raised platform between the two alcoves holds a tire. If the Kongs manage to progress from here, they can find a barrel and a small abyss with several tires after it. A DK Barrel wobbles above the tires to release any missing Kong. Once the primates climb over a large piece of land, they encounter two Zingers flying in vertical paths over an alcove. A wide abyss is ahead of here with two tires standing on stationary platforms within it. The tires can be used to help them cross the abyss, which is followed by an area of stair-like structures with Kritters hopping along them. At the bottom of the stairs, they can find the letter O being surrounded by a Zinger. A tire is ahead of here that they can roll under a low ceiling and bounce from to reach the [[Star Barrel|Continue Barrel]] in an enclosed area. | ||
A small passage under a ceiling can be found here that the heroes can climb through to reach a gap that they can drop into to progress. A platform hovers above the gap that, with the last tire on it, can be used to bounce to a hidden area, where they can find the letter N under a low ceiling being surrounded by a Zinger. A few Kritters hop in this area as well, along with a section containing tires and another DK Barrel. If the heroes do not take the secret path, they must take a path with several low ceilings above it. They must crawl under the ceilings to reach three separate rooms. The first room is filled with bouncy tires, the second contains a single Zinger that flies around some of its perimeter, and the third room holds two more Zingers and a DK Barrel. Once the Kongs pass through this area, they reach a tire that can bounce them into a Bonus Level containing Winky the frog. If they continue forward from here, they can find a tire sticking out of the ground near a Kritter on a raised piece of the ground. An alcove with two Kritters jumping over it is in this piece of land, which is followed by a large abyss that must be crossed with the use of two tires on stationary platforms. | A small passage under a ceiling can be found here that the heroes can climb through to reach a gap that they can drop into to progress. A platform hovers above the gap that, with the last tire on it, can be used to bounce to a hidden area, where they can find the letter N under a low ceiling being surrounded by a Zinger. A few Kritters hop in this area as well, along with a section containing tires and another DK Barrel. If the heroes do not take the secret path, they must take a path with several low ceilings above it. They must crawl under the ceilings to reach three separate rooms. The first room is filled with bouncy tires, the second contains a single Zinger that flies around some of its perimeter, and the third room holds two more Zingers and a DK Barrel. Once the Kongs pass through this area, they reach a tire that can bounce them into a Bonus Level containing Winky the frog. If they continue forward from here, they can find a tire sticking out of the ground near a Kritter on a raised piece of the ground. An alcove with two Kritters jumping over it is in this piece of land, which is followed by a large abyss that must be crossed with the use of two tires on stationary platforms. | ||
A Zinger flies around one of the platforms. | A Zinger flies around one of the platforms. Another abyss follows immediately after this is crossed. The abyss is nearly identical to the previous, but it contains two Zingers instead of one. A tire that can be used to reach a DK Barrel being orbited by a Zinger sits on a long stretch of land after the pit. The stretch of land is followed by an abyss with a single stationary platform in it. The platform holds a tire that is surrounded by two Zingers. An area of land with three small alcoves in it is ahead, and Kritters hop over the gaps. The second of the alcoves contains the letter G and a sign that indicates that the level is almost over. A tire follows this area with a Zinger right next to it. After the heroes pass the wasp, they come up to an abyss with a platform hovering over it that they can use to cross it with. The previous tire or Winky can also help them reach a [[Blast Barrel]] above here. Once the abyss is crossed the heroes can find a stretch of land leading past an exit sign into the [[exit]]. | ||
==Enemies== | ==Enemies== | ||
The following enemies appear, in the following quantities: | |||
<gallery> | |||
Kritter-yellow-DKC.png|[[Kritter]] (yellow) (11) | |||
Kritter-red-DKC.png|Kritter (red) (2) | |||
Zinger DKC.png|[[Zinger]] (yellow) (2) | |||
|[[ | Zinger-green-DKC.png|Zinger (green) (14) | ||
|[[ | </gallery> | ||
| | |||
==Items and objects== | |||
The following items and objects appear, in the following quantities: | |||
|[[ | |||
| | <gallery> | ||
|} | Banana DKC SNES.png|[[Banana]] (83) | ||
DK Barrel DKC.png|[[DK Barrel]] (4) | |||
Rambi Token Sprite SNES.png|[[Rambi]] [[animal token|Token]] (2){{footnote|main|a}} | |||
Vine Barrel DKC.png|[[Vine Barrel]] (2){{footnote|main|b}} | |||
</gallery> | |||
{{footnote|note|a|One Rambi token is at the start, above the entrance, while the other is a possible prize in the "Stop the Barrel!" Bonus Level challenge.}} | |||
{{footnote|note|b|Vine Barrels were replaced with regular [[Barrel]]s in the Game Boy Color version.}} | |||
===K-O-N-G Letters=== | ===K-O-N-G Letters=== | ||
[[File:Bouncy Bonanza Letter O.png|thumb|The location of the letter O]] | |||
| | |||
| | |||
*'''K:''' Near the start, floating over an elevated ground platform guarded by two bouncing Kritters. | |||
*'''O:''' After passing the second pair of bouncing Kritters down a staircase, the Kongs can find the letter O on the flat ground, guarded by a moving Zinger. | |||
*'''N:''' After passing the [[Star Barrel|Continue Barrel]], the Kongs can backtrack and push the nearby tire on a vertically-moving platform when it reaches below. As the platform goes back up, the Kongs must bounce from the tire to move through the wall on the right. This allows them to access a hidden area, where they can continue moving right to find the letter N in the center of a crawlspace guarded by a Zinger. | |||
*'''G:''' Near the end of the level, the Kongs can find a trio of Kritters bouncing between ground platforms. There are three gaps, and the letter G appears in the second gap in the center, with the Arrow Sign indicating a nearby level exit. | |||
{{br}} | |||
==Bonus Levels== | |||
{{multiframe|[[File:Bouncy Bonanza 4.png|200px]] [[File:Bouncy Bonanza Bonus Area 3.png|200px]]|size=420|A screenshot of the first and second Bonus Levels of Bouncy Bonanza, respectively}} | |||
Ropey Rampage has two Bonus Levels, listed by their type in the Game Boy Advance version: | |||
| | |||
| | |||
*'''''Stop the Barrel!''''': Shortly after passing the letter K, the Kongs can find a Vine Barrel. Shortly after, the Kongs can find a large gap guarded by two vertically-moving Zingers. They must carefully fall into the gap while holding the Barrel and must avoid hitting it into a Zinger. The Kongs can sneak underneath the Zingers and ram the barrel into a wall on the right, revealing an opening. In this Bonus Level, the Kongs play a "shell game" where they must stop each barrel as it displays an image. They must stop each of the three barrels on the same image, either three bananas, [[Banana Bunch]]es, [[Red Balloon|Life Balloon]]s, or Winky Tokens. By stopping two of the barrels on a different image, the Kongs lose the challenge and are not awarded with any prize. | |||
*After passing the Continue Barrel, the Kongs must either push the nearby tire through a series of crawlspaces or bounce from the tire and travel on top and pass the letter N. This way, they can either bounce on or fall down onto a ground platform with a visible opening. The Bonus Level is very small and empty, and only consists of an [[animal crate]] containing [[Winky the Frog]], with the entrance and exit on the left and right sides respectively. Even though it plays the Bonus Room Blitz theme, it is not a proper Bonus Level, as it doesn't add to the game total percentage, nor does it have a title card in the Game Boy Advance version. | |||
| | *'''''Collect the Bananas!''''': After passing the letter G, the Kongs can find a tire before a Zinger. They must continue moving forward while pushing the tire and gently push it onto a platform horizontally moving over a pit. They must bounce from the tire and into a [[Bonus Barrel]] in mid-air. In this Bonus Level, the Kongs start in a rotating [[Barrel Cannon]], with a trail of bananas located directly above it. The Kongs can blast upward to then collect more bananas while bouncing from two round tires to four partial ones attached to the ceiling. To exit the Bonus Level, the Kongs must fall into the pit below. | ||
! | ==Warp Barrel== | ||
The [[Warp Barrel]] appears only in the Game Boy Advance version. After passing the letter K, the Kongs end up at the first abyss. They must jump down into it from the left side, where a Warp Barrel then catches them. It transports them just outside the level exit. | |||
==Gallery== | ==Gallery== | ||
<gallery> | <gallery> | ||
Bouncy Bonanza.png|The Kongs stand at the beginning of the level. | Bouncy Bonanza.png|The Kongs stand at the beginning of the level. | ||
Bouncy Bonanza Letter K.png|The letter K | |||
Bouncy Bonanza 3.png|Donkey wobbles on the edge of a ledge. | Bouncy Bonanza 3.png|Donkey wobbles on the edge of a ledge. | ||
Bouncy Bonanza 6.png|The Kongs use a tire to reach the level's Continue Barrel. | |||
Bouncy Bonanza 7.png|The letter N | |||
Bouncy Bonanza Bonus Area 2.png|The area with the Winky crate | |||
Bouncy Bonanza 2.png|The Kongs in a high, secret area with the letter N to their right. | Bouncy Bonanza 2.png|The Kongs in a high, secret area with the letter N to their right. | ||
Bouncy Bonanza Letter G.png|The letter G | |||
BouncyBonanza-GBA-2.png|The Kongs moving a tire onto a platform leading up to a hidden area with the letter N in the Game Boy Advance version | |||
Bouncy Bonanza Letter G GBA.png|The Kongs approaching the letter G in the Game Boy Advance version | |||
BouncyBonanza-GBA-2.png|The Kongs moving a tire onto a platform leading up to a hidden area with the letter N | |||
Bouncy Bonanza Letter G GBA.png|The Kongs | |||
</gallery> | </gallery> | ||
| Line 134: | Line 82: | ||
|Spa=Rebote Bonanza | |Spa=Rebote Bonanza | ||
|SpaM=Bonanza Bounce | |SpaM=Bonanza Bounce | ||
| | |Fre=Filon Filant | ||
| | |FreM=Free-running Seam | ||
|Ger=Goldige Buckel<br | |Ger=Goldige Buckel<br> Hurtige Hopser (GBA) | ||
|GerM=Golden Humps<br | |GerM=Golden Humps<br> Fast Jumps | ||
|Ita=Salti d'Oro | |Ita=Salti d'Oro | ||
|ItaM=Golden Leaps | |ItaM=Golden Leaps | ||
}} | }} | ||
{{DKC}} | {{DKC}} | ||
{{DKC | {{DKC levels}} | ||
[[Category: | [[Category:Underground areas]] | ||
[[Category:Donkey Kong Country | [[Category:Donkey Kong Country levels]] | ||
[[Category:Donkey Kong Island]] | [[Category:Donkey Kong Island]] | ||
Latest revision as of 12:19, April 1, 2024
| Level | |
|---|---|
| Bouncy Bonanza | |

| |
| Level code | 2-3 |
| World | Monkey Mines |
| Game | Donkey Kong Country |
| Music track | Cave Dweller Concert |
| << Directory of levels >> | |
Bouncy Bonanza is the eighth level in Donkey Kong Country and the third level of Monkey Mines. It takes place in a dark cave with a purple background. Donkey Kong and Diddy Kong can bounce from tires to access secret locations, some of which are Bonus Levels. Every Kritter in the level can bounce, either in a straight, vertical pattern or in an arch. On the other hand, Zingers pose as obstacles both mid-air and in crawlspaces of the cave. About halfway through the level, the Kongs can find Winky in his animal crate.
Layout[edit]


At the beginning of the level is a Kritter bouncing in front of a higher area of land. If the heroes climb onto this piece of land, they can find a barrel near a raised piece of land that is surrounded by a Zinger. A tire stands on this piece of land that can be rolled along the ground towards and area with a long alcove in it. A raised piece of land stands in the center of the alcove with the letter K above it. A pair of Kritters also hop over the small gaps around this piece of land. After passing this long alcove, the heroes reach two smaller alcoves with a Zinger flying between them. The raised platform between the two alcoves holds a tire. If the Kongs manage to progress from here, they can find a barrel and a small abyss with several tires after it. A DK Barrel wobbles above the tires to release any missing Kong. Once the primates climb over a large piece of land, they encounter two Zingers flying in vertical paths over an alcove. A wide abyss is ahead of here with two tires standing on stationary platforms within it. The tires can be used to help them cross the abyss, which is followed by an area of stair-like structures with Kritters hopping along them. At the bottom of the stairs, they can find the letter O being surrounded by a Zinger. A tire is ahead of here that they can roll under a low ceiling and bounce from to reach the Continue Barrel in an enclosed area.
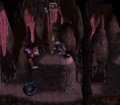
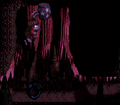
A small passage under a ceiling can be found here that the heroes can climb through to reach a gap that they can drop into to progress. A platform hovers above the gap that, with the last tire on it, can be used to bounce to a hidden area, where they can find the letter N under a low ceiling being surrounded by a Zinger. A few Kritters hop in this area as well, along with a section containing tires and another DK Barrel. If the heroes do not take the secret path, they must take a path with several low ceilings above it. They must crawl under the ceilings to reach three separate rooms. The first room is filled with bouncy tires, the second contains a single Zinger that flies around some of its perimeter, and the third room holds two more Zingers and a DK Barrel. Once the Kongs pass through this area, they reach a tire that can bounce them into a Bonus Level containing Winky the frog. If they continue forward from here, they can find a tire sticking out of the ground near a Kritter on a raised piece of the ground. An alcove with two Kritters jumping over it is in this piece of land, which is followed by a large abyss that must be crossed with the use of two tires on stationary platforms.
A Zinger flies around one of the platforms. Another abyss follows immediately after this is crossed. The abyss is nearly identical to the previous, but it contains two Zingers instead of one. A tire that can be used to reach a DK Barrel being orbited by a Zinger sits on a long stretch of land after the pit. The stretch of land is followed by an abyss with a single stationary platform in it. The platform holds a tire that is surrounded by two Zingers. An area of land with three small alcoves in it is ahead, and Kritters hop over the gaps. The second of the alcoves contains the letter G and a sign that indicates that the level is almost over. A tire follows this area with a Zinger right next to it. After the heroes pass the wasp, they come up to an abyss with a platform hovering over it that they can use to cross it with. The previous tire or Winky can also help them reach a Blast Barrel above here. Once the abyss is crossed the heroes can find a stretch of land leading past an exit sign into the exit.
Enemies[edit]
The following enemies appear, in the following quantities:


Items and objects[edit]
The following items and objects appear, in the following quantities:

Banana (83)

DK Barrel (4)

Vine Barrel (2)b


a - One Rambi token is at the start, above the entrance, while the other is a possible prize in the "Stop the Barrel!" Bonus Level challenge.
b - Vine Barrels were replaced with regular Barrels in the Game Boy Color version.
K-O-N-G Letters[edit]

- K: Near the start, floating over an elevated ground platform guarded by two bouncing Kritters.
- O: After passing the second pair of bouncing Kritters down a staircase, the Kongs can find the letter O on the flat ground, guarded by a moving Zinger.
- N: After passing the Continue Barrel, the Kongs can backtrack and push the nearby tire on a vertically-moving platform when it reaches below. As the platform goes back up, the Kongs must bounce from the tire to move through the wall on the right. This allows them to access a hidden area, where they can continue moving right to find the letter N in the center of a crawlspace guarded by a Zinger.
- G: Near the end of the level, the Kongs can find a trio of Kritters bouncing between ground platforms. There are three gaps, and the letter G appears in the second gap in the center, with the Arrow Sign indicating a nearby level exit.
Bonus Levels[edit]


Ropey Rampage has two Bonus Levels, listed by their type in the Game Boy Advance version:
- Stop the Barrel!: Shortly after passing the letter K, the Kongs can find a Vine Barrel. Shortly after, the Kongs can find a large gap guarded by two vertically-moving Zingers. They must carefully fall into the gap while holding the Barrel and must avoid hitting it into a Zinger. The Kongs can sneak underneath the Zingers and ram the barrel into a wall on the right, revealing an opening. In this Bonus Level, the Kongs play a "shell game" where they must stop each barrel as it displays an image. They must stop each of the three barrels on the same image, either three bananas, Banana Bunches, Life Balloons, or Winky Tokens. By stopping two of the barrels on a different image, the Kongs lose the challenge and are not awarded with any prize.
- After passing the Continue Barrel, the Kongs must either push the nearby tire through a series of crawlspaces or bounce from the tire and travel on top and pass the letter N. This way, they can either bounce on or fall down onto a ground platform with a visible opening. The Bonus Level is very small and empty, and only consists of an animal crate containing Winky the Frog, with the entrance and exit on the left and right sides respectively. Even though it plays the Bonus Room Blitz theme, it is not a proper Bonus Level, as it doesn't add to the game total percentage, nor does it have a title card in the Game Boy Advance version.
- Collect the Bananas!: After passing the letter G, the Kongs can find a tire before a Zinger. They must continue moving forward while pushing the tire and gently push it onto a platform horizontally moving over a pit. They must bounce from the tire and into a Bonus Barrel in mid-air. In this Bonus Level, the Kongs start in a rotating Barrel Cannon, with a trail of bananas located directly above it. The Kongs can blast upward to then collect more bananas while bouncing from two round tires to four partial ones attached to the ceiling. To exit the Bonus Level, the Kongs must fall into the pit below.
Warp Barrel[edit]
The Warp Barrel appears only in the Game Boy Advance version. After passing the letter K, the Kongs end up at the first abyss. They must jump down into it from the left side, where a Warp Barrel then catches them. It transports them just outside the level exit.
Gallery[edit]
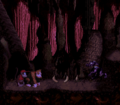
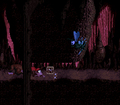
The Kongs stand at the beginning of the level.
The letter K
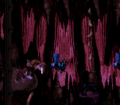
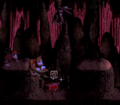
Donkey wobbles on the edge of a ledge.
The Kongs use a tire to reach the level's Continue Barrel.
The letter N
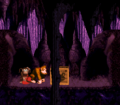
The area with the Winky crate
The Kongs in a high, secret area with the letter N to their right.
The letter G
The Kongs moving a tire onto a platform leading up to a hidden area with the letter N in the Game Boy Advance version
The Kongs approaching the letter G in the Game Boy Advance version


Names in other languages[edit]
| Language | Name | Meaning |
|---|---|---|
| Japanese | クレムリンのどうくつ2 Kuremurin no dōkutsu 2 |
Kremling's Den 2 |
| French | Filon Filant |
Free-running Seam |
| German | Goldige Buckel Hurtige Hopser (GBA) |
Golden Humps Fast Jumps |
| Italian | Salti d'Oro |
Golden Leaps |
| Spanish | Rebote Bonanza |
Bonanza Bounce |