Switch (Wario Land 4): Difference between revisions
(Undo revision 3069150 by 73.60.143.25 (talk)) Tag: Undo |
mNo edit summary Tag: Mobile edit |
||
| (24 intermediate revisions by 11 users not shown) | |||
| Line 1: | Line 1: | ||
{{ | {{italic title|id=yes}} | ||
{{item | {{item infobox | ||
|image=[[File:WL4-Frog Switch Artwork.png|120px]]<br>Artwork of [[Wario]] jumping on the switch | |image=[[File:WL4-Frog Switch Artwork.png|120px]]<br>Artwork of [[Wario]] jumping on the switch | ||
|first_appearance=''[[Wario Land 4]]'' ([[List of games by date#2001|2001]]) | |first_appearance=''[[Wario Land 4]]'' ([[List of games by date#2001|2001]]) | ||
|latest_appearance=''[[Densetsu no | |latest_appearance=''[[Densetsu no Stafy 3]]'' ([[List of games by date#2004|2004]]) | ||
}} | }} | ||
{{quote2|This switch has an ignorant little frog face!! Once you step on it, hurry up and get back to the [[vortex]]!|[[Wario]]|[[Wario Land 4]] instruction booklet}} | {{quote2|This switch has an ignorant little frog face!! Once you step on it, hurry up and get back to the [[vortex]]!|[[Wario]]|[[Wario Land 4]] </span>instruction booklet<span>}} | ||
[[File:WL4-Frog Switch HoH.png|frame|left|The switch in the [[Hall of Hieroglyphs]] | [[File:WL4-Frog Switch HoH.png|frame|left|The switch in the [[Hall of Hieroglyphs]]]] | ||
A '''[[switch]]''',<ref>''Wario Land 4'' American instruction booklet, page 15.</ref> also referred to as a '''Timer'''<ref>''Nintendo Power Advance'' V.3, page 56.</ref> or '''Portal Switch'''<ref>''Nintendo Official Magazine'' (UK) Issue 114, page 59.</ref> | A '''[[switch]]''',<ref>''Wario Land 4'' American instruction booklet, page 15.</ref> also referred to as a '''Timer'''<ref>''Nintendo Power Advance'' V.3, page 56.</ref> or '''Portal Switch''',<ref>''Nintendo Official Magazine'' (UK) Issue 114, page 59.</ref> is an object that appears at the end of every [[level]] in ''[[Wario Land 4]]''. When Wario [[jump]]s on a switch, it opens to reveal a ticking time bomb, and any solid [[Kaeru Block]]s turn transparent and vice-versa. [[Wario]] then yells, ''"Hurry up!"'' (or occasionally ''"No-no-no... Hurry up!"'' or ''"H-H-Hurry up!"''), the game's theme becomes more intense, and the player is given a certain amount of time to escape the level by returning to the [[vortex]] at the beginning of the stage. If Wario does not escape before the timer runs out, his [[Coin (Wario Land 4)|coin]]s and score will quickly deplete. If the score reaches zero, Wario will be forced out of the level and back to the main map. | ||
The times given by the switches vary on the [[Wario Land 4#Game | The times given by the switches vary on the [[Wario Land 4#Game mode|game mode]]. In the level [[Fiery Cavern]], the switch turns the level into ice. In [[Hotel Horror]], there are two doors that have a frog sign on them. Those doors open only when the switch is hit. | ||
The switch made a cameo appearance in ''[[Densetsu no | The switch made a cameo appearance in ''[[Densetsu no Stafy 3]]'', where [[Starfy|Stafy]] and Wario must trek through [[starfywiki:Undersea Ruins|Kaitei Iseki]]. A switch is found in the middle of the level, opening a new area. | ||
==List of time limits== | ==List of time limits== | ||
This table is a list of time limits given to complete levels in different | This table is a list of time limits given to complete levels in different game modes. It also includes the times to defeat the in-game [[Wario Land 4#Bosses|bosses]]. The [[Golden Passage]]'s switch is located at the beginning of the level in all modes. | ||
{|width=100% cellspacing=0 border=1 cellpadding=3 style="border-collapse:collapse;" | {|width=100% cellspacing=0 border=1 cellpadding=3 style="border-collapse:collapse;" | ||
|- | |- | ||
!Level | !Level | ||
!colspan="3" |Time limits given in different [[Wario Land 4#Game | !colspan="3"|Time limits given in different [[Wario Land 4#Game mode|game modes]] to complete the levels | ||
|- | |- | ||
| | | | ||
!align="center" style="background: #48D1C9;" |Normal | !align="center"style="background: #48D1C9;"|Normal | ||
!align="center" style="background: #FFCC07;" |Hard | !align="center"style="background: #FFCC07;"|Hard | ||
!align="center" style="background: #E35148;" |S-Hard | !align="center"style="background: #E35148;"|S-Hard | ||
|- | |- | ||
| | | | ||
!colspan="3" |[[Entry Passage]] | !colspan="3"|[[Entry Passage]] | ||
|- | |- | ||
!align="center" |[[Hall of Hieroglyphs]] | !align="center"|[[Hall of Hieroglyphs]] | ||
|align="center" style="background: #48D1C9;" |1:00 | |align="center"style="background: #48D1C9;"|1:00 | ||
|align="center" style="background: #FFCC07;" |0:15 | |align="center"style="background: #FFCC07;"|0:15 | ||
|align="center" style="background: #E35148;" |2:30* | |align="center"style="background: #E35148;"|2:30* | ||
|- | |- | ||
!align="center" |[[Spoiled Rotten]] (boss) | !align="center"|[[Spoiled Rotten]] (boss) | ||
|align="center" style="background: #48D1C9;" |1:00 | |align="center"style="background: #48D1C9;"|1:00 | ||
|align="center" style="background: #FFCC07;" |0:30 | |align="center"style="background: #FFCC07;"|0:30 | ||
|align="center" style="background: #E35148;" |0:15 | |align="center"style="background: #E35148;"|0:15 | ||
|- | |- | ||
| | | | ||
!colspan="3" |[[Emerald Passage]] | !colspan="3"|[[Emerald Passage]] | ||
|- | |- | ||
!align="center" |[[Palm Tree Paradise]] | !align="center"|[[Palm Tree Paradise]] | ||
|align="center" style="background: #48D1C9;" |1:30 | |align="center"style="background: #48D1C9;"|1:30 | ||
|align="center" style="background: #FFCC07;" |0:45 | |align="center"style="background: #FFCC07;"|0:45 | ||
|align="center" style="background: #E35148;" |4:30* | |align="center"style="background: #E35148;"|4:30* | ||
|- | |- | ||
!align="center" |[[Wildflower Fields]] | !align="center"|[[Wildflower Fields]] | ||
|align="center" style="background: #48D1C9;" |2:30 | |align="center"style="background: #48D1C9;"|2:30 | ||
|align="center" style="background: #FFCC07;" |1:20 | |align="center"style="background: #FFCC07;"|1:20 | ||
|align="center" style="background: #E35148;" |0:50 | |align="center"style="background: #E35148;"|0:50 | ||
|- | |- | ||
!align="center" |[[Mystic Lake]] | !align="center"|[[Mystic Lake]] | ||
|align="center" style="background: #48D1C9;" |3:00 | |align="center"style="background: #48D1C9;"|3:00 | ||
|align="center" style="background: #FFCC07;" |2:00 | |align="center"style="background: #FFCC07;"|2:00 | ||
|align="center" style="background: #E35148;" |1:30 | |align="center"style="background: #E35148;"|1:30 | ||
|- | |- | ||
!align="center" |[[Monsoon Jungle]] | !align="center"|[[Monsoon Jungle]] | ||
|align="center" style="background: #48D1C9;" |4:00 | |align="center"style="background: #48D1C9;"|4:00 | ||
|align="center" style="background: #FFCC07;" |2:45 | |align="center"style="background: #FFCC07;"|2:45 | ||
|align="center" style="background: #E35148;" |2:00 | |align="center"style="background: #E35148;"|2:00 | ||
|- | |- | ||
!align="center" |[[Cractus]] (boss) | !align="center"|[[Cractus]] (boss) | ||
|align="center" style="background: #48D1C9;" |4:00 | |align="center"style="background: #48D1C9;"|4:00 | ||
|align="center" style="background: #FFCC07;" |3:00 | |align="center"style="background: #FFCC07;"|3:00 | ||
|align="center" style="background: #E35148;" |2:00 | |align="center"style="background: #E35148;"|2:00 | ||
|- | |- | ||
| | | | ||
!colspan="3" |[[Ruby Passage]] | !colspan="3"|[[Ruby Passage]] | ||
|- | |- | ||
!align="center" |[[The Curious Factory]] | !align="center"|[[The Curious Factory]] | ||
|align="center" style="background: #48D1C9;" |3:30 | |align="center"style="background: #48D1C9;"|3:30 | ||
|align="center" style="background: #FFCC07;" |2:50 | |align="center"style="background: #FFCC07;"|2:50 | ||
|align="center" style="background: #E35148;" |2:30 | |align="center"style="background: #E35148;"|2:30 | ||
|- | |- | ||
!align="center" |[[The Toxic Landfill]] | !align="center"|[[The Toxic Landfill]] | ||
|align="center" style="background: #48D1C9;" |5:00 | |align="center"style="background: #48D1C9;"|5:00 | ||
|align="center" style="background: #FFCC07;" |3:30 | |align="center"style="background: #FFCC07;"|3:30 | ||
|align="center" style="background: #E35148;" |2:30 | |align="center"style="background: #E35148;"|2:30 | ||
|- | |- | ||
!align="center" |[[40 Below Fridge]] | !align="center"|[[40 Below Fridge]] | ||
|align="center" style="background: #48D1C9;" |4:00 | |align="center"style="background: #48D1C9;"|4:00 | ||
|align="center" style="background: #FFCC07;" |3:30 | |align="center"style="background: #FFCC07;"|3:30 | ||
|align="center" style="background: #E35148;" |2:00 | |align="center"style="background: #E35148;"|2:00 | ||
|- | |- | ||
!align="center" |[[Pinball Zone]] | !align="center"|[[Pinball Zone]] | ||
|align="center" style="background: #48D1C9;" |6:00 | |align="center"style="background: #48D1C9;"|6:00 | ||
|align="center" style="background: #FFCC07;" |5:15 | |align="center"style="background: #FFCC07;"|5:15 | ||
|align="center" style="background: #E35148;" |3:30 | |align="center"style="background: #E35148;"|3:30 | ||
|- | |- | ||
!align="center" |[[Cuckoo Condor]] (boss) | !align="center"|[[Cuckoo Condor]] (boss) | ||
|align="center" style="background: #48D1C9;" |4:00 | |align="center"style="background: #48D1C9;"|4:00 | ||
|align="center" style="background: #FFCC07;" |3:00 | |align="center"style="background: #FFCC07;"|3:00 | ||
|align="center" style="background: #E35148;" |2:00 | |align="center"style="background: #E35148;"|2:00 | ||
|- | |- | ||
| | | | ||
!colspan="3" |[[Topaz Passage]] | !colspan="3"|[[Topaz Passage]] | ||
|- | |- | ||
!align="center" |[[Toy Block Tower]] | !align="center"|[[Toy Block Tower]] | ||
|align="center" style="background: #48D1C9;" |4:00 | |align="center"style="background: #48D1C9;"|4:00 | ||
|align="center" style="background: #FFCC07;" |2:30 | |align="center"style="background: #FFCC07;"|2:30 | ||
|align="center" style="background: #E35148;" |2:00 | |align="center"style="background: #E35148;"|2:00 | ||
|- | |- | ||
!align="center" |[[The Big Board]] | !align="center"|[[The Big Board]] | ||
|align="center" style="background: #48D1C9;" |3:00 | |align="center"style="background: #48D1C9;"|3:00 | ||
|align="center" style="background: #FFCC07;" |2:30 | |align="center"style="background: #FFCC07;"|2:30 | ||
|align="center" style="background: #E35148;" |2:00 | |align="center"style="background: #E35148;"|2:00 | ||
|- | |- | ||
!align="center" |[[Doodle Woods]] | !align="center"|[[Doodle Woods]] | ||
|align="center" style="background: #48D1C9;" |6:00 | |align="center"style="background: #48D1C9;"|6:00 | ||
|align="center" style="background: #FFCC07;" |5:15 | |align="center"style="background: #FFCC07;"|5:15 | ||
|align="center" style="background: #E35148;" |4:00 | |align="center"style="background: #E35148;"|4:00 | ||
|- | |- | ||
!align="center" |[[Domino Row]] | !align="center"|[[Domino Row]] | ||
|align="center" style="background: #48D1C9;" |4:00 | |align="center"style="background: #48D1C9;"|4:00 | ||
|align="center" style="background: #FFCC07;" |3:00 | |align="center"style="background: #FFCC07;"|3:00 | ||
|align="center" style="background: #E35148;" |2:00 | |align="center"style="background: #E35148;"|2:00 | ||
|- | |- | ||
!align="center" |[[Aerodent]] (boss) | !align="center"|[[Aerodent]] (boss) | ||
|align="center" style="background: #48D1C9;" |4:00 | |align="center"style="background: #48D1C9;"|4:00 | ||
|align="center" style="background: #FFCC07;" |3:00 | |align="center"style="background: #FFCC07;"|3:00 | ||
|align="center" style="background: #E35148;" |2:00 | |align="center"style="background: #E35148;"|2:00 | ||
|- | |- | ||
| | | | ||
!colspan="3" |[[Sapphire Passage]] | !colspan="3"|[[Sapphire Passage]] | ||
|- | |- | ||
!align="center" |[[Crescent Moon Village]] | !align="center"|[[Crescent Moon Village]] | ||
|align="center" style="background: #48D1C9;" |3:30 | |align="center"style="background: #48D1C9;"|3:30 | ||
|align="center" style="background: #FFCC07;" |2:45 | |align="center"style="background: #FFCC07;"|2:45 | ||
|align="center" style="background: #E35148;" |2:00 | |align="center"style="background: #E35148;"|2:00 | ||
|- | |- | ||
!align="center" |[[Arabian Night]] | !align="center"|[[Arabian Night]] | ||
|align="center" style="background: #48D1C9;" |4:00 | |align="center"style="background: #48D1C9;"|4:00 | ||
|align="center" style="background: #FFCC07;" |3:00 | |align="center"style="background: #FFCC07;"|3:00 | ||
|align="center" style="background: #E35148;" |1:30 | |align="center"style="background: #E35148;"|1:30 | ||
|- | |- | ||
!align="center" |[[Fiery Cavern]] | !align="center"|[[Fiery Cavern]] | ||
|align="center" style="background: #48D1C9;" |5:00 | |align="center"style="background: #48D1C9;"|5:00 | ||
|align="center" style="background: #FFCC07;" |4:00 | |align="center"style="background: #FFCC07;"|4:00 | ||
|align="center" style="background: #E35148;" |2:45 | |align="center"style="background: #E35148;"|2:45 | ||
|- | |- | ||
!align="center" |[[Hotel Horror]] | !align="center"|[[Hotel Horror]] | ||
|align="center" style="background: #48D1C9;" |4:00 | |align="center"style="background: #48D1C9;"|4:00 | ||
|align="center" style="background: #FFCC07;" |3:15 | |align="center"style="background: #FFCC07;"|3:15 | ||
|align="center" style="background: #E35148;" |2:00 | |align="center"style="background: #E35148;"|2:00 | ||
|- | |- | ||
!align="center" |[[Catbat]] (boss) | !align="center"|[[Catbat]] (boss) | ||
|align="center" style="background: #48D1C9;" |4:00 | |align="center"style="background: #48D1C9;"|4:00 | ||
|align="center" style="background: #FFCC07;" |3:00 | |align="center"style="background: #FFCC07;"|3:00 | ||
|align="center" style="background: #E35148;" |2:00 | |align="center"style="background: #E35148;"|2:00 | ||
|- | |- | ||
| | | | ||
!colspan="3" |[[Golden Pyramid]] | !colspan="3"|[[Golden Pyramid]] | ||
|- | |- | ||
!align="center" |[[Golden Passage]] | !align="center"|[[Golden Passage]] | ||
|align="center" style="background: #48D1C9;" |9:30 | |align="center"style="background: #48D1C9;"|9:30 | ||
|align="center" style="background: #FFCC07;" |6:00 | |align="center"style="background: #FFCC07;"|6:00 | ||
|align="center" style="background: #E35148;" |3:30 | |align="center"style="background: #E35148;"|3:30 | ||
|- | |- | ||
!align="center" |[[Golden Diva]] (boss) | !align="center"|[[Golden Diva]] (boss) | ||
|align="center" style="background: #48D1C9;" |6:00 | |align="center"style="background: #48D1C9;"|6:00 | ||
|align="center" style="background: #FFCC07;" |5:00 | |align="center"style="background: #FFCC07;"|5:00 | ||
|align="center" style="background: #E35148;" |4:00 | |align="center"style="background: #E35148;"|4:00 | ||
|- | |- | ||
|colspan="4" align="center"| *Switch position changes | |colspan="4"align="center"|*Switch position changes | ||
|} | |} | ||
{{br}} | {{br}} | ||
| Line 172: | Line 169: | ||
==Gallery== | ==Gallery== | ||
<gallery> | <gallery> | ||
FrogSwitch.png|The three stages of a switch | FrogSwitch.png|The three stages of a switch | ||
WL4-Golden Passage Switch.png|[[Wario]] must hit the switch in order to open the [[vortex]]. | WL4-Golden Passage Switch.png|[[Wario]] must hit the switch in order to open the [[vortex]]. | ||
WL4-Ice Switch.png|The switch turning the level into ice in the [[Fiery Cavern]] | WL4-Ice Switch.png|The switch turning the level into ice in the [[Fiery Cavern]] | ||
WL4 Prerelease 40 Below Fridge.png|[[List of Wario Land 4 pre-release and unused content|Pre-release]] screenshot of [[40 Below Fridge]], which includes the switch | WL4 Prerelease 40 Below Fridge.png|[[List of Wario Land 4 pre-release and unused content|Pre-release]] screenshot of [[40 Below Fridge]], which includes the switch | ||
WL4-Densetsu no Starfy 3 Frog Switch.png|The switch in ''[[Densetsu no | WL4-Densetsu no Starfy 3 Frog Switch.png|The switch in ''[[Densetsu no Stafy 3]]'' | ||
</gallery> | </gallery> | ||
==Media== | ==Media== | ||
{{media table | {{media table | ||
| | |file1=Wario Land 4 music- Hurry Up!.oga | ||
|title1=Switch | |||
| | |||
|description1=Music that is heard when the switch is hit | |description1=Music that is heard when the switch is hit | ||
|length1= | |length1=0:30 | ||
}} | }} | ||
| Line 193: | Line 189: | ||
|JapR=Suicchi | |JapR=Suicchi | ||
|JapM=Switch | |JapM=Switch | ||
|ChiS=青蛙机关<ref>Official Chinese manual for ''Wario Land 4'', page 15.</ref> | |||
|ChiSR=Qīngwā Jīguān | |||
|ChiSM=Frog Switch | |||
|Spa=interruptor<ref>''Wario Land 4'' European instruction booklet, page 90.</ref><br>Rana Azul<ref>[https://www.guiasnintendo.com/1_GAMEBOY_ADVANCE/wario4/wario4_sp/welcome.html Official ''Wario Land 4'' website (Guías Nintendo)]</ref> | |Spa=interruptor<ref>''Wario Land 4'' European instruction booklet, page 90.</ref><br>Rana Azul<ref>[https://www.guiasnintendo.com/1_GAMEBOY_ADVANCE/wario4/wario4_sp/welcome.html Official ''Wario Land 4'' website (Guías Nintendo)]</ref> | ||
|SpaM=switch<br>Blue Frog | |SpaM=switch<br>Blue Frog | ||
| Line 199: | Line 198: | ||
|Ger=Schalter<ref>''Wario Land 4'' European instruction booklet, page 30.</ref> | |Ger=Schalter<ref>''Wario Land 4'' European instruction booklet, page 30.</ref> | ||
|GerM=Switch | |GerM=Switch | ||
|Ita=interruttore<ref>''Wario Land 4'' European instruction booklet, page 110.</ref> | |Ita=interruttore<ref>''Wario Land 4'' European instruction booklet, page 110.</ref><br>Ranocchio<ref>''Wario Land 4'' European instruction booklet, page 111.</ref> | ||
|ItaM=switch | |ItaM=switch<br>Froggie | ||
}} | }} | ||
==Trivia== | ==Trivia== | ||
*A redesign of this switch is [[tcrf:Wario Land: Shake It!/Unused Object Graphics#Frog | *A redesign of this switch is [[tcrf:Wario Land: Shake It!/Unused Object Graphics#Frog Goal|unused]] in ''[[Wario Land: Shake It!]]'' It is still mostly functional and activates [[shake block]]s. | ||
==References== | ==References== | ||
<references/> | <references/> | ||
{{WL4}} | {{WL4}} | ||
[[Category:Switches]] | [[Category:Switches]] | ||
[[Category:Wario Land 4 | [[Category:Wario Land 4 objects]] | ||
[[de:Frosch-Schalter]] | [[de:Frosch-Schalter]] | ||
Latest revision as of 14:15, November 21, 2023
| Switch | |
|---|---|
 Artwork of Wario jumping on the switch | |
| First appearance | Wario Land 4 (2001) |
| Latest appearance | Densetsu no Stafy 3 (2004) |
- “This switch has an ignorant little frog face!! Once you step on it, hurry up and get back to the vortex!”
- —Wario, Wario Land 4 instruction booklet

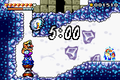
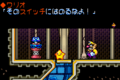
A switch,[1] also referred to as a Timer[2] or Portal Switch,[3] is an object that appears at the end of every level in Wario Land 4. When Wario jumps on a switch, it opens to reveal a ticking time bomb, and any solid Kaeru Blocks turn transparent and vice-versa. Wario then yells, "Hurry up!" (or occasionally "No-no-no... Hurry up!" or "H-H-Hurry up!"), the game's theme becomes more intense, and the player is given a certain amount of time to escape the level by returning to the vortex at the beginning of the stage. If Wario does not escape before the timer runs out, his coins and score will quickly deplete. If the score reaches zero, Wario will be forced out of the level and back to the main map.
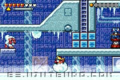
The times given by the switches vary on the game mode. In the level Fiery Cavern, the switch turns the level into ice. In Hotel Horror, there are two doors that have a frog sign on them. Those doors open only when the switch is hit.
The switch made a cameo appearance in Densetsu no Stafy 3, where Stafy and Wario must trek through Kaitei Iseki. A switch is found in the middle of the level, opening a new area.
List of time limits[edit]
This table is a list of time limits given to complete levels in different game modes. It also includes the times to defeat the in-game bosses. The Golden Passage's switch is located at the beginning of the level in all modes.
| Level | Time limits given in different game modes to complete the levels | ||
|---|---|---|---|
| Normal | Hard | S-Hard | |
| Entry Passage | |||
| Hall of Hieroglyphs | 1:00 | 0:15 | 2:30* |
| Spoiled Rotten (boss) | 1:00 | 0:30 | 0:15 |
| Emerald Passage | |||
| Palm Tree Paradise | 1:30 | 0:45 | 4:30* |
| Wildflower Fields | 2:30 | 1:20 | 0:50 |
| Mystic Lake | 3:00 | 2:00 | 1:30 |
| Monsoon Jungle | 4:00 | 2:45 | 2:00 |
| Cractus (boss) | 4:00 | 3:00 | 2:00 |
| Ruby Passage | |||
| The Curious Factory | 3:30 | 2:50 | 2:30 |
| The Toxic Landfill | 5:00 | 3:30 | 2:30 |
| 40 Below Fridge | 4:00 | 3:30 | 2:00 |
| Pinball Zone | 6:00 | 5:15 | 3:30 |
| Cuckoo Condor (boss) | 4:00 | 3:00 | 2:00 |
| Topaz Passage | |||
| Toy Block Tower | 4:00 | 2:30 | 2:00 |
| The Big Board | 3:00 | 2:30 | 2:00 |
| Doodle Woods | 6:00 | 5:15 | 4:00 |
| Domino Row | 4:00 | 3:00 | 2:00 |
| Aerodent (boss) | 4:00 | 3:00 | 2:00 |
| Sapphire Passage | |||
| Crescent Moon Village | 3:30 | 2:45 | 2:00 |
| Arabian Night | 4:00 | 3:00 | 1:30 |
| Fiery Cavern | 5:00 | 4:00 | 2:45 |
| Hotel Horror | 4:00 | 3:15 | 2:00 |
| Catbat (boss) | 4:00 | 3:00 | 2:00 |
| Golden Pyramid | |||
| Golden Passage | 9:30 | 6:00 | 3:30 |
| Golden Diva (boss) | 6:00 | 5:00 | 4:00 |
| *Switch position changes | |||
Gallery[edit]

The three stages of a switch
The switch turning the level into ice in the Fiery Cavern
Pre-release screenshot of 40 Below Fridge, which includes the switch
The switch in Densetsu no Stafy 3


Media[edit]
| File info 0:30 |
Names in other languages[edit]
| Language | Name | Meaning |
|---|---|---|
| Japanese | スイッチ[4] Suicchi |
Switch |
| Chinese (simplified) | 青蛙机关[5] Qīngwā Jīguān |
Frog Switch |
| French | commutateur[8] |
switch |
| German | Schalter[9] |
Switch |
| Italian | interruttore[10] Ranocchio[11] |
switch Froggie |
| Spanish | interruptor[6] Rana Azul[7] |
switch Blue Frog |
Trivia[edit]
- A redesign of this switch is unused in Wario Land: Shake It! It is still mostly functional and activates shake blocks.
References[edit]
- ^ Wario Land 4 American instruction booklet, page 15.
- ^ Nintendo Power Advance V.3, page 56.
- ^ Nintendo Official Magazine (UK) Issue 114, page 59.
- ^ Wario Land Advance: Yōki no Otakara Japanese instruction booklet, page 13.
- ^ Official Chinese manual for Wario Land 4, page 15.
- ^ Wario Land 4 European instruction booklet, page 90.
- ^ Official Wario Land 4 website (Guías Nintendo)
- ^ Wario Land 4 European instruction booklet, page 50.
- ^ Wario Land 4 European instruction booklet, page 30.
- ^ Wario Land 4 European instruction booklet, page 110.
- ^ Wario Land 4 European instruction booklet, page 111.