Pipe-Rock Plateau Palace
| Pipe-Rock Plateau Palace | |||||||
|---|---|---|---|---|---|---|---|

| |||||||
| World | Pipe-Rock Plateau | ||||||
| Game | Super Mario Bros. Wonder | ||||||
| Difficulty | ★★★ | ||||||
| Primary power-up | Elephant Fruit | ||||||
| Wonder Effect | Causes pipes to fall | ||||||
| Boss | Bowser Jr. / Wonder Bowser Jr. | ||||||
| Music tracks | "Palace Theme" "Doomy-Gloom Wonder" (Wonder Effect) "Bowser Jr. Battle" (boss battle) | ||||||
| |||||||
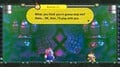
- “Let's take back the palace! And don't forget that you can press
 if you want to change the badge we're using, OK?”
 - —Prince Florian, Super Mario Bros. Wonder
Pipe-Rock Plateau Palace is a course in Super Mario Bros. Wonder, being the final course in Pipe-Rock Plateau. The course takes place in a palace, with a fight against Bowser Jr. at the end. The path to the palace is unlocked after clearing Wiggler Race Mountaineering!, but the palace itself is guarded by a Wonder Piranha that can only be disposed of with fourteen Pipe-Rock Plateau Wonder Seeds. Clearing it unlocks a path to enter Petal Isles for the first time. This course contains one Wonder Seed, as well as the first Royal Seed. This course has a difficulty of three stars, making it the only palace course in the game have a difficulty under four stars. It is also one of only two palace courses to use "Doomy-Gloom Wonder" as a Wonder Effect theme, the other being Fluff-Puff Peaks Palace.
Layout[edit]
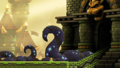
The player starts at the entrance of the palace, where a Talking Flower is disgusted by a nearby vine. Once inside the palace, Wonder power causes Bone Goombas to appear out of thin air. A row of blocks, consisting of brick, rotating, and hard kinds connect to rectangular platforms. The left platform has a Wow Bud that when touched, causes coins to appear. A Hidden Character Block is also here, which only Yellow Yoshi can see. The right platform has a ? Block that contains an Elephant Fruit, or a Super Mushroom if the player is small.
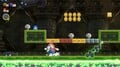
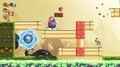
After progressing a little bit, there is a group of coins and a flower coin, but two pipes block the way. A nearby Wow Bud lowers the right pipe, thus allowing the player to obtain the coins. After that is two rows of breakable blocks, where Hammer Bros are. One of these blocks contains lots of coins and some flower coins. The next area has a long ? Block, followed by two rows of Rotating Blocks, with a pipe that endlessly spawns Bone Goombas. The first Checkpoint Flag is found right afterward.
After the Checkpoint Flag is a ? Block containing an Elephant Fruit or a Super Mushroom, depending on the player's size. There is then a long staircase that leads to the second Checkpoint Flag, along with a gate, leading to an intermission area. The intermission area has a block that shuffles between a Super Mushroom and an Elephant Fruit. At the end of the area is a pipe that leads to Bowser Jr. Bowser Jr. then fights the player.
At the start of the fight, Bowser Jr. spins inside his shell for a short time, and when he stops he is vulnerable to damage. After taking damage, he transforms into Wonder Bowser Jr., and changes the size of the player to big, and himself to small. After taking damage again, Wonder Bowser Jr. becomes big, while the player becomes small, reversing the effects of the previous phase. He now gains the ability to jump high and attempt to ground-pound the player. He also takes less damage while giant, with a jump simply lightly hurting him. After enough damage is dealt, Wonder Bowser Jr. is defeated, and reverts back to normal. He then leaves the area, and the player obtains a Royal Seed.
Wonder Flower[edit]
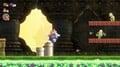
A Wonder Flower is found before the Checkpoint Flag, where if touched causes pipes to fall down while the effect is active. Falling pipes allow access to a higher path, where Dry Bones will appear. Pipes will even fall and crush a Hammer Bro, creating a pipe staircase. The Wonder Seed is found right after, and collecting it will stop the Wonder Effect.
Hidden Character Blocks[edit]
- A Red Yoshi Hidden Character Block can be found near the first Wow Bud that appears after the Checkpoint Flag. It is located to the left of the Wow Bud, in the corner on the celling. It contains a flower coin.
10-flower coins[edit]
| Image | Location |
|---|---|

|
Found from a Wow Bud right after the first checkpoint. The player must slide down a wall to activate it, causing the flower to make the 10-flower coin appear. |

|
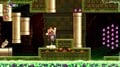
Found in between some blocks that can only be destroyed with the Elephant Fruit power-up. If the player has said power-up, they can destroy the blocks and reach the coin. |

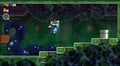
|
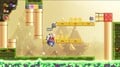
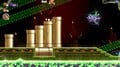
Found above the lava; with the help of the Wonder Effect, the player can use a slow-falling pipe to get the coin before the pipe sinks. |
Enemies and obstacles[edit]
- Bone Goomba
- Hammer Bro
- Dry Bones
- Bowser Jr. (boss)
- Poison (green)
Talking Flowers' quotes[edit]
- "Ew..." (at the start of the course)
- "What am I looking at?"
- "See ya later!" (after obtaining the royal seed)
Gallery[edit]
The course's thumbnail
The first room of the palace
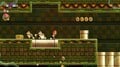
Hammer Bros. inside the palace
The Rotating Blocks before the first checkpoint
The first checkpoint area
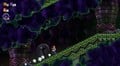
The course's Wonder Effect
The above passage during the Wonder Effect
The course's Wonder Seed
The stairs leading to the second checkpoint
The second checkpoint area
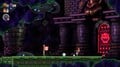
The intermission room between the second checkpoint and Bowser Jr.
Mario about to fight Bowser Jr.


Names in other languages[edit]
| Language | Name | Meaning | Note(s) | Ref. |
|---|---|---|---|---|
| Japanese | ドカンロック Dokan Rokku Heigen no Paresu |
Pipe-Rock Plateau Palace | [1] | |
| Chinese (Simplified) | 水管岩平原的神殿 Shuǐguǎn yán píngyuán de shéndiàn (Mandarin) |
Pipe-Rock Plateau Palace | [1] | |
| Chinese (Traditional) | 水管岩平原的神殿 Shuǐguǎn yán píngyuán de shéndiàn (Mandarin) |
Pipe-Rock Plateau Palace | [1] | |
| Dutch | Paleis van de Buizenweide | Palace of the Pipe-Rock Plateau | [1] | |
| French | Palais de la Plaine des tuyaux | Pipe-Rock Plateau's Palace | [1] | |
| German | Palast der Röhrenfelsen-Wiese | Pipe-Rock Plateau Palace | [1] | |
| Italian | Il castello della Piana Tubirocciosi | The castle of the Pipe-Rock Plateau | [1] | |
| Korean | 토관바위 평원의 팰리스 Togwanbawi Pyeong'won-ui Paelliseu |
Pipe-Rock Plateau's Palace | [1] | |
| Polish | Równina Rurowa: Pałac | Pipe-Rock Plateau: Palace | [1] | |
| Portuguese | Palácio do Planalto Rochacanos | Pipe-Rock Plateau Palace | [1] | |
| Russian | Дворец Долины труб Dvorets Dolina trub |
Pipe-Rock Plateau Palace | [1] | |
| Spanish | Palacio de la pradera Tubirroca | Pipe-Rock Plateau Palace | [1] | |
| Thai | ปราสาทที่ราบสูงท่อศิลา Bpraasàat Tîirâapsǔung Tɔ̂ɔ Sìlaa |
Pipe-Rock Plateau palace | [1] |
Notes[edit]
- When the player becomes small in Wonder Bowser Jr.'s boss battle, their behavior is similar to that of Mini Mario. The difference is that they can deal damage by simply stomping on Wonder Bowser Jr. instead of needing to use a Ground Pound (though Ground Pounding deals more damage).