Beneath the Waves: Difference between revisions
LinkTheLefty (talk | contribs) mNo edit summary |
(Added Musical Coins section; Rearranged sections) |
||
| Line 4: | Line 4: | ||
The level itself is set mostly underwater. Wario begins his exploration of this level in the main area which also serves as a hub to connect all the different areas of the level. The area around the hub is populated by sea creatures like [[Haridama]] and [[Octohōn]], and the center of the area is dominated by strong water currents. The currents surround a single door that leads to a dry cave filled with zip lines. All four [[treasure chest]]s of the level can be found in this area, so Wario's only reason to travel to other places in the level is to retrieve the necessary [[key]]s. There are also four other cave areas that can be reached from the hub area. One is another dry cave located above the surface on a ledge, with a [[Spearhead (enemy)|Spearhead]] and a [[Fire Robota]]. Another dry cave filled with enemies and breakable blocks is hidden behind a heavy block on the seabed. A system of tunnels dominated by harsh currents is located below the hub area, and a submerged cave filled with cracks that produce air bubbles can be found behind a grate in the west wall. | The level itself is set mostly underwater. Wario begins his exploration of this level in the main area which also serves as a hub to connect all the different areas of the level. The area around the hub is populated by sea creatures like [[Haridama]] and [[Octohōn]], and the center of the area is dominated by strong water currents. The currents surround a single door that leads to a dry cave filled with zip lines. All four [[treasure chest]]s of the level can be found in this area, so Wario's only reason to travel to other places in the level is to retrieve the necessary [[key]]s. There are also four other cave areas that can be reached from the hub area. One is another dry cave located above the surface on a ledge, with a [[Spearhead (enemy)|Spearhead]] and a [[Fire Robota]]. Another dry cave filled with enemies and breakable blocks is hidden behind a heavy block on the seabed. A system of tunnels dominated by harsh currents is located below the hub area, and a submerged cave filled with cracks that produce air bubbles can be found behind a grate in the west wall. | ||
==Treasures== | ==Treasures== | ||
| Line 42: | Line 30: | ||
The Clubs Crest is one of the four items that resemble the symbols on play cards. It looks like a green crest-shaped shield made of metal with a Club on it. Collecting the Clubs Crest or any of the other crest items is optional and does not affect the world and its levels in any way. | The Clubs Crest is one of the four items that resemble the symbols on play cards. It looks like a green crest-shaped shield made of metal with a Club on it. Collecting the Clubs Crest or any of the other crest items is optional and does not affect the world and its levels in any way. | ||
==[[Musical Coin]]s== | |||
{|width=60% cellspacing=0 border=2 cellpadding=3 style="border-collapse:collapse;" | |||
|- | |||
!Location | |||
!Description | |||
|- | |||
|[[File:WL3 S BeneathTheWaves MC1.png]] | |||
|align="center"|In the cave to the right above the surface, there is a Musical Coin blocked off by blocks breakable by a thrown object. An enemy in this room (either Spearhead or Fire Robota) must be thrown to break those blocks to reach the coin. | |||
|- | |||
|[[File:WL3 S BeneathTheWaves MC2.png]] | |||
|align="center"|In the cave past the 5-ton block at the bottom of the sea, the Musical Coin is past the spikes at the upper level. In order to get past the spikes, a Brrr Bear is required to trigger Ice Skatin' Wario, but a block on the floor must be broken by throwing the enemy so that Wario won't be stopped by it. | |||
|- | |||
|[[File:WL3 S BeneathTheWaves MC3.png]] | |||
|align="center"|In the undersea cave at the bottom-left where a current moving in the loop is, the Musical Coin is inside the rocks. To get there, Wario must go within the middle from the top or bottom, and then go to the right near the top. | |||
|- | |||
|[[File:WL3 S BeneathTheWaves MC4.png]] | |||
|align="center"|In the undersea cave at the bottom-left where a current moving in the loop is, there is a room reachable by breaking a series of breakable blocks from the bottom. In this room, the Musical Coin is near the ceiling, which requires Bouncy Wario triggered by Hammer-bot to reach. | |||
|- | |||
|[[File:WL3 S BeneathTheWaves MC5.png]] | |||
|align="center"|In the same room as above, there is a Musical Coin on the other side of the blocks. The Hammer-bot must be thrown towards the blocks to break them, and then it must be thrown on the platform with the Red Key. From there, Bouncy Wario must be triggered by the same Hammer-bot to reach the Musical Coin near the ceiling. | |||
|- | |||
|[[File:WL3 S BeneathTheWaves MC6.png]] | |||
|align="center"|In the cave on the left side from the beginning, the upper half is composed of a current flowing to the right. Wario must go against the current towards the top-left to reach the Musical Coin. | |||
|- | |||
|[[File:WL3 S BeneathTheWaves MC7.png]] | |||
|align="center"|In the cave in the middle of the sea surrounded by currents, there is a room with ziplines. The Musical Coin is reachable by taking the zipline handle near the second handle which travels towards the top-left. The Musical Coin is to the left of the end of this zipline. | |||
|- | |||
|[[File:WL3 S BeneathTheWaves MC8.png]] | |||
|align="center"|In the cave in the middle of the sea surrounded by currents, there is a room with ziplines. The top-left leads to a room with the Blue Chest, where the Musical Coin is to the right of the Doughnuteer, reachable by jumping towards it. | |||
|} | |||
==Enemies== | |||
*[[Haridama]] (8) | |||
*[[Spearhead (enemy)|Spearhead]] (2) | |||
*[[Octohōn]] (4) | |||
*[[Fire Robota]] (1) | |||
*[[Beam Robota]] (2) | |||
*[[Teruteru]] (2) | |||
*[[Para-Goom]] (3) | |||
*[[Hebarii]] (3) | |||
*[[Brrr Bear]] (4) | |||
*[[Silky]] (1) | |||
*[[Doughnuteer]] (1) | |||
==Reaction abilities in this level== | ==Reaction abilities in this level== | ||
| Line 48: | Line 80: | ||
*[[Fat Wario]] (via Doughnuteer) | *[[Fat Wario]] (via Doughnuteer) | ||
*[[Flaming Wario|Hot Wario]] (via Fire Robota) | *[[Flaming Wario|Hot Wario]] (via Fire Robota) | ||
*[[Frozen Wario|Ice Skatin' Wario]] (via Brrr Bear) | |||
==Screenshots== | ==Screenshots== | ||
Revision as of 08:45, March 11, 2023
- This article is about a level in Wario Land 3. For information about a Special Collection on the Super Mario Maker Bookmark website, see Super Mario Maker § Course Selects: Beneath the Waves.

Beneath the Waves is a location found in Wario Land 3 of the Wario Land series. It serves as the fifth of six levels found on the west side of the music box world. The level is located deep under the western sea. Wario can reach this level once he finds the Red Music Box that is hidden away in The Stagnant Swamp. The music box will form a whirlpool on the surface which serves as the entrance of the level.
The level itself is set mostly underwater. Wario begins his exploration of this level in the main area which also serves as a hub to connect all the different areas of the level. The area around the hub is populated by sea creatures like Haridama and Octohōn, and the center of the area is dominated by strong water currents. The currents surround a single door that leads to a dry cave filled with zip lines. All four treasure chests of the level can be found in this area, so Wario's only reason to travel to other places in the level is to retrieve the necessary keys. There are also four other cave areas that can be reached from the hub area. One is another dry cave located above the surface on a ledge, with a Spearhead and a Fire Robota. Another dry cave filled with enemies and breakable blocks is hidden behind a heavy block on the seabed. A system of tunnels dominated by harsh currents is located below the hub area, and a submerged cave filled with cracks that produce air bubbles can be found behind a grate in the west wall.
Treasures
Gray Chest: Explosive Plunger Box

The Explosive Plunger Box[1] is hidden away inside the Gray Chest found in the cave with the many zip lines. It is located in the lower-right area of the cave and can be reached by utilizing one of the zip lines to smash through two obstacles. The Gray Key that opens the chest can be found in the cave with the Spearhead and the Fire Robota. Wario needs the High Jump Boots from The Colossal Hole in order to climb the ledge in front of the entrance, and then to use the Spearhead as a stepping stone to reach the key in the upper area of the cave.
The Explosive Plunger Box is a device that can light bomb fuses from a distance. It looks like a blue box with black and yellow edges and a bomb symbol on it. After Wario pushes the lever on top of it. The bomb symbol flashes red and explosions occur in The Stagnant Swamp, Cave of Flames, and The Colossal Hole, making new areas accessible in the process.
Red Chest: Crayon (red)

The Crayon is located in the Red Chest in the upper right area of the cave with the zip lines, guarded by two Teruteru. The chest can be reached right away, but Wario needs Prince Frog's Glove from Out of the Woods in order to reach the key that unlocks it. The Red Key is located in the tunnels under the hub area. To get there, Wario needs to swim against the water currents. The key is hidden in a cave with many Enemy Blocks and a Hammer-bot.
Once the crayon has been collected, it flies to a hill on the north side of the world. A building resembling a tower can be found there, complete with a door and a sign that reads "GAME". The scene is initially monochrome, but gains another color for each crayon Wario manages to find. There are seven crayons in total hidden throughout the game, and once Wario finds all of them, he will be able to play the golf minigame there at every time the player desires. The red crayon colors the door that serves as the building's entrance.
Green Chest: Red Chemical

The Red Chemical housed in the Green Chest is stored behind a door in the middle of the room with the zip lines. Wario can reach the door by dropping down from above with good timing. The chest itself is guarded by a single Silky. Wario should take the Silky to the highest level of ground, then become Ball o' String Wario to break the block. The chest is found below, though the key that unlocks it is not available from the beginning. It is hidden away behind a grate which Wario cannot destroy himself. The player needs to locate the Sapling of Growth in A Town in Chaos first, to make the Octohōn in the level grow. With their increased strength they will smash all the grates in the hub area. From there Wario can venture into the cave filled with air bubbles. At the end of the cave Wario can find the Green Key.
The Red Chemical from this level and the Blue Chemical found in The Steep Canyon are two fluids contained in test glasses. When brought together they react and form an extremely potent acid. With this acid Wario can cause the heavy blocks in The Vast Plain and this level to move out of the way by disintegrating the floor beneath them. This causes them to sink into the ground.
Blue Chest: Clubs Crest

The Clubs Crest is locked up inside the Blue Chest which itself is hidden in the upper-left area of the cave with the zip lines. Wario needs to dodge the hovering spikes while riding the zip lines to the chest, and he also needs to utilize his fat form in order to reach it. The key to the chest is hidden in a cave near the bottom of the hub area, behind a heavy block. Wario first needs to find the Blue and Red Chemicals from this level and The Steep Canyon before he can enter the cave. Inside there are several breakable blocks, Para-Gooms, and Brrr Bears. The key is located at the end of the tunnel.
The Clubs Crest is one of the four items that resemble the symbols on play cards. It looks like a green crest-shaped shield made of metal with a Club on it. Collecting the Clubs Crest or any of the other crest items is optional and does not affect the world and its levels in any way.
Musical Coins
| Location | Description |
|---|---|

|
In the cave to the right above the surface, there is a Musical Coin blocked off by blocks breakable by a thrown object. An enemy in this room (either Spearhead or Fire Robota) must be thrown to break those blocks to reach the coin. |

|
In the cave past the 5-ton block at the bottom of the sea, the Musical Coin is past the spikes at the upper level. In order to get past the spikes, a Brrr Bear is required to trigger Ice Skatin' Wario, but a block on the floor must be broken by throwing the enemy so that Wario won't be stopped by it. |

|
In the undersea cave at the bottom-left where a current moving in the loop is, the Musical Coin is inside the rocks. To get there, Wario must go within the middle from the top or bottom, and then go to the right near the top. |

|
In the undersea cave at the bottom-left where a current moving in the loop is, there is a room reachable by breaking a series of breakable blocks from the bottom. In this room, the Musical Coin is near the ceiling, which requires Bouncy Wario triggered by Hammer-bot to reach. |

|
In the same room as above, there is a Musical Coin on the other side of the blocks. The Hammer-bot must be thrown towards the blocks to break them, and then it must be thrown on the platform with the Red Key. From there, Bouncy Wario must be triggered by the same Hammer-bot to reach the Musical Coin near the ceiling. |

|
In the cave on the left side from the beginning, the upper half is composed of a current flowing to the right. Wario must go against the current towards the top-left to reach the Musical Coin. |

|
In the cave in the middle of the sea surrounded by currents, there is a room with ziplines. The Musical Coin is reachable by taking the zipline handle near the second handle which travels towards the top-left. The Musical Coin is to the left of the end of this zipline. |

|
In the cave in the middle of the sea surrounded by currents, there is a room with ziplines. The top-left leads to a room with the Blue Chest, where the Musical Coin is to the right of the Doughnuteer, reachable by jumping towards it. |
Enemies
- Haridama (8)
- Spearhead (2)
- Octohōn (4)
- Fire Robota (1)
- Beam Robota (2)
- Teruteru (2)
- Para-Goom (3)
- Hebarii (3)
- Brrr Bear (4)
- Silky (1)
- Doughnuteer (1)
Reaction abilities in this level
- Bouncy Wario (via Hammer-bot)
- Bubble Wario
- Fat Wario (via Doughnuteer)
- Hot Wario (via Fire Robota)
- Ice Skatin' Wario (via Brrr Bear)
Screenshots
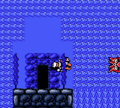
The center of the main area
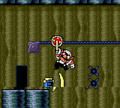
Inside the cave with the zip lines
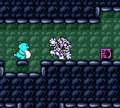
Another cave
The air bubble cave
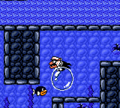
In the tunnels beneath the seabed


Names in other languages
| Language | Name | Meaning |
|---|---|---|
| Japanese | 深海 Shinkai |
The Deep Sea |
References
- ^ Brady, Matthew K., Nathan Beittenmiller, Debra McBride, and David Cassady. Game Boy Game Secrets, 2001 Edition Prima's Official Strategy Guide. Page 95.