Desert Ruins
- This article is about the level in Wario Land 3. For the stadium in Mario Strikers: Battle League, see Desert Ruin.

Desert Ruins, also known as The Western Ruins,[1] is the first level on the western side of the music box world in Wario Land 3. This level is accessible after Wario finds the Blue and Green Tablets in The Peaceful Village's Gray Chest and The Vast Plain's Gray Chest, causing the door to open up the path to the Desert Ruins.
The Desert Ruins are a big structure located in the center of a nameless desert. The level is mainly composed of two building on opposite sides themed after the moon to the west and the sun to the east, two big pools of quicksand, and an underground tunnel that lies beneath them. Both buildings have huge gates which only open during a specific time of the day: the western temple opens at night and the eastern temple opens at day. Both of these gates are breakable if the Super Smash power-up is acquired, through the Garlic of the Tower of Revival. The level of quicksand changes depending on the time of the day. At night, the level is almost free of quicksand, with the only exception being a small underground puddle. During daytime, the pools are filled with quicksand to the brim. The boss found in this level is Yellow Belly.
Enemies[edit]
- Suna kara te (6), (day only)
- Spearhead (9)
- Spear-bot (3)
- Hammer-bot (7)
- Doughnuteer (2)
- Para-Goom (3)
- Beam Robota (6)
- Silky (3)
- Kobatto (1)
Reaction abilities[edit]
- Ball o' String Wario (via Silky)
- Bouncy Wario (via Hammer-bot)
- Fat Wario (via Doughnuteer)
- Puffy Wario (via Yellow Belly)
- Vampire Wario (via Kobatto)
Items[edit]
Treasures[edit]
Gray Chest: Top Half of Scroll[edit]

The Top Half of Scroll[2] is in the Gray Chest. It is available as soon as the level is unlocked, but only during daytime at this point of the game, since the door to the temple is blocked during nighttime and the necessary power-up to bypass it is not available.
On the way to the right to the sun temple, the narrow platforms have suna kara te occasionally emerging, where they will pull Wario into the quicksand, requiring jumping through the platforms again if that were to happen. In the building before the gate, there is a room with several Spearheads and a Gray key in a narrow gap accessible from high up. This narrow gap requires jumping while crouching to access.
After exiting the room, the Gray Chest is within the door past the sun gate. Within the temple, the door leading to the Gray Chest requires traveling downwards through the ladders and damaged blocks, while avoiding the Spear-bots and Hammer-bots, the latter impeding progress by triggering Bouncy Wario to cause him to move away from the door. From the door in the room with the Gray Chest, the chest is on the other side of the open pillar.
After both the Top Half of Scroll from this chest and The Bottom Half of Scroll from this level's Red Chest are collected, they are combined to make the cyclone subside, rendering The Volcano's Base accessible.
Red Chest: Bottom Half of Scroll[edit]

The Bottom Half of Scroll[2] is found at the Desert Ruins and is in the Red Chest. It is available as soon as the level is unlocked, but only during nighttime at this point of the game, since the door to the temple is blocked during daytime and the necessary power-up to bypass it is not available.
The room with the Red Key is to the left from the beginning, where it is before the moon gate. Unlike daytime, the quicksand is absent near the surface, thus no suna kara te are present to pull Wario down. In this room, there are two Doughnuteers on the way to the Red Key. The square blocks next to the moon-patterned block in the upper level is breakable, though at this point of the game only Fat Wario can break it.
After exiting the room, the Red Chest is within the door past the moon gate. Within the temple, the door leading to the Red Chest is three ladders up. On the way, there are a Para-Goom, three Beam Robotas, and three Silkies. Within the room with the Red Chest, the chest is on the other side of the open pillar.
After both the Bottom Half of Scroll from this chest and The Top Half of Scroll from this level's Gray Chest are collected, they are combined to make the cyclone subside, rendering The Volcano's Base accessible.
Green Chest: Crayon (pink)[edit]

The Crayon[3] is in the Green Chest. It requires the Head Smash Helmet from The Frigid Sea's Gray Chest, which allows Wario to break blocks above him by jump towards them. If the Super Smash is not obtained, the room can only be visited at night since the moon gate can be broken with a powered-up Dash Attack.
The Green Key and Green Chest are located at the moon temple on the left side from the beginning. Within the moon temple at the highest platform climbable by ladders, the damaged block is visible. The block next to it is also breakable. In the floor above those breakable blocks, there is a Golf minigame room that requires completing in order to open the way to the chest. To the left of that room, there are two sets of damaged blocks. The floor below the nearest set of damaged blocks is also breakable, which leads to the Green Key. Alternatively, the Green Key can also be collected by breaking the block next to the room leading to the Red Chest.
To get to the Green Chest, the block next to the entrance to the moon temple needs to be broken. It can only be broken with Ball o' String Wario triggered by one of the Silkies, since it is treated as an Itodama Block. To the left of this block, there is a mini-game block that requires the Golf minigame to be cleared. To the left of it, there is a ladder leading to the Green Chest, where three Beam Robota are nearby. They impede progress since Wario will fall from the ladder if their beams strike him. The Green Chest is to the right from the top of the ladder.
The pink Crayon flies to the tower on the northern side of the world. The crayon is used to color one part of the area that is initially monochrome. The pink crayon colors the bricks on the building itself. After the area is colored by seven different crayons, the Golf minigame there can be played.
Blue Chest: Bottom Half of Sun Medallion[edit]

The Bottom Half of Sun Medallion[4] is in the Blue Chest. It requires the Super Jump Slam Overalls from the Castle of Illusions' Gray Chest, which is used to Smash Attack the blocks within the moon temple to access a new path.
The treasure is located at the moon temple. After going past the gate, a Smash Attack is required to use on blocks next to the entrance to reveal a floor beneath it. There is a door on that floor that leads to a room with Kobatto and light rays shining through the windows. In order to obtain the Blue Key, Vampire Wario needs to be triggered by Kobatto so that he can fly to the top where the key is, while avoiding the rays of light since they turn Wario back to normal.
The door leading to the Blue Chest requires finding a switch so that the platform towards the door is pushed out to be able to enter it. This switch is located in a room beneath where the Kobatto is, revealed by breaking the fifth block on the floor, and then breaking the blocks towards the left. In this room, there is a Hammer-bot that requires throwing a barrel at it to bring it down. The enemy is required to trigger Bouncy Wario so that Wario can reach the platform near the switch. The switch is blocked by damaged blocks. After toggling the platforms with the switch, Vampire Wario must be triggered again to fly to that platform since the ladder leading to the room is blocked off from one of the blocks.

In this room, Wario will drop, and then Yellow Belly will emerge from the hole in the wall, after which the boss battle commences. It opens the battle by swooping down at Wario to take a stab at him. If Wario gets stung, Puffy Wario is triggered and float out of the battle towards the pipe. The pipe leads to the platform to the boss room, and if that happens because the boss is not defeated, the battle has to be restarted. To damage Yellow Belly, Wario must use a Smash Attack on its head, causing an air pump to drop. Smash Attacking on this pump causes the boss to inflate and speed up its attacks in the next phase. After three pumps have been stepped on, Yellow Belly explodes and the platform disappears to reveal hole below, leading to the Blue Chest.
The Sun Medallion, which is formed from this treasure and Top Half of Sun Medallion from Sea Turtle Rocks's Green Chest, affects the eastern part of the world. Initially, it is trapped in an eternal night that cannot be toggled by the Day or Night Spell. After completing the Sun Medallion, daytime can occur and thus new paths are accessible in The Colossal Hole, The Frigid Sea, and the Castle of Illusions during the daytime. Respectively, the owls rest on the ground (this event is plays in the cutscene) so that Wario can grab them more easily, the frozen waterfall flows so that Wario can pass through it, and light breaks through the windows so that one of the thin platforms leading to a new area can be stepped on through reverting Zombie Wario back to normal.
Musical Coins[edit]
| Location | Description |
|---|---|

|
In the sun temple where the room to the Gray Chest is, there is a Musical Coin three levels below the entrance. If visiting the level at night, the Super Smash is required to break the gate. |

|
In the sun temple where the room to the Gray Chest is, the Musical Coin is at the bottom-most level. It can be accessed by breaking the block on the floor to the left of the entrance to the Gray Chest. |

|
In the sun temple where the room to the Gray Chest is, the Musical Coin is at the top-most level. It can be accessed by using a Hammer-bot to trigger Bouncy Wario, and then breaking the top-right block at the ceiling from where the entrance it. To the left, there is the Musical Coin and a pillar blocking it. That pillar, treated as Enemy Blocks, can be broken by throwing a Spear-bot at it. |

|
The Musical Coin is underground, which can only be reached by breaking the blocks below the entrance to the moon temple during the day (the gate to reach the entrance can be broken with a Super Smash during the day) since the quicksand prevents Wario from using a Dash Attack or a Smash Attack. The quicksand is absent at night so Wario can also break the blocks underneath the platforms to the left from the entrance. To the right below the ladder, Wario has to crawl past a narrow passageway to reach two breakable pillars, and past them is where the Musical Coin is. |

|
From where the previous Musical Coin is, there are two damaged blocks on the right. The Musical Coin is past those two blocks. At night, there are damaged blocks above this Musical Coin that can be broken with a Smash Attack to reach it. |

|
In the moon temple, there is a block on the floor to the right of the entrance that can be broken with a Smash Attack. In the floor below, there are three pillars where the bottom three rows are treated as Enemy Blocks, thus an enemy must be thrown to break them. The Musical Coin is to the left of the last of the three pillars. |

|
In the room where the Blue Key is, a Musical Coin is below the light that is second from the top. |

|
In the room where the Blue Key is, there is a secret entrance that is reachable by breaking the fifth block on the floor, and then breaking the blocks towards the left. In this room, there is a Hammer-bot that requires throwing a barrel at it to bring it down, and it is required to trigger Bouncy Wario so that Wario can reach the Musical Coin at the top-right. |


Gallery[edit]
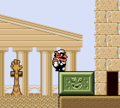
The exteriors of Desert Ruins at day.
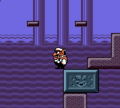
The exteriors of Desert Ruins at night.
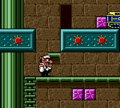
Inside one of the temples.


Names in other languages[edit]
| Language | Name | Meaning | Note(s) | Ref. |
|---|---|---|---|---|
| Japanese | 砂漠の遺跡 Sabaku no Iseki |
Desert Ruins | [?] |
Notes[edit]
- A number of green blocks found throughout the stage have a face drawn on them. A similar, larger face can be found in the tileset data for The Temple, suggesting that this unused face was to be used for a transformation that a hidden figure would perform prior to the final boss fight.
References[edit]
- ^ June 2000. Nintendo Power Volume 133. Nintendo of America (American English). Page 64.
- ^ a b Brady, Matthew K., Nathan Beittenmiller, Debra McBride, and David Cassady (February 5, 2001). Game Boy Game Secrets, 2001 Edition Prima's Official Strategy Guide. Prima Games (American English). ISBN 0-7615-3090-8. Page 90.
- ^ Brady, Matthew K., Nathan Beittenmiller, Debra McBride, and David Cassady (February 5, 2001). Game Boy Game Secrets, 2001 Edition Prima's Official Strategy Guide. Prima Games (American English). ISBN 0-7615-3090-8. Page 93.
- ^ Brady, Matthew K., Nathan Beittenmiller, Debra McBride, and David Cassady (February 5, 2001). Game Boy Game Secrets, 2001 Edition Prima's Official Strategy Guide. Prima Games (American English). ISBN 0-7615-3090-8. Page 95.