Beneath the Waves: Difference between revisions
(Added Musical Coins section; Rearranged sections) |
(username removed) (Revamped Treasures section) |
||
| Line 1: | Line 1: | ||
{{about|a level in [[Wario Land 3]]|information about a Special Collection on the [[Super Mario Maker]] Bookmark website|[[Super Mario Maker#Course Selects: Beneath the Waves|Super Mario Maker § Course Selects: Beneath the Waves]]}} | {{about|a level in [[Wario Land 3]]|information about a Special Collection on the [[Super Mario Maker]] Bookmark website|[[Super Mario Maker#Course Selects: Beneath the Waves|Super Mario Maker § Course Selects: Beneath the Waves]]}} | ||
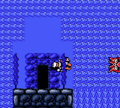
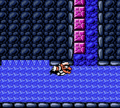
[[File:WL3 S BeneathTheWaves10.PNG|thumb|W5 Beneath the Waves]] | [[File:WL3 S BeneathTheWaves10.PNG|thumb|W5 Beneath the Waves]] | ||
'''Beneath the Waves''' is a location found in ''[[Wario Land 3]]'' of the [[Wario Land (series)|''Wario Land'' series | '''Beneath the Waves''' is a location found in ''[[Wario Land 3]]'' of the [[Wario Land (series)|''Wario Land'' series]]. The level is located deep under the western sea. [[Wario]] can reach this level once he finds the Red Music Box in [[The Stagnant Swamp]]'s Green Chest, causing a whirlpool on the surface to form. | ||
The level | The level is set mostly underwater. In the middle of the level, there is a current moving in a loop that resembles a whirlpool, and within the middle, there is a cave in which every chest is accessible from here. Besides the main area, the bottom area also contains a series of currents, and the left area contains a current moving towards the right. The area to the right does not contain any currents, where it is instead a cave that is mostly land. | ||
==Treasures== | ==Treasures== | ||
===Gray Chest: Explosive Plunger Box=== | ===Gray Chest: Explosive Plunger Box=== | ||
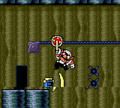
[[File:WL3 S BeneathTheWaves6.PNG|thumb|left|Close-up of the Explosive Plunger Box]] | [[File:WL3 S BeneathTheWaves6.PNG|thumb|left|Close-up of the Explosive Plunger Box]] | ||
The Explosive Plunger Box<ref>Brady, Matthew K., Nathan Beittenmiller, Debra McBride, and David Cassady. ''Game Boy Game Secrets, 2001 Edition'' Prima's Official Strategy Guide. Page 95.</ref> is | The Explosive Plunger Box<ref>Brady, Matthew K., Nathan Beittenmiller, Debra McBride, and David Cassady. ''Game Boy Game Secrets, 2001 Edition'' Prima's Official Strategy Guide. Page 95.</ref> is inside the Gray Chest. | ||
The | The [[key|Gray Key]] is within the cave above the surface to the right. Within this cave, there are multiple columns with thin platforms, which requires using the [[Spearhead (enemy)|Spearhead]] to bring to the right to bounce off it. Above the platforms, there is a [[Fire Robota]]. The Gray Key is above the sixth column of thin platforms. | ||
The Gray Chest is located in cave in the middle of the current moving in a loop. In order to get there without the Prince Frog's Glove, Wario must go to the current from the right, where there is a current moving to the left, allowing him to move downwards to the entrance. Within the cave, in addition to multiple ziplines, there are two Spearhead, a [[Beam Robota]], and a [[Para-Goom]]. In order to get to the Gray Chest, Wario must take the second zipline handle that travels down and right, which causes him to roll through the breakable blocks. From there, the Gray Chest is down the ladder and to the left. | |||
The Explosive Plunger Box detonates the bombs, where the bomb symbol flashes red and explosions occur, causing new areas found in [[The Stagnant Swamp]], [[Cave of Flames]], and The Colossal Hole to be accessible. | |||
{{br}} | {{br}} | ||
===Red Chest: Crayon (red)=== | ===Red Chest: Crayon (red)=== | ||
[[File:WL3 S BeneathTheWaves7.PNG|thumb|The door, colored by the red crayon]] | [[File:WL3 S BeneathTheWaves7.PNG|thumb|The door, colored by the red crayon]] | ||
The {{conjectural|Crayon}} is | The red {{conjectural|Crayon}} is inside the Red Chest, which requires the Prince Frog's Glove from [[Out of the Woods]]' Green Chest to obtain. | ||
The Red Key is located in the bottom area, which contains a series of currents. In order to reach the cave that contains the Red Key, Wario must go in the middle column, and then go to the left near the bottom, followed by going up, left, and then down. Within this cave, there is a Red Key and a [[Hammer-bot]] blocked off by a column of [[Enemy Block]]s. | |||
The Red Chest is within the cave in the main area surrounded by a loop of currents. With the Prince Frog's Glove, Wario doesn't need to ride the current to reach it. Within the cave, the room with the Red Chest is at the top-right, which can be reached by riding a series of zipline handles to reach there. Within this room, there are two [[Teruteru]] and one column of breakable blocks at the top before the Red Chest. | |||
Once the crayon has been collected, it flies to a hill on the north side of the world. A building resembling a tower can be found there, complete with a door and a sign that reads "GAME". The scene is initially monochrome, but gains another color for each crayon Wario manages to find. There are seven crayons in total hidden throughout the game, and once Wario finds all of them, he will be able to play the Golf Minigame there. The red crayon colors the door that serves as the building's entrance. | |||
{{br|right}} | |||
===Green Chest: Red Chemical=== | ===Green Chest: Red Chemical=== | ||
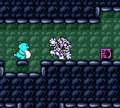
[[File:WL3 S BeneathTheWaves9.PNG|thumb|left|The two chemicals move the heavy blocks]] | [[File:WL3 S BeneathTheWaves9.PNG|thumb|left|The two chemicals move the heavy blocks]] | ||
The {{conjectural|Red Chemical}} | The {{conjectural|Red Chemical}} is inside the Green Chest, which requires the Sapling of Growth from [[A Town in Chaos]]' Blue Chest to obtain. | ||
The | The Green Key is located in the area to the left, after the [[Octohōn]] breaks the grate that originally blocked the way. Within this area, there is a current at the top of the area, while the area at the bottom doesn't have them. The Green Key is towards the left at the bottom, where there are bubbles and [[Haridama]] to avoid in order to reach the key. | ||
The Green Chest is within the cave in the main area surrounded by a loop of currents. Within this cave, the room with the Green Chest is in the middle. To reach it, Wario must go to the top row of ziplines and drop towards it, past the first set of [[Spike (Wario Land series)|spike]]s. Within this room, there is a [[Silky]]. Wario must bring the Silky to the top, to allow it to trigger [[Ball o' String Wario]] to break part of the pillar that is treated as a [[Yarn Block]]. After reverting, Wario must climb down a series of ladders to reach the Green Chest. | |||
The Red Chemical and the Blue Chemical in [[The Steep Canyon]]'s Blue Chest are required to soften the ground below 5-ton blocks in this level and [[The Vast Plain]] so that they sink, allowing access to areas previously blocked by them. | |||
{{br|left}} | |||
===Blue Chest: Clubs Crest=== | ===Blue Chest: Clubs Crest=== | ||
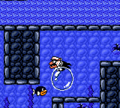
[[File:WL3 S BeneathTheWaves8.PNG|thumb|Wario finding the Clubs Crest]] | [[File:WL3 S BeneathTheWaves8.PNG|thumb|Wario finding the Clubs Crest]] | ||
The {{conjectural|Clubs Crest}} is | The {{conjectural|Clubs Crest}} is inside the Blue Chest, which requires both the Red Chemical from this level's Red Chest and the Blue Chemical in [[The Steep Canyon]]'s Blue Chest to obtain. | ||
The Blue Key is located in a cave past the 5-ton block on the right. Within this cave, there are [[Hebarii]], Para-Gooms, and [[Brrr Bear]]s, as well as many breakable blocks. The Blue Key itself is at the top-left, which can be reached by going right, then up the ladder, and then to the left. | |||
The | The Blue Chest is within the cave in the main area surrounded by a loop of currents. Within this cave, the room with the Blue Chest is at the top-left corner. To reach it, Wario must go to the top row of ziplines and travel to the left, while avoiding the spikes along the way. Within this room, there is a [[Doughnuteer]] in the ladder above. To access the chest, the Doughnuteer must be thrown at the Enemy Block to break it, and then use its doughnut to trigger [[Fat Wario]] to break the nearby [[doughnut block]]s, so that Wario can access the chest after the reaction wears off. | ||
The Clubs Crest does not affect the world in any way. | |||
{{br|right}} | |||
==[[Musical Coin]]s== | ==[[Musical Coin]]s== | ||
{|width=60% cellspacing=0 border=2 cellpadding=3 style="border-collapse:collapse;" | {|width=60% cellspacing=0 border=2 cellpadding=3 style="border-collapse:collapse;" | ||
| Line 38: | Line 54: | ||
|- | |- | ||
|[[File:WL3 S BeneathTheWaves MC1.png]] | |[[File:WL3 S BeneathTheWaves MC1.png]] | ||
|align="center"|In the cave to the right above the surface, there is a Musical Coin blocked off by | |align="center"|In the cave to the right above the surface, there is a Musical Coin blocked off by Enemy Blocks. An enemy in this room (either Spearhead or Fire Robota) must be thrown to break those blocks to reach the coin. | ||
|- | |- | ||
|[[File:WL3 S BeneathTheWaves MC2.png]] | |[[File:WL3 S BeneathTheWaves MC2.png]] | ||
|align="center"|In the cave past the 5-ton block at the bottom of the sea, the Musical Coin is past the spikes at the upper level. In order to get past the spikes, a Brrr Bear is required to trigger Ice Skatin' Wario, but | |align="center"|In the cave past the 5-ton block at the bottom of the sea, the Musical Coin is past the spikes at the upper level. In order to get past the spikes, a Brrr Bear is required to trigger Ice Skatin' Wario, but an Enemy Block must be destroyed so that Wario won't be stopped by it. | ||
|- | |- | ||
|[[File:WL3 S BeneathTheWaves MC3.png]] | |[[File:WL3 S BeneathTheWaves MC3.png]] | ||
| Line 50: | Line 66: | ||
|- | |- | ||
|[[File:WL3 S BeneathTheWaves MC5.png]] | |[[File:WL3 S BeneathTheWaves MC5.png]] | ||
|align="center"|In the same room as above, there is a Musical Coin on the other side of the | |align="center"|In the same room as above, there is a Musical Coin on the other side of the Enemy Blocks. The Hammer-bot must be thrown towards those blocks to break them, and then it must be thrown on the platform with the Red Key. From there, Bouncy Wario must be triggered by the same Hammer-bot to reach the Musical Coin near the ceiling. | ||
|- | |- | ||
|[[File:WL3 S BeneathTheWaves MC6.png]] | |[[File:WL3 S BeneathTheWaves MC6.png]] | ||
Revision as of 06:47, March 19, 2023
- This article is about a level in Wario Land 3. For information about a Special Collection on the Super Mario Maker Bookmark website, see Super Mario Maker § Course Selects: Beneath the Waves.

Beneath the Waves is a location found in Wario Land 3 of the Wario Land series. The level is located deep under the western sea. Wario can reach this level once he finds the Red Music Box in The Stagnant Swamp's Green Chest, causing a whirlpool on the surface to form.
The level is set mostly underwater. In the middle of the level, there is a current moving in a loop that resembles a whirlpool, and within the middle, there is a cave in which every chest is accessible from here. Besides the main area, the bottom area also contains a series of currents, and the left area contains a current moving towards the right. The area to the right does not contain any currents, where it is instead a cave that is mostly land.
Treasures
Gray Chest: Explosive Plunger Box

The Explosive Plunger Box[1] is inside the Gray Chest.
The Gray Key is within the cave above the surface to the right. Within this cave, there are multiple columns with thin platforms, which requires using the Spearhead to bring to the right to bounce off it. Above the platforms, there is a Fire Robota. The Gray Key is above the sixth column of thin platforms.
The Gray Chest is located in cave in the middle of the current moving in a loop. In order to get there without the Prince Frog's Glove, Wario must go to the current from the right, where there is a current moving to the left, allowing him to move downwards to the entrance. Within the cave, in addition to multiple ziplines, there are two Spearhead, a Beam Robota, and a Para-Goom. In order to get to the Gray Chest, Wario must take the second zipline handle that travels down and right, which causes him to roll through the breakable blocks. From there, the Gray Chest is down the ladder and to the left.
The Explosive Plunger Box detonates the bombs, where the bomb symbol flashes red and explosions occur, causing new areas found in The Stagnant Swamp, Cave of Flames, and The Colossal Hole to be accessible.
Red Chest: Crayon (red)

The red Crayon is inside the Red Chest, which requires the Prince Frog's Glove from Out of the Woods' Green Chest to obtain.
The Red Key is located in the bottom area, which contains a series of currents. In order to reach the cave that contains the Red Key, Wario must go in the middle column, and then go to the left near the bottom, followed by going up, left, and then down. Within this cave, there is a Red Key and a Hammer-bot blocked off by a column of Enemy Blocks.
The Red Chest is within the cave in the main area surrounded by a loop of currents. With the Prince Frog's Glove, Wario doesn't need to ride the current to reach it. Within the cave, the room with the Red Chest is at the top-right, which can be reached by riding a series of zipline handles to reach there. Within this room, there are two Teruteru and one column of breakable blocks at the top before the Red Chest.
Once the crayon has been collected, it flies to a hill on the north side of the world. A building resembling a tower can be found there, complete with a door and a sign that reads "GAME". The scene is initially monochrome, but gains another color for each crayon Wario manages to find. There are seven crayons in total hidden throughout the game, and once Wario finds all of them, he will be able to play the Golf Minigame there. The red crayon colors the door that serves as the building's entrance.
Green Chest: Red Chemical

The Red Chemical is inside the Green Chest, which requires the Sapling of Growth from A Town in Chaos' Blue Chest to obtain.
The Green Key is located in the area to the left, after the Octohōn breaks the grate that originally blocked the way. Within this area, there is a current at the top of the area, while the area at the bottom doesn't have them. The Green Key is towards the left at the bottom, where there are bubbles and Haridama to avoid in order to reach the key.
The Green Chest is within the cave in the main area surrounded by a loop of currents. Within this cave, the room with the Green Chest is in the middle. To reach it, Wario must go to the top row of ziplines and drop towards it, past the first set of spikes. Within this room, there is a Silky. Wario must bring the Silky to the top, to allow it to trigger Ball o' String Wario to break part of the pillar that is treated as a Yarn Block. After reverting, Wario must climb down a series of ladders to reach the Green Chest.
The Red Chemical and the Blue Chemical in The Steep Canyon's Blue Chest are required to soften the ground below 5-ton blocks in this level and The Vast Plain so that they sink, allowing access to areas previously blocked by them.
Blue Chest: Clubs Crest

The Clubs Crest is inside the Blue Chest, which requires both the Red Chemical from this level's Red Chest and the Blue Chemical in The Steep Canyon's Blue Chest to obtain.
The Blue Key is located in a cave past the 5-ton block on the right. Within this cave, there are Hebarii, Para-Gooms, and Brrr Bears, as well as many breakable blocks. The Blue Key itself is at the top-left, which can be reached by going right, then up the ladder, and then to the left.
The Blue Chest is within the cave in the main area surrounded by a loop of currents. Within this cave, the room with the Blue Chest is at the top-left corner. To reach it, Wario must go to the top row of ziplines and travel to the left, while avoiding the spikes along the way. Within this room, there is a Doughnuteer in the ladder above. To access the chest, the Doughnuteer must be thrown at the Enemy Block to break it, and then use its doughnut to trigger Fat Wario to break the nearby doughnut blocks, so that Wario can access the chest after the reaction wears off.
The Clubs Crest does not affect the world in any way.
Musical Coins
| Location | Description |
|---|---|

|
In the cave to the right above the surface, there is a Musical Coin blocked off by Enemy Blocks. An enemy in this room (either Spearhead or Fire Robota) must be thrown to break those blocks to reach the coin. |

|
In the cave past the 5-ton block at the bottom of the sea, the Musical Coin is past the spikes at the upper level. In order to get past the spikes, a Brrr Bear is required to trigger Ice Skatin' Wario, but an Enemy Block must be destroyed so that Wario won't be stopped by it. |

|
In the undersea cave at the bottom-left where a current moving in the loop is, the Musical Coin is inside the rocks. To get there, Wario must go within the middle from the top or bottom, and then go to the right near the top. |

|
In the undersea cave at the bottom-left where a current moving in the loop is, there is a room reachable by breaking a series of breakable blocks from the bottom. In this room, the Musical Coin is near the ceiling, which requires Bouncy Wario triggered by Hammer-bot to reach. |

|
In the same room as above, there is a Musical Coin on the other side of the Enemy Blocks. The Hammer-bot must be thrown towards those blocks to break them, and then it must be thrown on the platform with the Red Key. From there, Bouncy Wario must be triggered by the same Hammer-bot to reach the Musical Coin near the ceiling. |

|
In the cave on the left side from the beginning, the upper half is composed of a current flowing to the right. Wario must go against the current towards the top-left to reach the Musical Coin. |

|
In the cave in the middle of the sea surrounded by currents, there is a room with ziplines. The Musical Coin is reachable by taking the zipline handle near the second handle which travels towards the top-left. The Musical Coin is to the left of the end of this zipline. |

|
In the cave in the middle of the sea surrounded by currents, there is a room with ziplines. The top-left leads to a room with the Blue Chest, where the Musical Coin is to the right of the Doughnuteer, reachable by jumping towards it. |
Enemies
- Haridama (8)
- Spearhead (2)
- Octohōn (4)
- Fire Robota (1)
- Beam Robota (2)
- Teruteru (2)
- Para-Goom (3)
- Hebarii (3)
- Brrr Bear (4)
- Silky (1)
- Doughnuteer (1)
Reaction abilities in this level
- Bouncy Wario (via Hammer-bot)
- Bubble Wario
- Fat Wario (via Doughnuteer)
- Hot Wario (via Fire Robota)
- Ice Skatin' Wario (via Brrr Bear)
Screenshots
The center of the main area
Inside the cave with the zip lines
Another cave
The air bubble cave
In the tunnels beneath the seabed


Names in other languages
| Language | Name | Meaning |
|---|---|---|
| Japanese | 深海 Shinkai |
The Deep Sea |
References
- ^ Brady, Matthew K., Nathan Beittenmiller, Debra McBride, and David Cassady. Game Boy Game Secrets, 2001 Edition Prima's Official Strategy Guide. Page 95.