Jungle Hijinxs (Donkey Kong Country Returns): Difference between revisions
m (Text replacement - "dktable-brown" to "wikitable dk") |
|||
| (63 intermediate revisions by 29 users not shown) | |||
| Line 1: | Line 1: | ||
{{ | {{italic title|id=yes}} | ||
{{level | {{level infobox | ||
|image=[[File:01 DKCR.png|260px]] | |image=[[File:01 DKCR.png|260px]] | ||
|code=1 - 1 | |code=1-1 | ||
|world=[[Jungle (Donkey Kong Country Returns)|Jungle]] | |||
|game=''[[Donkey Kong Country Returns]]'' (''[[Donkey Kong Country Returns 3D|3D]]'') | |game=''[[Donkey Kong Country Returns]]'' (''[[Donkey Kong Country Returns 3D|3D]]'') | ||
|before=<< | |before=<< | ||
|after=[[King of Cling|>>]] | |after=[[King of Cling|>>]] | ||
|track=Jungle Hijinxs | |||
}} | }} | ||
'''Jungle Hijinxs''' is the first level of ''[[Donkey Kong Country Returns]]'' and ''[[Donkey Kong Country Returns 3D]]''. It is located within the [[Jungle (Donkey Kong Country Returns)|Jungle]] area of [[Donkey Kong Island]]. Similar to the [[Jungle Hijinxs (Donkey Kong Country)|identically-named level]] from the first ''Donkey Kong Country'', this stage is rather basic, with very few pits. | |||
'''Jungle Hijinxs''' is the first level of ''[[Donkey Kong Country Returns]]'' and ''[[Donkey Kong Country Returns 3D]]''. It is located within the [[Jungle (Donkey Kong Country Returns)|Jungle]] area of [[Donkey Kong Island]]. | |||
In the [[Donkey Kong Country Returns#Time Attack|Time Attack]] mode, a time of 0:53:00 is required to get a shiny gold medal, a time of 0:57:00 for gold, a time of 1:17:00 for silver, and a time of 1:45:00 for bronze. | |||
==Overview== | |||
The level begins with a view of [[DK's Tree House|the treehouse]], where [[Donkey Kong]] must beat up the [[Tiki Tak Tribe|Kalimba]]. The player can do so by shaking the Wii Remote (or by repeatedly pressing {{button|3DS|X}} or {{button|3DS|Y}} in the 3DS remake). After this, Donkey Kong beats his chest and jumps to the ground. He has an option to enter his tree house or empty [[banana hoard]], the former having a [[Red Balloon]] and a TV that can be turned on with a [[Ground Pound]] to reveal the game's title screen on it, and the latter having a [[Puzzle Piece (Donkey Kong Country series)|Puzzle Piece]] and a [[Banana Coin]] which can be obtained by [[blow]]ing at a dandelion. By traveling along the sandy pathway, Donkey Kong heads into a deeper part of the jungle, where he finds an Awk near a breakable stone block. A dandelion and three more Awks appear afterward. Donkey Kong can walk onto a few treetops above, and the rightmost of them has the [[K-O-N-G Letters|Letter K]]. A few more stone blocks appear after the trees, with a [[Tiki Goon]] walking between the second and third ones. After this, Donkey Kong encounters two pairs of [[Screaming Pillar]]s: he can avoid the first pair by standing in the middle of them or running past, whereas the second pair features a Screaming Pillar atop another. Donkey Kong must wait for them to crash onto each other before he can pass. Donkey Kong can jump up and collect a [[Banana|Banana Bunch]] and walk down on a wooden bridge. | |||
As he crosses the bridge, the player can see the [[Tiki Pilot]] on an airship in the background, with all the stolen Bananas from the banana hoard. It flies away shortly afterward. Donkey Kong can optionally [[Hand Slap]] onto a stone tile to enter a hidden area with a [[Heart]], some [[Banana]]s and a Banana Coin below. He must pass two more Awks and three plants (one of them being a dandelion) each containing an item. Shortly after, Donkey Kong can find two Frogoons followed by a large, bouncy flower located between two [[Mugly]] statues. By bouncing on the flower, the Statues begin to shoot out many bananas. After passing another Frogoon on a slightly elevated ground patch, Donkey Kong can find a pit leading to an Awk and a series of three raised platforms. Two of the platforms float slightly below the upper one, and the lower ones are smaller and have a gap between them. Donkey Kong can quickly collect a [[Red Balloon]] to the left of the bottom-left platform. Each of the three platforms have three Bananas on them, and the bottom-right one also has a Tiki Goon. Donkey Kong can alternatively go below the platforms and perform a roll jump above a pit and collect the letter O above it. Donkey Kong can find the checkpoint directly afterwards. | |||
[[ | A [[DK Barrel]] follows the checkpoint where Donkey Kong can free [[Diddy Kong]]. Two Awks march near a gap full of spikes ahead. Eventually, Donkey and Diddy reach a giant button that makes a new area appear in the background if pounded on several times. Once they shoot to the background with the [[Barrel Cannon]] that appears, they land on top of some tall, pillar-like platforms that are pushed downwards when hit. Awks are on some of these pillars, and they are followed by two additional Awks in a flat area of land. Four platforms are attached to a solid wall above here. The first of these platforms holds the letter N, while the second carries a heart. If they climb up all of the platforms, they can reach a Barrel Cannon that shoots them towards many Auto Fire Barrels in the air. The barrels shoot them through the air and then onto solid ground again, where a barrel and a block can be found. A raised area is after the block with two Tiki Goons on it. A heart and another stone cube are located at the end of the raised land, which is followed by a bridge with some Awks on it. Awks and Rawks march along the pathway ahead, trying to attack the primates. Several stone structures are placed above all of these foes, and they lead to the letter G and even a [[Puzzle Piece (Donkey Kong Country Returns)|Puzzle Piece]]. Two large, red flowers can be seen ahead. If the Kongs bounce from the second flower, they can reach the level's [[Slot Machine Barrel]] and finish the level. | ||
==Enemies== | |||
{|class="wikitable dk" width=25% | |||
|- | |||
!Image | |||
!Name | |||
!Amount | |||
|- | |||
|align="center"|[[File:Awk.png|x50px]] | |||
|align="center"|[[Awk]] | |||
|16 | |||
|- | |||
|align="center"|[[File:Frogoon_screenshot.png|x50px]] | |||
|align="center"|[[Frogoon]] | |||
|3 | |||
|- | |||
|align="center"|[[File:TikiGoon.png|x50px]] | |||
|align="center"|[[Tiki Goon]] | |||
|4 | |||
|- | |||
|align="center"|[[File:Screaming_Pillar.png|x50px]] | |||
|align="center"|[[Screaming Pillar]] | |||
|4 | |||
|- | |||
|align="center"|[[File:Rawk.png|x50px]] | |||
|align="center"|[[Rawk]] | |||
|3 | |||
|} | |||
== | ==Items== | ||
{|class="wikitable dk" width=25% | |||
|- | |||
!Image | |||
!Name | |||
!Amount | |||
|- | |||
|align="center"|[[File:BananacoinDKCR.png|x50px]] | |||
|align="center"|[[Banana Coin]] | |||
|9 | |||
|- | |||
|align="center"|[[File:BarrelDKCR.png|x50px]] | |||
|align="center"|[[Barrel]] | |||
|1 | |||
|- | |||
|align="center"|[[File:DKBarrelDKCR.png|x50px]] | |||
|align="center"|[[DK Barrel]] | |||
|1 | |||
|- | |||
|align="center"|[[File:Heart.png|x50px]] | |||
|align="center"|[[Heart (item)|Heart]] | |||
|4 | |||
|- | |||
|align="center"|[[File:BalloonDKCR.png|x50px]] | |||
|align="center"|[[Red Balloon]] | |||
|3 | |||
|} | |||
===K-O-N-G Letters=== | ===K-O-N-G Letters=== | ||
{|class="wikitable dk" width=70% | |||
|- | |||
!Image | |||
!Letter | |||
!Location | |||
|- | |||
|align="center"|[[File:DKCR Jungle Hijinxs Letter K.png|250px]] | |||
|align="center"|K | |||
|Appears on a treetop just after a trio of Awks near the beginning of the level. The Kongs can reach it by jumping from a stone block. | |||
|- | |||
|align="center"|[[File:DKCR Jungle Hijinxs Letter O.png|250px]] | |||
|align="center"|O | |||
|Floating above a pit right before the checkpoint. The Kongs can only obtain it by performing a roll jump, or an extremely difficult move involving hovering over the pit. | |||
|- | |||
|align="center"|[[File:DKCR Jungle Hijinxs Letter N.png|250px]] | |||
|align="center"|N | |||
|Floating above a platform on the background ruin structure. The Kongs can reach the structure by Ground Pounding a large DK switch and then jumping into the [[Arrow Barrel]]. | |||
|- | |||
|align="center"|[[File:DKCR Jungle Hijinxs Letter G.png|250px]] | |||
|align="center"|G | |||
|After getting the 8th Puzzle Piece, the Kongs must go back to the right on the platforms, and collect the letter G floating in the air. | |||
|} | |||
===Puzzle Pieces=== | ===Puzzle Pieces=== | ||
[[File: | {|class="wikitable dk" width=70% | ||
|- | |||
!Image | |||
!Number | |||
!Location | |||
|- | |||
|align="center"|[[File:DKCR Jungle Hijinxs Puzzle Piece 1.png|250px]] | |||
|align="center"|1 | |||
|Immediately at the start of the level, the Kongs can go backwards into their empty banana hoard to find a Puzzle Piece. | |||
|- | |||
|align="center"|[[File:DKCR Jungle Hijinxs Puzzle Piece 2.png|250px]] | |||
|align="center"|2 | |||
|After collecting the letter K, the Kongs must jump from more treetops until reaching the one on the far left with a dandelion. Blowing on it reveals a Puzzle Piece. | |||
|- | |||
|align="center"|[[File:DKCR Jungle Hijinxs Puzzle Piece 3.png|250px]] | |||
|align="center"|3 | |||
|After the last Screaming Pillar falls onto the ground followed by another on top of it, the Kongs can Ground Pound both of them for the Puzzle Piece. | |||
|- | |||
|align="center"|[[File:DKCR Jungle Hijinxs Puzzle Piece 4.png|250px]] | |||
|align="center"|4 | |||
|Shortly after the flying ship comes into view, the Kongs must Ground Pound a large gourd, which is positioned between two smaller ones, for the fourth Puzzle Piece. | |||
|- | |||
|align="center"|[[File:DKCR Jungle Hijinxs Puzzle Piece 5.png|250px]] | |||
|align="center"|5 | |||
|The Kongs must jump on a bouncy red flower between two statues. They begin to let out some bananas into the air. The Kongs must quickly collect them before time runs out. If they collect every Banana, a Puzzle Piece appears. | |||
|- | |||
|align="center"|[[File:DKCR Jungle Hijinxs Puzzle Piece 6.png|250px]] | |||
|align="center"|6 | |||
|From the ruin structure in the background, the Kongs can reach a small platform on the left by roll jumping over a pit. The small platform has a dandelion containing the Puzzle Piece. | |||
|- | |||
|align="center"|[[File:DKCR Bonus Room 1.png|250px]] | |||
|align="center"|7 | |||
|After exiting from the background structure, the Kongs can find a stone tilt shortly afterward, after two Tiki Goons. By pounding it, the Kongs fall into the hidden Bonus Level, where the objective is shooting from a Barrel Cannon to collect 57 Bananas, two [[Banana Coin]]s, and a [[Red Balloon]]. By collecting every item within thirty seconds, a Puzzle Piece appears for the Kongs to collect. | |||
|- | |||
|align="center"|[[File:DKCR Jungle Hijinxs Puzzle Piece 8.png|250px]] | |||
|align="center"|8 | |||
|Near the end of the level, the Kongs must go on a stone platform preceding the [[Rawk]] trio. By continuing left, the Kongs must jump from a treetop and three more platforms. The leftmost platform has the Puzzle Piece. | |||
|- | |||
|align="center"|[[File:DKCR Jungle Hijinxs Puzzle Piece 9.png|250px]] | |||
|align="center"|9 | |||
|At the end of the level, the Kongs must pass the Slot Machine Barrel and continue heading right behind the foreground, which goes off-screen and reveals the ninth and final Puzzle Piece up between the branches. | |||
|} | |||
==Gallery== | ==Gallery== | ||
<gallery> | |||
JungleHijinxsDKCR7.png|Donkey Kong exits the banana horde | |||
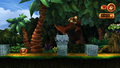
01 DKCR.png|The Kongs meet a Tiki enemy on a ship | |||
JungleHijinxsDKCR3.png|Donkey Kong approaches some Awks | |||
JungleHijinxsDKCR4.png|Donkey Kong pounds on a giant button | |||
JungleHijinxs-TimeAttack-DKCR.png|The level in Time Attack mode | |||
JungleHijinxs-Mirror-DKCR.png|The level in Mirror Mode | |||
</gallery> | |||
</gallery | |||
==Names in | ==Names in other languages== | ||
{{ | {{foreign names | ||
|Jap=バナナジャングル | |Jap=バナナジャングル | ||
|JapR=Banana Janguru | |JapR=Banana Janguru | ||
| Line 62: | Line 160: | ||
|Spa=Jungla Escandalosa | |Spa=Jungla Escandalosa | ||
|SpaM=Scandalous Jungle | |SpaM=Scandalous Jungle | ||
| | |FreA=Jungle Enjouée | ||
| | |FreAM=Playful Jungle | ||
| | |FreE=Jungle Déjantée | ||
| | |FreEM=Crazy Jungle | ||
|Ger=Dschungel-Fieber | |Ger=Dschungel-Fieber | ||
|GerM=Jungle Fever | |GerM=Jungle Fever | ||
|Ita=Giungla | |Ita=Giungla selvaggia | ||
|ItaM=Wild Jungle | |ItaM=Wild Jungle | ||
|Kor=바나나 정글 | |Kor=바나나 정글 | ||
|KorR=Banana Jeonggeul | |KorR=Banana Jeonggeul | ||
|KorM=Banana Jungle}} | |KorM=Banana Jungle | ||
|Chi=香蕉丛林 | |||
|ChiR=Xiāngjiāo Cónglín | |||
|ChiM=Banana Jungle | |||
}} | |||
==Trivia== | ==Trivia== | ||
* | *In ''[[Donkey Kong Country: Tropical Freeze]]'', the [[Mugly]] statues seen in this level appear in the background of [[Homecoming Hijinxs]], which represents the Jungle world from ''Donkey Kong Country Returns''. | ||
{{DKCR}} | {{DKCR}} | ||
[[Category:Donkey Kong Island]] | [[Category:Donkey Kong Island]] | ||
[[Category:Donkey Kong | [[Category:Jungles]] | ||
[[ | [[Category:Donkey Kong Country Returns levels]] | ||
[[ | [[de:Dschungelfieber]] | ||
[[it:Giungla selvaggia (Donkey Kong Country Returns)]] | |||
Latest revision as of 14:18, February 3, 2024
| Level | |
|---|---|
| Jungle Hijinxs | |

| |
| Level code | 1-1 |
| World | Jungle |
| Game | Donkey Kong Country Returns (3D) |
| Music track | Jungle Hijinxs |
| << Directory of levels >> | |
Jungle Hijinxs is the first level of Donkey Kong Country Returns and Donkey Kong Country Returns 3D. It is located within the Jungle area of Donkey Kong Island. Similar to the identically-named level from the first Donkey Kong Country, this stage is rather basic, with very few pits.
In the Time Attack mode, a time of 0:53:00 is required to get a shiny gold medal, a time of 0:57:00 for gold, a time of 1:17:00 for silver, and a time of 1:45:00 for bronze.
Overview[edit]
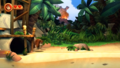
The level begins with a view of the treehouse, where Donkey Kong must beat up the Kalimba. The player can do so by shaking the Wii Remote (or by repeatedly pressing ![]() or
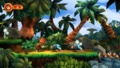
or ![]() in the 3DS remake). After this, Donkey Kong beats his chest and jumps to the ground. He has an option to enter his tree house or empty banana hoard, the former having a Red Balloon and a TV that can be turned on with a Ground Pound to reveal the game's title screen on it, and the latter having a Puzzle Piece and a Banana Coin which can be obtained by blowing at a dandelion. By traveling along the sandy pathway, Donkey Kong heads into a deeper part of the jungle, where he finds an Awk near a breakable stone block. A dandelion and three more Awks appear afterward. Donkey Kong can walk onto a few treetops above, and the rightmost of them has the Letter K. A few more stone blocks appear after the trees, with a Tiki Goon walking between the second and third ones. After this, Donkey Kong encounters two pairs of Screaming Pillars: he can avoid the first pair by standing in the middle of them or running past, whereas the second pair features a Screaming Pillar atop another. Donkey Kong must wait for them to crash onto each other before he can pass. Donkey Kong can jump up and collect a Banana Bunch and walk down on a wooden bridge.
in the 3DS remake). After this, Donkey Kong beats his chest and jumps to the ground. He has an option to enter his tree house or empty banana hoard, the former having a Red Balloon and a TV that can be turned on with a Ground Pound to reveal the game's title screen on it, and the latter having a Puzzle Piece and a Banana Coin which can be obtained by blowing at a dandelion. By traveling along the sandy pathway, Donkey Kong heads into a deeper part of the jungle, where he finds an Awk near a breakable stone block. A dandelion and three more Awks appear afterward. Donkey Kong can walk onto a few treetops above, and the rightmost of them has the Letter K. A few more stone blocks appear after the trees, with a Tiki Goon walking between the second and third ones. After this, Donkey Kong encounters two pairs of Screaming Pillars: he can avoid the first pair by standing in the middle of them or running past, whereas the second pair features a Screaming Pillar atop another. Donkey Kong must wait for them to crash onto each other before he can pass. Donkey Kong can jump up and collect a Banana Bunch and walk down on a wooden bridge.
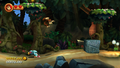
As he crosses the bridge, the player can see the Tiki Pilot on an airship in the background, with all the stolen Bananas from the banana hoard. It flies away shortly afterward. Donkey Kong can optionally Hand Slap onto a stone tile to enter a hidden area with a Heart, some Bananas and a Banana Coin below. He must pass two more Awks and three plants (one of them being a dandelion) each containing an item. Shortly after, Donkey Kong can find two Frogoons followed by a large, bouncy flower located between two Mugly statues. By bouncing on the flower, the Statues begin to shoot out many bananas. After passing another Frogoon on a slightly elevated ground patch, Donkey Kong can find a pit leading to an Awk and a series of three raised platforms. Two of the platforms float slightly below the upper one, and the lower ones are smaller and have a gap between them. Donkey Kong can quickly collect a Red Balloon to the left of the bottom-left platform. Each of the three platforms have three Bananas on them, and the bottom-right one also has a Tiki Goon. Donkey Kong can alternatively go below the platforms and perform a roll jump above a pit and collect the letter O above it. Donkey Kong can find the checkpoint directly afterwards.
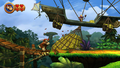
A DK Barrel follows the checkpoint where Donkey Kong can free Diddy Kong. Two Awks march near a gap full of spikes ahead. Eventually, Donkey and Diddy reach a giant button that makes a new area appear in the background if pounded on several times. Once they shoot to the background with the Barrel Cannon that appears, they land on top of some tall, pillar-like platforms that are pushed downwards when hit. Awks are on some of these pillars, and they are followed by two additional Awks in a flat area of land. Four platforms are attached to a solid wall above here. The first of these platforms holds the letter N, while the second carries a heart. If they climb up all of the platforms, they can reach a Barrel Cannon that shoots them towards many Auto Fire Barrels in the air. The barrels shoot them through the air and then onto solid ground again, where a barrel and a block can be found. A raised area is after the block with two Tiki Goons on it. A heart and another stone cube are located at the end of the raised land, which is followed by a bridge with some Awks on it. Awks and Rawks march along the pathway ahead, trying to attack the primates. Several stone structures are placed above all of these foes, and they lead to the letter G and even a Puzzle Piece. Two large, red flowers can be seen ahead. If the Kongs bounce from the second flower, they can reach the level's Slot Machine Barrel and finish the level.
Enemies[edit]
| Image | Name | Amount |
|---|---|---|

|
Awk | 16 |

|
Frogoon | 3 |
| Tiki Goon | 4 | |
| Screaming Pillar | 4 | |

|
Rawk | 3 |
Items[edit]
| Image | Name | Amount |
|---|---|---|
| Banana Coin | 9 | |
| Barrel | 1 | |
| DK Barrel | 1 | |

|
Heart | 4 |
| Red Balloon | 3 |
K-O-N-G Letters[edit]
| Image | Letter | Location |
|---|---|---|

|
K | Appears on a treetop just after a trio of Awks near the beginning of the level. The Kongs can reach it by jumping from a stone block. |

|
O | Floating above a pit right before the checkpoint. The Kongs can only obtain it by performing a roll jump, or an extremely difficult move involving hovering over the pit. |

|
N | Floating above a platform on the background ruin structure. The Kongs can reach the structure by Ground Pounding a large DK switch and then jumping into the Arrow Barrel. |

|
G | After getting the 8th Puzzle Piece, the Kongs must go back to the right on the platforms, and collect the letter G floating in the air. |
Puzzle Pieces[edit]
| Image | Number | Location |
|---|---|---|

|
1 | Immediately at the start of the level, the Kongs can go backwards into their empty banana hoard to find a Puzzle Piece. |

|
2 | After collecting the letter K, the Kongs must jump from more treetops until reaching the one on the far left with a dandelion. Blowing on it reveals a Puzzle Piece. |

|
3 | After the last Screaming Pillar falls onto the ground followed by another on top of it, the Kongs can Ground Pound both of them for the Puzzle Piece. |

|
4 | Shortly after the flying ship comes into view, the Kongs must Ground Pound a large gourd, which is positioned between two smaller ones, for the fourth Puzzle Piece. |

|
5 | The Kongs must jump on a bouncy red flower between two statues. They begin to let out some bananas into the air. The Kongs must quickly collect them before time runs out. If they collect every Banana, a Puzzle Piece appears. |

|
6 | From the ruin structure in the background, the Kongs can reach a small platform on the left by roll jumping over a pit. The small platform has a dandelion containing the Puzzle Piece. |

|
7 | After exiting from the background structure, the Kongs can find a stone tilt shortly afterward, after two Tiki Goons. By pounding it, the Kongs fall into the hidden Bonus Level, where the objective is shooting from a Barrel Cannon to collect 57 Bananas, two Banana Coins, and a Red Balloon. By collecting every item within thirty seconds, a Puzzle Piece appears for the Kongs to collect. |

|
8 | Near the end of the level, the Kongs must go on a stone platform preceding the Rawk trio. By continuing left, the Kongs must jump from a treetop and three more platforms. The leftmost platform has the Puzzle Piece. |

|
9 | At the end of the level, the Kongs must pass the Slot Machine Barrel and continue heading right behind the foreground, which goes off-screen and reveals the ninth and final Puzzle Piece up between the branches. |
Gallery[edit]
Donkey Kong exits the banana horde
The Kongs meet a Tiki enemy on a ship
Donkey Kong approaches some Awks

Donkey Kong pounds on a giant button
The level in Time Attack mode
The level in Mirror Mode


Names in other languages[edit]
| Language | Name | Meaning |
|---|---|---|
| Japanese | バナナジャングル Banana Janguru |
Banana Jungle |
| Chinese | 香蕉丛林 Xiāngjiāo Cónglín |
Banana Jungle |
| French (NOA) | Jungle Enjouée |
Playful Jungle |
| French (NOE) | Jungle Déjantée |
Crazy Jungle |
| German | Dschungel-Fieber |
Jungle Fever |
| Italian | Giungla selvaggia |
Wild Jungle |
| Korean | 바나나 정글 Banana Jeonggeul |
Banana Jungle |
| Spanish | Jungla Escandalosa |
Scandalous Jungle |
Trivia[edit]
- In Donkey Kong Country: Tropical Freeze, the Mugly statues seen in this level appear in the background of Homecoming Hijinxs, which represents the Jungle world from Donkey Kong Country Returns.