The East Crater: Difference between revisions
m (done!) |
LinkTheLefty (talk | contribs) mNo edit summary |
||
| (46 intermediate revisions by 21 users not shown) | |||
| Line 1: | Line 1: | ||
[[File:Crater1.png|thumb]] | |||
'''The East Crater''' is the sixth level on the eastern side of the [[music box (world)|music box world]] in ''[[Wario Land 3]]''. After [[Wario]] gets the Treasure Map from [[Tower of Revival]]'s Green Chest to track its location, he can access this level. | |||
[[ | The level takes place inside a volcano. To get to the bottom, Wario has to break several [[Enemy Block]]s with barrels. In the bottom of this level, Wario can also find a flaming pit and areas to the left and right of it that are each blocked by [[Lump|Prince Froggy]]. Additionally, there are also two areas on the way down to the left and right: one contains a portal in the wall and the other is a door leading to a new area. | ||
''' | ==Treasures== | ||
===Gray Chest: Super Grab Gloves=== | |||
The Super Grab Gloves<ref>''Nintendo Power'' Volume 133, pages 59, 66.</ref><ref>Brady, Matthew K., Nathan Beittenmiller, Debra McBride, and David Cassady. ''Game Boy Game Secrets, 2001 Edition'' Prima's Official Strategy Guide. Page 96.</ref>, also called the Glove with Superpower II<ref>[https://web.archive.org/web/20010501125924/http://www.warioland3.com/strategy/body.asp?key_id=S4_RED&land_id=S4 Official American ''Wario Land 3'' website (Internet Archive)]</ref>, is a power-up in the [[treasure chest|Gray Chest]]. It is available as soon as the level is unlocked. | |||
Wario must first get to the level's bottom by breaking the damaged blocks on the way down, breaking [[Enemy Block]]s with barrels, and avoiding [[Jellybob (Wario Land 3)|Pneumo]]s. While he's down to the lowest thin platform above the flame pit, Wario must break the blocks to the left to where a Prince Froggy is. Using the earthquake impacts of his [[Ground Pound|Smash Attack]]s, Wario can force the Prince Froggy to move up the platforms in order to use it as a stepping stone to reach the Gray Key above it to the left. | |||
After collecting the Gray Key, Wario must then enter the flame pit to trigger [[Flaming Wario|Hot Wario]], and then move to the left side until he is enveloped in flames, after which he can eliminate the Prince Froggy to the left and move to the area to the left to also eliminate another Prince Froggy to the left. After that, he can access the Gray Chest after climbing the ladder. | |||
The Super Grab Gloves allow Wario to carry heavy enemies like [[Count Richtertoffen]] and throw them, though his running speed is lowered when he's carrying a heavy enemy. This opens up the way to new treasures in [[A Town in Chaos]], [[Castle of Illusions]], and [[Forest of Fear]]. The latter level additionally requires the Mystery Handle from [[The Warped Void]]'s Gray Chest for its treasure. | |||
=== | ===Red Chest: Diamonds Crest=== | ||
[[File:diamondcrest.PNG|thumb|Wario finds the Diamond Crest]] | |||
The {{conjectural|Diamond Crest}} in the Red Chest requires the Fire Drencher from [[Above the Clouds (Wario Land 3)|Above the Clouds]]' Red Chest. This causes the fire in this level to be extinguished, opening up the area that is originally blocked by it. | |||
To get to the area where the fire originally is, Wario must first make his way to the bottom to the lowest thin platform above the flame pit, and then break the blocks to the right. After that, he must use the flame pit to trigger [[Flaming Wario|Hot Wario]] and then move to the right side until he is enveloped in flames, so that he can eliminate the Prince Froggy to the right to be able to climb the ladder to go to this area. In this area, Wario must first climb up the ladder and enter the room. There, he must cross the [[Omodonmeka]] without getting squashed by the [[Omodon]], and then enter the door. In this door, Wario must take one of the [[Para-Goom]] to the left to charge a throw through the Enemy Blocks, and then return to the other side via the room with the Omodonmeka. On that side, he must break the block to the right with a Smash Attack , and then go left to collect the Red Key. | |||
To get | |||
From the Red Key, Wario must break the blocks to the right, and then take one of the Para-Gooms so that it is thrown to the left side, where he must carry it to the top above the thin platform to throw it at the Enemy Blocks to the right. After that, he must go to the [[Snake (Wario Land 3)|snake]] to the left and wait for it to breathe fire on Wario to trigger Hot Wario, where he must be brought to the topmost platform until he is turned into fire, where he can break the [[Bonfire Block]]s to the right. After that, he can access the Red Chest to the right. | |||
The Diamonds Crest does not effect the world in any way. | |||
===Green Chest : Night Vision Scope=== | ===Green Chest: Night Vision Scope=== | ||
[[File:nightvisionwl3.PNG|thumb|left|Wario using the | [[File:nightvisionwl3.PNG|thumb|left|Wario using the Night Vision Scope]] | ||
The {{conjectural|Night Vision Scope}} requires the Jackhammer from Above the Clouds' Green Chest. It is used to create perforations on the ground in a room, releasing wind from under it. | |||
To reach the new area, Wario must first go down to the fourth group of blocks, and then take a barrel to throw at the Enemy Blocks to the right, making the room to the right accessible. Within this room, the newly-created updraft is to the left of Wario, which he must use to go all the way up while avoiding the [[Nobiiru]]. After that, he must crouch and then drop into the narrow pit, while hugging the wall to the right to crawl under the narrow passageway. Within this part, Wario must use a [[Kobatto]] to trigger [[Vampire Wario]], and then use his bat form to go around the sunlight to the right in order to collect the Green Key. | |||
After that, Wario must return to normal with the light, and then go to left topmost platform to where the narrow pit is. Here, he must crouch and drop into it while hugging the wall to the right to crawl under the narrow passageway. This time, he must cross the gaps all the way to the right while avoiding the Kobatto to drop down one level below, and then travel all the way left while also avoiding the Kobatto to reach the Green Chest. | |||
The Night Vision Scope increases visibility of a dark area in [[Sea Turtle Rocks]], causing a door within it is revealed and making it accessible. | |||
== | ===Blue Chest: Earthen Figure=== | ||
The {{conjectural|Earthen Figure}}, which is basically a [[wikipedia:Dogū|Dogū]], is in the Blue Chest. It requires the Pick-Axe from Above the Clouds' Blue Chest, which is used to chisel a tiny hole with a portal behind it, so that it becomes bigger and thus allowing Wario to fit through it. | |||
== | First, Wario must go down to where the third set of blocks is, and then go left to where a swirling portal is. In order to enter it, Wario must jump and then press up when he's in front of it. In this new area, there are multiple barrels and Enemy Blocks. The barrels must be brought to the Enemy Blocks to throw at them. However, certain walls are high enough that Wario can walk under them, but will cause him to drop the barrel if he's carrying through them. In order to keep the barrel, Wario must throw the barrel up, go past the wall, and then go under the thrown barrel to catch it. If a barrel is broken, Wario needs to retrieve the previous barrel and try again (going off-screen from where a barrel originally is found causes it to respawn). To the right of first barrel, Wario must carry the barrel past one wall, but must avoid the [[Appleby]]'s apples, which causes Wario to instantly drop the barrel if he's holding it as [[Fat Wario]] is triggered. For the second barrel, Wario must throw and catch the barrel over two walls to break the Enemy Blocks to the right. Using the third barrel, the barrel must be thrown above so that he can collect the Blue Key. | ||
To get to the Blue Chest, Wario must take the third barrel over two walls to the right, and then stand on the snake's head in order to reach the upper group of Enemy Blocks to throw it at them. After doing so, the Blue Chest can be accessed. | |||
The Earthen Figure does not affect the world in any way. | |||
{{br}} | |||
==[[Musical Coin]]s== | |||
{|width=60% cellspacing=0 border=2 cellpadding=3 style="border-collapse:collapse;" | |||
|- | |||
!Location | |||
!Description | |||
|- | |||
|[[File:WL3 S TheEastCrater MC1.png]] | |||
|align="center"|From the beginning, Wario must break the group of blocks to the left and another two group of blocks below him. After that, the first Pneumo must be used to trigger Puffy Wario, where he must navigate around the thick floor so that he reaches the ceiling to the right, where the Musical Coin is. | |||
|- | |||
|[[File:WL3 S TheEastCrater MC2 Loc.png]] | |||
[[File:WL3 S TheEastCrater MC2.png]] | |||
|align="center"|Within the portal from the beginning area, Wario must take the first barrel and then break the Enemy Blocks to the right. After that, he must take the second barrel past the two walls to the right, and then use the elevation to jump on the walls to the left. There is another wall to the left that Wario must throw the barrel over, after which it must be thrown at the Enemy Blocks to be able to collect the Musical Coin. | |||
|- | |||
|[[File:WL3 S TheEastCrater MC3.png]] | |||
|align="center"|Within the portal from the beginning area, Wario must take the third barrel past the two walls to the right, and then throw it at the lower set of Enemy Blocks to be able to collect the Musical Coin. | |||
|- | |||
|[[File:WL3 S TheEastCrater MC4.png]] | |||
|align="center"|In the main area (outside the portal), Wario must take a barrel to break the second set of enemy blocks to open up the area to the right, and then use a Pneumo below to trigger Puffy Wario to move past the newly-opened area to reach the Musical Coin. | |||
|- | |||
|[[File:WL3 S TheEastCrater MC5.png]] | |||
|align="center"|From the previous Musical Coin, Wario must go into the room where the Green Key and Green Chest is. First, he must move up the updraft, and then drop into the pit while crouching to crawl under the narrow passageway. He must then move to the platform to the right one level above to reach the Musical Coin. | |||
|- | |||
|[[File:WL3 S TheEastCrater MC6.png]] | |||
|align="center"|In the main area, Wario must go all the way to the bottommost platform near where a flame pit is, and then break the blocks to the left. After that, he must use the flame pit to trigger Hot Wario and move to the left area until he is enveloped in fire, allowing him to defeat not only the Prince Froggy to the left, but also another Prince Froggy in the area to the left. The area that the second Prince Froggy blocked contains a Musical Coin. | |||
|- | |||
|[[File:WL3 S TheEastCrater MC7.png]] | |||
|align="center"|In the main area, Wario must go all the way to the bottommost platform near where a flame pit is, and then break the blocks to the right. After that, he must use the flame pit to trigger Hot Wario and move to the right area until he is enveloped in fire, allowing him to defeat the Prince Froggy to the right. From there, he must climb the ladder to go to the next area, and then go into the room. In this room, he must use the Omodon to trigger [[Flat Wario]], and then go right while jumping at the Omodonmeka to prevent it from returning him back to normal, so that he can sneak past the narrow gap to reach the Musical Coin. | |||
|- | |||
|[[File:WL3 S TheEastCrater MC8.png]] | |||
|align="center"|From the previous Musical Coin, Wario must return back to normal and then enter the door to where the Para-Gooms are, in order to use one of them to throw at the Enemy Blocks to the left. After that, he must go back to the left by going in the room, crossing the Omodonmeka to the left, then exit the room. Then, he must break the blocks to the right and also down, then take one of the Para-Goom below, where it is used to throw at the Enemy Block to the right to be able to access the Musical Coin. | |||
|} | |||
==Enemies== | |||
*[[Jellybob (Wario Land 3)|Pneumo]] (4) | |||
*[[Lump|Prince Froggy]] (3) | |||
*[[Snake (Wario Land 3)|Snake]] (2) | |||
*[[Omodonmeka]] (2, 1 carrying Omodon) | |||
*[[Omodon]] (1) | |||
*[[Para-Goom]] (2) | |||
*[[Nobiiru]] (4) | |||
*[[Kobatto]] (3) | |||
*[[Appleby]] (1) | |||
==Reaction abilities in this level== | |||
*[[Puffy Wario]] (via Pneumo) | |||
*[[Flaming Wario|Hot Wario]] (via fire, flame pit, or snake) | |||
*[[Flat Wario]] (via Omodon) | |||
*[[Vampire Wario]] (via Kobatto) | |||
*[[Fat Wario]] (via Appleby) | |||
==Gallery== | |||
<gallery> | <gallery> | ||
TEC1.PNG|The level's bottom | |||
TEC2.PNG|The wind cave lined with [[Nobiiru]] | |||
TEC3.PNG|Another cave accessed using a warp | |||
</gallery> | </gallery> | ||
{{ | |||
[[Category:Wario | ==Names in other languages== | ||
{{foreign names | |||
|Jap=東の火口 | |||
|JapR=Higashi no Kakō | |||
|JapM=The East Crater | |||
}} | |||
==References== | |||
<references/> | |||
{{WL3}} | |||
[[Category:Underground areas]] | |||
[[Category:Wario Land 3 levels]] | |||
[[de:The East Crater]] | |||
Latest revision as of 21:42, November 9, 2023

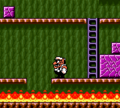
The East Crater is the sixth level on the eastern side of the music box world in Wario Land 3. After Wario gets the Treasure Map from Tower of Revival's Green Chest to track its location, he can access this level.
The level takes place inside a volcano. To get to the bottom, Wario has to break several Enemy Blocks with barrels. In the bottom of this level, Wario can also find a flaming pit and areas to the left and right of it that are each blocked by Prince Froggy. Additionally, there are also two areas on the way down to the left and right: one contains a portal in the wall and the other is a door leading to a new area.
Treasures[edit]
Gray Chest: Super Grab Gloves[edit]
The Super Grab Gloves[1][2], also called the Glove with Superpower II[3], is a power-up in the Gray Chest. It is available as soon as the level is unlocked.
Wario must first get to the level's bottom by breaking the damaged blocks on the way down, breaking Enemy Blocks with barrels, and avoiding Pneumos. While he's down to the lowest thin platform above the flame pit, Wario must break the blocks to the left to where a Prince Froggy is. Using the earthquake impacts of his Smash Attacks, Wario can force the Prince Froggy to move up the platforms in order to use it as a stepping stone to reach the Gray Key above it to the left.
After collecting the Gray Key, Wario must then enter the flame pit to trigger Hot Wario, and then move to the left side until he is enveloped in flames, after which he can eliminate the Prince Froggy to the left and move to the area to the left to also eliminate another Prince Froggy to the left. After that, he can access the Gray Chest after climbing the ladder.
The Super Grab Gloves allow Wario to carry heavy enemies like Count Richtertoffen and throw them, though his running speed is lowered when he's carrying a heavy enemy. This opens up the way to new treasures in A Town in Chaos, Castle of Illusions, and Forest of Fear. The latter level additionally requires the Mystery Handle from The Warped Void's Gray Chest for its treasure.
Red Chest: Diamonds Crest[edit]

The Diamond Crest in the Red Chest requires the Fire Drencher from Above the Clouds' Red Chest. This causes the fire in this level to be extinguished, opening up the area that is originally blocked by it.
To get to the area where the fire originally is, Wario must first make his way to the bottom to the lowest thin platform above the flame pit, and then break the blocks to the right. After that, he must use the flame pit to trigger Hot Wario and then move to the right side until he is enveloped in flames, so that he can eliminate the Prince Froggy to the right to be able to climb the ladder to go to this area. In this area, Wario must first climb up the ladder and enter the room. There, he must cross the Omodonmeka without getting squashed by the Omodon, and then enter the door. In this door, Wario must take one of the Para-Goom to the left to charge a throw through the Enemy Blocks, and then return to the other side via the room with the Omodonmeka. On that side, he must break the block to the right with a Smash Attack , and then go left to collect the Red Key.
From the Red Key, Wario must break the blocks to the right, and then take one of the Para-Gooms so that it is thrown to the left side, where he must carry it to the top above the thin platform to throw it at the Enemy Blocks to the right. After that, he must go to the snake to the left and wait for it to breathe fire on Wario to trigger Hot Wario, where he must be brought to the topmost platform until he is turned into fire, where he can break the Bonfire Blocks to the right. After that, he can access the Red Chest to the right.
The Diamonds Crest does not effect the world in any way.
Green Chest: Night Vision Scope[edit]

The Night Vision Scope requires the Jackhammer from Above the Clouds' Green Chest. It is used to create perforations on the ground in a room, releasing wind from under it.
To reach the new area, Wario must first go down to the fourth group of blocks, and then take a barrel to throw at the Enemy Blocks to the right, making the room to the right accessible. Within this room, the newly-created updraft is to the left of Wario, which he must use to go all the way up while avoiding the Nobiiru. After that, he must crouch and then drop into the narrow pit, while hugging the wall to the right to crawl under the narrow passageway. Within this part, Wario must use a Kobatto to trigger Vampire Wario, and then use his bat form to go around the sunlight to the right in order to collect the Green Key.
After that, Wario must return to normal with the light, and then go to left topmost platform to where the narrow pit is. Here, he must crouch and drop into it while hugging the wall to the right to crawl under the narrow passageway. This time, he must cross the gaps all the way to the right while avoiding the Kobatto to drop down one level below, and then travel all the way left while also avoiding the Kobatto to reach the Green Chest.
The Night Vision Scope increases visibility of a dark area in Sea Turtle Rocks, causing a door within it is revealed and making it accessible.
Blue Chest: Earthen Figure[edit]
The Earthen Figure, which is basically a Dogū, is in the Blue Chest. It requires the Pick-Axe from Above the Clouds' Blue Chest, which is used to chisel a tiny hole with a portal behind it, so that it becomes bigger and thus allowing Wario to fit through it.
First, Wario must go down to where the third set of blocks is, and then go left to where a swirling portal is. In order to enter it, Wario must jump and then press up when he's in front of it. In this new area, there are multiple barrels and Enemy Blocks. The barrels must be brought to the Enemy Blocks to throw at them. However, certain walls are high enough that Wario can walk under them, but will cause him to drop the barrel if he's carrying through them. In order to keep the barrel, Wario must throw the barrel up, go past the wall, and then go under the thrown barrel to catch it. If a barrel is broken, Wario needs to retrieve the previous barrel and try again (going off-screen from where a barrel originally is found causes it to respawn). To the right of first barrel, Wario must carry the barrel past one wall, but must avoid the Appleby's apples, which causes Wario to instantly drop the barrel if he's holding it as Fat Wario is triggered. For the second barrel, Wario must throw and catch the barrel over two walls to break the Enemy Blocks to the right. Using the third barrel, the barrel must be thrown above so that he can collect the Blue Key.
To get to the Blue Chest, Wario must take the third barrel over two walls to the right, and then stand on the snake's head in order to reach the upper group of Enemy Blocks to throw it at them. After doing so, the Blue Chest can be accessed.
The Earthen Figure does not affect the world in any way.
Musical Coins[edit]
| Location | Description |
|---|---|

|
From the beginning, Wario must break the group of blocks to the left and another two group of blocks below him. After that, the first Pneumo must be used to trigger Puffy Wario, where he must navigate around the thick floor so that he reaches the ceiling to the right, where the Musical Coin is. |

|
Within the portal from the beginning area, Wario must take the first barrel and then break the Enemy Blocks to the right. After that, he must take the second barrel past the two walls to the right, and then use the elevation to jump on the walls to the left. There is another wall to the left that Wario must throw the barrel over, after which it must be thrown at the Enemy Blocks to be able to collect the Musical Coin. |

|
Within the portal from the beginning area, Wario must take the third barrel past the two walls to the right, and then throw it at the lower set of Enemy Blocks to be able to collect the Musical Coin. |

|
In the main area (outside the portal), Wario must take a barrel to break the second set of enemy blocks to open up the area to the right, and then use a Pneumo below to trigger Puffy Wario to move past the newly-opened area to reach the Musical Coin. |

|
From the previous Musical Coin, Wario must go into the room where the Green Key and Green Chest is. First, he must move up the updraft, and then drop into the pit while crouching to crawl under the narrow passageway. He must then move to the platform to the right one level above to reach the Musical Coin. |

|
In the main area, Wario must go all the way to the bottommost platform near where a flame pit is, and then break the blocks to the left. After that, he must use the flame pit to trigger Hot Wario and move to the left area until he is enveloped in fire, allowing him to defeat not only the Prince Froggy to the left, but also another Prince Froggy in the area to the left. The area that the second Prince Froggy blocked contains a Musical Coin. |

|
In the main area, Wario must go all the way to the bottommost platform near where a flame pit is, and then break the blocks to the right. After that, he must use the flame pit to trigger Hot Wario and move to the right area until he is enveloped in fire, allowing him to defeat the Prince Froggy to the right. From there, he must climb the ladder to go to the next area, and then go into the room. In this room, he must use the Omodon to trigger Flat Wario, and then go right while jumping at the Omodonmeka to prevent it from returning him back to normal, so that he can sneak past the narrow gap to reach the Musical Coin. |

|
From the previous Musical Coin, Wario must return back to normal and then enter the door to where the Para-Gooms are, in order to use one of them to throw at the Enemy Blocks to the left. After that, he must go back to the left by going in the room, crossing the Omodonmeka to the left, then exit the room. Then, he must break the blocks to the right and also down, then take one of the Para-Goom below, where it is used to throw at the Enemy Block to the right to be able to access the Musical Coin. |

Enemies[edit]
- Pneumo (4)
- Prince Froggy (3)
- Snake (2)
- Omodonmeka (2, 1 carrying Omodon)
- Omodon (1)
- Para-Goom (2)
- Nobiiru (4)
- Kobatto (3)
- Appleby (1)
Reaction abilities in this level[edit]
- Puffy Wario (via Pneumo)
- Hot Wario (via fire, flame pit, or snake)
- Flat Wario (via Omodon)
- Vampire Wario (via Kobatto)
- Fat Wario (via Appleby)
Gallery[edit]
The level's bottom

The wind cave lined with Nobiiru
Another cave accessed using a warp


Names in other languages[edit]
| Language | Name | Meaning |
|---|---|---|
| Japanese | 東の火口 Higashi no Kakō |
The East Crater |
References[edit]
- ^ Nintendo Power Volume 133, pages 59, 66.
- ^ Brady, Matthew K., Nathan Beittenmiller, Debra McBride, and David Cassady. Game Boy Game Secrets, 2001 Edition Prima's Official Strategy Guide. Page 96.
- ^ Official American Wario Land 3 website (Internet Archive)