Bombs Away (level): Difference between revisions
m (maintenance) |
m (Text replacement - "dktable-brown" to "wikitable dk") |
||
| (47 intermediate revisions by 23 users not shown) | |||
| Line 1: | Line 1: | ||
{{ | {{level infobox | ||
|image=[[File:BombsAway.png|250px]] | |image=[[File:BombsAway.png|250px]] | ||
|code=4 - 3 | |code=4-3 | ||
|game=''[[Donkey Kong Country Returns]] | |world=[[Cave]] | ||
|game=''[[Donkey Kong Country Returns]]'' (''[[Donkey Kong Country Returns 3D|3D]]'') | |||
|before=[[ | |before=[[Rickety Rails|<<]] | ||
|after=[[ | |after=[[Crowded Cavern|>>]] | ||
|secret=[[Jagged Jewels|**]] | |||
|track=Rickety Rails | |||
}} | }} | ||
'''Bombs Away''' is the twenty-fifth level in ''[[Donkey Kong Country Returns]]'', as well as the third area in the [[Cave]] world. | '''Bombs Away''' is the twenty-fifth level in ''[[Donkey Kong Country Returns]]'' and ''[[Donkey Kong Country Returns 3D]]'', as well as the third area in the [[Cave]] world. | ||
The level takes place in a cave, where [[Donkey Kong]] and [[Diddy Kong]] must ride in a [[Cart|minecart]] to progress. Unlike the previous minecart level, [[Grip 'n' Trip]], the [[Kong]]s jump with the minecart, instead of jumping out of it. Therefore, they must stay in the same cart for the whole level. This level features a great amount of crystals that stick out of the top of the cave. They are not too high from the track, so the primates must make sure that they do not jump too high, or else they will hit into them and lose an [[Extra Life Balloon]]. Sometimes, the sharp crystals are very low, so the Kongs have to duck into the cart to avoid hitting into them. In some parts of the stage, the crystals even move down towards the heroes as they ride. However, the main obstacle in this level is the mole that rides in the foreground in front of the Kongs. This foe throws bombs on their side of the track, causing it to break and make more gaps. The mole also throws bombs at the ceiling, which causes crystals to fall and break the track as well. It can also send a giant bomb toward the track that breaks a great part of it. Near the end, a ring will break apart from the track and the Kongs will have to ride inside it. | The level takes place in a cave, where [[Donkey Kong]] and [[Diddy Kong]] must ride in a [[Mine Cart|minecart]] to progress. Unlike the previous minecart level, [[Grip 'n' Trip]], the [[Kong]]s jump with the minecart, instead of jumping out of it. Therefore, they must stay in the same cart for the whole level. This level features a great amount of crystals that stick out of the top of the cave. They are not too high from the track, so the primates must make sure that they do not jump too high, or else they will hit into them and lose an [[Extra Life Balloon]]. Sometimes, the sharp crystals are very low, so the Kongs have to duck into the cart to avoid hitting into them. In some parts of the stage, the crystals even move down towards the heroes as they ride. However, the main obstacle in this level is the mole that rides in the foreground in front of the Kongs. This foe throws bombs on their side of the track, causing it to break and make more gaps. The mole also throws bombs at the ceiling, which causes crystals to fall and break the track as well. It can also send a giant bomb toward the track that breaks a great part of it. Near the end, a ring will break apart from the track and the Kongs will have to ride inside it. | ||
In the [[Donkey Kong Country Returns#Time Attack|Time Attack]] mode of the game, a time of 1:45:00 is needed to get a gold medal, a time of 1:49:00 for silver, and a time of 1:52:00 for bronze. | In the [[Donkey Kong Country Returns#Time Attack|Time Attack]] mode of the game, a time of 1:45:00 is needed to get a gold medal, a time of 1:49:00 for silver, and a time of 1:52:00 for bronze. | ||
Bombs Away features eight [[Mole Miner]]s, which are the only enemies in the level. There are four [[Banana Coin]]s in the level. | |||
==Overview== | ==Overview== | ||
The level begins on a flat pathway. Nine [[ | The level begins on a flat pathway. Nine [[Banana Bunch]]es are to the left of here, while a raised, wooden platform is to the right. The Kongs can jump from this platform to reach a minecart stationary on the track. When they enter it, the cart begins to move forward along the rails, leading them down a hill with a [[banana]] trail above it. There are two gaps in the track ahead, with the letter K of the [[KONG Letters|K-O-N-G Letters]] above the second one, which is about twice the size as the first. As the primates begin to ride under a high ceiling covered in crystals, they come up to another gap. Shortly after they cross this gap, they reach a low ceiling of crystals that they must crouch under as the minecart pulls them ahead. Another gap is located immediately at the end of the crystal-covered ceiling. While they ride on the track after this gap, they find a mole enemy in a minecart riding towards them that they must avoid. They can also bounce on this foe to reach a higher set of tracks with bananas on them. A platform with a [[Puzzle Piece (Donkey Kong Country Returns)|Puzzle Piece]] is after a gap in the higher track. An additional pit is placed at the end of the low and high track here. There is a smaller gap ahead, and it is under a low ceiling of crystals. They must make a small jump to avoid jumping into the hazards. After they cross another gap nearby, they ride down a steel hill under more crystals and then approach an abyss again. | ||
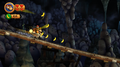
[[File: | [[File:DKCR Bombs Away 1.png|thumb|left|250px|Donkey and Diddy approach a steep trail]] | ||
The area following this abyss features a straight track with a few small walls on it that can be jumped over. However, as the heroes travel through this area, the crystals located above slowly lower, forcing them to make smaller jumps. An area of crystals falls slightly above the track after the final wall here. A gap and the letter O are on the other side of the crystals. An additional pit is ahead, and under the track on the other side of it is a lower track with a Puzzle Piece on it. A small hill and two more gaps follow this, with some collectibles, including a [[Banana Coin]], above the second one. Once the duo lands onto the section of the track after this gap, a track closer to the foreground appears with a mole enemy riding on it. It throws a few bombs at the Kongs' track, putting two gaps ahead of them. When they cross this gap and then pass another mole enemy riding towards them, the mole in the foreground throws even more bombs. The bombs cause crystals to fall, which then smash into the track, breaking it and creating gaps for Donkey and Diddy to cross. A low ceiling of crystals that the Kongs must crouch under follows. A smaller ceiling of crystals is also ahead, with a gap right after it. There is then another gap after a third low ceiling of crystals. When the heroes cross this gap, they make their way onto a straight track that leads past the [[Tutorial Pig]] and the checkpoint. | The area following this abyss features a straight track with a few small walls on it that can be jumped over. However, as the heroes travel through this area, the crystals located above slowly lower, forcing them to make smaller jumps. An area of crystals falls slightly above the track after the final wall here. A gap and the letter O are on the other side of the crystals. An additional pit is ahead, and under the track on the other side of it is a lower track with a Puzzle Piece on it. A small hill and two more gaps follow this, with some collectibles, including a [[Banana Coin]], above the second one. Once the duo lands onto the section of the track after this gap, a track closer to the foreground appears with a mole enemy riding on it. It throws a few bombs at the Kongs' track, putting two gaps ahead of them. When they cross this gap and then pass another mole enemy riding towards them, the mole in the foreground throws even more bombs. The bombs cause crystals to fall, which then smash into the track, breaking it and creating gaps for Donkey and Diddy to cross. A low ceiling of crystals that the Kongs must crouch under follows. A smaller ceiling of crystals is also ahead, with a gap right after it. There is then another gap after a third low ceiling of crystals. When the heroes cross this gap, they make their way onto a straight track that leads past the [[Professor Chops|Tutorial Pig]] and the checkpoint. | ||
The Kongs soon make their way under a ceiling of crystals. It is not low enough to force them to crouch, but a small section of the crystals falls at the end of it, making them have to crouch to survive there. Another area of crystals is ahead after another mole enemy. A piece of the crystals slips downwards and blocks the primates' path, so they must crouch under it to continue. There is a small gap following this, with more sliding crystals ahead. A Puzzle Piece and bananas are in an area between the sliding hazards. If they manage to cross a small pit nearby, the heroes come up to some more mole enemies riding forwards at a slow speed. They must bounce on them to pass them all, watching out for some sharp crystals above. The letter N is in the air after the last mole here. Once the duo crosses another gap, they come across a straight track, where another mole enemy is put into view on a separate track in the foreground. It throws bombs at the Kongs' track, creating several gaps. After they pass the final abyss, the mole runs into a small wall that causes it to fly over a large gap and into a new minecart. At the same time, the heroes come under a low ceiling of crystals that they must crouch under. | The Kongs soon make their way under a ceiling of crystals. It is not low enough to force them to crouch, but a small section of the crystals falls at the end of it, making them have to crouch to survive there. Another area of crystals is ahead after another mole enemy. A piece of the crystals slips downwards and blocks the primates' path, so they must crouch under it to continue. There is a small gap following this, with more sliding crystals ahead. A Puzzle Piece and bananas are in an area between the sliding hazards. If they manage to cross a small pit nearby, the heroes come up to some more mole enemies riding forwards at a slow speed. They must bounce on them to pass them all, watching out for some sharp crystals above. The letter N is in the air after the last mole here. Once the duo crosses another gap, they come across a straight track, where another mole enemy is put into view on a separate track in the foreground. It throws bombs at the Kongs' track, creating several gaps. After they pass the final abyss, the mole runs into a small wall that causes it to fly over a large gap and into a new minecart. At the same time, the heroes come under a low ceiling of crystals that they must crouch under. | ||
[[File:Bombs Away DKCR jumping from wheel.png|thumb|250px|Donkey Kong jumping from a circular rail]] | |||
While they progress through here, the mole in the foreground prepares to throw a large bomb at them, but then hits into another wall, sending the bomb through the air. It lands nearby on the Kongs' track, creating a large gap. Once they cross the abyss made by it and the one that follows, they come up to a curved section of the track. When they get on it, it breaks off and begins to roll across an area full of crystals. The wheel-shaped piece of the track, smashes through many of the crystals, creating a path for the heroes. As they travel with the track piece, however, they must constantly watch out for the gap in the track, as they can fall through it and hit some crystals. Eventually, the wheel-shaped track stops at a different piece of the track, which is covered in bumps. When they ride along the bumps, they lose control and fall out of the cart, landing on a solid platform with the [[Slot Machine Barrel]] on it; the level is completed when this is hit. | |||
[[File: | ==Enemies== | ||
{|class="wikitable dk" | |||
!Image | |||
!Name | |||
!Count | |||
|- | |||
|align="center"|[[File:Mole MinerDKCR.png|x50px]] | |||
|align="center"|[[Mole Guard]] | |||
|8 | |||
|} | |||
== | ==Items== | ||
{|class="wikitable dk"width=15% | |||
|- | |||
!Image | |||
!Name | |||
!Count | |||
|- | |||
|align="center"|[[File:BananacoinDKCR.png|x50px]] | |||
|align="center"|[[Banana Coin]] | |||
|4 | |||
|} | |||
===K-O-N-G Letters=== | ===K-O-N-G Letters=== | ||
{|class="wikitable dk"width=70% | |||
|- | |||
!Image | |||
!Letter | |||
!Location | |||
|- | |||
|align="center"|[[File:DKCR Bombs Away Letter K.png|250px]] | |||
|align="center"|K | |||
|At the end of the first mine track, the Kongs must jump off it early to get on the smaller rail and jump for the K. | |||
|- | |||
|align="center"|[[File:Bombs Away DKCR letter O.png|250px]] | |||
|align="center"|O | |||
|In the area where the Kongs ride under a long ceiling of crystals that slowly lower, they come up to a low ceiling of crystals. The letter O is immediately before the gap at the other side of these crystals. The Kongs must jump earlier than usual to grab it, but without hitting into the nearby crystals. | |||
|- | |||
|align="center"|[[File:DKCR Bombs Away Letter N.png|250px]] | |||
|align="center"|N | |||
|Near the end of the level, the Kongs come up to a line of Mole Miners riding in minecarts to the right. They must bounce on third or fourth one to grab the letter N in the air. | |||
|- | |||
|align="center"|[[File:DKCR Bombs Away Letter G.png|250px]] | |||
|align="center"|G | |||
|As soon as the Kongs go into a section where they ride in a wheel-shaped piece of track, they come up to the letter G above the first gap. | |||
|} | |||
===Puzzle Pieces=== | ===Puzzle Pieces=== | ||
[[File: | {|class="wikitable dk"width=70% | ||
|- | |||
!Image | |||
!Number | |||
!Location | |||
|- | |||
< | |align="center"|[[File:DKCR Bombs Away Puzzle Piece 1.png|250px]] | ||
|align="center"|1 | |||
|If the Kongs perform a high-jump off of the second Mole Miner shortly after the letter K, they can reach a high track with the first Puzzle Piece. | |||
|- | |||
|align="center"|[[File:DKCR Bombs Away Puzzle Piece 2.png|250px]] | |||
|align="center"|2 | |||
|Shortly after the letter O, the Kongs can reach a small track beneath the main track by making a small jump at the second gap from the letter O. This is where the second Puzzle Piece is located. | |||
|- | |||
|align="center"|[[File:Bombs Away DKCR third Puzzle Piece.png|250px]] | |||
|align="center"|3 | |||
|In the area of the level where the Kongs must avoid falling crystals that put gaps in the track, there is a banana floating at the bottom of the screen in the third gap. If they fall to the banana, they land on a separate track with the third Puzzle Piece. | |||
|- | |||
|align="center"|[[File:DKCR Bombs Away Puzzle Piece 4.png|250px]] | |||
|align="center"|4 | |||
|Just before the letter N, the Kongs must crouch under some crystals that have slipped down toward the track. After passing three consecutive sets of crystals, the Kongs travel through a small passage with a trail of bananas and a Puzzle Piece in it. The Puzzle Piece is next to more low crystals, so they must crouch immediately after grabbing it. | |||
|- | |||
|align="center"|[[File:Bombs Away DKCR Bonus Level.png|250px]] | |||
|align="center"|5 | |||
|At the end of the level, Donkey Kong and Diddy Kong should ignore the Slot Machine Barrel and continue forward to find a hidden entrance to a [[bonus room]], where they must collect 78 bananas and two Banana Coins around many stationary platforms within 30 seconds to make the fifth Puzzle Piece appear. | |||
|} | |||
==Gallery== | |||
<gallery> | |||
Bombs Away DKCR bananas.png|Donkey Kong and Diddy Kong collect bananas while in a minecart | |||
Bombs Away DKCR broken rail.png|The Kongs on a broken rail adjacent to a Mole Miner | |||
</gallery> | |||
==Names in | ==Names in other languages== | ||
{{ | {{foreign names | ||
|Jap=クリスタルアドベンチャー | |||
|JapR=Kurisutaru Adobenchā | |||
|JapM=Crystal Adventure | |||
|Spa=Bombas Fuera | |Spa=Bombas Fuera | ||
|SpaM= | |SpaM=Bombs Away | ||
|Ita=Galleria saltinaria | |||
|ItaM=Saltine Gallery | |||
|FreA=Voie de l'Effroi | |||
|FreAM=Road of Fear | |||
|Ger=Eine Bombige Fahrt | |||
|GerM=A Bomby Ride | |||
|Chi=水晶冒险 | |||
|ChiR=Shuǐjīng Màoxiǎn | |||
|ChiM=Crystal Adventure | |||
}} | |||
{{DKCR}} | {{DKCR}} | ||
[[Category: | [[Category:Mines]] | ||
[[Category:Railways]] | [[Category:Railways]] | ||
[[Category:Donkey Kong Country Returns levels]] | |||
Latest revision as of 14:18, February 3, 2024
| Level | |
|---|---|
| Bombs Away | |

| |
| Level code | 4-3 |
| World | Cave |
| Game | Donkey Kong Country Returns (3D) |
| Music track | Rickety Rails |
| << Directory of levels >> ** | |
Bombs Away is the twenty-fifth level in Donkey Kong Country Returns and Donkey Kong Country Returns 3D, as well as the third area in the Cave world.
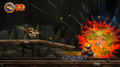
The level takes place in a cave, where Donkey Kong and Diddy Kong must ride in a minecart to progress. Unlike the previous minecart level, Grip 'n' Trip, the Kongs jump with the minecart, instead of jumping out of it. Therefore, they must stay in the same cart for the whole level. This level features a great amount of crystals that stick out of the top of the cave. They are not too high from the track, so the primates must make sure that they do not jump too high, or else they will hit into them and lose an Extra Life Balloon. Sometimes, the sharp crystals are very low, so the Kongs have to duck into the cart to avoid hitting into them. In some parts of the stage, the crystals even move down towards the heroes as they ride. However, the main obstacle in this level is the mole that rides in the foreground in front of the Kongs. This foe throws bombs on their side of the track, causing it to break and make more gaps. The mole also throws bombs at the ceiling, which causes crystals to fall and break the track as well. It can also send a giant bomb toward the track that breaks a great part of it. Near the end, a ring will break apart from the track and the Kongs will have to ride inside it.
In the Time Attack mode of the game, a time of 1:45:00 is needed to get a gold medal, a time of 1:49:00 for silver, and a time of 1:52:00 for bronze.
Bombs Away features eight Mole Miners, which are the only enemies in the level. There are four Banana Coins in the level.
Overview[edit]
The level begins on a flat pathway. Nine Banana Bunches are to the left of here, while a raised, wooden platform is to the right. The Kongs can jump from this platform to reach a minecart stationary on the track. When they enter it, the cart begins to move forward along the rails, leading them down a hill with a banana trail above it. There are two gaps in the track ahead, with the letter K of the K-O-N-G Letters above the second one, which is about twice the size as the first. As the primates begin to ride under a high ceiling covered in crystals, they come up to another gap. Shortly after they cross this gap, they reach a low ceiling of crystals that they must crouch under as the minecart pulls them ahead. Another gap is located immediately at the end of the crystal-covered ceiling. While they ride on the track after this gap, they find a mole enemy in a minecart riding towards them that they must avoid. They can also bounce on this foe to reach a higher set of tracks with bananas on them. A platform with a Puzzle Piece is after a gap in the higher track. An additional pit is placed at the end of the low and high track here. There is a smaller gap ahead, and it is under a low ceiling of crystals. They must make a small jump to avoid jumping into the hazards. After they cross another gap nearby, they ride down a steel hill under more crystals and then approach an abyss again.

The area following this abyss features a straight track with a few small walls on it that can be jumped over. However, as the heroes travel through this area, the crystals located above slowly lower, forcing them to make smaller jumps. An area of crystals falls slightly above the track after the final wall here. A gap and the letter O are on the other side of the crystals. An additional pit is ahead, and under the track on the other side of it is a lower track with a Puzzle Piece on it. A small hill and two more gaps follow this, with some collectibles, including a Banana Coin, above the second one. Once the duo lands onto the section of the track after this gap, a track closer to the foreground appears with a mole enemy riding on it. It throws a few bombs at the Kongs' track, putting two gaps ahead of them. When they cross this gap and then pass another mole enemy riding towards them, the mole in the foreground throws even more bombs. The bombs cause crystals to fall, which then smash into the track, breaking it and creating gaps for Donkey and Diddy to cross. A low ceiling of crystals that the Kongs must crouch under follows. A smaller ceiling of crystals is also ahead, with a gap right after it. There is then another gap after a third low ceiling of crystals. When the heroes cross this gap, they make their way onto a straight track that leads past the Tutorial Pig and the checkpoint.
The Kongs soon make their way under a ceiling of crystals. It is not low enough to force them to crouch, but a small section of the crystals falls at the end of it, making them have to crouch to survive there. Another area of crystals is ahead after another mole enemy. A piece of the crystals slips downwards and blocks the primates' path, so they must crouch under it to continue. There is a small gap following this, with more sliding crystals ahead. A Puzzle Piece and bananas are in an area between the sliding hazards. If they manage to cross a small pit nearby, the heroes come up to some more mole enemies riding forwards at a slow speed. They must bounce on them to pass them all, watching out for some sharp crystals above. The letter N is in the air after the last mole here. Once the duo crosses another gap, they come across a straight track, where another mole enemy is put into view on a separate track in the foreground. It throws bombs at the Kongs' track, creating several gaps. After they pass the final abyss, the mole runs into a small wall that causes it to fly over a large gap and into a new minecart. At the same time, the heroes come under a low ceiling of crystals that they must crouch under.

While they progress through here, the mole in the foreground prepares to throw a large bomb at them, but then hits into another wall, sending the bomb through the air. It lands nearby on the Kongs' track, creating a large gap. Once they cross the abyss made by it and the one that follows, they come up to a curved section of the track. When they get on it, it breaks off and begins to roll across an area full of crystals. The wheel-shaped piece of the track, smashes through many of the crystals, creating a path for the heroes. As they travel with the track piece, however, they must constantly watch out for the gap in the track, as they can fall through it and hit some crystals. Eventually, the wheel-shaped track stops at a different piece of the track, which is covered in bumps. When they ride along the bumps, they lose control and fall out of the cart, landing on a solid platform with the Slot Machine Barrel on it; the level is completed when this is hit.
Enemies[edit]
| Image | Name | Count |
|---|---|---|

|
Mole Guard | 8 |
Items[edit]
| Image | Name | Count |
|---|---|---|
| Banana Coin | 4 |
K-O-N-G Letters[edit]
| Image | Letter | Location |
|---|---|---|

|
K | At the end of the first mine track, the Kongs must jump off it early to get on the smaller rail and jump for the K. |

|
O | In the area where the Kongs ride under a long ceiling of crystals that slowly lower, they come up to a low ceiling of crystals. The letter O is immediately before the gap at the other side of these crystals. The Kongs must jump earlier than usual to grab it, but without hitting into the nearby crystals. |

|
N | Near the end of the level, the Kongs come up to a line of Mole Miners riding in minecarts to the right. They must bounce on third or fourth one to grab the letter N in the air. |

|
G | As soon as the Kongs go into a section where they ride in a wheel-shaped piece of track, they come up to the letter G above the first gap. |
Puzzle Pieces[edit]
| Image | Number | Location |
|---|---|---|

|
1 | If the Kongs perform a high-jump off of the second Mole Miner shortly after the letter K, they can reach a high track with the first Puzzle Piece. |

|
2 | Shortly after the letter O, the Kongs can reach a small track beneath the main track by making a small jump at the second gap from the letter O. This is where the second Puzzle Piece is located. |

|
3 | In the area of the level where the Kongs must avoid falling crystals that put gaps in the track, there is a banana floating at the bottom of the screen in the third gap. If they fall to the banana, they land on a separate track with the third Puzzle Piece. |

|
4 | Just before the letter N, the Kongs must crouch under some crystals that have slipped down toward the track. After passing three consecutive sets of crystals, the Kongs travel through a small passage with a trail of bananas and a Puzzle Piece in it. The Puzzle Piece is next to more low crystals, so they must crouch immediately after grabbing it. |

|
5 | At the end of the level, Donkey Kong and Diddy Kong should ignore the Slot Machine Barrel and continue forward to find a hidden entrance to a bonus room, where they must collect 78 bananas and two Banana Coins around many stationary platforms within 30 seconds to make the fifth Puzzle Piece appear. |
Gallery[edit]
Donkey Kong and Diddy Kong collect bananas while in a minecart
The Kongs on a broken rail adjacent to a Mole Miner


Names in other languages[edit]
| Language | Name | Meaning |
|---|---|---|
| Japanese | クリスタルアドベンチャー Kurisutaru Adobenchā |
Crystal Adventure |
| Chinese | 水晶冒险 Shuǐjīng Màoxiǎn |
Crystal Adventure |
| French (NOA) | Voie de l'Effroi |
Road of Fear |
| German | Eine Bombige Fahrt |
A Bomby Ride |
| Italian | Galleria saltinaria |
Saltine Gallery |
| Spanish | Bombas Fuera |
Bombs Away |