Damp Dungeon: Difference between revisions
m (Text replacement - " Levels]]" to " levels]]") |
m (Text replacement - "dktable-brown" to "wikitable dk") |
||
| (8 intermediate revisions by 3 users not shown) | |||
| Line 1: | Line 1: | ||
{{ | {{level infobox | ||
|image=[[File:DKCR Damp Dungeon 3.png|250px]] | |image=[[File:DKCR Damp Dungeon 3.png|250px]] | ||
|code=3-4 | |code=3-4 | ||
| Line 7: | Line 6: | ||
|before=[[Wonky Waterway|<<]] | |before=[[Wonky Waterway|<<]] | ||
|after=[[Mast Blast|>>]] [[Temple Topple|>>]] | |after=[[Mast Blast|>>]] [[Temple Topple|>>]] | ||
| | |track=Ruin Rhapsody | ||
}} | }} | ||
'''Damp Dungeon''' is the nineteenth level in ''[[Donkey Kong Country Returns]]'' and ''[[Donkey Kong Country Returns 3D]]'', and the fourth level in the [[Ruins]] world. To access the level, the [[Kong]]s are required to have a [[Map Key]] from [[Cranky Kong's Shop]]. | '''Damp Dungeon''' is the nineteenth level in ''[[Donkey Kong Country Returns]]'' and ''[[Donkey Kong Country Returns 3D]]'', and the fourth level in the [[Ruins]] world. To access the level, the [[Kong]]s are required to have a [[Map Key]] from [[Cranky Kong's Shop]]. | ||
As the level's name suggests, Damp Dungeon takes place in a dark dungeon full of water. Since neither [[Donkey Kong|Donkey]] or [[Diddy Kong]] can swim, they must use platforms on moving various water mills to transverse large gaps, with not every mill functioning the same; some mills do not orbit 360 degrees, while others may be missing platforms or have enemies on them. Many fragile stone platforms are throughout, and they collapse if the Kongs stand on them for too long. [[Climbing | As the level's name suggests, Damp Dungeon takes place in a dark dungeon full of water. Since neither [[Donkey Kong|Donkey]] or [[Diddy Kong]] can swim, they must use platforms on moving various water mills to transverse large gaps, with not every mill functioning the same; some mills do not orbit 360 degrees, while others may be missing platforms or have enemies on them. Many fragile stone platforms are throughout, and they collapse if the Kongs stand on them for too long. [[Climbing grass|Green surface]]s appear on the ceiling in some parts of the level, allowing the Kongs to climb over water and spikes. | ||
In the [[Donkey Kong Country Returns#Time Attack|Time Attack]] mode of the game, a time of 0:56:00 is needed to get a gold medal, a time of 1:30:00 for silver, and a time of 1:51:00 for bronze. | In the [[Donkey Kong Country Returns#Time Attack|Time Attack]] mode of the game, a time of 0:56:00 is needed to get a gold medal, a time of 1:30:00 for silver, and a time of 1:51:00 for bronze. | ||
==Overview== | ==Overview== | ||
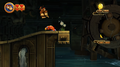
[[File:DKCR Damp Dungeon 1.png|thumb|250px|left|The beginning portion of the level]] | [[File:DKCR Damp Dungeon 1.png|thumb|250px|left|The beginning portion of the level]] | ||
| Line 22: | Line 20: | ||
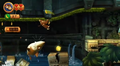
[[File:Damp Dungeon DKCR.png|thumb|left|250px|The Kongs attack two Rawks]] | [[File:Damp Dungeon DKCR.png|thumb|left|250px|The Kongs attack two Rawks]] | ||
There is another wheel right after this area, and under it is a solid area of stone that is placed above the water. A [[barrel]] and a dandelion are on it. The wheel, which moves faster than the previous wheels, has two bananas on each of the platforms it supports. Farther ahead, there is a stone pathway leading over the water. This area is infested with Rawks and has several platforms that cannot hold the Kongs very long before falling. Fortunately, many Banana Coins are above these foes and the [[Tutorial Pig]] is at the end of the area at the checkpoint. Farther ahead, the Kongs can find a Stilts at the end of a stone pathway, as well as a DK Barrel on a small platform just before it. Near the enemy is a [[Barrel Cannon]]. Below this object is a small platform with a windmill next to it that Donkey or Diddy can [[blow]] on to reveal a hidden platform in the background. The Barrel Cannon can shoot the heroes into the background, where there are many platforms that fall when stood on. Bananas are between each of the platforms, which help the Kongs reach an area with some Rawks and an urn, as well as a small platform with a barrel on it. | There is another wheel right after this area, and under it is a solid area of stone that is placed above the water. A [[barrel]] and a dandelion are on it. The wheel, which moves faster than the previous wheels, has two bananas on each of the platforms it supports. Farther ahead, there is a stone pathway leading over the water. This area is infested with Rawks and has several platforms that cannot hold the Kongs very long before falling. Fortunately, many Banana Coins are above these foes and the [[Professor Chops|Tutorial Pig]] is at the end of the area at the checkpoint. Farther ahead, the Kongs can find a Stilts at the end of a stone pathway, as well as a DK Barrel on a small platform just before it. Near the enemy is a [[Barrel Cannon]]. Below this object is a small platform with a windmill next to it that Donkey or Diddy can [[blow]] on to reveal a hidden platform in the background. The Barrel Cannon can shoot the heroes into the background, where there are many platforms that fall when stood on. Bananas are between each of the platforms, which help the Kongs reach an area with some Rawks and an urn, as well as a small platform with a barrel on it. | ||
Another wheel is just ahead, and some Snaggles just out of the water below it. This wheel, along with the two wheels after it, have three platforms on one side of them and do not move in a full circle. Instead, they move back and forth, swinging the Kongs above the water. Each platform on the three wheels has a collectible on it, and a Banana Coin is also in the center of the first two wheels. The third wheel has a Tiki Bomber on the platform in the center of it, and many Snaggles also jump out from the water under it. A pathway of bananas and the letter K leads the heroes to a Barrel Cannon at the end of the area. This cannon shoots them to the foreground, where dandelions grow at the edge of the stone pathway. The pathway leads to some spikes, which can safely be crossed if the Kongs use the grassy turf on the ceiling. A Stilts walk through the spikes, so they must also watch out for this foe. Two large, solid platforms are after this area. The first platform holds an urn with an item in it, while the second has two Rawks and a dandelion on it. One last wheel is just ahead. It supports two platforms with collectibles on them and helps the Kongs reach the [[Slot Machine Barrel]] floating in the air above the water. A [[Giga Rangwi]] guards the barrel, but if the heroes avoid it and hit the object, the level is completed. | Another wheel is just ahead, and some Snaggles just out of the water below it. This wheel, along with the two wheels after it, have three platforms on one side of them and do not move in a full circle. Instead, they move back and forth, swinging the Kongs above the water. Each platform on the three wheels has a collectible on it, and a Banana Coin is also in the center of the first two wheels. The third wheel has a Tiki Bomber on the platform in the center of it, and many Snaggles also jump out from the water under it. A pathway of bananas and the letter K leads the heroes to a Barrel Cannon at the end of the area. This cannon shoots them to the foreground, where dandelions grow at the edge of the stone pathway. The pathway leads to some spikes, which can safely be crossed if the Kongs use the grassy turf on the ceiling. A Stilts walk through the spikes, so they must also watch out for this foe. Two large, solid platforms are after this area. The first platform holds an urn with an item in it, while the second has two Rawks and a dandelion on it. One last wheel is just ahead. It supports two platforms with collectibles on them and helps the Kongs reach the [[Slot Machine Barrel]] floating in the air above the water. A [[Giga Rangwi]] guards the barrel, but if the heroes avoid it and hit the object, the level is completed. | ||
==Enemies== | ==Enemies== | ||
{| class=" | {|class="wikitable dk" | ||
!Image | !Image | ||
!Name | !Name | ||
| Line 62: | Line 60: | ||
==Items== | ==Items== | ||
{|class=" | {|class="wikitable dk"width=15% | ||
|- | |- | ||
!Image | !Image | ||
| Line 85: | Line 83: | ||
|} | |} | ||
===K-O-N-G Letters=== | ===K-O-N-G Letters=== | ||
{|class=" | {|class="wikitable dk"width=70% | ||
|- | |- | ||
!Image | !Image | ||
| Line 91: | Line 89: | ||
!Location | !Location | ||
|- | |- | ||
|align="center"| | |align="center"|[[File:DKCR Damp Dungeon Letter K.png|250px]] | ||
|align="center"|K | |align="center"|K | ||
|When the Kongs reach the first | |When the Kongs reach the first green surface on the ceiling, they encounter a few yellow Snaggles. The letter K is on the fragile platform between these enemies. | ||
|- | |- | ||
|align="center"|[[File:DKCR Damp Dungeon Letter O.png|250px]] | |align="center"|[[File:DKCR Damp Dungeon Letter O.png|250px]] | ||
| Line 99: | Line 97: | ||
|Immediately after the fourth Puzzle Piece, the letter O is in the center of a turning wheel. | |Immediately after the fourth Puzzle Piece, the letter O is in the center of a turning wheel. | ||
|- | |- | ||
|align="center"| | |align="center"|[[File:DKCR Damp Dungeon Letter N.png|250px]] | ||
|align="center"|N | |align="center"|N | ||
|Right after the eighth Puzzle Piece, the Kongs must ride up a moving wheel platform and collect the letter N in the air just before a Barrel Cannon. | |Right after the eighth Puzzle Piece, the Kongs must ride up a moving wheel platform and collect the letter N in the air just before a Barrel Cannon. | ||
| Line 105: | Line 103: | ||
|align="center"|[[File:DKCR Damp Dungeon Letter G.png|250px]] | |align="center"|[[File:DKCR Damp Dungeon Letter G.png|250px]] | ||
|align="center"|G | |align="center"|G | ||
|On the last set of | |On the last set of green surfaces at the end of the level, the Kongs can find the letter G near a Stilts. | ||
|} | |} | ||
===Puzzle Pieces=== | ===Puzzle Pieces=== | ||
{|class=" | {|class="wikitable dk"width=70% | ||
|- | |- | ||
!Image | !Image | ||
| Line 114: | Line 113: | ||
!Location | !Location | ||
|- | |- | ||
|align="center"| | |align="center"|[[File:DKCR Damp Dungeon Puzzle Piece 1.png|250px]] | ||
|align="center"|1 | |align="center"|1 | ||
|When the Kongs find the first DK Barrel, they must pick it up and ride on the following wheel. As they approach the top of the wheel, the Kongs must throw the DK Barrel at a [[Burlap Hanging Sack|bag]], causing it to break and release the first [[Puzzle Piece (Donkey Kong Country Returns)|Puzzle Piece]]. | |When the Kongs find the first DK Barrel, they must pick it up and ride on the following wheel. As they approach the top of the wheel, the Kongs must throw the DK Barrel at a [[Burlap Hanging Sack|bag]], causing it to break and release the first [[Puzzle Piece (Donkey Kong Country Returns)|Puzzle Piece]]. | ||
|- | |- | ||
|align="center"| | |align="center"|[[File:DKCR Damp Dungeon Puzzle Piece 2.png|250px]] | ||
|align="center"|2 | |align="center"|2 | ||
|Immediately after the letter K, the Kongs can find a cracked leafy floor piece near an urn. By pounding the floor, the Kongs can find a hidden alcove with the second Puzzle Piece. | |Immediately after the letter K, the Kongs can find a cracked leafy floor piece near an urn. By pounding the floor, the Kongs can find a hidden alcove with the second Puzzle Piece. | ||
|- | |- | ||
|align="center"| | |align="center"|[[File:DKCR Damp Dungeon Puzzle Piece 3.png|250px]] | ||
|align="center"|3 | |align="center"|3 | ||
|When the Kongs encounter the first Screaming Pillar, they must drop down to the platform below. They must Ground Pound an urn to reveal a Puzzle Piece. | |When the Kongs encounter the first Screaming Pillar, they must drop down to the platform below. They must Ground Pound an urn to reveal a Puzzle Piece. | ||
|- | |- | ||
|align="center"| | |align="center"|[[File:DKCR Damp Dungeon Puzzle Piece 4.png|250px]] | ||
|align="center"|4 | |align="center"|4 | ||
|When the Kongs reach the second Screaming Pillar, they can pound it after it falls to reveal the fourth Puzzle Piece. | |When the Kongs reach the second Screaming Pillar, they can pound it after it falls to reveal the fourth Puzzle Piece. | ||
|- | |- | ||
|align="center"| | |align="center"|[[File:DKCR Damp Dungeon Puzzle Piece 5.png|250px]] | ||
|align="center"|5 | |align="center"|5 | ||
|Below the last water mill before the checkpoint, the Kongs can [[blow]] on a dandelion to reveal a Puzzle Piece. | |Below the last water mill before the checkpoint, the Kongs can [[blow]] on a dandelion to reveal a Puzzle Piece. | ||
| Line 136: | Line 135: | ||
|align="center"|[[File:DKCR Damp Dungeon Bonus Room 1.png|250px]] | |align="center"|[[File:DKCR Damp Dungeon Bonus Room 1.png|250px]] | ||
|align="center"|6 | |align="center"|6 | ||
|Right after the checkpoint, the Kongs can find a low platform. There is | |Right after the checkpoint, the Kongs can find a low platform. There is a green surface on the platform above the smaller platform, and they can climb it to reach the entrance to a [[Bonus Level]]. There, the Kongs must bounce from a moving platform to collect 99 bananas and three Banana Coins spinning in a circle. Once they collect all the items, a Puzzle Piece appears. | ||
|- | |- | ||
|align="center"| | |align="center"|[[File:DKCR Damp Dungeon Puzzle Piece 7.png|250px]] | ||
|align="center"|7 | |align="center"|7 | ||
|Before the Kongs enter the Barrel Cannon that shoots them to the background shortly after the checkpoint, they must drop to the small platform below and blow on a hidden windmill. After doing so for a while, a platform emerges from the water in the background. They must roll jump to it to find the seventh Puzzle Piece on it. | |Before the Kongs enter the Barrel Cannon that shoots them to the background shortly after the checkpoint, they must drop to the small platform below and blow on a hidden windmill. After doing so for a while, a platform emerges from the water in the background. They must roll jump to it to find the seventh Puzzle Piece on it. | ||
|- | |- | ||
|align="center"| | |align="center"|[[File:DKCR Damp Dungeon Puzzle Piece 8.png|250px]] | ||
|align="center"|8 | |align="center"|8 | ||
|Soon after the seventh Puzzle Piece, the Kongs can find a barrel on a small platform. They should carry it across the moving wheels farther ahead. The Kongs must ride up the second wheel and throw the barrel at a hanging sand bag to reveal a Puzzle Piece. | |Soon after the seventh Puzzle Piece, the Kongs can find a barrel on a small platform. They should carry it across the moving wheels farther ahead. The Kongs must ride up the second wheel and throw the barrel at a hanging sand bag to reveal a Puzzle Piece. | ||
|- | |- | ||
|align="center"| | |align="center"|[[File:DKCR Damp Dungeon Bonus Room 2.png|250px]] | ||
|align="center"|9 | |align="center"|9 | ||
|The Kongs must [[Ground Pound]] a platform under the letter G. When it flips, they fall into a Bonus Level, where they must blast between four Barrel Cannons (located north, south, east, and west) to collect 60 bananas, three Banana Coins, and a Red Balloon. When all of the items are collected, the final Puzzle Piece appears. | |The Kongs must [[Ground Pound]] a platform under the letter G. When it flips, they fall into a Bonus Level, where they must blast between four Barrel Cannons (located north, south, east, and west) to collect 60 bananas, three Banana Coins, and a Red Balloon. When all of the items are collected, the final Puzzle Piece appears. | ||
| Line 164: | Line 163: | ||
|Spa=Mazmorra Mohosa | |Spa=Mazmorra Mohosa | ||
|SpaM=Moldy Dungeon | |SpaM=Moldy Dungeon | ||
| | |FreA=Dangereux Donjon | ||
| | |FreAM=Dangerous Dungeon | ||
|Ger=Feuchtes Verlies | |Ger=Feuchtes Verlies | ||
|GerM=Wet Dungeon | |GerM=Wet Dungeon | ||
|Ita=Sotterraneo acquafresca | |Ita=Sotterraneo acquafresca | ||
|ItaM=Freshwater Underground}} | |ItaM=Freshwater Underground | ||
}} | |||
{{DKCR}} | {{DKCR}} | ||
[[Category:Dungeons]] | [[Category:Dungeons]] | ||
Latest revision as of 14:19, February 3, 2024
| Level | |
|---|---|
| Damp Dungeon | |

| |
| Level code | 3-4 |
| World | Ruins |
| Game | Donkey Kong Country Returns (3D) |
| Music track | Ruin Rhapsody |
| << Directory of levels >> >> | |
Damp Dungeon is the nineteenth level in Donkey Kong Country Returns and Donkey Kong Country Returns 3D, and the fourth level in the Ruins world. To access the level, the Kongs are required to have a Map Key from Cranky Kong's Shop.
As the level's name suggests, Damp Dungeon takes place in a dark dungeon full of water. Since neither Donkey or Diddy Kong can swim, they must use platforms on moving various water mills to transverse large gaps, with not every mill functioning the same; some mills do not orbit 360 degrees, while others may be missing platforms or have enemies on them. Many fragile stone platforms are throughout, and they collapse if the Kongs stand on them for too long. Green surfaces appear on the ceiling in some parts of the level, allowing the Kongs to climb over water and spikes.
In the Time Attack mode of the game, a time of 0:56:00 is needed to get a gold medal, a time of 1:30:00 for silver, and a time of 1:51:00 for bronze.
Overview[edit]

The level begins in a small jungle area leading into a dark dungeon area. The first thing the Kongs come up to in here is an urn with a collectible in it, followed by a single Rawk. A turning wheel is after this, supporting four platforms. One of its platforms have a Banana Coin on them, while the others have one banana each. Another wheel is farther ahead, which is much larger than the previous. It can be reached by using a platform between the two wheels, which has a DK Barrel on it. A Snaggles jumps out of the water here, and a Tiki Bomber attacks from the center platform on the second wheel. After another Snaggles near this wheel is an area of solid ground, where some Rawks can be found. Some grassy turf is located on the ceiling just after the second Rawk to help the Kongs cross some water. Three small, crumbling platforms are under this ceiling with collectibles on them; the middle platform holds the letter K. However, the platforms fall as soon as they are stood on, so the Kongs must be careful.
Two solid, stone platforms rise above the water after the end of the turf, so the primates can continue to travel above the water and get to a turning wheel. A Stilts is just before this wheel, and a Tiki Bomber is on the platform in the center of it. The wheel supports four platforms, each with a certain collectible on it. A set of two platforms are near this wheel. One platform is placed below the other, which is supported by a large structure in the background. The platform on the bottom of the area has a urn on it, which reveals an item when broken open, and the platform above it has a Screaming Pillar behind it. A small wheel is farther ahead, and it can only be reached by jumping from the higher platform of the previous area. This wheel has collectibles on the two boards that it is holding for the Kongs to grab. The letter O is also in the center of it. Another platform is just ahead of this wheel with a heart on it. A Screaming Pillar is also behind the item.

There is another wheel right after this area, and under it is a solid area of stone that is placed above the water. A barrel and a dandelion are on it. The wheel, which moves faster than the previous wheels, has two bananas on each of the platforms it supports. Farther ahead, there is a stone pathway leading over the water. This area is infested with Rawks and has several platforms that cannot hold the Kongs very long before falling. Fortunately, many Banana Coins are above these foes and the Tutorial Pig is at the end of the area at the checkpoint. Farther ahead, the Kongs can find a Stilts at the end of a stone pathway, as well as a DK Barrel on a small platform just before it. Near the enemy is a Barrel Cannon. Below this object is a small platform with a windmill next to it that Donkey or Diddy can blow on to reveal a hidden platform in the background. The Barrel Cannon can shoot the heroes into the background, where there are many platforms that fall when stood on. Bananas are between each of the platforms, which help the Kongs reach an area with some Rawks and an urn, as well as a small platform with a barrel on it.
Another wheel is just ahead, and some Snaggles just out of the water below it. This wheel, along with the two wheels after it, have three platforms on one side of them and do not move in a full circle. Instead, they move back and forth, swinging the Kongs above the water. Each platform on the three wheels has a collectible on it, and a Banana Coin is also in the center of the first two wheels. The third wheel has a Tiki Bomber on the platform in the center of it, and many Snaggles also jump out from the water under it. A pathway of bananas and the letter K leads the heroes to a Barrel Cannon at the end of the area. This cannon shoots them to the foreground, where dandelions grow at the edge of the stone pathway. The pathway leads to some spikes, which can safely be crossed if the Kongs use the grassy turf on the ceiling. A Stilts walk through the spikes, so they must also watch out for this foe. Two large, solid platforms are after this area. The first platform holds an urn with an item in it, while the second has two Rawks and a dandelion on it. One last wheel is just ahead. It supports two platforms with collectibles on them and helps the Kongs reach the Slot Machine Barrel floating in the air above the water. A Giga Rangwi guards the barrel, but if the heroes avoid it and hit the object, the level is completed.
Enemies[edit]
| Image | Name | Count |
|---|---|---|
| Giga Rangwi | 1 | |

|
Rawk | 15 |
| Screaming Pillar | 3 | |
| Snaggles | 6 | |

|
Stilts | 3 |

|
Tiki Bomber | 3 |
| Yellow Snaggles | 3 |
Items[edit]
| Image | Name | Count |
|---|---|---|
| Banana Coin | 16 | |
| DK Barrel | 2 | |
| Extra Life Balloon | 2 | |

|
Heart | 4 |
K-O-N-G Letters[edit]
| Image | Letter | Location |
|---|---|---|

|
K | When the Kongs reach the first green surface on the ceiling, they encounter a few yellow Snaggles. The letter K is on the fragile platform between these enemies. |

|
O | Immediately after the fourth Puzzle Piece, the letter O is in the center of a turning wheel. |

|
N | Right after the eighth Puzzle Piece, the Kongs must ride up a moving wheel platform and collect the letter N in the air just before a Barrel Cannon. |

|
G | On the last set of green surfaces at the end of the level, the Kongs can find the letter G near a Stilts. |
Puzzle Pieces[edit]
| Image | Number | Location |
|---|---|---|

|
1 | When the Kongs find the first DK Barrel, they must pick it up and ride on the following wheel. As they approach the top of the wheel, the Kongs must throw the DK Barrel at a bag, causing it to break and release the first Puzzle Piece. |

|
2 | Immediately after the letter K, the Kongs can find a cracked leafy floor piece near an urn. By pounding the floor, the Kongs can find a hidden alcove with the second Puzzle Piece. |

|
3 | When the Kongs encounter the first Screaming Pillar, they must drop down to the platform below. They must Ground Pound an urn to reveal a Puzzle Piece. |

|
4 | When the Kongs reach the second Screaming Pillar, they can pound it after it falls to reveal the fourth Puzzle Piece. |

|
5 | Below the last water mill before the checkpoint, the Kongs can blow on a dandelion to reveal a Puzzle Piece. |

|
6 | Right after the checkpoint, the Kongs can find a low platform. There is a green surface on the platform above the smaller platform, and they can climb it to reach the entrance to a Bonus Level. There, the Kongs must bounce from a moving platform to collect 99 bananas and three Banana Coins spinning in a circle. Once they collect all the items, a Puzzle Piece appears. |

|
7 | Before the Kongs enter the Barrel Cannon that shoots them to the background shortly after the checkpoint, they must drop to the small platform below and blow on a hidden windmill. After doing so for a while, a platform emerges from the water in the background. They must roll jump to it to find the seventh Puzzle Piece on it. |

|
8 | Soon after the seventh Puzzle Piece, the Kongs can find a barrel on a small platform. They should carry it across the moving wheels farther ahead. The Kongs must ride up the second wheel and throw the barrel at a hanging sand bag to reveal a Puzzle Piece. |

|
9 | The Kongs must Ground Pound a platform under the letter G. When it flips, they fall into a Bonus Level, where they must blast between four Barrel Cannons (located north, south, east, and west) to collect 60 bananas, three Banana Coins, and a Red Balloon. When all of the items are collected, the final Puzzle Piece appears. |
Gallery[edit]
Donkey Kong jumping to a Rawk
A Yellow Snaggles jumps up to the Kongs


Names in other languages[edit]
| Language | Name | Meaning |
|---|---|---|
| Japanese | ラングィのすいろ Rangwi no Suiro |
Snaggle's Waterway |
| French (NOA) | Dangereux Donjon |
Dangerous Dungeon |
| German | Feuchtes Verlies |
Wet Dungeon |
| Italian | Sotterraneo acquafresca |
Freshwater Underground |
| Spanish | Mazmorra Mohosa |
Moldy Dungeon |