Sloppy Sands: Difference between revisions
No edit summary |
m (Text replacement - "dktable-brown" to "wikitable dk") |
||
| (24 intermediate revisions by 11 users not shown) | |||
| Line 1: | Line 1: | ||
{{level | {{level infobox | ||
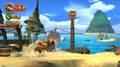
|image=[[File:SloppySands.png|250px]] | |image=[[File:SloppySands.png|250px]] | ||
|code=2 - 2 | |code=2-2 | ||
|world=[[Beach]] | |world=[[Beach]] | ||
|game=''[[Donkey Kong Country Returns]]'' (''[[Donkey Kong Country Returns 3D|3D]]'') | |game=''[[Donkey Kong Country Returns]]'' (''[[Donkey Kong Country Returns 3D|3D]]'') | ||
|before=[[Poppin' Planks|<<]] | |before=[[Poppin' Planks|<<]] | ||
|after=[[Peaceful Pier|>>]] | |after=[[Peaceful Pier|>>]] | ||
| | |track=Poppin' Planks<br>Sloppy Sands | ||
}} | }} | ||
'''Sloppy Sands''' is the ninth level in ''[[Donkey Kong Country Returns]]'' and ''[[Donkey Kong Country Returns 3D]]'' | '''Sloppy Sands''' is the ninth level in ''[[Donkey Kong Country Returns]]'' and ''[[Donkey Kong Country Returns 3D]]'' and the second level in the [[Beach]] world. | ||
==Summary== | |||
Sloppy Sands takes place at the ocean shore, where [[Donkey Kong|Donkey]] and [[Diddy Kong]] encounter many [[Squidly]]s and [[Electrasquid]]s shot from [[Squid Shot]]s; both enemies debut in the level. The [[Kong]]s Squidlys can be bounced on to reach collectibles, although Electrasquids are electrified variants and can hurt the [[Kong]]s upon contact. The Kongs also encounter [[Snaggles]] and [[Snippys]] along the way. It is the first level with cannons that the Kongs can pound on to shoot out collectibles and help them find a single [[Puzzle Piece (Donkey Kong Country Returns)|Puzzle Piece]]. The level also has wooden crates that, when Ground Pounded, activate another set of crates that appear from the sands. | |||
Near the end of the level, the Kongs must [[Ground Pound]] a switch with the DK emblem, which uproots a sunken castle. The Kongs must jump into a Barrel Cannon to launch to the bottom of the castle. The remainder of the level takes place in the castle, where the Kongs must use sand-filled wooden buckets as platforms and climb [[climbing grass|green surface]]s while avoiding Squidlys throughout. | |||
In the [[Donkey Kong Country Returns#Time Attack|Time Attack]] mode | In the [[Donkey Kong Country Returns#Time Attack|Time Attack]] mode, a time of 1:11:00 is needed to get a gold medal, a time of 1:26:00 for silver, and a time of 1:57:00 for bronze. | ||
== | ==Layout== | ||
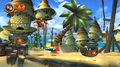
[[File: | [[File:DKCR Sloppy Sands 2.png|250px|left|thumb|The Kongs, near the level's start]] | ||
The level begins with a straight pathway along the sand leading to two wooden pillars sticking out of the ground. When the Kongs pound on the pillars, they fall under the surface and another pair of pillars shoots out of the ground near a | The level begins with a straight pathway along the sand leading to two wooden pillars sticking out of the ground. When the Kongs pound on the pillars, they fall under the surface and another pair of pillars shoots out of the ground near a Snippys. The new pillars can help the Kongs reach a higher platform with the first [[DK Barrel]] and a small hill with Snippys enemies infesting it. A trio of pillars are after a Squid Shot that the primates can pound into the ground to make another three pillars appear nearby, shooting out items, including a [[Puzzle Piece (Donkey Kong Country Returns)|Puzzle Piece]], as they emerge. They can help the Kongs reach a wooden platform with these collectibles on it. There is a cannon ahead of the Kongs that can be pounded on to blast a cannonball at a mast in the background. A treasure chest is on the mast that lands in the foreground, spilling out four [[Banana Coin]]s when it breaks. | ||
The Kongs are able to find a small plant growing between two Squid Shots ahead, and it gives an item when blown on. There are also many [[banana]]s between the Squid Shots, as well as after them right before another two of these foes. A second treasure chest is after the two Squid Shots that contains a [[Red Balloon]]. As the primates try to grab it, squids shoot from a nearby Squid Shot and try to hit them. A raised, wooden platform is after this, with special items placed above and below it. A trio of pillars also stands ahead of the previous Squid Shot, with two more Squid Shots piled up on each other next to it. More pillars appear closer to the squid-shooting enemies when the heroes pound these pillars into the ground. The new pillars can help them jump over the Squid Shots and travel to a bridge area that is above the water. The [[Professor Chops|Tutorial Pig]] is on it, along with the first checkpoint. | |||
Another DK Barrel and a treasure chest are ahead of the checkpoint, along with a rectangular crate. Near the crate, a | Another DK Barrel and a treasure chest are ahead of the checkpoint, along with a rectangular crate. Near the crate, a Snaggles jumps out of the water below and breaks through the boards, creating a gap that must be jumped over. There is also another crate near here that hides a treasure chest with a [[Barrel Cannon]] in it. It can shoot the Kongs into an island in the background with the letter K of the [[KONG Letters|K-O-N-G Letters]] on a tall, stone pillar and another treasure chest with a Barrel Cannon in it. This cannon can blast the heroes back into the foreground. After the Kongs cross another gap after this treasure chest, they reach a flat bridge area with a Squid Shot at the beginning of it. A Pinchly and a [[barrel]] are on the bridge, and a cannon is also under it. A hill is in the area after the cannon that leads towards the letter O that is surrounded by bananas. Squid Shots also wait to shoot at the Kongs next to it. The Kongs can reach a platform above the letter O by bouncing off of a Squidly to find a pathway leading over a Squid Shot on a crashed vessel part. Bananas sit under a platform at the end of the large ship piece, and the letter N floats in the air near some crates being suspended in the air by a platform. The Tutorial Pig and the second checkpoint are under the crates. | ||
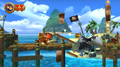
[[File: | [[File:DKCR Sloppy Sands 3.png|250px|left|thumb|Donkey Kong and Diddy Kong get fired into the tower in the background]] | ||
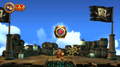
[[File:DKCR Sloppy Sands Tower.png|250px|thumb|Inside the tower]] | |||
The third DK Barrel and a giant button are ahead of the Tutorial Pig. If the primates pound the button into the ground, a tower emerges from the water in the background and a Barrel Cannon appears to shoot them there. A treasure chest is inside of the cavernous-like tower, and two platforms are above it that can help the Kongs climb closer to some buckets being conveyed by ropes. Squid Shots shoot at them as they head up the area. Once the heroes manage to get on the buckets, they are transported to the other side of the thin room, where there is a wall of grassy turf. It is climbable, so they can travel along the walls with it. The wall on the opposite side of this turf is covered in the same kind of turf, so it can be climbed on as well. The second wall of turf has the letter G at the bottom end of it, and the primates can climb up the same turf, passing three squid enemies on the way, to access a higher area with another platform that leads to some buckets. This platform also holds a treasure chest with a Banana Coin in it. | The third DK Barrel and a giant button are ahead of the Tutorial Pig. If the primates pound the button into the ground, a tower emerges from the water in the background and a Barrel Cannon appears to shoot them there. A treasure chest is inside of the cavernous-like tower, and two platforms are above it that can help the Kongs climb closer to some buckets being conveyed by ropes. Squid Shots shoot at them as they head up the area. Once the heroes manage to get on the buckets, they are transported to the other side of the thin room, where there is a wall of grassy turf. It is climbable, so they can travel along the walls with it. The wall on the opposite side of this turf is covered in the same kind of turf, so it can be climbed on as well. The second wall of turf has the letter G at the bottom end of it, and the primates can climb up the same turf, passing three squid enemies on the way, to access a higher area with another platform that leads to some buckets. This platform also holds a treasure chest with a Banana Coin in it. | ||
The buckets, again being pulled by a group of convey belt-like ropes, are able to aid the Kongs in reaching another high platform after pulling them past many bananas and Banana Coins. More platforms are above this, and a Squid Shot shoots from the side of the area nearby here. When the primates climb the platform, they can find grassy turf on both walls. The turf on the right leads to the next area, but it is too high to reach. So, the Kongs must first grab onto the turf on the left to reach it. While on the left turf, they must jump on a spinning wheel between the walls to be pulled next to the wall on the right. When they reach this wall, they can climb past some squid enemies being shot by nearby Squid Shots in order to reach a moving platform. This platform has the ability to carry them to another wall of turf that leads to a treasure chest and a group of platforms above it. Buckets moving across the area on ropes are above the last platform that can be used to reach a Barrel Cannon. The cannon shoots the Kongs outside of the tower on its roof, where | The buckets, again being pulled by a group of convey belt-like ropes, are able to aid the Kongs in reaching another high platform after pulling them past many bananas and Banana Coins. More platforms are above this, and a Squid Shot shoots from the side of the area nearby here. When the primates climb the platform, they can find grassy turf on both walls. The turf on the right leads to the next area, but it is too high to reach. So, the Kongs must first grab onto the turf on the left to reach it. While on the left turf, they must jump on a spinning wheel between the walls to be pulled next to the wall on the right. When they reach this wall, they can climb past some squid enemies being shot by nearby Squid Shots in order to reach a moving platform. This platform has the ability to carry them to another wall of turf that leads to a treasure chest and a group of platforms above it. Buckets moving across the area on ropes are above the last platform that can be used to reach a Barrel Cannon. The cannon shoots the Kongs outside of the tower on its roof, where the [[Slot Machine Barrel]] is present. | ||
== | ==Enemies== | ||
{|class="wikitable dk"width=25% | |||
|- | |||
!Image | |||
!Name | |||
!Amount | |||
|- | |||
|align="center"|[[File:Electasquid.png|x50px]] | |||
|align="center"|[[Electrasquid]] | |||
|Infinite | |||
|- | |||
|align="center"|[[File:Pinchly Render.png|x50px]] | |||
|align="center"|[[Pinchly]] | |||
|4 | |||
|- | |||
|align="center"|[[File:Snaggles-DKCR.png|x50px]] | |||
|align="center"|[[Snaggles]] | |||
|2 | |||
|- | |||
|align="center"|[[File:Snaps_closeup.png|x50px]] | |||
|align="center"|[[Snippys]] | |||
|4 | |||
|- | |||
|align="center"|[[File:Squidly_DKCR.png|x50px]] | |||
|align="center"|[[Squidly]] | |||
|Infinite | |||
|} | |||
==Items== | |||
{|class="wikitable dk"width=25% | |||
|- | |||
!Image | |||
!Name | |||
!Amount | |||
|- | |||
|align="center"|[[File:BananacoinDKCR.png|x50px]] | |||
|align="center"|[[Banana Coin]] | |||
|10 | |||
|- | |||
|align="center"|[[File:BarrelDKCR.png|x50px]] | |||
|align="center"|[[Barrel]] | |||
|2 | |||
|- | |||
|align="center"|[[File:DKBarrelDKCR.png|x50px]] | |||
|align="center"|[[DK Barrel]] | |||
|3 | |||
|- | |||
|align="center"|[[File:Heart.png|x50px]] | |||
|align="center"|[[Heart (item)|Heart]] | |||
|6 | |||
|- | |||
|align="center"|[[File:BalloonDKCR.png|x50px]] | |||
|align="center"|[[Red Balloon]] | |||
|1 | |||
|} | |||
===K-O-N-G Letters=== | ===K-O-N-G Letters=== | ||
{|class="wikitable dk"width=70% | |||
|- | |||
!Image | |||
!Letter | |||
!Location | |||
|- | |||
|align="center"|[[File:DKCR Sloppy Sands Letter K.png|250px]] | |||
|align="center"|K | |||
|The Kongs must break the second crate from the first checkpoint to find a treasure chest. They must pound the chest for to reveal a Barrel Cannon, which shoots them to an island with the letter K on top of a pillar. The Kongs must [[Kong Roll|roll]] into the base of the pillar, causing it to fall. The letter K becomes in reach for the Kongs to collect. | |||
|- | |||
|align="center"|[[File:DKCR Sloppy Sands Letter O.png|250px]] | |||
|align="center"|O | |||
|A vessel infested with Squid Shots is right before the second checkpoint. The letter O is to the left, surrounded by bananas. | |||
|- | |||
|align="center"|[[File:DKCR Sloppy Sands Letter N.png|250px]] | |||
|align="center"|N | |||
|The letter N is in the air before the second checkpoint next to some crates. The Kongs must bounce on a Squidly to reach it. | |||
|- | |||
|align="center"|[[File:DKCR Sloppy Sands Letter G.png|250px]] | |||
|align="center"|G | |||
|At the start of the sand tower, the letter G is on the bottom of the second green surface wall, near a Squid Shot. | |||
|} | |||
===Puzzle Pieces=== | |||
{|class="wikitable dk" width=70% | |||
|- | |||
!Image | |||
!Number | |||
!Location | |||
|- | |||
|align="center"|[[File:DKCR Sloppy Sands Puzzle Piece 1.png|250px]] | |||
|align="center"|1 | |||
|To the left of the level's starting point is a wooden barrier with a white target painted on. The Kongs must pick up a nearby DK Barrel and throw it at the wall for it to break open, allowing the Kongs to obtain the Puzzle Piece. | |||
|- | |||
|align="center"|[[File:DKCR Sloppy Sands Puzzle Piece 2.png|250px]] | |||
|align="center"|2 | |||
|Shortly after the first Puzzle Piece, the Kongs can Ground Pound three pillars to reveal another nearby group of pillars under a platform. When the pillars emerge, a Puzzle Piece comes out of the sand and lands on the platform. | |||
|- | |||
|align="center"|[[File:DKCR Sloppy Sands Puzzle Piece 3.png|250px]] | |||
|align="center"|3 | |||
|Just after the second Puzzle Piece, the Kongs can [[blow]] a dandelion between two Squid Shots to reveal the third Puzzle Piece. | |||
|- | |||
|align="center"|[[File:DKCR Sloppy Sands Puzzle Piece 4.png|250px]] | |||
|align="center"|4 | |||
|Just before the first checkpoint is a platform raised above a heart. A Puzzle Piece is high above a platform, and it can be reached by bouncing from a nearby pair of Squidlys. | |||
|- | |||
|align="center"|[[File:DKCR Sloppy Sands Puzzle Piece 5.png|250px]] | |||
|align="center"|5 | |||
|After the first Squid Shot following the letter K is a cannon under a bridge. The Kongs must Ground Pound the cannon for it to blast at a bridge, leaving a few remains of it on the water. If the Kongs go along the platforms, they can find the Puzzle Piece. | |||
|- | |||
|align="center"|[[File:DKCR Bonus Room 7.png|250px]] | |||
|align="center"|6 | |||
|Immediately before the second checkpoint, the Kongs can find a trail of bananas near the side of a vessel. By following the bananas, the Kongs can go into an entrance of a hidden ship leading into the [[Bonus Level]]. | |||
There, the Kongs have 30 seconds to bounce on a horizontally moving platform and collect four Banana Coins and 44 bananas. All of the items move up and down slightly. After the Kongs collect all the items, the Puzzle Piece appears. | |||
|- | |||
|align="center"|[[File:DKCR Sloppy Sands Puzzle Piece 7.png|250px]] | |||
|align="center"|7 | |||
|The seventh and final Puzzle Piece is in a hidden alcove behind a pile of barrels to the right of the last treasure chest. | |||
|} | |||
==Gallery== | |||
<gallery> | |||
Sloppy Sands cannon.png|The Kongs shoot a cannonball at a wooden pole with a treasure chest | |||
Sloppy Sands Electrasquid.png|The Kongs jump over an Electrasquid | |||
Sloppy Sands Snaggles.png|A Snaggles jumps out at the Kongs | |||
Sloppy Sands Slot Machine Barrel.png|The Kongs under the Slot Machine Barrel | |||
</gallery> | |||
==Names in other languages== | ==Names in other languages== | ||
| Line 54: | Line 161: | ||
|Spa=Chaparrón de Calamares | |Spa=Chaparrón de Calamares | ||
|SpaM=Squids Downpour | |SpaM=Squids Downpour | ||
| | |FreA=Kalmars Cachés | ||
| | |FreAM=Hidden Squids ("kalmar" being a distortion of ''calmar'' (squid)) | ||
|FreE=Sables sournois | |||
|FreEM=Sly Sands | |||
|Ger=Sandiger Sandstrand | |Ger=Sandiger Sandstrand | ||
|GerM=Sandy Shore | |GerM=Sandy Shore | ||
|Ita=Lido scompiglio | |||
|ItaM=Confusion Shore | |||
|Chi=乌贼遍地海滩 | |||
|ChiR=Wūzéi Biàndì Hǎitān | |||
|ChiM=Beach Full of Squids | |||
}} | |||
{{DKCR}} | {{DKCR}} | ||
[[Category:Beaches]] | [[Category:Beaches]] | ||
[[Category:Donkey Kong Country Returns | [[Category:Donkey Kong Country Returns levels]] | ||
Latest revision as of 14:18, February 3, 2024
| Level | |
|---|---|
| Sloppy Sands | |

| |
| Level code | 2-2 |
| World | Beach |
| Game | Donkey Kong Country Returns (3D) |
| Music track | Poppin' Planks Sloppy Sands |
| << Directory of levels >> | |
Sloppy Sands is the ninth level in Donkey Kong Country Returns and Donkey Kong Country Returns 3D and the second level in the Beach world.
Summary[edit]
Sloppy Sands takes place at the ocean shore, where Donkey and Diddy Kong encounter many Squidlys and Electrasquids shot from Squid Shots; both enemies debut in the level. The Kongs Squidlys can be bounced on to reach collectibles, although Electrasquids are electrified variants and can hurt the Kongs upon contact. The Kongs also encounter Snaggles and Snippys along the way. It is the first level with cannons that the Kongs can pound on to shoot out collectibles and help them find a single Puzzle Piece. The level also has wooden crates that, when Ground Pounded, activate another set of crates that appear from the sands.
Near the end of the level, the Kongs must Ground Pound a switch with the DK emblem, which uproots a sunken castle. The Kongs must jump into a Barrel Cannon to launch to the bottom of the castle. The remainder of the level takes place in the castle, where the Kongs must use sand-filled wooden buckets as platforms and climb green surfaces while avoiding Squidlys throughout.
In the Time Attack mode, a time of 1:11:00 is needed to get a gold medal, a time of 1:26:00 for silver, and a time of 1:57:00 for bronze.
Layout[edit]

The level begins with a straight pathway along the sand leading to two wooden pillars sticking out of the ground. When the Kongs pound on the pillars, they fall under the surface and another pair of pillars shoots out of the ground near a Snippys. The new pillars can help the Kongs reach a higher platform with the first DK Barrel and a small hill with Snippys enemies infesting it. A trio of pillars are after a Squid Shot that the primates can pound into the ground to make another three pillars appear nearby, shooting out items, including a Puzzle Piece, as they emerge. They can help the Kongs reach a wooden platform with these collectibles on it. There is a cannon ahead of the Kongs that can be pounded on to blast a cannonball at a mast in the background. A treasure chest is on the mast that lands in the foreground, spilling out four Banana Coins when it breaks.
The Kongs are able to find a small plant growing between two Squid Shots ahead, and it gives an item when blown on. There are also many bananas between the Squid Shots, as well as after them right before another two of these foes. A second treasure chest is after the two Squid Shots that contains a Red Balloon. As the primates try to grab it, squids shoot from a nearby Squid Shot and try to hit them. A raised, wooden platform is after this, with special items placed above and below it. A trio of pillars also stands ahead of the previous Squid Shot, with two more Squid Shots piled up on each other next to it. More pillars appear closer to the squid-shooting enemies when the heroes pound these pillars into the ground. The new pillars can help them jump over the Squid Shots and travel to a bridge area that is above the water. The Tutorial Pig is on it, along with the first checkpoint.
Another DK Barrel and a treasure chest are ahead of the checkpoint, along with a rectangular crate. Near the crate, a Snaggles jumps out of the water below and breaks through the boards, creating a gap that must be jumped over. There is also another crate near here that hides a treasure chest with a Barrel Cannon in it. It can shoot the Kongs into an island in the background with the letter K of the K-O-N-G Letters on a tall, stone pillar and another treasure chest with a Barrel Cannon in it. This cannon can blast the heroes back into the foreground. After the Kongs cross another gap after this treasure chest, they reach a flat bridge area with a Squid Shot at the beginning of it. A Pinchly and a barrel are on the bridge, and a cannon is also under it. A hill is in the area after the cannon that leads towards the letter O that is surrounded by bananas. Squid Shots also wait to shoot at the Kongs next to it. The Kongs can reach a platform above the letter O by bouncing off of a Squidly to find a pathway leading over a Squid Shot on a crashed vessel part. Bananas sit under a platform at the end of the large ship piece, and the letter N floats in the air near some crates being suspended in the air by a platform. The Tutorial Pig and the second checkpoint are under the crates.


The third DK Barrel and a giant button are ahead of the Tutorial Pig. If the primates pound the button into the ground, a tower emerges from the water in the background and a Barrel Cannon appears to shoot them there. A treasure chest is inside of the cavernous-like tower, and two platforms are above it that can help the Kongs climb closer to some buckets being conveyed by ropes. Squid Shots shoot at them as they head up the area. Once the heroes manage to get on the buckets, they are transported to the other side of the thin room, where there is a wall of grassy turf. It is climbable, so they can travel along the walls with it. The wall on the opposite side of this turf is covered in the same kind of turf, so it can be climbed on as well. The second wall of turf has the letter G at the bottom end of it, and the primates can climb up the same turf, passing three squid enemies on the way, to access a higher area with another platform that leads to some buckets. This platform also holds a treasure chest with a Banana Coin in it.
The buckets, again being pulled by a group of convey belt-like ropes, are able to aid the Kongs in reaching another high platform after pulling them past many bananas and Banana Coins. More platforms are above this, and a Squid Shot shoots from the side of the area nearby here. When the primates climb the platform, they can find grassy turf on both walls. The turf on the right leads to the next area, but it is too high to reach. So, the Kongs must first grab onto the turf on the left to reach it. While on the left turf, they must jump on a spinning wheel between the walls to be pulled next to the wall on the right. When they reach this wall, they can climb past some squid enemies being shot by nearby Squid Shots in order to reach a moving platform. This platform has the ability to carry them to another wall of turf that leads to a treasure chest and a group of platforms above it. Buckets moving across the area on ropes are above the last platform that can be used to reach a Barrel Cannon. The cannon shoots the Kongs outside of the tower on its roof, where the Slot Machine Barrel is present.
Enemies[edit]
| Image | Name | Amount |
|---|---|---|

|
Electrasquid | Infinite |

|
Pinchly | 4 |
| Snaggles | 2 | |

|
Snippys | 4 |

|
Squidly | Infinite |
Items[edit]
| Image | Name | Amount |
|---|---|---|
| Banana Coin | 10 | |
| Barrel | 2 | |
| DK Barrel | 3 | |

|
Heart | 6 |
| Red Balloon | 1 |
K-O-N-G Letters[edit]
| Image | Letter | Location |
|---|---|---|

|
K | The Kongs must break the second crate from the first checkpoint to find a treasure chest. They must pound the chest for to reveal a Barrel Cannon, which shoots them to an island with the letter K on top of a pillar. The Kongs must roll into the base of the pillar, causing it to fall. The letter K becomes in reach for the Kongs to collect. |

|
O | A vessel infested with Squid Shots is right before the second checkpoint. The letter O is to the left, surrounded by bananas. |

|
N | The letter N is in the air before the second checkpoint next to some crates. The Kongs must bounce on a Squidly to reach it. |

|
G | At the start of the sand tower, the letter G is on the bottom of the second green surface wall, near a Squid Shot. |
Puzzle Pieces[edit]
| Image | Number | Location |
|---|---|---|

|
1 | To the left of the level's starting point is a wooden barrier with a white target painted on. The Kongs must pick up a nearby DK Barrel and throw it at the wall for it to break open, allowing the Kongs to obtain the Puzzle Piece. |

|
2 | Shortly after the first Puzzle Piece, the Kongs can Ground Pound three pillars to reveal another nearby group of pillars under a platform. When the pillars emerge, a Puzzle Piece comes out of the sand and lands on the platform. |

|
3 | Just after the second Puzzle Piece, the Kongs can blow a dandelion between two Squid Shots to reveal the third Puzzle Piece. |

|
4 | Just before the first checkpoint is a platform raised above a heart. A Puzzle Piece is high above a platform, and it can be reached by bouncing from a nearby pair of Squidlys. |

|
5 | After the first Squid Shot following the letter K is a cannon under a bridge. The Kongs must Ground Pound the cannon for it to blast at a bridge, leaving a few remains of it on the water. If the Kongs go along the platforms, they can find the Puzzle Piece. |

|
6 | Immediately before the second checkpoint, the Kongs can find a trail of bananas near the side of a vessel. By following the bananas, the Kongs can go into an entrance of a hidden ship leading into the Bonus Level.
There, the Kongs have 30 seconds to bounce on a horizontally moving platform and collect four Banana Coins and 44 bananas. All of the items move up and down slightly. After the Kongs collect all the items, the Puzzle Piece appears. |

|
7 | The seventh and final Puzzle Piece is in a hidden alcove behind a pile of barrels to the right of the last treasure chest. |
Gallery[edit]
The Kongs shoot a cannonball at a wooden pole with a treasure chest
The Kongs jump over an Electrasquid
A Snaggles jumps out at the Kongs
The Kongs under the Slot Machine Barrel


Names in other languages[edit]
| Language | Name | Meaning |
|---|---|---|
| Japanese | イカだらけビーチ Ika Darake Bīchi |
Beach Full of Squids |
| Chinese | 乌贼遍地海滩 Wūzéi Biàndì Hǎitān |
Beach Full of Squids |
| French (NOA) | Kalmars Cachés |
Hidden Squids ("kalmar" being a distortion of calmar (squid)) |
| French (NOE) | Sables sournois |
Sly Sands |
| German | Sandiger Sandstrand |
Sandy Shore |
| Italian | Lido scompiglio |
Confusion Shore |
| Spanish | Chaparrón de Calamares |
Squids Downpour |