Krockhead Klamber (Donkey Kong Land 2): Difference between revisions
No edit summary |
(dk wiki) |
||
| Line 2: | Line 2: | ||
{{Levelbox | {{Levelbox | ||
|title=Krockhead Klamber | |title=Krockhead Klamber | ||
|image=[[File:Krockhead Klamber DKL2.png]] | |image=[[File:Krockhead Klamber DKL2 Flitter.png]] | ||
|code=2 - 8 | |code=2 - 8 | ||
|world=[[Krem Cauldron]] | |world=[[Krem Cauldron]] | ||
| Line 10: | Line 10: | ||
|after=[[Rattle Battle (Donkey Kong Land 2)|>>]] | |after=[[Rattle Battle (Donkey Kong Land 2)|>>]] | ||
}} | }} | ||
'''Krockhead Klamber''' is the thirteenth [[level]] of ''[[Donkey Kong Land 2]]'' | '''Krockhead Klamber''' is the thirteenth [[level]] of ''[[Donkey Kong Land 2]]'' and the eighth level of [[Krem Cauldron]]. | ||
As the level name suggests, Krockhead Klamber has many [[Krockhead]]s that [[Diddy Kong]] and [[Dixie Kong]] must jump from to get across a swamp. The [[Kong]]s make them emerge from the swamp temporarily by jumping at a [[Krockhead Barrel]]. Cattail plants first appear in the level, and are positioned in the swamp and act as vertical [[rope]]s. Sometimes a [[Klinger]] climbs up and down a cattail. Both [[Flitter]]s and [[Zinger]]s appear as the aerial enemies of the level. | |||
== | ==Layout== | ||
[[File:Krockhead Klamber DKL2 shot 2.png|thumb|left|160px|Diddy Kong | [[File:Krockhead Klamber DKL2 shot 2.png|thumb|left|160px|Diddy Kong climbing toward a Banana Coin]] | ||
The level begins on a long area of land with a DK Barrel above it. An area of water with two solid platforms above it is ahead of here, and a Zinger hovers between the platforms. Once the water area is crossed, the Kongs reach a small section of ground that supports a Neek. A Zinger hovers near here, and it is followed by two vines, one of which that holds a Klinger, and some platforms located in another pit full of water. The primates can discover two Flitters and some bananas once they reach the last of these platforms. If they bounce on the foes, they can cross a portion of the water and reach a pair of vines with the letter K and a Banana Bunch between them. A Klinger climbs along the second of the vines. Once they pass this foe and continue to the right, they reach some more platforms that they must use to cross the water area. A Flitter hovers over some of these platforms, and another Flitter is present slightly ahead of them. The duo must bounce on this foe in order to reach an additional platform that is positioned next to a vine and a large section of land. If the heroes jump from the top of the vine, they can reach a Flitter that they must bounce on to access a Bonus Barrel. | The level begins on a long area of land with a DK Barrel above it. An area of water with two solid platforms above it is ahead of here, and a Zinger hovers between the platforms. Once the water area is crossed, the Kongs reach a small section of ground that supports a Neek. A Zinger hovers near here, and it is followed by two vines, one of which that holds a Klinger, and some platforms located in another pit full of water. The primates can discover two Flitters and some bananas once they reach the last of these platforms. If they bounce on the foes, they can cross a portion of the water and reach a pair of vines with the letter K and a Banana Bunch between them. A Klinger climbs along the second of the vines. Once they pass this foe and continue to the right, they reach some more platforms that they must use to cross the water area. A Flitter hovers over some of these platforms, and another Flitter is present slightly ahead of them. The duo must bounce on this foe in order to reach an additional platform that is positioned next to a vine and a large section of land. If the heroes jump from the top of the vine, they can reach a Flitter that they must bounce on to access a Bonus Barrel. | ||
[[File:Krockhead Klamber DKL2 shot 3.png|thumb|160px|Diddy | [[File:Krockhead Klamber DKL2 shot 3.png|thumb|160px|Diddy on a boardwalk with the letter G above it]] | ||
Near the land area, they can discover a Krockhead Barrel that they must touch in order to make some | Near the land area, they can discover a Krockhead Barrel that they must touch in order to make some Krockheads appear out of the area of water ahead. They must jump along the heads of these crocodile foes in order to progress over the water. As they travel, a Flitter flies in their way. They encounter another Flitter farther ahead of here that they must bounce on to reach a Krockhead located farther ahead of them. This Krockhead is followed by a trio of vines. The vine in the center of the group holds a Klinger, while the final vine in the group is positioned next to a Banana Coin. Two platforms are near here that the primates can use to cross more of the water and reach a Krockhead Barrel. After they hit the barrel, some Krockheads stick their heads out of the surface of the water, and they can be used as stepping stones. As the Kongs travel over a small portion of the water with them, a Zinger flies in their way. They also come up to the letter O, which can only be reached with their super-jump move. Soon, they reach a vine that is followed by a solid platform with a Kaboing on it. An area of land is after here, and the level's Star Barrel and a DK Barrel float above it. | ||
A Neek also walks along the long section of land, which is followed by a Zinger and a solid platform with a Krockhead Barrel above it. If the Kongs touch this barrel, | A Neek also walks along the long section of land, which is followed by a Zinger and a solid platform with a Krockhead Barrel above it. If the Kongs touch this barrel, Krockheads appear in the water ahead of them. A wide gap separates the first two Krockheads, but it can be crossed if the heroes jump on the Flitter that hovers between them. Once they jump from the last of these Krockheads, they reach a vine with a Flitter after it. The enemy can be bounced on in order to reach the letter N and a vine that is positioned to the left of an additional Flitter. The primates can use this enemy to their advantage by bouncing on it in order to reach a Krockhead Barrel and two solid platforms. After they activate the barrel, Krockheads appear ahead of the platforms. As they travel over the water with these creatures, they reach a pair of Flitters that they can use to bounce to another Krockhead with an additional Flitter after it. They can bounce on this insect to reach a Krockhead located next to a vine with a DK Coin next to it. To the right of this vine, the Kongs can discover a trio of platforms that are covered in hopping Kaboings. | ||
Once they pass these foes and continue slightly farther into the level, they reach an area of land that holds a Klomp and a Neek. The letter G and some bananas are also above it. | Once they pass these foes and continue slightly farther into the level, they reach an area of land that holds a Klomp and a Neek. The letter G and some bananas are also above it. | ||
At the end of the land section, the primates can discover a Krockhead Barrel that they must touch to make more | At the end of the land section, the primates can discover a Krockhead Barrel that they must touch to make more Krockheads emerge above the surface of the water. Before they can reach these Krockheads, they must first continue over some of another area of water, where there is a pair of platforms with a wide gap between them. In order to cross this gap, the heroes must bounce on the Flitter that flies between the two platforms. A vine with a Klinger on it follows these platforms, and a Banana Coin floats near the top of it. On the other side of the vine, the primates can find another pair of platforms with a Zinger between them. Once they pass another vine with a Klinger on it, they reach a Krockhead that can hold them above the water. A Flitter is next to the Krockhead, and it must be bounced on in order to reach another Krockhead that is followed by an area of land. A spring is on this ground area, and if the heroes bounce the spring, they complete the level. | ||
{{br}} | {{br}} | ||
| Line 37: | Line 37: | ||
*[[Banana Coin]]: 1 | *[[Banana Coin]]: 1 | ||
*[[DK Barrel]]s: 3 | *[[DK Barrel]]s: 3 | ||
*[[ | *[[Red Balloon]]: 1 | ||
===K-O-N-G Letters=== | |||
*K: Near the beginning of the level, the Kongs reach a pair of cattails, one of which has a Klinger on it. The letter K and a Banana Bunch are between the cattails. | |||
*O: After the Kongs hit the second Krockhead Barrel, they must jump from some emerged Krockheads. The letter O is between two Krockheads after a Zinger, and the Kongs can reach it by safely performing a roll jump. | |||
*N: Shortly before the second Krockhead Barrel after the Star Barrel, the letter N is between a cattail and a Flitter. | |||
*G: Above a Neek and a Klomp on a long boardwalk near the final Krockhead Barrel. | |||
===DK Coin=== | ===DK Coin=== | ||
After the letter N, the Kongs must jump from some Krockheads, and they eventually encounter a few Flitters. They must bounce on the third Flitter to bounce up to the [[DK Coin]], which is above another Flitter. | |||
==Bonus Level== | ==Bonus Level== | ||
[[File:Krockhead Klamber DKL2 Bonus Area.png | {|class=wikitable | ||
!Image | |||
!Type and description | |||
|- | |||
|[[File:Krockhead Klamber DKL2 Bonus Area.png]] | |||
|'''Find the Token!'''<br>Almost immediately before the first Krockhead Barrel, the Kongs reach a cattail which a Flitter is hovering to the right of. They must bounce from it to land into a [[Bonus Barrel]] to the right. In the [[Bonus Level]], the Kongs have 20 seconds to reach the [[Kremkoin]] on the boardwalk on the other side. To get there, Diddy or Dixie must blast from [[Rotatable Barrel]]s over a swamp while following in the direction of the [[banana]]s. | |||
|} | |||
==Gallery== | |||
<gallery> | |||
Krockhead Klamber DKL2.png|Diddy jumps on a lilypad | |||
Krockhead Klamber DKL2 cattails.png|Dixie jumps between cattails | |||
Krockhead Klamber DKL2 screenshot.png|Diddy at a Krockhead Barrel | |||
</gallery> | |||
==Names in other languages== | ==Names in other languages== | ||
Revision as of 19:20, October 17, 2019
Template:Levelbox Krockhead Klamber is the thirteenth level of Donkey Kong Land 2 and the eighth level of Krem Cauldron.
As the level name suggests, Krockhead Klamber has many Krockheads that Diddy Kong and Dixie Kong must jump from to get across a swamp. The Kongs make them emerge from the swamp temporarily by jumping at a Krockhead Barrel. Cattail plants first appear in the level, and are positioned in the swamp and act as vertical ropes. Sometimes a Klinger climbs up and down a cattail. Both Flitters and Zingers appear as the aerial enemies of the level.
Layout

The level begins on a long area of land with a DK Barrel above it. An area of water with two solid platforms above it is ahead of here, and a Zinger hovers between the platforms. Once the water area is crossed, the Kongs reach a small section of ground that supports a Neek. A Zinger hovers near here, and it is followed by two vines, one of which that holds a Klinger, and some platforms located in another pit full of water. The primates can discover two Flitters and some bananas once they reach the last of these platforms. If they bounce on the foes, they can cross a portion of the water and reach a pair of vines with the letter K and a Banana Bunch between them. A Klinger climbs along the second of the vines. Once they pass this foe and continue to the right, they reach some more platforms that they must use to cross the water area. A Flitter hovers over some of these platforms, and another Flitter is present slightly ahead of them. The duo must bounce on this foe in order to reach an additional platform that is positioned next to a vine and a large section of land. If the heroes jump from the top of the vine, they can reach a Flitter that they must bounce on to access a Bonus Barrel.

Near the land area, they can discover a Krockhead Barrel that they must touch in order to make some Krockheads appear out of the area of water ahead. They must jump along the heads of these crocodile foes in order to progress over the water. As they travel, a Flitter flies in their way. They encounter another Flitter farther ahead of here that they must bounce on to reach a Krockhead located farther ahead of them. This Krockhead is followed by a trio of vines. The vine in the center of the group holds a Klinger, while the final vine in the group is positioned next to a Banana Coin. Two platforms are near here that the primates can use to cross more of the water and reach a Krockhead Barrel. After they hit the barrel, some Krockheads stick their heads out of the surface of the water, and they can be used as stepping stones. As the Kongs travel over a small portion of the water with them, a Zinger flies in their way. They also come up to the letter O, which can only be reached with their super-jump move. Soon, they reach a vine that is followed by a solid platform with a Kaboing on it. An area of land is after here, and the level's Star Barrel and a DK Barrel float above it.
A Neek also walks along the long section of land, which is followed by a Zinger and a solid platform with a Krockhead Barrel above it. If the Kongs touch this barrel, Krockheads appear in the water ahead of them. A wide gap separates the first two Krockheads, but it can be crossed if the heroes jump on the Flitter that hovers between them. Once they jump from the last of these Krockheads, they reach a vine with a Flitter after it. The enemy can be bounced on in order to reach the letter N and a vine that is positioned to the left of an additional Flitter. The primates can use this enemy to their advantage by bouncing on it in order to reach a Krockhead Barrel and two solid platforms. After they activate the barrel, Krockheads appear ahead of the platforms. As they travel over the water with these creatures, they reach a pair of Flitters that they can use to bounce to another Krockhead with an additional Flitter after it. They can bounce on this insect to reach a Krockhead located next to a vine with a DK Coin next to it. To the right of this vine, the Kongs can discover a trio of platforms that are covered in hopping Kaboings. Once they pass these foes and continue slightly farther into the level, they reach an area of land that holds a Klomp and a Neek. The letter G and some bananas are also above it.
At the end of the land section, the primates can discover a Krockhead Barrel that they must touch to make more Krockheads emerge above the surface of the water. Before they can reach these Krockheads, they must first continue over some of another area of water, where there is a pair of platforms with a wide gap between them. In order to cross this gap, the heroes must bounce on the Flitter that flies between the two platforms. A vine with a Klinger on it follows these platforms, and a Banana Coin floats near the top of it. On the other side of the vine, the primates can find another pair of platforms with a Zinger between them. Once they pass another vine with a Klinger on it, they reach a Krockhead that can hold them above the water. A Flitter is next to the Krockhead, and it must be bounced on in order to reach another Krockhead that is followed by an area of land. A spring is on this ground area, and if the heroes bounce the spring, they complete the level.
Enemies
Items
- Banana Coin: 1
- DK Barrels: 3
- Red Balloon: 1
K-O-N-G Letters
- K: Near the beginning of the level, the Kongs reach a pair of cattails, one of which has a Klinger on it. The letter K and a Banana Bunch are between the cattails.
- O: After the Kongs hit the second Krockhead Barrel, they must jump from some emerged Krockheads. The letter O is between two Krockheads after a Zinger, and the Kongs can reach it by safely performing a roll jump.
- N: Shortly before the second Krockhead Barrel after the Star Barrel, the letter N is between a cattail and a Flitter.
- G: Above a Neek and a Klomp on a long boardwalk near the final Krockhead Barrel.
DK Coin
After the letter N, the Kongs must jump from some Krockheads, and they eventually encounter a few Flitters. They must bounce on the third Flitter to bounce up to the DK Coin, which is above another Flitter.
Bonus Level
| Image | Type and description |
|---|---|

|
Find the Token! Almost immediately before the first Krockhead Barrel, the Kongs reach a cattail which a Flitter is hovering to the right of. They must bounce from it to land into a Bonus Barrel to the right. In the Bonus Level, the Kongs have 20 seconds to reach the Kremkoin on the boardwalk on the other side. To get there, Diddy or Dixie must blast from Rotatable Barrels over a swamp while following in the direction of the bananas. |
Gallery
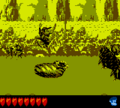
Diddy jumps on a lilypad
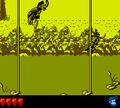
Dixie jumps between cattails

Diddy at a Krockhead Barrel


Names in other languages
| Language | Name | Meaning |
|---|---|---|
| Japanese | クロコヘッドクライマー Kurokuheddo Kuraimā |
Krockhead Climber |