Jagged Jewels: Difference between revisions
m (Text replacement - "dktable-brown" to "wikitable dk") |
|||
| (22 intermediate revisions by 10 users not shown) | |||
| Line 1: | Line 1: | ||
{{level | {{level infobox | ||
|title=Jagged Jewels | |title=Jagged Jewels | ||
|image=[[File:JaggedJewels.png|250px]] | |image=[[File:JaggedJewels.png|250px]] | ||
|code=4 - K | |code=4-K | ||
|world=[[Cave]] | |world=[[Cave]] | ||
|game=''[[Donkey Kong Country Returns]]'' (''[[Donkey Kong Country Returns 3D|3D]]'') | |game=''[[Donkey Kong Country Returns]]'' (''[[Donkey Kong Country Returns 3D|3D]]'') | ||
|before=[[Bombs Away (level)|<<]] | |before=[[Bombs Away (level)|<<]] | ||
|after= | |after= | ||
}} | }} | ||
'''Jagged Jewels''' is the twenty-eighth level in ''[[Donkey Kong Country Returns]]'' and ''[[Donkey Kong Country Returns 3D]]'', as well as the sixth and final level in the [[Cave]] world. It is a | '''Jagged Jewels''' is the twenty-eighth level in ''[[Donkey Kong Country Returns]]'' and ''[[Donkey Kong Country Returns 3D]]'', as well as the sixth and final level in the [[Cave]] world. It is a Key Temple, and all of the [[KONG Letters|K-O-N-G Letters]] in the Cave world must be collected to unlock it. | ||
As its name suggests, this level features many sharp, jewel-like spikes. These spikes can be found on or around every platform in this | As its name suggests, this level features many sharp, jewel-like spikes. These spikes can be found on or around every platform in this temple. Most of the spikes are located inside square-shaped platforms, sticking out of them occasionally to attack the [[Kong]]s, but some also revolve around hemisphere shaped platforms as well. Other times, they quickly orbit around tilting, cylinder shaped platforms or appear on parts of the ceiling that can smash [[Donkey Kong]] and [[Diddy Kong]]. There are also some [[Skewer]]-like obstacles, which behave in a similar way to their ''[[Super Mario (franchise)|Super Mario]]'' franchise counterpart. | ||
Other than spikes, the | Other than spikes, the level has many [[Buzzbite]]s rolling along the platforms. | ||
In the [[Donkey Kong Country Returns#Time Attack|Time Attack]] mode of the game, a time of 1:10:00 is needed to get a gold medal, a time of 1:30:00 for silver, and a time of 1:50:00 for bronze. | In the [[Donkey Kong Country Returns#Time Attack|Time Attack]] mode of the game, a time of 1:10:00 is needed to get a gold medal, a time of 1:30:00 for silver, and a time of 1:50:00 for bronze. | ||
==Overview== | ==Overview== | ||
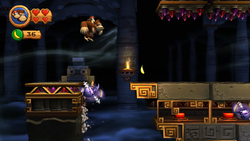
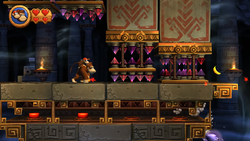
At the beginning of the level, there is a solid | At the beginning of the level, there is a solid and flat pathway with a [[DK Barrel]] on the end of it. The platform in the large gap ahead features three sets of spikes that shoot in and out of it repeatedly. A solid platform is ahead with a ceiling of spikes above it. A [[Buzzbite]] on the bottom part of the platform travels in circles, occasionally hitting a small button that makes the ceiling fall downwards and possibly crush one of the Kongs. When it is passed, the primates come up to two tall platforms with spikes shooting out of them. A platform shaped like a hemisphere is ahead with a ring of spikes surrounding it. If they manage to reach the following platform, they can find two ceilings of spikes that fall downwards every time the Buzzbite beneath the platform hits a button. A tall platform with spikes shooting in and out of it and two hemisphere-shaped objects are after it. They have rings of spikes around them. A Tiki Goon is also on the first hemisphere platform, and a Buzzbite surrounds the second. | ||
[[File:DKCR Jagged Jewels 1.png|thumb|left|250px|The Kongs head towards a solid platform with spiky ceilings smashing it]] | |||
There is a pair of tilting, pillar-like platforms in the gap ahead that have more spikes shooting in and out of them. A similar platform to these is right after another hemisphere shaped platform with a ring of spikes around it. A Buzzbite moves all around it. After the gap nearby, the heroes can reach a long, solid area with four separate ceilings of spikes above it. They fall to the ground when they a triggered by the Buzzbites below, who hit buttons that activate them. A pair of hemisphere-shaped platforms follow this area, with rings of spikes around them. There is a long, cylinder-shaped platform nearby, tilting up and down. A ring of spikes moves along it. After another hemisphere-shaped platform, the primates reach another cylinder-shaped platform with two spiky rings around it. Buzzbites also surround it. Two small, solid platforms follow this area, and a Tiki Boing is on the second of them. Pillars covered in spikes shoot from the gaps between them. | |||
A tilting, cylinder-shaped structure with one spiky ring moving around it is after this, being followed by three more small platforms that each have a spiked pillar shooting around them. After passing the third of these spiky pillars, they reach another cylinder-shaped platform that has three spike-covered rings around it. Buzzbites also circle it. One small platform with a Tiki Boing on it is nearby, with a single pillar of spikes shooting next to it. Just ahead of it is a hemisphere-shaped platform with more spiky rings around it. There is yet another small platform after here, and it has a spiky pillar near it. A tilting, cylinder-shaped structure is ahead, and a few spiked rings and Buzzbites move around it. A plain, solid platform is soon after, with two hemisphere-shaped platforms after it. As usual, rings of spikes move around them. Once they are traveled along, the duo reaches a round platform with a hole in the center of it. A platform with a spiky ring around it is in the hole. As they continue along it, a [[Barrel Cannon]] appears nearby. If they get into it, they are shot to a solid area of ground. The pathway ahead leads to the fourth [[Rare Orb]]. When it is grabbed, the level ends. | |||
==Enemies== | |||
{| class="wikitable dk" | |||
!Image | |||
!Name | |||
!Count | |||
|- | |||
|align="center"|[[File:Buzzbite_DKCR.png|x50px]] | |||
|align="center"|[[Buzzbite]] | |||
|16 | |||
|- | |||
|align="center"|[[File:Tiki_Boing.png|x50px]] | |||
|align="center"|[[Tiki Boing]] | |||
|3 | |||
|- | |||
|align="center"|[[File:TikiGoon.png|x50px]] | |||
|align="center"|[[Tiki Goon]] | |||
|2 | |||
|} | |||
== | ==Items== | ||
{|class="wikitable dk" width=15% | |||
|- | |||
!Image | |||
!Name | |||
!Count | |||
|- | |||
|align="center"|[[File:BananacoinDKCR.png|x50px]] | |||
|align="center"|[[Banana Coin]] | |||
|2 | |||
|- | |||
|align="center"|[[File:DKBarrelDKCR.png|x50px]] | |||
|align="center"|[[DK Barrel]] | |||
|1 | |||
|} | |||
===Puzzle Pieces=== | ===Puzzle Pieces=== | ||
[[File: | {|class="wikitable dk" width=70% | ||
|- | |||
!Image | |||
!Number | |||
!Location | |||
|- | |||
|align="center"|[[File:DKCR Jagged Jewels Puzzle Piece 1.png|250px]] | |||
|align="center"|1 | |||
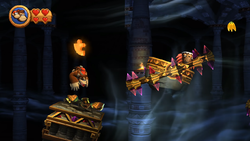
|The first [[Puzzle Piece (Donkey Kong Country series)|Puzzle Piece]] is hidden within a vase on a tilting platform. The Kongs must break the vase and release the piece, and then grab it before the spikes pop up and stab him. | |||
|- | |||
|align="center"|[[File:DKCR Jagged Jewels Puzzle Piece 2.png|250px]] | |||
|align="center"|2 | |||
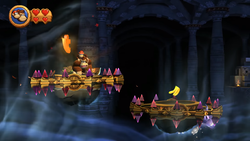
|The second Puzzle Piece is also hidden in a vase. This time, however, it is on a tilting platform with a Tiki Goon that has a ring of spikes tilting around it in a different angle. The Kongs need to break the vase and grab the piece without touching the ring of spikes. | |||
|- | |||
|align="center"|[[File:DKCR Jagged Jewels Puzzle Piece 3.png|250px]] | |||
|align="center"|3 | |||
|The third Puzzle Piece is hovering over a spike that shoots and recoils constantly. The player needs to wait until the spike is recoiling and then hop over the tip of the spike to grab the piece. | |||
|- | |||
|align="center"|[[File:DKCR Jagged Jewels Puzzle Piece 4.png|250px]] | |||
|align="center"|4 | |||
|The fourth Puzzle Piece is much like the third, except it is reversed. The player needs to have a Kong roll at the piece as the spike is recoiling, and then jump onto the next platform to avoid death. | |||
|- | |||
|align="center"|[[File:DKCR Jagged Jewels Puzzle Piece 5.png|250px]] | |||
|align="center"|5 | |||
|After shooting to the final platform, the player must have Diddy Kong in order to fly back to the piece. The Puzzle Piece is above the barrel, and requires the rockets to be able to reach that far. | |||
|} | |||
==Names in other languages== | ==Names in other languages== | ||
| Line 40: | Line 91: | ||
|JapM=Spiky Labyrinth | |JapM=Spiky Labyrinth | ||
|Spa=Joyas en los juanetes | |Spa=Joyas en los juanetes | ||
|SpaM=Jewels in the Bunions | |SpaM=Jewels in the Bunions | ||
| | |Ita=Antro gemmaguzza | ||
| | |ItaM= | ||
|FreA=Pics Épiques | |||
|FreAM=Epic Spikes | |||
|Ger=Pieksende Preziosen | |Ger=Pieksende Preziosen | ||
|GerM=Pricky Jewelry}} | |GerM=Pricky Jewelry | ||
}} | |||
{{DKCR}} | {{DKCR}} | ||
[[Category:Secret | [[Category:Secret levels]] | ||
[[Category:Temples | [[Category:Temples]] | ||
[[Category:Donkey Kong Country Returns | [[Category:Donkey Kong Country Returns levels]] | ||
Latest revision as of 14:18, February 3, 2024
| Level | |
|---|---|
| Jagged Jewels | |
| |
| Level code | 4-K |
| World | Cave |
| Game | Donkey Kong Country Returns (3D) |
| << Directory of levels >> | |
Jagged Jewels is the twenty-eighth level in Donkey Kong Country Returns and Donkey Kong Country Returns 3D, as well as the sixth and final level in the Cave world. It is a Key Temple, and all of the K-O-N-G Letters in the Cave world must be collected to unlock it.
As its name suggests, this level features many sharp, jewel-like spikes. These spikes can be found on or around every platform in this temple. Most of the spikes are located inside square-shaped platforms, sticking out of them occasionally to attack the Kongs, but some also revolve around hemisphere shaped platforms as well. Other times, they quickly orbit around tilting, cylinder shaped platforms or appear on parts of the ceiling that can smash Donkey Kong and Diddy Kong. There are also some Skewer-like obstacles, which behave in a similar way to their Super Mario franchise counterpart.
Other than spikes, the level has many Buzzbites rolling along the platforms.
In the Time Attack mode of the game, a time of 1:10:00 is needed to get a gold medal, a time of 1:30:00 for silver, and a time of 1:50:00 for bronze.
Overview[edit]
At the beginning of the level, there is a solid and flat pathway with a DK Barrel on the end of it. The platform in the large gap ahead features three sets of spikes that shoot in and out of it repeatedly. A solid platform is ahead with a ceiling of spikes above it. A Buzzbite on the bottom part of the platform travels in circles, occasionally hitting a small button that makes the ceiling fall downwards and possibly crush one of the Kongs. When it is passed, the primates come up to two tall platforms with spikes shooting out of them. A platform shaped like a hemisphere is ahead with a ring of spikes surrounding it. If they manage to reach the following platform, they can find two ceilings of spikes that fall downwards every time the Buzzbite beneath the platform hits a button. A tall platform with spikes shooting in and out of it and two hemisphere-shaped objects are after it. They have rings of spikes around them. A Tiki Goon is also on the first hemisphere platform, and a Buzzbite surrounds the second.
There is a pair of tilting, pillar-like platforms in the gap ahead that have more spikes shooting in and out of them. A similar platform to these is right after another hemisphere shaped platform with a ring of spikes around it. A Buzzbite moves all around it. After the gap nearby, the heroes can reach a long, solid area with four separate ceilings of spikes above it. They fall to the ground when they a triggered by the Buzzbites below, who hit buttons that activate them. A pair of hemisphere-shaped platforms follow this area, with rings of spikes around them. There is a long, cylinder-shaped platform nearby, tilting up and down. A ring of spikes moves along it. After another hemisphere-shaped platform, the primates reach another cylinder-shaped platform with two spiky rings around it. Buzzbites also surround it. Two small, solid platforms follow this area, and a Tiki Boing is on the second of them. Pillars covered in spikes shoot from the gaps between them.
A tilting, cylinder-shaped structure with one spiky ring moving around it is after this, being followed by three more small platforms that each have a spiked pillar shooting around them. After passing the third of these spiky pillars, they reach another cylinder-shaped platform that has three spike-covered rings around it. Buzzbites also circle it. One small platform with a Tiki Boing on it is nearby, with a single pillar of spikes shooting next to it. Just ahead of it is a hemisphere-shaped platform with more spiky rings around it. There is yet another small platform after here, and it has a spiky pillar near it. A tilting, cylinder-shaped structure is ahead, and a few spiked rings and Buzzbites move around it. A plain, solid platform is soon after, with two hemisphere-shaped platforms after it. As usual, rings of spikes move around them. Once they are traveled along, the duo reaches a round platform with a hole in the center of it. A platform with a spiky ring around it is in the hole. As they continue along it, a Barrel Cannon appears nearby. If they get into it, they are shot to a solid area of ground. The pathway ahead leads to the fourth Rare Orb. When it is grabbed, the level ends.
Enemies[edit]
| Image | Name | Count |
|---|---|---|

|
Buzzbite | 16 |

|
Tiki Boing | 3 |
| Tiki Goon | 2 |
Items[edit]
| Image | Name | Count |
|---|---|---|
| Banana Coin | 2 | |
| DK Barrel | 1 |
Puzzle Pieces[edit]
| Image | Number | Location |
|---|---|---|
|
1 | The first Puzzle Piece is hidden within a vase on a tilting platform. The Kongs must break the vase and release the piece, and then grab it before the spikes pop up and stab him. |
|
2 | The second Puzzle Piece is also hidden in a vase. This time, however, it is on a tilting platform with a Tiki Goon that has a ring of spikes tilting around it in a different angle. The Kongs need to break the vase and grab the piece without touching the ring of spikes. |
|
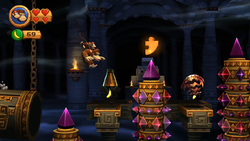
3 | The third Puzzle Piece is hovering over a spike that shoots and recoils constantly. The player needs to wait until the spike is recoiling and then hop over the tip of the spike to grab the piece. |
|
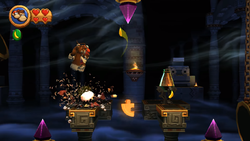
4 | The fourth Puzzle Piece is much like the third, except it is reversed. The player needs to have a Kong roll at the piece as the spike is recoiling, and then jump onto the next platform to avoid death. |
|
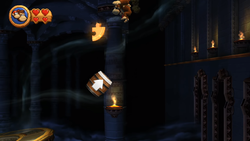
5 | After shooting to the final platform, the player must have Diddy Kong in order to fly back to the piece. The Puzzle Piece is above the barrel, and requires the rockets to be able to reach that far. |
Names in other languages[edit]
| Language | Name | Meaning |
|---|---|---|
| Japanese | トゲトゲラビリンス Togetoge Rabirinsu |
Spiky Labyrinth |
| French (NOA) | Pics Épiques |
Epic Spikes |
| German | Pieksende Preziosen |
Pricky Jewelry |
| Italian | Antro gemmaguzza |
|
| Spanish | Joyas en los juanetes |
Jewels in the Bunions |
