Mainbrace Mayhem (Donkey Kong Country 2): Difference between revisions
(Restructuring to match other pages.) |
(part one) |
||
| Line 12: | Line 12: | ||
'''Mainbrace Mayhem''' is the second level of ''[[Donkey Kong Country 2: Diddy's Kong Quest]]'' and its world, [[Gangplank Galleon (world)|Gangplank Galleon]]. | '''Mainbrace Mayhem''' is the second level of ''[[Donkey Kong Country 2: Diddy's Kong Quest]]'' and its world, [[Gangplank Galleon (world)|Gangplank Galleon]]. | ||
This is the first rigging level of the game | == Summary == | ||
This is the first rigging level of the game. It involves [[Diddy Kong|Diddy]] and [[Dixie Kong]] climbing on multiple ship masts and yards in order to progress. The [[Kong]]s must climb many [[rope]]s, both vertically and horizontally, in order to reach the top. Unlike ''[[Donkey Kong Country]]'', the Kongs cannot swing from these ropes. | |||
== | Two enemies are introduced in the level: [[Klinger]]s, who climb up and slide down the ropes throughout, and [[Click-Clack]]s, beetles who walk on the yards throughout. There are also [[Neek]]s and [[Klomp]]s, which return from the previous level, [[Pirate Panic (Donkey Kong Country 2: Diddy's Kong Quest)|Pirate Panic]]. Mainbrace Mayhem also introduces a [[Kannon (cannon)|kannon]] and a [[kannonball]], which leads into one of its [[Bonus Level]]s. It is the first level to feature these objects. | ||
==Layout== | |||
The level begins on a yard with a Click-Clack and a few bananas on it. There is a tilted yard just ahead with a pair of Neeks and a [[barrel]] on it. A [[DK Barrel]] shakes in front of a nearby rope that leads up to a higher yard and the [[K-O-N-G Letters|letter K]]. A Click-Clack is on this yard, and two more of these blue insects are on the following yard to the left. A crate also sits on the yard. Ropes are above here, and a Klinger slides along them, guarding a [[Banana Coin]]. The ropes can be used to reach a yard with another Click-Clack on it. A set of ropes floats near here with the letter O and another Klinger on it. Two yards are located around these ropes. The one on the left holds two Banana Coins, while the one to the right leads to some ropes. A Click-Clack is on this yard. Once the Kongs climb the ropes, they find themselves on a higher yard with a barrel. The [[Star Barrel]] is also above them here. | The level begins on a yard with a Click-Clack and a few bananas on it. There is a tilted yard just ahead with a pair of Neeks and a [[barrel]] on it. A [[DK Barrel]] shakes in front of a nearby rope that leads up to a higher yard and the [[K-O-N-G Letters|letter K]]. A Click-Clack is on this yard, and two more of these blue insects are on the following yard to the left. A crate also sits on the yard. Ropes are above here, and a Klinger slides along them, guarding a [[Banana Coin]]. The ropes can be used to reach a yard with another Click-Clack on it. A set of ropes floats near here with the letter O and another Klinger on it. Two yards are located around these ropes. The one on the left holds two Banana Coins, while the one to the right leads to some ropes. A Click-Clack is on this yard. Once the Kongs climb the ropes, they find themselves on a higher yard with a barrel. The [[Star Barrel]] is also above them here. | ||
[[File:DiddyKongRap.png|thumb|left|Diddy Kong celebrates after completing the level]] | [[File:DiddyKongRap.png|thumb|left|Diddy Kong celebrates after completing the level]] | ||
Neeks march down a tilted yard just ahead. Ropes are right after the mob of foes, holding a DK Barrel. When the Kongs climb the rope, they can find a yard with two Klomps and a crate on it. They can either travel along this yard or continue along the rope, which leads above the [[Kremling]] enemies. Many bananas are along the long rope. At the end of the rope and the yard, the heroes can find two sets of ropes, both of which that are infested with Klingers. The letter N is next to the second set of ropes, which can be climbed to reach a yard with a Klomp, a DK Barrel, and a kannonball. There is a tilted yard nearby to the west, which has a pair a Click-Clacks marching along it. A flat yard is at the end of this one, which holds a cannon that can shoot the primates to a [[Bonus Level]] if the kannonball found previously is inserted into it. Some ropes with a Klinger on them are above here. The Kongs can climb along the ropes to reach a second set of ropes with two Klingers on them. A yard is hidden to the left of here with a [[Bonus Barrel]] located above it. Soon, the heroes climb farther along the ropes, which lead straight to a yard with the [[End of Level Target]] | Neeks march down a tilted yard just ahead. Ropes are right after the mob of foes, holding a DK Barrel. When the Kongs climb the rope, they can find a yard with two Klomps and a crate on it. They can either travel along this yard or continue along the rope, which leads above the [[Kremling]] enemies. Many bananas are along the long rope. At the end of the rope and the yard, the heroes can find two sets of ropes, both of which that are infested with Klingers. The letter N is next to the second set of ropes, which can be climbed to reach a yard with a Klomp, a DK Barrel, and a kannonball. There is a tilted yard nearby to the west, which has a pair a Click-Clacks marching along it. A flat yard is at the end of this one, which holds a cannon that can shoot the primates to a [[Bonus Level]] if the kannonball found previously is inserted into it. Some ropes with a Klinger on them are above here. The Kongs can climb along the ropes to reach a second set of ropes with two Klingers on them. A yard is hidden to the left of here with a [[Bonus Barrel]] located above it. Soon, the heroes climb farther along the ropes, which lead straight to a yard with the [[End of Level Target]]. The end prizes include a Banana Bunch, Banana Bunch Coin, or a red Extra Life Balloon. | ||
{{br}} | {{br}} | ||
| Line 37: | Line 40: | ||
|align="center"|[[File:Klinger DKC2.png]] | |align="center"|[[File:Klinger DKC2.png]] | ||
|[[Klinger]] | |[[Klinger]] | ||
| | |8 (main level)<br>5 (second Bonus Level)<br>'''Total:''' 13 | ||
|- | |- | ||
|align="center"|[[File:Klomp DKC2.png]] | |align="center"|[[File:Klomp DKC2.png]] | ||
| Line 54: | Line 57: | ||
|- | |- | ||
| align="center" |[[File:Banana Coin.png]]<br>[[Banana Coin|Banana Bunch Coin]] | | align="center" |[[File:Banana Coin.png]]<br>[[Banana Coin|Banana Bunch Coin]] | ||
| | |3 | ||
|- | |||
| align="center" |[[File:DKC2 Barrel.png]]<br>[[Barrel]] | |||
|3 | |||
|- | |||
| align="center" |[[File:Crate DKC2.png]]<br>[[Crate]] | |||
|2 | |||
|- | |- | ||
| align="center" |[[File:DK Barrel.png]]<br>[[DK Barrel]] | | align="center" |[[File:DK Barrel.png]]<br>[[DK Barrel]] | ||
| Line 62: | Line 71: | ||
|1 | |1 | ||
|- | |- | ||
| align="center" |[[File: | | align="center" |[[File:CannonSprite-DKC2.png]]<br>[[Kannon (cannon)|Kannon]] | ||
| | |1 | ||
|- | |- | ||
| align="center" |[[File:Kannonball.png]]<br>[[Kannonball]] | | align="center" |[[File:Kannonball.png]]<br>[[Kannonball]] | ||
|2 | |2 (1 of which in a Bonus Level) | ||
|} | |} | ||
| Line 79: | Line 85: | ||
|- | |- | ||
| align="center" |[[File:Letter K.png]] | | align="center" |[[File:Letter K.png]] | ||
| | |At the top-right of the first rope, hovering between a square. | ||
|- | |- | ||
| align="center" |[[File:Letter O.png]] | | align="center" |[[File:Letter O.png]] | ||
| | |Located on the third set of ropes, to the left of a Klinger. | ||
|- | |- | ||
| align="center" |[[File:Letter N.png]] | | align="center" |[[File:Letter N.png]] | ||
| | |After the Star Barrel, the Kongs must climb a few more sets of ropes. The letter N is next to the second Klinger, on the right. | ||
|- | |- | ||
| align="center" |[[File:Letter G.png]] | | align="center" |[[File:Letter G.png]] | ||
| | |After the Kannon, the Kongs must climb up a rope, go horizontal, and then straight down to find the letter G hanging at the bottom of a rope. | ||
|} | |} | ||
===Collectibles=== | ===Collectibles=== | ||
[[File:MainbraceMayhemCoin.png|thumb|The DK Coin]] | [[File:MainbraceMayhemCoin.png|thumb|The DK Coin]] | ||
{|class="dktable-brown" width=70% | {|class="dktable-brown" width=70% | ||
|- | |- | ||
| Line 104: | Line 105: | ||
|- | |- | ||
| align="center" |[[File:DK Coin sprite.png]]<br>[[DK Coin]] | | align="center" |[[File:DK Coin sprite.png]]<br>[[DK Coin]] | ||
| | |From the yard beneath the third Bonus Barrel, the Kongs must use [[Team-up]] to reach an uppermost yard. They can also land on it by exiting the third Bonus Level. From the level's uppermost yard, the Kongs must continue forward and jump to another yard to the right and collect its DK Coin. | ||
|- | |- | ||
| align="center" | [[File:Golden Feather DKC2 GBA.png]]<br>[[Golden Feather]] (GBA version) | | align="center" | [[File:Golden Feather DKC2 GBA.png]]<br>[[Golden Feather]] (GBA version) | ||
|To find the | |To find the Golden Feather, the Kongs must be on a grid-shaped series of ropes with the letter O. They must jump left to land on a hidden yard with two Banana Coins and the Golden Feather. | ||
|} | |} | ||
| Line 135: | Line 136: | ||
|'''''Collect the Stars!'''''<br>The final Bonus Barrel is on a ship yard far west of the [[End of Level Target]]. The Kongs must use their [[Team-up]] move to reach the barrel. The barrel sends them into a Bonus Level, where they must climb up and down some ropes in order to collect 75 stars within the time limit of 35 seconds. Once all of the stars are collected, the Kremkoin appears for them to grab within the remaining time. | |'''''Collect the Stars!'''''<br>The final Bonus Barrel is on a ship yard far west of the [[End of Level Target]]. The Kongs must use their [[Team-up]] move to reach the barrel. The barrel sends them into a Bonus Level, where they must climb up and down some ropes in order to collect 75 stars within the time limit of 35 seconds. Once all of the stars are collected, the Kremkoin appears for them to grab within the remaining time. | ||
|} | |} | ||
==Gallery== | |||
===Super Nintendo Entertainment System=== | |||
<gallery> | |||
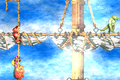
Gangplank Galleon Rigging concept.jpg|Concept artwork of the level's rigging theme | |||
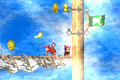
MainbraceMayhemCannonball.png|Dixie carrying a kannonball to a Click-Clack on her path to second Bonus Level. | |||
MainbraceMayhem-SNES-O.png|The letter O | |||
MainbraceMayhem-SNES-N.png|The letter N | |||
</gallery> | |||
===Game Boy Advance=== | |||
<gallery> | |||
Mainbrace Mayhem DKC2 GBA.png|The Kongs climbing up a vertical rope | |||
MainbraceMayhem-GBA-Feather.png|The location of the Golden Feather | |||
</gallery> | |||
==Names in other languages== | ==Names in other languages== | ||
| Line 146: | Line 162: | ||
|JapM=Main-Mast Crisis | |JapM=Main-Mast Crisis | ||
}} | }} | ||
{{DKC2}} | {{DKC2}} | ||
[[Category:Crocodile Isle]] | [[Category:Crocodile Isle]] | ||
[[Category:Donkey Kong Country 2: Diddy's Kong Quest Levels]] | [[Category:Donkey Kong Country 2: Diddy's Kong Quest Levels]] | ||
Revision as of 13:24, June 18, 2019
Template:Levelbox Mainbrace Mayhem is the second level of Donkey Kong Country 2: Diddy's Kong Quest and its world, Gangplank Galleon.
Summary
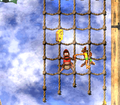
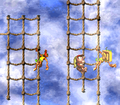
This is the first rigging level of the game. It involves Diddy and Dixie Kong climbing on multiple ship masts and yards in order to progress. The Kongs must climb many ropes, both vertically and horizontally, in order to reach the top. Unlike Donkey Kong Country, the Kongs cannot swing from these ropes.
Two enemies are introduced in the level: Klingers, who climb up and slide down the ropes throughout, and Click-Clacks, beetles who walk on the yards throughout. There are also Neeks and Klomps, which return from the previous level, Pirate Panic. Mainbrace Mayhem also introduces a kannon and a kannonball, which leads into one of its Bonus Levels. It is the first level to feature these objects.
Layout
The level begins on a yard with a Click-Clack and a few bananas on it. There is a tilted yard just ahead with a pair of Neeks and a barrel on it. A DK Barrel shakes in front of a nearby rope that leads up to a higher yard and the letter K. A Click-Clack is on this yard, and two more of these blue insects are on the following yard to the left. A crate also sits on the yard. Ropes are above here, and a Klinger slides along them, guarding a Banana Coin. The ropes can be used to reach a yard with another Click-Clack on it. A set of ropes floats near here with the letter O and another Klinger on it. Two yards are located around these ropes. The one on the left holds two Banana Coins, while the one to the right leads to some ropes. A Click-Clack is on this yard. Once the Kongs climb the ropes, they find themselves on a higher yard with a barrel. The Star Barrel is also above them here.

Neeks march down a tilted yard just ahead. Ropes are right after the mob of foes, holding a DK Barrel. When the Kongs climb the rope, they can find a yard with two Klomps and a crate on it. They can either travel along this yard or continue along the rope, which leads above the Kremling enemies. Many bananas are along the long rope. At the end of the rope and the yard, the heroes can find two sets of ropes, both of which that are infested with Klingers. The letter N is next to the second set of ropes, which can be climbed to reach a yard with a Klomp, a DK Barrel, and a kannonball. There is a tilted yard nearby to the west, which has a pair a Click-Clacks marching along it. A flat yard is at the end of this one, which holds a cannon that can shoot the primates to a Bonus Level if the kannonball found previously is inserted into it. Some ropes with a Klinger on them are above here. The Kongs can climb along the ropes to reach a second set of ropes with two Klingers on them. A yard is hidden to the left of here with a Bonus Barrel located above it. Soon, the heroes climb farther along the ropes, which lead straight to a yard with the End of Level Target. The end prizes include a Banana Bunch, Banana Bunch Coin, or a red Extra Life Balloon.
Enemies
| Sprite | Name | Count |
|---|---|---|
| Click-Clack | 8 | |
| Neek | 10 | |
| Klinger | 8 (main level) 5 (second Bonus Level) Total: 13 | |
| Klomp | 3 |
Items and objects
| Name | Amount |
|---|---|
Banana |
166 |
Banana Bunch Coin |
3 |
Barrel |
3 |
Crate |
2 |
DK Barrel |
3 |
Extra Life Balloon |
1 |
Kannon |
1 |
Kannonball |
2 (1 of which in a Bonus Level) |
K-O-N-G Letters
| Letter | Location |
|---|---|
| At the top-right of the first rope, hovering between a square. | |
| Located on the third set of ropes, to the left of a Klinger. | |
| After the Star Barrel, the Kongs must climb a few more sets of ropes. The letter N is next to the second Klinger, on the right. | |
| After the Kannon, the Kongs must climb up a rope, go horizontal, and then straight down to find the letter G hanging at the bottom of a rope. |
Collectibles

| Item | Location |
|---|---|
DK Coin |
From the yard beneath the third Bonus Barrel, the Kongs must use Team-up to reach an uppermost yard. They can also land on it by exiting the third Bonus Level. From the level's uppermost yard, the Kongs must continue forward and jump to another yard to the right and collect its DK Coin. |
Golden Feather (GBA version) |
To find the Golden Feather, the Kongs must be on a grid-shaped series of ropes with the letter O. They must jump left to land on a hidden yard with two Banana Coins and the Golden Feather. |
Warp Barrel
| Sprite | Location |
|---|---|
| At the beginning of the level, Dixie Kong should roll off of the edge of the first yard and then hover to the left under the yard with her Helicopter Spin to land in a hidden Warp Barrel that can take her into a Bonus Level. Here, she and Diddy Kong can find a formation of bananas that create an exclamation mark on a yard. If they travel to the right end of the bonus, they can exit the area and reenter the main level near the level's DK Coin, which is positioned above the End of Level Target. |
Bonus Levels
| Image | Type and description |
|---|---|

|
Find the Token! The first Bonus Level is near the very beginning of the level. Dixie Kong must be the Kong in the lead and look for a group of bananas forming the shape of an arrow to the right of the level's start. She must then use her Helicopter Spin to hover off of the yard and move through the air in the direction of the arrow, where she should see some ropes to climb on. To the right of the ropes is a Bonus Barrel, which she can go into in order to access a Bonus Level. There, Dixie and Diddy need to climb up a series of ropes until they reach the Kremkoin and complete the Bonus Level. They have 20 seconds to reach the coin located at the end of the bonus. |

|
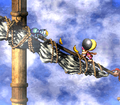
Destroy Them All! The second Bonus Level can be reached by shooting out of a cannon. Shortly after passing the Star Barrel, the primates must find and pick up a kannonball and carry it across the yard. At the end of the yard, there is a cannon. When they put the ball in the cannon, it glows, meaning that it is loaded. The cannon can shoot them into the Bonus Level if they enter it in this state. In the Bonus Level, they must defeat some Klingers who slide on ropes above them within 35 seconds. The two primates must use the crates and kannonballs around them to defeat all of the enemies. Once they are all defeated, a Kremkoin appears to grab within the remaining time. |

|
Collect the Stars! The final Bonus Barrel is on a ship yard far west of the End of Level Target. The Kongs must use their Team-up move to reach the barrel. The barrel sends them into a Bonus Level, where they must climb up and down some ropes in order to collect 75 stars within the time limit of 35 seconds. Once all of the stars are collected, the Kremkoin appears for them to grab within the remaining time. |
Gallery
Super Nintendo Entertainment System
Concept artwork of the level's rigging theme
Dixie carrying a kannonball to a Click-Clack on her path to second Bonus Level.
The letter O
The letter N


Game Boy Advance
The Kongs climbing up a vertical rope
The location of the Golden Feather


Names in other languages
| Language | Name | Meaning |
|---|---|---|
| Japanese | メインマスト クライシス Meinmasuto kuraishisu |
Main-Mast Crisis |
| Italian | Orde di Corde! |
Hordes of Ropes! |