Cherry Kingdom: Difference between revisions

From the Super Mario Wiki, the Mario encyclopedia
Jump to navigationJump to search
Tags: Mobile edit Advanced mobile edit
 
(40 intermediate revisions by 15 users not shown)
Line 1: Line 1:
{{DKJB Kingdom
{{DKJB kingdom infobox
|barrel=J Barrel
|barrel=J Barrel
|image=[[Image:Aurora_Glacier.PNG|230px]]
|image=[[File:CherryKingdomIcon.png]]
|crests=12
|crests=12
|levels=Aurora Glacier<br>Grim Volcano
|levels=[[Aurora Glacier]]<br>[[Grim Volcano]]
|boss=[[Hard Roc]] (GameCube version)<br>[[Grave Tusk]] (Wii version)
|boss=[[Hard Roc]] (GameCube)<br>[[Grave Tusk]] (Wii)
|notes=This kingdom marks the first appearance of a dancing panda enemy.
|before=[[Grape Kingdom|<<]]
|before=[[Grape Kingdom|<<]]
|after=[[Peach Kingdom|>>]]
|after=[[Peach Kingdom|>>]]
}}
}}
The '''Cherry Kingdom''' is the ninth kingdom linked in ''[[Donkey Kong Jungle Beat]]'', and the first kingdom linked to the [[Barrel|J Barrel]]. The kingdom is located on both a glacier and a volcano. The Cherry Kingdom can be accessed by completing all the kingdoms linked to the K Barrel and collecting twelve or more [[Crest]]s. It is the dominion of [[Hard Roc]] in the [[GameCube]] version of the game, or [[Grave Tusk]] in the ''[[New Play Control!]]'' version. [[Donkey Kong]] travels through this kingdom to fight these mighty foes, and at the end of every level he eats a giant [[cherry]] bunch.
The '''Cherry Kingdom''' is the ninth kingdom in ''[[Donkey Kong Jungle Beat]]''. In the original version of the game, it is the first kingdom linked to the [[Barrel|J Barrel]] and can be accessed by completing all the kingdoms linked to the K Barrel and collecting twelve or more [[Crest]]s. In the ''[[New Play Control!]]'' version, it is the third kingdom linked to the J Barrel and is accessed by completing the [[Grape Kingdom]]. It is the dominion of [[Hard Roc]] in the [[Nintendo GameCube]] version of the game, or [[Grave Tusk]] in the ''[[New Play Control!]]'' version. At the end of every level, [[Donkey Kong]] eats a giant [[cherry]] bunch.


==Levels==
==Levels==
===Aurora Glacier===
{|border=1 cellspacing=0 cellpadding=3 style="border-collapse:collapse" style="text-align: center;
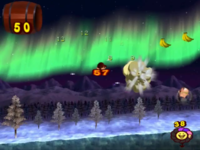
'''Aurora Glacier''' is the first area of the Cherry Kingdom. As its name implies, this level takes place on a freezing glacier. Donkey Kong has less traction on this stage and can easily slide across the icy floors. Freezing bats attack Donkey Kong here, causing him to freeze as well if hit. The stage also features some [[Helper Monkey]]s, who toss Donkey Kong to new areas. Although it appears to be very chilly in this level, Donkey Kong is able to swim in the underwater areas of it. Two mini-bosses are encountered in this level as well, and they include a set of two hog enemies, who throw coconuts at the ape from trees, and a round, rolling reptile. At the end of the level, Donkey Kong is able to bite into a cherry bunch to end the level.
!width="140px"|Level
!Preview
!Description
|-
![[Aurora Glacier]]
|[[File:Aurora_Glacier.png|200px]]
|align=left|Aurora Glacier is the first area of the Cherry Kingdom. Auroras can be seen in the outside portion of the level, hence the name. [[Donkey Kong]] has less traction on this stage and can easily slide across the icy floors. [[Ice Bakky|Ice Bakkies]] attack Donkey Kong here, causing him to freeze as well if hit. The stage also features some [[Helper Monkey]]s, who toss Donkey Kong to new areas. Although it appears to be very chilly in this level, Donkey Kong is able to swim in the underwater areas of it. Two mini-bosses are encountered in this level as well, and they include a set of two [[Coco Pig]]s, who throw coconuts and ice balls at the ape from trees, and a [[Rolling Frog]]. At the end of the level, Donkey Kong is able to bite into a cherry bunch to end the level.
|-
![[Grim Volcano]]
|[[File:Grim_Volcano.png|200px]]
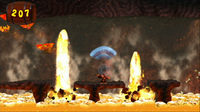
|align=left|Grim Volcano is the second area of the Cherry Kingdom. There are several [[Fire Bakky|Fire Bakkies]] here and they will cause Donkey Kong to [[burn]] if they touch him. The [[lava]] in the level occasionally shoots a pillar of fire here as well, so Donkey Kong has to time his [[jump]]s correctly. Like most other levels in the game, Helper Monkeys and [[Banandelion]]s appear, as do some meteors. Other returning obstacles include mushrooms that quickly grow when hit by sound waves and [[Dragon Pipe]]s that send Donkey Kong to new areas. Two new types of enemies also appear in this level. The first new foe is [[Tar Man]], who blocks the ape's path into a small gap, and the final new enemy is [[Mini Panda]].
|-
!VS. [[Hard Roc]]<br>(GameCube version)
||[[File:Hard_Roc.png|200px]]
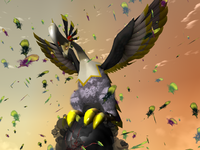
|align=left|In the GameCube version, Hard Roc is faced. He looks like the other Rocs, but is colored a light grey. Hard Roc is fought in a setting much like the other two battles, but there is a larger stone column, [[Banandelion]]s, and two [[Helper Monkey]]s. He attacks in the same way his predecessors attack, using their attacks as well. After he loses half his health, Hard Roc will gain the ability to fire three Shadow Meteors at once, as well as the ability to fire a shadow-like creature. Once defeated, he will explode, and feathers will fall to the ground.
|-
!VS. [[Grave Tusk]]<br>(''New Play Control!'' version)
|[[File:Gravetusk.png|200px]]
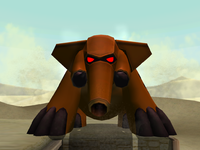
|align=left|In the ''New Play Control!'' version, Donkey Kong must face Grave Tusk, who looks exactly like [[Turret Tusk]], but is colored brown. He is fought in a desert-like setting. After losing enough health, Grave Tusk gains a new attack: a laser attack that is fired from its trunk. When defeated, Grave Tusk will fall apart and deactivate, much like the way Turret Tusk is defeated.
|}


====Level Layout====
==Names in other languages==
The level begins on a long slope, which Donkey Kong is forced to slide down. A bump in the ground is located farther ahead of the start, and when the ape goes over it, he is sent between several Banana Bunches and to many [[Bloom]]s. The Blooms create a path that goes over the nearby ice crystals and over a ledge. There is a path below this ledge to break the Kong's fall, as well as some hog enemies walking along it. Two groups of three Banana Bunches are also above this area. At the end of the long path is a few stair-like platforms leading to a [[Gale Hawg]], who blocks the ape's path. Once it is defeated, Donkey Kong can climb up the rest of the stairs to find another slippery slope. While the ape skates down the area, he treads through a few snowmen and makes his way into a small, underground ice cavern, where he slides down into a lower area after crashing through three more snowmen.
{{foreign names
 
|Jap=チェリー{{hover|王国|おうこく}}
Another set of snowmen are in the area below this, and Donkey Kong is forced into them because of the slippery ice. Another gap is below this area, and on the way down, one can find some bananas and Banana Bunches. At the lowest area of the cavern, the ground becomes less flat and tilted, although it is still quite slippery. A few ice bats are along this westward path, as well as a large, spiked enemy sticking out of the ground and a few sharp ice crystals. Another spiked enemy is ahead, as well as a Helper Monkey. This monkey throws Donkey Kong through a narrow passage to some other Helper Monkeys. On the way, he runs into some Blooms, which can be collected to earn beats. When the area becomes wider, the ape falls to a giant iceberg floating on the water. Above this rising and sinking platform is a group of small, sphere shaped enemies. A pathway into the water is at the end of this iceberg, and at the bottom of the gap is a set of three Banana Bunches, each encased in a small bubble. Ice crystals pave the underwater areas under the iceberg, and there are several groups of four bananas directing Donkey Kong to the next area. A narrow passage is just ahead from here, and a heavy current is in it, which pushes the ape back to land.
|JapR=Cherī Ōkoku
 
|JapM=Cherry Kingdom
No longer underwater, Donkey Kong soon climbs up a small stair platform to meet two hog enemies in trees. Once the foes are defeated, a new Helper Monkey appears. This monkey throws the ape to another Helper Monkey, who then swings him to a high area, where there are four Banana Bunches trapped in bubbles. Near here is a deep abyss leading to another slide. As Donkey Kong goes down this icy surface, he heads past some bananas. After passing a few spiky enemies, who stick out of the top and bottom of the area, Donkey Kong runs into a large, sphere shaped lizard. It blocks the ape's path completely, however, once it is defeated, the Kong is able to access another gap that leads him into a lower area. The ground is slippery in here as well, so he must skate down the slope, running into two sets of four Banana Bunches. At the end of the area, the ape slides under a small tree. On this tree's branch is a giant cherry; once the ape bites into it, the level ends.
}}
 
===Grim Volcano===
[[Image:Grim_Volcano.PNG|thumb|left|200px|'''Grim Volcano''']]
'''Grim Volcano''' is the second area of the Cherry Kingdom. Unlike the previous level, Grim Volcano takes place in a hot volcano rather than a cold glacier. The bats are on fire here and cause Donkey Kong to [[burn]] if they touch him. The [[lava]] in the level occasionally shoots a pillar of fire here as well, so Donkey Kong has to time his [[jump]]s correctly. Like most other levels in the game, Helper Monkey and [[Banande Lion]]s appear, as do some meteors. Other returning obstacles include mushrooms that quickly grow when hit by sound waves and dragon heads that send Donkey Kong to new areas. Two new types of enemies also appear in this level. The first new foe is a giant, ghost-like enemy, who blocks the ape's path into a small gap, and the final new enemy is a dancing panda. After biting into the giant cherry bunch at the end of the level, Donkey Kong fights the boss, Hard Rock (or Grave Tusk in the Wii version).
 
====Level Layout====
This level begins with a few bananas leading into a fiery cavern. Inside, there is a narrow bridge leading to several small platforms. Fire shoots out between each of these platforms, and bats hang from the ceiling, waiting to attack Donkey Kong. At the end of the last platform, there are several small fairies floating above the fire. If hit by a sound wave, they form together to create another bridge. Below this bridge is a group of three Banana Bunches, while above it is a Helper Monkey. The monkey can help Donkey Kong reach the passage above, which he must climb up to reach a [[Banande Lion]]. The Banande Lion flings the ape to a second Helper Monkey. To the left of this monkey are some bananas, and a Banande Lion waits to be used northeast from it. This plant is able to shoot the ape to a group of more yellow fairies, who form an orange trampoline when hit by the Kong's [[Sound Wave Attack]]. The trampoline can bounce the ape to a wall, which he can jump off of to reach a Helper Monkey. The monkey throws him high into the air, and as Donkey Kong falls toward the ground, several meteors move toward him.
 
When the big rocks are destroyed, Donkey Kong lands on a flat surface. Using his sound wave attack here can allow several bananas to appear. If Donkey Kong is to head back to the nearby Helper Monkey, he can also move himself to the cliff to the right, where more meteors fall from the ski. At the bottom of this cliff, there are a few flowers that give the ape bananas when hit by a sound wave, as well as two Helper Monkeys. These monkeys can help him make his way back onto the main path. To the right of where the ape left off is another cavern with a large, ghost-like monster inside of it. Once the creature is defeated, a gap opens at the end of the room, and a dragon head can be found in the gap. The dragon head is able to suck Donkey Kong up and send him into a square shaped room, where there are five Banana Bunches encased in bubbles and a few enemies. Another dragon head is to the right of this room as well, and it takes the ape to the deeper part of the cavern, where there are some small bridges above the lava.
 
Four Banana Bunches in bubbles are located in the cave, as well as some insect enemies. At the end of this pathway is a dead end, however, there is a mushroom growing on the edge of the platform just above the fire. When hit by a sound wave, the fungi expands, allowing the Kong to travel over it. Two Banana Bunches can be found above the now giant mushroom, and Donkey Kong can bounce on the fungi, watching out for flames shooting out of the lave, to reach a smaller platform with two more small mushrooms. Meteors also fall when the ape lands here, and the nearby mushrooms can be expanded to help the Kong reach a smaller platform. This platform is only big enough to hold one mushroom, and when the ape hits it with his Sound Wave Attack, the plant quickly grows and shoots the primate upwards through a narrow passage. Yellow fairies are located at the top of this passage to break Donkey Kong's fall. If one is to head to the right from here, Donkey Kong runs into a dancing panda enemy. Once it is defeated, a giant cherry bunch appears on a nearby tree branch. If Donkey Kong bites into this, the level ends.
 
===VS. Hard Roc===
After the battle, Hard Roc is faced. He looks like the other Rocs, but is colored a light grey. Hard Roc is fought in a setting much like the other two battles, but there is a larger stone column, [[Banande Lion]]s, and two [[Helper Monkey]]s. He attacks in the same way his predecessors attack, using their attacks as well. After he loses half his health, Hard Roc will gain the ability to fire three Shadow Meteors at once, as well as the ability to fire a shadow-like creature. Once defeated, he will explode, and feathers will fall to the ground.


<br clear=all>
{{JBK}}
{{DKJB}}
{{DKJB}}
[[Category:Kingdoms]]
{{DKJB levels}}
[[Category:Donkey Kong Places]]
[[Category:Donkey Kong Jungle Beat kingdoms]]
[[Category:Donkey Kong Jungle Beat]]
[[Category:Worlds]]

Latest revision as of 19:23, November 19, 2023

Donkey Kong Jungle Beat kingdom
Cherry Kingdom
The Cherry Kingdom's icon from Donkey Kong Jungle Beat
Barrel J Barrel
Crest(s) 12
Level(s) Aurora Glacier
Grim Volcano
Ruler Hard Roc (GameCube)
Grave Tusk (Wii)
<< Kingdoms >>

The Cherry Kingdom is the ninth kingdom in Donkey Kong Jungle Beat. In the original version of the game, it is the first kingdom linked to the J Barrel and can be accessed by completing all the kingdoms linked to the K Barrel and collecting twelve or more Crests. In the New Play Control! version, it is the third kingdom linked to the J Barrel and is accessed by completing the Grape Kingdom. It is the dominion of Hard Roc in the Nintendo GameCube version of the game, or Grave Tusk in the New Play Control! version. At the end of every level, Donkey Kong eats a giant cherry bunch.

Levels[edit]

Level Preview Description
Aurora Glacier Aurora Glacier Aurora Glacier is the first area of the Cherry Kingdom. Auroras can be seen in the outside portion of the level, hence the name. Donkey Kong has less traction on this stage and can easily slide across the icy floors. Ice Bakkies attack Donkey Kong here, causing him to freeze as well if hit. The stage also features some Helper Monkeys, who toss Donkey Kong to new areas. Although it appears to be very chilly in this level, Donkey Kong is able to swim in the underwater areas of it. Two mini-bosses are encountered in this level as well, and they include a set of two Coco Pigs, who throw coconuts and ice balls at the ape from trees, and a Rolling Frog. At the end of the level, Donkey Kong is able to bite into a cherry bunch to end the level.
Grim Volcano A screenshot of Grim Volcano in New Play Control! Donkey Kong Jungle Beat Grim Volcano is the second area of the Cherry Kingdom. There are several Fire Bakkies here and they will cause Donkey Kong to burn if they touch him. The lava in the level occasionally shoots a pillar of fire here as well, so Donkey Kong has to time his jumps correctly. Like most other levels in the game, Helper Monkeys and Banandelions appear, as do some meteors. Other returning obstacles include mushrooms that quickly grow when hit by sound waves and Dragon Pipes that send Donkey Kong to new areas. Two new types of enemies also appear in this level. The first new foe is Tar Man, who blocks the ape's path into a small gap, and the final new enemy is Mini Panda.
VS. Hard Roc
(GameCube version)
Hard Roc.png In the GameCube version, Hard Roc is faced. He looks like the other Rocs, but is colored a light grey. Hard Roc is fought in a setting much like the other two battles, but there is a larger stone column, Banandelions, and two Helper Monkeys. He attacks in the same way his predecessors attack, using their attacks as well. After he loses half his health, Hard Roc will gain the ability to fire three Shadow Meteors at once, as well as the ability to fire a shadow-like creature. Once defeated, he will explode, and feathers will fall to the ground.
VS. Grave Tusk
(New Play Control! version)
Gravetusk.png In the New Play Control! version, Donkey Kong must face Grave Tusk, who looks exactly like Turret Tusk, but is colored brown. He is fought in a desert-like setting. After losing enough health, Grave Tusk gains a new attack: a laser attack that is fired from its trunk. When defeated, Grave Tusk will fall apart and deactivate, much like the way Turret Tusk is defeated.

Names in other languages[edit]

Language Name Meaning
Japanese チェリー王国
Cherī Ōkoku
Cherry Kingdom