Yoshi's Island 3: Difference between revisions
mNo edit summary |
(→Trivia: Per discussion in Category talk:Dinosaur Land.) |
||
| (35 intermediate revisions by 14 users not shown) | |||
| Line 1: | Line 1: | ||
{{ | {{level infobox | ||
|title=Yoshi's Island 3 | |title=Yoshi's Island 3 | ||
|image=[[File:YoshisIsland3.png|256px]] | |image=[[File:YoshisIsland3.png|256px]] | ||
[[Mario]] and [[Yoshi]] on a [[Single Swing Lift]] | |||
|code=1-3 | |code=1-3 | ||
|world=[[Yoshi's Island ( | |world=[[Yoshi's Island (location)#Super Mario World|Yoshi's Island]] | ||
|game=''[[Super Mario World]]'' | |game=''[[Super Mario World]]'' | ||
|limit=300 seconds | |limit=300 seconds | ||
| Line 9: | Line 10: | ||
|after=[[Yoshi's Island 4|>>]] | |after=[[Yoshi's Island 4|>>]] | ||
}} | }} | ||
'''Yoshi's Island 3''' is the third level of [[Yoshi's Island ( | '''Yoshi's Island 3''' is the third [[level]] of [[Yoshi's Island (location)|Yoshi's Island]] in ''[[Super Mario World]]''. It takes place on a high mountain and features numerous yellow [[! Block|Exclamation Mark Block]]s that can make a hidden area easier to find if the [[Yellow Switch Palace|Yellow Switch]] is pressed. Clearing this stage grants access to [[Yoshi's Island 4]]. | ||
==Overview== | ==Overview== | ||
[[File:Smw mario2.png|thumb|left]] | [[File:Smw mario2.png|thumb|left]] | ||
The level starts with a [[Message Block]] giving information on [[Dragon Coin]]s. Right next to the | The level starts with a [[Message Block]] giving information on [[Dragon Coin]]s. Right next to the block, a row of yellow Exclamation Mark Blocks can be found. When the player follows the path up the steps and to the right, they come across a brown [[Single Swing Lift]]. When going on, the player finds two [[Stretch Block]]s. The first Dragon Coin can be found above. After another brown Single Swing Lift, the player finds a red [[Koopa Paratroopa]] flying over two [[? Block|Prize Block]]s, the second one containing [[Yoshi]]. Soon there is another type of platform. These platforms are black and white and simply move either horizontally or vertically, with another red Koopa Paratroopa flying near them. After a red-shelled [[Koopa Troopa]], there are some more brown Single Swing Lifts. There is a hidden [[Warp Pipe]] below the first one. The pipe leads to a simple underground room where the second Dragon Coin is found. Leaving the room through the Warp Pipe takes the player near the [[Midway Gate]]. | ||
After a | After a green Koopa Paratroopa, there is the third Dragon Coin and another Message Block talking about how to perform high [[jump]]s. Next, there is a row of five Rotating Blocks with a Koopa Troopa on the top. After a moving black-and-white platform and brown Single Swing Lift, the player comes across an area with five Stretch Blocks, where the fourth Dragon Coin is found. Between more platforms, the first [[bonus block|Bonus Block]] in the game can be found, providing the player with a [[1-Up Mushroom]] if the player has collected 30 [[coin]]s in this level. Otherwise, it yields only a single coin. Soon after crossing two more brown Single Swing Lifts, the player reaches the fifth Dragon Coin. A bit farther, there is the [[Giant Gate]], with no [[List of enemies|enemies]] protecting it. | ||
{{br|left}} | {{br|left}} | ||
==Enemies== | ==Enemies== | ||
{|border=1 cellspacing=0 cellpadding=3 style="border-collapse:collapse"style="text-align: center" | |||
!Sprite | |||
!Name | |||
!Count | |||
|- | |||
|[[File:SMW KoopaParatroopa Green.png]] | |||
|[[Koopa Paratroopa]] (green) | |||
|1 | |||
|- | |||
|[[File:SMW KoopaParatroopa Red.png]] | |||
|Koopa Paratroopa (red) | |||
|4 | |||
|- | |||
|[[File:SMW KoopaTroopa Green.png]] | |||
|[[Koopa Troopa]] (green) | |||
|1 (if stomped) | |||
|- | |||
|[[File:SMW KoopaTroopa Red.png]] | |||
|Koopa Troopa (red) | |||
|2 | |||
|- | |||
|[[File:SMW KoopaTroopaNoShell Green.png]] | |||
|[[Beach Koopa|Koopa without a Shell]] (green) | |||
|1 (if stomped) | |||
|- | |||
|[[File:SMW KoopaTroopaNoShell Red.png]] | |||
|Koopa without a Shell (red) | |||
|2 (if stomped) | |||
|} | |||
==Names in other languages== | ==Names in other languages== | ||
| Line 27: | Line 54: | ||
|Jap=ヨースターとう コース3 | |Jap=ヨースターとう コース3 | ||
|JapR=Yōsutā Tō Kōsu 3 | |JapR=Yōsutā Tō Kōsu 3 | ||
|JapM= | |JapM=Yoster Island Course 3 | ||
|Spa=Isla de Yoshi 3 | |Spa=Isla de Yoshi 3 | ||
|SpaM=Yoshi's Island 3 | |SpaM=Yoshi's Island 3 | ||
| Line 34: | Line 61: | ||
|Ger=Yoshi-Insel 3 | |Ger=Yoshi-Insel 3 | ||
|GerM=Yoshi Island 3 | |GerM=Yoshi Island 3 | ||
|Chi=耀东岛 3 | |||
|ChiR=Yàodōngdǎo 3 | |||
|ChiM=Yoshi's Island 3 | |||
|Ita=Isola Yoshi 3 | |||
|ItaM=Yoshi's Island 3 | |||
}} | }} | ||
==Trivia== | ==Trivia== | ||
*Similar vertically climbing | *Similar vertically climbing sets of hills appear in [[Mount Lineland#Chapter 1-2: Afoot in the Foothills|Chapter 1-2]] of ''[[Super Paper Mario]]''. | ||
{{SMW | |||
{{SMW levels}} | |||
[[Category:Mountains]] | |||
[[Category:Yoshi's Island]] | [[Category:Yoshi's Island]] | ||
[[Category:Super Mario World levels]] | |||
[[Category:Super Mario World | |||
Latest revision as of 14:23, January 26, 2024
| Level | |
|---|---|
| Yoshi's Island 3 | |

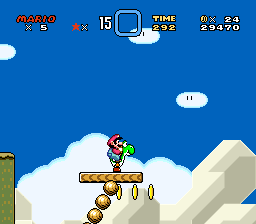
Mario and Yoshi on a Single Swing Lift | |
| Level code | 1-3 |
| World | Yoshi's Island |
| Game | Super Mario World |
| Time limit | 300 seconds |
| << Directory of levels >> | |
Yoshi's Island 3 is the third level of Yoshi's Island in Super Mario World. It takes place on a high mountain and features numerous yellow Exclamation Mark Blocks that can make a hidden area easier to find if the Yellow Switch is pressed. Clearing this stage grants access to Yoshi's Island 4.
Overview[edit]
The level starts with a Message Block giving information on Dragon Coins. Right next to the block, a row of yellow Exclamation Mark Blocks can be found. When the player follows the path up the steps and to the right, they come across a brown Single Swing Lift. When going on, the player finds two Stretch Blocks. The first Dragon Coin can be found above. After another brown Single Swing Lift, the player finds a red Koopa Paratroopa flying over two Prize Blocks, the second one containing Yoshi. Soon there is another type of platform. These platforms are black and white and simply move either horizontally or vertically, with another red Koopa Paratroopa flying near them. After a red-shelled Koopa Troopa, there are some more brown Single Swing Lifts. There is a hidden Warp Pipe below the first one. The pipe leads to a simple underground room where the second Dragon Coin is found. Leaving the room through the Warp Pipe takes the player near the Midway Gate.
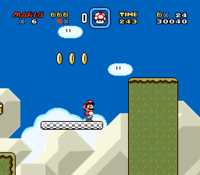
After a green Koopa Paratroopa, there is the third Dragon Coin and another Message Block talking about how to perform high jumps. Next, there is a row of five Rotating Blocks with a Koopa Troopa on the top. After a moving black-and-white platform and brown Single Swing Lift, the player comes across an area with five Stretch Blocks, where the fourth Dragon Coin is found. Between more platforms, the first Bonus Block in the game can be found, providing the player with a 1-Up Mushroom if the player has collected 30 coins in this level. Otherwise, it yields only a single coin. Soon after crossing two more brown Single Swing Lifts, the player reaches the fifth Dragon Coin. A bit farther, there is the Giant Gate, with no enemies protecting it.
Enemies[edit]
| Sprite | Name | Count |
|---|---|---|
| Koopa Paratroopa (green) | 1 | |
| Koopa Paratroopa (red) | 4 | |
| Koopa Troopa (green) | 1 (if stomped) | |
| Koopa Troopa (red) | 2 | |
| Koopa without a Shell (green) | 1 (if stomped) | |
| Koopa without a Shell (red) | 2 (if stomped) |
Names in other languages[edit]
| Language | Name | Meaning |
|---|---|---|
| Japanese | ヨースターとう コース3 Yōsutā Tō Kōsu 3 |
Yoster Island Course 3 |
| Chinese | 耀东岛 3 Yàodōngdǎo 3 |
Yoshi's Island 3 |
| French | Ile de Yoshi 3 |
Yoshi's Island 3 |
| German | Yoshi-Insel 3 |
Yoshi Island 3 |
| Italian | Isola Yoshi 3 |
Yoshi's Island 3 |
| Spanish | Isla de Yoshi 3 |
Yoshi's Island 3 |
Trivia[edit]
- Similar vertically climbing sets of hills appear in Chapter 1-2 of Super Paper Mario.
