Miller Instinct: Difference between revisions
N. Onymous (talk | contribs) (→Names in Other Languages: - That's essentially what it means.) |
mNo edit summary |
||
| (32 intermediate revisions by 19 users not shown) | |||
| Line 1: | Line 1: | ||
{{level | {{level infobox | ||
|image=[[File:Miller Instinct DKL3c.png]] | |||
|image=[[ | |code=2-6 | ||
|code=2 - 6 | |game=''[[Donkey Kong Land III]]'' | ||
|game=''[[Donkey Kong Land III]] | |||
|before=[[Riverbank Riot|<<]] | |before=[[Riverbank Riot|<<]] | ||
|after=[[ | |after=[[Bleak Magic|>>]] | ||
}} | }} | ||
'''Miller Instinct''' is the twelfth level in ''[[Donkey Kong Land III]]'' | '''Miller Instinct''' is the twelfth level in ''[[Donkey Kong Land III]]'' and the sixth and last normal level of [[Primate Plains]]. The level takes place in a water mill, where [[Dixie Kong]] and [[Kiddy Kong]] are required to enter an [[Animal Barrel]] to become [[Squawks]] for most of the level. Miller Instinct is maze-like because of the alternate paths that lead to various items. The level's name is a reference to ''{{wp|Killer Instinct}}'', another franchise created by [[Rare Ltd.|Rare]]. | ||
==Layout== | |||
== | |||
At the beginning of the level, the heroes make their way down a long path with a few small ramps. Once they get on the first elevators, they find a rope to climb up. It leads them right next to a barrel. Jumping into this normal barrel, the Kongs are fired to another rope. Climbing up this rope except using the rope next to it, they find an [[Animal Barrel]]. Going into the common barrel turns them into Squawks, who needs to fly through the mill, moving north. The parrot makes his way into a long pathway, full of twists and turn, avoiding some enemies, including Buzzes. Soon, he finds the [[Star Barrel]]. | At the beginning of the level, the heroes make their way down a long path with a few small ramps. Once they get on the first elevators, they find a rope to climb up. It leads them right next to a barrel. Jumping into this normal barrel, the Kongs are fired to another rope. Climbing up this rope except using the rope next to it, they find an [[Animal Barrel]]. Going into the common barrel turns them into Squawks, who needs to fly through the mill, moving north. The parrot makes his way into a long pathway, full of twists and turn, avoiding some enemies, including Buzzes. Soon, he finds the [[Star Barrel]]. | ||
About halfway through the level, the bird continues through the level by flying around the many sharp turns in the mill. Though more Buzzes tries to stop him, he should be able to attack them with his nuts. Eventually, Squawks finds himself in an area with many corridors and passages. Some of these corridors contain special prizes, though, ultimately, the parrot needs only to fly up to find his way in the next area. Soon, the bird needs to turn to the left and pass a [[No Animal Sign]]. It turns him back into the Kongs, where they need to make their way onto a high pathway, walking up several slanted boards. They then find themselves near a set of two elevators. Riding up both of them, they are taken to the next floor. There, the apes travel down the rest of the path, avoiding enemies and grabbing the letter G, until they find a flagpole. After touching this flagpole, the level ends. | About halfway through the level, the bird continues through the level by flying around the many sharp turns in the mill. Though more Buzzes tries to stop him, he should be able to attack them with his nuts. Eventually, Squawks finds himself in an area with many corridors and passages. Some of these corridors contain special prizes, though, ultimately, the parrot needs only to fly up to find his way in the next area. Soon, the bird needs to turn to the left and pass a [[No Animal Sign]]. It turns him back into the Kongs, where they need to make their way onto a high pathway, walking up several slanted boards. They then find themselves near a set of two elevators. Riding up both of them, they are taken to the next floor. There, the apes travel down the rest of the path, avoiding enemies and grabbing the letter G, until they find a flagpole. After touching this flagpole, the level ends. | ||
== | ==Enemies== | ||
The following enemies appear in the following quantities: | |||
* | |||
*[[Bristles]]: 8 | |||
*[[Buzz (enemy)|Buzz]]es: 21 | |||
*[[Re-Koil|Rekoil]]s: 5 | |||
*[[Sneek]]s: 6 | |||
==Items and objects== | |||
The following items and objects appear in the following quantities: | |||
*[[Bear coin]]: 1 | |||
*[[Red Balloon|Extra Life Balloon]]: 1 | |||
===K-O-N-G Letters=== | |||
[[File:Miller Instinct DKL3 Letter K.png|thumb|The letter K]] | |||
*'''K:''' To the right of the first Sneek encountered. | |||
*'''O:''' Shortly after two Buzzes, the "O" is to the right of a Rekoil. | |||
*'''N:''' At the three-way split in the path, stick right to get to the "N". | |||
*'''G:''' Near some Bristles beyond the No Animal Sign. | |||
{{br}} | |||
===DK Coin=== | ===DK Coin=== | ||
Shortly after the letter K, after the Kongs blast out from the first Barrel Cannon, they encounter the [[Koin]]. They must climb up a rope and jump on a platform to the left. The Kongs must walk under the Squawks Barrel and pick up a Steel Barrel. From the edge of the platform, Dixie or Kiddy must throw it at a wall to the right and then grab on a rope. As Koin is facing upward, the Steel Barrel hits him in the side, defeating him and rewarding the [[DK Coin]] to the Kongs. They can also defeat Koin by jumping down to the platform with Koin and throwing the Steel Barrel at the left wall behind him. | |||
==Bonus Levels== | |||
[[File:Miller Instinct DKL3 Bonus Level 1.png|thumb|The first Bonus Level of Miller Instinct]] | |||
Miller Instinct has two [[Bonus room|Bonus Levels]], listed by type: | |||
*'''Collect the Stars!''': From the platform Koin is on, Dixie or Kiddy must jump right over a Barrel Cannon to land into a hidden [[Bonus Barrel]]. Alternatively, Squawks can fly down to the location. In the [[Bonus Level]], Dixie or Kiddy must collect 36 stars within 30 seconds. The first nine stars shape a right arrow, indicating out the four vertical ropes that the Kong must climb to collect more stars, each arranged in groups of three. The second-to-last group of three stars is hovering over a platform, and the last three stars appear just before a Buzz and a No Animal Sign. When all the stars are collected, the Bonus Coin appears just right of the No Animal Sign. | |||
*'''Find the Token!''': Near the end of the level, Squawks can find a No Animal Sign to the left. He must instead go right and pass a different No Animal Sign, which is in front of a Bonus Barrel, to turn back into the Kongs. In the Bonus Level, the Kongs have 20 seconds to collect the Bonus Coin at the top of the area. Dixie or Kiddy must blast through several [[Spinner Barrel|Rotatable Barrel]]s above ground, following in the direction of the bananas. When they reach the upper-right, the Kong can blast up to the Bonus Coin. | |||
== | ==Gallery== | ||
<gallery> | |||
Miller Instinct DKL3 Squawks and Bristles.png|Squawks spits a nut at a Bristles | |||
Miller Instinct DKL3 Bear Coin.png|Squawks finds a bear coin | |||
Miller Instinct DKL3 Letter O.png|The letter O | |||
Miller Instinct DKL3 Letter N.png|The letter N | |||
Miller Instinct DKL3 Letter G.png|The letter G | |||
</gallery> | |||
== Names in | ==Names in other languages== | ||
{{ | {{foreign names | ||
|Jap= | |Jap=スコークスのすいしゃごや | ||
|JapR=Sukōkusu no Suishagoya | |JapR=Sukōkusu no Suishagoya | ||
|JapM=Squawks' | |JapM=Squawks' Watermill | ||
}} | }} | ||
{{DKL3}} | {{DKL3}} | ||
[[Category: | [[Category:Factories]] | ||
[[Category:Northern Kremisphere]] | [[Category:Northern Kremisphere]] | ||
[[Category:Donkey Kong Land III levels]] | |||
[[Category:Donkey Kong Land III]] | |||
Latest revision as of 23:25, March 31, 2024
| Level | |
|---|---|
| Miller Instinct | |

| |
| Level code | 2-6 |
| Game | Donkey Kong Land III |
| << Directory of levels >> | |
Miller Instinct is the twelfth level in Donkey Kong Land III and the sixth and last normal level of Primate Plains. The level takes place in a water mill, where Dixie Kong and Kiddy Kong are required to enter an Animal Barrel to become Squawks for most of the level. Miller Instinct is maze-like because of the alternate paths that lead to various items. The level's name is a reference to Killer Instinct, another franchise created by Rare.
Layout[edit]
At the beginning of the level, the heroes make their way down a long path with a few small ramps. Once they get on the first elevators, they find a rope to climb up. It leads them right next to a barrel. Jumping into this normal barrel, the Kongs are fired to another rope. Climbing up this rope except using the rope next to it, they find an Animal Barrel. Going into the common barrel turns them into Squawks, who needs to fly through the mill, moving north. The parrot makes his way into a long pathway, full of twists and turn, avoiding some enemies, including Buzzes. Soon, he finds the Star Barrel.
About halfway through the level, the bird continues through the level by flying around the many sharp turns in the mill. Though more Buzzes tries to stop him, he should be able to attack them with his nuts. Eventually, Squawks finds himself in an area with many corridors and passages. Some of these corridors contain special prizes, though, ultimately, the parrot needs only to fly up to find his way in the next area. Soon, the bird needs to turn to the left and pass a No Animal Sign. It turns him back into the Kongs, where they need to make their way onto a high pathway, walking up several slanted boards. They then find themselves near a set of two elevators. Riding up both of them, they are taken to the next floor. There, the apes travel down the rest of the path, avoiding enemies and grabbing the letter G, until they find a flagpole. After touching this flagpole, the level ends.
Enemies[edit]
The following enemies appear in the following quantities:
Items and objects[edit]
The following items and objects appear in the following quantities:
- Bear coin: 1
- Extra Life Balloon: 1
K-O-N-G Letters[edit]

- K: To the right of the first Sneek encountered.
- O: Shortly after two Buzzes, the "O" is to the right of a Rekoil.
- N: At the three-way split in the path, stick right to get to the "N".
- G: Near some Bristles beyond the No Animal Sign.
DK Coin[edit]
Shortly after the letter K, after the Kongs blast out from the first Barrel Cannon, they encounter the Koin. They must climb up a rope and jump on a platform to the left. The Kongs must walk under the Squawks Barrel and pick up a Steel Barrel. From the edge of the platform, Dixie or Kiddy must throw it at a wall to the right and then grab on a rope. As Koin is facing upward, the Steel Barrel hits him in the side, defeating him and rewarding the DK Coin to the Kongs. They can also defeat Koin by jumping down to the platform with Koin and throwing the Steel Barrel at the left wall behind him.
Bonus Levels[edit]

Miller Instinct has two Bonus Levels, listed by type:
- Collect the Stars!: From the platform Koin is on, Dixie or Kiddy must jump right over a Barrel Cannon to land into a hidden Bonus Barrel. Alternatively, Squawks can fly down to the location. In the Bonus Level, Dixie or Kiddy must collect 36 stars within 30 seconds. The first nine stars shape a right arrow, indicating out the four vertical ropes that the Kong must climb to collect more stars, each arranged in groups of three. The second-to-last group of three stars is hovering over a platform, and the last three stars appear just before a Buzz and a No Animal Sign. When all the stars are collected, the Bonus Coin appears just right of the No Animal Sign.
- Find the Token!: Near the end of the level, Squawks can find a No Animal Sign to the left. He must instead go right and pass a different No Animal Sign, which is in front of a Bonus Barrel, to turn back into the Kongs. In the Bonus Level, the Kongs have 20 seconds to collect the Bonus Coin at the top of the area. Dixie or Kiddy must blast through several Rotatable Barrels above ground, following in the direction of the bananas. When they reach the upper-right, the Kong can blast up to the Bonus Coin.
Gallery[edit]
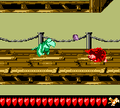
Squawks spits a nut at a Bristles
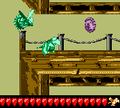
Squawks finds a bear coin

The letter O
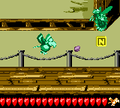
The letter N
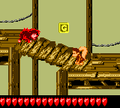
The letter G


Names in other languages[edit]
| Language | Name | Meaning |
|---|---|---|
| Japanese | スコークスのすいしゃごや Sukōkusu no Suishagoya |
Squawks' Watermill |