Haunted Hollows: Difference between revisions
mNo edit summary |
LinkTheLefty (talk | contribs) mNo edit summary |
||
| (15 intermediate revisions by 6 users not shown) | |||
| Line 1: | Line 1: | ||
{{ | {{level infobox | ||
|image=[[File:Haunted Hollows DKL3c.png]] | |image=[[File:Haunted Hollows DKL3c.png]] | ||
|code=6-3 | |code=6-3 | ||
|game=''[[Donkey Kong Land III]]'' | |game=''[[Donkey Kong Land III]]'' | ||
| Line 7: | Line 6: | ||
|after=[[Rainforest Rumble|>>]] | |after=[[Rainforest Rumble|>>]] | ||
}} | }} | ||
'''Haunted Hollows''' is the thirty-third level in ''[[Donkey Kong Land III]]'' | '''Haunted Hollows''' is the thirty-third level in ''[[Donkey Kong Land III]]'' and the third level of [[Lost World (Donkey Kong Land III)|the Lost World]]. It takes place in a cavern submerged in water. During the first half, [[Dixie Kong|Dixie]] and [[Kiddy Kong|Kiddy]] must swim underwater and avoid some aquatic enemies along their path, including [[Bounty Bass]]es, [[Lurchin]]s, and [[Koco]]s. The second half takes place outside the water, and it becomes a normal cavern level akin to [[Stalagmite Frights]]. The [[Kong]]s encounter many types of enemies on land, such as [[Krumple]]s and [[Kuchuka]]s. [[Squitter]] is playable during the second [[Bonus Level]]. | ||
==Layout== | |||
== | |||
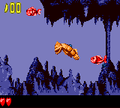
[[File:HauntedHollows-Kuchuka.png|thumb|left|Dixie Kong between two Kuchukas]] | [[File:HauntedHollows-Kuchuka.png|thumb|left|Dixie Kong between two Kuchukas]] | ||
From the start of the level, the heroes need to swim through a damp cave. They swim west as they travel, avoiding Bounty Basses and Kocos. Eventually, the group find a straight, underwater pathway where they need to dodge a few Lurchins to survive. Past this area, the heroes have to swim a little farther west and then head upwards to reach the next area. There, they need to begin traveling east and watch out for more underwater enemies, mainly Kocos. After a while, the group approach the shore of the water, where they have to dodge several Lurchins. After the letter O, the monkeys see a barrel above them. They must jump into it to blast to a higher level of the area. From there, they need to travel up a few stony ledges, without stepping on any Bristles, and then hit the [[Star Barrel]] nearby. | From the start of the level, the heroes need to swim through a damp cave. They swim west as they travel, avoiding Bounty Basses and Kocos. Eventually, the group find a straight, underwater pathway where they need to dodge a few Lurchins to survive. Past this area, the heroes have to swim a little farther west and then head upwards to reach the next area. There, they need to begin traveling east and watch out for more underwater enemies, mainly Kocos. After a while, the group approach the shore of the water, where they have to dodge several Lurchins. After [[KONG Letters|the letter O]], the monkeys see a barrel above them. They must jump into it to blast to a higher level of the area. From there, they need to travel up a few stony ledges, without stepping on any Bristles, and then hit the [[Star Barrel]] nearby. | ||
Halfway through the level, the apes have to walk west and defeat several enemies, including the mighty Krumples. Eventually, they find another barrel. Jumping into it, they are shot to a higher area, where they need to beat two | Halfway through the level, the apes have to walk west and defeat several enemies, including the mighty Krumples. Eventually, they find another barrel. Jumping into it, they are shot to a higher area, where they need to beat two Rekoils. Soon, they are greeted by a Kuchuka and a Knocka. They need to pass them both and jump over a few Krumples to find some Sneeks and Krimps. After passing all these foes, [[Kiddy Kong]] and [[Dixie Kong]] find a barrel. They have to jump into it and blast to an even higher area. There, they, again, have to defeat some Rekoils and a Sneek. Afterwards, they find a couple of Kuchukas. They must dodge the two foes and head more westward to find more enemies. After passing the level's final Kuchuka, the Kongs come across the [[Level Flag|End of Level Flag]]. | ||
{{br|left}} | {{br|left}} | ||
==Enemies== | ==Enemies== | ||
*[[Bounty Bass]] | *[[Bounty Bass]] | ||
*[[Bristles]] | |||
*[[Buzz (enemy)|Buzz]] | *[[Buzz (enemy)|Buzz]] | ||
*[[ | *[[Kobble]] | ||
*[[Koco]] | *[[Koco]] | ||
*[[Krimp]] | *[[Krimp]] | ||
*[[Kuchuka]] | |||
*[[Lurchin]] | |||
*[[Re-Koil|Rekoil]] | |||
*[[Sneek]] | *[[Sneek]] | ||
==Items== | ==Items and objects== | ||
The following items and objects appear in the following quantities: | |||
*[[Animal Barrel]]: 1 | *[[Animal Barrel]]: 1 | ||
*[[Banana Bunch]]: 2 | *[[Banana Bunch]]: 2 | ||
*[[Bear | *[[Bear coin]]s: 1 | ||
*[[Boo Barrel|Ghost Barrel]]: 1 | |||
*[[DK Barrel]]: 3 | *[[DK Barrel]]: 3 | ||
===K-O-N-G Letters=== | ===K-O-N-G Letters=== | ||
[[File:HauntedHollows-O.png|thumb|The letter O]] | |||
*K: Near the first Koco in the level. | *K: Near the first Koco in the level. | ||
*O: Found in between a Lurchin and a Koco. | *O: Found in between a Lurchin and a Koco. | ||
*N: Obtained while getting launched out of Barrel Cannons. | *N: Obtained while getting launched out of Barrel Cannons. | ||
*G: Found above a Bristles, past two | *G: Found above a Bristles, past two Kuchukas. | ||
{{br}} | |||
===DK Coin=== | ===DK Coin=== | ||
[[File:Haunted Hollows DKL3 Koin.png|thumb|The Koin of Haunted Hollows]] | |||
After the second DK Barrel, the Kongs must swim straight to the top of the underwater area. They must jump on a platform to the left, where they encounter the [[Koin]]. Dixie or Kiddy must pick up the [[Iron Barrel|Steel Barrel]] next to Koin and throw it at the left wall behind him. The Steel Barrel ricochets into Koin's back and defeats him, and the Kongs are rewarded the [[DK Coin]]. | |||
{{br}} | |||
==Bonus Levels== | ==Bonus Levels== | ||
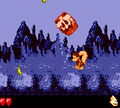
[[File:HauntedHollows-Bonus.png|thumb|The second | [[File:HauntedHollows-Bonus.png|thumb|The second Bonus Level of Haunted Hollows]] | ||
*After the letter K, the | Haunted Hollows has two [[Bonus room|Bonus Level]]s, listed by type: | ||
*Shortly after the Star Barrel, the | *'''Collect the Stars!''': After the letter K, the Kongs encounter the first Lurchin of the level. By swimming above it, the Kongs can enter a [[Bonus Barrel]] above. In the [[Bonus Level]], the Kongs have 20 seconds to collect 12 [[star (Donkey Kong franchise)|star]]s. The stars are in groups of three, each guarded by a Kuchuka. The Kongs must avoid the enemies as they collect the stars. After obtaining every star, the [[Bonus Coin (Donkey Kong franchise)|Bonus Coin]] appears at the end of the area. | ||
*'''Bash the Baddies!''': Shortly after the Star Barrel, the Kongs find a DK Barrel above a Kuchuka. They must go right to the next Kuchuka and jump into a Barrel Cannon hidden above it. The Barrel Cannon blasts them up into the second Bonus Barrel. In the Bonus Level, the Kongs must enter an [[Animal Barrel]] to transform into [[Squitter]], who has 40 seconds to defeat numerous Buzzes in the area. Some Buzzes are above an abyss, so Squitter must create a web platform to stand over the abyss and defeat the Buzz. After defeating every Buzz, a Bonus Coin appears at the end. Before reaching the Bonus Coin, Squitter must pass a [[No Animal Sign]] to turn back into the Kongs. | |||
==Gallery== | |||
<gallery> | |||
Haunted Hollows DKL3 swimming.png|Kiddy swimming in the level | |||
Haunted Hollows DKL3 Boo Barrel.png|Dixie stands next to the only Ghost Barrel in the level | |||
</gallery> | |||
==Names in other languages== | ==Names in other languages== | ||
{{foreign names | {{foreign names | ||
|Jap= | |Jap=あんこくのしょうにゅうどう | ||
|JapR=Ankoku no | |JapR=Ankoku no Shōnyūdō | ||
|JapM=Limestone Cave of Darkness | |JapM=Limestone Cave of Darkness | ||
}} | }} | ||
{{DKL3}} | {{DKL3}} | ||
[[Category: | [[Category:Underground areas]] | ||
[[Category:Secret | [[Category:Aquatic areas]] | ||
[[Category:Secret levels]] | |||
[[Category:Donkey Kong Land III levels]] | |||
Latest revision as of 20:13, January 2, 2024
| Level | |
|---|---|
| Haunted Hollows | |

| |
| Level code | 6-3 |
| Game | Donkey Kong Land III |
| << Directory of levels >> | |
Haunted Hollows is the thirty-third level in Donkey Kong Land III and the third level of the Lost World. It takes place in a cavern submerged in water. During the first half, Dixie and Kiddy must swim underwater and avoid some aquatic enemies along their path, including Bounty Basses, Lurchins, and Kocos. The second half takes place outside the water, and it becomes a normal cavern level akin to Stalagmite Frights. The Kongs encounter many types of enemies on land, such as Krumples and Kuchukas. Squitter is playable during the second Bonus Level.
Layout[edit]

From the start of the level, the heroes need to swim through a damp cave. They swim west as they travel, avoiding Bounty Basses and Kocos. Eventually, the group find a straight, underwater pathway where they need to dodge a few Lurchins to survive. Past this area, the heroes have to swim a little farther west and then head upwards to reach the next area. There, they need to begin traveling east and watch out for more underwater enemies, mainly Kocos. After a while, the group approach the shore of the water, where they have to dodge several Lurchins. After the letter O, the monkeys see a barrel above them. They must jump into it to blast to a higher level of the area. From there, they need to travel up a few stony ledges, without stepping on any Bristles, and then hit the Star Barrel nearby.
Halfway through the level, the apes have to walk west and defeat several enemies, including the mighty Krumples. Eventually, they find another barrel. Jumping into it, they are shot to a higher area, where they need to beat two Rekoils. Soon, they are greeted by a Kuchuka and a Knocka. They need to pass them both and jump over a few Krumples to find some Sneeks and Krimps. After passing all these foes, Kiddy Kong and Dixie Kong find a barrel. They have to jump into it and blast to an even higher area. There, they, again, have to defeat some Rekoils and a Sneek. Afterwards, they find a couple of Kuchukas. They must dodge the two foes and head more westward to find more enemies. After passing the level's final Kuchuka, the Kongs come across the End of Level Flag.
Enemies[edit]
Items and objects[edit]
The following items and objects appear in the following quantities:
- Animal Barrel: 1
- Banana Bunch: 2
- Bear coins: 1
- Ghost Barrel: 1
- DK Barrel: 3
K-O-N-G Letters[edit]

- K: Near the first Koco in the level.
- O: Found in between a Lurchin and a Koco.
- N: Obtained while getting launched out of Barrel Cannons.
- G: Found above a Bristles, past two Kuchukas.
DK Coin[edit]

After the second DK Barrel, the Kongs must swim straight to the top of the underwater area. They must jump on a platform to the left, where they encounter the Koin. Dixie or Kiddy must pick up the Steel Barrel next to Koin and throw it at the left wall behind him. The Steel Barrel ricochets into Koin's back and defeats him, and the Kongs are rewarded the DK Coin.
Bonus Levels[edit]

Haunted Hollows has two Bonus Levels, listed by type:
- Collect the Stars!: After the letter K, the Kongs encounter the first Lurchin of the level. By swimming above it, the Kongs can enter a Bonus Barrel above. In the Bonus Level, the Kongs have 20 seconds to collect 12 stars. The stars are in groups of three, each guarded by a Kuchuka. The Kongs must avoid the enemies as they collect the stars. After obtaining every star, the Bonus Coin appears at the end of the area.
- Bash the Baddies!: Shortly after the Star Barrel, the Kongs find a DK Barrel above a Kuchuka. They must go right to the next Kuchuka and jump into a Barrel Cannon hidden above it. The Barrel Cannon blasts them up into the second Bonus Barrel. In the Bonus Level, the Kongs must enter an Animal Barrel to transform into Squitter, who has 40 seconds to defeat numerous Buzzes in the area. Some Buzzes are above an abyss, so Squitter must create a web platform to stand over the abyss and defeat the Buzz. After defeating every Buzz, a Bonus Coin appears at the end. Before reaching the Bonus Coin, Squitter must pass a No Animal Sign to turn back into the Kongs.
Gallery[edit]
Kiddy swimming in the level
Dixie stands next to the only Ghost Barrel in the level


Names in other languages[edit]
| Language | Name | Meaning |
|---|---|---|
| Japanese | あんこくのしょうにゅうどう Ankoku no Shōnyūdō |
Limestone Cave of Darkness |