Shivering Mountains: Difference between revisions
mNo edit summary |
GlobinGoblin (talk | contribs) |
||
| (39 intermediate revisions by 10 users not shown) | |||
| Line 1: | Line 1: | ||
{{ | {{Distinguish|Shiver Mountain}} | ||
|subject= | {{WW location infobox | ||
|image=[[File:ShiveringMountains.png| | |subject=level | ||
|image=[[File:ShiveringMountains.png|256px]] | |||
|world=[[Thrillsville]] | |world=[[Thrillsville]] | ||
|neighbor=[[Beanstalk Way]] | |neighbor=[[Beanstalk Way]] | ||
| | |diamonds_needed=5 | ||
|boss=[[Winter Windster]] | |boss=[[Winter Windster]] | ||
|before=[[Wonky Circus|<<]] | |before=[[Wonky Circus|<<]] | ||
|after=[[Beanstalk Way|>>]] | |after=[[Beanstalk Way|>>]] | ||
|list=[[:Category:Wario World | |list=[[:Category:Wario World levels|List of levels]] | ||
}} | }} | ||
'''Shivering Mountains''' is an icy mountain range, the first level of the [[Thrillsville]] world, and the fifth level overall in ''[[Wario World]]''. Most of the enemies and obstacles here are ice-themed. Several large Christmas trees highlight the atmosphere, plus plenty of igloos. A common feature of this level is ice slides, which serve to complicate reaching certain areas and obtaining certain collectibles since [[Wario]] cannot backtrack up them. The boss of this level is the [[Winter Windster]]. | '''Shivering Mountains''' is an icy mountain range, the first level of the [[Thrillsville]] world, and the fifth level overall in ''[[Wario World]]''. Most of the enemies and obstacles here are ice-themed. Several large Christmas trees highlight the atmosphere, plus plenty of igloos. A common feature of this level is ice slides, which serve to complicate reaching certain areas and obtaining certain collectibles since [[Wario]] cannot backtrack up them. The boss of this level is the [[Winter Windster]]. | ||
==Level layout== | ==Level layout== | ||
The player begins next to a cottage with a [[Bunny Spring]] to help Wario get on top of it, where they will find the red [[ | The player begins next to a cottage with a [[Bunny Spring]] to help Wario get on top of it, where they will find the red [[treasure button]]. Immediately to the right, there is a large ice slide with several ramps. The bottom-most ramp on the back of the slope will help the player get up to the top of the house at the bottom of the ramp, which contains a [[trapdoor (Wario World)|trapdoor]] housing the first [[Red diamond (Wario World)|red diamond]] of the level. Behind the house are a series of platforms placed around Christmas trees that the player has to use [[Glue Globe]]s to jump between. On top of the one on the left is a [[Gold Statue]] part. Back on the ground, the player can find the red [[treasure chest|treasure chest's]] spawn point along with the yellow treasure button to the left of the house. There is a slope here with a couple of a electric barriers that will hurt Wario if he gets too close. Afterward, there is a [[Garlic Dispenser]] before a large slope with many [[Sled Creature]]s sliding down it and a few igloos. On top of one of the igloos is the red [[Spriteling]]. To the right of the slope is an [[Angler Mangler]], waiting for and blocking Wario. After this is another ice slide that leads to either an icy cavern below or a snowy area above, the latter of which the player has to jump off the correct ramp to reach. Another one of the ramps toward the start of the slide in the back has a Gold Statue part on it. | ||
If Wario makes it to the snowy area, he will be immediately thrust into a battle with a yellow [[ | If Wario makes it to the snowy area, he will be immediately thrust into a battle with a yellow [[Crystal Entity]]. Other enemies in the area include [[Polar Bear]]s, [[Snow Bomber]]s, and an [[enemy generator]]. There are two igloos here, one of which has the blue treasure button on top of it. Behind them are several Christmas tree platforms, one of which has a [[wooden chest]] underneath it. The yellow treasure's spawn point is below the tree on the far right. Jumping through the platforms will ultimately lead to a trapdoor, with a Gold Statue part on the way. The sub-level beneath the trapdoor contains the yellow Spriteling. Once the player feels like they are done in this area, they can break a block that leads down to the icy cavern, right into the first [[Battle Ring (Wario World)|Battle Ring]]. | ||
Regardless of how the cave is entered, in order to progress through it, the player must first pass through a Battle Ring. Past this are several [[Icicle Mite]]s the player can use to get over the walls. On the eastern platform is a steel trapdoor near an | Regardless of how the cave is entered, in order to progress through it, the player must first pass through a Battle Ring. Past this are several [[Icicle Mite]]s the player can use to get over the walls. On the eastern platform is a steel trapdoor near an enemy generator. To the left of this platform is where the blue treasure spawns. To the right are a couple of poles which are placed to help the player reach the purple treasure button. Afterward are a number of bridges, with several of them having [[Turtle (Wario World)|Turtle]]s and electric barriers that impede Wario's path. To the right of the second Turtle is a steel trapdoor, and below that and to the left is a wooden trapdoor. The green Spriteling is beneath the steel trapdoor, while the wooden one contains a Gold Statue part. The bridge leading to the left of a [[statue]] leads to where the green treasure will spawn, along with the chartreuse treasure button on the wall across from the bridge that the player needs to throw an enemy into or jump and hit it to activate it. After the bridges is a tall platform where the blue Spriteling is; Wario needs to use an Icicle Mite to reach it. Nearby is an enemy generator and the green treasure button high up on the wall. To the right are more narrow bridges where [[Fattington]]s will spawn and attempt to bounce Wario into the abyss below. On a wall at the back of this section is the cyan treasure button, while the chartreuse treasure is on a platform in the middle of the narrow pathways. There is a pathway in the back leading to the left guarded by a Fattington that leads to a Bunny Spring, which allows Wario to access an isolated above ground area with a few assorted enemies, the pink treasure button, the cyan treasure, and a Gold Statue part. The path to the right of that one leads to an [[Ice Ankiron]], a steel trapdoor containing another Gold Statue part, and the exit of the ice cave. | ||
Ahead is an upward slope with a few Fattingtons dropping in from above leading to a second Battle Ring, with a trapdoor housing a Gold Statue | Ahead is an upward slope with a few Fattingtons dropping in from above leading to a second Battle Ring, with a trapdoor housing a Gold Statue part on the way. After the Battle Ring is another fight with an Angler Mangler. To the right, there is a slope with several [[Freeze Cannon]]s and Sled Creatures. Above and slightly to the right of the first Freeze Cannon in this area is a wooden chest, and near the end of it is the purple treasure's spawn point. After this is the final ice slide of the level. A ramp on the slide toward the front has a Gold Statue part on it. At the bottom of the slide is a Garlic Dispenser, [[ByeBye Balloon]]s, and the pink treasure's spawn point. A pair of Glue Globes can be used to climb to the ledge above, where the player will find some Snow Bombers, an enemy generator, a steel trapdoor where the purple Spriteling awaits, and the goal. | ||
If Wario reenters the level after defeating the boss, there will be a set of ByeBye Balloons at the beginning that will take him to the where the | If Wario reenters the level after defeating the boss, there will be a set of ByeBye Balloons at the beginning that will take him to the where the Turtles are. | ||
==Enemies== | ==Enemies== | ||
*[[ | *[[Snowman (enemy)|Snowmen]] | ||
*[[ | *[[Polar Bear]]s | ||
*[[ | *[[Snow Bomber]]s | ||
*[[Ankiron | *[[Ice Ankiron]]s | ||
*[[Enemy | *[[Enemy generator]]s | ||
*[[Freeze Cannon]]s | *[[Freeze Cannon]]s | ||
*[[Fattington]]s | *[[Fattington]]s | ||
*[[Icicle Mite]]s | *[[Icicle Mite]]s | ||
*[[ | *[[Turtle (Wario World)|Turtle]]s | ||
*[[ | *[[Sled Creature]]s | ||
*[[ | *[[Crystal Entity|Yellow Crystal Entity]] | ||
*[[Angler Mangler]] | *[[Angler Mangler]] | ||
*[[Barrel Buster]] | *[[Barrel Buster]] | ||
| Line 41: | Line 40: | ||
==Red diamond sub-levels== | ==Red diamond sub-levels== | ||
{|border=1 cellspacing=0 cellpadding=3 style="border-collapse:collapse" style="text-align: center; width: 100%" | {|border=1 cellspacing=0 cellpadding=3 style="border-collapse:collapse"style="text-align: center; width: 100%" | ||
!width="2%"|# | !width="2%"|# | ||
!width="1%"|Image | !width="1%"|Image | ||
| Line 50: | Line 49: | ||
|[[File:ShiveringMountainsSub1.png|150px]] | |[[File:ShiveringMountainsSub1.png|150px]] | ||
|On top of a house after the first ice slide. | |On top of a house after the first ice slide. | ||
|This room has a stack of [[Rock Block]]s in the middle with [[ | |This room has a stack of [[Rock Block]]s in the middle with [[Spike Ball|spiked ball]]s rotating around them. The red diamond is on top of the stack. Wario must destroy the blocks until he can reach it. | ||
|- | |- | ||
|2 | |2 | ||
|[[File:ShiveringMountainsSub2.png|150px]] | |[[File:ShiveringMountainsSub2.png|150px]] | ||
|Accessed by climbing up the Christmas trees in | |Accessed by climbing up the Christmas trees in the area with two igloos above the first Battle Ring. | ||
|This room has multiple vertically-aligned platforms (one of them being a [[Marshmallow Block]]) leading up to the red diamond and yellow Spriteling. Wario must grab onto them from the left or right side then leap upward to reach them. | |This room has multiple vertically-aligned platforms (one of them being a [[Marshmallow Block]]) leading up to the red diamond and yellow Spriteling. Wario must grab onto them from the left or right side then leap upward to reach them. | ||
|- | |- | ||
|3 | |3 | ||
|[[File:ShiveringMountainsSub3.png|150px]] | |[[File:ShiveringMountainsSub3.png|150px]] | ||
|Next to an | |Next to an enemy generator shortly after the first Battle Ring. | ||
|Five levers control five cubic platforms; the ones on the right control the nearest platforms, while the ones one the left control the farthest platforms. The solution is to hit the one on the upper right once, ignore the one on the lower right, hit the one in the middle once, and start and stop the ones on the left so the platforms line up. There is a wooden chest with [[garlic]] next to the red diamond at the end. | |Five levers control five cubic platforms; the ones on the right control the nearest platforms, while the ones one the left control the farthest platforms. The solution is to hit the one on the upper right once, ignore the one on the lower right, hit the one in the middle once, and start and stop the ones on the left so the platforms line up. There is a wooden chest with [[garlic]] next to the red diamond at the end. | ||
|- | |- | ||
|4 | |4 | ||
|[[File:ShiveringMountainsSub4.png|150px]] | |[[File:ShiveringMountainsSub4.png|150px]] | ||
|On a circular platform to the right of a | |On a circular platform to the right of a Turtle in the ice cave. | ||
|Spinning platforms make up the pathway to this red diamond. Wario must cross the platforms while avoiding sliding off. There is also a green Spriteling at the end. | |Spinning platforms make up the pathway to this red diamond. Wario must cross the platforms while avoiding sliding off. There is also a green Spriteling at the end. | ||
|- | |- | ||
| Line 70: | Line 69: | ||
|[[File:ShiveringMountainsSub5.png|150px]] | |[[File:ShiveringMountainsSub5.png|150px]] | ||
|From trapdoor #4, accessed by dropping to the narrow pathway below and going left. | |From trapdoor #4, accessed by dropping to the narrow pathway below and going left. | ||
|There are five Rock Blocks and a lever in this room. Hitting the lever causes the blocks to light up in a random order. Wario must punch them in the order that they light up to reveal the red diamond and a Gold Statue | |There are five Rock Blocks and a lever in this room. Hitting the lever causes the blocks to light up in a random order. Wario must punch them in the order that they light up to reveal the red diamond and a Gold Statue part. | ||
|- | |- | ||
|6 | |6 | ||
|[[File:ShiveringMountainsSub6.png|150px]] | |[[File:ShiveringMountainsSub6.png|150px]] | ||
|On a high ledge at the exit of the ice cave, near an Ankiron. | |On a high ledge at the exit of the ice cave, near an Ice Ankiron. | ||
|The objective of this sub-level is to jump across moving platforms to reach the red diamond and Gold Statue | |The objective of this sub-level is to jump across moving platforms to reach the red diamond and Gold Statue part at the end. The first four move left and right, while the last four move back and forth. There is a stationary platform in the middle. | ||
|- | |- | ||
|7 | |7 | ||
|[[File:ShiveringMountainsSub7.png|150px]] | |[[File:ShiveringMountainsSub7.png|150px]] | ||
|On a raised ice platform before the second Battle Ring. | |On a raised ice platform before the second Battle Ring. | ||
|This room has four vertically-aligned rings of spiked balls rotating horizontally. Each ring has a pair of Glue Globes amongst the spiked balls; Wario must cling to these and ascend upward to reach the red diamond and Gold Statue | |This room has four vertically-aligned rings of spiked balls rotating horizontally. Each ring has a pair of Glue Globes amongst the spiked balls; Wario must cling to these and ascend upward to reach the red diamond and Gold Statue part at the top. | ||
|- | |- | ||
|8 | |8 | ||
| Line 88: | Line 87: | ||
|} | |} | ||
==Gold Statue | ==Gold Statue parts== | ||
*On top of a Christmas tree after the first ice slide. | *On top of a Christmas tree after the first ice slide. | ||
*On the second ice slide. | *On the second ice slide. | ||
*On top of a Christmas tree in | *On top of a Christmas tree in the area with two igloos above the first Battle Ring. | ||
*Inside the fifth red diamond sub-level. | *Inside the fifth red diamond sub-level. | ||
*In a small, isolated above ground area, accessed via a Bunny Spring in the ice cave where the Fattingtons are. | *In a small, isolated above ground area, accessed via a Bunny Spring in the ice cave where the Fattingtons are. | ||
| Line 99: | Line 98: | ||
==Treasures== | ==Treasures== | ||
{|border=1 cellspacing=0 cellpadding=3 style="border-collapse:collapse" style="text-align: center; width: 100%" | {|border=1 cellspacing=0 cellpadding=3 style="border-collapse:collapse"style="text-align: center; width: 100%" | ||
!width="1%"|Chest color | !width="1%"|Chest color | ||
!width="4%"|Treasure | !width="4%"|Treasure | ||
!width="5%"|Image | |||
!width="20%"|Button location | !width="20%"|Button location | ||
!width="20%"|Chest location | !width="20%"|Chest location | ||
| Line 107: | Line 107: | ||
|Red | |Red | ||
|Nice Glass | |Nice Glass | ||
|[[File:WW Nice Glass.png]] | |||
|On top of the house at the beginning of the level. | |On top of the house at the beginning of the level. | ||
|At the bottom of the first ice slide. | |At the bottom of the first ice slide. | ||
| Line 112: | Line 113: | ||
|Yellow | |Yellow | ||
|Ancient Chalice | |Ancient Chalice | ||
|[[File:WW Ancient Chalice.png]] | |||
|To the left of the houses at the bottom of the first ice slide. | |To the left of the houses at the bottom of the first ice slide. | ||
|Near the bottom of a Christmas tree in | |Near the bottom of a Christmas tree in the area with two igloos above the first Battle Ring. | ||
|- | |- | ||
|Chartreuse | |Chartreuse | ||
|Nice Cup | |Nice Cup | ||
|On a wall in the ice cave, near some | |[[File:WW Nice Cup.png]] | ||
|On a wall in the ice cave, near some Turtles and a statue. | |||
|In the area where the first Fattingtons are. | |In the area where the first Fattingtons are. | ||
|- | |- | ||
|Green | |Green | ||
|Ornate Decanter | |Ornate Decanter | ||
|On the wall above an | |[[File:WW Ornate Decanter.png]] | ||
|To the left of the chartreuse button, behind a | |On the wall above an enemy generator before where Fattingtons are first encountered. | ||
|To the left of the chartreuse treasure button, behind a Turtle. | |||
|- | |- | ||
|Cyan | |Cyan | ||
|Glass Decanter | |Glass Decanter | ||
|[[File:WW Glass Decanter.png]] | |||
|On a wall in the area where the first Fattingtons are. | |On a wall in the area where the first Fattingtons are. | ||
|In a small, isolated above ground area, accessed via a Bunny Spring in the ice cave where the Fattingtons are. | |In a small, isolated above ground area, accessed via a Bunny Spring in the ice cave where the Fattingtons are. | ||
| Line 132: | Line 137: | ||
|Blue | |Blue | ||
|Nice Saucer | |Nice Saucer | ||
|On top of one of the two igloos in | |[[File:WW Nice Saucer.png]] | ||
|On top of one of the two igloos in the area above the first Battle Ring. | |||
|To the left of where the first steel trapdoor is. | |To the left of where the first steel trapdoor is. | ||
|- | |- | ||
|Purple | |Purple | ||
|Glass Bowl | |Glass Bowl | ||
|[[File:WW Glass Bowl.png]] | |||
|To the right of the where the first steel trapdoor is, past some climbable poles. | |To the right of the where the first steel trapdoor is, past some climbable poles. | ||
|On a raised ice platform before the third ice slide. | |On a raised ice platform before the third ice slide. | ||
| Line 142: | Line 149: | ||
|Pink | |Pink | ||
|Jade Box | |Jade Box | ||
|[[File:WW Jade Box.png]] | |||
|In a small, isolated above ground area, accessed via a Bunny Spring in the ice cave where the Fattingtons are. | |In a small, isolated above ground area, accessed via a Bunny Spring in the ice cave where the Fattingtons are. | ||
|Near the goal. | |Near the goal. | ||
| Line 147: | Line 155: | ||
==Spritelings== | ==Spritelings== | ||
{|border=1 cellspacing=0 cellpadding=3 style="border-collapse:collapse" style="text-align: center; width: 100%" | {|border=1 cellspacing=0 cellpadding=3 style="border-collapse:collapse"style="text-align: center; width: 100%" | ||
!width="1%"|Color | !width="1%"|Color | ||
!width="20%"|Location | !width="20%"|Location | ||
| Line 153: | Line 161: | ||
|- | |- | ||
|Red | |Red | ||
|On top of an igloo near some | |On top of an igloo near some Sled Creatures. | ||
|'' | |"''The [[Angler Mangler]]'s weak spot hangs from its noggin! Don't bother punching its face! Attack its buddy, the [[Barrel Buster]], by smacking him in the head when he pokes it out! If you can just {{color|force it into the air|red}}...''" | ||
|- | |- | ||
|Yellow | |Yellow | ||
|Inside the second red diamond sub-level. | |Inside the second red diamond sub-level. | ||
|'' | |"''There are places in the ice caves that are too high to jump to! In those areas, why not try to use the [[Icicle Mite]]s somehow? It looks like their pointy heads might just {{color|stick right into|red}} the floor!''" | ||
|- | |- | ||
|Green | |Green | ||
|Inside the fourth red | |Inside the fourth red diamond sub-level. | ||
|'' | |"''Beware the [[Fattington]]s on the narrow roads, Wario! If they bounce you, you'll fall! It's probably safest if you can {{color|knock them unconscious|red}} before trying to get past them!''" | ||
|- | |- | ||
|Blue | |Blue | ||
|On a high ledge near some Icicle Mites, which must be used to reach it. | |On a high ledge near some Icicle Mites, which must be used to reach it. | ||
|'' | |"''This mountain is big, huh?! Collecting all the treasure here is going to be really tough! If you clear it once, there might be something useful at the Start Point when you return!''" | ||
|- | |- | ||
|Purple | |Purple | ||
|Inside the eighth red diamond sub-level. | |Inside the eighth red diamond sub-level. | ||
|'' | |"''The [[Winter Windster]] in front of the Goal will try to attack from midair. Ooh! Chilling! Listen, I bet if you stick something in one of those magma holes, magma might shoot out! Oh, one more thing... Don't look at its {{color|eyes when they turn red|red}}!''" | ||
|} | |} | ||
==Gallery== | ==Gallery== | ||
<gallery> | <gallery> | ||
Shivering Mountains Slide.jpg|Wario slides down on an ice slope | |||
Shivering Mountains Town.png|Wario next to some houses | |||
Angler Mangler.png|Wario fighting an Angler Mangler | |||
FreezeCannon.png|Wario next to a Freeze Cannon | FreezeCannon.png|Wario next to a Freeze Cannon | ||
ShiveringMountainsBattleRing1.png|The first Battle Ring | ShiveringMountainsBattleRing1.png|The first Battle Ring | ||
| Line 187: | Line 197: | ||
Shivering Mountains has two background music tracks. One plays during the above ground sections of the level, while the other plays in the ice cave. | Shivering Mountains has two background music tracks. One plays during the above ground sections of the level, while the other plays in the ice cave. | ||
{{media table | {{media table | ||
| | |file1=ShiveringMountains.oga | ||
|title1=Shivering Mountains (above ground) | |||
| | |file2=ShiveringMountainsIceCave.oga | ||
| | |title2=Shivering Mountains (ice cave) | ||
| | |||
}} | }} | ||
| Line 199: | Line 207: | ||
|Jap=ブルブルやま | |Jap=ブルブルやま | ||
|JapR=Buruburu Yama | |JapR=Buruburu Yama | ||
|JapM= | |JapM=Shivering Mountains | ||
|Ger=Bibber Berge | |Ger=Bibber Berge | ||
|GerM=Shiver Hills | |GerM=Shiver Hills | ||
|Fre=Frisson de Montagnes | |Fre=Frisson de Montagnes | ||
|FreM=Mountain's Shivers | |FreM=Mountain's Shivers | ||
|Ita=Monti dei Ghiacci | |||
|ItaM=Mountain of Ices | |||
|Spa=Hielos Perpetuos | |||
|SpaM=Perpetual Ices | |||
}} | }} | ||
{{Wario World}} | {{Wario World}} | ||
[[Category:Ice caves]] | |||
[[Category:Mountains]] | [[Category:Mountains]] | ||
[[Category:Snowscapes]] | [[Category:Snowscapes]] | ||
[[Category:Wario World | [[Category:Wario World levels]] | ||
Latest revision as of 09:54, January 13, 2024
- Not to be confused with Shiver Mountain.
| Wario World level | |
|---|---|
| Shivering Mountains | |

| |
| World | Thrillsville |
| Neighbor level | Beanstalk Way |
| Red diamond requirement |
5 |
| Boss | Winter Windster |
| << List of levels >> | |
Shivering Mountains is an icy mountain range, the first level of the Thrillsville world, and the fifth level overall in Wario World. Most of the enemies and obstacles here are ice-themed. Several large Christmas trees highlight the atmosphere, plus plenty of igloos. A common feature of this level is ice slides, which serve to complicate reaching certain areas and obtaining certain collectibles since Wario cannot backtrack up them. The boss of this level is the Winter Windster.
Level layout[edit]
The player begins next to a cottage with a Bunny Spring to help Wario get on top of it, where they will find the red treasure button. Immediately to the right, there is a large ice slide with several ramps. The bottom-most ramp on the back of the slope will help the player get up to the top of the house at the bottom of the ramp, which contains a trapdoor housing the first red diamond of the level. Behind the house are a series of platforms placed around Christmas trees that the player has to use Glue Globes to jump between. On top of the one on the left is a Gold Statue part. Back on the ground, the player can find the red treasure chest's spawn point along with the yellow treasure button to the left of the house. There is a slope here with a couple of a electric barriers that will hurt Wario if he gets too close. Afterward, there is a Garlic Dispenser before a large slope with many Sled Creatures sliding down it and a few igloos. On top of one of the igloos is the red Spriteling. To the right of the slope is an Angler Mangler, waiting for and blocking Wario. After this is another ice slide that leads to either an icy cavern below or a snowy area above, the latter of which the player has to jump off the correct ramp to reach. Another one of the ramps toward the start of the slide in the back has a Gold Statue part on it.
If Wario makes it to the snowy area, he will be immediately thrust into a battle with a yellow Crystal Entity. Other enemies in the area include Polar Bears, Snow Bombers, and an enemy generator. There are two igloos here, one of which has the blue treasure button on top of it. Behind them are several Christmas tree platforms, one of which has a wooden chest underneath it. The yellow treasure's spawn point is below the tree on the far right. Jumping through the platforms will ultimately lead to a trapdoor, with a Gold Statue part on the way. The sub-level beneath the trapdoor contains the yellow Spriteling. Once the player feels like they are done in this area, they can break a block that leads down to the icy cavern, right into the first Battle Ring.
Regardless of how the cave is entered, in order to progress through it, the player must first pass through a Battle Ring. Past this are several Icicle Mites the player can use to get over the walls. On the eastern platform is a steel trapdoor near an enemy generator. To the left of this platform is where the blue treasure spawns. To the right are a couple of poles which are placed to help the player reach the purple treasure button. Afterward are a number of bridges, with several of them having Turtles and electric barriers that impede Wario's path. To the right of the second Turtle is a steel trapdoor, and below that and to the left is a wooden trapdoor. The green Spriteling is beneath the steel trapdoor, while the wooden one contains a Gold Statue part. The bridge leading to the left of a statue leads to where the green treasure will spawn, along with the chartreuse treasure button on the wall across from the bridge that the player needs to throw an enemy into or jump and hit it to activate it. After the bridges is a tall platform where the blue Spriteling is; Wario needs to use an Icicle Mite to reach it. Nearby is an enemy generator and the green treasure button high up on the wall. To the right are more narrow bridges where Fattingtons will spawn and attempt to bounce Wario into the abyss below. On a wall at the back of this section is the cyan treasure button, while the chartreuse treasure is on a platform in the middle of the narrow pathways. There is a pathway in the back leading to the left guarded by a Fattington that leads to a Bunny Spring, which allows Wario to access an isolated above ground area with a few assorted enemies, the pink treasure button, the cyan treasure, and a Gold Statue part. The path to the right of that one leads to an Ice Ankiron, a steel trapdoor containing another Gold Statue part, and the exit of the ice cave.
Ahead is an upward slope with a few Fattingtons dropping in from above leading to a second Battle Ring, with a trapdoor housing a Gold Statue part on the way. After the Battle Ring is another fight with an Angler Mangler. To the right, there is a slope with several Freeze Cannons and Sled Creatures. Above and slightly to the right of the first Freeze Cannon in this area is a wooden chest, and near the end of it is the purple treasure's spawn point. After this is the final ice slide of the level. A ramp on the slide toward the front has a Gold Statue part on it. At the bottom of the slide is a Garlic Dispenser, ByeBye Balloons, and the pink treasure's spawn point. A pair of Glue Globes can be used to climb to the ledge above, where the player will find some Snow Bombers, an enemy generator, a steel trapdoor where the purple Spriteling awaits, and the goal.
If Wario reenters the level after defeating the boss, there will be a set of ByeBye Balloons at the beginning that will take him to the where the Turtles are.
Enemies[edit]
- Snowmen
- Polar Bears
- Snow Bombers
- Ice Ankirons
- Enemy generators
- Freeze Cannons
- Fattingtons
- Icicle Mites
- Turtles
- Sled Creatures
- Yellow Crystal Entity
- Angler Mangler
- Barrel Buster
- Winter Windster (Boss)
Red diamond sub-levels[edit]
| # | Image | Location | Description |
|---|---|---|---|
| 1 | 
|
On top of a house after the first ice slide. | This room has a stack of Rock Blocks in the middle with spiked balls rotating around them. The red diamond is on top of the stack. Wario must destroy the blocks until he can reach it. |
| 2 | 
|
Accessed by climbing up the Christmas trees in the area with two igloos above the first Battle Ring. | This room has multiple vertically-aligned platforms (one of them being a Marshmallow Block) leading up to the red diamond and yellow Spriteling. Wario must grab onto them from the left or right side then leap upward to reach them. |
| 3 | 
|
Next to an enemy generator shortly after the first Battle Ring. | Five levers control five cubic platforms; the ones on the right control the nearest platforms, while the ones one the left control the farthest platforms. The solution is to hit the one on the upper right once, ignore the one on the lower right, hit the one in the middle once, and start and stop the ones on the left so the platforms line up. There is a wooden chest with garlic next to the red diamond at the end. |
| 4 | 
|
On a circular platform to the right of a Turtle in the ice cave. | Spinning platforms make up the pathway to this red diamond. Wario must cross the platforms while avoiding sliding off. There is also a green Spriteling at the end. |
| 5 | 
|
From trapdoor #4, accessed by dropping to the narrow pathway below and going left. | There are five Rock Blocks and a lever in this room. Hitting the lever causes the blocks to light up in a random order. Wario must punch them in the order that they light up to reveal the red diamond and a Gold Statue part. |
| 6 | 
|
On a high ledge at the exit of the ice cave, near an Ice Ankiron. | The objective of this sub-level is to jump across moving platforms to reach the red diamond and Gold Statue part at the end. The first four move left and right, while the last four move back and forth. There is a stationary platform in the middle. |
| 7 | 
|
On a raised ice platform before the second Battle Ring. | This room has four vertically-aligned rings of spiked balls rotating horizontally. Each ring has a pair of Glue Globes amongst the spiked balls; Wario must cling to these and ascend upward to reach the red diamond and Gold Statue part at the top. |
| 8 | 
|
Next to the goal. | The red diamond and purple Spriteling sit amidst a cluster of moving spiked balls. |
Gold Statue parts[edit]
- On top of a Christmas tree after the first ice slide.
- On the second ice slide.
- On top of a Christmas tree in the area with two igloos above the first Battle Ring.
- Inside the fifth red diamond sub-level.
- In a small, isolated above ground area, accessed via a Bunny Spring in the ice cave where the Fattingtons are.
- Inside the sixth red diamond sub-level.
- Inside the seventh red diamond sub-level.
- On the third and final ice slide.
Treasures[edit]
| Chest color | Treasure | Image | Button location | Chest location |
|---|---|---|---|---|
| Red | Nice Glass | On top of the house at the beginning of the level. | At the bottom of the first ice slide. | |
| Yellow | Ancient Chalice | To the left of the houses at the bottom of the first ice slide. | Near the bottom of a Christmas tree in the area with two igloos above the first Battle Ring. | |
| Chartreuse | Nice Cup | 
|
On a wall in the ice cave, near some Turtles and a statue. | In the area where the first Fattingtons are. |
| Green | Ornate Decanter | 
|
On the wall above an enemy generator before where Fattingtons are first encountered. | To the left of the chartreuse treasure button, behind a Turtle. |
| Cyan | Glass Decanter | On a wall in the area where the first Fattingtons are. | In a small, isolated above ground area, accessed via a Bunny Spring in the ice cave where the Fattingtons are. | |
| Blue | Nice Saucer | On top of one of the two igloos in the area above the first Battle Ring. | To the left of where the first steel trapdoor is. | |
| Purple | Glass Bowl | 
|
To the right of the where the first steel trapdoor is, past some climbable poles. | On a raised ice platform before the third ice slide. |
| Pink | Jade Box | 
|
In a small, isolated above ground area, accessed via a Bunny Spring in the ice cave where the Fattingtons are. | Near the goal. |
Spritelings[edit]
| Color | Location | Dialogue |
|---|---|---|
| Red | On top of an igloo near some Sled Creatures. | "The Angler Mangler's weak spot hangs from its noggin! Don't bother punching its face! Attack its buddy, the Barrel Buster, by smacking him in the head when he pokes it out! If you can just force it into the air..." |
| Yellow | Inside the second red diamond sub-level. | "There are places in the ice caves that are too high to jump to! In those areas, why not try to use the Icicle Mites somehow? It looks like their pointy heads might just stick right into the floor!" |
| Green | Inside the fourth red diamond sub-level. | "Beware the Fattingtons on the narrow roads, Wario! If they bounce you, you'll fall! It's probably safest if you can knock them unconscious before trying to get past them!" |
| Blue | On a high ledge near some Icicle Mites, which must be used to reach it. | "This mountain is big, huh?! Collecting all the treasure here is going to be really tough! If you clear it once, there might be something useful at the Start Point when you return!" |
| Purple | Inside the eighth red diamond sub-level. | "The Winter Windster in front of the Goal will try to attack from midair. Ooh! Chilling! Listen, I bet if you stick something in one of those magma holes, magma might shoot out! Oh, one more thing... Don't look at its eyes when they turn red!" |
Gallery[edit]
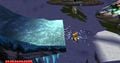
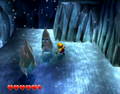
Wario slides down on an ice slope
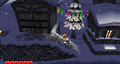
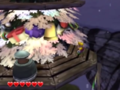
Wario next to some houses
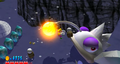
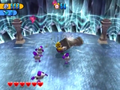
Wario fighting an Angler Mangler
Wario next to a Freeze Cannon
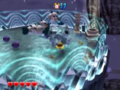
The first Battle Ring
Two Icicle Mites
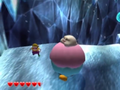
A Fattington
The second Battle Ring


Music[edit]
Shivering Mountains has two background music tracks. One plays during the above ground sections of the level, while the other plays in the ice cave.
| File info |
| File info |
Names in other languages[edit]
| Language | Name | Meaning |
|---|---|---|
| Japanese | ブルブルやま Buruburu Yama |
Shivering Mountains |
| French | Frisson de Montagnes |
Mountain's Shivers |
| German | Bibber Berge |
Shiver Hills |
| Italian | Monti dei Ghiacci |
Mountain of Ices |
| Spanish | Hielos Perpetuos |
Perpetual Ices |